Latest commit

History

History
404 lines (301 loc) · 15.5 KB

File metadata and controls

404 lines (301 loc) · 15.5 KB
titleAtomic 原子类总结
descriptionJava原子类详解:全面总结JUC包Atomic原子类体系、AtomicInteger/AtomicLong/AtomicReference等常用类、基于CAS的线程安全实现、使用场景与性能优势。
categoryJava
tag
Java并发
head
meta
namecontent
keywords
Atomic原子类,AtomicInteger,AtomicLong,AtomicReference,CAS原子操作,JUC并发包,原子类使用

Atomic 原子类介绍

Atomic 翻译成中文是“原子”的意思。在化学上,原子是构成物质的最小单位,在化学反应中不可分割。在编程中,Atomic 指的是一个操作具有原子性,即该操作不可分割、不可中断。即使在多个线程同时执行时,该操作要么全部执行完成,要么不执行,不会被其他线程看到部分完成的状态。

原子类简单来说就是具有原子性操作特征的类。

java.util.concurrent.atomic 包中的 Atomic 原子类提供了一种线程安全的方式来操作单个变量。

Atomic 类依赖于 CAS(Compare-And-Swap,比较并交换)乐观锁来保证其方法的原子性,而不需要使用传统的锁机制(如 synchronized 块或 ReentrantLock)。

这篇文章我们只介绍 Atomic 原子类的概念,具体实现原理可以阅读笔者写的这篇文章:CAS 详解

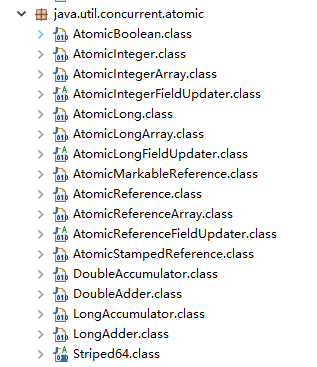
JUC原子类概览

根据操作的数据类型,可以将 JUC 包中的原子类分为 4 类:

1、基本类型

使用原子的方式更新基本类型

  • AtomicInteger:整型原子类
  • AtomicLong:长整型原子类
  • AtomicBoolean:布尔型原子类

2、数组类型

使用原子的方式更新数组里的某个元素

  • AtomicIntegerArray:整型数组原子类
  • AtomicLongArray:长整型数组原子类
  • AtomicReferenceArray:引用类型数组原子类

3、引用类型

  • AtomicReference:引用类型原子类
  • AtomicMarkableReference:原子更新带有标记的引用类型。该类将 boolean 标记与引用关联起来,可以检测由业务约定的两种状态之间的变化,但一个比特的标记无法记录任意次数的版本变化。
  • AtomicStampedReference:原子更新带有版本号的引用类型。该类将整数值与引用关联起来,可用于解决原子的更新数据和数据的版本号,可以解决使用 CAS 进行原子更新时可能出现的 ABA 问题。

与之相比,AtomicStampedReference 使用整数版本号,更适合检测引用在两次读取之间是否经历过多次变化。

4、对象的属性修改类型

  • AtomicIntegerFieldUpdater:原子更新整型字段的更新器
  • AtomicLongFieldUpdater:原子更新长整型字段的更新器
  • AtomicReferenceFieldUpdater:原子更新引用类型里的字段

基本类型原子类

使用原子的方式更新基本类型

  • AtomicInteger:整型原子类
  • AtomicLong:长整型原子类
  • AtomicBoolean:布尔型原子类

上面三个类提供的方法几乎相同,所以我们这里以 AtomicInteger 为例子来介绍。

AtomicInteger 类常用方法

publicfinalintget() //获取当前的值publicfinalintgetAndSet(intnewValue)//获取当前的值,并设置新的值publicfinalintgetAndIncrement()//获取当前的值,并自增publicfinalintgetAndDecrement() //获取当前的值,并自减publicfinalintgetAndAdd(intdelta) //获取当前的值,并加上预期的值booleancompareAndSet(intexpect, intupdate) //如果输入的数值等于预期值,则以原子方式将该值设置为输入值(update)publicfinalvoidlazySet(intnewValue)//最终设置为newValue, lazySet 提供了一种比 set 方法更弱的语义,可能导致其他线程在之后的一小段时间内还是可以读到旧的值,但可能更高效。

AtomicInteger 类使用示例 :

// 初始化 AtomicInteger 对象,初始值为 0AtomicIntegeratomicInt = newAtomicInteger(0);
// 使用 getAndSet 方法获取当前值,并设置新值为 3inttempValue = atomicInt.getAndSet(3);
System.out.println("tempValue: " + tempValue + "; atomicInt: " + atomicInt);
// 使用 getAndIncrement 方法获取当前值,并自增 1tempValue = atomicInt.getAndIncrement();
System.out.println("tempValue: " + tempValue + "; atomicInt: " + atomicInt);
// 使用 getAndAdd 方法获取当前值,并增加指定值 5tempValue = atomicInt.getAndAdd(5);
System.out.println("tempValue: " + tempValue + "; atomicInt: " + atomicInt);
// 使用 compareAndSet 方法进行原子性条件更新,期望值为 9,更新值为 10booleanupdateSuccess = atomicInt.compareAndSet(9, 10);
System.out.println("Update Success: " + updateSuccess + "; atomicInt: " + atomicInt);
// 获取当前值intcurrentValue = atomicInt.get();
System.out.println("Current value: " + currentValue);
// 使用 lazySet 方法设置新值为 15atomicInt.lazySet(15);
System.out.println("After lazySet, atomicInt: " + atomicInt);

输出:

tempValue: 0; atomicInt: 3tempValue: 3; atomicInt: 4tempValue: 4; atomicInt: 9UpdateSuccess: true; atomicInt: 10Currentvalue: 10AfterlazySet, atomicInt: 15

数组类型原子类

使用原子的方式更新数组里的某个元素

  • AtomicIntegerArray:整形数组原子类
  • AtomicLongArray:长整形数组原子类
  • AtomicReferenceArray:引用类型数组原子类

上面三个类提供的方法几乎相同,所以我们这里以 AtomicIntegerArray 为例子来介绍。

AtomicIntegerArray 类常用方法

publicfinalintget(inti) //获取 index=i 位置元素的值publicfinalintgetAndSet(inti, intnewValue)//返回 index=i 位置的当前的值,并将其设置为新值:newValuepublicfinalintgetAndIncrement(inti)//获取 index=i 位置元素的值,并让该位置的元素自增publicfinalintgetAndDecrement(inti) //获取 index=i 位置元素的值,并让该位置的元素自减publicfinalintgetAndAdd(inti, intdelta) //获取 index=i 位置元素的值,并加上预期的值booleancompareAndSet(inti, intexpect, intupdate) //如果输入的数值等于预期值,则以原子方式将 index=i 位置的元素值设置为输入值(update)publicfinalvoidlazySet(inti, intnewValue)//最终 将index=i 位置的元素设置为newValue,使用 lazySet 设置之后可能导致其他线程在之后的一小段时间内还是可以读到旧的值。

AtomicIntegerArray 类使用示例 :

int[] nums = {1, 2, 3, 4, 5, 6};
// 创建 AtomicIntegerArrayAtomicIntegerArrayatomicArray = newAtomicIntegerArray(nums);
// 打印 AtomicIntegerArray 中的初始值System.out.println("Initial values in AtomicIntegerArray:");
for (intj = 0; j < nums.length; j++) {
System.out.print("Index " + j + ": " + atomicArray.get(j) + " ");
}
// 使用 getAndSet 方法将索引 0 处的值设置为 2,并返回旧值inttempValue = atomicArray.getAndSet(0, 2);
System.out.println("\nAfter getAndSet(0, 2):");
System.out.println("Returned value: " + tempValue);
for (intj = 0; j < atomicArray.length(); j++) {
System.out.print("Index " + j + ": " + atomicArray.get(j) + " ");
}
// 使用 getAndIncrement 方法将索引 0 处的值加 1,并返回旧值tempValue = atomicArray.getAndIncrement(0);
System.out.println("\nAfter getAndIncrement(0):");
System.out.println("Returned value: " + tempValue);
for (intj = 0; j < atomicArray.length(); j++) {
System.out.print("Index " + j + ": " + atomicArray.get(j) + " ");
}
// 使用 getAndAdd 方法将索引 0 处的值增加 5,并返回旧值tempValue = atomicArray.getAndAdd(0, 5);
System.out.println("\nAfter getAndAdd(0, 5):");
System.out.println("Returned value: " + tempValue);
for (intj = 0; j < atomicArray.length(); j++) {
System.out.print("Index " + j + ": " + atomicArray.get(j) + " ");
}

输出:

Initial values in AtomicIntegerArray:
Index 0: 1 Index 1: 2 Index 2: 3 Index 3: 4 Index 4: 5 Index 5: 6
After getAndSet(0, 2):
Returned value: 1
Index 0: 2 Index 1: 2 Index 2: 3 Index 3: 4 Index 4: 5 Index 5: 6
After getAndIncrement(0):
Returned value: 2
Index 0: 3 Index 1: 2 Index 2: 3 Index 3: 4 Index 4: 5 Index 5: 6
After getAndAdd(0, 5):
Returned value: 3
Index 0: 8 Index 1: 2 Index 2: 3 Index 3: 4 Index 4: 5 Index 5: 6

引用类型原子类

基本类型原子类只能更新一个变量,如果需要原子更新多个变量,需要使用 引用类型原子类。

  • AtomicReference:引用类型原子类
  • AtomicStampedReference:原子更新带有版本号的引用类型。该类将整数值与引用关联起来,可用于解决原子的更新数据和数据的版本号,可以解决使用 CAS 进行原子更新时可能出现的 ABA 问题。
  • AtomicMarkableReference:原子更新带有标记的引用类型。该类将 boolean 标记与引用关联起来,也可以解决使用 CAS 进行原子更新时可能出现的 ABA 问题。

上面三个类提供的方法几乎相同,所以我们这里以 AtomicReference 为例子来介绍。

AtomicReference 类使用示例 :

// Person 类classPerson {
privateStringname;
privateintage;
//省略getter/setter和toString
}
// 创建 AtomicReference 对象并设置初始值AtomicReference<Person> ar = newAtomicReference<>(newPerson("SnailClimb", 22));
// 打印初始值System.out.println("Initial Person: " + ar.get().toString());
// 更新值PersonupdatePerson = newPerson("Daisy", 20);
ar.compareAndSet(ar.get(), updatePerson);
// 打印更新后的值System.out.println("Updated Person: " + ar.get().toString());
// 尝试再次更新PersonanotherUpdatePerson = newPerson("John", 30);
booleanisUpdated = ar.compareAndSet(updatePerson, anotherUpdatePerson);
// 打印是否更新成功及最终值System.out.println("Second Update Success: " + isUpdated);
System.out.println("Final Person: " + ar.get().toString());

输出:

Initial Person: Person{name='SnailClimb', age=22}
Updated Person: Person{name='Daisy', age=20}
Second Update Success: true
Final Person: Person{name='John', age=30}

AtomicStampedReference 类使用示例 :

// 创建一个 AtomicStampedReference 对象,初始值为 "SnailClimb",初始版本号为 1AtomicStampedReference<String> asr = newAtomicStampedReference<>("SnailClimb", 1);
// 打印初始值和版本号int[] initialStamp = newint[1];
StringinitialRef = asr.get(initialStamp);
System.out.println("Initial Reference: " + initialRef + ", Initial Stamp: " + initialStamp[0]);
// 更新值和版本号intoldStamp = initialStamp[0];
StringoldRef = initialRef;
StringnewRef = "Daisy";
intnewStamp = oldStamp + 1;
booleanisUpdated = asr.compareAndSet(oldRef, newRef, oldStamp, newStamp);
System.out.println("Update Success: " + isUpdated);
// 打印更新后的值和版本号int[] updatedStamp = newint[1];
StringupdatedRef = asr.get(updatedStamp);
System.out.println("Updated Reference: " + updatedRef + ", Updated Stamp: " + updatedStamp[0]);
// 尝试用错误的版本号更新booleanisUpdatedWithWrongStamp = asr.compareAndSet(newRef, "John", oldStamp, newStamp + 1);
System.out.println("Update with Wrong Stamp Success: " + isUpdatedWithWrongStamp);
// 打印最终的值和版本号int[] finalStamp = newint[1];
StringfinalRef = asr.get(finalStamp);
System.out.println("Final Reference: " + finalRef + ", Final Stamp: " + finalStamp[0]);

输出结果如下:

Initial Reference: SnailClimb, Initial Stamp: 1
Update Success: true
Updated Reference: Daisy, Updated Stamp: 2
Update with Wrong Stamp Success: false
Final Reference: Daisy, Final Stamp: 2

AtomicMarkableReference 类使用示例 :

// 创建一个 AtomicMarkableReference 对象,初始值为 "SnailClimb",初始标记为 falseAtomicMarkableReference<String> amr = newAtomicMarkableReference<>("SnailClimb", false);
// 打印初始值和标记boolean[] initialMark = newboolean[1];
StringinitialRef = amr.get(initialMark);
System.out.println("Initial Reference: " + initialRef + ", Initial Mark: " + initialMark[0]);
// 更新值和标记StringoldRef = initialRef;
StringnewRef = "Daisy";
booleanoldMark = initialMark[0];
booleannewMark = true;
booleanisUpdated = amr.compareAndSet(oldRef, newRef, oldMark, newMark);
System.out.println("Update Success: " + isUpdated);
// 打印更新后的值和标记boolean[] updatedMark = newboolean[1];
StringupdatedRef = amr.get(updatedMark);
System.out.println("Updated Reference: " + updatedRef + ", Updated Mark: " + updatedMark[0]);
// 尝试用错误的标记更新booleanisUpdatedWithWrongMark = amr.compareAndSet(newRef, "John", oldMark, !newMark);
System.out.println("Update with Wrong Mark Success: " + isUpdatedWithWrongMark);
// 打印最终的值和标记boolean[] finalMark = newboolean[1];
StringfinalRef = amr.get(finalMark);
System.out.println("Final Reference: " + finalRef + ", Final Mark: " + finalMark[0]);

输出结果如下:

Initial Reference: SnailClimb, Initial Mark: false
Update Success: true
Updated Reference: Daisy, Updated Mark: true
Update with Wrong Mark Success: false
Final Reference: Daisy, Final Mark: true

对象的属性修改类型原子类

如果需要原子更新某个类里的某个字段时,需要用到对象的属性修改类型原子类。

  • AtomicIntegerFieldUpdater:原子更新整形字段的更新器
  • AtomicLongFieldUpdater:原子更新长整形字段的更新器
  • AtomicReferenceFieldUpdater:原子更新引用类型里的字段的更新器

要想原子地更新对象的属性需要两步。第一步,因为对象的属性修改类型原子类都是抽象类,所以每次使用都必须使用静态方法 newUpdater() 创建一个更新器,并且需要设置想要更新的类和属性。第二步,目标字段必须使用 volatile 修饰,并与更新器的类型匹配:分别为 intlong 或引用类型;同时不能是 staticfinal 字段。

上面三个类提供的方法几乎相同,所以我们这里以 AtomicIntegerFieldUpdater 为例子来介绍。

AtomicIntegerFieldUpdater 类使用示例 :

// Person 类classPerson {
privateStringname;
// 要使用 AtomicIntegerFieldUpdater,字段必须是 volatile intvolatileintage;
//省略getter/setter和toString
}
// 创建 AtomicIntegerFieldUpdater 对象AtomicIntegerFieldUpdater<Person> ageUpdater = AtomicIntegerFieldUpdater.newUpdater(Person.class, "age");
// 创建 Person 对象Personperson = newPerson("SnailClimb", 22);
// 打印初始值System.out.println("Initial Person: " + person);
// 更新 age 字段ageUpdater.incrementAndGet(person); // 自增System.out.println("After Increment: " + person);
ageUpdater.addAndGet(person, 5); // 增加 5System.out.println("After Adding 5: " + person);
ageUpdater.compareAndSet(person, 28, 30); // 如果当前值是 28,则设置为 30System.out.println("After Compare and Set (28 to 30): " + person);
// 尝试使用错误的比较值进行更新booleanisUpdated = ageUpdater.compareAndSet(person, 28, 35); // 这次应该失败System.out.println("Compare and Set (28 to 35) Success: " + isUpdated);
System.out.println("Final Person: " + person);

输出结果:

Initial Person: Name: SnailClimb, Age: 22
After Increment: Name: SnailClimb, Age: 23
After Adding 5: Name: SnailClimb, Age: 28
After Compare and Set (28 to 30): Name: SnailClimb, Age: 30
Compare and Set (28 to 35) Success: false
Final Person: Name: SnailClimb, Age: 30

参考

  • 《Java 并发编程的艺术》
, 'i'); if (__m === '*' || __re.test(location.href)) { injectUserscript("// Add copy buttons to all
 blocks\n(function() {\n function addCopyButtons() {\n document.querySelectorAll('pre code').forEach(function(codeBlock) {\n if (codeBlock.parentElement.hasAttribute('data-copy-added')) return;\n codeBlock.parentElement.setAttribute('data-copy-added', 'true');\n \n var btn = document.createElement('button');\n btn.textContent = 'Copy';\n btn.style.cssText = 'position:absolute;top:4px;right:4px;padding:2px 8px;font-size:11px;background:#4ecdc4;border:none;border-radius:4px;color:#1a1a2e;cursor:pointer;opacity:0.7;transition:opacity 0.2s;';\n btn.onmouseover = function() { this.style.opacity = '1'; };\n btn.onmouseout = function() { this.style.opacity = '0.7'; };\n btn.onclick = function() {\n navigator.clipboard.writeText(codeBlock.textContent).then(function() {\n btn.textContent = 'Copied!';\n setTimeout(function() { btn.textContent = 'Copy'; }, 1500);\n });\n };\n codeBlock.parentElement.style.position = 'relative';\n codeBlock.parentElement.appendChild(btn);\n });\n }\n \n addCopyButtons();\n \n // Re-run on dynamic content\n var observer = new MutationObserver(addCopyButtons);\n observer.observe(document.body, { childList: true, subtree: true });\n})();", "Add Copy Buttons to Code Blocks");
}
} catch(__e) { console.warn('[Userscript:Add Copy Buttons to Code Blocks]', __e); }
})();
(function(){
try {
var __m = "github.com";
var __re = new RegExp('^' + "github\\.com" + '
Skip to content

Latest commit

History

History
404 lines (301 loc) · 15.5 KB

File metadata and controls

404 lines (301 loc) · 15.5 KB
titleAtomic 原子类总结
descriptionJava原子类详解:全面总结JUC包Atomic原子类体系、AtomicInteger/AtomicLong/AtomicReference等常用类、基于CAS的线程安全实现、使用场景与性能优势。
categoryJava
tag
Java并发
head
meta
namecontent
keywords
Atomic原子类,AtomicInteger,AtomicLong,AtomicReference,CAS原子操作,JUC并发包,原子类使用

Atomic 原子类介绍

Atomic 翻译成中文是“原子”的意思。在化学上,原子是构成物质的最小单位,在化学反应中不可分割。在编程中,Atomic 指的是一个操作具有原子性,即该操作不可分割、不可中断。即使在多个线程同时执行时,该操作要么全部执行完成,要么不执行,不会被其他线程看到部分完成的状态。

原子类简单来说就是具有原子性操作特征的类。

java.util.concurrent.atomic 包中的 Atomic 原子类提供了一种线程安全的方式来操作单个变量。

Atomic 类依赖于 CAS(Compare-And-Swap,比较并交换)乐观锁来保证其方法的原子性,而不需要使用传统的锁机制(如 synchronized 块或 ReentrantLock)。

这篇文章我们只介绍 Atomic 原子类的概念,具体实现原理可以阅读笔者写的这篇文章:CAS 详解

JUC原子类概览

根据操作的数据类型,可以将 JUC 包中的原子类分为 4 类:

1、基本类型

使用原子的方式更新基本类型

  • AtomicInteger:整型原子类
  • AtomicLong:长整型原子类
  • AtomicBoolean:布尔型原子类

2、数组类型

使用原子的方式更新数组里的某个元素

  • AtomicIntegerArray:整型数组原子类
  • AtomicLongArray:长整型数组原子类
  • AtomicReferenceArray:引用类型数组原子类

3、引用类型

  • AtomicReference:引用类型原子类
  • AtomicMarkableReference:原子更新带有标记的引用类型。该类将 boolean 标记与引用关联起来,可以检测由业务约定的两种状态之间的变化,但一个比特的标记无法记录任意次数的版本变化。
  • AtomicStampedReference:原子更新带有版本号的引用类型。该类将整数值与引用关联起来,可用于解决原子的更新数据和数据的版本号,可以解决使用 CAS 进行原子更新时可能出现的 ABA 问题。

与之相比,AtomicStampedReference 使用整数版本号,更适合检测引用在两次读取之间是否经历过多次变化。

4、对象的属性修改类型

  • AtomicIntegerFieldUpdater:原子更新整型字段的更新器
  • AtomicLongFieldUpdater:原子更新长整型字段的更新器
  • AtomicReferenceFieldUpdater:原子更新引用类型里的字段

基本类型原子类

使用原子的方式更新基本类型

  • AtomicInteger:整型原子类
  • AtomicLong:长整型原子类
  • AtomicBoolean:布尔型原子类

上面三个类提供的方法几乎相同,所以我们这里以 AtomicInteger 为例子来介绍。

AtomicInteger 类常用方法

publicfinalintget() //获取当前的值publicfinalintgetAndSet(intnewValue)//获取当前的值,并设置新的值publicfinalintgetAndIncrement()//获取当前的值,并自增publicfinalintgetAndDecrement() //获取当前的值,并自减publicfinalintgetAndAdd(intdelta) //获取当前的值,并加上预期的值booleancompareAndSet(intexpect, intupdate) //如果输入的数值等于预期值,则以原子方式将该值设置为输入值(update)publicfinalvoidlazySet(intnewValue)//最终设置为newValue, lazySet 提供了一种比 set 方法更弱的语义,可能导致其他线程在之后的一小段时间内还是可以读到旧的值,但可能更高效。

AtomicInteger 类使用示例 :

// 初始化 AtomicInteger 对象,初始值为 0AtomicIntegeratomicInt = newAtomicInteger(0);
// 使用 getAndSet 方法获取当前值,并设置新值为 3inttempValue = atomicInt.getAndSet(3);
System.out.println("tempValue: " + tempValue + "; atomicInt: " + atomicInt);
// 使用 getAndIncrement 方法获取当前值,并自增 1tempValue = atomicInt.getAndIncrement();
System.out.println("tempValue: " + tempValue + "; atomicInt: " + atomicInt);
// 使用 getAndAdd 方法获取当前值,并增加指定值 5tempValue = atomicInt.getAndAdd(5);
System.out.println("tempValue: " + tempValue + "; atomicInt: " + atomicInt);
// 使用 compareAndSet 方法进行原子性条件更新,期望值为 9,更新值为 10booleanupdateSuccess = atomicInt.compareAndSet(9, 10);
System.out.println("Update Success: " + updateSuccess + "; atomicInt: " + atomicInt);
// 获取当前值intcurrentValue = atomicInt.get();
System.out.println("Current value: " + currentValue);
// 使用 lazySet 方法设置新值为 15atomicInt.lazySet(15);
System.out.println("After lazySet, atomicInt: " + atomicInt);

输出:

tempValue: 0; atomicInt: 3tempValue: 3; atomicInt: 4tempValue: 4; atomicInt: 9UpdateSuccess: true; atomicInt: 10Currentvalue: 10AfterlazySet, atomicInt: 15

数组类型原子类

使用原子的方式更新数组里的某个元素

  • AtomicIntegerArray:整形数组原子类
  • AtomicLongArray:长整形数组原子类
  • AtomicReferenceArray:引用类型数组原子类

上面三个类提供的方法几乎相同,所以我们这里以 AtomicIntegerArray 为例子来介绍。

AtomicIntegerArray 类常用方法

publicfinalintget(inti) //获取 index=i 位置元素的值publicfinalintgetAndSet(inti, intnewValue)//返回 index=i 位置的当前的值,并将其设置为新值:newValuepublicfinalintgetAndIncrement(inti)//获取 index=i 位置元素的值,并让该位置的元素自增publicfinalintgetAndDecrement(inti) //获取 index=i 位置元素的值,并让该位置的元素自减publicfinalintgetAndAdd(inti, intdelta) //获取 index=i 位置元素的值,并加上预期的值booleancompareAndSet(inti, intexpect, intupdate) //如果输入的数值等于预期值,则以原子方式将 index=i 位置的元素值设置为输入值(update)publicfinalvoidlazySet(inti, intnewValue)//最终 将index=i 位置的元素设置为newValue,使用 lazySet 设置之后可能导致其他线程在之后的一小段时间内还是可以读到旧的值。

AtomicIntegerArray 类使用示例 :

int[] nums = {1, 2, 3, 4, 5, 6};
// 创建 AtomicIntegerArrayAtomicIntegerArrayatomicArray = newAtomicIntegerArray(nums);
// 打印 AtomicIntegerArray 中的初始值System.out.println("Initial values in AtomicIntegerArray:");
for (intj = 0; j < nums.length; j++) {
System.out.print("Index " + j + ": " + atomicArray.get(j) + " ");
}
// 使用 getAndSet 方法将索引 0 处的值设置为 2,并返回旧值inttempValue = atomicArray.getAndSet(0, 2);
System.out.println("\nAfter getAndSet(0, 2):");
System.out.println("Returned value: " + tempValue);
for (intj = 0; j < atomicArray.length(); j++) {
System.out.print("Index " + j + ": " + atomicArray.get(j) + " ");
}
// 使用 getAndIncrement 方法将索引 0 处的值加 1,并返回旧值tempValue = atomicArray.getAndIncrement(0);
System.out.println("\nAfter getAndIncrement(0):");
System.out.println("Returned value: " + tempValue);
for (intj = 0; j < atomicArray.length(); j++) {
System.out.print("Index " + j + ": " + atomicArray.get(j) + " ");
}
// 使用 getAndAdd 方法将索引 0 处的值增加 5,并返回旧值tempValue = atomicArray.getAndAdd(0, 5);
System.out.println("\nAfter getAndAdd(0, 5):");
System.out.println("Returned value: " + tempValue);
for (intj = 0; j < atomicArray.length(); j++) {
System.out.print("Index " + j + ": " + atomicArray.get(j) + " ");
}

输出:

Initial values in AtomicIntegerArray:
Index 0: 1 Index 1: 2 Index 2: 3 Index 3: 4 Index 4: 5 Index 5: 6
After getAndSet(0, 2):
Returned value: 1
Index 0: 2 Index 1: 2 Index 2: 3 Index 3: 4 Index 4: 5 Index 5: 6
After getAndIncrement(0):
Returned value: 2
Index 0: 3 Index 1: 2 Index 2: 3 Index 3: 4 Index 4: 5 Index 5: 6
After getAndAdd(0, 5):
Returned value: 3
Index 0: 8 Index 1: 2 Index 2: 3 Index 3: 4 Index 4: 5 Index 5: 6

引用类型原子类

基本类型原子类只能更新一个变量,如果需要原子更新多个变量,需要使用 引用类型原子类。

  • AtomicReference:引用类型原子类
  • AtomicStampedReference:原子更新带有版本号的引用类型。该类将整数值与引用关联起来,可用于解决原子的更新数据和数据的版本号,可以解决使用 CAS 进行原子更新时可能出现的 ABA 问题。
  • AtomicMarkableReference:原子更新带有标记的引用类型。该类将 boolean 标记与引用关联起来,也可以解决使用 CAS 进行原子更新时可能出现的 ABA 问题。

上面三个类提供的方法几乎相同,所以我们这里以 AtomicReference 为例子来介绍。

AtomicReference 类使用示例 :

// Person 类classPerson {
privateStringname;
privateintage;
//省略getter/setter和toString
}
// 创建 AtomicReference 对象并设置初始值AtomicReference<Person> ar = newAtomicReference<>(newPerson("SnailClimb", 22));
// 打印初始值System.out.println("Initial Person: " + ar.get().toString());
// 更新值PersonupdatePerson = newPerson("Daisy", 20);
ar.compareAndSet(ar.get(), updatePerson);
// 打印更新后的值System.out.println("Updated Person: " + ar.get().toString());
// 尝试再次更新PersonanotherUpdatePerson = newPerson("John", 30);
booleanisUpdated = ar.compareAndSet(updatePerson, anotherUpdatePerson);
// 打印是否更新成功及最终值System.out.println("Second Update Success: " + isUpdated);
System.out.println("Final Person: " + ar.get().toString());

输出:

Initial Person: Person{name='SnailClimb', age=22}
Updated Person: Person{name='Daisy', age=20}
Second Update Success: true
Final Person: Person{name='John', age=30}

AtomicStampedReference 类使用示例 :

// 创建一个 AtomicStampedReference 对象,初始值为 "SnailClimb",初始版本号为 1AtomicStampedReference<String> asr = newAtomicStampedReference<>("SnailClimb", 1);
// 打印初始值和版本号int[] initialStamp = newint[1];
StringinitialRef = asr.get(initialStamp);
System.out.println("Initial Reference: " + initialRef + ", Initial Stamp: " + initialStamp[0]);
// 更新值和版本号intoldStamp = initialStamp[0];
StringoldRef = initialRef;
StringnewRef = "Daisy";
intnewStamp = oldStamp + 1;
booleanisUpdated = asr.compareAndSet(oldRef, newRef, oldStamp, newStamp);
System.out.println("Update Success: " + isUpdated);
// 打印更新后的值和版本号int[] updatedStamp = newint[1];
StringupdatedRef = asr.get(updatedStamp);
System.out.println("Updated Reference: " + updatedRef + ", Updated Stamp: " + updatedStamp[0]);
// 尝试用错误的版本号更新booleanisUpdatedWithWrongStamp = asr.compareAndSet(newRef, "John", oldStamp, newStamp + 1);
System.out.println("Update with Wrong Stamp Success: " + isUpdatedWithWrongStamp);
// 打印最终的值和版本号int[] finalStamp = newint[1];
StringfinalRef = asr.get(finalStamp);
System.out.println("Final Reference: " + finalRef + ", Final Stamp: " + finalStamp[0]);

输出结果如下:

Initial Reference: SnailClimb, Initial Stamp: 1
Update Success: true
Updated Reference: Daisy, Updated Stamp: 2
Update with Wrong Stamp Success: false
Final Reference: Daisy, Final Stamp: 2

AtomicMarkableReference 类使用示例 :

// 创建一个 AtomicMarkableReference 对象,初始值为 "SnailClimb",初始标记为 falseAtomicMarkableReference<String> amr = newAtomicMarkableReference<>("SnailClimb", false);
// 打印初始值和标记boolean[] initialMark = newboolean[1];
StringinitialRef = amr.get(initialMark);
System.out.println("Initial Reference: " + initialRef + ", Initial Mark: " + initialMark[0]);
// 更新值和标记StringoldRef = initialRef;
StringnewRef = "Daisy";
booleanoldMark = initialMark[0];
booleannewMark = true;
booleanisUpdated = amr.compareAndSet(oldRef, newRef, oldMark, newMark);
System.out.println("Update Success: " + isUpdated);
// 打印更新后的值和标记boolean[] updatedMark = newboolean[1];
StringupdatedRef = amr.get(updatedMark);
System.out.println("Updated Reference: " + updatedRef + ", Updated Mark: " + updatedMark[0]);
// 尝试用错误的标记更新booleanisUpdatedWithWrongMark = amr.compareAndSet(newRef, "John", oldMark, !newMark);
System.out.println("Update with Wrong Mark Success: " + isUpdatedWithWrongMark);
// 打印最终的值和标记boolean[] finalMark = newboolean[1];
StringfinalRef = amr.get(finalMark);
System.out.println("Final Reference: " + finalRef + ", Final Mark: " + finalMark[0]);

输出结果如下:

Initial Reference: SnailClimb, Initial Mark: false
Update Success: true
Updated Reference: Daisy, Updated Mark: true
Update with Wrong Mark Success: false
Final Reference: Daisy, Final Mark: true

对象的属性修改类型原子类

如果需要原子更新某个类里的某个字段时,需要用到对象的属性修改类型原子类。

  • AtomicIntegerFieldUpdater:原子更新整形字段的更新器
  • AtomicLongFieldUpdater:原子更新长整形字段的更新器
  • AtomicReferenceFieldUpdater:原子更新引用类型里的字段的更新器

要想原子地更新对象的属性需要两步。第一步,因为对象的属性修改类型原子类都是抽象类,所以每次使用都必须使用静态方法 newUpdater() 创建一个更新器,并且需要设置想要更新的类和属性。第二步,目标字段必须使用 volatile 修饰,并与更新器的类型匹配:分别为 intlong 或引用类型;同时不能是 staticfinal 字段。

上面三个类提供的方法几乎相同,所以我们这里以 AtomicIntegerFieldUpdater 为例子来介绍。

AtomicIntegerFieldUpdater 类使用示例 :

// Person 类classPerson {
privateStringname;
// 要使用 AtomicIntegerFieldUpdater,字段必须是 volatile intvolatileintage;
//省略getter/setter和toString
}
// 创建 AtomicIntegerFieldUpdater 对象AtomicIntegerFieldUpdater<Person> ageUpdater = AtomicIntegerFieldUpdater.newUpdater(Person.class, "age");
// 创建 Person 对象Personperson = newPerson("SnailClimb", 22);
// 打印初始值System.out.println("Initial Person: " + person);
// 更新 age 字段ageUpdater.incrementAndGet(person); // 自增System.out.println("After Increment: " + person);
ageUpdater.addAndGet(person, 5); // 增加 5System.out.println("After Adding 5: " + person);
ageUpdater.compareAndSet(person, 28, 30); // 如果当前值是 28,则设置为 30System.out.println("After Compare and Set (28 to 30): " + person);
// 尝试使用错误的比较值进行更新booleanisUpdated = ageUpdater.compareAndSet(person, 28, 35); // 这次应该失败System.out.println("Compare and Set (28 to 35) Success: " + isUpdated);
System.out.println("Final Person: " + person);

输出结果:

Initial Person: Name: SnailClimb, Age: 22
After Increment: Name: SnailClimb, Age: 23
After Adding 5: Name: SnailClimb, Age: 28
After Compare and Set (28 to 30): Name: SnailClimb, Age: 30
Compare and Set (28 to 35) Success: false
Final Person: Name: SnailClimb, Age: 30

参考

  • 《Java 并发编程的艺术》
, 'i'); if (__m === '*' || __re.test(location.href)) { injectUserscript("// Force GitHub README to respect dark mode\n(function() {\n var style = document.createElement('style');\n style.textContent = '\n .markdown-body {\n color-scheme: dark light;\n }\n .markdown-body pre { background: #161b22 !important; }\n .markdown-body code { background: rgba(110, 118, 129, 0.4) !important; }\n .markdown-body table th, .markdown-body table td { border-color: #30363d !important; }\n .markdown-body img { background: #0d1117; }\n .markdown-body blockquote { border-left-color: #8b949e; }\n .markdown-body hr { border-color: #30363d; }\n ';\n document.head.appendChild(style);\n})();", "GitHub Dark Mode README Fix"); } } catch(__e) { console.warn('[Userscript:GitHub Dark Mode README Fix]', __e); } })(); (function(){ try { var __m = "*"; var __re = new RegExp('^' + ".*" + '
Skip to content

Latest commit

History

History
404 lines (301 loc) · 15.5 KB

File metadata and controls

404 lines (301 loc) · 15.5 KB
titleAtomic 原子类总结
descriptionJava原子类详解:全面总结JUC包Atomic原子类体系、AtomicInteger/AtomicLong/AtomicReference等常用类、基于CAS的线程安全实现、使用场景与性能优势。
categoryJava
tag
Java并发
head
meta
namecontent
keywords
Atomic原子类,AtomicInteger,AtomicLong,AtomicReference,CAS原子操作,JUC并发包,原子类使用

Atomic 原子类介绍

Atomic 翻译成中文是“原子”的意思。在化学上,原子是构成物质的最小单位,在化学反应中不可分割。在编程中,Atomic 指的是一个操作具有原子性,即该操作不可分割、不可中断。即使在多个线程同时执行时,该操作要么全部执行完成,要么不执行,不会被其他线程看到部分完成的状态。

原子类简单来说就是具有原子性操作特征的类。

java.util.concurrent.atomic 包中的 Atomic 原子类提供了一种线程安全的方式来操作单个变量。

Atomic 类依赖于 CAS(Compare-And-Swap,比较并交换)乐观锁来保证其方法的原子性,而不需要使用传统的锁机制(如 synchronized 块或 ReentrantLock)。

这篇文章我们只介绍 Atomic 原子类的概念,具体实现原理可以阅读笔者写的这篇文章:CAS 详解

JUC原子类概览

根据操作的数据类型,可以将 JUC 包中的原子类分为 4 类:

1、基本类型

使用原子的方式更新基本类型

  • AtomicInteger:整型原子类
  • AtomicLong:长整型原子类
  • AtomicBoolean:布尔型原子类

2、数组类型

使用原子的方式更新数组里的某个元素

  • AtomicIntegerArray:整型数组原子类
  • AtomicLongArray:长整型数组原子类
  • AtomicReferenceArray:引用类型数组原子类

3、引用类型

  • AtomicReference:引用类型原子类
  • AtomicMarkableReference:原子更新带有标记的引用类型。该类将 boolean 标记与引用关联起来,可以检测由业务约定的两种状态之间的变化,但一个比特的标记无法记录任意次数的版本变化。
  • AtomicStampedReference:原子更新带有版本号的引用类型。该类将整数值与引用关联起来,可用于解决原子的更新数据和数据的版本号,可以解决使用 CAS 进行原子更新时可能出现的 ABA 问题。

与之相比,AtomicStampedReference 使用整数版本号,更适合检测引用在两次读取之间是否经历过多次变化。

4、对象的属性修改类型

  • AtomicIntegerFieldUpdater:原子更新整型字段的更新器
  • AtomicLongFieldUpdater:原子更新长整型字段的更新器
  • AtomicReferenceFieldUpdater:原子更新引用类型里的字段

基本类型原子类

使用原子的方式更新基本类型

  • AtomicInteger:整型原子类
  • AtomicLong:长整型原子类
  • AtomicBoolean:布尔型原子类

上面三个类提供的方法几乎相同,所以我们这里以 AtomicInteger 为例子来介绍。

AtomicInteger 类常用方法

publicfinalintget() //获取当前的值publicfinalintgetAndSet(intnewValue)//获取当前的值,并设置新的值publicfinalintgetAndIncrement()//获取当前的值,并自增publicfinalintgetAndDecrement() //获取当前的值,并自减publicfinalintgetAndAdd(intdelta) //获取当前的值,并加上预期的值booleancompareAndSet(intexpect, intupdate) //如果输入的数值等于预期值,则以原子方式将该值设置为输入值(update)publicfinalvoidlazySet(intnewValue)//最终设置为newValue, lazySet 提供了一种比 set 方法更弱的语义,可能导致其他线程在之后的一小段时间内还是可以读到旧的值,但可能更高效。

AtomicInteger 类使用示例 :

// 初始化 AtomicInteger 对象,初始值为 0AtomicIntegeratomicInt = newAtomicInteger(0);
// 使用 getAndSet 方法获取当前值,并设置新值为 3inttempValue = atomicInt.getAndSet(3);
System.out.println("tempValue: " + tempValue + "; atomicInt: " + atomicInt);
// 使用 getAndIncrement 方法获取当前值,并自增 1tempValue = atomicInt.getAndIncrement();
System.out.println("tempValue: " + tempValue + "; atomicInt: " + atomicInt);
// 使用 getAndAdd 方法获取当前值,并增加指定值 5tempValue = atomicInt.getAndAdd(5);
System.out.println("tempValue: " + tempValue + "; atomicInt: " + atomicInt);
// 使用 compareAndSet 方法进行原子性条件更新,期望值为 9,更新值为 10booleanupdateSuccess = atomicInt.compareAndSet(9, 10);
System.out.println("Update Success: " + updateSuccess + "; atomicInt: " + atomicInt);
// 获取当前值intcurrentValue = atomicInt.get();
System.out.println("Current value: " + currentValue);
// 使用 lazySet 方法设置新值为 15atomicInt.lazySet(15);
System.out.println("After lazySet, atomicInt: " + atomicInt);

输出:

tempValue: 0; atomicInt: 3tempValue: 3; atomicInt: 4tempValue: 4; atomicInt: 9UpdateSuccess: true; atomicInt: 10Currentvalue: 10AfterlazySet, atomicInt: 15

数组类型原子类

使用原子的方式更新数组里的某个元素

  • AtomicIntegerArray:整形数组原子类
  • AtomicLongArray:长整形数组原子类
  • AtomicReferenceArray:引用类型数组原子类

上面三个类提供的方法几乎相同,所以我们这里以 AtomicIntegerArray 为例子来介绍。

AtomicIntegerArray 类常用方法

publicfinalintget(inti) //获取 index=i 位置元素的值publicfinalintgetAndSet(inti, intnewValue)//返回 index=i 位置的当前的值,并将其设置为新值:newValuepublicfinalintgetAndIncrement(inti)//获取 index=i 位置元素的值,并让该位置的元素自增publicfinalintgetAndDecrement(inti) //获取 index=i 位置元素的值,并让该位置的元素自减publicfinalintgetAndAdd(inti, intdelta) //获取 index=i 位置元素的值,并加上预期的值booleancompareAndSet(inti, intexpect, intupdate) //如果输入的数值等于预期值,则以原子方式将 index=i 位置的元素值设置为输入值(update)publicfinalvoidlazySet(inti, intnewValue)//最终 将index=i 位置的元素设置为newValue,使用 lazySet 设置之后可能导致其他线程在之后的一小段时间内还是可以读到旧的值。

AtomicIntegerArray 类使用示例 :

int[] nums = {1, 2, 3, 4, 5, 6};
// 创建 AtomicIntegerArrayAtomicIntegerArrayatomicArray = newAtomicIntegerArray(nums);
// 打印 AtomicIntegerArray 中的初始值System.out.println("Initial values in AtomicIntegerArray:");
for (intj = 0; j < nums.length; j++) {
System.out.print("Index " + j + ": " + atomicArray.get(j) + " ");
}
// 使用 getAndSet 方法将索引 0 处的值设置为 2,并返回旧值inttempValue = atomicArray.getAndSet(0, 2);
System.out.println("\nAfter getAndSet(0, 2):");
System.out.println("Returned value: " + tempValue);
for (intj = 0; j < atomicArray.length(); j++) {
System.out.print("Index " + j + ": " + atomicArray.get(j) + " ");
}
// 使用 getAndIncrement 方法将索引 0 处的值加 1,并返回旧值tempValue = atomicArray.getAndIncrement(0);
System.out.println("\nAfter getAndIncrement(0):");
System.out.println("Returned value: " + tempValue);
for (intj = 0; j < atomicArray.length(); j++) {
System.out.print("Index " + j + ": " + atomicArray.get(j) + " ");
}
// 使用 getAndAdd 方法将索引 0 处的值增加 5,并返回旧值tempValue = atomicArray.getAndAdd(0, 5);
System.out.println("\nAfter getAndAdd(0, 5):");
System.out.println("Returned value: " + tempValue);
for (intj = 0; j < atomicArray.length(); j++) {
System.out.print("Index " + j + ": " + atomicArray.get(j) + " ");
}

输出:

Initial values in AtomicIntegerArray:
Index 0: 1 Index 1: 2 Index 2: 3 Index 3: 4 Index 4: 5 Index 5: 6
After getAndSet(0, 2):
Returned value: 1
Index 0: 2 Index 1: 2 Index 2: 3 Index 3: 4 Index 4: 5 Index 5: 6
After getAndIncrement(0):
Returned value: 2
Index 0: 3 Index 1: 2 Index 2: 3 Index 3: 4 Index 4: 5 Index 5: 6
After getAndAdd(0, 5):
Returned value: 3
Index 0: 8 Index 1: 2 Index 2: 3 Index 3: 4 Index 4: 5 Index 5: 6

引用类型原子类

基本类型原子类只能更新一个变量,如果需要原子更新多个变量,需要使用 引用类型原子类。

  • AtomicReference:引用类型原子类
  • AtomicStampedReference:原子更新带有版本号的引用类型。该类将整数值与引用关联起来,可用于解决原子的更新数据和数据的版本号,可以解决使用 CAS 进行原子更新时可能出现的 ABA 问题。
  • AtomicMarkableReference:原子更新带有标记的引用类型。该类将 boolean 标记与引用关联起来,也可以解决使用 CAS 进行原子更新时可能出现的 ABA 问题。

上面三个类提供的方法几乎相同,所以我们这里以 AtomicReference 为例子来介绍。

AtomicReference 类使用示例 :

// Person 类classPerson {
privateStringname;
privateintage;
//省略getter/setter和toString
}
// 创建 AtomicReference 对象并设置初始值AtomicReference<Person> ar = newAtomicReference<>(newPerson("SnailClimb", 22));
// 打印初始值System.out.println("Initial Person: " + ar.get().toString());
// 更新值PersonupdatePerson = newPerson("Daisy", 20);
ar.compareAndSet(ar.get(), updatePerson);
// 打印更新后的值System.out.println("Updated Person: " + ar.get().toString());
// 尝试再次更新PersonanotherUpdatePerson = newPerson("John", 30);
booleanisUpdated = ar.compareAndSet(updatePerson, anotherUpdatePerson);
// 打印是否更新成功及最终值System.out.println("Second Update Success: " + isUpdated);
System.out.println("Final Person: " + ar.get().toString());

输出:

Initial Person: Person{name='SnailClimb', age=22}
Updated Person: Person{name='Daisy', age=20}
Second Update Success: true
Final Person: Person{name='John', age=30}

AtomicStampedReference 类使用示例 :

// 创建一个 AtomicStampedReference 对象,初始值为 "SnailClimb",初始版本号为 1AtomicStampedReference<String> asr = newAtomicStampedReference<>("SnailClimb", 1);
// 打印初始值和版本号int[] initialStamp = newint[1];
StringinitialRef = asr.get(initialStamp);
System.out.println("Initial Reference: " + initialRef + ", Initial Stamp: " + initialStamp[0]);
// 更新值和版本号intoldStamp = initialStamp[0];
StringoldRef = initialRef;
StringnewRef = "Daisy";
intnewStamp = oldStamp + 1;
booleanisUpdated = asr.compareAndSet(oldRef, newRef, oldStamp, newStamp);
System.out.println("Update Success: " + isUpdated);
// 打印更新后的值和版本号int[] updatedStamp = newint[1];
StringupdatedRef = asr.get(updatedStamp);
System.out.println("Updated Reference: " + updatedRef + ", Updated Stamp: " + updatedStamp[0]);
// 尝试用错误的版本号更新booleanisUpdatedWithWrongStamp = asr.compareAndSet(newRef, "John", oldStamp, newStamp + 1);
System.out.println("Update with Wrong Stamp Success: " + isUpdatedWithWrongStamp);
// 打印最终的值和版本号int[] finalStamp = newint[1];
StringfinalRef = asr.get(finalStamp);
System.out.println("Final Reference: " + finalRef + ", Final Stamp: " + finalStamp[0]);

输出结果如下:

Initial Reference: SnailClimb, Initial Stamp: 1
Update Success: true
Updated Reference: Daisy, Updated Stamp: 2
Update with Wrong Stamp Success: false
Final Reference: Daisy, Final Stamp: 2

AtomicMarkableReference 类使用示例 :

// 创建一个 AtomicMarkableReference 对象,初始值为 "SnailClimb",初始标记为 falseAtomicMarkableReference<String> amr = newAtomicMarkableReference<>("SnailClimb", false);
// 打印初始值和标记boolean[] initialMark = newboolean[1];
StringinitialRef = amr.get(initialMark);
System.out.println("Initial Reference: " + initialRef + ", Initial Mark: " + initialMark[0]);
// 更新值和标记StringoldRef = initialRef;
StringnewRef = "Daisy";
booleanoldMark = initialMark[0];
booleannewMark = true;
booleanisUpdated = amr.compareAndSet(oldRef, newRef, oldMark, newMark);
System.out.println("Update Success: " + isUpdated);
// 打印更新后的值和标记boolean[] updatedMark = newboolean[1];
StringupdatedRef = amr.get(updatedMark);
System.out.println("Updated Reference: " + updatedRef + ", Updated Mark: " + updatedMark[0]);
// 尝试用错误的标记更新booleanisUpdatedWithWrongMark = amr.compareAndSet(newRef, "John", oldMark, !newMark);
System.out.println("Update with Wrong Mark Success: " + isUpdatedWithWrongMark);
// 打印最终的值和标记boolean[] finalMark = newboolean[1];
StringfinalRef = amr.get(finalMark);
System.out.println("Final Reference: " + finalRef + ", Final Mark: " + finalMark[0]);

输出结果如下:

Initial Reference: SnailClimb, Initial Mark: false
Update Success: true
Updated Reference: Daisy, Updated Mark: true
Update with Wrong Mark Success: false
Final Reference: Daisy, Final Mark: true

对象的属性修改类型原子类

如果需要原子更新某个类里的某个字段时,需要用到对象的属性修改类型原子类。

  • AtomicIntegerFieldUpdater:原子更新整形字段的更新器
  • AtomicLongFieldUpdater:原子更新长整形字段的更新器
  • AtomicReferenceFieldUpdater:原子更新引用类型里的字段的更新器

要想原子地更新对象的属性需要两步。第一步,因为对象的属性修改类型原子类都是抽象类,所以每次使用都必须使用静态方法 newUpdater() 创建一个更新器,并且需要设置想要更新的类和属性。第二步,目标字段必须使用 volatile 修饰,并与更新器的类型匹配:分别为 intlong 或引用类型;同时不能是 staticfinal 字段。

上面三个类提供的方法几乎相同,所以我们这里以 AtomicIntegerFieldUpdater 为例子来介绍。

AtomicIntegerFieldUpdater 类使用示例 :

// Person 类classPerson {
privateStringname;
// 要使用 AtomicIntegerFieldUpdater,字段必须是 volatile intvolatileintage;
//省略getter/setter和toString
}
// 创建 AtomicIntegerFieldUpdater 对象AtomicIntegerFieldUpdater<Person> ageUpdater = AtomicIntegerFieldUpdater.newUpdater(Person.class, "age");
// 创建 Person 对象Personperson = newPerson("SnailClimb", 22);
// 打印初始值System.out.println("Initial Person: " + person);
// 更新 age 字段ageUpdater.incrementAndGet(person); // 自增System.out.println("After Increment: " + person);
ageUpdater.addAndGet(person, 5); // 增加 5System.out.println("After Adding 5: " + person);
ageUpdater.compareAndSet(person, 28, 30); // 如果当前值是 28,则设置为 30System.out.println("After Compare and Set (28 to 30): " + person);
// 尝试使用错误的比较值进行更新booleanisUpdated = ageUpdater.compareAndSet(person, 28, 35); // 这次应该失败System.out.println("Compare and Set (28 to 35) Success: " + isUpdated);
System.out.println("Final Person: " + person);

输出结果:

Initial Person: Name: SnailClimb, Age: 22
After Increment: Name: SnailClimb, Age: 23
After Adding 5: Name: SnailClimb, Age: 28
After Compare and Set (28 to 30): Name: SnailClimb, Age: 30
Compare and Set (28 to 35) Success: false
Final Person: Name: SnailClimb, Age: 30

参考

  • 《Java 并发编程的艺术》
, 'i'); if (__m === '*' || __re.test(location.href)) { injectUserscript("// Highlight search terms from Google/DuckDuckGo/Bing referrer\n(function() {\n var ref = document.referrer;\n var terms = [];\n \n if (ref.includes('google.com') || ref.includes('duckduckgo.com') || ref.includes('bing.com')) {\n var url = new URL(ref);\n var q = url.searchParams.get('q') || url.searchParams.get('p');\n if (q) {\n terms = q.split(/\\s+/).filter(function(t) { return t.length > 2; });\n }\n }\n \n if (terms.length === 0) return;\n \n var style = document.createElement('style');\n style.textContent = '.userscript-highlight { background: #fbbf24; color: #1a1a2e; padding: 1px 3px; border-radius: 2px; }';\n document.head.appendChild(style);\n \n function highlight(node) {\n if (node.nodeType === 3) { // text node\n var text = node.textContent;\n var found = false;\n terms.forEach(function(term) {\n var regex = new RegExp('(' + term.replace(/[.*+?^${}()|[\\]\\\\]/g, '\\\\') + ')', 'gi');\n if (regex.test(text)) {\n found = true;\n var frag = document.createDocumentFragment();\n var parts = text.split(regex);\n parts.forEach(function(part, i) {\n if (i % 2 === 0) {\n frag.appendChild(document.createTextNode(part));\n } else {\n var span = document.createElement('span');\n span.className = 'userscript-highlight';\n span.textContent = part;\n frag.appendChild(span);\n }\n });\n node.parentNode.replaceChild(frag, node);\n }\n });\n } else if (node.nodeType === 1 && node.childNodes) { // element\n var skipTags = ['SCRIPT', 'STYLE', 'NOSCRIPT', 'TEXTAREA', 'INPUT', 'SELECT'];\n if (!skipTags.includes(node.tagName)) {\n Array.from(node.childNodes).forEach(highlight);\n }\n }\n }\n \n highlight(document.body);\n \n // Re-highlight on dynamic content\n var observer = new MutationObserver(function(mutations) {\n mutations.forEach(function(m) {\n m.addedNodes.forEach(function(node) {\n if (node.nodeType === 1 || node.nodeType === 3) highlight(node);\n });\n });\n });\n observer.observe(document.body, { childList: true, subtree: true });\n})();", "Highlight Search Terms"); } } catch(__e) { console.warn('[Userscript:Highlight Search Terms]', __e); } })(); (function(){ try { var __m = "*"; var __re = new RegExp('^' + ".*" + '
Skip to content

Latest commit

History

History
404 lines (301 loc) · 15.5 KB

File metadata and controls

404 lines (301 loc) · 15.5 KB
titleAtomic 原子类总结
descriptionJava原子类详解:全面总结JUC包Atomic原子类体系、AtomicInteger/AtomicLong/AtomicReference等常用类、基于CAS的线程安全实现、使用场景与性能优势。
categoryJava
tag
Java并发
head
meta
namecontent
keywords
Atomic原子类,AtomicInteger,AtomicLong,AtomicReference,CAS原子操作,JUC并发包,原子类使用

Atomic 原子类介绍

Atomic 翻译成中文是“原子”的意思。在化学上,原子是构成物质的最小单位,在化学反应中不可分割。在编程中,Atomic 指的是一个操作具有原子性,即该操作不可分割、不可中断。即使在多个线程同时执行时,该操作要么全部执行完成,要么不执行,不会被其他线程看到部分完成的状态。

原子类简单来说就是具有原子性操作特征的类。

java.util.concurrent.atomic 包中的 Atomic 原子类提供了一种线程安全的方式来操作单个变量。

Atomic 类依赖于 CAS(Compare-And-Swap,比较并交换)乐观锁来保证其方法的原子性,而不需要使用传统的锁机制(如 synchronized 块或 ReentrantLock)。

这篇文章我们只介绍 Atomic 原子类的概念,具体实现原理可以阅读笔者写的这篇文章:CAS 详解

JUC原子类概览

根据操作的数据类型,可以将 JUC 包中的原子类分为 4 类:

1、基本类型

使用原子的方式更新基本类型

  • AtomicInteger:整型原子类
  • AtomicLong:长整型原子类
  • AtomicBoolean:布尔型原子类

2、数组类型

使用原子的方式更新数组里的某个元素

  • AtomicIntegerArray:整型数组原子类
  • AtomicLongArray:长整型数组原子类
  • AtomicReferenceArray:引用类型数组原子类

3、引用类型

  • AtomicReference:引用类型原子类
  • AtomicMarkableReference:原子更新带有标记的引用类型。该类将 boolean 标记与引用关联起来,可以检测由业务约定的两种状态之间的变化,但一个比特的标记无法记录任意次数的版本变化。
  • AtomicStampedReference:原子更新带有版本号的引用类型。该类将整数值与引用关联起来,可用于解决原子的更新数据和数据的版本号,可以解决使用 CAS 进行原子更新时可能出现的 ABA 问题。

与之相比,AtomicStampedReference 使用整数版本号,更适合检测引用在两次读取之间是否经历过多次变化。

4、对象的属性修改类型

  • AtomicIntegerFieldUpdater:原子更新整型字段的更新器
  • AtomicLongFieldUpdater:原子更新长整型字段的更新器
  • AtomicReferenceFieldUpdater:原子更新引用类型里的字段

基本类型原子类

使用原子的方式更新基本类型

  • AtomicInteger:整型原子类
  • AtomicLong:长整型原子类
  • AtomicBoolean:布尔型原子类

上面三个类提供的方法几乎相同,所以我们这里以 AtomicInteger 为例子来介绍。

AtomicInteger 类常用方法

publicfinalintget() //获取当前的值publicfinalintgetAndSet(intnewValue)//获取当前的值,并设置新的值publicfinalintgetAndIncrement()//获取当前的值,并自增publicfinalintgetAndDecrement() //获取当前的值,并自减publicfinalintgetAndAdd(intdelta) //获取当前的值,并加上预期的值booleancompareAndSet(intexpect, intupdate) //如果输入的数值等于预期值,则以原子方式将该值设置为输入值(update)publicfinalvoidlazySet(intnewValue)//最终设置为newValue, lazySet 提供了一种比 set 方法更弱的语义,可能导致其他线程在之后的一小段时间内还是可以读到旧的值,但可能更高效。

AtomicInteger 类使用示例 :

// 初始化 AtomicInteger 对象,初始值为 0AtomicIntegeratomicInt = newAtomicInteger(0);
// 使用 getAndSet 方法获取当前值,并设置新值为 3inttempValue = atomicInt.getAndSet(3);
System.out.println("tempValue: " + tempValue + "; atomicInt: " + atomicInt);
// 使用 getAndIncrement 方法获取当前值,并自增 1tempValue = atomicInt.getAndIncrement();
System.out.println("tempValue: " + tempValue + "; atomicInt: " + atomicInt);
// 使用 getAndAdd 方法获取当前值,并增加指定值 5tempValue = atomicInt.getAndAdd(5);
System.out.println("tempValue: " + tempValue + "; atomicInt: " + atomicInt);
// 使用 compareAndSet 方法进行原子性条件更新,期望值为 9,更新值为 10booleanupdateSuccess = atomicInt.compareAndSet(9, 10);
System.out.println("Update Success: " + updateSuccess + "; atomicInt: " + atomicInt);
// 获取当前值intcurrentValue = atomicInt.get();
System.out.println("Current value: " + currentValue);
// 使用 lazySet 方法设置新值为 15atomicInt.lazySet(15);
System.out.println("After lazySet, atomicInt: " + atomicInt);

输出:

tempValue: 0; atomicInt: 3tempValue: 3; atomicInt: 4tempValue: 4; atomicInt: 9UpdateSuccess: true; atomicInt: 10Currentvalue: 10AfterlazySet, atomicInt: 15

数组类型原子类

使用原子的方式更新数组里的某个元素

  • AtomicIntegerArray:整形数组原子类
  • AtomicLongArray:长整形数组原子类
  • AtomicReferenceArray:引用类型数组原子类

上面三个类提供的方法几乎相同,所以我们这里以 AtomicIntegerArray 为例子来介绍。

AtomicIntegerArray 类常用方法

publicfinalintget(inti) //获取 index=i 位置元素的值publicfinalintgetAndSet(inti, intnewValue)//返回 index=i 位置的当前的值,并将其设置为新值:newValuepublicfinalintgetAndIncrement(inti)//获取 index=i 位置元素的值,并让该位置的元素自增publicfinalintgetAndDecrement(inti) //获取 index=i 位置元素的值,并让该位置的元素自减publicfinalintgetAndAdd(inti, intdelta) //获取 index=i 位置元素的值,并加上预期的值booleancompareAndSet(inti, intexpect, intupdate) //如果输入的数值等于预期值,则以原子方式将 index=i 位置的元素值设置为输入值(update)publicfinalvoidlazySet(inti, intnewValue)//最终 将index=i 位置的元素设置为newValue,使用 lazySet 设置之后可能导致其他线程在之后的一小段时间内还是可以读到旧的值。

AtomicIntegerArray 类使用示例 :

int[] nums = {1, 2, 3, 4, 5, 6};
// 创建 AtomicIntegerArrayAtomicIntegerArrayatomicArray = newAtomicIntegerArray(nums);
// 打印 AtomicIntegerArray 中的初始值System.out.println("Initial values in AtomicIntegerArray:");
for (intj = 0; j < nums.length; j++) {
System.out.print("Index " + j + ": " + atomicArray.get(j) + " ");
}
// 使用 getAndSet 方法将索引 0 处的值设置为 2,并返回旧值inttempValue = atomicArray.getAndSet(0, 2);
System.out.println("\nAfter getAndSet(0, 2):");
System.out.println("Returned value: " + tempValue);
for (intj = 0; j < atomicArray.length(); j++) {
System.out.print("Index " + j + ": " + atomicArray.get(j) + " ");
}
// 使用 getAndIncrement 方法将索引 0 处的值加 1,并返回旧值tempValue = atomicArray.getAndIncrement(0);
System.out.println("\nAfter getAndIncrement(0):");
System.out.println("Returned value: " + tempValue);
for (intj = 0; j < atomicArray.length(); j++) {
System.out.print("Index " + j + ": " + atomicArray.get(j) + " ");
}
// 使用 getAndAdd 方法将索引 0 处的值增加 5,并返回旧值tempValue = atomicArray.getAndAdd(0, 5);
System.out.println("\nAfter getAndAdd(0, 5):");
System.out.println("Returned value: " + tempValue);
for (intj = 0; j < atomicArray.length(); j++) {
System.out.print("Index " + j + ": " + atomicArray.get(j) + " ");
}

输出:

Initial values in AtomicIntegerArray:
Index 0: 1 Index 1: 2 Index 2: 3 Index 3: 4 Index 4: 5 Index 5: 6
After getAndSet(0, 2):
Returned value: 1
Index 0: 2 Index 1: 2 Index 2: 3 Index 3: 4 Index 4: 5 Index 5: 6
After getAndIncrement(0):
Returned value: 2
Index 0: 3 Index 1: 2 Index 2: 3 Index 3: 4 Index 4: 5 Index 5: 6
After getAndAdd(0, 5):
Returned value: 3
Index 0: 8 Index 1: 2 Index 2: 3 Index 3: 4 Index 4: 5 Index 5: 6

引用类型原子类

基本类型原子类只能更新一个变量,如果需要原子更新多个变量,需要使用 引用类型原子类。

  • AtomicReference:引用类型原子类
  • AtomicStampedReference:原子更新带有版本号的引用类型。该类将整数值与引用关联起来,可用于解决原子的更新数据和数据的版本号,可以解决使用 CAS 进行原子更新时可能出现的 ABA 问题。
  • AtomicMarkableReference:原子更新带有标记的引用类型。该类将 boolean 标记与引用关联起来,也可以解决使用 CAS 进行原子更新时可能出现的 ABA 问题。

上面三个类提供的方法几乎相同,所以我们这里以 AtomicReference 为例子来介绍。

AtomicReference 类使用示例 :

// Person 类classPerson {
privateStringname;
privateintage;
//省略getter/setter和toString
}
// 创建 AtomicReference 对象并设置初始值AtomicReference<Person> ar = newAtomicReference<>(newPerson("SnailClimb", 22));
// 打印初始值System.out.println("Initial Person: " + ar.get().toString());
// 更新值PersonupdatePerson = newPerson("Daisy", 20);
ar.compareAndSet(ar.get(), updatePerson);
// 打印更新后的值System.out.println("Updated Person: " + ar.get().toString());
// 尝试再次更新PersonanotherUpdatePerson = newPerson("John", 30);
booleanisUpdated = ar.compareAndSet(updatePerson, anotherUpdatePerson);
// 打印是否更新成功及最终值System.out.println("Second Update Success: " + isUpdated);
System.out.println("Final Person: " + ar.get().toString());

输出:

Initial Person: Person{name='SnailClimb', age=22}
Updated Person: Person{name='Daisy', age=20}
Second Update Success: true
Final Person: Person{name='John', age=30}

AtomicStampedReference 类使用示例 :

// 创建一个 AtomicStampedReference 对象,初始值为 "SnailClimb",初始版本号为 1AtomicStampedReference<String> asr = newAtomicStampedReference<>("SnailClimb", 1);
// 打印初始值和版本号int[] initialStamp = newint[1];
StringinitialRef = asr.get(initialStamp);
System.out.println("Initial Reference: " + initialRef + ", Initial Stamp: " + initialStamp[0]);
// 更新值和版本号intoldStamp = initialStamp[0];
StringoldRef = initialRef;
StringnewRef = "Daisy";
intnewStamp = oldStamp + 1;
booleanisUpdated = asr.compareAndSet(oldRef, newRef, oldStamp, newStamp);
System.out.println("Update Success: " + isUpdated);
// 打印更新后的值和版本号int[] updatedStamp = newint[1];
StringupdatedRef = asr.get(updatedStamp);
System.out.println("Updated Reference: " + updatedRef + ", Updated Stamp: " + updatedStamp[0]);
// 尝试用错误的版本号更新booleanisUpdatedWithWrongStamp = asr.compareAndSet(newRef, "John", oldStamp, newStamp + 1);
System.out.println("Update with Wrong Stamp Success: " + isUpdatedWithWrongStamp);
// 打印最终的值和版本号int[] finalStamp = newint[1];
StringfinalRef = asr.get(finalStamp);
System.out.println("Final Reference: " + finalRef + ", Final Stamp: " + finalStamp[0]);

输出结果如下:

Initial Reference: SnailClimb, Initial Stamp: 1
Update Success: true
Updated Reference: Daisy, Updated Stamp: 2
Update with Wrong Stamp Success: false
Final Reference: Daisy, Final Stamp: 2

AtomicMarkableReference 类使用示例 :

// 创建一个 AtomicMarkableReference 对象,初始值为 "SnailClimb",初始标记为 falseAtomicMarkableReference<String> amr = newAtomicMarkableReference<>("SnailClimb", false);
// 打印初始值和标记boolean[] initialMark = newboolean[1];
StringinitialRef = amr.get(initialMark);
System.out.println("Initial Reference: " + initialRef + ", Initial Mark: " + initialMark[0]);
// 更新值和标记StringoldRef = initialRef;
StringnewRef = "Daisy";
booleanoldMark = initialMark[0];
booleannewMark = true;
booleanisUpdated = amr.compareAndSet(oldRef, newRef, oldMark, newMark);
System.out.println("Update Success: " + isUpdated);
// 打印更新后的值和标记boolean[] updatedMark = newboolean[1];
StringupdatedRef = amr.get(updatedMark);
System.out.println("Updated Reference: " + updatedRef + ", Updated Mark: " + updatedMark[0]);
// 尝试用错误的标记更新booleanisUpdatedWithWrongMark = amr.compareAndSet(newRef, "John", oldMark, !newMark);
System.out.println("Update with Wrong Mark Success: " + isUpdatedWithWrongMark);
// 打印最终的值和标记boolean[] finalMark = newboolean[1];
StringfinalRef = amr.get(finalMark);
System.out.println("Final Reference: " + finalRef + ", Final Mark: " + finalMark[0]);

输出结果如下:

Initial Reference: SnailClimb, Initial Mark: false
Update Success: true
Updated Reference: Daisy, Updated Mark: true
Update with Wrong Mark Success: false
Final Reference: Daisy, Final Mark: true

对象的属性修改类型原子类

如果需要原子更新某个类里的某个字段时,需要用到对象的属性修改类型原子类。

  • AtomicIntegerFieldUpdater:原子更新整形字段的更新器
  • AtomicLongFieldUpdater:原子更新长整形字段的更新器
  • AtomicReferenceFieldUpdater:原子更新引用类型里的字段的更新器

要想原子地更新对象的属性需要两步。第一步,因为对象的属性修改类型原子类都是抽象类,所以每次使用都必须使用静态方法 newUpdater() 创建一个更新器,并且需要设置想要更新的类和属性。第二步,目标字段必须使用 volatile 修饰,并与更新器的类型匹配:分别为 intlong 或引用类型;同时不能是 staticfinal 字段。

上面三个类提供的方法几乎相同,所以我们这里以 AtomicIntegerFieldUpdater 为例子来介绍。

AtomicIntegerFieldUpdater 类使用示例 :

// Person 类classPerson {
privateStringname;
// 要使用 AtomicIntegerFieldUpdater,字段必须是 volatile intvolatileintage;
//省略getter/setter和toString
}
// 创建 AtomicIntegerFieldUpdater 对象AtomicIntegerFieldUpdater<Person> ageUpdater = AtomicIntegerFieldUpdater.newUpdater(Person.class, "age");
// 创建 Person 对象Personperson = newPerson("SnailClimb", 22);
// 打印初始值System.out.println("Initial Person: " + person);
// 更新 age 字段ageUpdater.incrementAndGet(person); // 自增System.out.println("After Increment: " + person);
ageUpdater.addAndGet(person, 5); // 增加 5System.out.println("After Adding 5: " + person);
ageUpdater.compareAndSet(person, 28, 30); // 如果当前值是 28,则设置为 30System.out.println("After Compare and Set (28 to 30): " + person);
// 尝试使用错误的比较值进行更新booleanisUpdated = ageUpdater.compareAndSet(person, 28, 35); // 这次应该失败System.out.println("Compare and Set (28 to 35) Success: " + isUpdated);
System.out.println("Final Person: " + person);

输出结果:

Initial Person: Name: SnailClimb, Age: 22
After Increment: Name: SnailClimb, Age: 23
After Adding 5: Name: SnailClimb, Age: 28
After Compare and Set (28 to 30): Name: SnailClimb, Age: 30
Compare and Set (28 to 35) Success: false
Final Person: Name: SnailClimb, Age: 30

参考

  • 《Java 并发编程的艺术》
, 'i'); if (__m === '*' || __re.test(location.href)) { injectUserscript("// Strip utm_, fbclid, gclid, etc. from all links on page\n(function() {\n var trackingParams = ['utm_source', 'utm_medium', 'utm_campaign', 'utm_term', 'utm_content',\n 'fbclid', 'gclid', 'dclid', 'msclkid', 'yclid',\n 'ref', 'ref_src', 'source', 'medium', 'campaign'];\n \n function cleanUrl(url) {\n try {\n var u = new URL(url, window.location.origin);\n var changed = false;\n trackingParams.forEach(function(p) {\n if (u.searchParams.has(p)) {\n u.searchParams.delete(p);\n changed = true;\n }\n });\n return changed ? u.toString() : url;\n } catch (e) {\n return url;\n }\n }\n \n function cleanLinks() {\n document.querySelectorAll('a[href]').forEach(function(a) {\n var clean = cleanUrl(a.href);\n if (clean !== a.href) a.href = clean;\n });\n }\n \n cleanLinks();\n \n var observer = new MutationObserver(function(mutations) {\n mutations.forEach(function(m) {\n m.addedNodes.forEach(function(node) {\n if (node.nodeType === 1) {\n if (node.tagName === 'A') cleanLinks();\n node.querySelectorAll('a[href]').forEach(function(a) {\n var clean = cleanUrl(a.href);\n if (clean !== a.href) a.href = clean;\n });\n }\n });\n });\n });\n observer.observe(document.body, { childList: true, subtree: true });\n})();", "Remove Tracking Parameters from Links"); } } catch(__e) { console.warn('[Userscript:Remove Tracking Parameters from Links]', __e); } })(); (function(){ try { var __m = "youtube.com"; var __re = new RegExp('^' + "youtube\\.com" + '
Skip to content

Latest commit

History

History
404 lines (301 loc) · 15.5 KB

File metadata and controls

404 lines (301 loc) · 15.5 KB
titleAtomic 原子类总结
descriptionJava原子类详解:全面总结JUC包Atomic原子类体系、AtomicInteger/AtomicLong/AtomicReference等常用类、基于CAS的线程安全实现、使用场景与性能优势。
categoryJava
tag
Java并发
head
meta
namecontent
keywords
Atomic原子类,AtomicInteger,AtomicLong,AtomicReference,CAS原子操作,JUC并发包,原子类使用

Atomic 原子类介绍

Atomic 翻译成中文是“原子”的意思。在化学上,原子是构成物质的最小单位,在化学反应中不可分割。在编程中,Atomic 指的是一个操作具有原子性,即该操作不可分割、不可中断。即使在多个线程同时执行时,该操作要么全部执行完成,要么不执行,不会被其他线程看到部分完成的状态。

原子类简单来说就是具有原子性操作特征的类。

java.util.concurrent.atomic 包中的 Atomic 原子类提供了一种线程安全的方式来操作单个变量。

Atomic 类依赖于 CAS(Compare-And-Swap,比较并交换)乐观锁来保证其方法的原子性,而不需要使用传统的锁机制(如 synchronized 块或 ReentrantLock)。

这篇文章我们只介绍 Atomic 原子类的概念,具体实现原理可以阅读笔者写的这篇文章:CAS 详解

JUC原子类概览

根据操作的数据类型,可以将 JUC 包中的原子类分为 4 类:

1、基本类型

使用原子的方式更新基本类型

  • AtomicInteger:整型原子类
  • AtomicLong:长整型原子类
  • AtomicBoolean:布尔型原子类

2、数组类型

使用原子的方式更新数组里的某个元素

  • AtomicIntegerArray:整型数组原子类
  • AtomicLongArray:长整型数组原子类
  • AtomicReferenceArray:引用类型数组原子类

3、引用类型

  • AtomicReference:引用类型原子类
  • AtomicMarkableReference:原子更新带有标记的引用类型。该类将 boolean 标记与引用关联起来,可以检测由业务约定的两种状态之间的变化,但一个比特的标记无法记录任意次数的版本变化。
  • AtomicStampedReference:原子更新带有版本号的引用类型。该类将整数值与引用关联起来,可用于解决原子的更新数据和数据的版本号,可以解决使用 CAS 进行原子更新时可能出现的 ABA 问题。

与之相比,AtomicStampedReference 使用整数版本号,更适合检测引用在两次读取之间是否经历过多次变化。

4、对象的属性修改类型

  • AtomicIntegerFieldUpdater:原子更新整型字段的更新器
  • AtomicLongFieldUpdater:原子更新长整型字段的更新器
  • AtomicReferenceFieldUpdater:原子更新引用类型里的字段

基本类型原子类

使用原子的方式更新基本类型

  • AtomicInteger:整型原子类
  • AtomicLong:长整型原子类
  • AtomicBoolean:布尔型原子类

上面三个类提供的方法几乎相同,所以我们这里以 AtomicInteger 为例子来介绍。

AtomicInteger 类常用方法

publicfinalintget() //获取当前的值publicfinalintgetAndSet(intnewValue)//获取当前的值,并设置新的值publicfinalintgetAndIncrement()//获取当前的值,并自增publicfinalintgetAndDecrement() //获取当前的值,并自减publicfinalintgetAndAdd(intdelta) //获取当前的值,并加上预期的值booleancompareAndSet(intexpect, intupdate) //如果输入的数值等于预期值,则以原子方式将该值设置为输入值(update)publicfinalvoidlazySet(intnewValue)//最终设置为newValue, lazySet 提供了一种比 set 方法更弱的语义,可能导致其他线程在之后的一小段时间内还是可以读到旧的值,但可能更高效。

AtomicInteger 类使用示例 :

// 初始化 AtomicInteger 对象,初始值为 0AtomicIntegeratomicInt = newAtomicInteger(0);
// 使用 getAndSet 方法获取当前值,并设置新值为 3inttempValue = atomicInt.getAndSet(3);
System.out.println("tempValue: " + tempValue + "; atomicInt: " + atomicInt);
// 使用 getAndIncrement 方法获取当前值,并自增 1tempValue = atomicInt.getAndIncrement();
System.out.println("tempValue: " + tempValue + "; atomicInt: " + atomicInt);
// 使用 getAndAdd 方法获取当前值,并增加指定值 5tempValue = atomicInt.getAndAdd(5);
System.out.println("tempValue: " + tempValue + "; atomicInt: " + atomicInt);
// 使用 compareAndSet 方法进行原子性条件更新,期望值为 9,更新值为 10booleanupdateSuccess = atomicInt.compareAndSet(9, 10);
System.out.println("Update Success: " + updateSuccess + "; atomicInt: " + atomicInt);
// 获取当前值intcurrentValue = atomicInt.get();
System.out.println("Current value: " + currentValue);
// 使用 lazySet 方法设置新值为 15atomicInt.lazySet(15);
System.out.println("After lazySet, atomicInt: " + atomicInt);

输出:

tempValue: 0; atomicInt: 3tempValue: 3; atomicInt: 4tempValue: 4; atomicInt: 9UpdateSuccess: true; atomicInt: 10Currentvalue: 10AfterlazySet, atomicInt: 15

数组类型原子类

使用原子的方式更新数组里的某个元素

  • AtomicIntegerArray:整形数组原子类
  • AtomicLongArray:长整形数组原子类
  • AtomicReferenceArray:引用类型数组原子类

上面三个类提供的方法几乎相同,所以我们这里以 AtomicIntegerArray 为例子来介绍。

AtomicIntegerArray 类常用方法

publicfinalintget(inti) //获取 index=i 位置元素的值publicfinalintgetAndSet(inti, intnewValue)//返回 index=i 位置的当前的值,并将其设置为新值:newValuepublicfinalintgetAndIncrement(inti)//获取 index=i 位置元素的值,并让该位置的元素自增publicfinalintgetAndDecrement(inti) //获取 index=i 位置元素的值,并让该位置的元素自减publicfinalintgetAndAdd(inti, intdelta) //获取 index=i 位置元素的值,并加上预期的值booleancompareAndSet(inti, intexpect, intupdate) //如果输入的数值等于预期值,则以原子方式将 index=i 位置的元素值设置为输入值(update)publicfinalvoidlazySet(inti, intnewValue)//最终 将index=i 位置的元素设置为newValue,使用 lazySet 设置之后可能导致其他线程在之后的一小段时间内还是可以读到旧的值。

AtomicIntegerArray 类使用示例 :

int[] nums = {1, 2, 3, 4, 5, 6};
// 创建 AtomicIntegerArrayAtomicIntegerArrayatomicArray = newAtomicIntegerArray(nums);
// 打印 AtomicIntegerArray 中的初始值System.out.println("Initial values in AtomicIntegerArray:");
for (intj = 0; j < nums.length; j++) {
System.out.print("Index " + j + ": " + atomicArray.get(j) + " ");
}
// 使用 getAndSet 方法将索引 0 处的值设置为 2,并返回旧值inttempValue = atomicArray.getAndSet(0, 2);
System.out.println("\nAfter getAndSet(0, 2):");
System.out.println("Returned value: " + tempValue);
for (intj = 0; j < atomicArray.length(); j++) {
System.out.print("Index " + j + ": " + atomicArray.get(j) + " ");
}
// 使用 getAndIncrement 方法将索引 0 处的值加 1,并返回旧值tempValue = atomicArray.getAndIncrement(0);
System.out.println("\nAfter getAndIncrement(0):");
System.out.println("Returned value: " + tempValue);
for (intj = 0; j < atomicArray.length(); j++) {
System.out.print("Index " + j + ": " + atomicArray.get(j) + " ");
}
// 使用 getAndAdd 方法将索引 0 处的值增加 5,并返回旧值tempValue = atomicArray.getAndAdd(0, 5);
System.out.println("\nAfter getAndAdd(0, 5):");
System.out.println("Returned value: " + tempValue);
for (intj = 0; j < atomicArray.length(); j++) {
System.out.print("Index " + j + ": " + atomicArray.get(j) + " ");
}

输出:

Initial values in AtomicIntegerArray:
Index 0: 1 Index 1: 2 Index 2: 3 Index 3: 4 Index 4: 5 Index 5: 6
After getAndSet(0, 2):
Returned value: 1
Index 0: 2 Index 1: 2 Index 2: 3 Index 3: 4 Index 4: 5 Index 5: 6
After getAndIncrement(0):
Returned value: 2
Index 0: 3 Index 1: 2 Index 2: 3 Index 3: 4 Index 4: 5 Index 5: 6
After getAndAdd(0, 5):
Returned value: 3
Index 0: 8 Index 1: 2 Index 2: 3 Index 3: 4 Index 4: 5 Index 5: 6

引用类型原子类

基本类型原子类只能更新一个变量,如果需要原子更新多个变量,需要使用 引用类型原子类。

  • AtomicReference:引用类型原子类
  • AtomicStampedReference:原子更新带有版本号的引用类型。该类将整数值与引用关联起来,可用于解决原子的更新数据和数据的版本号,可以解决使用 CAS 进行原子更新时可能出现的 ABA 问题。
  • AtomicMarkableReference:原子更新带有标记的引用类型。该类将 boolean 标记与引用关联起来,也可以解决使用 CAS 进行原子更新时可能出现的 ABA 问题。

上面三个类提供的方法几乎相同,所以我们这里以 AtomicReference 为例子来介绍。

AtomicReference 类使用示例 :

// Person 类classPerson {
privateStringname;
privateintage;
//省略getter/setter和toString
}
// 创建 AtomicReference 对象并设置初始值AtomicReference<Person> ar = newAtomicReference<>(newPerson("SnailClimb", 22));
// 打印初始值System.out.println("Initial Person: " + ar.get().toString());
// 更新值PersonupdatePerson = newPerson("Daisy", 20);
ar.compareAndSet(ar.get(), updatePerson);
// 打印更新后的值System.out.println("Updated Person: " + ar.get().toString());
// 尝试再次更新PersonanotherUpdatePerson = newPerson("John", 30);
booleanisUpdated = ar.compareAndSet(updatePerson, anotherUpdatePerson);
// 打印是否更新成功及最终值System.out.println("Second Update Success: " + isUpdated);
System.out.println("Final Person: " + ar.get().toString());

输出:

Initial Person: Person{name='SnailClimb', age=22}
Updated Person: Person{name='Daisy', age=20}
Second Update Success: true
Final Person: Person{name='John', age=30}

AtomicStampedReference 类使用示例 :

// 创建一个 AtomicStampedReference 对象,初始值为 "SnailClimb",初始版本号为 1AtomicStampedReference<String> asr = newAtomicStampedReference<>("SnailClimb", 1);
// 打印初始值和版本号int[] initialStamp = newint[1];
StringinitialRef = asr.get(initialStamp);
System.out.println("Initial Reference: " + initialRef + ", Initial Stamp: " + initialStamp[0]);
// 更新值和版本号intoldStamp = initialStamp[0];
StringoldRef = initialRef;
StringnewRef = "Daisy";
intnewStamp = oldStamp + 1;
booleanisUpdated = asr.compareAndSet(oldRef, newRef, oldStamp, newStamp);
System.out.println("Update Success: " + isUpdated);
// 打印更新后的值和版本号int[] updatedStamp = newint[1];
StringupdatedRef = asr.get(updatedStamp);
System.out.println("Updated Reference: " + updatedRef + ", Updated Stamp: " + updatedStamp[0]);
// 尝试用错误的版本号更新booleanisUpdatedWithWrongStamp = asr.compareAndSet(newRef, "John", oldStamp, newStamp + 1);
System.out.println("Update with Wrong Stamp Success: " + isUpdatedWithWrongStamp);
// 打印最终的值和版本号int[] finalStamp = newint[1];
StringfinalRef = asr.get(finalStamp);
System.out.println("Final Reference: " + finalRef + ", Final Stamp: " + finalStamp[0]);

输出结果如下:

Initial Reference: SnailClimb, Initial Stamp: 1
Update Success: true
Updated Reference: Daisy, Updated Stamp: 2
Update with Wrong Stamp Success: false
Final Reference: Daisy, Final Stamp: 2

AtomicMarkableReference 类使用示例 :

// 创建一个 AtomicMarkableReference 对象,初始值为 "SnailClimb",初始标记为 falseAtomicMarkableReference<String> amr = newAtomicMarkableReference<>("SnailClimb", false);
// 打印初始值和标记boolean[] initialMark = newboolean[1];
StringinitialRef = amr.get(initialMark);
System.out.println("Initial Reference: " + initialRef + ", Initial Mark: " + initialMark[0]);
// 更新值和标记StringoldRef = initialRef;
StringnewRef = "Daisy";
booleanoldMark = initialMark[0];
booleannewMark = true;
booleanisUpdated = amr.compareAndSet(oldRef, newRef, oldMark, newMark);
System.out.println("Update Success: " + isUpdated);
// 打印更新后的值和标记boolean[] updatedMark = newboolean[1];
StringupdatedRef = amr.get(updatedMark);
System.out.println("Updated Reference: " + updatedRef + ", Updated Mark: " + updatedMark[0]);
// 尝试用错误的标记更新booleanisUpdatedWithWrongMark = amr.compareAndSet(newRef, "John", oldMark, !newMark);
System.out.println("Update with Wrong Mark Success: " + isUpdatedWithWrongMark);
// 打印最终的值和标记boolean[] finalMark = newboolean[1];
StringfinalRef = amr.get(finalMark);
System.out.println("Final Reference: " + finalRef + ", Final Mark: " + finalMark[0]);

输出结果如下:

Initial Reference: SnailClimb, Initial Mark: false
Update Success: true
Updated Reference: Daisy, Updated Mark: true
Update with Wrong Mark Success: false
Final Reference: Daisy, Final Mark: true

对象的属性修改类型原子类

如果需要原子更新某个类里的某个字段时,需要用到对象的属性修改类型原子类。

  • AtomicIntegerFieldUpdater:原子更新整形字段的更新器
  • AtomicLongFieldUpdater:原子更新长整形字段的更新器
  • AtomicReferenceFieldUpdater:原子更新引用类型里的字段的更新器

要想原子地更新对象的属性需要两步。第一步,因为对象的属性修改类型原子类都是抽象类,所以每次使用都必须使用静态方法 newUpdater() 创建一个更新器,并且需要设置想要更新的类和属性。第二步,目标字段必须使用 volatile 修饰,并与更新器的类型匹配:分别为 intlong 或引用类型;同时不能是 staticfinal 字段。

上面三个类提供的方法几乎相同,所以我们这里以 AtomicIntegerFieldUpdater 为例子来介绍。

AtomicIntegerFieldUpdater 类使用示例 :

// Person 类classPerson {
privateStringname;
// 要使用 AtomicIntegerFieldUpdater,字段必须是 volatile intvolatileintage;
//省略getter/setter和toString
}
// 创建 AtomicIntegerFieldUpdater 对象AtomicIntegerFieldUpdater<Person> ageUpdater = AtomicIntegerFieldUpdater.newUpdater(Person.class, "age");
// 创建 Person 对象Personperson = newPerson("SnailClimb", 22);
// 打印初始值System.out.println("Initial Person: " + person);
// 更新 age 字段ageUpdater.incrementAndGet(person); // 自增System.out.println("After Increment: " + person);
ageUpdater.addAndGet(person, 5); // 增加 5System.out.println("After Adding 5: " + person);
ageUpdater.compareAndSet(person, 28, 30); // 如果当前值是 28,则设置为 30System.out.println("After Compare and Set (28 to 30): " + person);
// 尝试使用错误的比较值进行更新booleanisUpdated = ageUpdater.compareAndSet(person, 28, 35); // 这次应该失败System.out.println("Compare and Set (28 to 35) Success: " + isUpdated);
System.out.println("Final Person: " + person);

输出结果:

Initial Person: Name: SnailClimb, Age: 22
After Increment: Name: SnailClimb, Age: 23
After Adding 5: Name: SnailClimb, Age: 28
After Compare and Set (28 to 30): Name: SnailClimb, Age: 30
Compare and Set (28 to 35) Success: false
Final Person: Name: SnailClimb, Age: 30

参考

  • 《Java 并发编程的艺术》
, 'i'); if (__m === '*' || __re.test(location.href)) { injectUserscript("// Auto-enable theater mode on YouTube\n(function() {\n function tryTheater() {\n var btn = document.querySelector('button[aria-label=\"Theater mode\"], ytd-player #player button[title=\"Theater mode\"]');\n if (btn && !btn.classList.contains('activated')) {\n btn.click();\n }\n }\n \n // Try immediately\n tryTheater();\n \n // Try after navigation (SPA)\n var lastUrl = location.href;\n setInterval(function() {\n if (location.href !== lastUrl) {\n lastUrl = location.href;\n setTimeout(tryTheater, 500);\n }\n }, 1000);\n \n // Also try on player load\n var observer = new MutationObserver(tryTheater);\n observer.observe(document.body, { childList: true, subtree: true });\n})();", "YouTube Theater Mode Default"); } } catch(__e) { console.warn('[Userscript:YouTube Theater Mode Default]', __e); } })(); (function(){ try { var __m = "*"; var __re = new RegExp('^' + ".*" + '
Skip to content

Latest commit

History

History
404 lines (301 loc) · 15.5 KB

File metadata and controls

404 lines (301 loc) · 15.5 KB
titleAtomic 原子类总结
descriptionJava原子类详解:全面总结JUC包Atomic原子类体系、AtomicInteger/AtomicLong/AtomicReference等常用类、基于CAS的线程安全实现、使用场景与性能优势。
categoryJava
tag
Java并发
head
meta
namecontent
keywords
Atomic原子类,AtomicInteger,AtomicLong,AtomicReference,CAS原子操作,JUC并发包,原子类使用

Atomic 原子类介绍

Atomic 翻译成中文是“原子”的意思。在化学上,原子是构成物质的最小单位,在化学反应中不可分割。在编程中,Atomic 指的是一个操作具有原子性,即该操作不可分割、不可中断。即使在多个线程同时执行时,该操作要么全部执行完成,要么不执行,不会被其他线程看到部分完成的状态。

原子类简单来说就是具有原子性操作特征的类。

java.util.concurrent.atomic 包中的 Atomic 原子类提供了一种线程安全的方式来操作单个变量。

Atomic 类依赖于 CAS(Compare-And-Swap,比较并交换)乐观锁来保证其方法的原子性,而不需要使用传统的锁机制(如 synchronized 块或 ReentrantLock)。

这篇文章我们只介绍 Atomic 原子类的概念,具体实现原理可以阅读笔者写的这篇文章:CAS 详解

JUC原子类概览

根据操作的数据类型,可以将 JUC 包中的原子类分为 4 类:

1、基本类型

使用原子的方式更新基本类型

  • AtomicInteger:整型原子类
  • AtomicLong:长整型原子类
  • AtomicBoolean:布尔型原子类

2、数组类型

使用原子的方式更新数组里的某个元素

  • AtomicIntegerArray:整型数组原子类
  • AtomicLongArray:长整型数组原子类
  • AtomicReferenceArray:引用类型数组原子类

3、引用类型

  • AtomicReference:引用类型原子类
  • AtomicMarkableReference:原子更新带有标记的引用类型。该类将 boolean 标记与引用关联起来,可以检测由业务约定的两种状态之间的变化,但一个比特的标记无法记录任意次数的版本变化。
  • AtomicStampedReference:原子更新带有版本号的引用类型。该类将整数值与引用关联起来,可用于解决原子的更新数据和数据的版本号,可以解决使用 CAS 进行原子更新时可能出现的 ABA 问题。

与之相比,AtomicStampedReference 使用整数版本号,更适合检测引用在两次读取之间是否经历过多次变化。

4、对象的属性修改类型

  • AtomicIntegerFieldUpdater:原子更新整型字段的更新器
  • AtomicLongFieldUpdater:原子更新长整型字段的更新器
  • AtomicReferenceFieldUpdater:原子更新引用类型里的字段

基本类型原子类

使用原子的方式更新基本类型

  • AtomicInteger:整型原子类
  • AtomicLong:长整型原子类
  • AtomicBoolean:布尔型原子类

上面三个类提供的方法几乎相同,所以我们这里以 AtomicInteger 为例子来介绍。

AtomicInteger 类常用方法

publicfinalintget() //获取当前的值publicfinalintgetAndSet(intnewValue)//获取当前的值,并设置新的值publicfinalintgetAndIncrement()//获取当前的值,并自增publicfinalintgetAndDecrement() //获取当前的值,并自减publicfinalintgetAndAdd(intdelta) //获取当前的值,并加上预期的值booleancompareAndSet(intexpect, intupdate) //如果输入的数值等于预期值,则以原子方式将该值设置为输入值(update)publicfinalvoidlazySet(intnewValue)//最终设置为newValue, lazySet 提供了一种比 set 方法更弱的语义,可能导致其他线程在之后的一小段时间内还是可以读到旧的值,但可能更高效。

AtomicInteger 类使用示例 :

// 初始化 AtomicInteger 对象,初始值为 0AtomicIntegeratomicInt = newAtomicInteger(0);
// 使用 getAndSet 方法获取当前值,并设置新值为 3inttempValue = atomicInt.getAndSet(3);
System.out.println("tempValue: " + tempValue + "; atomicInt: " + atomicInt);
// 使用 getAndIncrement 方法获取当前值,并自增 1tempValue = atomicInt.getAndIncrement();
System.out.println("tempValue: " + tempValue + "; atomicInt: " + atomicInt);
// 使用 getAndAdd 方法获取当前值,并增加指定值 5tempValue = atomicInt.getAndAdd(5);
System.out.println("tempValue: " + tempValue + "; atomicInt: " + atomicInt);
// 使用 compareAndSet 方法进行原子性条件更新,期望值为 9,更新值为 10booleanupdateSuccess = atomicInt.compareAndSet(9, 10);
System.out.println("Update Success: " + updateSuccess + "; atomicInt: " + atomicInt);
// 获取当前值intcurrentValue = atomicInt.get();
System.out.println("Current value: " + currentValue);
// 使用 lazySet 方法设置新值为 15atomicInt.lazySet(15);
System.out.println("After lazySet, atomicInt: " + atomicInt);

输出:

tempValue: 0; atomicInt: 3tempValue: 3; atomicInt: 4tempValue: 4; atomicInt: 9UpdateSuccess: true; atomicInt: 10Currentvalue: 10AfterlazySet, atomicInt: 15

数组类型原子类

使用原子的方式更新数组里的某个元素

  • AtomicIntegerArray:整形数组原子类
  • AtomicLongArray:长整形数组原子类
  • AtomicReferenceArray:引用类型数组原子类

上面三个类提供的方法几乎相同,所以我们这里以 AtomicIntegerArray 为例子来介绍。

AtomicIntegerArray 类常用方法

publicfinalintget(inti) //获取 index=i 位置元素的值publicfinalintgetAndSet(inti, intnewValue)//返回 index=i 位置的当前的值,并将其设置为新值:newValuepublicfinalintgetAndIncrement(inti)//获取 index=i 位置元素的值,并让该位置的元素自增publicfinalintgetAndDecrement(inti) //获取 index=i 位置元素的值,并让该位置的元素自减publicfinalintgetAndAdd(inti, intdelta) //获取 index=i 位置元素的值,并加上预期的值booleancompareAndSet(inti, intexpect, intupdate) //如果输入的数值等于预期值,则以原子方式将 index=i 位置的元素值设置为输入值(update)publicfinalvoidlazySet(inti, intnewValue)//最终 将index=i 位置的元素设置为newValue,使用 lazySet 设置之后可能导致其他线程在之后的一小段时间内还是可以读到旧的值。

AtomicIntegerArray 类使用示例 :

int[] nums = {1, 2, 3, 4, 5, 6};
// 创建 AtomicIntegerArrayAtomicIntegerArrayatomicArray = newAtomicIntegerArray(nums);
// 打印 AtomicIntegerArray 中的初始值System.out.println("Initial values in AtomicIntegerArray:");
for (intj = 0; j < nums.length; j++) {
System.out.print("Index " + j + ": " + atomicArray.get(j) + " ");
}
// 使用 getAndSet 方法将索引 0 处的值设置为 2,并返回旧值inttempValue = atomicArray.getAndSet(0, 2);
System.out.println("\nAfter getAndSet(0, 2):");
System.out.println("Returned value: " + tempValue);
for (intj = 0; j < atomicArray.length(); j++) {
System.out.print("Index " + j + ": " + atomicArray.get(j) + " ");
}
// 使用 getAndIncrement 方法将索引 0 处的值加 1,并返回旧值tempValue = atomicArray.getAndIncrement(0);
System.out.println("\nAfter getAndIncrement(0):");
System.out.println("Returned value: " + tempValue);
for (intj = 0; j < atomicArray.length(); j++) {
System.out.print("Index " + j + ": " + atomicArray.get(j) + " ");
}
// 使用 getAndAdd 方法将索引 0 处的值增加 5,并返回旧值tempValue = atomicArray.getAndAdd(0, 5);
System.out.println("\nAfter getAndAdd(0, 5):");
System.out.println("Returned value: " + tempValue);
for (intj = 0; j < atomicArray.length(); j++) {
System.out.print("Index " + j + ": " + atomicArray.get(j) + " ");
}

输出:

Initial values in AtomicIntegerArray:
Index 0: 1 Index 1: 2 Index 2: 3 Index 3: 4 Index 4: 5 Index 5: 6
After getAndSet(0, 2):
Returned value: 1
Index 0: 2 Index 1: 2 Index 2: 3 Index 3: 4 Index 4: 5 Index 5: 6
After getAndIncrement(0):
Returned value: 2
Index 0: 3 Index 1: 2 Index 2: 3 Index 3: 4 Index 4: 5 Index 5: 6
After getAndAdd(0, 5):
Returned value: 3
Index 0: 8 Index 1: 2 Index 2: 3 Index 3: 4 Index 4: 5 Index 5: 6

引用类型原子类

基本类型原子类只能更新一个变量,如果需要原子更新多个变量,需要使用 引用类型原子类。

  • AtomicReference:引用类型原子类
  • AtomicStampedReference:原子更新带有版本号的引用类型。该类将整数值与引用关联起来,可用于解决原子的更新数据和数据的版本号,可以解决使用 CAS 进行原子更新时可能出现的 ABA 问题。
  • AtomicMarkableReference:原子更新带有标记的引用类型。该类将 boolean 标记与引用关联起来,也可以解决使用 CAS 进行原子更新时可能出现的 ABA 问题。

上面三个类提供的方法几乎相同,所以我们这里以 AtomicReference 为例子来介绍。

AtomicReference 类使用示例 :

// Person 类classPerson {
privateStringname;
privateintage;
//省略getter/setter和toString
}
// 创建 AtomicReference 对象并设置初始值AtomicReference<Person> ar = newAtomicReference<>(newPerson("SnailClimb", 22));
// 打印初始值System.out.println("Initial Person: " + ar.get().toString());
// 更新值PersonupdatePerson = newPerson("Daisy", 20);
ar.compareAndSet(ar.get(), updatePerson);
// 打印更新后的值System.out.println("Updated Person: " + ar.get().toString());
// 尝试再次更新PersonanotherUpdatePerson = newPerson("John", 30);
booleanisUpdated = ar.compareAndSet(updatePerson, anotherUpdatePerson);
// 打印是否更新成功及最终值System.out.println("Second Update Success: " + isUpdated);
System.out.println("Final Person: " + ar.get().toString());

输出:

Initial Person: Person{name='SnailClimb', age=22}
Updated Person: Person{name='Daisy', age=20}
Second Update Success: true
Final Person: Person{name='John', age=30}

AtomicStampedReference 类使用示例 :

// 创建一个 AtomicStampedReference 对象,初始值为 "SnailClimb",初始版本号为 1AtomicStampedReference<String> asr = newAtomicStampedReference<>("SnailClimb", 1);
// 打印初始值和版本号int[] initialStamp = newint[1];
StringinitialRef = asr.get(initialStamp);
System.out.println("Initial Reference: " + initialRef + ", Initial Stamp: " + initialStamp[0]);
// 更新值和版本号intoldStamp = initialStamp[0];
StringoldRef = initialRef;
StringnewRef = "Daisy";
intnewStamp = oldStamp + 1;
booleanisUpdated = asr.compareAndSet(oldRef, newRef, oldStamp, newStamp);
System.out.println("Update Success: " + isUpdated);
// 打印更新后的值和版本号int[] updatedStamp = newint[1];
StringupdatedRef = asr.get(updatedStamp);
System.out.println("Updated Reference: " + updatedRef + ", Updated Stamp: " + updatedStamp[0]);
// 尝试用错误的版本号更新booleanisUpdatedWithWrongStamp = asr.compareAndSet(newRef, "John", oldStamp, newStamp + 1);
System.out.println("Update with Wrong Stamp Success: " + isUpdatedWithWrongStamp);
// 打印最终的值和版本号int[] finalStamp = newint[1];
StringfinalRef = asr.get(finalStamp);
System.out.println("Final Reference: " + finalRef + ", Final Stamp: " + finalStamp[0]);

输出结果如下:

Initial Reference: SnailClimb, Initial Stamp: 1
Update Success: true
Updated Reference: Daisy, Updated Stamp: 2
Update with Wrong Stamp Success: false
Final Reference: Daisy, Final Stamp: 2

AtomicMarkableReference 类使用示例 :

// 创建一个 AtomicMarkableReference 对象,初始值为 "SnailClimb",初始标记为 falseAtomicMarkableReference<String> amr = newAtomicMarkableReference<>("SnailClimb", false);
// 打印初始值和标记boolean[] initialMark = newboolean[1];
StringinitialRef = amr.get(initialMark);
System.out.println("Initial Reference: " + initialRef + ", Initial Mark: " + initialMark[0]);
// 更新值和标记StringoldRef = initialRef;
StringnewRef = "Daisy";
booleanoldMark = initialMark[0];
booleannewMark = true;
booleanisUpdated = amr.compareAndSet(oldRef, newRef, oldMark, newMark);
System.out.println("Update Success: " + isUpdated);
// 打印更新后的值和标记boolean[] updatedMark = newboolean[1];
StringupdatedRef = amr.get(updatedMark);
System.out.println("Updated Reference: " + updatedRef + ", Updated Mark: " + updatedMark[0]);
// 尝试用错误的标记更新booleanisUpdatedWithWrongMark = amr.compareAndSet(newRef, "John", oldMark, !newMark);
System.out.println("Update with Wrong Mark Success: " + isUpdatedWithWrongMark);
// 打印最终的值和标记boolean[] finalMark = newboolean[1];
StringfinalRef = amr.get(finalMark);
System.out.println("Final Reference: " + finalRef + ", Final Mark: " + finalMark[0]);

输出结果如下:

Initial Reference: SnailClimb, Initial Mark: false
Update Success: true
Updated Reference: Daisy, Updated Mark: true
Update with Wrong Mark Success: false
Final Reference: Daisy, Final Mark: true

对象的属性修改类型原子类

如果需要原子更新某个类里的某个字段时,需要用到对象的属性修改类型原子类。

  • AtomicIntegerFieldUpdater:原子更新整形字段的更新器
  • AtomicLongFieldUpdater:原子更新长整形字段的更新器
  • AtomicReferenceFieldUpdater:原子更新引用类型里的字段的更新器

要想原子地更新对象的属性需要两步。第一步,因为对象的属性修改类型原子类都是抽象类,所以每次使用都必须使用静态方法 newUpdater() 创建一个更新器,并且需要设置想要更新的类和属性。第二步,目标字段必须使用 volatile 修饰,并与更新器的类型匹配:分别为 intlong 或引用类型;同时不能是 staticfinal 字段。

上面三个类提供的方法几乎相同,所以我们这里以 AtomicIntegerFieldUpdater 为例子来介绍。

AtomicIntegerFieldUpdater 类使用示例 :

// Person 类classPerson {
privateStringname;
// 要使用 AtomicIntegerFieldUpdater,字段必须是 volatile intvolatileintage;
//省略getter/setter和toString
}
// 创建 AtomicIntegerFieldUpdater 对象AtomicIntegerFieldUpdater<Person> ageUpdater = AtomicIntegerFieldUpdater.newUpdater(Person.class, "age");
// 创建 Person 对象Personperson = newPerson("SnailClimb", 22);
// 打印初始值System.out.println("Initial Person: " + person);
// 更新 age 字段ageUpdater.incrementAndGet(person); // 自增System.out.println("After Increment: " + person);
ageUpdater.addAndGet(person, 5); // 增加 5System.out.println("After Adding 5: " + person);
ageUpdater.compareAndSet(person, 28, 30); // 如果当前值是 28,则设置为 30System.out.println("After Compare and Set (28 to 30): " + person);
// 尝试使用错误的比较值进行更新booleanisUpdated = ageUpdater.compareAndSet(person, 28, 35); // 这次应该失败System.out.println("Compare and Set (28 to 35) Success: " + isUpdated);
System.out.println("Final Person: " + person);

输出结果:

Initial Person: Name: SnailClimb, Age: 22
After Increment: Name: SnailClimb, Age: 23
After Adding 5: Name: SnailClimb, Age: 28
After Compare and Set (28 to 30): Name: SnailClimb, Age: 30
Compare and Set (28 to 35) Success: false
Final Person: Name: SnailClimb, Age: 30

参考

  • 《Java 并发编程的艺术》
, 'i'); if (__m === '*' || __re.test(location.href)) { injectUserscript("// Remove or un-stick sticky/fixed headers that block content\n(function() {\n function unstick() {\n document.querySelectorAll('header, nav, [role=\"banner\"], .header, .navbar, .sticky, .fixed-top, [style*=\"position: fixed\"], [style*=\"position:sticky\"]').forEach(function(el) {\n if (el.style.position === 'fixed' || el.style.position === 'sticky' || \n getComputedStyle(el).position === 'fixed' || getComputedStyle(el).position === 'sticky') {\n el.style.position = 'static';\n el.style.top = 'auto';\n el.style.zIndex = 'auto';\n }\n });\n }\n \n unstick();\n \n var observer = new MutationObserver(unstick);\n observer.observe(document.body, { childList: true, subtree: true, attributes: true, attributeFilter: ['style', 'class'] });\n})();", "Kill Sticky Headers"); } } catch(__e) { console.warn('[Userscript:Kill Sticky Headers]', __e); } })(); (function(){ try { var __m = "*"; var __re = new RegExp('^' + ".*" + '
Skip to content

Latest commit

History

History
404 lines (301 loc) · 15.5 KB

File metadata and controls

404 lines (301 loc) · 15.5 KB
titleAtomic 原子类总结
descriptionJava原子类详解:全面总结JUC包Atomic原子类体系、AtomicInteger/AtomicLong/AtomicReference等常用类、基于CAS的线程安全实现、使用场景与性能优势。
categoryJava
tag
Java并发
head
meta
namecontent
keywords
Atomic原子类,AtomicInteger,AtomicLong,AtomicReference,CAS原子操作,JUC并发包,原子类使用

Atomic 原子类介绍

Atomic 翻译成中文是“原子”的意思。在化学上,原子是构成物质的最小单位,在化学反应中不可分割。在编程中,Atomic 指的是一个操作具有原子性,即该操作不可分割、不可中断。即使在多个线程同时执行时,该操作要么全部执行完成,要么不执行,不会被其他线程看到部分完成的状态。

原子类简单来说就是具有原子性操作特征的类。

java.util.concurrent.atomic 包中的 Atomic 原子类提供了一种线程安全的方式来操作单个变量。

Atomic 类依赖于 CAS(Compare-And-Swap,比较并交换)乐观锁来保证其方法的原子性,而不需要使用传统的锁机制(如 synchronized 块或 ReentrantLock)。

这篇文章我们只介绍 Atomic 原子类的概念,具体实现原理可以阅读笔者写的这篇文章:CAS 详解

JUC原子类概览

根据操作的数据类型,可以将 JUC 包中的原子类分为 4 类:

1、基本类型

使用原子的方式更新基本类型

  • AtomicInteger:整型原子类
  • AtomicLong:长整型原子类
  • AtomicBoolean:布尔型原子类

2、数组类型

使用原子的方式更新数组里的某个元素

  • AtomicIntegerArray:整型数组原子类
  • AtomicLongArray:长整型数组原子类
  • AtomicReferenceArray:引用类型数组原子类

3、引用类型

  • AtomicReference:引用类型原子类
  • AtomicMarkableReference:原子更新带有标记的引用类型。该类将 boolean 标记与引用关联起来,可以检测由业务约定的两种状态之间的变化,但一个比特的标记无法记录任意次数的版本变化。
  • AtomicStampedReference:原子更新带有版本号的引用类型。该类将整数值与引用关联起来,可用于解决原子的更新数据和数据的版本号,可以解决使用 CAS 进行原子更新时可能出现的 ABA 问题。

与之相比,AtomicStampedReference 使用整数版本号,更适合检测引用在两次读取之间是否经历过多次变化。

4、对象的属性修改类型

  • AtomicIntegerFieldUpdater:原子更新整型字段的更新器
  • AtomicLongFieldUpdater:原子更新长整型字段的更新器
  • AtomicReferenceFieldUpdater:原子更新引用类型里的字段

基本类型原子类

使用原子的方式更新基本类型

  • AtomicInteger:整型原子类
  • AtomicLong:长整型原子类
  • AtomicBoolean:布尔型原子类

上面三个类提供的方法几乎相同,所以我们这里以 AtomicInteger 为例子来介绍。

AtomicInteger 类常用方法

publicfinalintget() //获取当前的值publicfinalintgetAndSet(intnewValue)//获取当前的值,并设置新的值publicfinalintgetAndIncrement()//获取当前的值,并自增publicfinalintgetAndDecrement() //获取当前的值,并自减publicfinalintgetAndAdd(intdelta) //获取当前的值,并加上预期的值booleancompareAndSet(intexpect, intupdate) //如果输入的数值等于预期值,则以原子方式将该值设置为输入值(update)publicfinalvoidlazySet(intnewValue)//最终设置为newValue, lazySet 提供了一种比 set 方法更弱的语义,可能导致其他线程在之后的一小段时间内还是可以读到旧的值,但可能更高效。

AtomicInteger 类使用示例 :

// 初始化 AtomicInteger 对象,初始值为 0AtomicIntegeratomicInt = newAtomicInteger(0);
// 使用 getAndSet 方法获取当前值,并设置新值为 3inttempValue = atomicInt.getAndSet(3);
System.out.println("tempValue: " + tempValue + "; atomicInt: " + atomicInt);
// 使用 getAndIncrement 方法获取当前值,并自增 1tempValue = atomicInt.getAndIncrement();
System.out.println("tempValue: " + tempValue + "; atomicInt: " + atomicInt);
// 使用 getAndAdd 方法获取当前值,并增加指定值 5tempValue = atomicInt.getAndAdd(5);
System.out.println("tempValue: " + tempValue + "; atomicInt: " + atomicInt);
// 使用 compareAndSet 方法进行原子性条件更新,期望值为 9,更新值为 10booleanupdateSuccess = atomicInt.compareAndSet(9, 10);
System.out.println("Update Success: " + updateSuccess + "; atomicInt: " + atomicInt);
// 获取当前值intcurrentValue = atomicInt.get();
System.out.println("Current value: " + currentValue);
// 使用 lazySet 方法设置新值为 15atomicInt.lazySet(15);
System.out.println("After lazySet, atomicInt: " + atomicInt);

输出:

tempValue: 0; atomicInt: 3tempValue: 3; atomicInt: 4tempValue: 4; atomicInt: 9UpdateSuccess: true; atomicInt: 10Currentvalue: 10AfterlazySet, atomicInt: 15

数组类型原子类

使用原子的方式更新数组里的某个元素

  • AtomicIntegerArray:整形数组原子类
  • AtomicLongArray:长整形数组原子类
  • AtomicReferenceArray:引用类型数组原子类

上面三个类提供的方法几乎相同,所以我们这里以 AtomicIntegerArray 为例子来介绍。

AtomicIntegerArray 类常用方法

publicfinalintget(inti) //获取 index=i 位置元素的值publicfinalintgetAndSet(inti, intnewValue)//返回 index=i 位置的当前的值,并将其设置为新值:newValuepublicfinalintgetAndIncrement(inti)//获取 index=i 位置元素的值,并让该位置的元素自增publicfinalintgetAndDecrement(inti) //获取 index=i 位置元素的值,并让该位置的元素自减publicfinalintgetAndAdd(inti, intdelta) //获取 index=i 位置元素的值,并加上预期的值booleancompareAndSet(inti, intexpect, intupdate) //如果输入的数值等于预期值,则以原子方式将 index=i 位置的元素值设置为输入值(update)publicfinalvoidlazySet(inti, intnewValue)//最终 将index=i 位置的元素设置为newValue,使用 lazySet 设置之后可能导致其他线程在之后的一小段时间内还是可以读到旧的值。

AtomicIntegerArray 类使用示例 :

int[] nums = {1, 2, 3, 4, 5, 6};
// 创建 AtomicIntegerArrayAtomicIntegerArrayatomicArray = newAtomicIntegerArray(nums);
// 打印 AtomicIntegerArray 中的初始值System.out.println("Initial values in AtomicIntegerArray:");
for (intj = 0; j < nums.length; j++) {
System.out.print("Index " + j + ": " + atomicArray.get(j) + " ");
}
// 使用 getAndSet 方法将索引 0 处的值设置为 2,并返回旧值inttempValue = atomicArray.getAndSet(0, 2);
System.out.println("\nAfter getAndSet(0, 2):");
System.out.println("Returned value: " + tempValue);
for (intj = 0; j < atomicArray.length(); j++) {
System.out.print("Index " + j + ": " + atomicArray.get(j) + " ");
}
// 使用 getAndIncrement 方法将索引 0 处的值加 1,并返回旧值tempValue = atomicArray.getAndIncrement(0);
System.out.println("\nAfter getAndIncrement(0):");
System.out.println("Returned value: " + tempValue);
for (intj = 0; j < atomicArray.length(); j++) {
System.out.print("Index " + j + ": " + atomicArray.get(j) + " ");
}
// 使用 getAndAdd 方法将索引 0 处的值增加 5,并返回旧值tempValue = atomicArray.getAndAdd(0, 5);
System.out.println("\nAfter getAndAdd(0, 5):");
System.out.println("Returned value: " + tempValue);
for (intj = 0; j < atomicArray.length(); j++) {
System.out.print("Index " + j + ": " + atomicArray.get(j) + " ");
}

输出:

Initial values in AtomicIntegerArray:
Index 0: 1 Index 1: 2 Index 2: 3 Index 3: 4 Index 4: 5 Index 5: 6
After getAndSet(0, 2):
Returned value: 1
Index 0: 2 Index 1: 2 Index 2: 3 Index 3: 4 Index 4: 5 Index 5: 6
After getAndIncrement(0):
Returned value: 2
Index 0: 3 Index 1: 2 Index 2: 3 Index 3: 4 Index 4: 5 Index 5: 6
After getAndAdd(0, 5):
Returned value: 3
Index 0: 8 Index 1: 2 Index 2: 3 Index 3: 4 Index 4: 5 Index 5: 6

引用类型原子类

基本类型原子类只能更新一个变量,如果需要原子更新多个变量,需要使用 引用类型原子类。

  • AtomicReference:引用类型原子类
  • AtomicStampedReference:原子更新带有版本号的引用类型。该类将整数值与引用关联起来,可用于解决原子的更新数据和数据的版本号,可以解决使用 CAS 进行原子更新时可能出现的 ABA 问题。
  • AtomicMarkableReference:原子更新带有标记的引用类型。该类将 boolean 标记与引用关联起来,也可以解决使用 CAS 进行原子更新时可能出现的 ABA 问题。

上面三个类提供的方法几乎相同,所以我们这里以 AtomicReference 为例子来介绍。

AtomicReference 类使用示例 :

// Person 类classPerson {
privateStringname;
privateintage;
//省略getter/setter和toString
}
// 创建 AtomicReference 对象并设置初始值AtomicReference<Person> ar = newAtomicReference<>(newPerson("SnailClimb", 22));
// 打印初始值System.out.println("Initial Person: " + ar.get().toString());
// 更新值PersonupdatePerson = newPerson("Daisy", 20);
ar.compareAndSet(ar.get(), updatePerson);
// 打印更新后的值System.out.println("Updated Person: " + ar.get().toString());
// 尝试再次更新PersonanotherUpdatePerson = newPerson("John", 30);
booleanisUpdated = ar.compareAndSet(updatePerson, anotherUpdatePerson);
// 打印是否更新成功及最终值System.out.println("Second Update Success: " + isUpdated);
System.out.println("Final Person: " + ar.get().toString());

输出:

Initial Person: Person{name='SnailClimb', age=22}
Updated Person: Person{name='Daisy', age=20}
Second Update Success: true
Final Person: Person{name='John', age=30}

AtomicStampedReference 类使用示例 :

// 创建一个 AtomicStampedReference 对象,初始值为 "SnailClimb",初始版本号为 1AtomicStampedReference<String> asr = newAtomicStampedReference<>("SnailClimb", 1);
// 打印初始值和版本号int[] initialStamp = newint[1];
StringinitialRef = asr.get(initialStamp);
System.out.println("Initial Reference: " + initialRef + ", Initial Stamp: " + initialStamp[0]);
// 更新值和版本号intoldStamp = initialStamp[0];
StringoldRef = initialRef;
StringnewRef = "Daisy";
intnewStamp = oldStamp + 1;
booleanisUpdated = asr.compareAndSet(oldRef, newRef, oldStamp, newStamp);
System.out.println("Update Success: " + isUpdated);
// 打印更新后的值和版本号int[] updatedStamp = newint[1];
StringupdatedRef = asr.get(updatedStamp);
System.out.println("Updated Reference: " + updatedRef + ", Updated Stamp: " + updatedStamp[0]);
// 尝试用错误的版本号更新booleanisUpdatedWithWrongStamp = asr.compareAndSet(newRef, "John", oldStamp, newStamp + 1);
System.out.println("Update with Wrong Stamp Success: " + isUpdatedWithWrongStamp);
// 打印最终的值和版本号int[] finalStamp = newint[1];
StringfinalRef = asr.get(finalStamp);
System.out.println("Final Reference: " + finalRef + ", Final Stamp: " + finalStamp[0]);

输出结果如下:

Initial Reference: SnailClimb, Initial Stamp: 1
Update Success: true
Updated Reference: Daisy, Updated Stamp: 2
Update with Wrong Stamp Success: false
Final Reference: Daisy, Final Stamp: 2

AtomicMarkableReference 类使用示例 :

// 创建一个 AtomicMarkableReference 对象,初始值为 "SnailClimb",初始标记为 falseAtomicMarkableReference<String> amr = newAtomicMarkableReference<>("SnailClimb", false);
// 打印初始值和标记boolean[] initialMark = newboolean[1];
StringinitialRef = amr.get(initialMark);
System.out.println("Initial Reference: " + initialRef + ", Initial Mark: " + initialMark[0]);
// 更新值和标记StringoldRef = initialRef;
StringnewRef = "Daisy";
booleanoldMark = initialMark[0];
booleannewMark = true;
booleanisUpdated = amr.compareAndSet(oldRef, newRef, oldMark, newMark);
System.out.println("Update Success: " + isUpdated);
// 打印更新后的值和标记boolean[] updatedMark = newboolean[1];
StringupdatedRef = amr.get(updatedMark);
System.out.println("Updated Reference: " + updatedRef + ", Updated Mark: " + updatedMark[0]);
// 尝试用错误的标记更新booleanisUpdatedWithWrongMark = amr.compareAndSet(newRef, "John", oldMark, !newMark);
System.out.println("Update with Wrong Mark Success: " + isUpdatedWithWrongMark);
// 打印最终的值和标记boolean[] finalMark = newboolean[1];
StringfinalRef = amr.get(finalMark);
System.out.println("Final Reference: " + finalRef + ", Final Mark: " + finalMark[0]);

输出结果如下:

Initial Reference: SnailClimb, Initial Mark: false
Update Success: true
Updated Reference: Daisy, Updated Mark: true
Update with Wrong Mark Success: false
Final Reference: Daisy, Final Mark: true

对象的属性修改类型原子类

如果需要原子更新某个类里的某个字段时,需要用到对象的属性修改类型原子类。

  • AtomicIntegerFieldUpdater:原子更新整形字段的更新器
  • AtomicLongFieldUpdater:原子更新长整形字段的更新器
  • AtomicReferenceFieldUpdater:原子更新引用类型里的字段的更新器

要想原子地更新对象的属性需要两步。第一步,因为对象的属性修改类型原子类都是抽象类,所以每次使用都必须使用静态方法 newUpdater() 创建一个更新器,并且需要设置想要更新的类和属性。第二步,目标字段必须使用 volatile 修饰,并与更新器的类型匹配:分别为 intlong 或引用类型;同时不能是 staticfinal 字段。

上面三个类提供的方法几乎相同,所以我们这里以 AtomicIntegerFieldUpdater 为例子来介绍。

AtomicIntegerFieldUpdater 类使用示例 :

// Person 类classPerson {
privateStringname;
// 要使用 AtomicIntegerFieldUpdater,字段必须是 volatile intvolatileintage;
//省略getter/setter和toString
}
// 创建 AtomicIntegerFieldUpdater 对象AtomicIntegerFieldUpdater<Person> ageUpdater = AtomicIntegerFieldUpdater.newUpdater(Person.class, "age");
// 创建 Person 对象Personperson = newPerson("SnailClimb", 22);
// 打印初始值System.out.println("Initial Person: " + person);
// 更新 age 字段ageUpdater.incrementAndGet(person); // 自增System.out.println("After Increment: " + person);
ageUpdater.addAndGet(person, 5); // 增加 5System.out.println("After Adding 5: " + person);
ageUpdater.compareAndSet(person, 28, 30); // 如果当前值是 28,则设置为 30System.out.println("After Compare and Set (28 to 30): " + person);
// 尝试使用错误的比较值进行更新booleanisUpdated = ageUpdater.compareAndSet(person, 28, 35); // 这次应该失败System.out.println("Compare and Set (28 to 35) Success: " + isUpdated);
System.out.println("Final Person: " + person);

输出结果:

Initial Person: Name: SnailClimb, Age: 22
After Increment: Name: SnailClimb, Age: 23
After Adding 5: Name: SnailClimb, Age: 28
After Compare and Set (28 to 30): Name: SnailClimb, Age: 30
Compare and Set (28 to 35) Success: false
Final Person: Name: SnailClimb, Age: 30

参考

  • 《Java 并发编程的艺术》
, 'i'); if (__m === '*' || __re.test(location.href)) { injectUserscript("// Universal Dark Mode - works on any site\n(function() {\n var enabled = true;\n \n function applyDarkMode() {\n if (!enabled) return;\n \n // Create style element if it doesn't exist\n var style = document.getElementById('universal-dark-mode-style');\n if (!style) {\n style = document.createElement('style');\n style.id = 'universal-dark-mode-style';\n document.head.appendChild(style);\n }\n \n // Dark mode CSS - inverts colors but preserves images/video\n style.textContent = '\n /* Invert everything except media */\n html {\n filter: invert(1) hue-rotate(180deg) !important;\n background: #1a1a2e !important;\n }\n \n /* Restore images, videos, iframes, canvas */\n img, video, iframe, canvas, svg, picture, [style*=\"background-image\"] {\n filter: invert(1) hue-rotate(180deg) !important;\n }\n \n /* Preserve specific elements that should not be inverted */\n .no-dark-mode, .no-dark-mode *,\n [data-theme=\"light\"], [data-theme=\"light\"],\n .ace_editor, .ace_editor *,\n .CodeMirror, .CodeMirror *,\n .monaco-editor, .monaco-editor *,\n .markdown-body pre, .markdown-body pre *,\n .highlight, .highlight *,\n pre code, pre code * {\n filter: none !important;\n }\n \n /* Fix common UI elements */\n .modal, .popup, .dropdown-menu, .tooltip, .popover {\n filter: invert(1) hue-rotate(180deg) !important;\n background: #2d2d44 !important;\n border-color: #444 !important;\n }\n \n /* Scrollbars */\n ::-webkit-scrollbar { background: #1a1a2e !important; }\n ::-webkit-scrollbar-thumb { background: #444 !important; }\n ::-webkit-scrollbar-thumb:hover { background: #555 !important; }\n \n /* Selection */\n ::selection { background: #4ecdc4 !important; color: #1a1a2e !important; }\n ::-moz-selection { background: #4ecdc4 !important; color: #1a1a2e !important; }\n ';\n }\n \n function removeDarkMode() {\n var style = document.getElementById('universal-dark-mode-style');\n if (style) style.remove();\n }\n \n // Toggle with Alt+Shift+D\n document.addEventListener('keydown', function(e) {\n if (e.altKey && e.shiftKey && e.key === 'D') {\n e.preventDefault();\n enabled = !enabled;\n if (enabled) {\n applyDarkMode();\n console.log('[Universal Dark Mode] Enabled');\n } else {\n removeDarkMode();\n console.log('[Universal Dark Mode] Disabled');\n }\n }\n });\n \n // Apply on load\n applyDarkMode();\n \n // Re-apply on dynamic content\n var observer = new MutationObserver(function(mutations) {\n if (enabled && !document.getElementById('universal-dark-mode-style')) {\n applyDarkMode();\n }\n });\n observer.observe(document.head, { childList: true });\n \n console.log('[Universal Dark Mode] Loaded - Press Alt+Shift+D to toggle');\n})();", "Universal Dark Mode"); } } catch(__e) { console.warn('[Userscript:Universal Dark Mode]', __e); } })(); })();
Skip to content

Latest commit

History

History
404 lines (301 loc) · 15.5 KB

File metadata and controls

404 lines (301 loc) · 15.5 KB
titleAtomic 原子类总结
descriptionJava原子类详解:全面总结JUC包Atomic原子类体系、AtomicInteger/AtomicLong/AtomicReference等常用类、基于CAS的线程安全实现、使用场景与性能优势。
categoryJava
tag
Java并发
head
meta
namecontent
keywords
Atomic原子类,AtomicInteger,AtomicLong,AtomicReference,CAS原子操作,JUC并发包,原子类使用

Atomic 原子类介绍

Atomic 翻译成中文是“原子”的意思。在化学上,原子是构成物质的最小单位,在化学反应中不可分割。在编程中,Atomic 指的是一个操作具有原子性,即该操作不可分割、不可中断。即使在多个线程同时执行时,该操作要么全部执行完成,要么不执行,不会被其他线程看到部分完成的状态。

原子类简单来说就是具有原子性操作特征的类。

java.util.concurrent.atomic 包中的 Atomic 原子类提供了一种线程安全的方式来操作单个变量。

Atomic 类依赖于 CAS(Compare-And-Swap,比较并交换)乐观锁来保证其方法的原子性,而不需要使用传统的锁机制(如 synchronized 块或 ReentrantLock)。

这篇文章我们只介绍 Atomic 原子类的概念,具体实现原理可以阅读笔者写的这篇文章:CAS 详解

JUC原子类概览

根据操作的数据类型,可以将 JUC 包中的原子类分为 4 类:

1、基本类型

使用原子的方式更新基本类型

  • AtomicInteger:整型原子类
  • AtomicLong:长整型原子类
  • AtomicBoolean:布尔型原子类

2、数组类型

使用原子的方式更新数组里的某个元素

  • AtomicIntegerArray:整型数组原子类
  • AtomicLongArray:长整型数组原子类
  • AtomicReferenceArray:引用类型数组原子类

3、引用类型

  • AtomicReference:引用类型原子类
  • AtomicMarkableReference:原子更新带有标记的引用类型。该类将 boolean 标记与引用关联起来,可以检测由业务约定的两种状态之间的变化,但一个比特的标记无法记录任意次数的版本变化。
  • AtomicStampedReference:原子更新带有版本号的引用类型。该类将整数值与引用关联起来,可用于解决原子的更新数据和数据的版本号,可以解决使用 CAS 进行原子更新时可能出现的 ABA 问题。

与之相比,AtomicStampedReference 使用整数版本号,更适合检测引用在两次读取之间是否经历过多次变化。

4、对象的属性修改类型

  • AtomicIntegerFieldUpdater:原子更新整型字段的更新器
  • AtomicLongFieldUpdater:原子更新长整型字段的更新器
  • AtomicReferenceFieldUpdater:原子更新引用类型里的字段

基本类型原子类

使用原子的方式更新基本类型

  • AtomicInteger:整型原子类
  • AtomicLong:长整型原子类
  • AtomicBoolean:布尔型原子类

上面三个类提供的方法几乎相同,所以我们这里以 AtomicInteger 为例子来介绍。

AtomicInteger 类常用方法

publicfinalintget() //获取当前的值publicfinalintgetAndSet(intnewValue)//获取当前的值,并设置新的值publicfinalintgetAndIncrement()//获取当前的值,并自增publicfinalintgetAndDecrement() //获取当前的值,并自减publicfinalintgetAndAdd(intdelta) //获取当前的值,并加上预期的值booleancompareAndSet(intexpect, intupdate) //如果输入的数值等于预期值,则以原子方式将该值设置为输入值(update)publicfinalvoidlazySet(intnewValue)//最终设置为newValue, lazySet 提供了一种比 set 方法更弱的语义,可能导致其他线程在之后的一小段时间内还是可以读到旧的值,但可能更高效。

AtomicInteger 类使用示例 :

// 初始化 AtomicInteger 对象,初始值为 0AtomicIntegeratomicInt = newAtomicInteger(0);
// 使用 getAndSet 方法获取当前值,并设置新值为 3inttempValue = atomicInt.getAndSet(3);
System.out.println("tempValue: " + tempValue + "; atomicInt: " + atomicInt);
// 使用 getAndIncrement 方法获取当前值,并自增 1tempValue = atomicInt.getAndIncrement();
System.out.println("tempValue: " + tempValue + "; atomicInt: " + atomicInt);
// 使用 getAndAdd 方法获取当前值,并增加指定值 5tempValue = atomicInt.getAndAdd(5);
System.out.println("tempValue: " + tempValue + "; atomicInt: " + atomicInt);
// 使用 compareAndSet 方法进行原子性条件更新,期望值为 9,更新值为 10booleanupdateSuccess = atomicInt.compareAndSet(9, 10);
System.out.println("Update Success: " + updateSuccess + "; atomicInt: " + atomicInt);
// 获取当前值intcurrentValue = atomicInt.get();
System.out.println("Current value: " + currentValue);
// 使用 lazySet 方法设置新值为 15atomicInt.lazySet(15);
System.out.println("After lazySet, atomicInt: " + atomicInt);

输出:

tempValue: 0; atomicInt: 3tempValue: 3; atomicInt: 4tempValue: 4; atomicInt: 9UpdateSuccess: true; atomicInt: 10Currentvalue: 10AfterlazySet, atomicInt: 15

数组类型原子类

使用原子的方式更新数组里的某个元素

  • AtomicIntegerArray:整形数组原子类
  • AtomicLongArray:长整形数组原子类
  • AtomicReferenceArray:引用类型数组原子类

上面三个类提供的方法几乎相同,所以我们这里以 AtomicIntegerArray 为例子来介绍。

AtomicIntegerArray 类常用方法

publicfinalintget(inti) //获取 index=i 位置元素的值publicfinalintgetAndSet(inti, intnewValue)//返回 index=i 位置的当前的值,并将其设置为新值:newValuepublicfinalintgetAndIncrement(inti)//获取 index=i 位置元素的值,并让该位置的元素自增publicfinalintgetAndDecrement(inti) //获取 index=i 位置元素的值,并让该位置的元素自减publicfinalintgetAndAdd(inti, intdelta) //获取 index=i 位置元素的值,并加上预期的值booleancompareAndSet(inti, intexpect, intupdate) //如果输入的数值等于预期值,则以原子方式将 index=i 位置的元素值设置为输入值(update)publicfinalvoidlazySet(inti, intnewValue)//最终 将index=i 位置的元素设置为newValue,使用 lazySet 设置之后可能导致其他线程在之后的一小段时间内还是可以读到旧的值。

AtomicIntegerArray 类使用示例 :

int[] nums = {1, 2, 3, 4, 5, 6};
// 创建 AtomicIntegerArrayAtomicIntegerArrayatomicArray = newAtomicIntegerArray(nums);
// 打印 AtomicIntegerArray 中的初始值System.out.println("Initial values in AtomicIntegerArray:");
for (intj = 0; j < nums.length; j++) {
System.out.print("Index " + j + ": " + atomicArray.get(j) + " ");
}
// 使用 getAndSet 方法将索引 0 处的值设置为 2,并返回旧值inttempValue = atomicArray.getAndSet(0, 2);
System.out.println("\nAfter getAndSet(0, 2):");
System.out.println("Returned value: " + tempValue);
for (intj = 0; j < atomicArray.length(); j++) {
System.out.print("Index " + j + ": " + atomicArray.get(j) + " ");
}
// 使用 getAndIncrement 方法将索引 0 处的值加 1,并返回旧值tempValue = atomicArray.getAndIncrement(0);
System.out.println("\nAfter getAndIncrement(0):");
System.out.println("Returned value: " + tempValue);
for (intj = 0; j < atomicArray.length(); j++) {
System.out.print("Index " + j + ": " + atomicArray.get(j) + " ");
}
// 使用 getAndAdd 方法将索引 0 处的值增加 5,并返回旧值tempValue = atomicArray.getAndAdd(0, 5);
System.out.println("\nAfter getAndAdd(0, 5):");
System.out.println("Returned value: " + tempValue);
for (intj = 0; j < atomicArray.length(); j++) {
System.out.print("Index " + j + ": " + atomicArray.get(j) + " ");
}

输出:

Initial values in AtomicIntegerArray:
Index 0: 1 Index 1: 2 Index 2: 3 Index 3: 4 Index 4: 5 Index 5: 6
After getAndSet(0, 2):
Returned value: 1
Index 0: 2 Index 1: 2 Index 2: 3 Index 3: 4 Index 4: 5 Index 5: 6
After getAndIncrement(0):
Returned value: 2
Index 0: 3 Index 1: 2 Index 2: 3 Index 3: 4 Index 4: 5 Index 5: 6
After getAndAdd(0, 5):
Returned value: 3
Index 0: 8 Index 1: 2 Index 2: 3 Index 3: 4 Index 4: 5 Index 5: 6

引用类型原子类

基本类型原子类只能更新一个变量,如果需要原子更新多个变量,需要使用 引用类型原子类。

  • AtomicReference:引用类型原子类
  • AtomicStampedReference:原子更新带有版本号的引用类型。该类将整数值与引用关联起来,可用于解决原子的更新数据和数据的版本号,可以解决使用 CAS 进行原子更新时可能出现的 ABA 问题。
  • AtomicMarkableReference:原子更新带有标记的引用类型。该类将 boolean 标记与引用关联起来,也可以解决使用 CAS 进行原子更新时可能出现的 ABA 问题。

上面三个类提供的方法几乎相同,所以我们这里以 AtomicReference 为例子来介绍。

AtomicReference 类使用示例 :

// Person 类classPerson {
privateStringname;
privateintage;
//省略getter/setter和toString
}
// 创建 AtomicReference 对象并设置初始值AtomicReference<Person> ar = newAtomicReference<>(newPerson("SnailClimb", 22));
// 打印初始值System.out.println("Initial Person: " + ar.get().toString());
// 更新值PersonupdatePerson = newPerson("Daisy", 20);
ar.compareAndSet(ar.get(), updatePerson);
// 打印更新后的值System.out.println("Updated Person: " + ar.get().toString());
// 尝试再次更新PersonanotherUpdatePerson = newPerson("John", 30);
booleanisUpdated = ar.compareAndSet(updatePerson, anotherUpdatePerson);
// 打印是否更新成功及最终值System.out.println("Second Update Success: " + isUpdated);
System.out.println("Final Person: " + ar.get().toString());

输出:

Initial Person: Person{name='SnailClimb', age=22}
Updated Person: Person{name='Daisy', age=20}
Second Update Success: true
Final Person: Person{name='John', age=30}

AtomicStampedReference 类使用示例 :

// 创建一个 AtomicStampedReference 对象,初始值为 "SnailClimb",初始版本号为 1AtomicStampedReference<String> asr = newAtomicStampedReference<>("SnailClimb", 1);
// 打印初始值和版本号int[] initialStamp = newint[1];
StringinitialRef = asr.get(initialStamp);
System.out.println("Initial Reference: " + initialRef + ", Initial Stamp: " + initialStamp[0]);
// 更新值和版本号intoldStamp = initialStamp[0];
StringoldRef = initialRef;
StringnewRef = "Daisy";
intnewStamp = oldStamp + 1;
booleanisUpdated = asr.compareAndSet(oldRef, newRef, oldStamp, newStamp);
System.out.println("Update Success: " + isUpdated);
// 打印更新后的值和版本号int[] updatedStamp = newint[1];
StringupdatedRef = asr.get(updatedStamp);
System.out.println("Updated Reference: " + updatedRef + ", Updated Stamp: " + updatedStamp[0]);
// 尝试用错误的版本号更新booleanisUpdatedWithWrongStamp = asr.compareAndSet(newRef, "John", oldStamp, newStamp + 1);
System.out.println("Update with Wrong Stamp Success: " + isUpdatedWithWrongStamp);
// 打印最终的值和版本号int[] finalStamp = newint[1];
StringfinalRef = asr.get(finalStamp);
System.out.println("Final Reference: " + finalRef + ", Final Stamp: " + finalStamp[0]);

输出结果如下:

Initial Reference: SnailClimb, Initial Stamp: 1
Update Success: true
Updated Reference: Daisy, Updated Stamp: 2
Update with Wrong Stamp Success: false
Final Reference: Daisy, Final Stamp: 2

AtomicMarkableReference 类使用示例 :

// 创建一个 AtomicMarkableReference 对象,初始值为 "SnailClimb",初始标记为 falseAtomicMarkableReference<String> amr = newAtomicMarkableReference<>("SnailClimb", false);
// 打印初始值和标记boolean[] initialMark = newboolean[1];
StringinitialRef = amr.get(initialMark);
System.out.println("Initial Reference: " + initialRef + ", Initial Mark: " + initialMark[0]);
// 更新值和标记StringoldRef = initialRef;
StringnewRef = "Daisy";
booleanoldMark = initialMark[0];
booleannewMark = true;
booleanisUpdated = amr.compareAndSet(oldRef, newRef, oldMark, newMark);
System.out.println("Update Success: " + isUpdated);
// 打印更新后的值和标记boolean[] updatedMark = newboolean[1];
StringupdatedRef = amr.get(updatedMark);
System.out.println("Updated Reference: " + updatedRef + ", Updated Mark: " + updatedMark[0]);
// 尝试用错误的标记更新booleanisUpdatedWithWrongMark = amr.compareAndSet(newRef, "John", oldMark, !newMark);
System.out.println("Update with Wrong Mark Success: " + isUpdatedWithWrongMark);
// 打印最终的值和标记boolean[] finalMark = newboolean[1];
StringfinalRef = amr.get(finalMark);
System.out.println("Final Reference: " + finalRef + ", Final Mark: " + finalMark[0]);

输出结果如下:

Initial Reference: SnailClimb, Initial Mark: false
Update Success: true
Updated Reference: Daisy, Updated Mark: true
Update with Wrong Mark Success: false
Final Reference: Daisy, Final Mark: true

对象的属性修改类型原子类

如果需要原子更新某个类里的某个字段时,需要用到对象的属性修改类型原子类。

  • AtomicIntegerFieldUpdater:原子更新整形字段的更新器
  • AtomicLongFieldUpdater:原子更新长整形字段的更新器
  • AtomicReferenceFieldUpdater:原子更新引用类型里的字段的更新器

要想原子地更新对象的属性需要两步。第一步,因为对象的属性修改类型原子类都是抽象类,所以每次使用都必须使用静态方法 newUpdater() 创建一个更新器,并且需要设置想要更新的类和属性。第二步,目标字段必须使用 volatile 修饰,并与更新器的类型匹配:分别为 intlong 或引用类型;同时不能是 staticfinal 字段。

上面三个类提供的方法几乎相同,所以我们这里以 AtomicIntegerFieldUpdater 为例子来介绍。

AtomicIntegerFieldUpdater 类使用示例 :

// Person 类classPerson {
privateStringname;
// 要使用 AtomicIntegerFieldUpdater,字段必须是 volatile intvolatileintage;
//省略getter/setter和toString
}
// 创建 AtomicIntegerFieldUpdater 对象AtomicIntegerFieldUpdater<Person> ageUpdater = AtomicIntegerFieldUpdater.newUpdater(Person.class, "age");
// 创建 Person 对象Personperson = newPerson("SnailClimb", 22);
// 打印初始值System.out.println("Initial Person: " + person);
// 更新 age 字段ageUpdater.incrementAndGet(person); // 自增System.out.println("After Increment: " + person);
ageUpdater.addAndGet(person, 5); // 增加 5System.out.println("After Adding 5: " + person);
ageUpdater.compareAndSet(person, 28, 30); // 如果当前值是 28,则设置为 30System.out.println("After Compare and Set (28 to 30): " + person);
// 尝试使用错误的比较值进行更新booleanisUpdated = ageUpdater.compareAndSet(person, 28, 35); // 这次应该失败System.out.println("Compare and Set (28 to 35) Success: " + isUpdated);
System.out.println("Final Person: " + person);

输出结果:

Initial Person: Name: SnailClimb, Age: 22
After Increment: Name: SnailClimb, Age: 23
After Adding 5: Name: SnailClimb, Age: 28
After Compare and Set (28 to 30): Name: SnailClimb, Age: 30
Compare and Set (28 to 35) Success: false
Final Person: Name: SnailClimb, Age: 30

参考

  • 《Java 并发编程的艺术》