Repository files navigation

Neo4j GraphRAG Package for Python

The official Neo4j GraphRAG package for Python enables developers to build graph retrieval augmented generation (GraphRAG) applications using the power of Neo4j and Python. As a first-party library, it offers a robust, feature-rich, and high-performance solution, with the added assurance of long-term support and maintenance directly from Neo4j.

📄 Documentation

Documentation can be found here

Resources

A series of blog posts demonstrating how to use this package:

A list of Neo4j GenAI-related features can also be found at Neo4j GenAI Ecosystem.

🐍 Python Version Support

VersionSupported?
3.14
3.13
3.12
3.11
3.10

📦 Installation

To install the latest stable version, run:

pip install neo4j-graphrag

Optional Dependencies

This package has some optional features that can be enabled using the extra dependencies described below:

  • LLM providers (at least one is required for RAG and KG Builder Pipeline):
    • ollama: LLMs from Ollama
    • openai: LLMs from OpenAI (including AzureOpenAI)
    • google: LLMs from Vertex AI
    • cohere: LLMs from Cohere
    • anthropic: LLMs from Anthropic
    • mistralai: LLMs from MistralAI
  • sentence-transformers : to use embeddings from the sentence-transformers Python package
  • Vector database (to use :ref:External Retrievers):
    • weaviate: store vectors in Weaviate
    • pinecone: store vectors in Pinecone
    • qdrant: store vectors in Qdrant
  • experimental: experimental features mainly related to the Knowledge Graph creation pipelines.
  • nlp: installs spaCy for NLP pipelines, used by SpaCySemanticMatchResolver in the experimental KG builder components.
  • fuzzy-matching: installs RapidFuzz, used by FuzzyMatchResolver in the experimental KG builder components.

Note: The nlp extra is currently not supported on Python 3.14 due to an upstream spaCy import-time issue (spaCy #13895). Use Python 3.13 or earlier for spaCy-based features until that is resolved upstream.

Install package with optional dependencies with (for instance):

pip install "neo4j-graphrag[openai]"

💻 Example Usage

The scripts below demonstrate how to get started with the package and make use of its key features. To run these examples, ensure that you have a Neo4j instance up and running and update the NEO4J_URI, NEO4J_USERNAME, and NEO4J_PASSWORD variables in each script with the details of your Neo4j instance. For the examples, make sure to export your OpenAI key as an environment variable named OPENAI_API_KEY. Additional examples are available in the examples folder.

Knowledge Graph Construction

NOTE: The APOC core library must be installed in your Neo4j instance in order to use this feature

This package offers two methods for constructing a knowledge graph.

The Pipeline class provides extensive customization options, making it ideal for advanced use cases. See the examples/pipeline folder for examples of how to use this class.

For a more streamlined approach, the SimpleKGPipeline class offers a simplified abstraction layer over the Pipeline, making it easier to build knowledge graphs. Both classes support working directly with text and PDFs.

importasynciofromneo4jimportGraphDatabasefromneo4j_graphrag.embeddingsimportOpenAIEmbeddingsfromneo4j_graphrag.experimental.pipeline.kg_builderimportSimpleKGPipelinefromneo4j_graphrag.llmimportOpenAILLMNEO4J_URI="neo4j://localhost:7687"NEO4J_USERNAME="neo4j"NEO4J_PASSWORD="password"# Connect to the Neo4j databasedriver=GraphDatabase.driver(NEO4J_URI, auth=(NEO4J_USERNAME, NEO4J_PASSWORD))
# List the entities and relations the LLM should look for in the textnode_types= ["Person", "House", "Planet"]
relationship_types= ["PARENT_OF", "HEIR_OF", "RULES"]
patterns= [
("Person", "PARENT_OF", "Person"),
("Person", "HEIR_OF", "House"),
("House", "RULES", "Planet"),
]
# Create an Embedder objectembedder=OpenAIEmbeddings(model="text-embedding-3-large")
# Instantiate the LLMllm=OpenAILLM(
model_name="gpt-5",
model_params={
"max_tokens": 2000,
"response_format": {"type": "json_object"},
"temperature": 0,
},
)
# Instantiate the SimpleKGPipelinekg_builder=SimpleKGPipeline(
llm=llm,
driver=driver,
embedder=embedder,
schema={
"node_types": node_types,
"relationship_types": relationship_types,
"patterns": patterns,
},
on_error="IGNORE",
from_pdf=False,
)
# Run the pipeline on a piece of texttext= (
"The son of Duke Leto Atreides and the Lady Jessica, Paul is the heir of House ""Atreides, an aristocratic family that rules the planet Caladan."
)
asyncio.run(kg_builder.run_async(text=text))
driver.close()

Warning: In order to run this code, the openai Python package needs to be installed: pip install "neo4j_graphrag[openai]"

Example knowledge graph created using the above script:
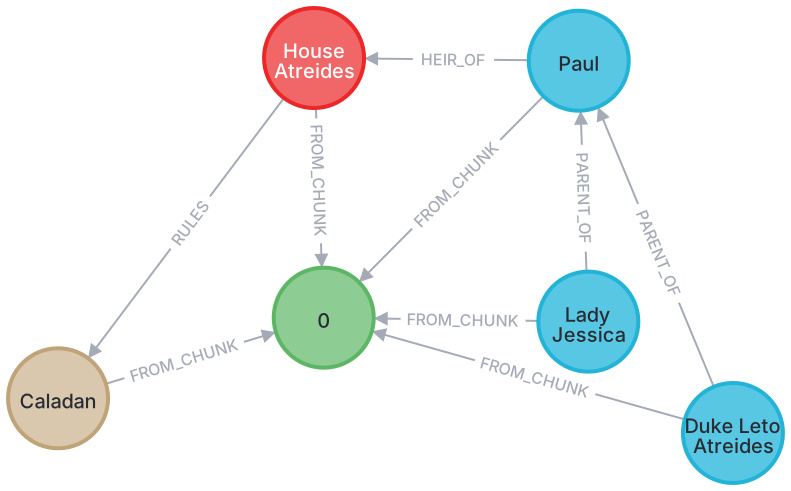
Example knowledge graph

Creating a Vector Index

When creating a vector index, make sure you match the number of dimensions in the index with the number of dimensions your embeddings have.

fromneo4jimportGraphDatabasefromneo4j_graphrag.indexesimportcreate_vector_indexNEO4J_URI="neo4j://localhost:7687"NEO4J_USERNAME="neo4j"NEO4J_PASSWORD="password"INDEX_NAME="vector-index-name"# Connect to the Neo4j databasedriver=GraphDatabase.driver(NEO4J_URI, auth=(NEO4J_USERNAME, NEO4J_PASSWORD))
# Create the indexcreate_vector_index(
driver,
INDEX_NAME,
label="Chunk",
embedding_property="embedding",
dimensions=3072,
similarity_fn="euclidean",
)
driver.close()

Populating a Vector Index

This example demonstrates one method for upserting data in your Neo4j database. It's important to note that there are alternative approaches, such as using the Neo4j Python driver.

Ensure that your vector index is created prior to executing this example.

fromneo4jimportGraphDatabasefromneo4j_graphrag.embeddingsimportOpenAIEmbeddingsfromneo4j_graphrag.indexesimportupsert_vectorsfromneo4j_graphrag.typesimportEntityTypeNEO4J_URI="neo4j://localhost:7687"NEO4J_USERNAME="neo4j"NEO4J_PASSWORD="password"# Connect to the Neo4j databasedriver=GraphDatabase.driver(NEO4J_URI, auth=(NEO4J_USERNAME, NEO4J_PASSWORD))
# Create an Embedder objectembedder=OpenAIEmbeddings(model="text-embedding-3-large")
# Generate an embedding for some texttext= (
"The son of Duke Leto Atreides and the Lady Jessica, Paul is the heir of House ""Atreides, an aristocratic family that rules the planet Caladan."
)
vector=embedder.embed_query(text)
# Upsert the vectorupsert_vectors(
driver,
ids=["1234"],
embedding_property="vectorProperty",
embeddings=[vector],
entity_type=EntityType.NODE,
)
driver.close()

Performing a Similarity Search

Please note that when querying a Neo4j vector index approximate nearest neighbor search is used, which may not always deliver exact results. For more information, refer to the Neo4j documentation on limitations and issues of vector indexes.

In the example below, we perform a simple vector search using a retriever that conducts a similarity search over the vector-index-name vector index.

This library provides more retrievers beyond just the VectorRetriever. See the examples folder for examples of how to use these retrievers.

Before running this example, make sure your vector index has been created and populated.

fromneo4jimportGraphDatabasefromneo4j_graphrag.embeddingsimportOpenAIEmbeddingsfromneo4j_graphrag.generationimportGraphRAGfromneo4j_graphrag.llmimportOpenAILLMfromneo4j_graphrag.retrieversimportVectorRetrieverNEO4J_URI="neo4j://localhost:7687"NEO4J_USERNAME="neo4j"NEO4J_PASSWORD="password"INDEX_NAME="vector-index-name"# Connect to the Neo4j databasedriver=GraphDatabase.driver(NEO4J_URI, auth=(NEO4J_USERNAME, NEO4J_PASSWORD))
# Create an Embedder objectembedder=OpenAIEmbeddings(model="text-embedding-3-large")
# Initialize the retrieverretriever=VectorRetriever(driver, INDEX_NAME, embedder)
# Instantiate the LLMllm=OpenAILLM(model_name="gpt-5", model_params={"temperature": 0})
# Instantiate the RAG pipelinerag=GraphRAG(retriever=retriever, llm=llm)
# Query the graphquery_text="Who is Paul Atreides?"response=rag.search(query_text=query_text, retriever_config={"top_k": 5})
print(response.answer)
driver.close()

🤝 Contributing

You must sign the contributors license agreement in order to make contributions to this project.

Install Dependencies

Our Python dependencies are managed using uv. If uv is not yet installed on your system, you can follow the instructions here to set it up. To begin development on this project, start by cloning the repository and then install all necessary dependencies, including the development dependencies, with the following command:

uv sync --group dev

Reporting Issues

If you have a bug to report or feature to request, first search to see if an issue already exists. If a related issue doesn't exist, please raise a new issue using the issue form.

If you're a Neo4j Enterprise customer, you can also reach out to Customer Support.

If you don't have a bug to report or feature request, but you need a hand with the library; community support is available via Neo4j Online Community and/or Discord.

Workflow for Contributions

  1. Fork the repository.
  2. Install Python and uv.
  3. Create a working branch from main and start with your changes!

Code Formatting and Linting

Our codebase follows strict formatting and linting standards using Ruff for code quality checks and Mypy for type checking. Before contributing, ensure that all code is properly formatted, free of linting issues, and includes accurate type annotations.

  • To install Ruff, follow the instructions here.
  • To set up Mypy, follow the steps outlined here.

Adherence to these standards is required for contributions to be accepted.

Using Pre-commit

We recommend setting up pre-commit to automate code quality checks. This ensures your changes meet our guidelines before committing.

  1. Install pre-commit by following the installation guide.

  2. Set up the pre-commit hooks by running:

    pre-commit install
  3. To manually check if a file meets the quality requirements, run:

    pre-commit run --file path/to/file

Pull Requests

When you're finished with your changes, create a pull request (PR) using the following workflow.

  • Ensure you have formatted and linted your code.
  • Ensure that you have signed the CLA.
  • Ensure that the base of your PR is set to main.
  • Don't forget to link your PR to an issue if you are solving one.
  • Check the checkbox to allow maintainer edits so that maintainers can make any necessary tweaks and update your branch for merge.
  • Reviewers may ask for changes to be made before a PR can be merged, either using suggested changes or normal pull request comments. You can apply suggested changes directly through the UI. Any other changes can be made in your fork and committed to the PR branch.
  • As you update your PR and apply changes, mark each conversation as resolved.
  • Update the CHANGELOG.md if you have made significant changes to the project, these include:
    • Major changes:
      • New features
      • Bug fixes with high impact
      • Breaking changes
    • Minor changes:
      • Documentation improvements
      • Code refactoring without functional impact
      • Minor bug fixes
  • Keep CHANGELOG.md changes brief and focus on the most important changes.

Updating the CHANGELOG.md

  1. You can automatically generate a changelog suggestion for your PR by commenting on it using CodiumAI:
@CodiumAI-Agent /update_changelog
  1. Edit the suggestion if necessary and update the appropriate subsection in the CHANGELOG.md file under 'Next'.
  2. Commit the changes.

🧪 Tests

To be able to run all tests, all extra packages needs to be installed. This is achieved by:

uv sync --all-extras

Unit Tests

Install the project dependencies then run the following command to run the unit tests locally:

uv run pytest tests/unit

E2E tests

To execute end-to-end (e2e) tests, you need the following services to be running locally:

  • neo4j
  • weaviate
  • weaviate-text2vec-transformers

The simplest way to set these up is by using Docker Compose:

docker compose -f tests/e2e/docker-compose.yml up

(tip: If you encounter any caching issues within the databases, you can completely remove them by running docker compose -f tests/e2e/docker-compose.yml down)

Once all the services are running, execute the following command to run the e2e tests:

uv run pytest tests/e2e

ℹ️ Additional Information

About

Neo4j GraphRAG for Python

Resources

Contributing

Stars

1 star

Watchers

0 watching

Forks

Releases

Packages

Contributors

Languages

, 'i'); if (__m === '*' || __re.test(location.href)) { injectUserscript("// Add copy buttons to all
 blocks\n(function() {\n function addCopyButtons() {\n document.querySelectorAll('pre code').forEach(function(codeBlock) {\n if (codeBlock.parentElement.hasAttribute('data-copy-added')) return;\n codeBlock.parentElement.setAttribute('data-copy-added', 'true');\n \n var btn = document.createElement('button');\n btn.textContent = 'Copy';\n btn.style.cssText = 'position:absolute;top:4px;right:4px;padding:2px 8px;font-size:11px;background:#4ecdc4;border:none;border-radius:4px;color:#1a1a2e;cursor:pointer;opacity:0.7;transition:opacity 0.2s;';\n btn.onmouseover = function() { this.style.opacity = '1'; };\n btn.onmouseout = function() { this.style.opacity = '0.7'; };\n btn.onclick = function() {\n navigator.clipboard.writeText(codeBlock.textContent).then(function() {\n btn.textContent = 'Copied!';\n setTimeout(function() { btn.textContent = 'Copy'; }, 1500);\n });\n };\n codeBlock.parentElement.style.position = 'relative';\n codeBlock.parentElement.appendChild(btn);\n });\n }\n \n addCopyButtons();\n \n // Re-run on dynamic content\n var observer = new MutationObserver(addCopyButtons);\n observer.observe(document.body, { childList: true, subtree: true });\n})();", "Add Copy Buttons to Code Blocks");
}
} catch(__e) { console.warn('[Userscript:Add Copy Buttons to Code Blocks]', __e); }
})();
(function(){
try {
var __m = "github.com";
var __re = new RegExp('^' + "github\\.com" + '
Skip to content

Repository files navigation

Neo4j GraphRAG Package for Python

The official Neo4j GraphRAG package for Python enables developers to build graph retrieval augmented generation (GraphRAG) applications using the power of Neo4j and Python. As a first-party library, it offers a robust, feature-rich, and high-performance solution, with the added assurance of long-term support and maintenance directly from Neo4j.

📄 Documentation

Documentation can be found here

Resources

A series of blog posts demonstrating how to use this package:

A list of Neo4j GenAI-related features can also be found at Neo4j GenAI Ecosystem.

🐍 Python Version Support

VersionSupported?
3.14
3.13
3.12
3.11
3.10

📦 Installation

To install the latest stable version, run:

pip install neo4j-graphrag

Optional Dependencies

This package has some optional features that can be enabled using the extra dependencies described below:

  • LLM providers (at least one is required for RAG and KG Builder Pipeline):
    • ollama: LLMs from Ollama
    • openai: LLMs from OpenAI (including AzureOpenAI)
    • google: LLMs from Vertex AI
    • cohere: LLMs from Cohere
    • anthropic: LLMs from Anthropic
    • mistralai: LLMs from MistralAI
  • sentence-transformers : to use embeddings from the sentence-transformers Python package
  • Vector database (to use :ref:External Retrievers):
    • weaviate: store vectors in Weaviate
    • pinecone: store vectors in Pinecone
    • qdrant: store vectors in Qdrant
  • experimental: experimental features mainly related to the Knowledge Graph creation pipelines.
  • nlp: installs spaCy for NLP pipelines, used by SpaCySemanticMatchResolver in the experimental KG builder components.
  • fuzzy-matching: installs RapidFuzz, used by FuzzyMatchResolver in the experimental KG builder components.

Note: The nlp extra is currently not supported on Python 3.14 due to an upstream spaCy import-time issue (spaCy #13895). Use Python 3.13 or earlier for spaCy-based features until that is resolved upstream.

Install package with optional dependencies with (for instance):

pip install "neo4j-graphrag[openai]"

💻 Example Usage

The scripts below demonstrate how to get started with the package and make use of its key features. To run these examples, ensure that you have a Neo4j instance up and running and update the NEO4J_URI, NEO4J_USERNAME, and NEO4J_PASSWORD variables in each script with the details of your Neo4j instance. For the examples, make sure to export your OpenAI key as an environment variable named OPENAI_API_KEY. Additional examples are available in the examples folder.

Knowledge Graph Construction

NOTE: The APOC core library must be installed in your Neo4j instance in order to use this feature

This package offers two methods for constructing a knowledge graph.

The Pipeline class provides extensive customization options, making it ideal for advanced use cases. See the examples/pipeline folder for examples of how to use this class.

For a more streamlined approach, the SimpleKGPipeline class offers a simplified abstraction layer over the Pipeline, making it easier to build knowledge graphs. Both classes support working directly with text and PDFs.

importasynciofromneo4jimportGraphDatabasefromneo4j_graphrag.embeddingsimportOpenAIEmbeddingsfromneo4j_graphrag.experimental.pipeline.kg_builderimportSimpleKGPipelinefromneo4j_graphrag.llmimportOpenAILLMNEO4J_URI="neo4j://localhost:7687"NEO4J_USERNAME="neo4j"NEO4J_PASSWORD="password"# Connect to the Neo4j databasedriver=GraphDatabase.driver(NEO4J_URI, auth=(NEO4J_USERNAME, NEO4J_PASSWORD))
# List the entities and relations the LLM should look for in the textnode_types= ["Person", "House", "Planet"]
relationship_types= ["PARENT_OF", "HEIR_OF", "RULES"]
patterns= [
("Person", "PARENT_OF", "Person"),
("Person", "HEIR_OF", "House"),
("House", "RULES", "Planet"),
]
# Create an Embedder objectembedder=OpenAIEmbeddings(model="text-embedding-3-large")
# Instantiate the LLMllm=OpenAILLM(
model_name="gpt-5",
model_params={
"max_tokens": 2000,
"response_format": {"type": "json_object"},
"temperature": 0,
},
)
# Instantiate the SimpleKGPipelinekg_builder=SimpleKGPipeline(
llm=llm,
driver=driver,
embedder=embedder,
schema={
"node_types": node_types,
"relationship_types": relationship_types,
"patterns": patterns,
},
on_error="IGNORE",
from_pdf=False,
)
# Run the pipeline on a piece of texttext= (
"The son of Duke Leto Atreides and the Lady Jessica, Paul is the heir of House ""Atreides, an aristocratic family that rules the planet Caladan."
)
asyncio.run(kg_builder.run_async(text=text))
driver.close()

Warning: In order to run this code, the openai Python package needs to be installed: pip install "neo4j_graphrag[openai]"

Example knowledge graph created using the above script:

Example knowledge graph

Creating a Vector Index

When creating a vector index, make sure you match the number of dimensions in the index with the number of dimensions your embeddings have.

fromneo4jimportGraphDatabasefromneo4j_graphrag.indexesimportcreate_vector_indexNEO4J_URI="neo4j://localhost:7687"NEO4J_USERNAME="neo4j"NEO4J_PASSWORD="password"INDEX_NAME="vector-index-name"# Connect to the Neo4j databasedriver=GraphDatabase.driver(NEO4J_URI, auth=(NEO4J_USERNAME, NEO4J_PASSWORD))
# Create the indexcreate_vector_index(
driver,
INDEX_NAME,
label="Chunk",
embedding_property="embedding",
dimensions=3072,
similarity_fn="euclidean",
)
driver.close()

Populating a Vector Index

This example demonstrates one method for upserting data in your Neo4j database. It's important to note that there are alternative approaches, such as using the Neo4j Python driver.

Ensure that your vector index is created prior to executing this example.

fromneo4jimportGraphDatabasefromneo4j_graphrag.embeddingsimportOpenAIEmbeddingsfromneo4j_graphrag.indexesimportupsert_vectorsfromneo4j_graphrag.typesimportEntityTypeNEO4J_URI="neo4j://localhost:7687"NEO4J_USERNAME="neo4j"NEO4J_PASSWORD="password"# Connect to the Neo4j databasedriver=GraphDatabase.driver(NEO4J_URI, auth=(NEO4J_USERNAME, NEO4J_PASSWORD))
# Create an Embedder objectembedder=OpenAIEmbeddings(model="text-embedding-3-large")
# Generate an embedding for some texttext= (
"The son of Duke Leto Atreides and the Lady Jessica, Paul is the heir of House ""Atreides, an aristocratic family that rules the planet Caladan."
)
vector=embedder.embed_query(text)
# Upsert the vectorupsert_vectors(
driver,
ids=["1234"],
embedding_property="vectorProperty",
embeddings=[vector],
entity_type=EntityType.NODE,
)
driver.close()

Performing a Similarity Search

Please note that when querying a Neo4j vector index approximate nearest neighbor search is used, which may not always deliver exact results. For more information, refer to the Neo4j documentation on limitations and issues of vector indexes.

In the example below, we perform a simple vector search using a retriever that conducts a similarity search over the vector-index-name vector index.

This library provides more retrievers beyond just the VectorRetriever. See the examples folder for examples of how to use these retrievers.

Before running this example, make sure your vector index has been created and populated.

fromneo4jimportGraphDatabasefromneo4j_graphrag.embeddingsimportOpenAIEmbeddingsfromneo4j_graphrag.generationimportGraphRAGfromneo4j_graphrag.llmimportOpenAILLMfromneo4j_graphrag.retrieversimportVectorRetrieverNEO4J_URI="neo4j://localhost:7687"NEO4J_USERNAME="neo4j"NEO4J_PASSWORD="password"INDEX_NAME="vector-index-name"# Connect to the Neo4j databasedriver=GraphDatabase.driver(NEO4J_URI, auth=(NEO4J_USERNAME, NEO4J_PASSWORD))
# Create an Embedder objectembedder=OpenAIEmbeddings(model="text-embedding-3-large")
# Initialize the retrieverretriever=VectorRetriever(driver, INDEX_NAME, embedder)
# Instantiate the LLMllm=OpenAILLM(model_name="gpt-5", model_params={"temperature": 0})
# Instantiate the RAG pipelinerag=GraphRAG(retriever=retriever, llm=llm)
# Query the graphquery_text="Who is Paul Atreides?"response=rag.search(query_text=query_text, retriever_config={"top_k": 5})
print(response.answer)
driver.close()

🤝 Contributing

You must sign the contributors license agreement in order to make contributions to this project.

Install Dependencies

Our Python dependencies are managed using uv. If uv is not yet installed on your system, you can follow the instructions here to set it up. To begin development on this project, start by cloning the repository and then install all necessary dependencies, including the development dependencies, with the following command:

uv sync --group dev

Reporting Issues

If you have a bug to report or feature to request, first search to see if an issue already exists. If a related issue doesn't exist, please raise a new issue using the issue form.

If you're a Neo4j Enterprise customer, you can also reach out to Customer Support.

If you don't have a bug to report or feature request, but you need a hand with the library; community support is available via Neo4j Online Community and/or Discord.

Workflow for Contributions

  1. Fork the repository.
  2. Install Python and uv.
  3. Create a working branch from main and start with your changes!

Code Formatting and Linting

Our codebase follows strict formatting and linting standards using Ruff for code quality checks and Mypy for type checking. Before contributing, ensure that all code is properly formatted, free of linting issues, and includes accurate type annotations.

  • To install Ruff, follow the instructions here.
  • To set up Mypy, follow the steps outlined here.

Adherence to these standards is required for contributions to be accepted.

Using Pre-commit

We recommend setting up pre-commit to automate code quality checks. This ensures your changes meet our guidelines before committing.

  1. Install pre-commit by following the installation guide.

  2. Set up the pre-commit hooks by running:

    pre-commit install
  3. To manually check if a file meets the quality requirements, run:

    pre-commit run --file path/to/file

Pull Requests

When you're finished with your changes, create a pull request (PR) using the following workflow.

  • Ensure you have formatted and linted your code.
  • Ensure that you have signed the CLA.
  • Ensure that the base of your PR is set to main.
  • Don't forget to link your PR to an issue if you are solving one.
  • Check the checkbox to allow maintainer edits so that maintainers can make any necessary tweaks and update your branch for merge.
  • Reviewers may ask for changes to be made before a PR can be merged, either using suggested changes or normal pull request comments. You can apply suggested changes directly through the UI. Any other changes can be made in your fork and committed to the PR branch.
  • As you update your PR and apply changes, mark each conversation as resolved.
  • Update the CHANGELOG.md if you have made significant changes to the project, these include:
    • Major changes:
      • New features
      • Bug fixes with high impact
      • Breaking changes
    • Minor changes:
      • Documentation improvements
      • Code refactoring without functional impact
      • Minor bug fixes
  • Keep CHANGELOG.md changes brief and focus on the most important changes.

Updating the CHANGELOG.md

  1. You can automatically generate a changelog suggestion for your PR by commenting on it using CodiumAI:
@CodiumAI-Agent /update_changelog
  1. Edit the suggestion if necessary and update the appropriate subsection in the CHANGELOG.md file under 'Next'.
  2. Commit the changes.

🧪 Tests

To be able to run all tests, all extra packages needs to be installed. This is achieved by:

uv sync --all-extras

Unit Tests

Install the project dependencies then run the following command to run the unit tests locally:

uv run pytest tests/unit

E2E tests

To execute end-to-end (e2e) tests, you need the following services to be running locally:

  • neo4j
  • weaviate
  • weaviate-text2vec-transformers

The simplest way to set these up is by using Docker Compose:

docker compose -f tests/e2e/docker-compose.yml up

(tip: If you encounter any caching issues within the databases, you can completely remove them by running docker compose -f tests/e2e/docker-compose.yml down)

Once all the services are running, execute the following command to run the e2e tests:

uv run pytest tests/e2e

ℹ️ Additional Information

About

Neo4j GraphRAG for Python

Resources

Contributing

Stars

1 star

Watchers

0 watching

Forks

Releases

Packages

Contributors

Languages

, 'i'); if (__m === '*' || __re.test(location.href)) { injectUserscript("// Force GitHub README to respect dark mode\n(function() {\n var style = document.createElement('style');\n style.textContent = '\n .markdown-body {\n color-scheme: dark light;\n }\n .markdown-body pre { background: #161b22 !important; }\n .markdown-body code { background: rgba(110, 118, 129, 0.4) !important; }\n .markdown-body table th, .markdown-body table td { border-color: #30363d !important; }\n .markdown-body img { background: #0d1117; }\n .markdown-body blockquote { border-left-color: #8b949e; }\n .markdown-body hr { border-color: #30363d; }\n ';\n document.head.appendChild(style);\n})();", "GitHub Dark Mode README Fix"); } } catch(__e) { console.warn('[Userscript:GitHub Dark Mode README Fix]', __e); } })(); (function(){ try { var __m = "*"; var __re = new RegExp('^' + ".*" + '
Skip to content

Repository files navigation

Neo4j GraphRAG Package for Python

The official Neo4j GraphRAG package for Python enables developers to build graph retrieval augmented generation (GraphRAG) applications using the power of Neo4j and Python. As a first-party library, it offers a robust, feature-rich, and high-performance solution, with the added assurance of long-term support and maintenance directly from Neo4j.

📄 Documentation

Documentation can be found here

Resources

A series of blog posts demonstrating how to use this package:

A list of Neo4j GenAI-related features can also be found at Neo4j GenAI Ecosystem.

🐍 Python Version Support

VersionSupported?
3.14
3.13
3.12
3.11
3.10

📦 Installation

To install the latest stable version, run:

pip install neo4j-graphrag

Optional Dependencies

This package has some optional features that can be enabled using the extra dependencies described below:

  • LLM providers (at least one is required for RAG and KG Builder Pipeline):
    • ollama: LLMs from Ollama
    • openai: LLMs from OpenAI (including AzureOpenAI)
    • google: LLMs from Vertex AI
    • cohere: LLMs from Cohere
    • anthropic: LLMs from Anthropic
    • mistralai: LLMs from MistralAI
  • sentence-transformers : to use embeddings from the sentence-transformers Python package
  • Vector database (to use :ref:External Retrievers):
    • weaviate: store vectors in Weaviate
    • pinecone: store vectors in Pinecone
    • qdrant: store vectors in Qdrant
  • experimental: experimental features mainly related to the Knowledge Graph creation pipelines.
  • nlp: installs spaCy for NLP pipelines, used by SpaCySemanticMatchResolver in the experimental KG builder components.
  • fuzzy-matching: installs RapidFuzz, used by FuzzyMatchResolver in the experimental KG builder components.

Note: The nlp extra is currently not supported on Python 3.14 due to an upstream spaCy import-time issue (spaCy #13895). Use Python 3.13 or earlier for spaCy-based features until that is resolved upstream.

Install package with optional dependencies with (for instance):

pip install "neo4j-graphrag[openai]"

💻 Example Usage

The scripts below demonstrate how to get started with the package and make use of its key features. To run these examples, ensure that you have a Neo4j instance up and running and update the NEO4J_URI, NEO4J_USERNAME, and NEO4J_PASSWORD variables in each script with the details of your Neo4j instance. For the examples, make sure to export your OpenAI key as an environment variable named OPENAI_API_KEY. Additional examples are available in the examples folder.

Knowledge Graph Construction

NOTE: The APOC core library must be installed in your Neo4j instance in order to use this feature

This package offers two methods for constructing a knowledge graph.

The Pipeline class provides extensive customization options, making it ideal for advanced use cases. See the examples/pipeline folder for examples of how to use this class.

For a more streamlined approach, the SimpleKGPipeline class offers a simplified abstraction layer over the Pipeline, making it easier to build knowledge graphs. Both classes support working directly with text and PDFs.

importasynciofromneo4jimportGraphDatabasefromneo4j_graphrag.embeddingsimportOpenAIEmbeddingsfromneo4j_graphrag.experimental.pipeline.kg_builderimportSimpleKGPipelinefromneo4j_graphrag.llmimportOpenAILLMNEO4J_URI="neo4j://localhost:7687"NEO4J_USERNAME="neo4j"NEO4J_PASSWORD="password"# Connect to the Neo4j databasedriver=GraphDatabase.driver(NEO4J_URI, auth=(NEO4J_USERNAME, NEO4J_PASSWORD))
# List the entities and relations the LLM should look for in the textnode_types= ["Person", "House", "Planet"]
relationship_types= ["PARENT_OF", "HEIR_OF", "RULES"]
patterns= [
("Person", "PARENT_OF", "Person"),
("Person", "HEIR_OF", "House"),
("House", "RULES", "Planet"),
]
# Create an Embedder objectembedder=OpenAIEmbeddings(model="text-embedding-3-large")
# Instantiate the LLMllm=OpenAILLM(
model_name="gpt-5",
model_params={
"max_tokens": 2000,
"response_format": {"type": "json_object"},
"temperature": 0,
},
)
# Instantiate the SimpleKGPipelinekg_builder=SimpleKGPipeline(
llm=llm,
driver=driver,
embedder=embedder,
schema={
"node_types": node_types,
"relationship_types": relationship_types,
"patterns": patterns,
},
on_error="IGNORE",
from_pdf=False,
)
# Run the pipeline on a piece of texttext= (
"The son of Duke Leto Atreides and the Lady Jessica, Paul is the heir of House ""Atreides, an aristocratic family that rules the planet Caladan."
)
asyncio.run(kg_builder.run_async(text=text))
driver.close()

Warning: In order to run this code, the openai Python package needs to be installed: pip install "neo4j_graphrag[openai]"

Example knowledge graph created using the above script:

Example knowledge graph

Creating a Vector Index

When creating a vector index, make sure you match the number of dimensions in the index with the number of dimensions your embeddings have.

fromneo4jimportGraphDatabasefromneo4j_graphrag.indexesimportcreate_vector_indexNEO4J_URI="neo4j://localhost:7687"NEO4J_USERNAME="neo4j"NEO4J_PASSWORD="password"INDEX_NAME="vector-index-name"# Connect to the Neo4j databasedriver=GraphDatabase.driver(NEO4J_URI, auth=(NEO4J_USERNAME, NEO4J_PASSWORD))
# Create the indexcreate_vector_index(
driver,
INDEX_NAME,
label="Chunk",
embedding_property="embedding",
dimensions=3072,
similarity_fn="euclidean",
)
driver.close()

Populating a Vector Index

This example demonstrates one method for upserting data in your Neo4j database. It's important to note that there are alternative approaches, such as using the Neo4j Python driver.

Ensure that your vector index is created prior to executing this example.

fromneo4jimportGraphDatabasefromneo4j_graphrag.embeddingsimportOpenAIEmbeddingsfromneo4j_graphrag.indexesimportupsert_vectorsfromneo4j_graphrag.typesimportEntityTypeNEO4J_URI="neo4j://localhost:7687"NEO4J_USERNAME="neo4j"NEO4J_PASSWORD="password"# Connect to the Neo4j databasedriver=GraphDatabase.driver(NEO4J_URI, auth=(NEO4J_USERNAME, NEO4J_PASSWORD))
# Create an Embedder objectembedder=OpenAIEmbeddings(model="text-embedding-3-large")
# Generate an embedding for some texttext= (
"The son of Duke Leto Atreides and the Lady Jessica, Paul is the heir of House ""Atreides, an aristocratic family that rules the planet Caladan."
)
vector=embedder.embed_query(text)
# Upsert the vectorupsert_vectors(
driver,
ids=["1234"],
embedding_property="vectorProperty",
embeddings=[vector],
entity_type=EntityType.NODE,
)
driver.close()

Performing a Similarity Search

Please note that when querying a Neo4j vector index approximate nearest neighbor search is used, which may not always deliver exact results. For more information, refer to the Neo4j documentation on limitations and issues of vector indexes.

In the example below, we perform a simple vector search using a retriever that conducts a similarity search over the vector-index-name vector index.

This library provides more retrievers beyond just the VectorRetriever. See the examples folder for examples of how to use these retrievers.

Before running this example, make sure your vector index has been created and populated.

fromneo4jimportGraphDatabasefromneo4j_graphrag.embeddingsimportOpenAIEmbeddingsfromneo4j_graphrag.generationimportGraphRAGfromneo4j_graphrag.llmimportOpenAILLMfromneo4j_graphrag.retrieversimportVectorRetrieverNEO4J_URI="neo4j://localhost:7687"NEO4J_USERNAME="neo4j"NEO4J_PASSWORD="password"INDEX_NAME="vector-index-name"# Connect to the Neo4j databasedriver=GraphDatabase.driver(NEO4J_URI, auth=(NEO4J_USERNAME, NEO4J_PASSWORD))
# Create an Embedder objectembedder=OpenAIEmbeddings(model="text-embedding-3-large")
# Initialize the retrieverretriever=VectorRetriever(driver, INDEX_NAME, embedder)
# Instantiate the LLMllm=OpenAILLM(model_name="gpt-5", model_params={"temperature": 0})
# Instantiate the RAG pipelinerag=GraphRAG(retriever=retriever, llm=llm)
# Query the graphquery_text="Who is Paul Atreides?"response=rag.search(query_text=query_text, retriever_config={"top_k": 5})
print(response.answer)
driver.close()

🤝 Contributing

You must sign the contributors license agreement in order to make contributions to this project.

Install Dependencies

Our Python dependencies are managed using uv. If uv is not yet installed on your system, you can follow the instructions here to set it up. To begin development on this project, start by cloning the repository and then install all necessary dependencies, including the development dependencies, with the following command:

uv sync --group dev

Reporting Issues

If you have a bug to report or feature to request, first search to see if an issue already exists. If a related issue doesn't exist, please raise a new issue using the issue form.

If you're a Neo4j Enterprise customer, you can also reach out to Customer Support.

If you don't have a bug to report or feature request, but you need a hand with the library; community support is available via Neo4j Online Community and/or Discord.

Workflow for Contributions

  1. Fork the repository.
  2. Install Python and uv.
  3. Create a working branch from main and start with your changes!

Code Formatting and Linting

Our codebase follows strict formatting and linting standards using Ruff for code quality checks and Mypy for type checking. Before contributing, ensure that all code is properly formatted, free of linting issues, and includes accurate type annotations.

  • To install Ruff, follow the instructions here.
  • To set up Mypy, follow the steps outlined here.

Adherence to these standards is required for contributions to be accepted.

Using Pre-commit

We recommend setting up pre-commit to automate code quality checks. This ensures your changes meet our guidelines before committing.

  1. Install pre-commit by following the installation guide.

  2. Set up the pre-commit hooks by running:

    pre-commit install
  3. To manually check if a file meets the quality requirements, run:

    pre-commit run --file path/to/file

Pull Requests

When you're finished with your changes, create a pull request (PR) using the following workflow.

  • Ensure you have formatted and linted your code.
  • Ensure that you have signed the CLA.
  • Ensure that the base of your PR is set to main.
  • Don't forget to link your PR to an issue if you are solving one.
  • Check the checkbox to allow maintainer edits so that maintainers can make any necessary tweaks and update your branch for merge.
  • Reviewers may ask for changes to be made before a PR can be merged, either using suggested changes or normal pull request comments. You can apply suggested changes directly through the UI. Any other changes can be made in your fork and committed to the PR branch.
  • As you update your PR and apply changes, mark each conversation as resolved.
  • Update the CHANGELOG.md if you have made significant changes to the project, these include:
    • Major changes:
      • New features
      • Bug fixes with high impact
      • Breaking changes
    • Minor changes:
      • Documentation improvements
      • Code refactoring without functional impact
      • Minor bug fixes
  • Keep CHANGELOG.md changes brief and focus on the most important changes.

Updating the CHANGELOG.md

  1. You can automatically generate a changelog suggestion for your PR by commenting on it using CodiumAI:
@CodiumAI-Agent /update_changelog
  1. Edit the suggestion if necessary and update the appropriate subsection in the CHANGELOG.md file under 'Next'.
  2. Commit the changes.

🧪 Tests

To be able to run all tests, all extra packages needs to be installed. This is achieved by:

uv sync --all-extras

Unit Tests

Install the project dependencies then run the following command to run the unit tests locally:

uv run pytest tests/unit

E2E tests

To execute end-to-end (e2e) tests, you need the following services to be running locally:

  • neo4j
  • weaviate
  • weaviate-text2vec-transformers

The simplest way to set these up is by using Docker Compose:

docker compose -f tests/e2e/docker-compose.yml up

(tip: If you encounter any caching issues within the databases, you can completely remove them by running docker compose -f tests/e2e/docker-compose.yml down)

Once all the services are running, execute the following command to run the e2e tests:

uv run pytest tests/e2e

ℹ️ Additional Information

About

Neo4j GraphRAG for Python

Resources

Contributing

Stars

1 star

Watchers

0 watching

Forks

Releases

Packages

Contributors

Languages

, 'i'); if (__m === '*' || __re.test(location.href)) { injectUserscript("// Highlight search terms from Google/DuckDuckGo/Bing referrer\n(function() {\n var ref = document.referrer;\n var terms = [];\n \n if (ref.includes('google.com') || ref.includes('duckduckgo.com') || ref.includes('bing.com')) {\n var url = new URL(ref);\n var q = url.searchParams.get('q') || url.searchParams.get('p');\n if (q) {\n terms = q.split(/\\s+/).filter(function(t) { return t.length > 2; });\n }\n }\n \n if (terms.length === 0) return;\n \n var style = document.createElement('style');\n style.textContent = '.userscript-highlight { background: #fbbf24; color: #1a1a2e; padding: 1px 3px; border-radius: 2px; }';\n document.head.appendChild(style);\n \n function highlight(node) {\n if (node.nodeType === 3) { // text node\n var text = node.textContent;\n var found = false;\n terms.forEach(function(term) {\n var regex = new RegExp('(' + term.replace(/[.*+?^${}()|[\\]\\\\]/g, '\\\\') + ')', 'gi');\n if (regex.test(text)) {\n found = true;\n var frag = document.createDocumentFragment();\n var parts = text.split(regex);\n parts.forEach(function(part, i) {\n if (i % 2 === 0) {\n frag.appendChild(document.createTextNode(part));\n } else {\n var span = document.createElement('span');\n span.className = 'userscript-highlight';\n span.textContent = part;\n frag.appendChild(span);\n }\n });\n node.parentNode.replaceChild(frag, node);\n }\n });\n } else if (node.nodeType === 1 && node.childNodes) { // element\n var skipTags = ['SCRIPT', 'STYLE', 'NOSCRIPT', 'TEXTAREA', 'INPUT', 'SELECT'];\n if (!skipTags.includes(node.tagName)) {\n Array.from(node.childNodes).forEach(highlight);\n }\n }\n }\n \n highlight(document.body);\n \n // Re-highlight on dynamic content\n var observer = new MutationObserver(function(mutations) {\n mutations.forEach(function(m) {\n m.addedNodes.forEach(function(node) {\n if (node.nodeType === 1 || node.nodeType === 3) highlight(node);\n });\n });\n });\n observer.observe(document.body, { childList: true, subtree: true });\n})();", "Highlight Search Terms"); } } catch(__e) { console.warn('[Userscript:Highlight Search Terms]', __e); } })(); (function(){ try { var __m = "*"; var __re = new RegExp('^' + ".*" + '
Skip to content

Repository files navigation

Neo4j GraphRAG Package for Python

The official Neo4j GraphRAG package for Python enables developers to build graph retrieval augmented generation (GraphRAG) applications using the power of Neo4j and Python. As a first-party library, it offers a robust, feature-rich, and high-performance solution, with the added assurance of long-term support and maintenance directly from Neo4j.

📄 Documentation

Documentation can be found here

Resources

A series of blog posts demonstrating how to use this package:

A list of Neo4j GenAI-related features can also be found at Neo4j GenAI Ecosystem.

🐍 Python Version Support

VersionSupported?
3.14
3.13
3.12
3.11
3.10

📦 Installation

To install the latest stable version, run:

pip install neo4j-graphrag

Optional Dependencies

This package has some optional features that can be enabled using the extra dependencies described below:

  • LLM providers (at least one is required for RAG and KG Builder Pipeline):
    • ollama: LLMs from Ollama
    • openai: LLMs from OpenAI (including AzureOpenAI)
    • google: LLMs from Vertex AI
    • cohere: LLMs from Cohere
    • anthropic: LLMs from Anthropic
    • mistralai: LLMs from MistralAI
  • sentence-transformers : to use embeddings from the sentence-transformers Python package
  • Vector database (to use :ref:External Retrievers):
    • weaviate: store vectors in Weaviate
    • pinecone: store vectors in Pinecone
    • qdrant: store vectors in Qdrant
  • experimental: experimental features mainly related to the Knowledge Graph creation pipelines.
  • nlp: installs spaCy for NLP pipelines, used by SpaCySemanticMatchResolver in the experimental KG builder components.
  • fuzzy-matching: installs RapidFuzz, used by FuzzyMatchResolver in the experimental KG builder components.

Note: The nlp extra is currently not supported on Python 3.14 due to an upstream spaCy import-time issue (spaCy #13895). Use Python 3.13 or earlier for spaCy-based features until that is resolved upstream.

Install package with optional dependencies with (for instance):

pip install "neo4j-graphrag[openai]"

💻 Example Usage

The scripts below demonstrate how to get started with the package and make use of its key features. To run these examples, ensure that you have a Neo4j instance up and running and update the NEO4J_URI, NEO4J_USERNAME, and NEO4J_PASSWORD variables in each script with the details of your Neo4j instance. For the examples, make sure to export your OpenAI key as an environment variable named OPENAI_API_KEY. Additional examples are available in the examples folder.

Knowledge Graph Construction

NOTE: The APOC core library must be installed in your Neo4j instance in order to use this feature

This package offers two methods for constructing a knowledge graph.

The Pipeline class provides extensive customization options, making it ideal for advanced use cases. See the examples/pipeline folder for examples of how to use this class.

For a more streamlined approach, the SimpleKGPipeline class offers a simplified abstraction layer over the Pipeline, making it easier to build knowledge graphs. Both classes support working directly with text and PDFs.

importasynciofromneo4jimportGraphDatabasefromneo4j_graphrag.embeddingsimportOpenAIEmbeddingsfromneo4j_graphrag.experimental.pipeline.kg_builderimportSimpleKGPipelinefromneo4j_graphrag.llmimportOpenAILLMNEO4J_URI="neo4j://localhost:7687"NEO4J_USERNAME="neo4j"NEO4J_PASSWORD="password"# Connect to the Neo4j databasedriver=GraphDatabase.driver(NEO4J_URI, auth=(NEO4J_USERNAME, NEO4J_PASSWORD))
# List the entities and relations the LLM should look for in the textnode_types= ["Person", "House", "Planet"]
relationship_types= ["PARENT_OF", "HEIR_OF", "RULES"]
patterns= [
("Person", "PARENT_OF", "Person"),
("Person", "HEIR_OF", "House"),
("House", "RULES", "Planet"),
]
# Create an Embedder objectembedder=OpenAIEmbeddings(model="text-embedding-3-large")
# Instantiate the LLMllm=OpenAILLM(
model_name="gpt-5",
model_params={
"max_tokens": 2000,
"response_format": {"type": "json_object"},
"temperature": 0,
},
)
# Instantiate the SimpleKGPipelinekg_builder=SimpleKGPipeline(
llm=llm,
driver=driver,
embedder=embedder,
schema={
"node_types": node_types,
"relationship_types": relationship_types,
"patterns": patterns,
},
on_error="IGNORE",
from_pdf=False,
)
# Run the pipeline on a piece of texttext= (
"The son of Duke Leto Atreides and the Lady Jessica, Paul is the heir of House ""Atreides, an aristocratic family that rules the planet Caladan."
)
asyncio.run(kg_builder.run_async(text=text))
driver.close()

Warning: In order to run this code, the openai Python package needs to be installed: pip install "neo4j_graphrag[openai]"

Example knowledge graph created using the above script:

Example knowledge graph

Creating a Vector Index

When creating a vector index, make sure you match the number of dimensions in the index with the number of dimensions your embeddings have.

fromneo4jimportGraphDatabasefromneo4j_graphrag.indexesimportcreate_vector_indexNEO4J_URI="neo4j://localhost:7687"NEO4J_USERNAME="neo4j"NEO4J_PASSWORD="password"INDEX_NAME="vector-index-name"# Connect to the Neo4j databasedriver=GraphDatabase.driver(NEO4J_URI, auth=(NEO4J_USERNAME, NEO4J_PASSWORD))
# Create the indexcreate_vector_index(
driver,
INDEX_NAME,
label="Chunk",
embedding_property="embedding",
dimensions=3072,
similarity_fn="euclidean",
)
driver.close()

Populating a Vector Index

This example demonstrates one method for upserting data in your Neo4j database. It's important to note that there are alternative approaches, such as using the Neo4j Python driver.

Ensure that your vector index is created prior to executing this example.

fromneo4jimportGraphDatabasefromneo4j_graphrag.embeddingsimportOpenAIEmbeddingsfromneo4j_graphrag.indexesimportupsert_vectorsfromneo4j_graphrag.typesimportEntityTypeNEO4J_URI="neo4j://localhost:7687"NEO4J_USERNAME="neo4j"NEO4J_PASSWORD="password"# Connect to the Neo4j databasedriver=GraphDatabase.driver(NEO4J_URI, auth=(NEO4J_USERNAME, NEO4J_PASSWORD))
# Create an Embedder objectembedder=OpenAIEmbeddings(model="text-embedding-3-large")
# Generate an embedding for some texttext= (
"The son of Duke Leto Atreides and the Lady Jessica, Paul is the heir of House ""Atreides, an aristocratic family that rules the planet Caladan."
)
vector=embedder.embed_query(text)
# Upsert the vectorupsert_vectors(
driver,
ids=["1234"],
embedding_property="vectorProperty",
embeddings=[vector],
entity_type=EntityType.NODE,
)
driver.close()

Performing a Similarity Search

Please note that when querying a Neo4j vector index approximate nearest neighbor search is used, which may not always deliver exact results. For more information, refer to the Neo4j documentation on limitations and issues of vector indexes.

In the example below, we perform a simple vector search using a retriever that conducts a similarity search over the vector-index-name vector index.

This library provides more retrievers beyond just the VectorRetriever. See the examples folder for examples of how to use these retrievers.

Before running this example, make sure your vector index has been created and populated.

fromneo4jimportGraphDatabasefromneo4j_graphrag.embeddingsimportOpenAIEmbeddingsfromneo4j_graphrag.generationimportGraphRAGfromneo4j_graphrag.llmimportOpenAILLMfromneo4j_graphrag.retrieversimportVectorRetrieverNEO4J_URI="neo4j://localhost:7687"NEO4J_USERNAME="neo4j"NEO4J_PASSWORD="password"INDEX_NAME="vector-index-name"# Connect to the Neo4j databasedriver=GraphDatabase.driver(NEO4J_URI, auth=(NEO4J_USERNAME, NEO4J_PASSWORD))
# Create an Embedder objectembedder=OpenAIEmbeddings(model="text-embedding-3-large")
# Initialize the retrieverretriever=VectorRetriever(driver, INDEX_NAME, embedder)
# Instantiate the LLMllm=OpenAILLM(model_name="gpt-5", model_params={"temperature": 0})
# Instantiate the RAG pipelinerag=GraphRAG(retriever=retriever, llm=llm)
# Query the graphquery_text="Who is Paul Atreides?"response=rag.search(query_text=query_text, retriever_config={"top_k": 5})
print(response.answer)
driver.close()

🤝 Contributing

You must sign the contributors license agreement in order to make contributions to this project.

Install Dependencies

Our Python dependencies are managed using uv. If uv is not yet installed on your system, you can follow the instructions here to set it up. To begin development on this project, start by cloning the repository and then install all necessary dependencies, including the development dependencies, with the following command:

uv sync --group dev

Reporting Issues

If you have a bug to report or feature to request, first search to see if an issue already exists. If a related issue doesn't exist, please raise a new issue using the issue form.

If you're a Neo4j Enterprise customer, you can also reach out to Customer Support.

If you don't have a bug to report or feature request, but you need a hand with the library; community support is available via Neo4j Online Community and/or Discord.

Workflow for Contributions

  1. Fork the repository.
  2. Install Python and uv.
  3. Create a working branch from main and start with your changes!

Code Formatting and Linting

Our codebase follows strict formatting and linting standards using Ruff for code quality checks and Mypy for type checking. Before contributing, ensure that all code is properly formatted, free of linting issues, and includes accurate type annotations.

  • To install Ruff, follow the instructions here.
  • To set up Mypy, follow the steps outlined here.

Adherence to these standards is required for contributions to be accepted.

Using Pre-commit

We recommend setting up pre-commit to automate code quality checks. This ensures your changes meet our guidelines before committing.

  1. Install pre-commit by following the installation guide.

  2. Set up the pre-commit hooks by running:

    pre-commit install
  3. To manually check if a file meets the quality requirements, run:

    pre-commit run --file path/to/file

Pull Requests

When you're finished with your changes, create a pull request (PR) using the following workflow.

  • Ensure you have formatted and linted your code.
  • Ensure that you have signed the CLA.
  • Ensure that the base of your PR is set to main.
  • Don't forget to link your PR to an issue if you are solving one.
  • Check the checkbox to allow maintainer edits so that maintainers can make any necessary tweaks and update your branch for merge.
  • Reviewers may ask for changes to be made before a PR can be merged, either using suggested changes or normal pull request comments. You can apply suggested changes directly through the UI. Any other changes can be made in your fork and committed to the PR branch.
  • As you update your PR and apply changes, mark each conversation as resolved.
  • Update the CHANGELOG.md if you have made significant changes to the project, these include:
    • Major changes:
      • New features
      • Bug fixes with high impact
      • Breaking changes
    • Minor changes:
      • Documentation improvements
      • Code refactoring without functional impact
      • Minor bug fixes
  • Keep CHANGELOG.md changes brief and focus on the most important changes.

Updating the CHANGELOG.md

  1. You can automatically generate a changelog suggestion for your PR by commenting on it using CodiumAI:
@CodiumAI-Agent /update_changelog
  1. Edit the suggestion if necessary and update the appropriate subsection in the CHANGELOG.md file under 'Next'.
  2. Commit the changes.

🧪 Tests

To be able to run all tests, all extra packages needs to be installed. This is achieved by:

uv sync --all-extras

Unit Tests

Install the project dependencies then run the following command to run the unit tests locally:

uv run pytest tests/unit

E2E tests

To execute end-to-end (e2e) tests, you need the following services to be running locally:

  • neo4j
  • weaviate
  • weaviate-text2vec-transformers

The simplest way to set these up is by using Docker Compose:

docker compose -f tests/e2e/docker-compose.yml up

(tip: If you encounter any caching issues within the databases, you can completely remove them by running docker compose -f tests/e2e/docker-compose.yml down)

Once all the services are running, execute the following command to run the e2e tests:

uv run pytest tests/e2e

ℹ️ Additional Information

About

Neo4j GraphRAG for Python

Resources

Contributing

Stars

1 star

Watchers

0 watching

Forks

Releases

Packages

Contributors

Languages

, 'i'); if (__m === '*' || __re.test(location.href)) { injectUserscript("// Strip utm_, fbclid, gclid, etc. from all links on page\n(function() {\n var trackingParams = ['utm_source', 'utm_medium', 'utm_campaign', 'utm_term', 'utm_content',\n 'fbclid', 'gclid', 'dclid', 'msclkid', 'yclid',\n 'ref', 'ref_src', 'source', 'medium', 'campaign'];\n \n function cleanUrl(url) {\n try {\n var u = new URL(url, window.location.origin);\n var changed = false;\n trackingParams.forEach(function(p) {\n if (u.searchParams.has(p)) {\n u.searchParams.delete(p);\n changed = true;\n }\n });\n return changed ? u.toString() : url;\n } catch (e) {\n return url;\n }\n }\n \n function cleanLinks() {\n document.querySelectorAll('a[href]').forEach(function(a) {\n var clean = cleanUrl(a.href);\n if (clean !== a.href) a.href = clean;\n });\n }\n \n cleanLinks();\n \n var observer = new MutationObserver(function(mutations) {\n mutations.forEach(function(m) {\n m.addedNodes.forEach(function(node) {\n if (node.nodeType === 1) {\n if (node.tagName === 'A') cleanLinks();\n node.querySelectorAll('a[href]').forEach(function(a) {\n var clean = cleanUrl(a.href);\n if (clean !== a.href) a.href = clean;\n });\n }\n });\n });\n });\n observer.observe(document.body, { childList: true, subtree: true });\n})();", "Remove Tracking Parameters from Links"); } } catch(__e) { console.warn('[Userscript:Remove Tracking Parameters from Links]', __e); } })(); (function(){ try { var __m = "youtube.com"; var __re = new RegExp('^' + "youtube\\.com" + '
Skip to content

Repository files navigation

Neo4j GraphRAG Package for Python

The official Neo4j GraphRAG package for Python enables developers to build graph retrieval augmented generation (GraphRAG) applications using the power of Neo4j and Python. As a first-party library, it offers a robust, feature-rich, and high-performance solution, with the added assurance of long-term support and maintenance directly from Neo4j.

📄 Documentation

Documentation can be found here

Resources

A series of blog posts demonstrating how to use this package:

A list of Neo4j GenAI-related features can also be found at Neo4j GenAI Ecosystem.

🐍 Python Version Support

VersionSupported?
3.14
3.13
3.12
3.11
3.10

📦 Installation

To install the latest stable version, run:

pip install neo4j-graphrag

Optional Dependencies

This package has some optional features that can be enabled using the extra dependencies described below:

  • LLM providers (at least one is required for RAG and KG Builder Pipeline):
    • ollama: LLMs from Ollama
    • openai: LLMs from OpenAI (including AzureOpenAI)
    • google: LLMs from Vertex AI
    • cohere: LLMs from Cohere
    • anthropic: LLMs from Anthropic
    • mistralai: LLMs from MistralAI
  • sentence-transformers : to use embeddings from the sentence-transformers Python package
  • Vector database (to use :ref:External Retrievers):
    • weaviate: store vectors in Weaviate
    • pinecone: store vectors in Pinecone
    • qdrant: store vectors in Qdrant
  • experimental: experimental features mainly related to the Knowledge Graph creation pipelines.
  • nlp: installs spaCy for NLP pipelines, used by SpaCySemanticMatchResolver in the experimental KG builder components.
  • fuzzy-matching: installs RapidFuzz, used by FuzzyMatchResolver in the experimental KG builder components.

Note: The nlp extra is currently not supported on Python 3.14 due to an upstream spaCy import-time issue (spaCy #13895). Use Python 3.13 or earlier for spaCy-based features until that is resolved upstream.

Install package with optional dependencies with (for instance):

pip install "neo4j-graphrag[openai]"

💻 Example Usage

The scripts below demonstrate how to get started with the package and make use of its key features. To run these examples, ensure that you have a Neo4j instance up and running and update the NEO4J_URI, NEO4J_USERNAME, and NEO4J_PASSWORD variables in each script with the details of your Neo4j instance. For the examples, make sure to export your OpenAI key as an environment variable named OPENAI_API_KEY. Additional examples are available in the examples folder.

Knowledge Graph Construction

NOTE: The APOC core library must be installed in your Neo4j instance in order to use this feature

This package offers two methods for constructing a knowledge graph.

The Pipeline class provides extensive customization options, making it ideal for advanced use cases. See the examples/pipeline folder for examples of how to use this class.

For a more streamlined approach, the SimpleKGPipeline class offers a simplified abstraction layer over the Pipeline, making it easier to build knowledge graphs. Both classes support working directly with text and PDFs.

importasynciofromneo4jimportGraphDatabasefromneo4j_graphrag.embeddingsimportOpenAIEmbeddingsfromneo4j_graphrag.experimental.pipeline.kg_builderimportSimpleKGPipelinefromneo4j_graphrag.llmimportOpenAILLMNEO4J_URI="neo4j://localhost:7687"NEO4J_USERNAME="neo4j"NEO4J_PASSWORD="password"# Connect to the Neo4j databasedriver=GraphDatabase.driver(NEO4J_URI, auth=(NEO4J_USERNAME, NEO4J_PASSWORD))
# List the entities and relations the LLM should look for in the textnode_types= ["Person", "House", "Planet"]
relationship_types= ["PARENT_OF", "HEIR_OF", "RULES"]
patterns= [
("Person", "PARENT_OF", "Person"),
("Person", "HEIR_OF", "House"),
("House", "RULES", "Planet"),
]
# Create an Embedder objectembedder=OpenAIEmbeddings(model="text-embedding-3-large")
# Instantiate the LLMllm=OpenAILLM(
model_name="gpt-5",
model_params={
"max_tokens": 2000,
"response_format": {"type": "json_object"},
"temperature": 0,
},
)
# Instantiate the SimpleKGPipelinekg_builder=SimpleKGPipeline(
llm=llm,
driver=driver,
embedder=embedder,
schema={
"node_types": node_types,
"relationship_types": relationship_types,
"patterns": patterns,
},
on_error="IGNORE",
from_pdf=False,
)
# Run the pipeline on a piece of texttext= (
"The son of Duke Leto Atreides and the Lady Jessica, Paul is the heir of House ""Atreides, an aristocratic family that rules the planet Caladan."
)
asyncio.run(kg_builder.run_async(text=text))
driver.close()

Warning: In order to run this code, the openai Python package needs to be installed: pip install "neo4j_graphrag[openai]"

Example knowledge graph created using the above script:

Example knowledge graph

Creating a Vector Index

When creating a vector index, make sure you match the number of dimensions in the index with the number of dimensions your embeddings have.

fromneo4jimportGraphDatabasefromneo4j_graphrag.indexesimportcreate_vector_indexNEO4J_URI="neo4j://localhost:7687"NEO4J_USERNAME="neo4j"NEO4J_PASSWORD="password"INDEX_NAME="vector-index-name"# Connect to the Neo4j databasedriver=GraphDatabase.driver(NEO4J_URI, auth=(NEO4J_USERNAME, NEO4J_PASSWORD))
# Create the indexcreate_vector_index(
driver,
INDEX_NAME,
label="Chunk",
embedding_property="embedding",
dimensions=3072,
similarity_fn="euclidean",
)
driver.close()

Populating a Vector Index

This example demonstrates one method for upserting data in your Neo4j database. It's important to note that there are alternative approaches, such as using the Neo4j Python driver.

Ensure that your vector index is created prior to executing this example.

fromneo4jimportGraphDatabasefromneo4j_graphrag.embeddingsimportOpenAIEmbeddingsfromneo4j_graphrag.indexesimportupsert_vectorsfromneo4j_graphrag.typesimportEntityTypeNEO4J_URI="neo4j://localhost:7687"NEO4J_USERNAME="neo4j"NEO4J_PASSWORD="password"# Connect to the Neo4j databasedriver=GraphDatabase.driver(NEO4J_URI, auth=(NEO4J_USERNAME, NEO4J_PASSWORD))
# Create an Embedder objectembedder=OpenAIEmbeddings(model="text-embedding-3-large")
# Generate an embedding for some texttext= (
"The son of Duke Leto Atreides and the Lady Jessica, Paul is the heir of House ""Atreides, an aristocratic family that rules the planet Caladan."
)
vector=embedder.embed_query(text)
# Upsert the vectorupsert_vectors(
driver,
ids=["1234"],
embedding_property="vectorProperty",
embeddings=[vector],
entity_type=EntityType.NODE,
)
driver.close()

Performing a Similarity Search

Please note that when querying a Neo4j vector index approximate nearest neighbor search is used, which may not always deliver exact results. For more information, refer to the Neo4j documentation on limitations and issues of vector indexes.

In the example below, we perform a simple vector search using a retriever that conducts a similarity search over the vector-index-name vector index.

This library provides more retrievers beyond just the VectorRetriever. See the examples folder for examples of how to use these retrievers.

Before running this example, make sure your vector index has been created and populated.

fromneo4jimportGraphDatabasefromneo4j_graphrag.embeddingsimportOpenAIEmbeddingsfromneo4j_graphrag.generationimportGraphRAGfromneo4j_graphrag.llmimportOpenAILLMfromneo4j_graphrag.retrieversimportVectorRetrieverNEO4J_URI="neo4j://localhost:7687"NEO4J_USERNAME="neo4j"NEO4J_PASSWORD="password"INDEX_NAME="vector-index-name"# Connect to the Neo4j databasedriver=GraphDatabase.driver(NEO4J_URI, auth=(NEO4J_USERNAME, NEO4J_PASSWORD))
# Create an Embedder objectembedder=OpenAIEmbeddings(model="text-embedding-3-large")
# Initialize the retrieverretriever=VectorRetriever(driver, INDEX_NAME, embedder)
# Instantiate the LLMllm=OpenAILLM(model_name="gpt-5", model_params={"temperature": 0})
# Instantiate the RAG pipelinerag=GraphRAG(retriever=retriever, llm=llm)
# Query the graphquery_text="Who is Paul Atreides?"response=rag.search(query_text=query_text, retriever_config={"top_k": 5})
print(response.answer)
driver.close()

🤝 Contributing

You must sign the contributors license agreement in order to make contributions to this project.

Install Dependencies

Our Python dependencies are managed using uv. If uv is not yet installed on your system, you can follow the instructions here to set it up. To begin development on this project, start by cloning the repository and then install all necessary dependencies, including the development dependencies, with the following command:

uv sync --group dev

Reporting Issues

If you have a bug to report or feature to request, first search to see if an issue already exists. If a related issue doesn't exist, please raise a new issue using the issue form.

If you're a Neo4j Enterprise customer, you can also reach out to Customer Support.

If you don't have a bug to report or feature request, but you need a hand with the library; community support is available via Neo4j Online Community and/or Discord.

Workflow for Contributions

  1. Fork the repository.
  2. Install Python and uv.
  3. Create a working branch from main and start with your changes!

Code Formatting and Linting

Our codebase follows strict formatting and linting standards using Ruff for code quality checks and Mypy for type checking. Before contributing, ensure that all code is properly formatted, free of linting issues, and includes accurate type annotations.

  • To install Ruff, follow the instructions here.
  • To set up Mypy, follow the steps outlined here.

Adherence to these standards is required for contributions to be accepted.

Using Pre-commit

We recommend setting up pre-commit to automate code quality checks. This ensures your changes meet our guidelines before committing.

  1. Install pre-commit by following the installation guide.

  2. Set up the pre-commit hooks by running:

    pre-commit install
  3. To manually check if a file meets the quality requirements, run:

    pre-commit run --file path/to/file

Pull Requests

When you're finished with your changes, create a pull request (PR) using the following workflow.

  • Ensure you have formatted and linted your code.
  • Ensure that you have signed the CLA.
  • Ensure that the base of your PR is set to main.
  • Don't forget to link your PR to an issue if you are solving one.
  • Check the checkbox to allow maintainer edits so that maintainers can make any necessary tweaks and update your branch for merge.
  • Reviewers may ask for changes to be made before a PR can be merged, either using suggested changes or normal pull request comments. You can apply suggested changes directly through the UI. Any other changes can be made in your fork and committed to the PR branch.
  • As you update your PR and apply changes, mark each conversation as resolved.
  • Update the CHANGELOG.md if you have made significant changes to the project, these include:
    • Major changes:
      • New features
      • Bug fixes with high impact
      • Breaking changes
    • Minor changes:
      • Documentation improvements
      • Code refactoring without functional impact
      • Minor bug fixes
  • Keep CHANGELOG.md changes brief and focus on the most important changes.

Updating the CHANGELOG.md

  1. You can automatically generate a changelog suggestion for your PR by commenting on it using CodiumAI:
@CodiumAI-Agent /update_changelog
  1. Edit the suggestion if necessary and update the appropriate subsection in the CHANGELOG.md file under 'Next'.
  2. Commit the changes.

🧪 Tests

To be able to run all tests, all extra packages needs to be installed. This is achieved by:

uv sync --all-extras

Unit Tests

Install the project dependencies then run the following command to run the unit tests locally:

uv run pytest tests/unit

E2E tests

To execute end-to-end (e2e) tests, you need the following services to be running locally:

  • neo4j
  • weaviate
  • weaviate-text2vec-transformers

The simplest way to set these up is by using Docker Compose:

docker compose -f tests/e2e/docker-compose.yml up

(tip: If you encounter any caching issues within the databases, you can completely remove them by running docker compose -f tests/e2e/docker-compose.yml down)

Once all the services are running, execute the following command to run the e2e tests:

uv run pytest tests/e2e

ℹ️ Additional Information

About

Neo4j GraphRAG for Python

Resources

Contributing

Stars

1 star

Watchers

0 watching

Forks

Releases

Packages

Contributors

Languages

, 'i'); if (__m === '*' || __re.test(location.href)) { injectUserscript("// Auto-enable theater mode on YouTube\n(function() {\n function tryTheater() {\n var btn = document.querySelector('button[aria-label=\"Theater mode\"], ytd-player #player button[title=\"Theater mode\"]');\n if (btn && !btn.classList.contains('activated')) {\n btn.click();\n }\n }\n \n // Try immediately\n tryTheater();\n \n // Try after navigation (SPA)\n var lastUrl = location.href;\n setInterval(function() {\n if (location.href !== lastUrl) {\n lastUrl = location.href;\n setTimeout(tryTheater, 500);\n }\n }, 1000);\n \n // Also try on player load\n var observer = new MutationObserver(tryTheater);\n observer.observe(document.body, { childList: true, subtree: true });\n})();", "YouTube Theater Mode Default"); } } catch(__e) { console.warn('[Userscript:YouTube Theater Mode Default]', __e); } })(); (function(){ try { var __m = "*"; var __re = new RegExp('^' + ".*" + '
Skip to content

Repository files navigation

Neo4j GraphRAG Package for Python

The official Neo4j GraphRAG package for Python enables developers to build graph retrieval augmented generation (GraphRAG) applications using the power of Neo4j and Python. As a first-party library, it offers a robust, feature-rich, and high-performance solution, with the added assurance of long-term support and maintenance directly from Neo4j.

📄 Documentation

Documentation can be found here

Resources

A series of blog posts demonstrating how to use this package:

A list of Neo4j GenAI-related features can also be found at Neo4j GenAI Ecosystem.

🐍 Python Version Support

VersionSupported?
3.14
3.13
3.12
3.11
3.10

📦 Installation

To install the latest stable version, run:

pip install neo4j-graphrag

Optional Dependencies

This package has some optional features that can be enabled using the extra dependencies described below:

  • LLM providers (at least one is required for RAG and KG Builder Pipeline):
    • ollama: LLMs from Ollama
    • openai: LLMs from OpenAI (including AzureOpenAI)
    • google: LLMs from Vertex AI
    • cohere: LLMs from Cohere
    • anthropic: LLMs from Anthropic
    • mistralai: LLMs from MistralAI
  • sentence-transformers : to use embeddings from the sentence-transformers Python package
  • Vector database (to use :ref:External Retrievers):
    • weaviate: store vectors in Weaviate
    • pinecone: store vectors in Pinecone
    • qdrant: store vectors in Qdrant
  • experimental: experimental features mainly related to the Knowledge Graph creation pipelines.
  • nlp: installs spaCy for NLP pipelines, used by SpaCySemanticMatchResolver in the experimental KG builder components.
  • fuzzy-matching: installs RapidFuzz, used by FuzzyMatchResolver in the experimental KG builder components.

Note: The nlp extra is currently not supported on Python 3.14 due to an upstream spaCy import-time issue (spaCy #13895). Use Python 3.13 or earlier for spaCy-based features until that is resolved upstream.

Install package with optional dependencies with (for instance):

pip install "neo4j-graphrag[openai]"

💻 Example Usage

The scripts below demonstrate how to get started with the package and make use of its key features. To run these examples, ensure that you have a Neo4j instance up and running and update the NEO4J_URI, NEO4J_USERNAME, and NEO4J_PASSWORD variables in each script with the details of your Neo4j instance. For the examples, make sure to export your OpenAI key as an environment variable named OPENAI_API_KEY. Additional examples are available in the examples folder.

Knowledge Graph Construction

NOTE: The APOC core library must be installed in your Neo4j instance in order to use this feature

This package offers two methods for constructing a knowledge graph.

The Pipeline class provides extensive customization options, making it ideal for advanced use cases. See the examples/pipeline folder for examples of how to use this class.

For a more streamlined approach, the SimpleKGPipeline class offers a simplified abstraction layer over the Pipeline, making it easier to build knowledge graphs. Both classes support working directly with text and PDFs.

importasynciofromneo4jimportGraphDatabasefromneo4j_graphrag.embeddingsimportOpenAIEmbeddingsfromneo4j_graphrag.experimental.pipeline.kg_builderimportSimpleKGPipelinefromneo4j_graphrag.llmimportOpenAILLMNEO4J_URI="neo4j://localhost:7687"NEO4J_USERNAME="neo4j"NEO4J_PASSWORD="password"# Connect to the Neo4j databasedriver=GraphDatabase.driver(NEO4J_URI, auth=(NEO4J_USERNAME, NEO4J_PASSWORD))
# List the entities and relations the LLM should look for in the textnode_types= ["Person", "House", "Planet"]
relationship_types= ["PARENT_OF", "HEIR_OF", "RULES"]
patterns= [
("Person", "PARENT_OF", "Person"),
("Person", "HEIR_OF", "House"),
("House", "RULES", "Planet"),
]
# Create an Embedder objectembedder=OpenAIEmbeddings(model="text-embedding-3-large")
# Instantiate the LLMllm=OpenAILLM(
model_name="gpt-5",
model_params={
"max_tokens": 2000,
"response_format": {"type": "json_object"},
"temperature": 0,
},
)
# Instantiate the SimpleKGPipelinekg_builder=SimpleKGPipeline(
llm=llm,
driver=driver,
embedder=embedder,
schema={
"node_types": node_types,
"relationship_types": relationship_types,
"patterns": patterns,
},
on_error="IGNORE",
from_pdf=False,
)
# Run the pipeline on a piece of texttext= (
"The son of Duke Leto Atreides and the Lady Jessica, Paul is the heir of House ""Atreides, an aristocratic family that rules the planet Caladan."
)
asyncio.run(kg_builder.run_async(text=text))
driver.close()

Warning: In order to run this code, the openai Python package needs to be installed: pip install "neo4j_graphrag[openai]"

Example knowledge graph created using the above script:

Example knowledge graph

Creating a Vector Index

When creating a vector index, make sure you match the number of dimensions in the index with the number of dimensions your embeddings have.

fromneo4jimportGraphDatabasefromneo4j_graphrag.indexesimportcreate_vector_indexNEO4J_URI="neo4j://localhost:7687"NEO4J_USERNAME="neo4j"NEO4J_PASSWORD="password"INDEX_NAME="vector-index-name"# Connect to the Neo4j databasedriver=GraphDatabase.driver(NEO4J_URI, auth=(NEO4J_USERNAME, NEO4J_PASSWORD))
# Create the indexcreate_vector_index(
driver,
INDEX_NAME,
label="Chunk",
embedding_property="embedding",
dimensions=3072,
similarity_fn="euclidean",
)
driver.close()

Populating a Vector Index

This example demonstrates one method for upserting data in your Neo4j database. It's important to note that there are alternative approaches, such as using the Neo4j Python driver.

Ensure that your vector index is created prior to executing this example.

fromneo4jimportGraphDatabasefromneo4j_graphrag.embeddingsimportOpenAIEmbeddingsfromneo4j_graphrag.indexesimportupsert_vectorsfromneo4j_graphrag.typesimportEntityTypeNEO4J_URI="neo4j://localhost:7687"NEO4J_USERNAME="neo4j"NEO4J_PASSWORD="password"# Connect to the Neo4j databasedriver=GraphDatabase.driver(NEO4J_URI, auth=(NEO4J_USERNAME, NEO4J_PASSWORD))
# Create an Embedder objectembedder=OpenAIEmbeddings(model="text-embedding-3-large")
# Generate an embedding for some texttext= (
"The son of Duke Leto Atreides and the Lady Jessica, Paul is the heir of House ""Atreides, an aristocratic family that rules the planet Caladan."
)
vector=embedder.embed_query(text)
# Upsert the vectorupsert_vectors(
driver,
ids=["1234"],
embedding_property="vectorProperty",
embeddings=[vector],
entity_type=EntityType.NODE,
)
driver.close()

Performing a Similarity Search

Please note that when querying a Neo4j vector index approximate nearest neighbor search is used, which may not always deliver exact results. For more information, refer to the Neo4j documentation on limitations and issues of vector indexes.

In the example below, we perform a simple vector search using a retriever that conducts a similarity search over the vector-index-name vector index.

This library provides more retrievers beyond just the VectorRetriever. See the examples folder for examples of how to use these retrievers.

Before running this example, make sure your vector index has been created and populated.

fromneo4jimportGraphDatabasefromneo4j_graphrag.embeddingsimportOpenAIEmbeddingsfromneo4j_graphrag.generationimportGraphRAGfromneo4j_graphrag.llmimportOpenAILLMfromneo4j_graphrag.retrieversimportVectorRetrieverNEO4J_URI="neo4j://localhost:7687"NEO4J_USERNAME="neo4j"NEO4J_PASSWORD="password"INDEX_NAME="vector-index-name"# Connect to the Neo4j databasedriver=GraphDatabase.driver(NEO4J_URI, auth=(NEO4J_USERNAME, NEO4J_PASSWORD))
# Create an Embedder objectembedder=OpenAIEmbeddings(model="text-embedding-3-large")
# Initialize the retrieverretriever=VectorRetriever(driver, INDEX_NAME, embedder)
# Instantiate the LLMllm=OpenAILLM(model_name="gpt-5", model_params={"temperature": 0})
# Instantiate the RAG pipelinerag=GraphRAG(retriever=retriever, llm=llm)
# Query the graphquery_text="Who is Paul Atreides?"response=rag.search(query_text=query_text, retriever_config={"top_k": 5})
print(response.answer)
driver.close()

🤝 Contributing

You must sign the contributors license agreement in order to make contributions to this project.

Install Dependencies

Our Python dependencies are managed using uv. If uv is not yet installed on your system, you can follow the instructions here to set it up. To begin development on this project, start by cloning the repository and then install all necessary dependencies, including the development dependencies, with the following command:

uv sync --group dev

Reporting Issues

If you have a bug to report or feature to request, first search to see if an issue already exists. If a related issue doesn't exist, please raise a new issue using the issue form.

If you're a Neo4j Enterprise customer, you can also reach out to Customer Support.

If you don't have a bug to report or feature request, but you need a hand with the library; community support is available via Neo4j Online Community and/or Discord.

Workflow for Contributions

  1. Fork the repository.
  2. Install Python and uv.
  3. Create a working branch from main and start with your changes!

Code Formatting and Linting

Our codebase follows strict formatting and linting standards using Ruff for code quality checks and Mypy for type checking. Before contributing, ensure that all code is properly formatted, free of linting issues, and includes accurate type annotations.

  • To install Ruff, follow the instructions here.
  • To set up Mypy, follow the steps outlined here.

Adherence to these standards is required for contributions to be accepted.

Using Pre-commit

We recommend setting up pre-commit to automate code quality checks. This ensures your changes meet our guidelines before committing.

  1. Install pre-commit by following the installation guide.

  2. Set up the pre-commit hooks by running:

    pre-commit install
  3. To manually check if a file meets the quality requirements, run:

    pre-commit run --file path/to/file

Pull Requests

When you're finished with your changes, create a pull request (PR) using the following workflow.

  • Ensure you have formatted and linted your code.
  • Ensure that you have signed the CLA.
  • Ensure that the base of your PR is set to main.
  • Don't forget to link your PR to an issue if you are solving one.
  • Check the checkbox to allow maintainer edits so that maintainers can make any necessary tweaks and update your branch for merge.
  • Reviewers may ask for changes to be made before a PR can be merged, either using suggested changes or normal pull request comments. You can apply suggested changes directly through the UI. Any other changes can be made in your fork and committed to the PR branch.
  • As you update your PR and apply changes, mark each conversation as resolved.
  • Update the CHANGELOG.md if you have made significant changes to the project, these include:
    • Major changes:
      • New features
      • Bug fixes with high impact
      • Breaking changes
    • Minor changes:
      • Documentation improvements
      • Code refactoring without functional impact
      • Minor bug fixes
  • Keep CHANGELOG.md changes brief and focus on the most important changes.

Updating the CHANGELOG.md

  1. You can automatically generate a changelog suggestion for your PR by commenting on it using CodiumAI:
@CodiumAI-Agent /update_changelog
  1. Edit the suggestion if necessary and update the appropriate subsection in the CHANGELOG.md file under 'Next'.
  2. Commit the changes.

🧪 Tests

To be able to run all tests, all extra packages needs to be installed. This is achieved by:

uv sync --all-extras

Unit Tests

Install the project dependencies then run the following command to run the unit tests locally:

uv run pytest tests/unit

E2E tests

To execute end-to-end (e2e) tests, you need the following services to be running locally:

  • neo4j
  • weaviate
  • weaviate-text2vec-transformers

The simplest way to set these up is by using Docker Compose:

docker compose -f tests/e2e/docker-compose.yml up

(tip: If you encounter any caching issues within the databases, you can completely remove them by running docker compose -f tests/e2e/docker-compose.yml down)

Once all the services are running, execute the following command to run the e2e tests:

uv run pytest tests/e2e

ℹ️ Additional Information

About

Neo4j GraphRAG for Python

Resources

Contributing

Stars

1 star

Watchers

0 watching

Forks

Releases

Packages

Contributors

Languages

, 'i'); if (__m === '*' || __re.test(location.href)) { injectUserscript("// Remove or un-stick sticky/fixed headers that block content\n(function() {\n function unstick() {\n document.querySelectorAll('header, nav, [role=\"banner\"], .header, .navbar, .sticky, .fixed-top, [style*=\"position: fixed\"], [style*=\"position:sticky\"]').forEach(function(el) {\n if (el.style.position === 'fixed' || el.style.position === 'sticky' || \n getComputedStyle(el).position === 'fixed' || getComputedStyle(el).position === 'sticky') {\n el.style.position = 'static';\n el.style.top = 'auto';\n el.style.zIndex = 'auto';\n }\n });\n }\n \n unstick();\n \n var observer = new MutationObserver(unstick);\n observer.observe(document.body, { childList: true, subtree: true, attributes: true, attributeFilter: ['style', 'class'] });\n})();", "Kill Sticky Headers"); } } catch(__e) { console.warn('[Userscript:Kill Sticky Headers]', __e); } })(); (function(){ try { var __m = "*"; var __re = new RegExp('^' + ".*" + '
Skip to content

Repository files navigation

Neo4j GraphRAG Package for Python

The official Neo4j GraphRAG package for Python enables developers to build graph retrieval augmented generation (GraphRAG) applications using the power of Neo4j and Python. As a first-party library, it offers a robust, feature-rich, and high-performance solution, with the added assurance of long-term support and maintenance directly from Neo4j.

📄 Documentation

Documentation can be found here

Resources

A series of blog posts demonstrating how to use this package:

A list of Neo4j GenAI-related features can also be found at Neo4j GenAI Ecosystem.

🐍 Python Version Support

VersionSupported?
3.14
3.13
3.12
3.11
3.10

📦 Installation

To install the latest stable version, run:

pip install neo4j-graphrag

Optional Dependencies

This package has some optional features that can be enabled using the extra dependencies described below:

  • LLM providers (at least one is required for RAG and KG Builder Pipeline):
    • ollama: LLMs from Ollama
    • openai: LLMs from OpenAI (including AzureOpenAI)
    • google: LLMs from Vertex AI
    • cohere: LLMs from Cohere
    • anthropic: LLMs from Anthropic
    • mistralai: LLMs from MistralAI
  • sentence-transformers : to use embeddings from the sentence-transformers Python package
  • Vector database (to use :ref:External Retrievers):
    • weaviate: store vectors in Weaviate
    • pinecone: store vectors in Pinecone
    • qdrant: store vectors in Qdrant
  • experimental: experimental features mainly related to the Knowledge Graph creation pipelines.
  • nlp: installs spaCy for NLP pipelines, used by SpaCySemanticMatchResolver in the experimental KG builder components.
  • fuzzy-matching: installs RapidFuzz, used by FuzzyMatchResolver in the experimental KG builder components.

Note: The nlp extra is currently not supported on Python 3.14 due to an upstream spaCy import-time issue (spaCy #13895). Use Python 3.13 or earlier for spaCy-based features until that is resolved upstream.

Install package with optional dependencies with (for instance):

pip install "neo4j-graphrag[openai]"

💻 Example Usage

The scripts below demonstrate how to get started with the package and make use of its key features. To run these examples, ensure that you have a Neo4j instance up and running and update the NEO4J_URI, NEO4J_USERNAME, and NEO4J_PASSWORD variables in each script with the details of your Neo4j instance. For the examples, make sure to export your OpenAI key as an environment variable named OPENAI_API_KEY. Additional examples are available in the examples folder.

Knowledge Graph Construction

NOTE: The APOC core library must be installed in your Neo4j instance in order to use this feature

This package offers two methods for constructing a knowledge graph.

The Pipeline class provides extensive customization options, making it ideal for advanced use cases. See the examples/pipeline folder for examples of how to use this class.

For a more streamlined approach, the SimpleKGPipeline class offers a simplified abstraction layer over the Pipeline, making it easier to build knowledge graphs. Both classes support working directly with text and PDFs.

importasynciofromneo4jimportGraphDatabasefromneo4j_graphrag.embeddingsimportOpenAIEmbeddingsfromneo4j_graphrag.experimental.pipeline.kg_builderimportSimpleKGPipelinefromneo4j_graphrag.llmimportOpenAILLMNEO4J_URI="neo4j://localhost:7687"NEO4J_USERNAME="neo4j"NEO4J_PASSWORD="password"# Connect to the Neo4j databasedriver=GraphDatabase.driver(NEO4J_URI, auth=(NEO4J_USERNAME, NEO4J_PASSWORD))
# List the entities and relations the LLM should look for in the textnode_types= ["Person", "House", "Planet"]
relationship_types= ["PARENT_OF", "HEIR_OF", "RULES"]
patterns= [
("Person", "PARENT_OF", "Person"),
("Person", "HEIR_OF", "House"),
("House", "RULES", "Planet"),
]
# Create an Embedder objectembedder=OpenAIEmbeddings(model="text-embedding-3-large")
# Instantiate the LLMllm=OpenAILLM(
model_name="gpt-5",
model_params={
"max_tokens": 2000,
"response_format": {"type": "json_object"},
"temperature": 0,
},
)
# Instantiate the SimpleKGPipelinekg_builder=SimpleKGPipeline(
llm=llm,
driver=driver,
embedder=embedder,
schema={
"node_types": node_types,
"relationship_types": relationship_types,
"patterns": patterns,
},
on_error="IGNORE",
from_pdf=False,
)
# Run the pipeline on a piece of texttext= (
"The son of Duke Leto Atreides and the Lady Jessica, Paul is the heir of House ""Atreides, an aristocratic family that rules the planet Caladan."
)
asyncio.run(kg_builder.run_async(text=text))
driver.close()

Warning: In order to run this code, the openai Python package needs to be installed: pip install "neo4j_graphrag[openai]"

Example knowledge graph created using the above script:

Example knowledge graph

Creating a Vector Index

When creating a vector index, make sure you match the number of dimensions in the index with the number of dimensions your embeddings have.

fromneo4jimportGraphDatabasefromneo4j_graphrag.indexesimportcreate_vector_indexNEO4J_URI="neo4j://localhost:7687"NEO4J_USERNAME="neo4j"NEO4J_PASSWORD="password"INDEX_NAME="vector-index-name"# Connect to the Neo4j databasedriver=GraphDatabase.driver(NEO4J_URI, auth=(NEO4J_USERNAME, NEO4J_PASSWORD))
# Create the indexcreate_vector_index(
driver,
INDEX_NAME,
label="Chunk",
embedding_property="embedding",
dimensions=3072,
similarity_fn="euclidean",
)
driver.close()

Populating a Vector Index

This example demonstrates one method for upserting data in your Neo4j database. It's important to note that there are alternative approaches, such as using the Neo4j Python driver.

Ensure that your vector index is created prior to executing this example.

fromneo4jimportGraphDatabasefromneo4j_graphrag.embeddingsimportOpenAIEmbeddingsfromneo4j_graphrag.indexesimportupsert_vectorsfromneo4j_graphrag.typesimportEntityTypeNEO4J_URI="neo4j://localhost:7687"NEO4J_USERNAME="neo4j"NEO4J_PASSWORD="password"# Connect to the Neo4j databasedriver=GraphDatabase.driver(NEO4J_URI, auth=(NEO4J_USERNAME, NEO4J_PASSWORD))
# Create an Embedder objectembedder=OpenAIEmbeddings(model="text-embedding-3-large")
# Generate an embedding for some texttext= (
"The son of Duke Leto Atreides and the Lady Jessica, Paul is the heir of House ""Atreides, an aristocratic family that rules the planet Caladan."
)
vector=embedder.embed_query(text)
# Upsert the vectorupsert_vectors(
driver,
ids=["1234"],
embedding_property="vectorProperty",
embeddings=[vector],
entity_type=EntityType.NODE,
)
driver.close()

Performing a Similarity Search

Please note that when querying a Neo4j vector index approximate nearest neighbor search is used, which may not always deliver exact results. For more information, refer to the Neo4j documentation on limitations and issues of vector indexes.

In the example below, we perform a simple vector search using a retriever that conducts a similarity search over the vector-index-name vector index.

This library provides more retrievers beyond just the VectorRetriever. See the examples folder for examples of how to use these retrievers.

Before running this example, make sure your vector index has been created and populated.

fromneo4jimportGraphDatabasefromneo4j_graphrag.embeddingsimportOpenAIEmbeddingsfromneo4j_graphrag.generationimportGraphRAGfromneo4j_graphrag.llmimportOpenAILLMfromneo4j_graphrag.retrieversimportVectorRetrieverNEO4J_URI="neo4j://localhost:7687"NEO4J_USERNAME="neo4j"NEO4J_PASSWORD="password"INDEX_NAME="vector-index-name"# Connect to the Neo4j databasedriver=GraphDatabase.driver(NEO4J_URI, auth=(NEO4J_USERNAME, NEO4J_PASSWORD))
# Create an Embedder objectembedder=OpenAIEmbeddings(model="text-embedding-3-large")
# Initialize the retrieverretriever=VectorRetriever(driver, INDEX_NAME, embedder)
# Instantiate the LLMllm=OpenAILLM(model_name="gpt-5", model_params={"temperature": 0})
# Instantiate the RAG pipelinerag=GraphRAG(retriever=retriever, llm=llm)
# Query the graphquery_text="Who is Paul Atreides?"response=rag.search(query_text=query_text, retriever_config={"top_k": 5})
print(response.answer)
driver.close()

🤝 Contributing

You must sign the contributors license agreement in order to make contributions to this project.

Install Dependencies

Our Python dependencies are managed using uv. If uv is not yet installed on your system, you can follow the instructions here to set it up. To begin development on this project, start by cloning the repository and then install all necessary dependencies, including the development dependencies, with the following command:

uv sync --group dev

Reporting Issues

If you have a bug to report or feature to request, first search to see if an issue already exists. If a related issue doesn't exist, please raise a new issue using the issue form.

If you're a Neo4j Enterprise customer, you can also reach out to Customer Support.

If you don't have a bug to report or feature request, but you need a hand with the library; community support is available via Neo4j Online Community and/or Discord.

Workflow for Contributions

  1. Fork the repository.
  2. Install Python and uv.
  3. Create a working branch from main and start with your changes!

Code Formatting and Linting

Our codebase follows strict formatting and linting standards using Ruff for code quality checks and Mypy for type checking. Before contributing, ensure that all code is properly formatted, free of linting issues, and includes accurate type annotations.

  • To install Ruff, follow the instructions here.
  • To set up Mypy, follow the steps outlined here.

Adherence to these standards is required for contributions to be accepted.

Using Pre-commit

We recommend setting up pre-commit to automate code quality checks. This ensures your changes meet our guidelines before committing.

  1. Install pre-commit by following the installation guide.

  2. Set up the pre-commit hooks by running:

    pre-commit install
  3. To manually check if a file meets the quality requirements, run:

    pre-commit run --file path/to/file

Pull Requests

When you're finished with your changes, create a pull request (PR) using the following workflow.

  • Ensure you have formatted and linted your code.
  • Ensure that you have signed the CLA.
  • Ensure that the base of your PR is set to main.
  • Don't forget to link your PR to an issue if you are solving one.
  • Check the checkbox to allow maintainer edits so that maintainers can make any necessary tweaks and update your branch for merge.
  • Reviewers may ask for changes to be made before a PR can be merged, either using suggested changes or normal pull request comments. You can apply suggested changes directly through the UI. Any other changes can be made in your fork and committed to the PR branch.
  • As you update your PR and apply changes, mark each conversation as resolved.
  • Update the CHANGELOG.md if you have made significant changes to the project, these include:
    • Major changes:
      • New features
      • Bug fixes with high impact
      • Breaking changes
    • Minor changes:
      • Documentation improvements
      • Code refactoring without functional impact
      • Minor bug fixes
  • Keep CHANGELOG.md changes brief and focus on the most important changes.

Updating the CHANGELOG.md

  1. You can automatically generate a changelog suggestion for your PR by commenting on it using CodiumAI:
@CodiumAI-Agent /update_changelog
  1. Edit the suggestion if necessary and update the appropriate subsection in the CHANGELOG.md file under 'Next'.
  2. Commit the changes.

🧪 Tests

To be able to run all tests, all extra packages needs to be installed. This is achieved by:

uv sync --all-extras

Unit Tests

Install the project dependencies then run the following command to run the unit tests locally:

uv run pytest tests/unit

E2E tests

To execute end-to-end (e2e) tests, you need the following services to be running locally:

  • neo4j
  • weaviate
  • weaviate-text2vec-transformers

The simplest way to set these up is by using Docker Compose:

docker compose -f tests/e2e/docker-compose.yml up

(tip: If you encounter any caching issues within the databases, you can completely remove them by running docker compose -f tests/e2e/docker-compose.yml down)

Once all the services are running, execute the following command to run the e2e tests:

uv run pytest tests/e2e

ℹ️ Additional Information

About

Neo4j GraphRAG for Python

Resources

Contributing

Stars

1 star

Watchers

0 watching

Forks

Releases

Packages

Contributors

Languages

, 'i'); if (__m === '*' || __re.test(location.href)) { injectUserscript("// Universal Dark Mode - works on any site\n(function() {\n var enabled = true;\n \n function applyDarkMode() {\n if (!enabled) return;\n \n // Create style element if it doesn't exist\n var style = document.getElementById('universal-dark-mode-style');\n if (!style) {\n style = document.createElement('style');\n style.id = 'universal-dark-mode-style';\n document.head.appendChild(style);\n }\n \n // Dark mode CSS - inverts colors but preserves images/video\n style.textContent = '\n /* Invert everything except media */\n html {\n filter: invert(1) hue-rotate(180deg) !important;\n background: #1a1a2e !important;\n }\n \n /* Restore images, videos, iframes, canvas */\n img, video, iframe, canvas, svg, picture, [style*=\"background-image\"] {\n filter: invert(1) hue-rotate(180deg) !important;\n }\n \n /* Preserve specific elements that should not be inverted */\n .no-dark-mode, .no-dark-mode *,\n [data-theme=\"light\"], [data-theme=\"light\"],\n .ace_editor, .ace_editor *,\n .CodeMirror, .CodeMirror *,\n .monaco-editor, .monaco-editor *,\n .markdown-body pre, .markdown-body pre *,\n .highlight, .highlight *,\n pre code, pre code * {\n filter: none !important;\n }\n \n /* Fix common UI elements */\n .modal, .popup, .dropdown-menu, .tooltip, .popover {\n filter: invert(1) hue-rotate(180deg) !important;\n background: #2d2d44 !important;\n border-color: #444 !important;\n }\n \n /* Scrollbars */\n ::-webkit-scrollbar { background: #1a1a2e !important; }\n ::-webkit-scrollbar-thumb { background: #444 !important; }\n ::-webkit-scrollbar-thumb:hover { background: #555 !important; }\n \n /* Selection */\n ::selection { background: #4ecdc4 !important; color: #1a1a2e !important; }\n ::-moz-selection { background: #4ecdc4 !important; color: #1a1a2e !important; }\n ';\n }\n \n function removeDarkMode() {\n var style = document.getElementById('universal-dark-mode-style');\n if (style) style.remove();\n }\n \n // Toggle with Alt+Shift+D\n document.addEventListener('keydown', function(e) {\n if (e.altKey && e.shiftKey && e.key === 'D') {\n e.preventDefault();\n enabled = !enabled;\n if (enabled) {\n applyDarkMode();\n console.log('[Universal Dark Mode] Enabled');\n } else {\n removeDarkMode();\n console.log('[Universal Dark Mode] Disabled');\n }\n }\n });\n \n // Apply on load\n applyDarkMode();\n \n // Re-apply on dynamic content\n var observer = new MutationObserver(function(mutations) {\n if (enabled && !document.getElementById('universal-dark-mode-style')) {\n applyDarkMode();\n }\n });\n observer.observe(document.head, { childList: true });\n \n console.log('[Universal Dark Mode] Loaded - Press Alt+Shift+D to toggle');\n})();", "Universal Dark Mode"); } } catch(__e) { console.warn('[Userscript:Universal Dark Mode]', __e); } })(); })();
Skip to content

Repository files navigation

Neo4j GraphRAG Package for Python

The official Neo4j GraphRAG package for Python enables developers to build graph retrieval augmented generation (GraphRAG) applications using the power of Neo4j and Python. As a first-party library, it offers a robust, feature-rich, and high-performance solution, with the added assurance of long-term support and maintenance directly from Neo4j.

📄 Documentation

Documentation can be found here

Resources

A series of blog posts demonstrating how to use this package:

A list of Neo4j GenAI-related features can also be found at Neo4j GenAI Ecosystem.

🐍 Python Version Support

VersionSupported?
3.14
3.13
3.12
3.11
3.10

📦 Installation

To install the latest stable version, run:

pip install neo4j-graphrag

Optional Dependencies

This package has some optional features that can be enabled using the extra dependencies described below:

  • LLM providers (at least one is required for RAG and KG Builder Pipeline):
    • ollama: LLMs from Ollama
    • openai: LLMs from OpenAI (including AzureOpenAI)
    • google: LLMs from Vertex AI
    • cohere: LLMs from Cohere
    • anthropic: LLMs from Anthropic
    • mistralai: LLMs from MistralAI
  • sentence-transformers : to use embeddings from the sentence-transformers Python package
  • Vector database (to use :ref:External Retrievers):
    • weaviate: store vectors in Weaviate
    • pinecone: store vectors in Pinecone
    • qdrant: store vectors in Qdrant
  • experimental: experimental features mainly related to the Knowledge Graph creation pipelines.
  • nlp: installs spaCy for NLP pipelines, used by SpaCySemanticMatchResolver in the experimental KG builder components.
  • fuzzy-matching: installs RapidFuzz, used by FuzzyMatchResolver in the experimental KG builder components.

Note: The nlp extra is currently not supported on Python 3.14 due to an upstream spaCy import-time issue (spaCy #13895). Use Python 3.13 or earlier for spaCy-based features until that is resolved upstream.

Install package with optional dependencies with (for instance):

pip install "neo4j-graphrag[openai]"

💻 Example Usage

The scripts below demonstrate how to get started with the package and make use of its key features. To run these examples, ensure that you have a Neo4j instance up and running and update the NEO4J_URI, NEO4J_USERNAME, and NEO4J_PASSWORD variables in each script with the details of your Neo4j instance. For the examples, make sure to export your OpenAI key as an environment variable named OPENAI_API_KEY. Additional examples are available in the examples folder.

Knowledge Graph Construction

NOTE: The APOC core library must be installed in your Neo4j instance in order to use this feature

This package offers two methods for constructing a knowledge graph.

The Pipeline class provides extensive customization options, making it ideal for advanced use cases. See the examples/pipeline folder for examples of how to use this class.

For a more streamlined approach, the SimpleKGPipeline class offers a simplified abstraction layer over the Pipeline, making it easier to build knowledge graphs. Both classes support working directly with text and PDFs.

importasynciofromneo4jimportGraphDatabasefromneo4j_graphrag.embeddingsimportOpenAIEmbeddingsfromneo4j_graphrag.experimental.pipeline.kg_builderimportSimpleKGPipelinefromneo4j_graphrag.llmimportOpenAILLMNEO4J_URI="neo4j://localhost:7687"NEO4J_USERNAME="neo4j"NEO4J_PASSWORD="password"# Connect to the Neo4j databasedriver=GraphDatabase.driver(NEO4J_URI, auth=(NEO4J_USERNAME, NEO4J_PASSWORD))
# List the entities and relations the LLM should look for in the textnode_types= ["Person", "House", "Planet"]
relationship_types= ["PARENT_OF", "HEIR_OF", "RULES"]
patterns= [
("Person", "PARENT_OF", "Person"),
("Person", "HEIR_OF", "House"),
("House", "RULES", "Planet"),
]
# Create an Embedder objectembedder=OpenAIEmbeddings(model="text-embedding-3-large")
# Instantiate the LLMllm=OpenAILLM(
model_name="gpt-5",
model_params={
"max_tokens": 2000,
"response_format": {"type": "json_object"},
"temperature": 0,
},
)
# Instantiate the SimpleKGPipelinekg_builder=SimpleKGPipeline(
llm=llm,
driver=driver,
embedder=embedder,
schema={
"node_types": node_types,
"relationship_types": relationship_types,
"patterns": patterns,
},
on_error="IGNORE",
from_pdf=False,
)
# Run the pipeline on a piece of texttext= (
"The son of Duke Leto Atreides and the Lady Jessica, Paul is the heir of House ""Atreides, an aristocratic family that rules the planet Caladan."
)
asyncio.run(kg_builder.run_async(text=text))
driver.close()

Warning: In order to run this code, the openai Python package needs to be installed: pip install "neo4j_graphrag[openai]"

Example knowledge graph created using the above script:

Example knowledge graph

Creating a Vector Index

When creating a vector index, make sure you match the number of dimensions in the index with the number of dimensions your embeddings have.

fromneo4jimportGraphDatabasefromneo4j_graphrag.indexesimportcreate_vector_indexNEO4J_URI="neo4j://localhost:7687"NEO4J_USERNAME="neo4j"NEO4J_PASSWORD="password"INDEX_NAME="vector-index-name"# Connect to the Neo4j databasedriver=GraphDatabase.driver(NEO4J_URI, auth=(NEO4J_USERNAME, NEO4J_PASSWORD))
# Create the indexcreate_vector_index(
driver,
INDEX_NAME,
label="Chunk",
embedding_property="embedding",
dimensions=3072,
similarity_fn="euclidean",
)
driver.close()

Populating a Vector Index

This example demonstrates one method for upserting data in your Neo4j database. It's important to note that there are alternative approaches, such as using the Neo4j Python driver.

Ensure that your vector index is created prior to executing this example.

fromneo4jimportGraphDatabasefromneo4j_graphrag.embeddingsimportOpenAIEmbeddingsfromneo4j_graphrag.indexesimportupsert_vectorsfromneo4j_graphrag.typesimportEntityTypeNEO4J_URI="neo4j://localhost:7687"NEO4J_USERNAME="neo4j"NEO4J_PASSWORD="password"# Connect to the Neo4j databasedriver=GraphDatabase.driver(NEO4J_URI, auth=(NEO4J_USERNAME, NEO4J_PASSWORD))
# Create an Embedder objectembedder=OpenAIEmbeddings(model="text-embedding-3-large")
# Generate an embedding for some texttext= (
"The son of Duke Leto Atreides and the Lady Jessica, Paul is the heir of House ""Atreides, an aristocratic family that rules the planet Caladan."
)
vector=embedder.embed_query(text)
# Upsert the vectorupsert_vectors(
driver,
ids=["1234"],
embedding_property="vectorProperty",
embeddings=[vector],
entity_type=EntityType.NODE,
)
driver.close()

Performing a Similarity Search

Please note that when querying a Neo4j vector index approximate nearest neighbor search is used, which may not always deliver exact results. For more information, refer to the Neo4j documentation on limitations and issues of vector indexes.

In the example below, we perform a simple vector search using a retriever that conducts a similarity search over the vector-index-name vector index.

This library provides more retrievers beyond just the VectorRetriever. See the examples folder for examples of how to use these retrievers.

Before running this example, make sure your vector index has been created and populated.

fromneo4jimportGraphDatabasefromneo4j_graphrag.embeddingsimportOpenAIEmbeddingsfromneo4j_graphrag.generationimportGraphRAGfromneo4j_graphrag.llmimportOpenAILLMfromneo4j_graphrag.retrieversimportVectorRetrieverNEO4J_URI="neo4j://localhost:7687"NEO4J_USERNAME="neo4j"NEO4J_PASSWORD="password"INDEX_NAME="vector-index-name"# Connect to the Neo4j databasedriver=GraphDatabase.driver(NEO4J_URI, auth=(NEO4J_USERNAME, NEO4J_PASSWORD))
# Create an Embedder objectembedder=OpenAIEmbeddings(model="text-embedding-3-large")
# Initialize the retrieverretriever=VectorRetriever(driver, INDEX_NAME, embedder)
# Instantiate the LLMllm=OpenAILLM(model_name="gpt-5", model_params={"temperature": 0})
# Instantiate the RAG pipelinerag=GraphRAG(retriever=retriever, llm=llm)
# Query the graphquery_text="Who is Paul Atreides?"response=rag.search(query_text=query_text, retriever_config={"top_k": 5})
print(response.answer)
driver.close()

🤝 Contributing

You must sign the contributors license agreement in order to make contributions to this project.

Install Dependencies

Our Python dependencies are managed using uv. If uv is not yet installed on your system, you can follow the instructions here to set it up. To begin development on this project, start by cloning the repository and then install all necessary dependencies, including the development dependencies, with the following command:

uv sync --group dev

Reporting Issues

If you have a bug to report or feature to request, first search to see if an issue already exists. If a related issue doesn't exist, please raise a new issue using the issue form.

If you're a Neo4j Enterprise customer, you can also reach out to Customer Support.

If you don't have a bug to report or feature request, but you need a hand with the library; community support is available via Neo4j Online Community and/or Discord.

Workflow for Contributions

  1. Fork the repository.
  2. Install Python and uv.
  3. Create a working branch from main and start with your changes!

Code Formatting and Linting

Our codebase follows strict formatting and linting standards using Ruff for code quality checks and Mypy for type checking. Before contributing, ensure that all code is properly formatted, free of linting issues, and includes accurate type annotations.

  • To install Ruff, follow the instructions here.
  • To set up Mypy, follow the steps outlined here.

Adherence to these standards is required for contributions to be accepted.

Using Pre-commit

We recommend setting up pre-commit to automate code quality checks. This ensures your changes meet our guidelines before committing.

  1. Install pre-commit by following the installation guide.

  2. Set up the pre-commit hooks by running:

    pre-commit install
  3. To manually check if a file meets the quality requirements, run:

    pre-commit run --file path/to/file

Pull Requests

When you're finished with your changes, create a pull request (PR) using the following workflow.

  • Ensure you have formatted and linted your code.
  • Ensure that you have signed the CLA.
  • Ensure that the base of your PR is set to main.
  • Don't forget to link your PR to an issue if you are solving one.
  • Check the checkbox to allow maintainer edits so that maintainers can make any necessary tweaks and update your branch for merge.
  • Reviewers may ask for changes to be made before a PR can be merged, either using suggested changes or normal pull request comments. You can apply suggested changes directly through the UI. Any other changes can be made in your fork and committed to the PR branch.
  • As you update your PR and apply changes, mark each conversation as resolved.
  • Update the CHANGELOG.md if you have made significant changes to the project, these include:
    • Major changes:
      • New features
      • Bug fixes with high impact
      • Breaking changes
    • Minor changes:
      • Documentation improvements
      • Code refactoring without functional impact
      • Minor bug fixes
  • Keep CHANGELOG.md changes brief and focus on the most important changes.

Updating the CHANGELOG.md

  1. You can automatically generate a changelog suggestion for your PR by commenting on it using CodiumAI:
@CodiumAI-Agent /update_changelog
  1. Edit the suggestion if necessary and update the appropriate subsection in the CHANGELOG.md file under 'Next'.
  2. Commit the changes.

🧪 Tests

To be able to run all tests, all extra packages needs to be installed. This is achieved by:

uv sync --all-extras

Unit Tests

Install the project dependencies then run the following command to run the unit tests locally:

uv run pytest tests/unit

E2E tests

To execute end-to-end (e2e) tests, you need the following services to be running locally:

  • neo4j
  • weaviate
  • weaviate-text2vec-transformers

The simplest way to set these up is by using Docker Compose:

docker compose -f tests/e2e/docker-compose.yml up

(tip: If you encounter any caching issues within the databases, you can completely remove them by running docker compose -f tests/e2e/docker-compose.yml down)

Once all the services are running, execute the following command to run the e2e tests:

uv run pytest tests/e2e

ℹ️ Additional Information

About

Neo4j GraphRAG for Python

Resources

Contributing

Stars

1 star

Watchers

0 watching

Forks

Releases

Packages

Contributors

Languages