众所周知,Github Copilot是一种基于机器学习的代码自动补全工具。它使用了来自GitHub的大量代码作为训练数据,并使用OpenAI的语言模型来生成代码。Copilot还可以学习用户的编码习惯,并根据上下文推断出正确的代码片段。
在实际使用中发现大部份提示还是非常好用的,能够较为准确的推测出用户意图,甚至是基于项目其他文件的上下文进行推理。比较好奇这里是怎么做到的,于是探索了这个VSCode插件的详细实现。
由于Copilot并没有开源,因此我们需要做一些逆向的准备。
首先,找到VSCode插件的安装目录,拿到extension.js:
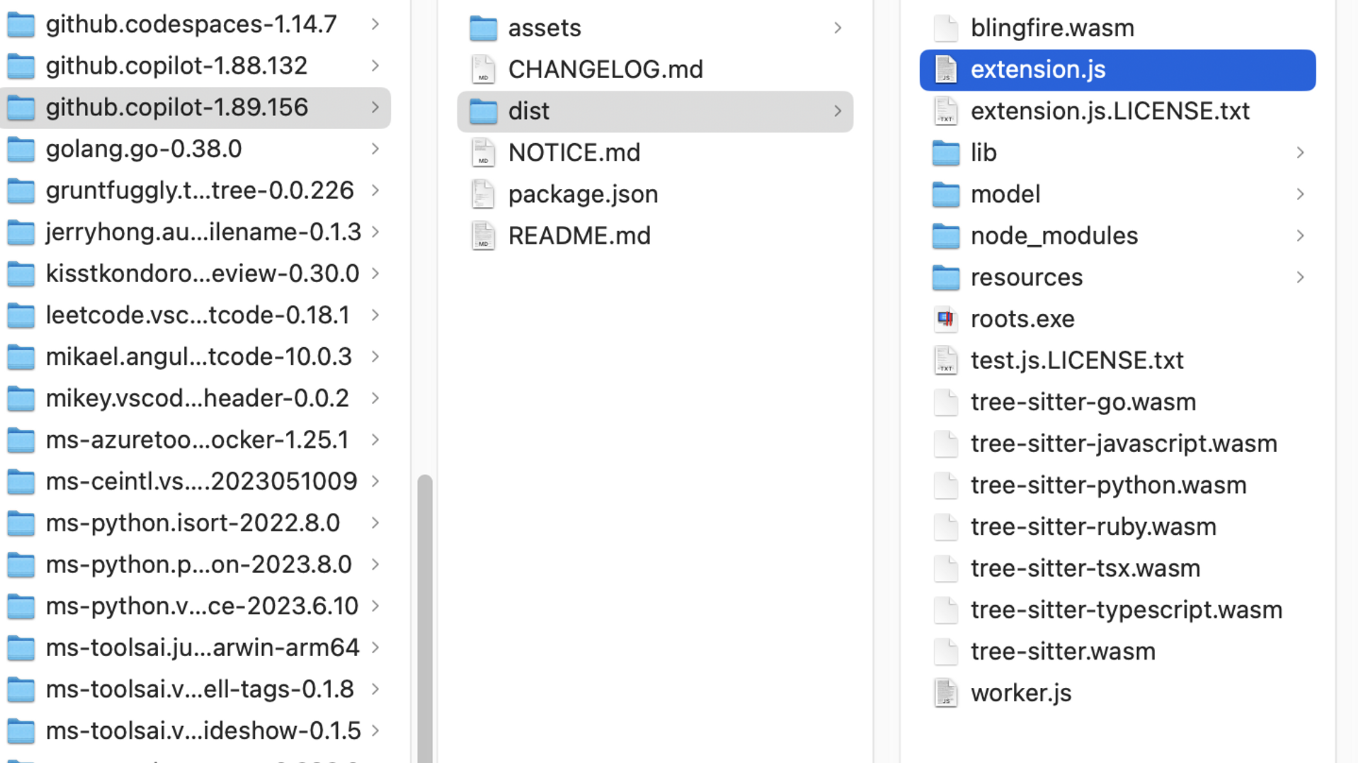
在mac下插件目录在~/.vscode下,我们可以拿到一个经过压缩混淆的文件:
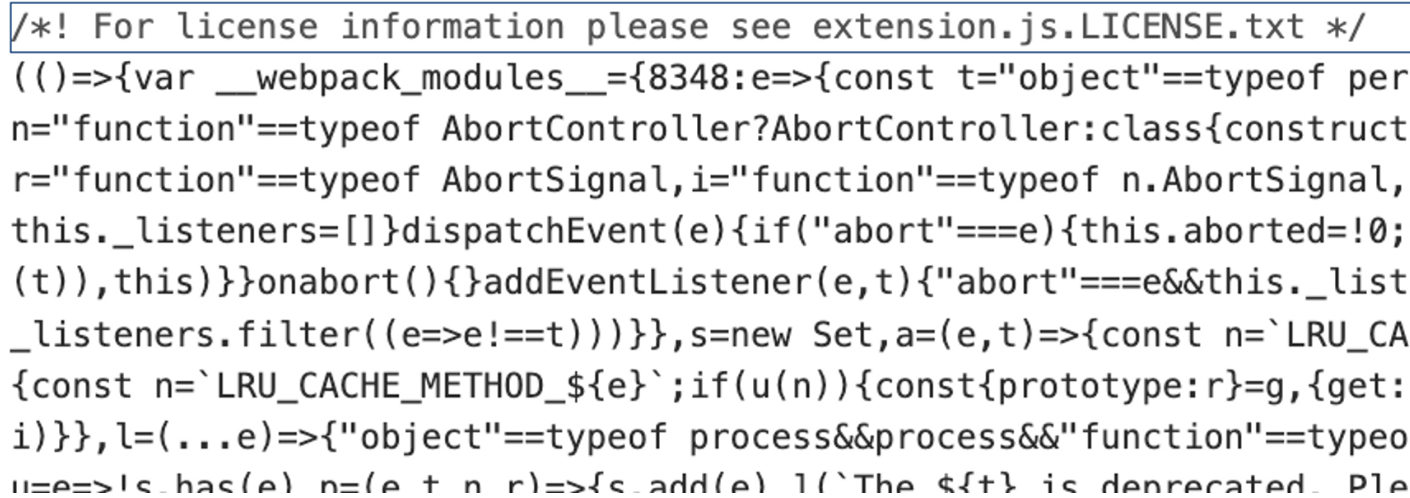
针对整个webpack压缩混淆的js,我们首先要将不同的bundle识别出来,分割成单个文件,以便于后续的分析。
由于压缩后的代码存在很多不确定性,一开始打算尝试通过正则提取,但无论如何都有各种边界情况导致提取不正确,最简单的方法还是通过AST来提取。
首先,通过babel-parser将源码解析为AST:
constast=parser.parse(source);然后,通过babel-traverse遍历整个AST,找到modules的变量,取出里面的值:
functionparseModules(){traverse(ast,{enter(path){if(path.node.type==="VariableDeclarator"&&path.node.id.name==="__webpack_modules__"){constmodules=path.node.init.properties;for(constmoduleofmodules){constmoduleId=module.key.value;constmoduleAst=module.value;constmoduleSource=generate(moduleAst).code;try{constast=transformRequire(prettier(clearfyParams(moduleId,moduleSource)));constmainBody=ast.program.body[0].expression.body.body;constmoduleCode=generate(types.Program(mainBody)).code;fs.writeFileSync("./prettier/modules/"+moduleId+".js",moduleCode,"utf8");}catch(e){console.log(e);}}}},});}最后,将处理过后的ast通过babel-generator和babel-types重新生成新的ast写入文件。
这样,我们就得到了以模块id命名的独立bundle,在我的这一版中,解析出来的copilot的bundle已经非常多了,达到752个。
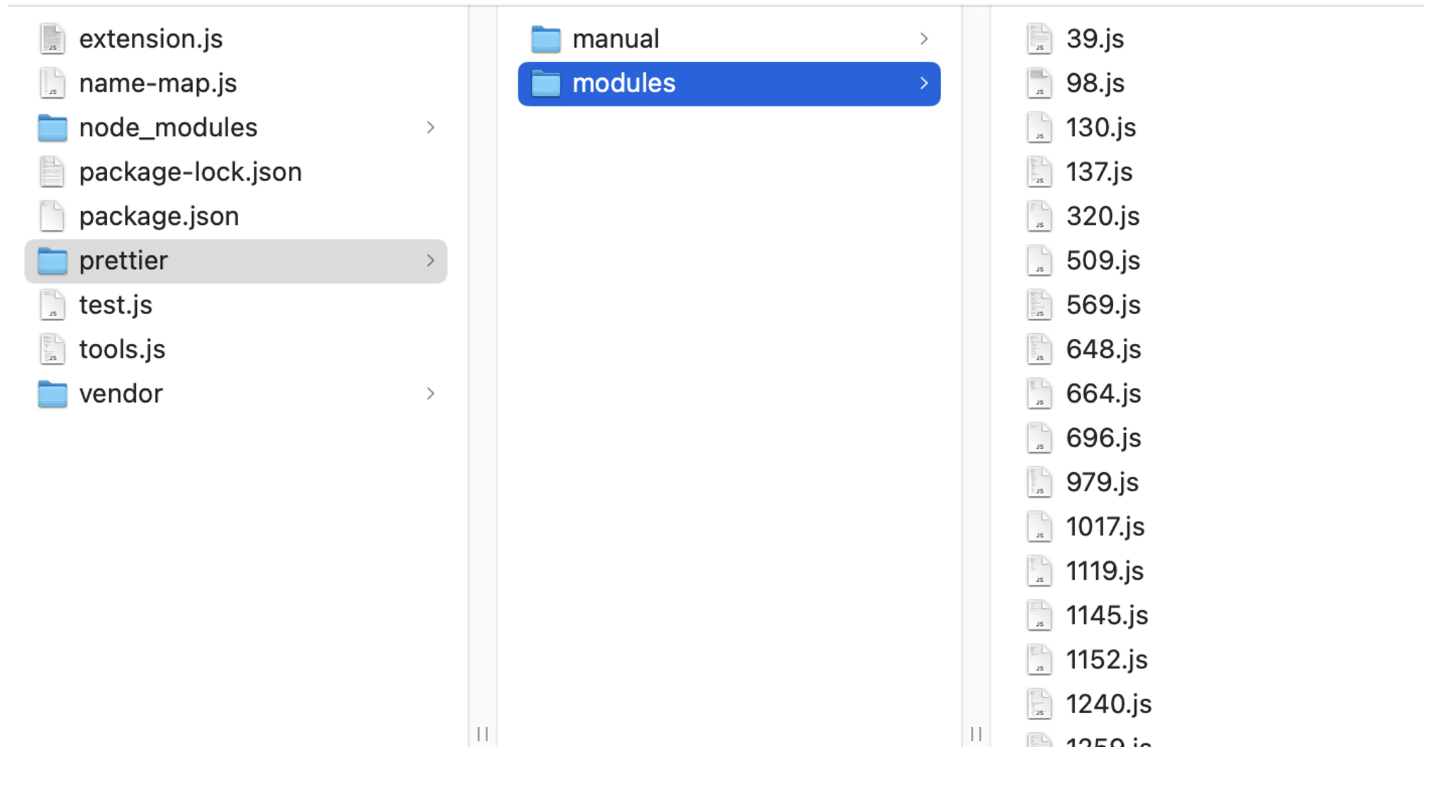
我们解析出来的bundle,第一层函数大概是这样:
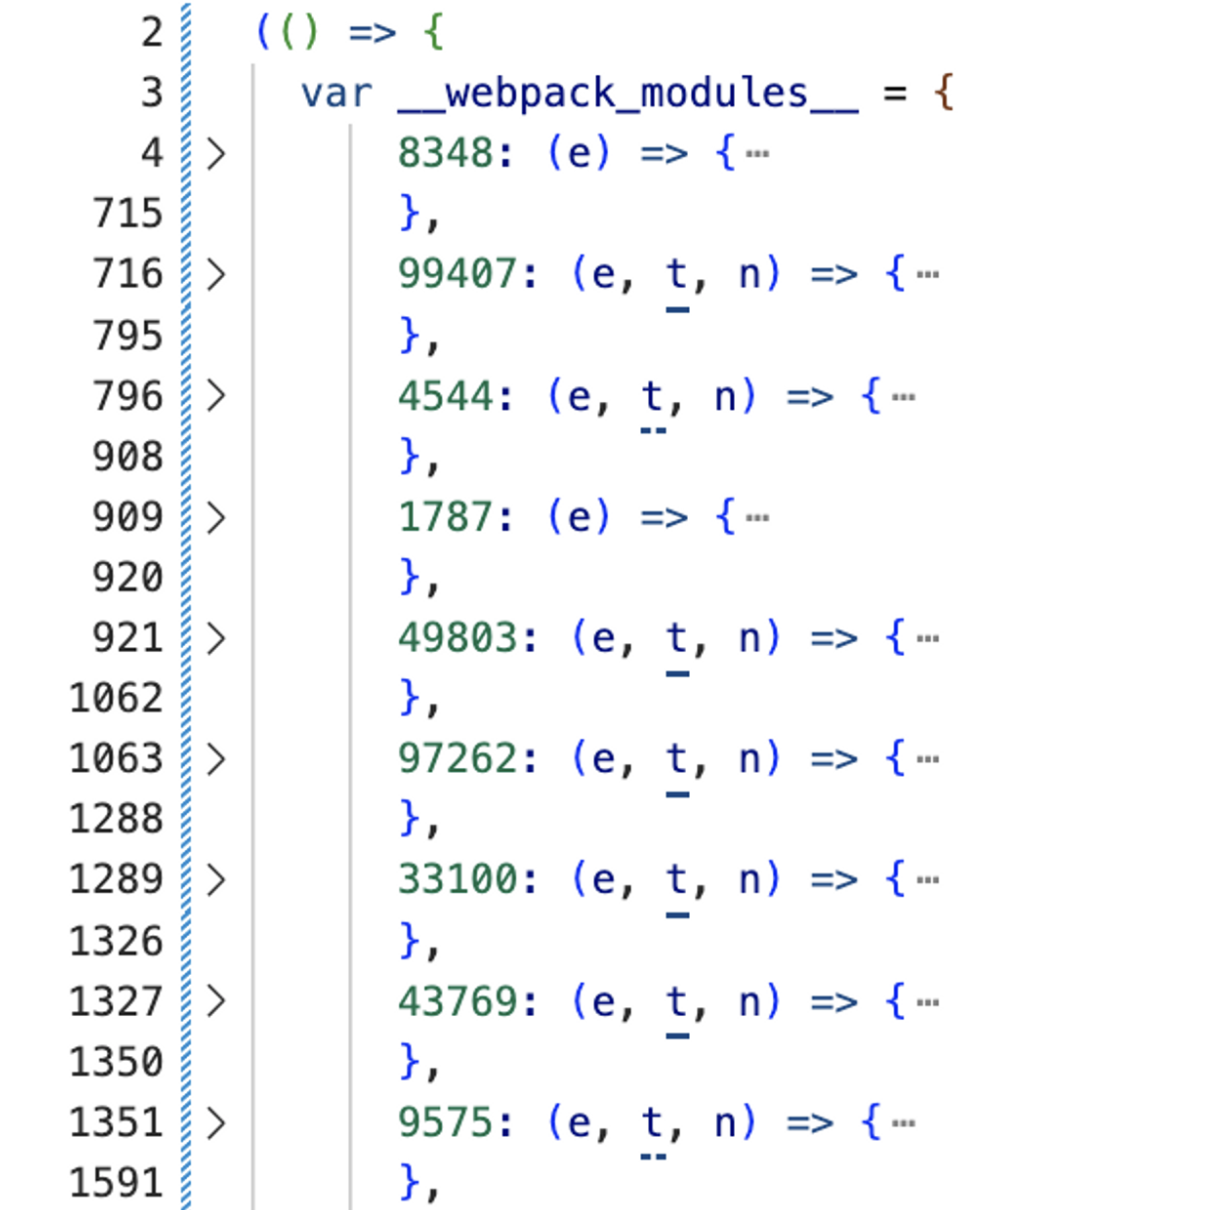
对于webpack来说,这几个参数是固定的,分别是module、exports、require,所以我们优先把这几个参数识别出来,进行作用域的替换,这样才可以看出模块间的依赖关系:
functionclearfyParams(moduleId,moduleSource){if(moduleSource.trim().startsWith("function")){// change `function(e, t, n) {` to `(e, t, n) => {`moduleSource=moduleSource.replace("function","");moduleSource=moduleSource.replace(")",") =>");}constmoduleAst=parser.parse(moduleSource);letflag=false;traverse(moduleAst,{ArrowFunctionExpression(path){if(flag)return;constparams=path.node.params;params.forEach((param)=>{if(param.name==="e"||param.name==="t"||param.name==="n"){path.scope.rename(param.name,{e: "module",t: "exports",n: "require",}[param.name]);}});flag=true;},});returnmoduleAst;}这样,我们就得到了类似这样的有require和exports的代码:
varr=require(12781).Stream;vari=require(73837);functiono(){this.source=null;this.dataSize=0;this.maxDataSize=1048576;this.pauseStream=!0;this._maxDataSizeExceeded=!1;this._released=!1;this._bufferedEvents=[];}module.exports=o;JS代码经过压缩后,会产生大量的逗号运算符、短路写法、三元表达式、括号闭包等等,非常阻碍阅读,这里参考了https://github.com/thakkarparth007/copilot-explorer 这个项目所做的一些逆向工作,对语法进行了一系列处理:
functionprettier(ast){constmoduleTransformer={// e.g., `(0, r.getConfig)(e, r.ConfigKey.DebugOverrideProxyUrl);`// gets transformed to r.getConfig(e, r.ConfigKey.DebugOverrideProxyUrl);CallExpression(path){if(path.node.callee.type!="SequenceExpression"){return;}if(path.node.callee.expressions.length==2&&path.node.callee.expressions[0].type=="NumericLiteral"){path.node.callee=path.node.callee.expressions[1];}},ExpressionStatement(path){if(path.node.expression.type=="SequenceExpression"){constexprs=path.node.expression.expressions;letexprStmts=exprs.map((e)=>{returntypes.expressionStatement(e);});path.replaceWithMultiple(exprStmts);return;}if(path.node.expression.type=="AssignmentExpression"){// handle cases like: `a = (expr1, expr2, expr3)`// convert to: `expr1; expr2; a = expr3;`if(path.node.expression.right.type=="SequenceExpression"){constexprs=path.node.expression.right.expressions;letexprStmts=exprs.map((e)=>{returntypes.expressionStatement(e);});letlastExpr=exprStmts.pop();path.node.expression.right=lastExpr.expression;exprStmts.push(path.node);path.replaceWithMultiple(exprStmts);return;}// handle cases like: `exports.GoodExplainableName = a;` where `a` is a function or a class// rename `a` to `GoodExplainableName` everywhere in the moduleif(path.node.expression.left.type=="MemberExpression"&&path.node.expression.left.object.type=="Identifier"&&path.node.expression.left.object.name=="exports"&&path.node.expression.left.property.type=="Identifier"&&path.node.expression.left.property.name!="default"&&path.node.expression.right.type=="Identifier"&&path.node.expression.right.name.length==1){path.scope.rename(path.node.expression.right.name,path.node.expression.left.property.name);return;}}if(path.node.expression.type=="ConditionalExpression"){// handle cases like: `<test> ? c : d;`// convert to: `if (<test>) { c; } else { d; }`consttest=path.node.expression.test;constconsequent=path.node.expression.consequent;constalternate=path.node.expression.alternate;constifStmt=types.ifStatement(test,types.blockStatement([types.expressionStatement(consequent)]),types.blockStatement([types.expressionStatement(alternate)]));path.replaceWith(ifStmt);return;}if(path.node.expression.type=="LogicalExpression"){// handle cases like: `a && b;`// convert to: `if (a) { b; }`consttest=path.node.expression.left;constconsequent=path.node.expression.right;constifStmt=types.ifStatement(test,types.blockStatement([types.expressionStatement(consequent)]),null);path.replaceWith(ifStmt);return;}},IfStatement(path){if(!path.node.test||path.node.test.type!="SequenceExpression"){return;}constexprs=path.node.test.expressions;letexprStmts=exprs.map((e)=>{returntypes.expressionStatement(e);});letlastExpr=exprStmts.pop();path.node.test=lastExpr.expression;exprStmts.push(path.node);path.replaceWithMultiple(exprStmts);},ReturnStatement(path){if(!path.node.argument||path.node.argument.type!="SequenceExpression"){return;}constexprs=path.node.argument.expressions;letexprStmts=exprs.map((e)=>{returntypes.expressionStatement(e);});letlastExpr=exprStmts.pop();letreturnStmt=types.returnStatement(lastExpr.expression);exprStmts.push(returnStmt);path.replaceWithMultiple(exprStmts);},VariableDeclaration(path){// change `const a = 1, b = 2;` to `const a = 1; const b = 2;`if(path.node.declarations.length>1){letnewDecls=path.node.declarations.map((d)=>{returntypes.variableDeclaration(path.node.kind,[d]);});path.replaceWithMultiple(newDecls);}},};traverse(ast,moduleTransformer);returnast;}由于压缩之后的代码,require依赖只有moduleid,已经失去了原来的文件名称,所以这里我们需要手动映射(当然也可以借助GPT)推断一下不同文件的名称,维护一个map文件,然后在ast里将模块id替换为有语义的模块名:
functiontransformRequire(ast){constmoduleTransformer={VariableDeclaration(path){if(path.node.declarations[0].init&&path.node.declarations[0].init.type==="CallExpression"){if(path.node.declarations[0].init.callee.name==="require"){constmoduleId=path.node.declarations[0].init.arguments[0].value;if(NameMap[moduleId]){const{ name,path: modulePath}=NameMap[moduleId];path.node.declarations[0].init.arguments[0].value='"'+modulePath+'"';path.scope.rename(path.node.declarations[0].id.name,name);}}}},};traverse(ast,moduleTransformer);returnast;}至此,我们逆向相关的准备工作就完成了。
虽然前面我们已经为逆向做了大量的工作,但实际上,逆向JS代码还是一个体力活,在有限的精力下,我们也只能手动将一些上下文压缩变量进行推断替换,尽可能还原一些核心文件的代码。
入口可以很轻易找到它的模块id是91238:

经过一系列的手动优化操作,我们可以大致还原这个入口文件的原始样貌:
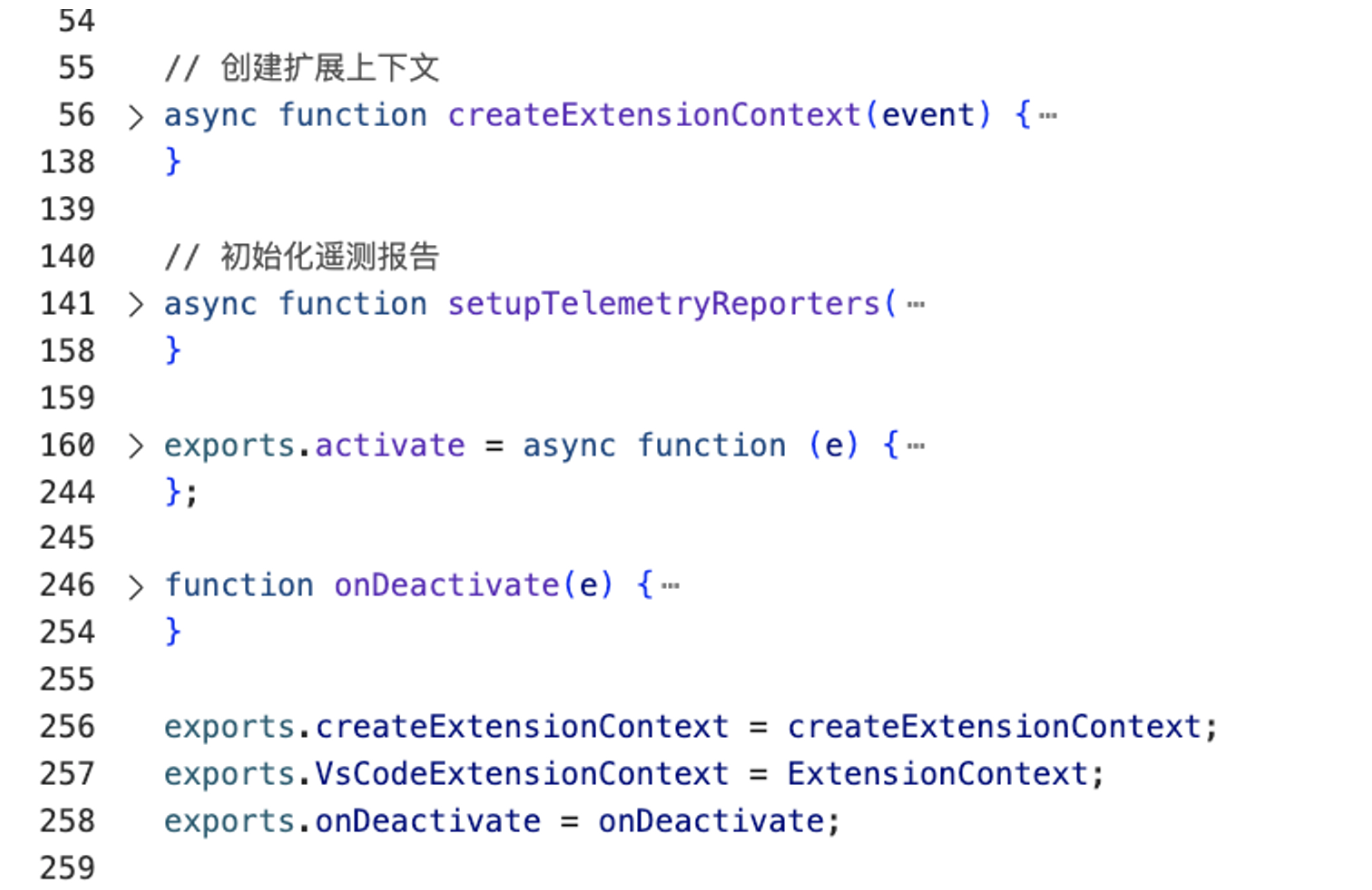
在VSCode的active函数中,copilot做了大量初始化相关的工作,以及将各个模块的示例注册到context中,后续取实例就从context上下文来取。
我们的核心还是想探索copilot的代码补全能力,入口文件的细节在这里就不展开了。
代码提示逻辑是在registerGhostText中注册的:
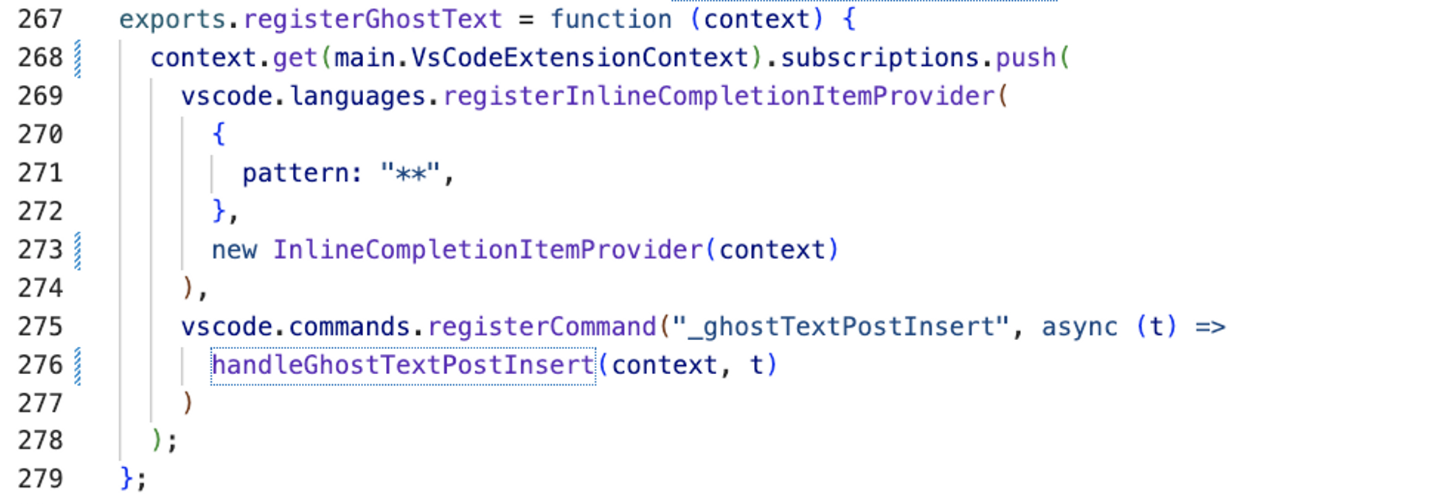
在vscode中,主要通过InlineCompletionItemProvider来实现编辑器中的代码补全能力。
整个实现的入口逻辑经过还原后大致如下:
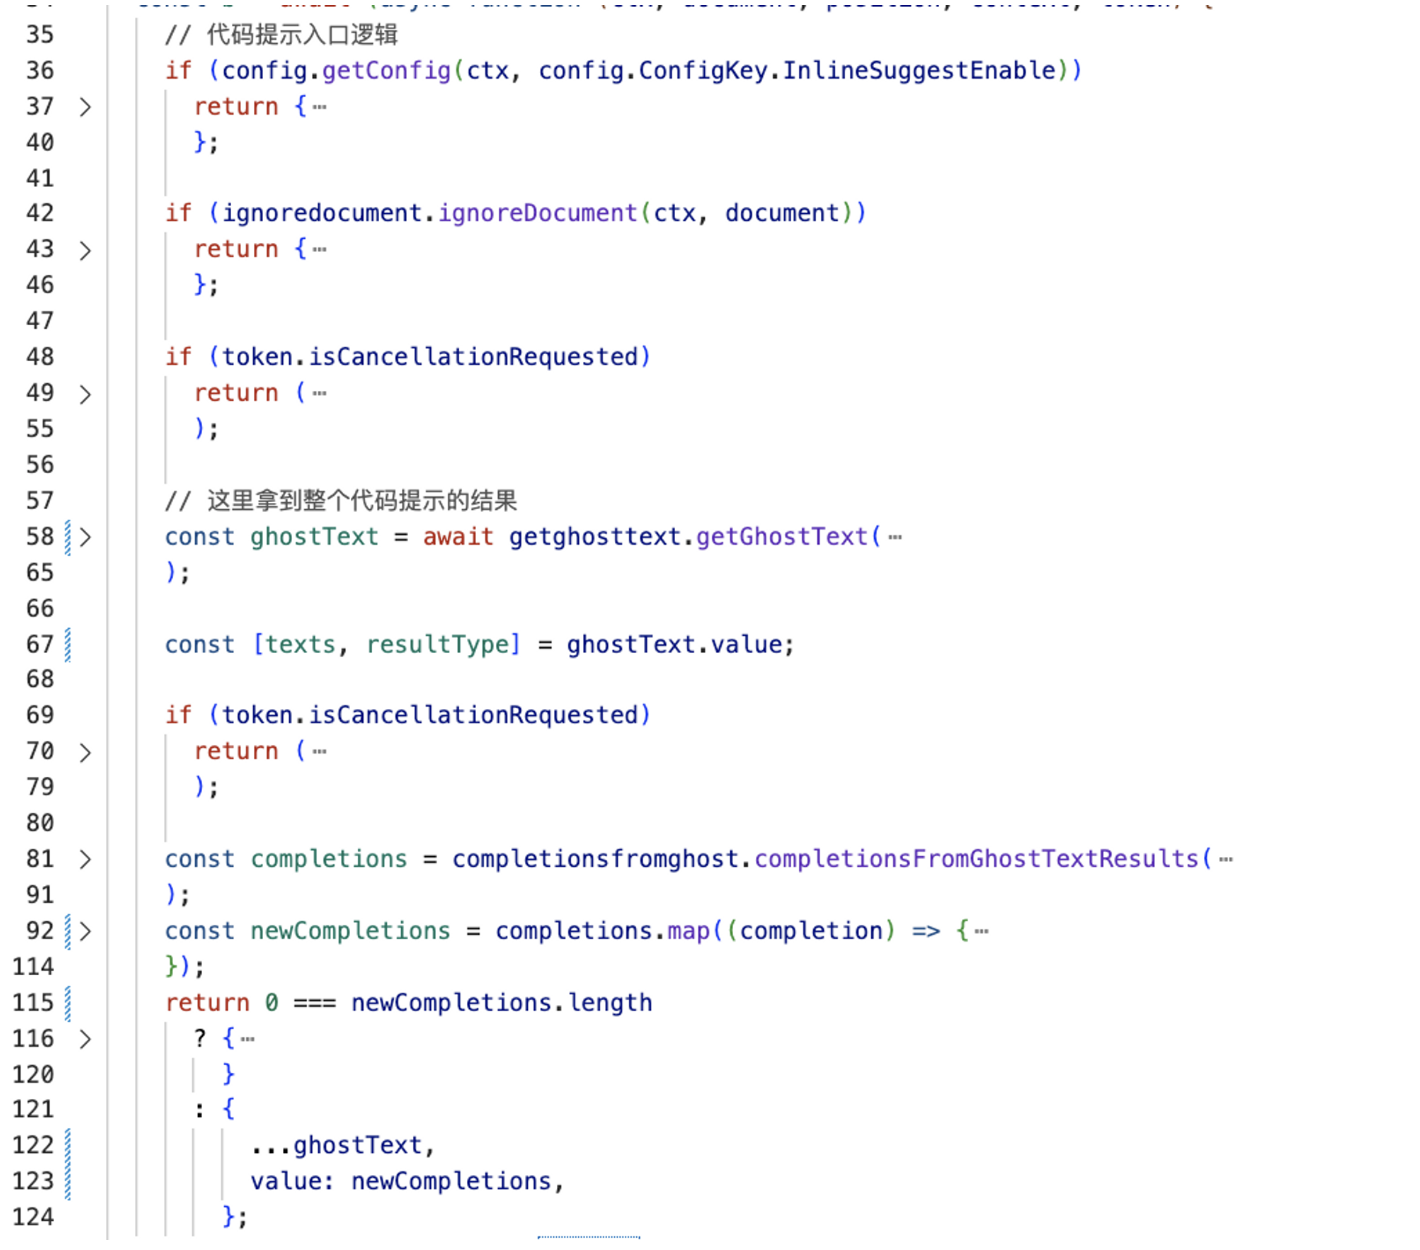
整体还是比较清晰的,它大致做了以下几件事情:
- 如果用户关闭了
InlineSuggestEnable、或者document不在处理白名单内,或者用户取消了输入,都会提前return,不进行代码提示。 - 调用
getGhostText方法拿到texts,这个大概就是最终会返回给用户的代码提示文本。 - 调用
completionsFromGhostTextResults,拿到最终的completions。这个函数比较简单,主要对文本进行了一些格式化的处理,比如处理Tab空格的问题,以及根据光标当前的位置计算出代码提示应当显示在编辑器中的坐标范围。
getGhostText是获取提示代码的核心方法,整体代码较多,我们将其拆分一下:
constprompt=awaitextractprompt.extractPrompt(ctx,document,position);提取prompt是一个比较复杂的操作,接下来我们单独拆一小节详细分析。
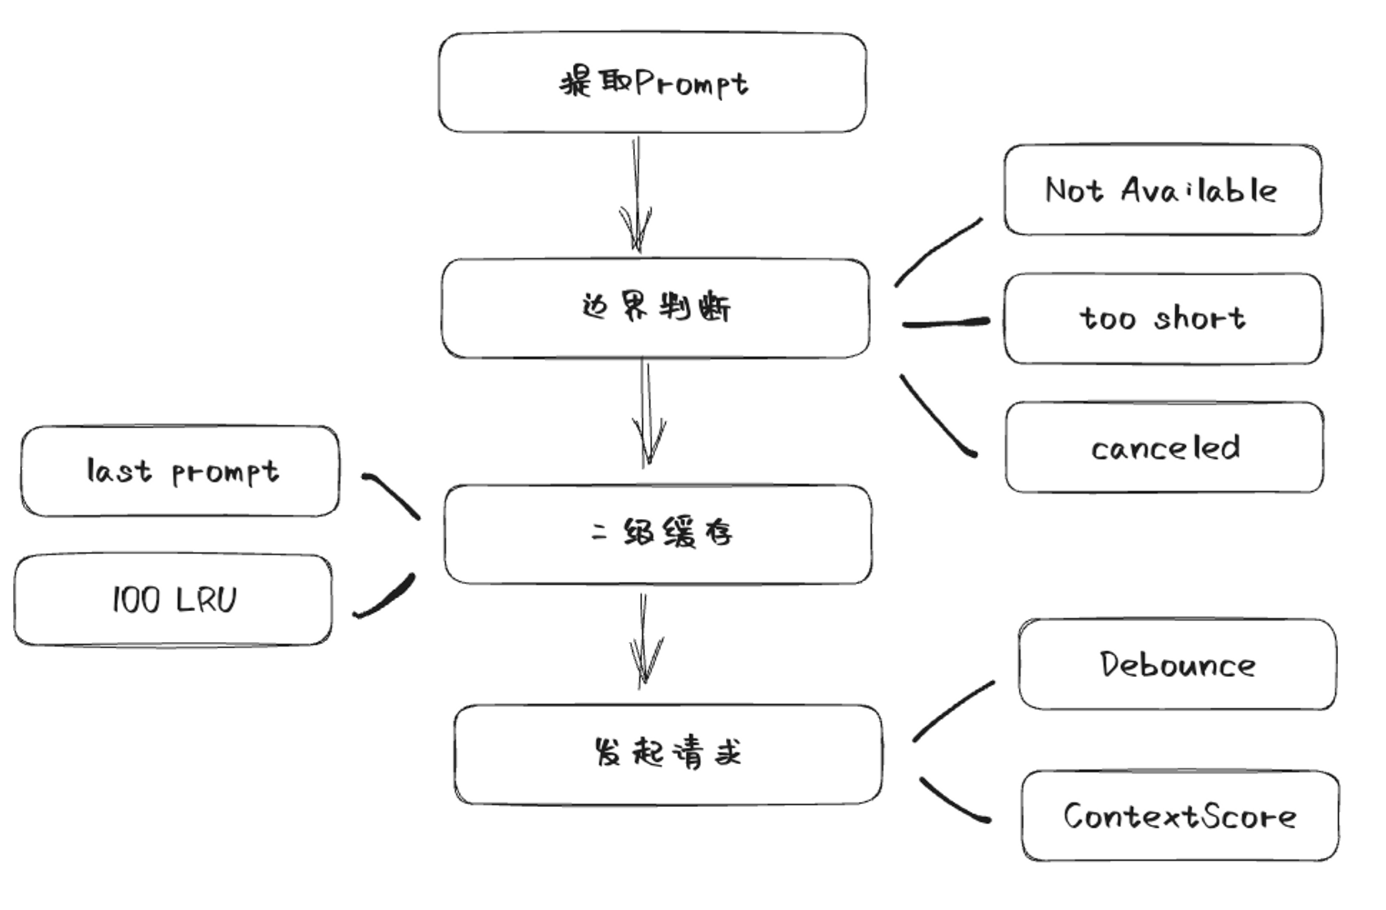
if("copilotNotAvailable"===prompt.type){exports.ghostTextLogger.debug(ctx,"Copilot not available, due to the .copilotignore settings");return{type: "abortedBeforeIssued",reason: "Copilot not available due to the .copilotignore settings",};}if("contextTooShort"===prompt.type){exports.ghostTextLogger.debug(ctx,"Breaking, not enough context");return{type: "abortedBeforeIssued",reason: "Not enough context",};}if(token?.isCancellationRequested){exports.ghostTextLogger.info(ctx,"Cancelled after extractPrompt");return{type: "abortedBeforeIssued",reason: "Cancelled after extractPrompt",};}这里的边界范围主要是三种情况:
- 包含在.copilotignore里的文件
- 上下文太少了
- 用户已经取消了
在copilot内部做了两层缓存处理,第一层缓存是保存了上一次的prefix和suffix:
functionupdateGlobalCacheKey(prefix,suffix,promptKey){prefixCache=prefix;suffixCache=suffix;promptKeyCache=promptKey;}这里的promptKey是根据prefix和suffix的内容计算得到。在copilot向后台发起请求前,如果判断这次请求的prefix和suffix还是和之前的一样,则会读取缓存的内容:
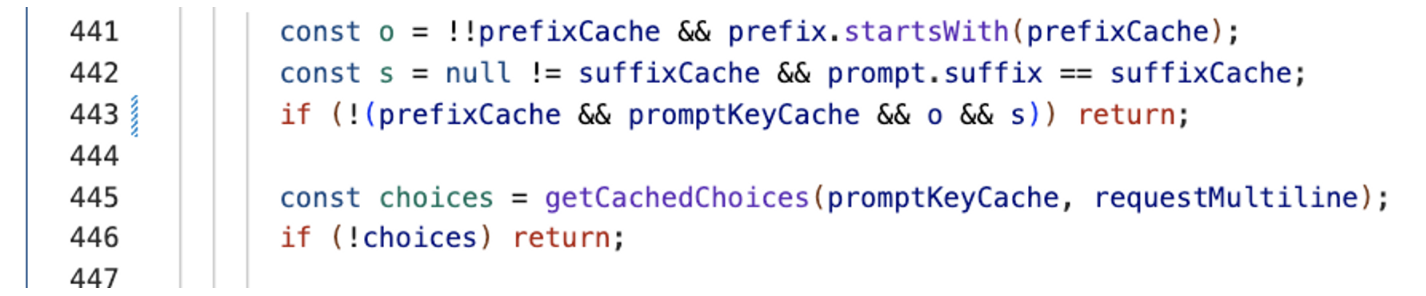
紧接着,如果上一层的缓存没有命中,copilot还会计算二级缓存,会计算当前的prompt在不在缓存范围内:

在这里,copilot采取的缓存是LRU缓存策略,prompt默认会缓存100条:
exports.completionCache=news.LRUCacheMap(100);而keyForPrompt函数就是一个对prefix和suffix的hash:
exports.keyForPrompt=function(e){returnr.SHA256(e.prefix+e.suffix).toString();};到了真正到向后台发送prompt请求的时候,copilot还是做了两件比较细致的事情:
- 设置
Debounce时延 - 判断
contexualFilterScore是否达到阈值
首先,为了避免频繁向后台发送请求,copilot做了debounce,要知道模型计算是十分消耗算力的,因此在这个场景下,必须要做debounce。copilot的这个debounce也不是一般的,让我们看看它的实现细节:
exports.getDebounceLimit=asyncfunction(e,t){letn;if((awaite.get(r.Features).debouncePredict())&&t.measurements.contextualFilterScore){conste=t.measurements.contextualFilterScore;constr=.3475;consti=7;n=25+250/(1+Math.pow(e/r,i));}elsen=awaite.get(r.Features).debounceMs();returnn>0 ? n : 75;};copilot有一个预测开关,如果这个预测开关打开,会根据当前的内容相关性评分预测当前的debounce时延,这个处理就比较高级了。当然在开关没打开的情况下默认值为75ms。
其次就是contexualFilterScore 了,这个值代表的是上下文的评分,copilot会记录之前几次上下文有没有采纳的结果,貌似是通过一个简单的线性回归来预测当前的上下文被采纳的可能性,如果小于一定的阈值,则不会再给用户进行提示,优化用户体验。
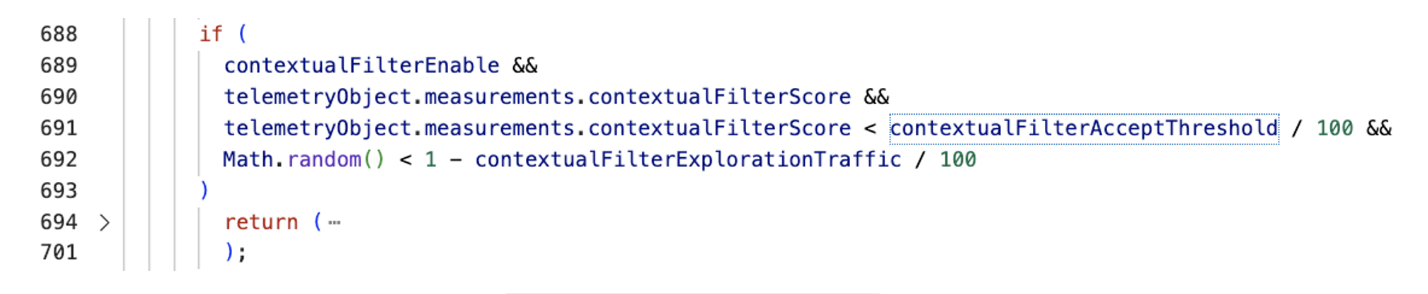
当前版本的阈值应该是35%。这个contextualFilterEnable开关默认是打开的。
最后,就是向后台真正发起请求了:

画个图总结一下copilot向后台发起请求之前做的事情:
Extract首层逻辑其实并不复杂,最终返回了prompt对象:
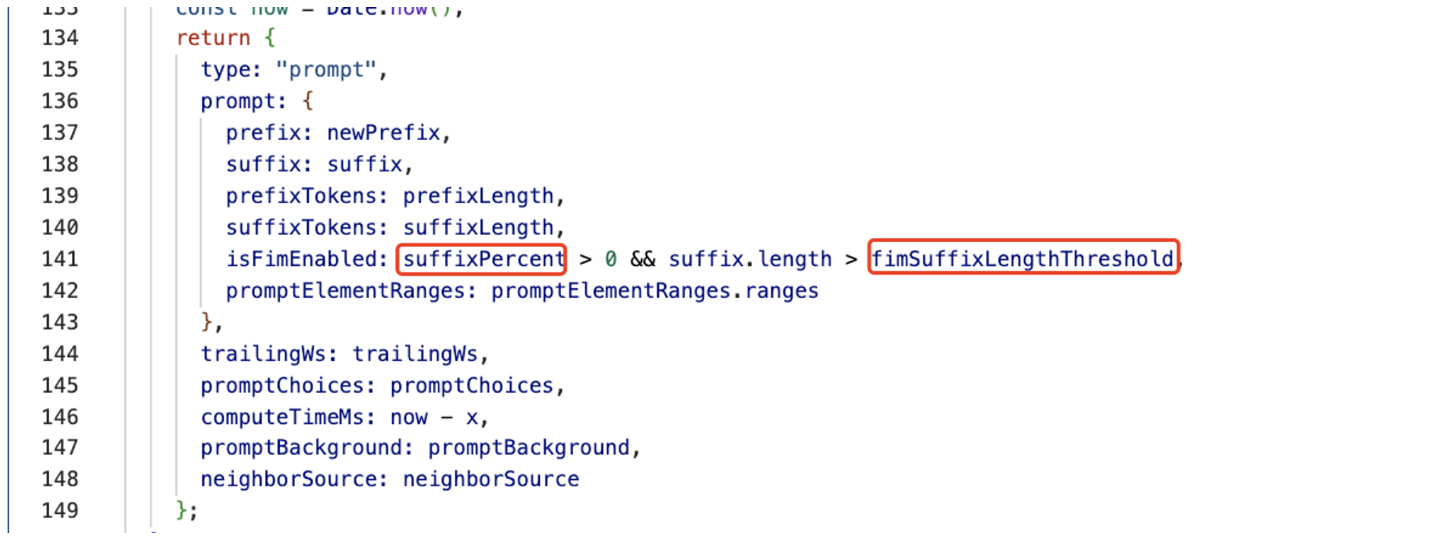
上图中用红框标出的字段来源于配置,其他的字段来自于getPrompt方法的返回,getPrompt是获取prompt的核心逻辑,这块我们接下来单独展开讨论,先来看看配置的问题。
在copilot(VSCode)体系中,有很多配置是对接了微软的AB实验平台的,可以在文件中找到这样的模块:
asyncfetchExperiments(e,t){constn=e.get(r.Fetcher);leto;try{o=awaitn.fetch("https://default.exp-tas.com/vscode/ab",{method: "GET",headers: t});}catch(t){returni.ExpConfig.createFallbackConfig(e,`Error fetching ExP config: ${t}`);}if(!o.ok)returni.ExpConfig.createFallbackConfig(e,`ExP responded with ${o.status}`);consts=awaito.json(),a=s.Configs.find(e=>"vscode"===e.Id)??{Id: "vscode",Parameters: {}},c=Object.entries(a.Parameters).map(([e,t])=>e+(t ? "" : "cf"));returnnewi.ExpConfig(a.Parameters,s.AssignmentContext,c.join(";"));}这个就是拉取了ab实验的平台,很多特性开关都是通过配置下发,copilot的相关配置也不例外。
这些配置在平台没有指定的时候,都是以它的默认值。
经过我实际抓包,发现我的Copilot插件配置好像没有经过配置平台单独指定,因此整个字段应该取的默认值:
suffixPercent,默认值为15.fimSuffixLengthThreshold,默认值为0maxPromptCompletionTokens,默认值为2048neighboringTabsOption,默认值为eagerneighboringSnippetTypes,默认值为NeighboringSnippetsnumberOfSnippets,默认值为4snippetPercent,默认值为0suffixStartMode,默认值为CursorTrimStarttokenizerName,默认值为cushman002indentationMinLength,默认值为undefinedindentationMaxLength,默认值为undefinedcursorContextFix,默认值为false
这些会作为Prompt的基础配置字段传给getPrompt方法。
在getPrompt逻辑里,首先扩充了一系列配置字段:
languageMarker,默认值为ToppathMarker,默认值为ToplocalImportContext,默认值为DeclarationssnippetPosition,默认值为TopOfTextlineEnding,默认值为ConvertToUnixsuffixMatchThreshold,默认值为0suffixMatchCriteria,默认值为LevenshteincursorSnippetsPickingStrategy,默认值为CursorJaccard
在Copilot中,prompt是由多种类型组合而成,可以在PromptElementKind中找到:
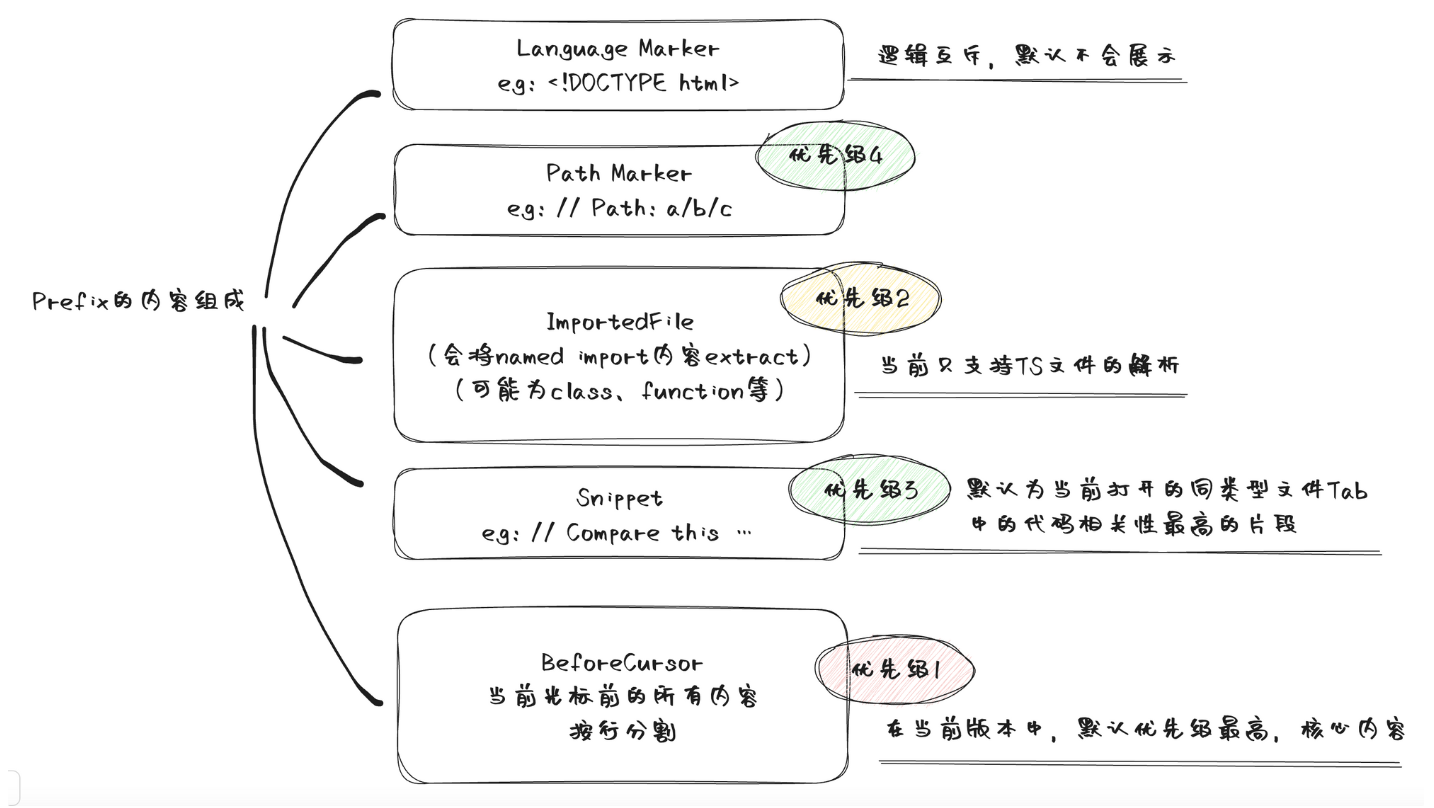
BeforeCursor,是光标前的内容AfterCursor,是光标后的内容SimilarFile,与当前文件相似度较高的内容ImportedFile:import依赖LanguageMarkder,文件开头的标记语法PathMarker,文件的路径信息
Copilot实现了一个优先级的辅助类,用来设置不同类型的Element优先级:
classPriorities{constructor(){this.registeredPriorities=[0,1];}register(e){if(e>Priorities.TOP||e<Priorities.BOTTOM)thrownewError("Priority must be between 0 and 1");this.registeredPriorities.push(e);returne;}justAbove(...e){constt=Math.max(...e);constn=Math.min(...this.registeredPriorities.filter(e=>e>t));returnthis.register((n+t)/2);}justBelow(...e){constt=Math.min(...e);constn=Math.max(...this.registeredPriorities.filter(e=>e<t));returnthis.register((n+t)/2);}between(e,t){if(this.registeredPriorities.some(n=>n>e&&n<t)||!this.registeredPriorities.includes(e)||!this.registeredPriorities.includes(t))thrownewError("Priorities must be adjacent in the list of priorities");returnthis.register((e+t)/2);}}可以看到justAbove和justBelow,就是生成一个比传入优先级略高或略低的优先级,保证这个优先级在目前的情况下只比传入的优先级高或低一点。
在Copilot中,不同类型的优先级是这样产生的:
constbeforeCursorPriority=priorities.justBelow(p.Priorities.TOP);constlanguageMarkerPriority=promptOpts.languageMarker===h.Always
? priorities.justBelow(p.Priorities.TOP)
: priorities.justBelow(beforeCursorPriority);constpathMarkerPriority=promptOpts.pathMarker===f.Always ? priorities.justBelow(p.Priorities.TOP) : priorities.justBelow(beforeCursorPriority);constimportedFilePriority=priorities.justBelow(beforeCursorPriority);constlowSnippetPriority=priorities.justBelow(importedFilePriority);consthighSnippetPriority=priorities.justAbove(beforeCursorPriority);
这里可以简单推断一下:
beforeCursorPriority,为0.5languageMarkerPriority,为0.25pathMarkderPriority,为0.375importedFilePriority,为0.4375lowSnippetPriority,为0.40625highSnippetPriority,为0.75
所以在默认的场景下,这几种类型的优先级排序为:highSnippetPriority > beforeCursorPriority > importedFilePriority > lowSnippetPriority > pathMarkderPriority > languageMarkerPriority
languageMarker和pathMarker
languageMarker和pathMarker是最先被放进promptWishList中的,经过前面的分析,我们知道在配置中,languageMarker和pathMarker都是有默认值的,因此下面的判断分支一定会走到:
if(promptOpts.languageMarker!==h.NoMarker){conste=newLineEnded(r.getLanguageMarker(resourceInfo));languageMarkerId=promptWishlist.append(e,p.PromptElementKind.LanguageMarker,languageMarkerPriority);}if(promptOpts.pathMarker!==f.NoMarker){conste=newLineEnded(r.getPathMarker(resourceInfo));if(e.length>0){pathMarkerId=promptWishlist.append(e,p.PromptElementKind.PathMarker,pathMarkerPriority);}}这两个函数实现也比较简单,我们先来看一下getLanguageMarker:
```jsx
exports.getLanguageMarker = function (e) {
const {
languageId: t
} = e;
return -1 !== n.indexOf(t) || hasLanguageMarker(e) ? "" : t in r ? r[t] : comment(`Language: ${t}`, t);
};
```
这里首先确认了languageId,不在ignoreList当中,在copilot中,有两种语言是被排除在外的:
```jsx
const n = ["php", "plaintext"];
```
其次再看一下语言本身是否有标记语法,在这个Map中(HTML、Python、Ruby、Shell、YAML):
```jsx
const r = {
html: "<!DOCTYPE html>",
python: "#!/usr/bin/env python3",
ruby: "#!/usr/bin/env ruby",
shellscript: "#!/bin/sh",
yaml: "# YAML data"
};
```
其余的情况就返回一行注释,类似这样:
```jsx
// Language: ${languageId}
```
getPathMarker逻辑更简单些,只是一行注释,标明文件路径(暂时搞不清楚这个信息给模型有什么用,可能路径里面包含了目录结构信息和文件名帮助模型更好进行推断?):
```jsx
exports.getPathMarker = function (e) {
return e.relativePath ? comment(`Path: ${e.relativePath}`, e.languageId) : "";
};
```
localImportContext
localImportContext的实现要复杂一点,通过上面的配置我们可以看到这个也是默认有值的,会进到下面这个分支当中:
if(promptOpts.localImportContext!==y.NoContext)for(consteofawaiti.extractLocalImportContext(resourceInfo,promptOpts.fs))promptWishlist.append(newLineEnded(e),p.PromptElementKind.ImportedFile,importedFilePriority);
extractLocalImportContext是一个异步函数,让我们看一下这里面的实现:
constreg=/^\s*import\s*(type|)\s*\{[^}]*\}\s*from\s*['"]\./gm;exports.extractLocalImportContext=asyncfunction(resourceInfo,fs){let{source: source,uri: uri,languageId: languageId}=resourceInfo;returnfs&&"typescript"===languageId ? asyncfunction(source,uri,fs){letlanguage="typescript";letresult=[];constimportEndIndex=function(source){letmatch;letlastIndex=-1;reg.lastIndex=-1;do{match=reg.exec(source);if(match){lastIndex=reg.lastIndex+match.length;}}while(match);if(-1===lastIndex)return-1;constnextNewLine=source.indexOf("\n",lastIndex);return-1!==nextNewLine ? nextNewLine : source.length;}(source);if(-1===importEndIndex)returnresult;source=source.substring(0,importEndIndex);letast=awaiti.parseTreeSitter(language,source);try{for(letnodeoffunction(node){lett=[];for(letchildNodeofnode.namedChildren)if("import_statement"===childNode.type){t.push(childNode);}returnt;}(ast.rootNode)){letfilePath=getTSFilePath(uri,node);if(!filePath)continue;letnamedImports=parseNamedImport(node);if(0===namedImports.length)continue;letexports=awaitgetExports(filePath,language,fs);for(leteofnamedImports)if(exports.has(e.name)){result.push(...exports.get(e.name));}}}finally{ast.delete();}returnresult;}(source,uri,fs) : [];}
首先我们可以关注到的是,这个函数先判断了Typescript的语言,也就意味着当前版本的Copilot,只对ts文件的import依赖做了处理。
这个函数之所以是异步的,就是这里要拿到import语句的语法树,这个过程比较复杂,copilot是使用了wasm的方式,通过tree-sitter来解析语法树的,这个过程是异步的。
最后,copilot提取出所有的import,并且返回了所有named import对应的export代码,也就是最终索引到了依赖文件,将用到的export都作为上下文extract出来。
snippets
snippets的处理是比较复杂的,在Copilot中,首先拿到了一个snippets:
constsnippets=[
...retrievalSnippets,
...(promptOpts.neighboringTabs===a.NeighboringTabsOption.None||0===neighborDocs.length
? []
: awaita.getNeighborSnippets(resourceInfo,neighborDocs,promptOpts.neighboringSnippetTypes,promptOpts.neighboringTabs,promptOpts.cursorContextFix,promptOpts.indentationMinLength,promptOpts.indentationMaxLength,promptOpts.snippetSelection,promptOpts.snippetSelectionK,lineCursorHistory,promptOpts.cursorSnippetsPickingStrategy)),];
在默认的场景下,
retrievalSnippets是空的,而neighboringTabs在我们前面的分析中是eager,所以会通过getNeighborSnippets去拿到这个数组。注意这里传入了
neighborDocs,这个是在extract的入口就传过来的,对应的代码是:letneighborDocs=[];letneighborSource=newMap();try{constt=awaitu.NeighborSource.getNeighborFiles(ctx,uri,repoUserData);neighborDocs=t.docs;neighborSource=t.neighborSource;}catch(t){telemetry.telemetryException(ctx,t,"prompt.getPromptForSource.exception");}
在默认的情况下,这里拿到的fileType是
OpenTabs,所以会默认通过VSCode拿到目前打开的tab中,包含同类型语言文件的所有内容(按访问时间排序),对应的代码如下:exports.OpenTabFiles=class{constructor(e,t){this.docManager=e;this.neighboringLanguageType=t;}asynctruncateDocs(e,t,n,r){consto=[];lets=0;for(constaofe)if(!(s+a.getText().length>i.NeighborSource.MAX_NEIGHBOR_AGGREGATE_LENGTH)&&("file"==a.uri.scheme&&a.fileName!==t&&i.considerNeighborFile(n,a.languageId,this.neighboringLanguageType)&&(o.push({uri: a.uri.toString(),relativePath: awaitthis.docManager.getRelativePath(a),languageId: a.languageId,source: a.getText()}),s+=a.getText().length),o.length>=r))break;returno;}asyncgetNeighborFiles(e,t,n,o){lets=[];consta=newMap();s=awaitthis.truncateDocs(utils2.sortByAccessTimes(this.docManager.textDocuments),e.fsPath,n,o);a.set(i.NeighboringFileType.OpenTabs,s.map(e=>e.uri));return{docs: s,neighborSource: a};}};
接着我们来看一下
getNeighborSnippets的实现:exports.getNeighborSnippets=asyncfunction(resourceInfo,neighborDocs,neighboringSnippetTypes,neighboringTabs,cursorContextFix,indentationMinLength,indentationMaxLength,snippetSelection,snippetSelectionK,lineCursorHistory,cursorSnippetsPickingStrategy){constoptions={ ...exports.neighborOptionToSelection[neighboringTabs],};consty=(function(resourceInfo,neighboringSnippetTypes,options,cursorContextFix,indentationMinLength,indentationMaxLength,lineCursorHistory,cursorSnippetsPickingStrategy=i.CursorSnippetsPickingStrategy.CursorJaccard){letd;if(neighboringSnippetTypes===s.NeighboringSnippets){d=void0!==indentationMinLength&&void0!==indentationMaxLength ? o.IndentationBasedJaccardMatcher.FACTORY(indentationMinLength,indentationMaxLength,cursorContextFix) : o.FixedWindowSizeJaccardMatcher.FACTORY(options.snippetLength,cursorContextFix);}else{if(neighboringSnippetTypes===s.NeighboringFunctions){d=o.FunctionJaccardMatcher.FACTORY(options.snippetLength,cursorContextFix,indentationMinLength,indentationMaxLength);}else{r.ok(void0!==lineCursorHistory,"lineCursorHistory should not be undefined");d=i.CursorHistoryMatcher.FACTORY(options.snippetLength,lineCursorHistory,cursorSnippetsPickingStrategy,cursorContextFix);}}returnd.to(resourceInfo);})(resourceInfo,neighboringSnippetTypes,options,cursorContextFix,indentationMinLength,indentationMaxLength,lineCursorHistory,cursorSnippetsPickingStrategy);return0===options.numberOfSnippets ? [] : (awaitneighborDocs.filter((e)=>e.source.length<1e4&&e.source.length>0).slice(0,20).reduce(async(e,t)=>(awaite).concat((awaity.findMatches(t,snippetSelection,snippetSelectionK)).map((e)=>({relativePath: t.relativePath, ...e,}))),Promise.resolve([]))).filter((e)=>e.score&&e.snippet&&e.score>options.threshold).sort((e,t)=>e.score-t.score).slice(-options.numberOfSnippets);};
在这个实现中,我们可以得到以下关键信息:
- neighboringSnippetTypes默认为NeighboringSnippets,所以会走到
FixedWindowSizeJaccardMatcher的逻辑里 - 返回值是根据neighborDocs的内容,过滤掉过小和过大文件,经过findMatchers拿到的结果
- 最后过滤掉score较低的,不过threshold默认为0,所以这里应该保留了所有的内容
- 根据score进行排序,选取较大的4条(numberOfSnippets默认为4)
紧接着我们就来看看
FixedWindowSizeJaccardMatcher的逻辑:classFixedWindowSizeJaccardMatcherextendsi.WindowedMatcher{constructor(resourceInfo,snippetLength,cursorContextFix){super(resourceInfo,cursorContextFix);this.windowLength=snippetLength;this.cursorContextFix=cursorContextFix;}id(){return"fixed:"+this.windowLength;}getWindowsDelineations(e){returno.getBasicWindowDelineations(this.windowLength,e);}trimDocument(e){returne.source.slice(0,e.offset).split("\n").slice(-this.windowLength).join("\n");}_getCursorContextInfo(e){returnr.getCursorContext(e,{maxLineCount: this.windowLength,cursorContextFix: this.cursorContextFix});}similarityScore(e,t){returncomputeScore(e,t);}}
这里的
snippetLength在eager的情况下默认为60,也就意味着snippet最多不超过60行。这个类继承了
WindowedMatcher,findMatches就在WindowedMatcher里:asyncfindMatches(e,t=i.SnippetSelectionOption.BestMatch,n){if(t==i.SnippetSelectionOption.BestMatch){constt=awaitthis.findBestMatch(e);returnt ? [t] : [];}returnt==i.SnippetSelectionOption.TopK&&(awaitthis.findTopKMatches(e,n))||[];}
在这里第二个参数其实默认是undefined,所以默认走到BestMatch的分支:
asyncfindBestMatch(e){if(0===e.source.length||0===this.referenceTokens.size)return;constt=e.source.split("\n");constn=this.retrieveAllSnippets(e,s.Descending);return0!==n.length&&0!==n[0].score ? {snippet: t.slice(n[0].startLine,n[0].endLine).join("\n"),semantics: o.SnippetSemantics.Snippet,provider: o.SnippetProvider.NeighboringTabs,
...n[0]} : void0;}
可以看到所谓BestMatch,就是取出
retrieveAllSnippets的第0条结果作为snippet返回。retrieveAllSnippets(e,t=s.Descending){constn=[];if(0===e.source.length||0===this.referenceTokens.size)returnn;constsourceArr=e.source.split("\n");constkey=this.id()+":"+e.source;constresult=c.get(key)??[];constnoCache=0==result.length;consttokens=noCache ? sourceArr.map(this.tokenizer.tokenize,this.tokenizer) : [];for(const[index,[startLine,endLine]]ofthis.getWindowsDelineations(sourceArr).entries()){if(noCache){conste=newSet();tokens.slice(startLine,endLine).forEach(t=>t.forEach(e.add,e));result.push(e);}constr=result[index];consts=this.similarityScore(r,this.referenceTokens);n.push({score: s,startLine: startLine,endLine: endLine});}if(noCache){c.put(key,result);}returnthis.sortScoredSnippets(n,t);}
这段代码的核心是根据窗口计算出不同的代码片段与当前文件的相似度,并返回排序后的片段列表。
首先这里做了个缓存处理,用来缓存已经计算过相似度的代码;
然后我们重点关注下这里的几个逻辑:
- 经过tokenize获取到当前代码片段每一行的token
- 通过getWindowsDelineations将代码分割成不同的小窗口(步长为1)
- 每个窗口的token和当前文件(referenceDoc)的token做一次相似度计算(
Jaccard相似度)
这三个点都非常关键,我们展开来分析下:
tokenize计算每一行的token
constp=newSet(["we","our","you","it","its","they","them","their","this","that","these","those","is","are","was","were","be","been","being","have","has","had","having","do","does","did","doing","can","don","t","s","will","would","should","what","which","who","when","where","why","how","a","an","the","and","or","not","no","but","because","as","until","again","further","then","once","here","there","all","any","both","each","few","more","most","other","some","such","above","below","to","during","before","after","of","at","by","about","between","into","through","from","up","down","in","out","on","off","over","under","only","own","same","so","than","too","very","just","now"]);constd=newSet(["if","then","else","for","while","with","def","function","return","TODO","import","try","catch","raise","finally","repeat","switch","case","match","assert","continue","break","const","class","enum","struct","static","new","super","this","var", ...p]);tokenize(e){returnnewSet(splitIntoWords(e).filter(e=>!this.stopsForLanguage.has(e)));}functionsplitIntoWords(e){returne.split(/[^a-zA-Z0-9]/).filter(e=>e.length>0);}
可以看到处理tokens其实就是分词的过程,比普通单词分割多了一步,就是过滤常见的关键词,这些关键词不影响相似度的计算(比如if、for这种)。
getWindowsDelineations分割窗口
exports.getBasicWindowDelineations=function(e,t){constn=[];constr=t.length;if(0==r)return[];if(r<e)return[[0,r]];for(lett=0;t<r-e+1;t++)n.push([t,t+e]);returnn;};
getWindowsDelineations本身逻辑并不复杂,就是根据传入的windowSize返回一个二维数组,这个二维数组的每一项都是一个起始行数和终止行数,它返回的是步长为1,在文件里面windowSize长度内的所有可能区间。得到这些区间后,会跟当前的内容(同样windowSize)进行相似度计算,选择出相似度最高的区间内容返回,这个内容就是最终的snippet。
其中,获取当前内容的方法如下:
getreferenceTokens(){if(void0===this._referenceTokens){this._referenceTokens=this.tokenizer.tokenize(this._getCursorContextInfo(this.referenceDoc).context);}returnthis._referenceTokens;}exports.getCursorContext=functione(doc,opts={}){constopts=function(e){return{
...i,
...e};}(opts);consts=r.getTokenizer(opts.tokenizerName);if(void0===opts.maxTokenLength&&void0!==opts.maxLineCount){conste=doc.source.slice(0,doc.offset).split("\n").slice(-opts.maxLineCount);constn=e.join("\n");return{context: n,lineCount: e.length,tokenLength: s.tokenLength(n),tokenizerName: opts.tokenizerName};}// ...};
可以看到,这里取的是当前光标前所有内容在窗口大小的截断,这个会token分词之后与对应的相关文件token进行相似度计算。
相似度计算(
Jaccard)Copilot通过一个非常简单的**
Jaccard** 相似度计算方法:functioncomputeScore(e,t){constn=newSet();e.forEach(e=>{if(t.has(e)){n.add(e);}});returnn.size/(e.size+t.size-n.size);}
实际上,Jaccard相似度计算公式为:
这是一个非常简单的集合运算,利用交集占比来求相似度,Copilot利用两个分词集合来快速计算文本相似度。
最后,copilot调用了processSnippetsForWishlist,将snippet加入到wishList当中:
function$(){constmaxSnippetLength=Math.round((promptOpts.snippetPercent/100)*promptOpts.maxPromptLength);c.processSnippetsForWishlist(snippets,resourceInfo.languageId,tokenizer,promptOpts.snippetProviderOptions,{priorities: priorities,low: lowSnippetPriority,high: highSnippetPriority,},promptOpts.numberOfSnippets,maxSnippetLength).forEach((e)=>{lett=p.PromptElementKind.SimilarFile;if(e.provider===c.SnippetProvider.Retrieval){t=p.PromptElementKind.RetrievalSnippet;}else{if(e.provider==c.SnippetProvider.SymbolDef){t=p.PromptElementKind.SymbolDefinition;}}promptWishlist.append(e.announcedSnippet,t,e.priority,e.tokens,e.normalizedScore);});}
从前面我们可以得知snippetPercent默认为0,所以这里maxSnippetLength也为0.
我们深入看一下processSnippetsForWishList的实现:
exports.processSnippetsForWishlist=function(snippets,languageId,tokenizer,snippetProviderOptions,priorities,numberOfSnippets,maxSnippetLength){const{reserved: reserved,candidates: candidates}=selectSnippets(snippets,numberOfSnippets,snippetProviderOptions);letd=0;leth=[];lethighPriorities=priorities.high;letlowPriorities=priorities.low;functiong(snippet,r){consto=announceSnippet(snippet,languageId);constc=tokenizer.tokenLength(o);letl;if(r+c<=maxSnippetLength){l=highPriorities;highPriorities=priorities.priorities.justBelow(l);}else{l=lowPriorities;lowPriorities=priorities.priorities.justBelow(l);}h.push({announcedSnippet: o,provider: snippet.provider,providerScore: snippet.providerScore,normalizedScore: snippet.normalizedScore,priority: l,tokens: c,relativePath: snippet.relativePath});returnr+c;}for(constsnippetof[...reserved, ...candidates]){if(h.length>=numberOfSnippets)break;d=g(snippete,d);}l(h);h.reverse();returnh;};
可以看到这里maxSnippetLength影响的是Priority,在这里默认情况下就是lowPriority了。
这里的处理其实本质上是对score进行正则化,重排序,然后返回announcedSnippet,这个announceSnippet就是最后被加入到Prompt文本里的内容:
functionannounceSnippet(e,t){constn=s[e.semantics];leti=(e.relativePath ? `Compare this ${n} from ${e.relativePath}:` : `Compare this ${n}:`)+"\n"+e.snippet;if(i.endsWith("\n")){i+="\n";}returnr.commentBlockAsSingles(i,t);}
可以看到这里,相关文件的snippet会包裹在注释里,并在头部加上一行
Compare this …的文案,提供给模型。- neighboringSnippetTypes默认为NeighboringSnippets,所以会走到
beforeCursor
beforeCursor的代码比较简单:
promptWishlist.appendLineForLine(source.substring(0,offset),p.PromptElementKind.BeforeCursor,beforeCursorPriority).forEach((e)=>V.push(e));
注意这里用了appendLineForLine,而不是append,让我们看一下appendLineForLine的实现:
appendLineForLine(text,kind,priority){constlineArr=(lines=this.convertLineEndings(text)).split("\n");for(leti=0;i<lineArr.length-1;i++)lineArr[i]+="\n";constlines=[];lineArr.forEach((line)=>{if("\n"===line&&lines.length>0&&!lines[lines.length-1].endsWith("\n\n")){lines[lines.length-1]+="\n";}else{lines.push(line);}});constresult=[];lines.forEach((text,index)=>{if(""!==text){result.push(this.append(text,kind,priority));if(index>0){this.content[this.content.length-2].requires=[this.content[this.content.length-1],];}}});returnresult;}
实际上这段代码的作用就是将光标前的内容按行append,这样在token有限的情况下,能够按行保留最大的上下文。

在接下来就是一系列依赖关系的处理:
if(h.Top===promptOpts.languageMarker&&V.length>0&&void0!==languageMarkerId){promptWishlist.require(languageMarkerId,V[0]);}if(f.Top===promptOpts.pathMarker&&V.length>0&&void0!==pathMarkerId){if(languageMarkerId){promptWishlist.require(pathMarkerId,languageMarkerId);}else{promptWishlist.require(pathMarkerId,V[0]);}}if(void0!==languageMarkerId&&void0!==pathMarkerId){promptWishlist.exclude(pathMarkerId,languageMarkerId);}这里其实我不太理解的一点是,pathMarker和languageMarker在这个逻辑里互斥了,在我们上面分析可以看到pathMarker的优先级比languageMarker优先级高,这里加了一个exclude,也就意味着languageMarker永远不可能出现了。
最后,如果是suffixPercent为0的情况下,代码到这里就直接结束了,调用fullfill方法返回最终的结果:
if(0===promptOpts.suffixPercent||q.length<=promptOpts.fimSuffixLengthThreshold)returnpromptWishlist.fulfill(promptOpts.maxPromptLength);当然,经过我们上面的分析suffixPercent在当前版本的默认值是15,不为0,会走到suffix的逻辑。
不过我们可以先看一下fullfill的处理,suffix逻辑我们就不分析了:
fulfill(maxPromptLength){constpromptChoices=newPromptChoices();constpromptBackground=newPromptBackground();constelements=this.content.map((e,t)=>({element: e,index: t,}));elements.sort((e,t)=>e.element.priority===t.element.priority
? t.index-e.index
: t.element.priority-e.element.priority);constrequires=newSet();constexcludes=newSet();letlastElement;constresults=[];letpromptLength=maxPromptLength;elements.forEach((e)=>{constelement=e.element;constindex=e.index;if(promptLength>=0&&(promptLength>0||void0===lastElement)&&element.requires.every((e)=>requires.has(e.id))&&!excludes.has(r.id)){lettokens=element.tokens;constnextElement=(function(e,t){letn;letr=1/0;for(constiofe)if(i.index>t&&i.index<r){n=i;r=i.index;}returnn;})(results,index)?.element;if(element.text.endsWith("\n\n")&&nextElement&&!nextElement.text.match(/^\s/)){tokens++;}if(promptLength>=tokens){promptLength-=tokens;requires.add(r.id);element.excludes.forEach((e)=>excludes.add(e.id));promptChoices.markUsed(element);promptBackground.markUsed(element);results.push(e);}else{if(void0===lastElement){lastElement=e;}else{promptChoices.markUnused(e.element);promptBackground.markUnused(e.element);}}}else{promptChoices.markUnused(element);promptBackground.markUnused(element);}});results.sort((e,t)=>e.index-t.index);letprefix=results.reduce((e,t)=>e+t.element.text,"");letprefixLength=this.tokenizer.tokenLength(prefix);for(;prefixLength>maxPromptLength;){u.sort((e,t)=>t.element.priority===e.element.priority
? t.index-e.index
: t.element.priority-e.element.priority);conste=u.pop();if(e){promptChoices.undoMarkUsed(e.element);promptChoices.markUnused(e.element);promptBackground.undoMarkUsed(e.element);promptBackground.markUnused(e.element);if(void0!==lastElement){promptChoices.markUnused(lastElement.element);promptBackground.markUnused(lastElement.element);}lastElement=void0;}u.sort((e,t)=>e.index-t.index);prefix=u.reduce((e,t)=>e+t.element.text,"");prefixLength=this.tokenizer.tokenLength(prefix);}constf=[...u];if(void0!==lastElement){f.push(lastElement);f.sort((e,t)=>e.index-t.index);constprefix=f.reduce((e,t)=>e+t.element.text,"");constprefixLength=this.tokenizer.tokenLength(prefix);if(prefixLength<=maxPromptLength){promptChoices.markUsed(l.element);promptBackground.markUsed(l.element);constpromptElementRanges=newPromptElementRanges(f);return{prefix: prefix,suffix: "",prefixLength: prefixLength,suffixLength: 0,promptChoices: promptChoices,promptBackground: promptBackground,promptElementRanges: promptElementRanges,};}promptChoices.markUnused(l.element);promptBackground.markUnused(l.element);}constm=newPromptElementRanges(u);return{prefix: prefix,suffix: "",prefixLength: prefixLength,suffixLength: 0,promptChoices: promptChoices,promptBackground: promptBackground,promptElementRanges: m,};}
这个fullfill逻辑核心有两点:
- 首先按照Priority排序(Priority相同按index),处理文本内容,这就意味着,在有限的Token下,Priority越高的文本越能被保障。
- 输出的时候,是按照index排序的,也就是说Priority只用作处理文本的优先级,最终组合的prefix文本的顺序是按照插入wishList的先后顺序的。
所以我们根据前面的分析,可以看到文本优先级是这样的:
languageMarkerpathMarkderimportedFileSnippetbeforeCursor
而处理优先级是这样的(优先保证的内容):
beforeCursorimportedFileSnippetpathMarkderlanguageMarker
prompt从代码上看比较复杂,我们整体把prefix的组成画一下做个总结:
我们找个TS文件来试试:
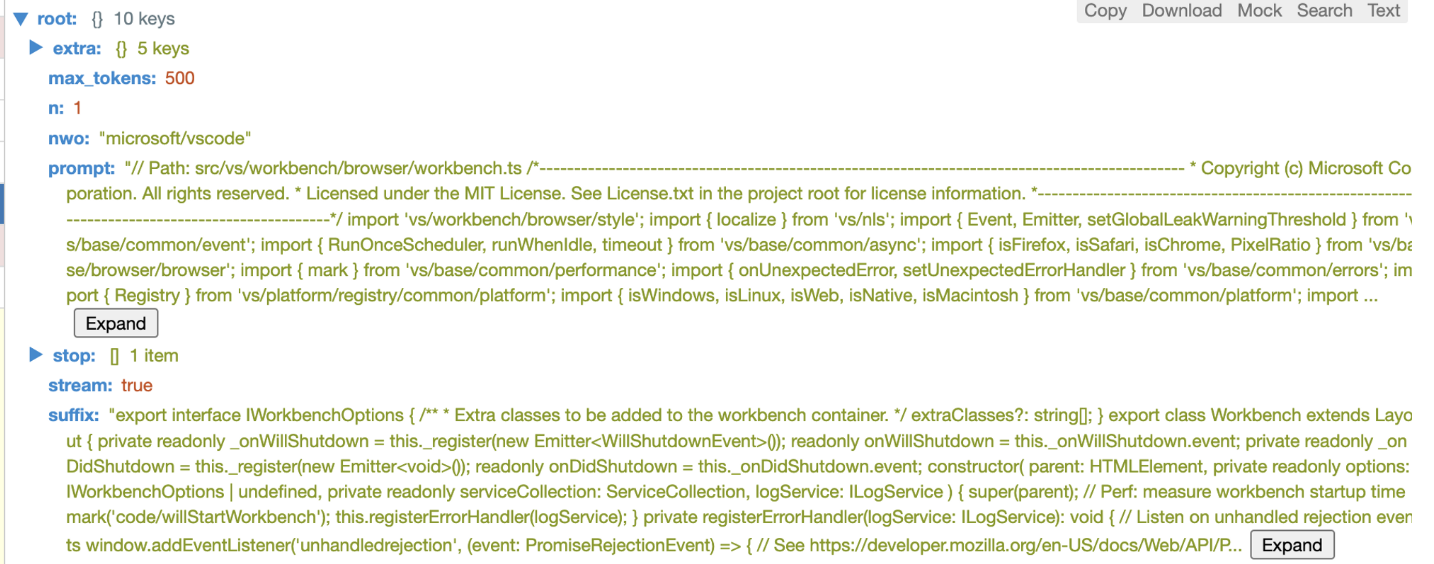
可以看到,在Copilot发起的请求中,prompt包含了Path Marker和BeforeCursor两个部分,这也是我们在使用过程中绝大多数的面临场景。
如果代码相关性够高,可以看到snippet的部分,比如我们拷贝了一个简单的文件:
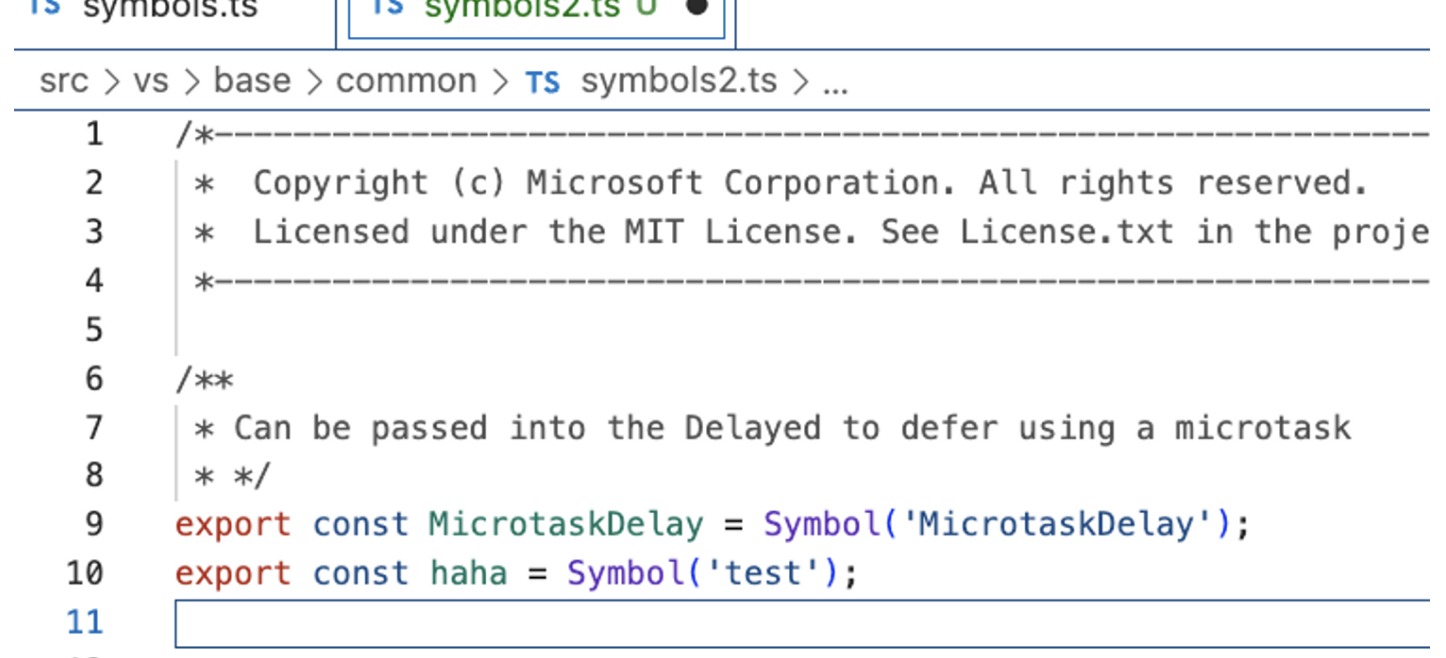
这个时候就会生成对应的snippet:
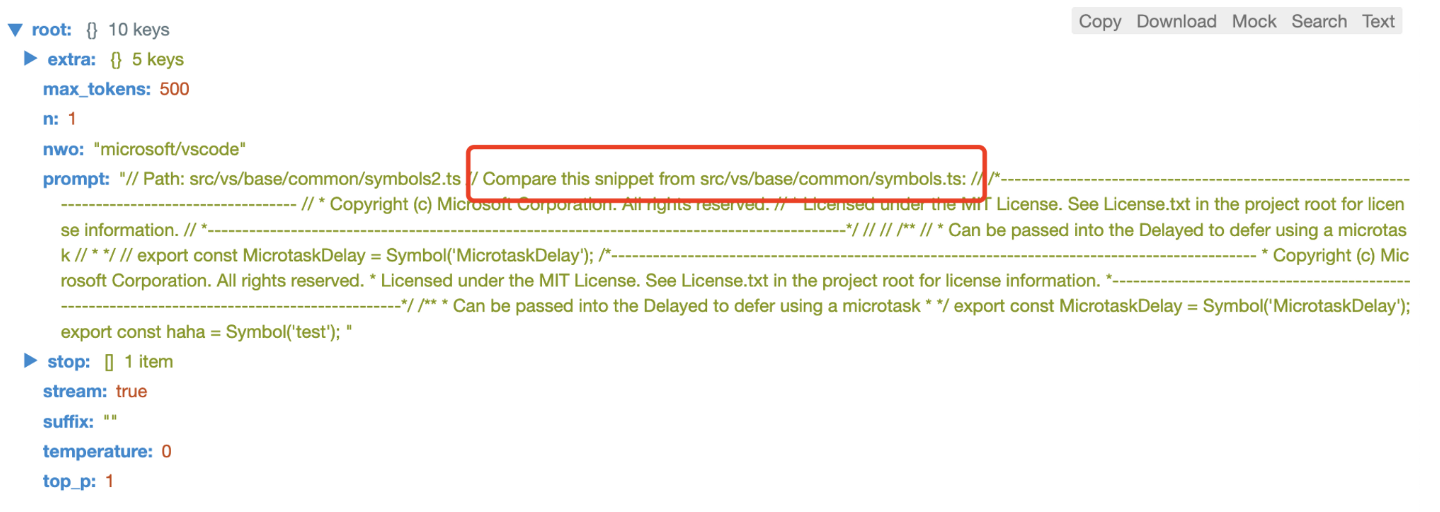
从Copilot中,我们可以了解到值得学习的几个核心思想:
- 对于编辑器输入的边界判断,包括太少、太多、取消等等很多场景齐全的考虑
- 缓存思想,利用多级缓存策略保护后台,模型运算本身就是一件昂贵的事情
- prompt的设计,不仅仅包含了上下文代码,在文件解析、编辑器打开的相关代码上还做了很多
- 利用简单的Jaccard算法计算分词后的文本相似度,能够快速决策出当前上下文相关的snippet
- 实验特性,在Copilot中,大量的参数、优先级、设置字段都是通过实验来控制的,有一套完整的监控上报体系,帮助Copilot去调整这些参数,以达到更好的效果
Copilot的逻辑比我想象中要复杂许多,逆向分析难度就更高了。耗费了很多时间在解析工作上,本文相关的工具链和代码都已上传Github,希望能够给一些有需要的同学提供帮助: