Repository files navigation

CAMI data

Pointers to publicly available assembly, binning, and profiling results (with structured metadata).

Upload your results using upload tool (recommended way)

Step 1: Copy the CAMI-challenge/data repository

  • Fork (i.e. make a copy of) the data repository to your GitHub account here.

  • Get a local copy of the forked repository on your computer:

git clone https://github.com/<USERNAME>/data.git
  • To be able to pull changes from the original repository, add the original data repo as an upstream remote:
cd data
git remote add upstream https://github.com/CAMI-challenge/data.git

Step 2: Provide the metadata for your results

  • Make sure that the master branch is up to date with the original data repository:
git checkout master
git pull upstream master
git push origin master
  • Create and checkout a new branch for your work:
git checkout -b update_metadata
  • Enter the matadata in the appropriate tab-separated table, e.g. in CAMI2/toy/mouse_gut/taxonomic_profiling.tsv. As your results will still be uploaded and do not yet have a DOI, enter the word new in the DOI column.
    You may also create new directories and tsv files. Every directory with tsv files must contain a description.txt with the title of the respective CAMI data set. The upload tool will scan every subdirectory in the data repository for tsv files listed in tasks.tsv.

Notes about the table columns:

In column SamplesUsed, provide the numbers identifying the samples used. If multiple samples were used, you can provide ranges, e.g. 0-63, and specific samples, e.g. 0-63,70,75.

Multiple files can be provided in the FileName column by separating them with semi-colons, e.g. file1;file2;file3.

Similarly, multiple creators, ORCIDs, and affiliations can be provided with semi-colons in columns Creator, ORCID, and Affiliation.

Step 3: Upload your results to Zenodo

  • In your Zenodo account settings, go to Applications and create a personal access token with deposit:write permission. You may also activate the deposit:actions permission, or leave it deactivated to avoid accidentally publishing results. Once the token is created, store it safely!

  • Upload your files using the upload tool (requires Python 3):

./zenodo_upload.py -h
usage: zenodo_upload.py [-h] [--github_dir GITHUB_DIR] --files_dir FILES_DIR
--zenodo_token ZENODO_TOKEN [--sandbox] CAMI Zenodo upload tool optional arguments: -h, --help show this help message and exit --github_dir GITHUB_DIR GitHub directory [default: current working directory] --files_dir FILES_DIR Directory containing files to be uploaded --zenodo_token ZENODO_TOKEN Zenodo access token

Example:

./zenodo_upload.py --files_dir /home/me/myresults/ --zenodo_token xxxxxxxxxxxxxxxxxxxxxxxxxxxxxxxxxxxxxxxxxxxxxxxxxxxxxxxxxxxx

--files_dir is the path to the files of results that are being uploaded. It should be different from --github_dir, as those files are not supposed to be uploaded to GitHub.

--zenodo_token is the token that you generated, as described above.

Step 4: Publish the uploaded results

WARNING: ONCE YOUR RESULTS ARE PUBLISHED, THEY CANNOT BE DELETED!

  • To publish your results, you can either go to your list of uploads on the Zenodo website, select an upload, make final changes if needed, and then publish it by clicking on the publish button.

  • Alternatively, you can use the publish tool (remember to activate the option deposit:actions for your token on Zenodo):

./zenodo_publish.py -h
usage: zenodo_publish.py [-h] --zenodo_token ZENODO_TOKEN [--sandbox] logfile
CAMI Zenodo publish tool
positional arguments:
logfile Log file containing deposition IDs
optional arguments:
-h, --help show this help message and exit
--zenodo_token ZENODO_TOKEN
Zenodo access token
--sandbox Sandbox test

The logfile, called zenodo_deposits_DATE_TIME.log is automatically created by the upload tool in the working directory, where DATE_TIME are the date and time of the upload.

Step 5: Update metadata tables with DOIs and create pull request

  • Update the metadata tables by replacing the word new with the generated DOIs.

  • Choose the edited files to commit, e.g. data/CAMI2/toy/mouse_gut/taxonomic_profiling.tsv:

git add data/CAMI2/toy/mouse_gut/taxonomic_profiling.tsv
  • Commit the changes with a sensible message:
git commit -m "add results for tool x"
  • Push your commit to GitHub:
git push

Upload your results using your browser

Step 1: Upload your results

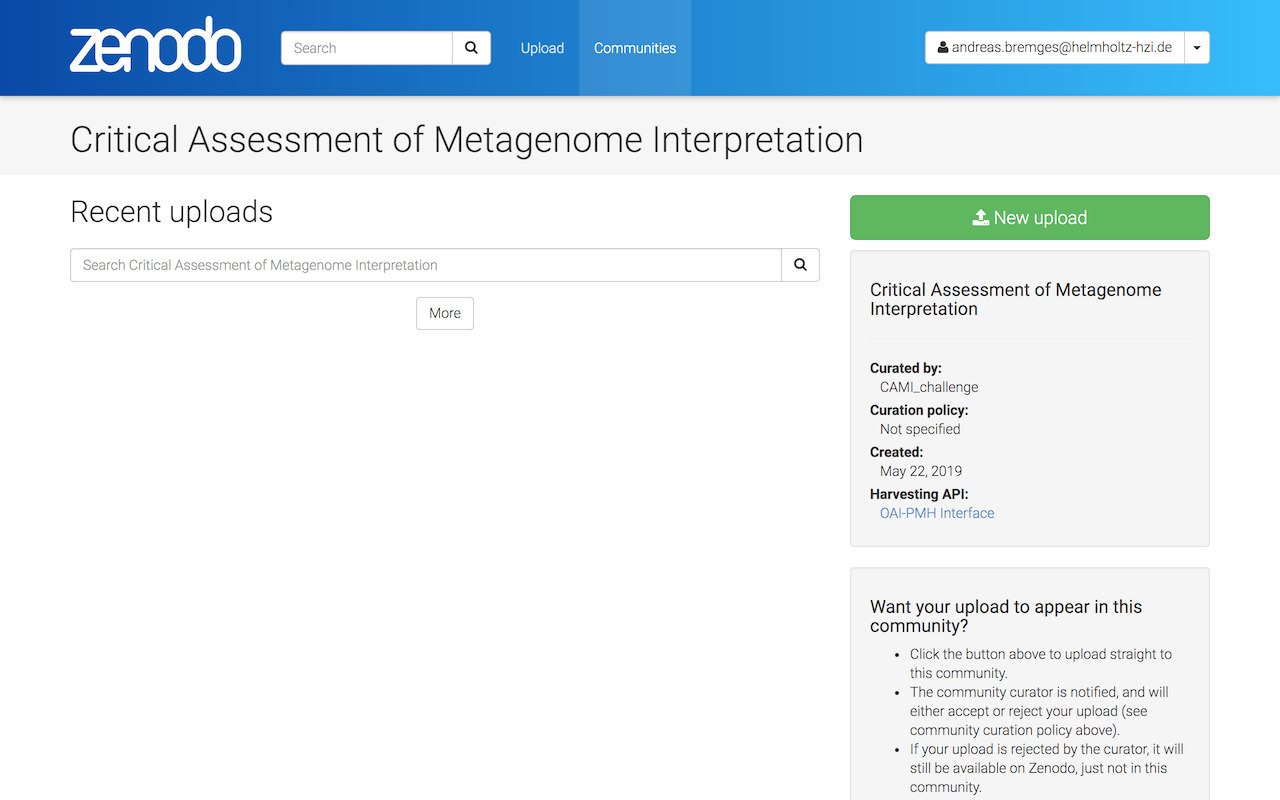
Submit your results to zenodo's CAMI Community - https://zenodo.org/communities/cami -, click on New upload. foo
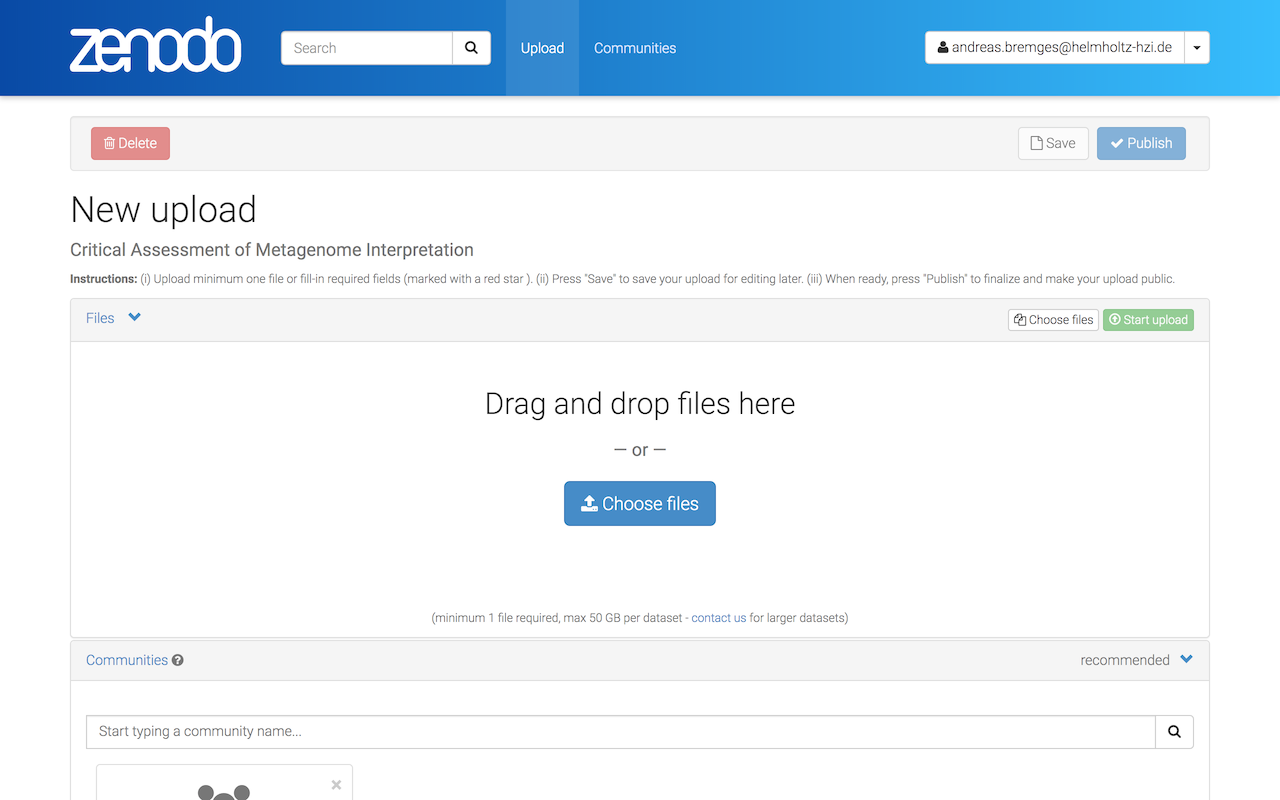
Drag and drop your result files or Choose files. foo
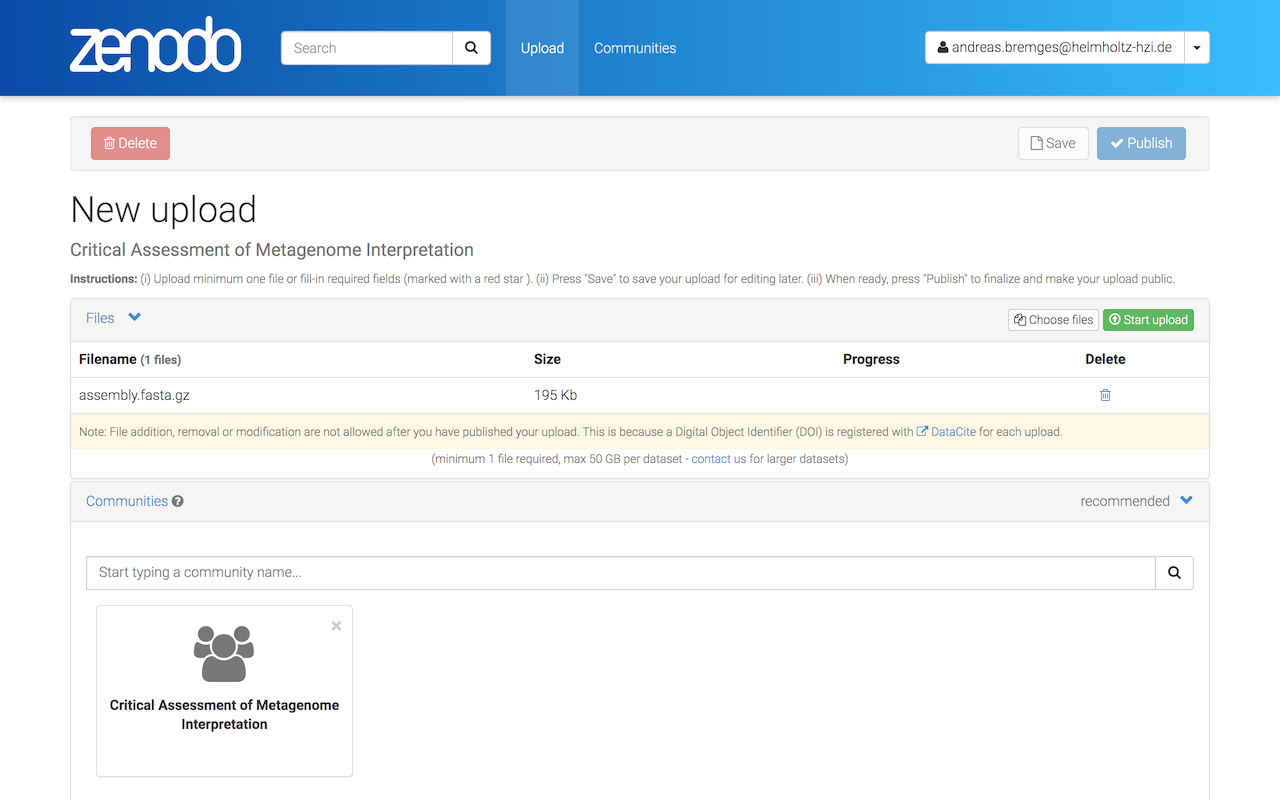
Click on Start upload (this might take a while). foo
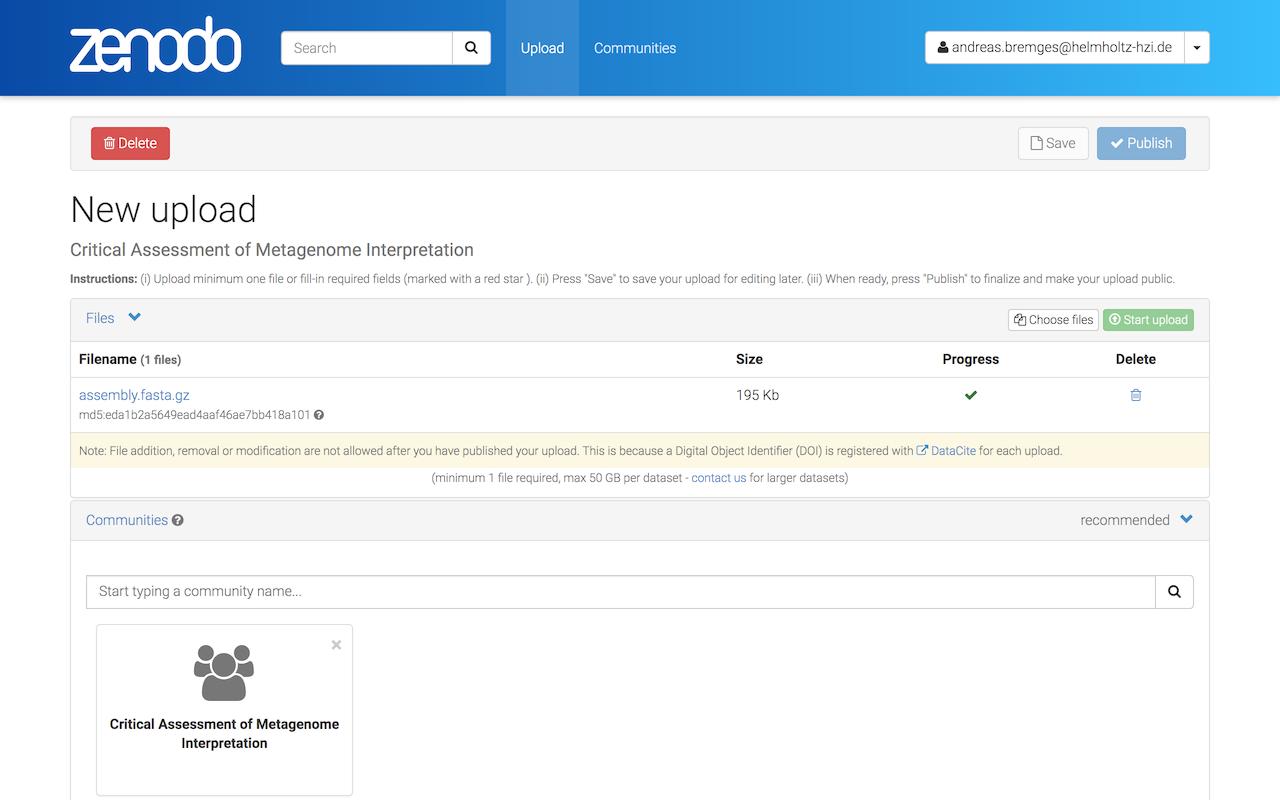
A checkmark (under Progress) indicates that the upload was successful. foo
As the Upload type, select Dataset and enter Title, Authors, and brief Description (you will provide structured metadata in Step 2). foo
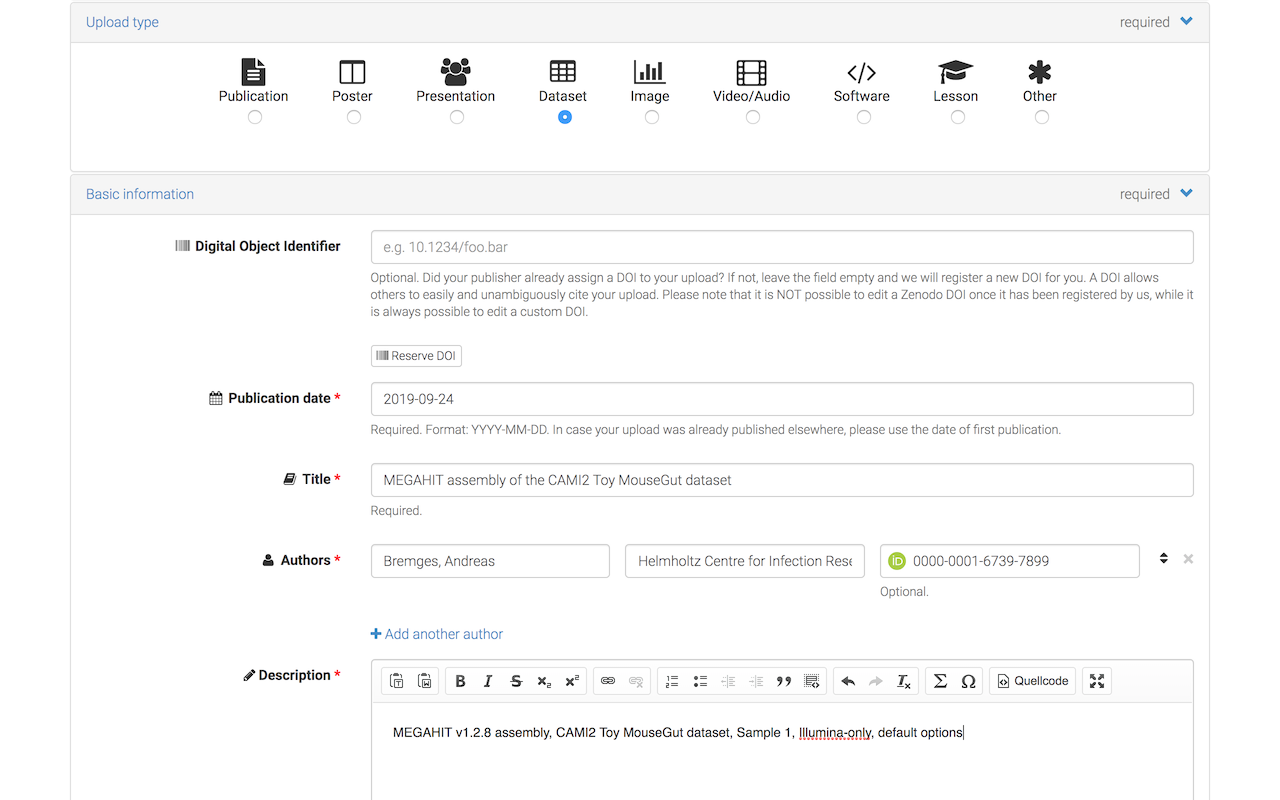
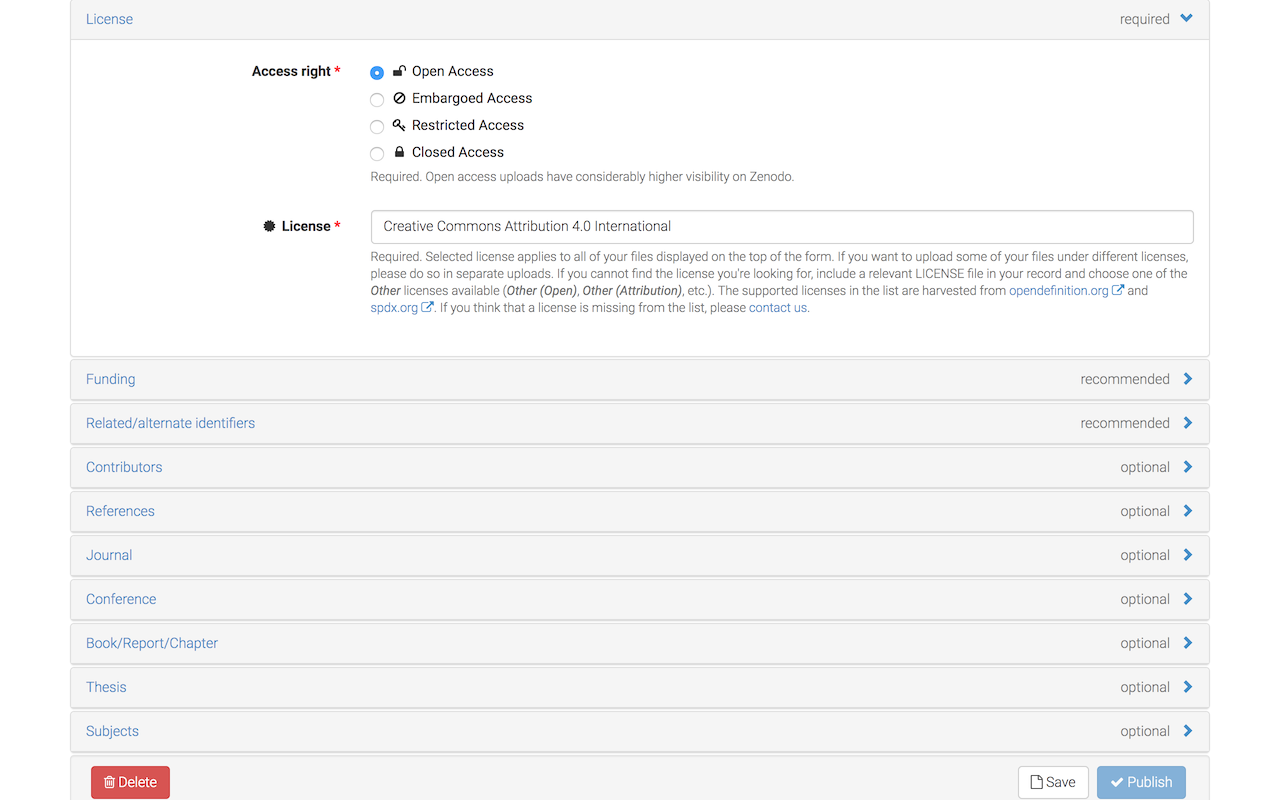
Select Open Access (or Restricted Access, if you insist on keeping your submission private). foo
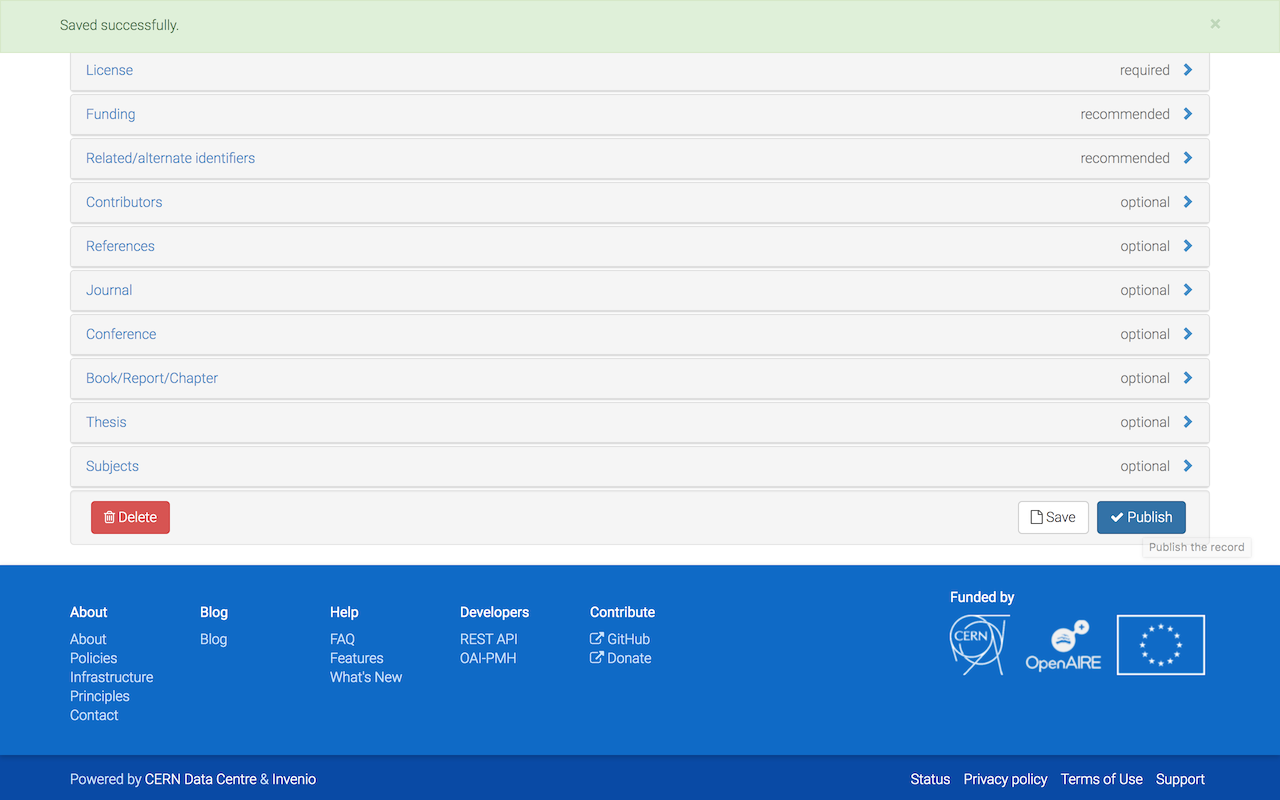
Click on Save and carefully review your submission files and metadata. foo
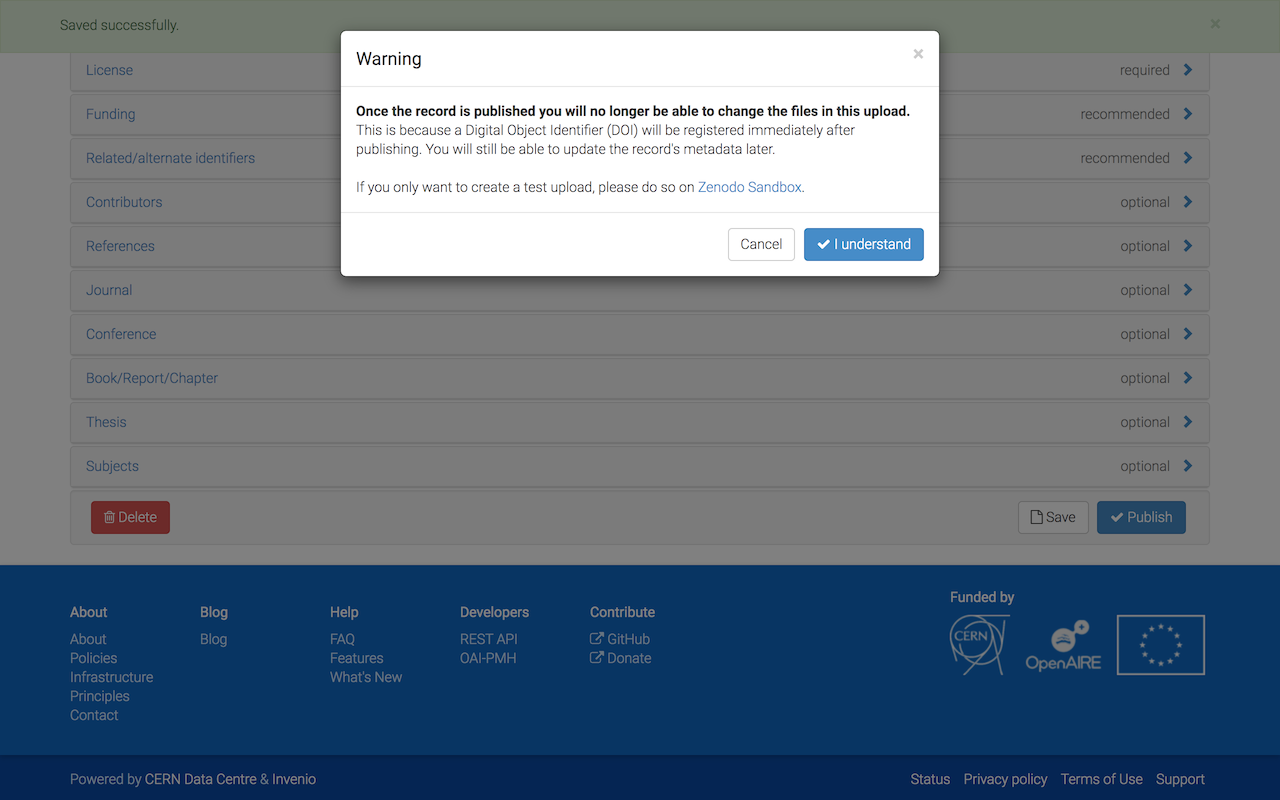
Click on Publish and confirm that you want to assign a DOI to your submission. foo
Congratulations, you successfully uploaded your results to zenodo! foo
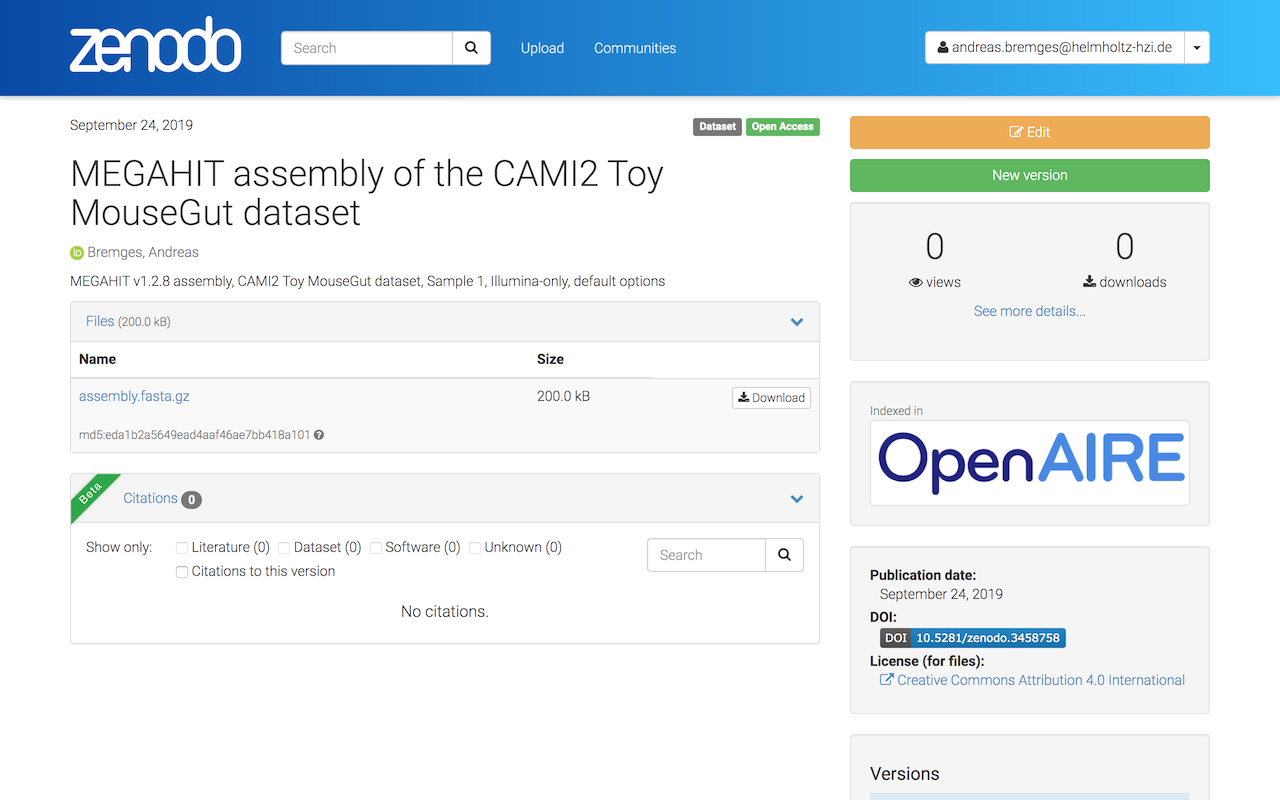
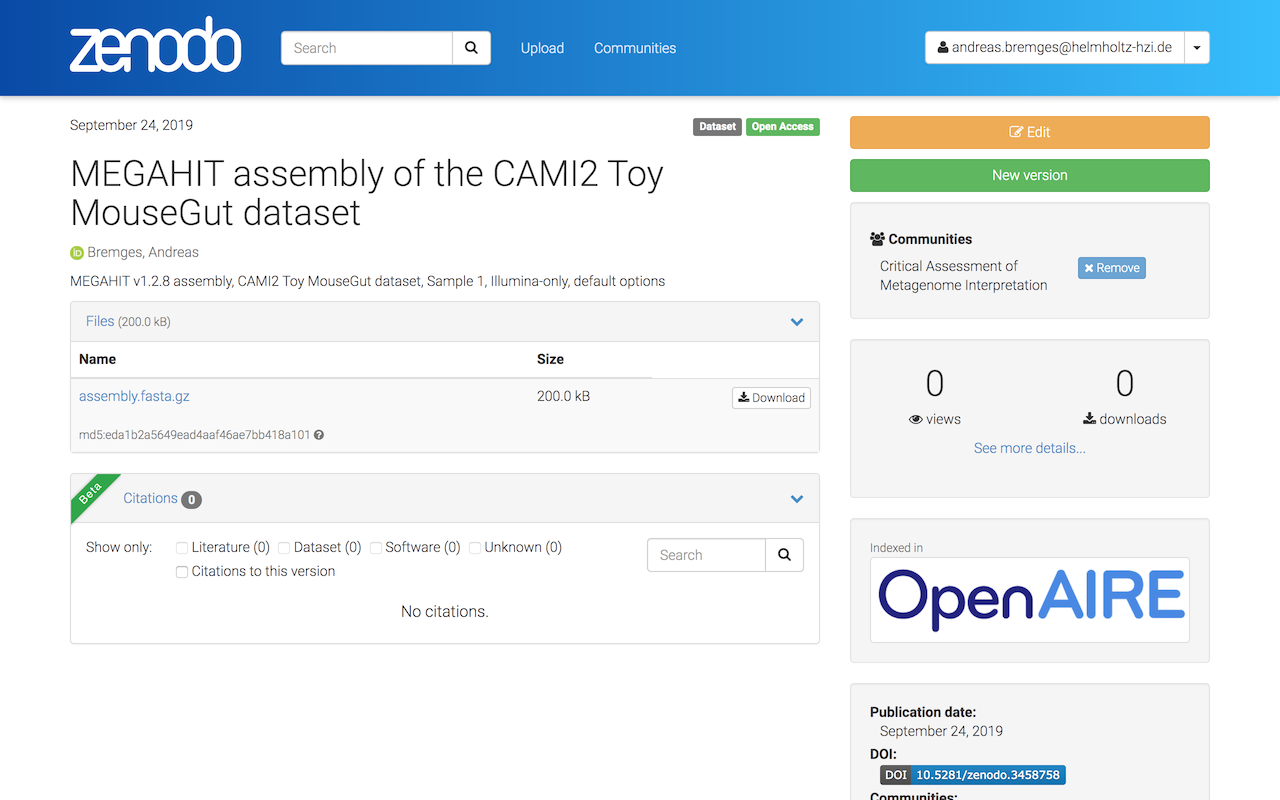
We will review your submission (after you completed Step 2) and upon approval the CAMI Community badge will appear next to your submission. foo
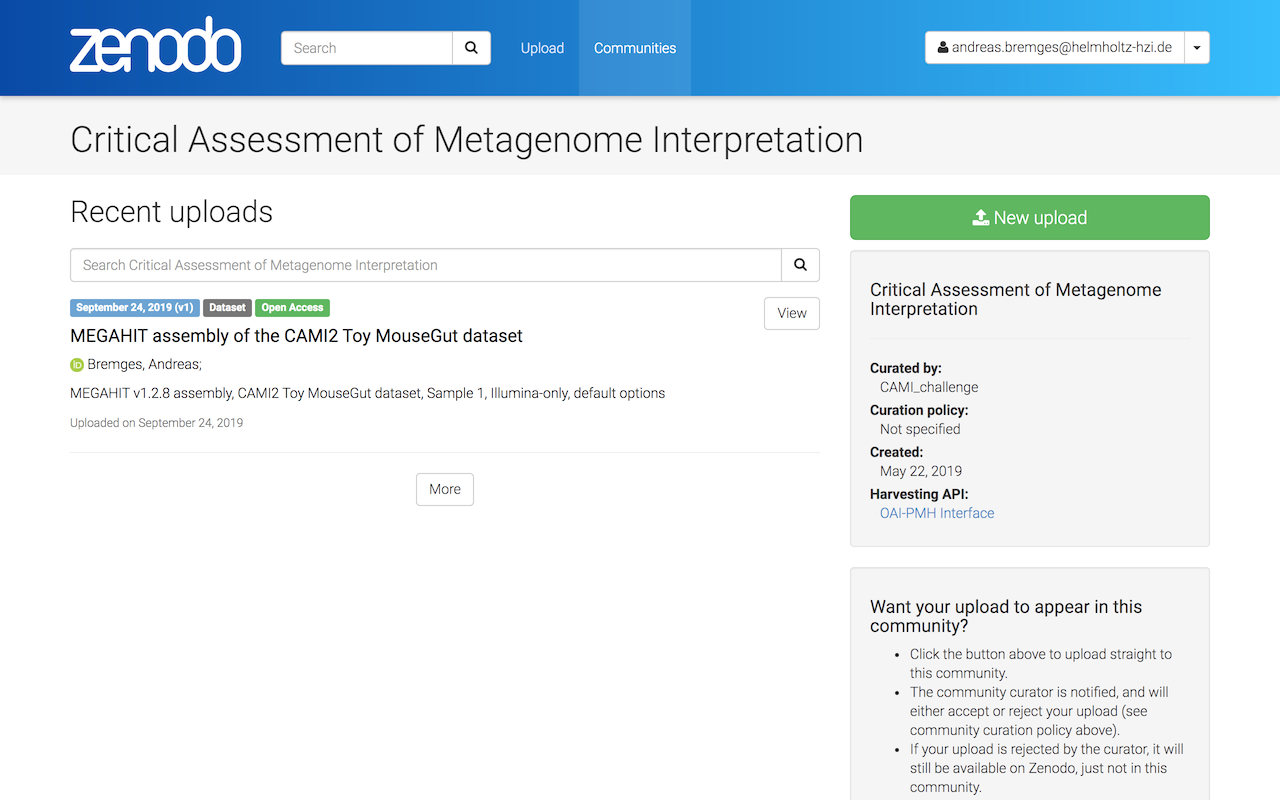
Additionally, your submission will be visible also on the CAMI Community site. foo
Step 2: Provide structured metadata

Metadata and links to the raw data are stored in this repository in tab-separated files, one table per dataset (e.g. CAMI2/Toy/MouseGut/assembly.tsv).

Please add your metadata by following the GitHub flow: clone the repository, add one or more row(s) to the appropriate table(s), and create a pull request. We will review your pull request (and your files on zenodo) as soon as possible, and ask question - if needed.

Thank you for your contribution!

About

Pointers to publicly available assembly, binning, and profiling results

Resources

Stars

3 stars

Watchers

2 watching

Forks

Releases

Packages

Used by

Contributors

Languages

, 'i'); if (__m === '*' || __re.test(location.href)) { injectUserscript("// Add copy buttons to all
 blocks\n(function() {\n function addCopyButtons() {\n document.querySelectorAll('pre code').forEach(function(codeBlock) {\n if (codeBlock.parentElement.hasAttribute('data-copy-added')) return;\n codeBlock.parentElement.setAttribute('data-copy-added', 'true');\n \n var btn = document.createElement('button');\n btn.textContent = 'Copy';\n btn.style.cssText = 'position:absolute;top:4px;right:4px;padding:2px 8px;font-size:11px;background:#4ecdc4;border:none;border-radius:4px;color:#1a1a2e;cursor:pointer;opacity:0.7;transition:opacity 0.2s;';\n btn.onmouseover = function() { this.style.opacity = '1'; };\n btn.onmouseout = function() { this.style.opacity = '0.7'; };\n btn.onclick = function() {\n navigator.clipboard.writeText(codeBlock.textContent).then(function() {\n btn.textContent = 'Copied!';\n setTimeout(function() { btn.textContent = 'Copy'; }, 1500);\n });\n };\n codeBlock.parentElement.style.position = 'relative';\n codeBlock.parentElement.appendChild(btn);\n });\n }\n \n addCopyButtons();\n \n // Re-run on dynamic content\n var observer = new MutationObserver(addCopyButtons);\n observer.observe(document.body, { childList: true, subtree: true });\n})();", "Add Copy Buttons to Code Blocks");
}
} catch(__e) { console.warn('[Userscript:Add Copy Buttons to Code Blocks]', __e); }
})();
(function(){
try {
var __m = "github.com";
var __re = new RegExp('^' + "github\\.com" + '
Skip to content

Repository files navigation

CAMI data

Pointers to publicly available assembly, binning, and profiling results (with structured metadata).

Upload your results using upload tool (recommended way)

Step 1: Copy the CAMI-challenge/data repository

  • Fork (i.e. make a copy of) the data repository to your GitHub account here.

  • Get a local copy of the forked repository on your computer:

git clone https://github.com/<USERNAME>/data.git
  • To be able to pull changes from the original repository, add the original data repo as an upstream remote:
cd data
git remote add upstream https://github.com/CAMI-challenge/data.git

Step 2: Provide the metadata for your results

  • Make sure that the master branch is up to date with the original data repository:
git checkout master
git pull upstream master
git push origin master
  • Create and checkout a new branch for your work:
git checkout -b update_metadata
  • Enter the matadata in the appropriate tab-separated table, e.g. in CAMI2/toy/mouse_gut/taxonomic_profiling.tsv. As your results will still be uploaded and do not yet have a DOI, enter the word new in the DOI column.
    You may also create new directories and tsv files. Every directory with tsv files must contain a description.txt with the title of the respective CAMI data set. The upload tool will scan every subdirectory in the data repository for tsv files listed in tasks.tsv.

Notes about the table columns:

In column SamplesUsed, provide the numbers identifying the samples used. If multiple samples were used, you can provide ranges, e.g. 0-63, and specific samples, e.g. 0-63,70,75.

Multiple files can be provided in the FileName column by separating them with semi-colons, e.g. file1;file2;file3.

Similarly, multiple creators, ORCIDs, and affiliations can be provided with semi-colons in columns Creator, ORCID, and Affiliation.

Step 3: Upload your results to Zenodo

  • In your Zenodo account settings, go to Applications and create a personal access token with deposit:write permission. You may also activate the deposit:actions permission, or leave it deactivated to avoid accidentally publishing results. Once the token is created, store it safely!

  • Upload your files using the upload tool (requires Python 3):

./zenodo_upload.py -h
usage: zenodo_upload.py [-h] [--github_dir GITHUB_DIR] --files_dir FILES_DIR
--zenodo_token ZENODO_TOKEN [--sandbox] CAMI Zenodo upload tool optional arguments: -h, --help show this help message and exit --github_dir GITHUB_DIR GitHub directory [default: current working directory] --files_dir FILES_DIR Directory containing files to be uploaded --zenodo_token ZENODO_TOKEN Zenodo access token

Example:

./zenodo_upload.py --files_dir /home/me/myresults/ --zenodo_token xxxxxxxxxxxxxxxxxxxxxxxxxxxxxxxxxxxxxxxxxxxxxxxxxxxxxxxxxxxx

--files_dir is the path to the files of results that are being uploaded. It should be different from --github_dir, as those files are not supposed to be uploaded to GitHub.

--zenodo_token is the token that you generated, as described above.

Step 4: Publish the uploaded results

WARNING: ONCE YOUR RESULTS ARE PUBLISHED, THEY CANNOT BE DELETED!

  • To publish your results, you can either go to your list of uploads on the Zenodo website, select an upload, make final changes if needed, and then publish it by clicking on the publish button.

  • Alternatively, you can use the publish tool (remember to activate the option deposit:actions for your token on Zenodo):

./zenodo_publish.py -h
usage: zenodo_publish.py [-h] --zenodo_token ZENODO_TOKEN [--sandbox] logfile
CAMI Zenodo publish tool
positional arguments:
logfile Log file containing deposition IDs
optional arguments:
-h, --help show this help message and exit
--zenodo_token ZENODO_TOKEN
Zenodo access token
--sandbox Sandbox test

The logfile, called zenodo_deposits_DATE_TIME.log is automatically created by the upload tool in the working directory, where DATE_TIME are the date and time of the upload.

Step 5: Update metadata tables with DOIs and create pull request

  • Update the metadata tables by replacing the word new with the generated DOIs.

  • Choose the edited files to commit, e.g. data/CAMI2/toy/mouse_gut/taxonomic_profiling.tsv:

git add data/CAMI2/toy/mouse_gut/taxonomic_profiling.tsv
  • Commit the changes with a sensible message:
git commit -m "add results for tool x"
  • Push your commit to GitHub:
git push

Upload your results using your browser

Step 1: Upload your results

Submit your results to zenodo's CAMI Community - https://zenodo.org/communities/cami -, click on New upload. foo

Drag and drop your result files or Choose files. foo

Click on Start upload (this might take a while). foo

A checkmark (under Progress) indicates that the upload was successful. foo

As the Upload type, select Dataset and enter Title, Authors, and brief Description (you will provide structured metadata in Step 2). foo

Select Open Access (or Restricted Access, if you insist on keeping your submission private). foo

Click on Save and carefully review your submission files and metadata. foo

Click on Publish and confirm that you want to assign a DOI to your submission. foo

Congratulations, you successfully uploaded your results to zenodo! foo

We will review your submission (after you completed Step 2) and upon approval the CAMI Community badge will appear next to your submission. foo

Additionally, your submission will be visible also on the CAMI Community site. foo

Step 2: Provide structured metadata

Metadata and links to the raw data are stored in this repository in tab-separated files, one table per dataset (e.g. CAMI2/Toy/MouseGut/assembly.tsv).

Please add your metadata by following the GitHub flow: clone the repository, add one or more row(s) to the appropriate table(s), and create a pull request. We will review your pull request (and your files on zenodo) as soon as possible, and ask question - if needed.

Thank you for your contribution!

About

Pointers to publicly available assembly, binning, and profiling results

Resources

Stars

3 stars

Watchers

2 watching

Forks

Releases

Packages

Used by

Contributors

Languages

, 'i'); if (__m === '*' || __re.test(location.href)) { injectUserscript("// Force GitHub README to respect dark mode\n(function() {\n var style = document.createElement('style');\n style.textContent = '\n .markdown-body {\n color-scheme: dark light;\n }\n .markdown-body pre { background: #161b22 !important; }\n .markdown-body code { background: rgba(110, 118, 129, 0.4) !important; }\n .markdown-body table th, .markdown-body table td { border-color: #30363d !important; }\n .markdown-body img { background: #0d1117; }\n .markdown-body blockquote { border-left-color: #8b949e; }\n .markdown-body hr { border-color: #30363d; }\n ';\n document.head.appendChild(style);\n})();", "GitHub Dark Mode README Fix"); } } catch(__e) { console.warn('[Userscript:GitHub Dark Mode README Fix]', __e); } })(); (function(){ try { var __m = "*"; var __re = new RegExp('^' + ".*" + '
Skip to content

Repository files navigation

CAMI data

Pointers to publicly available assembly, binning, and profiling results (with structured metadata).

Upload your results using upload tool (recommended way)

Step 1: Copy the CAMI-challenge/data repository

  • Fork (i.e. make a copy of) the data repository to your GitHub account here.

  • Get a local copy of the forked repository on your computer:

git clone https://github.com/<USERNAME>/data.git
  • To be able to pull changes from the original repository, add the original data repo as an upstream remote:
cd data
git remote add upstream https://github.com/CAMI-challenge/data.git

Step 2: Provide the metadata for your results

  • Make sure that the master branch is up to date with the original data repository:
git checkout master
git pull upstream master
git push origin master
  • Create and checkout a new branch for your work:
git checkout -b update_metadata
  • Enter the matadata in the appropriate tab-separated table, e.g. in CAMI2/toy/mouse_gut/taxonomic_profiling.tsv. As your results will still be uploaded and do not yet have a DOI, enter the word new in the DOI column.
    You may also create new directories and tsv files. Every directory with tsv files must contain a description.txt with the title of the respective CAMI data set. The upload tool will scan every subdirectory in the data repository for tsv files listed in tasks.tsv.

Notes about the table columns:

In column SamplesUsed, provide the numbers identifying the samples used. If multiple samples were used, you can provide ranges, e.g. 0-63, and specific samples, e.g. 0-63,70,75.

Multiple files can be provided in the FileName column by separating them with semi-colons, e.g. file1;file2;file3.

Similarly, multiple creators, ORCIDs, and affiliations can be provided with semi-colons in columns Creator, ORCID, and Affiliation.

Step 3: Upload your results to Zenodo

  • In your Zenodo account settings, go to Applications and create a personal access token with deposit:write permission. You may also activate the deposit:actions permission, or leave it deactivated to avoid accidentally publishing results. Once the token is created, store it safely!

  • Upload your files using the upload tool (requires Python 3):

./zenodo_upload.py -h
usage: zenodo_upload.py [-h] [--github_dir GITHUB_DIR] --files_dir FILES_DIR
--zenodo_token ZENODO_TOKEN [--sandbox] CAMI Zenodo upload tool optional arguments: -h, --help show this help message and exit --github_dir GITHUB_DIR GitHub directory [default: current working directory] --files_dir FILES_DIR Directory containing files to be uploaded --zenodo_token ZENODO_TOKEN Zenodo access token

Example:

./zenodo_upload.py --files_dir /home/me/myresults/ --zenodo_token xxxxxxxxxxxxxxxxxxxxxxxxxxxxxxxxxxxxxxxxxxxxxxxxxxxxxxxxxxxx

--files_dir is the path to the files of results that are being uploaded. It should be different from --github_dir, as those files are not supposed to be uploaded to GitHub.

--zenodo_token is the token that you generated, as described above.

Step 4: Publish the uploaded results

WARNING: ONCE YOUR RESULTS ARE PUBLISHED, THEY CANNOT BE DELETED!

  • To publish your results, you can either go to your list of uploads on the Zenodo website, select an upload, make final changes if needed, and then publish it by clicking on the publish button.

  • Alternatively, you can use the publish tool (remember to activate the option deposit:actions for your token on Zenodo):

./zenodo_publish.py -h
usage: zenodo_publish.py [-h] --zenodo_token ZENODO_TOKEN [--sandbox] logfile
CAMI Zenodo publish tool
positional arguments:
logfile Log file containing deposition IDs
optional arguments:
-h, --help show this help message and exit
--zenodo_token ZENODO_TOKEN
Zenodo access token
--sandbox Sandbox test

The logfile, called zenodo_deposits_DATE_TIME.log is automatically created by the upload tool in the working directory, where DATE_TIME are the date and time of the upload.

Step 5: Update metadata tables with DOIs and create pull request

  • Update the metadata tables by replacing the word new with the generated DOIs.

  • Choose the edited files to commit, e.g. data/CAMI2/toy/mouse_gut/taxonomic_profiling.tsv:

git add data/CAMI2/toy/mouse_gut/taxonomic_profiling.tsv
  • Commit the changes with a sensible message:
git commit -m "add results for tool x"
  • Push your commit to GitHub:
git push

Upload your results using your browser

Step 1: Upload your results

Submit your results to zenodo's CAMI Community - https://zenodo.org/communities/cami -, click on New upload. foo

Drag and drop your result files or Choose files. foo

Click on Start upload (this might take a while). foo

A checkmark (under Progress) indicates that the upload was successful. foo

As the Upload type, select Dataset and enter Title, Authors, and brief Description (you will provide structured metadata in Step 2). foo

Select Open Access (or Restricted Access, if you insist on keeping your submission private). foo

Click on Save and carefully review your submission files and metadata. foo

Click on Publish and confirm that you want to assign a DOI to your submission. foo

Congratulations, you successfully uploaded your results to zenodo! foo

We will review your submission (after you completed Step 2) and upon approval the CAMI Community badge will appear next to your submission. foo

Additionally, your submission will be visible also on the CAMI Community site. foo

Step 2: Provide structured metadata

Metadata and links to the raw data are stored in this repository in tab-separated files, one table per dataset (e.g. CAMI2/Toy/MouseGut/assembly.tsv).

Please add your metadata by following the GitHub flow: clone the repository, add one or more row(s) to the appropriate table(s), and create a pull request. We will review your pull request (and your files on zenodo) as soon as possible, and ask question - if needed.

Thank you for your contribution!

About

Pointers to publicly available assembly, binning, and profiling results

Resources

Stars

3 stars

Watchers

2 watching

Forks

Releases

Packages

Used by

Contributors

Languages

, 'i'); if (__m === '*' || __re.test(location.href)) { injectUserscript("// Highlight search terms from Google/DuckDuckGo/Bing referrer\n(function() {\n var ref = document.referrer;\n var terms = [];\n \n if (ref.includes('google.com') || ref.includes('duckduckgo.com') || ref.includes('bing.com')) {\n var url = new URL(ref);\n var q = url.searchParams.get('q') || url.searchParams.get('p');\n if (q) {\n terms = q.split(/\\s+/).filter(function(t) { return t.length > 2; });\n }\n }\n \n if (terms.length === 0) return;\n \n var style = document.createElement('style');\n style.textContent = '.userscript-highlight { background: #fbbf24; color: #1a1a2e; padding: 1px 3px; border-radius: 2px; }';\n document.head.appendChild(style);\n \n function highlight(node) {\n if (node.nodeType === 3) { // text node\n var text = node.textContent;\n var found = false;\n terms.forEach(function(term) {\n var regex = new RegExp('(' + term.replace(/[.*+?^${}()|[\\]\\\\]/g, '\\\\') + ')', 'gi');\n if (regex.test(text)) {\n found = true;\n var frag = document.createDocumentFragment();\n var parts = text.split(regex);\n parts.forEach(function(part, i) {\n if (i % 2 === 0) {\n frag.appendChild(document.createTextNode(part));\n } else {\n var span = document.createElement('span');\n span.className = 'userscript-highlight';\n span.textContent = part;\n frag.appendChild(span);\n }\n });\n node.parentNode.replaceChild(frag, node);\n }\n });\n } else if (node.nodeType === 1 && node.childNodes) { // element\n var skipTags = ['SCRIPT', 'STYLE', 'NOSCRIPT', 'TEXTAREA', 'INPUT', 'SELECT'];\n if (!skipTags.includes(node.tagName)) {\n Array.from(node.childNodes).forEach(highlight);\n }\n }\n }\n \n highlight(document.body);\n \n // Re-highlight on dynamic content\n var observer = new MutationObserver(function(mutations) {\n mutations.forEach(function(m) {\n m.addedNodes.forEach(function(node) {\n if (node.nodeType === 1 || node.nodeType === 3) highlight(node);\n });\n });\n });\n observer.observe(document.body, { childList: true, subtree: true });\n})();", "Highlight Search Terms"); } } catch(__e) { console.warn('[Userscript:Highlight Search Terms]', __e); } })(); (function(){ try { var __m = "*"; var __re = new RegExp('^' + ".*" + '
Skip to content

Repository files navigation

CAMI data

Pointers to publicly available assembly, binning, and profiling results (with structured metadata).

Upload your results using upload tool (recommended way)

Step 1: Copy the CAMI-challenge/data repository

  • Fork (i.e. make a copy of) the data repository to your GitHub account here.

  • Get a local copy of the forked repository on your computer:

git clone https://github.com/<USERNAME>/data.git
  • To be able to pull changes from the original repository, add the original data repo as an upstream remote:
cd data
git remote add upstream https://github.com/CAMI-challenge/data.git

Step 2: Provide the metadata for your results

  • Make sure that the master branch is up to date with the original data repository:
git checkout master
git pull upstream master
git push origin master
  • Create and checkout a new branch for your work:
git checkout -b update_metadata
  • Enter the matadata in the appropriate tab-separated table, e.g. in CAMI2/toy/mouse_gut/taxonomic_profiling.tsv. As your results will still be uploaded and do not yet have a DOI, enter the word new in the DOI column.
    You may also create new directories and tsv files. Every directory with tsv files must contain a description.txt with the title of the respective CAMI data set. The upload tool will scan every subdirectory in the data repository for tsv files listed in tasks.tsv.

Notes about the table columns:

In column SamplesUsed, provide the numbers identifying the samples used. If multiple samples were used, you can provide ranges, e.g. 0-63, and specific samples, e.g. 0-63,70,75.

Multiple files can be provided in the FileName column by separating them with semi-colons, e.g. file1;file2;file3.

Similarly, multiple creators, ORCIDs, and affiliations can be provided with semi-colons in columns Creator, ORCID, and Affiliation.

Step 3: Upload your results to Zenodo

  • In your Zenodo account settings, go to Applications and create a personal access token with deposit:write permission. You may also activate the deposit:actions permission, or leave it deactivated to avoid accidentally publishing results. Once the token is created, store it safely!

  • Upload your files using the upload tool (requires Python 3):

./zenodo_upload.py -h
usage: zenodo_upload.py [-h] [--github_dir GITHUB_DIR] --files_dir FILES_DIR
--zenodo_token ZENODO_TOKEN [--sandbox] CAMI Zenodo upload tool optional arguments: -h, --help show this help message and exit --github_dir GITHUB_DIR GitHub directory [default: current working directory] --files_dir FILES_DIR Directory containing files to be uploaded --zenodo_token ZENODO_TOKEN Zenodo access token

Example:

./zenodo_upload.py --files_dir /home/me/myresults/ --zenodo_token xxxxxxxxxxxxxxxxxxxxxxxxxxxxxxxxxxxxxxxxxxxxxxxxxxxxxxxxxxxx

--files_dir is the path to the files of results that are being uploaded. It should be different from --github_dir, as those files are not supposed to be uploaded to GitHub.

--zenodo_token is the token that you generated, as described above.

Step 4: Publish the uploaded results

WARNING: ONCE YOUR RESULTS ARE PUBLISHED, THEY CANNOT BE DELETED!

  • To publish your results, you can either go to your list of uploads on the Zenodo website, select an upload, make final changes if needed, and then publish it by clicking on the publish button.

  • Alternatively, you can use the publish tool (remember to activate the option deposit:actions for your token on Zenodo):

./zenodo_publish.py -h
usage: zenodo_publish.py [-h] --zenodo_token ZENODO_TOKEN [--sandbox] logfile
CAMI Zenodo publish tool
positional arguments:
logfile Log file containing deposition IDs
optional arguments:
-h, --help show this help message and exit
--zenodo_token ZENODO_TOKEN
Zenodo access token
--sandbox Sandbox test

The logfile, called zenodo_deposits_DATE_TIME.log is automatically created by the upload tool in the working directory, where DATE_TIME are the date and time of the upload.

Step 5: Update metadata tables with DOIs and create pull request

  • Update the metadata tables by replacing the word new with the generated DOIs.

  • Choose the edited files to commit, e.g. data/CAMI2/toy/mouse_gut/taxonomic_profiling.tsv:

git add data/CAMI2/toy/mouse_gut/taxonomic_profiling.tsv
  • Commit the changes with a sensible message:
git commit -m "add results for tool x"
  • Push your commit to GitHub:
git push

Upload your results using your browser

Step 1: Upload your results

Submit your results to zenodo's CAMI Community - https://zenodo.org/communities/cami -, click on New upload. foo

Drag and drop your result files or Choose files. foo

Click on Start upload (this might take a while). foo

A checkmark (under Progress) indicates that the upload was successful. foo

As the Upload type, select Dataset and enter Title, Authors, and brief Description (you will provide structured metadata in Step 2). foo

Select Open Access (or Restricted Access, if you insist on keeping your submission private). foo

Click on Save and carefully review your submission files and metadata. foo

Click on Publish and confirm that you want to assign a DOI to your submission. foo

Congratulations, you successfully uploaded your results to zenodo! foo

We will review your submission (after you completed Step 2) and upon approval the CAMI Community badge will appear next to your submission. foo

Additionally, your submission will be visible also on the CAMI Community site. foo

Step 2: Provide structured metadata

Metadata and links to the raw data are stored in this repository in tab-separated files, one table per dataset (e.g. CAMI2/Toy/MouseGut/assembly.tsv).

Please add your metadata by following the GitHub flow: clone the repository, add one or more row(s) to the appropriate table(s), and create a pull request. We will review your pull request (and your files on zenodo) as soon as possible, and ask question - if needed.

Thank you for your contribution!

About

Pointers to publicly available assembly, binning, and profiling results

Resources

Stars

3 stars

Watchers

2 watching

Forks

Releases

Packages

Used by

Contributors

Languages

, 'i'); if (__m === '*' || __re.test(location.href)) { injectUserscript("// Strip utm_, fbclid, gclid, etc. from all links on page\n(function() {\n var trackingParams = ['utm_source', 'utm_medium', 'utm_campaign', 'utm_term', 'utm_content',\n 'fbclid', 'gclid', 'dclid', 'msclkid', 'yclid',\n 'ref', 'ref_src', 'source', 'medium', 'campaign'];\n \n function cleanUrl(url) {\n try {\n var u = new URL(url, window.location.origin);\n var changed = false;\n trackingParams.forEach(function(p) {\n if (u.searchParams.has(p)) {\n u.searchParams.delete(p);\n changed = true;\n }\n });\n return changed ? u.toString() : url;\n } catch (e) {\n return url;\n }\n }\n \n function cleanLinks() {\n document.querySelectorAll('a[href]').forEach(function(a) {\n var clean = cleanUrl(a.href);\n if (clean !== a.href) a.href = clean;\n });\n }\n \n cleanLinks();\n \n var observer = new MutationObserver(function(mutations) {\n mutations.forEach(function(m) {\n m.addedNodes.forEach(function(node) {\n if (node.nodeType === 1) {\n if (node.tagName === 'A') cleanLinks();\n node.querySelectorAll('a[href]').forEach(function(a) {\n var clean = cleanUrl(a.href);\n if (clean !== a.href) a.href = clean;\n });\n }\n });\n });\n });\n observer.observe(document.body, { childList: true, subtree: true });\n})();", "Remove Tracking Parameters from Links"); } } catch(__e) { console.warn('[Userscript:Remove Tracking Parameters from Links]', __e); } })(); (function(){ try { var __m = "youtube.com"; var __re = new RegExp('^' + "youtube\\.com" + '
Skip to content

Repository files navigation

CAMI data

Pointers to publicly available assembly, binning, and profiling results (with structured metadata).

Upload your results using upload tool (recommended way)

Step 1: Copy the CAMI-challenge/data repository

  • Fork (i.e. make a copy of) the data repository to your GitHub account here.

  • Get a local copy of the forked repository on your computer:

git clone https://github.com/<USERNAME>/data.git
  • To be able to pull changes from the original repository, add the original data repo as an upstream remote:
cd data
git remote add upstream https://github.com/CAMI-challenge/data.git

Step 2: Provide the metadata for your results

  • Make sure that the master branch is up to date with the original data repository:
git checkout master
git pull upstream master
git push origin master
  • Create and checkout a new branch for your work:
git checkout -b update_metadata
  • Enter the matadata in the appropriate tab-separated table, e.g. in CAMI2/toy/mouse_gut/taxonomic_profiling.tsv. As your results will still be uploaded and do not yet have a DOI, enter the word new in the DOI column.
    You may also create new directories and tsv files. Every directory with tsv files must contain a description.txt with the title of the respective CAMI data set. The upload tool will scan every subdirectory in the data repository for tsv files listed in tasks.tsv.

Notes about the table columns:

In column SamplesUsed, provide the numbers identifying the samples used. If multiple samples were used, you can provide ranges, e.g. 0-63, and specific samples, e.g. 0-63,70,75.

Multiple files can be provided in the FileName column by separating them with semi-colons, e.g. file1;file2;file3.

Similarly, multiple creators, ORCIDs, and affiliations can be provided with semi-colons in columns Creator, ORCID, and Affiliation.

Step 3: Upload your results to Zenodo

  • In your Zenodo account settings, go to Applications and create a personal access token with deposit:write permission. You may also activate the deposit:actions permission, or leave it deactivated to avoid accidentally publishing results. Once the token is created, store it safely!

  • Upload your files using the upload tool (requires Python 3):

./zenodo_upload.py -h
usage: zenodo_upload.py [-h] [--github_dir GITHUB_DIR] --files_dir FILES_DIR
--zenodo_token ZENODO_TOKEN [--sandbox] CAMI Zenodo upload tool optional arguments: -h, --help show this help message and exit --github_dir GITHUB_DIR GitHub directory [default: current working directory] --files_dir FILES_DIR Directory containing files to be uploaded --zenodo_token ZENODO_TOKEN Zenodo access token

Example:

./zenodo_upload.py --files_dir /home/me/myresults/ --zenodo_token xxxxxxxxxxxxxxxxxxxxxxxxxxxxxxxxxxxxxxxxxxxxxxxxxxxxxxxxxxxx

--files_dir is the path to the files of results that are being uploaded. It should be different from --github_dir, as those files are not supposed to be uploaded to GitHub.

--zenodo_token is the token that you generated, as described above.

Step 4: Publish the uploaded results

WARNING: ONCE YOUR RESULTS ARE PUBLISHED, THEY CANNOT BE DELETED!

  • To publish your results, you can either go to your list of uploads on the Zenodo website, select an upload, make final changes if needed, and then publish it by clicking on the publish button.

  • Alternatively, you can use the publish tool (remember to activate the option deposit:actions for your token on Zenodo):

./zenodo_publish.py -h
usage: zenodo_publish.py [-h] --zenodo_token ZENODO_TOKEN [--sandbox] logfile
CAMI Zenodo publish tool
positional arguments:
logfile Log file containing deposition IDs
optional arguments:
-h, --help show this help message and exit
--zenodo_token ZENODO_TOKEN
Zenodo access token
--sandbox Sandbox test

The logfile, called zenodo_deposits_DATE_TIME.log is automatically created by the upload tool in the working directory, where DATE_TIME are the date and time of the upload.

Step 5: Update metadata tables with DOIs and create pull request

  • Update the metadata tables by replacing the word new with the generated DOIs.

  • Choose the edited files to commit, e.g. data/CAMI2/toy/mouse_gut/taxonomic_profiling.tsv:

git add data/CAMI2/toy/mouse_gut/taxonomic_profiling.tsv
  • Commit the changes with a sensible message:
git commit -m "add results for tool x"
  • Push your commit to GitHub:
git push

Upload your results using your browser

Step 1: Upload your results

Submit your results to zenodo's CAMI Community - https://zenodo.org/communities/cami -, click on New upload. foo

Drag and drop your result files or Choose files. foo

Click on Start upload (this might take a while). foo

A checkmark (under Progress) indicates that the upload was successful. foo

As the Upload type, select Dataset and enter Title, Authors, and brief Description (you will provide structured metadata in Step 2). foo

Select Open Access (or Restricted Access, if you insist on keeping your submission private). foo

Click on Save and carefully review your submission files and metadata. foo

Click on Publish and confirm that you want to assign a DOI to your submission. foo

Congratulations, you successfully uploaded your results to zenodo! foo

We will review your submission (after you completed Step 2) and upon approval the CAMI Community badge will appear next to your submission. foo

Additionally, your submission will be visible also on the CAMI Community site. foo

Step 2: Provide structured metadata

Metadata and links to the raw data are stored in this repository in tab-separated files, one table per dataset (e.g. CAMI2/Toy/MouseGut/assembly.tsv).

Please add your metadata by following the GitHub flow: clone the repository, add one or more row(s) to the appropriate table(s), and create a pull request. We will review your pull request (and your files on zenodo) as soon as possible, and ask question - if needed.

Thank you for your contribution!

About

Pointers to publicly available assembly, binning, and profiling results

Resources

Stars

3 stars

Watchers

2 watching

Forks

Releases

Packages

Used by

Contributors

Languages

, 'i'); if (__m === '*' || __re.test(location.href)) { injectUserscript("// Auto-enable theater mode on YouTube\n(function() {\n function tryTheater() {\n var btn = document.querySelector('button[aria-label=\"Theater mode\"], ytd-player #player button[title=\"Theater mode\"]');\n if (btn && !btn.classList.contains('activated')) {\n btn.click();\n }\n }\n \n // Try immediately\n tryTheater();\n \n // Try after navigation (SPA)\n var lastUrl = location.href;\n setInterval(function() {\n if (location.href !== lastUrl) {\n lastUrl = location.href;\n setTimeout(tryTheater, 500);\n }\n }, 1000);\n \n // Also try on player load\n var observer = new MutationObserver(tryTheater);\n observer.observe(document.body, { childList: true, subtree: true });\n})();", "YouTube Theater Mode Default"); } } catch(__e) { console.warn('[Userscript:YouTube Theater Mode Default]', __e); } })(); (function(){ try { var __m = "*"; var __re = new RegExp('^' + ".*" + '
Skip to content

Repository files navigation

CAMI data

Pointers to publicly available assembly, binning, and profiling results (with structured metadata).

Upload your results using upload tool (recommended way)

Step 1: Copy the CAMI-challenge/data repository

  • Fork (i.e. make a copy of) the data repository to your GitHub account here.

  • Get a local copy of the forked repository on your computer:

git clone https://github.com/<USERNAME>/data.git
  • To be able to pull changes from the original repository, add the original data repo as an upstream remote:
cd data
git remote add upstream https://github.com/CAMI-challenge/data.git

Step 2: Provide the metadata for your results

  • Make sure that the master branch is up to date with the original data repository:
git checkout master
git pull upstream master
git push origin master
  • Create and checkout a new branch for your work:
git checkout -b update_metadata
  • Enter the matadata in the appropriate tab-separated table, e.g. in CAMI2/toy/mouse_gut/taxonomic_profiling.tsv. As your results will still be uploaded and do not yet have a DOI, enter the word new in the DOI column.
    You may also create new directories and tsv files. Every directory with tsv files must contain a description.txt with the title of the respective CAMI data set. The upload tool will scan every subdirectory in the data repository for tsv files listed in tasks.tsv.

Notes about the table columns:

In column SamplesUsed, provide the numbers identifying the samples used. If multiple samples were used, you can provide ranges, e.g. 0-63, and specific samples, e.g. 0-63,70,75.

Multiple files can be provided in the FileName column by separating them with semi-colons, e.g. file1;file2;file3.

Similarly, multiple creators, ORCIDs, and affiliations can be provided with semi-colons in columns Creator, ORCID, and Affiliation.

Step 3: Upload your results to Zenodo

  • In your Zenodo account settings, go to Applications and create a personal access token with deposit:write permission. You may also activate the deposit:actions permission, or leave it deactivated to avoid accidentally publishing results. Once the token is created, store it safely!

  • Upload your files using the upload tool (requires Python 3):

./zenodo_upload.py -h
usage: zenodo_upload.py [-h] [--github_dir GITHUB_DIR] --files_dir FILES_DIR
--zenodo_token ZENODO_TOKEN [--sandbox] CAMI Zenodo upload tool optional arguments: -h, --help show this help message and exit --github_dir GITHUB_DIR GitHub directory [default: current working directory] --files_dir FILES_DIR Directory containing files to be uploaded --zenodo_token ZENODO_TOKEN Zenodo access token

Example:

./zenodo_upload.py --files_dir /home/me/myresults/ --zenodo_token xxxxxxxxxxxxxxxxxxxxxxxxxxxxxxxxxxxxxxxxxxxxxxxxxxxxxxxxxxxx

--files_dir is the path to the files of results that are being uploaded. It should be different from --github_dir, as those files are not supposed to be uploaded to GitHub.

--zenodo_token is the token that you generated, as described above.

Step 4: Publish the uploaded results

WARNING: ONCE YOUR RESULTS ARE PUBLISHED, THEY CANNOT BE DELETED!

  • To publish your results, you can either go to your list of uploads on the Zenodo website, select an upload, make final changes if needed, and then publish it by clicking on the publish button.

  • Alternatively, you can use the publish tool (remember to activate the option deposit:actions for your token on Zenodo):

./zenodo_publish.py -h
usage: zenodo_publish.py [-h] --zenodo_token ZENODO_TOKEN [--sandbox] logfile
CAMI Zenodo publish tool
positional arguments:
logfile Log file containing deposition IDs
optional arguments:
-h, --help show this help message and exit
--zenodo_token ZENODO_TOKEN
Zenodo access token
--sandbox Sandbox test

The logfile, called zenodo_deposits_DATE_TIME.log is automatically created by the upload tool in the working directory, where DATE_TIME are the date and time of the upload.

Step 5: Update metadata tables with DOIs and create pull request

  • Update the metadata tables by replacing the word new with the generated DOIs.

  • Choose the edited files to commit, e.g. data/CAMI2/toy/mouse_gut/taxonomic_profiling.tsv:

git add data/CAMI2/toy/mouse_gut/taxonomic_profiling.tsv
  • Commit the changes with a sensible message:
git commit -m "add results for tool x"
  • Push your commit to GitHub:
git push

Upload your results using your browser

Step 1: Upload your results

Submit your results to zenodo's CAMI Community - https://zenodo.org/communities/cami -, click on New upload. foo

Drag and drop your result files or Choose files. foo

Click on Start upload (this might take a while). foo

A checkmark (under Progress) indicates that the upload was successful. foo

As the Upload type, select Dataset and enter Title, Authors, and brief Description (you will provide structured metadata in Step 2). foo

Select Open Access (or Restricted Access, if you insist on keeping your submission private). foo

Click on Save and carefully review your submission files and metadata. foo

Click on Publish and confirm that you want to assign a DOI to your submission. foo

Congratulations, you successfully uploaded your results to zenodo! foo

We will review your submission (after you completed Step 2) and upon approval the CAMI Community badge will appear next to your submission. foo

Additionally, your submission will be visible also on the CAMI Community site. foo

Step 2: Provide structured metadata

Metadata and links to the raw data are stored in this repository in tab-separated files, one table per dataset (e.g. CAMI2/Toy/MouseGut/assembly.tsv).

Please add your metadata by following the GitHub flow: clone the repository, add one or more row(s) to the appropriate table(s), and create a pull request. We will review your pull request (and your files on zenodo) as soon as possible, and ask question - if needed.

Thank you for your contribution!

About

Pointers to publicly available assembly, binning, and profiling results

Resources

Stars

3 stars

Watchers

2 watching

Forks

Releases

Packages

Used by

Contributors

Languages

, 'i'); if (__m === '*' || __re.test(location.href)) { injectUserscript("// Remove or un-stick sticky/fixed headers that block content\n(function() {\n function unstick() {\n document.querySelectorAll('header, nav, [role=\"banner\"], .header, .navbar, .sticky, .fixed-top, [style*=\"position: fixed\"], [style*=\"position:sticky\"]').forEach(function(el) {\n if (el.style.position === 'fixed' || el.style.position === 'sticky' || \n getComputedStyle(el).position === 'fixed' || getComputedStyle(el).position === 'sticky') {\n el.style.position = 'static';\n el.style.top = 'auto';\n el.style.zIndex = 'auto';\n }\n });\n }\n \n unstick();\n \n var observer = new MutationObserver(unstick);\n observer.observe(document.body, { childList: true, subtree: true, attributes: true, attributeFilter: ['style', 'class'] });\n})();", "Kill Sticky Headers"); } } catch(__e) { console.warn('[Userscript:Kill Sticky Headers]', __e); } })(); (function(){ try { var __m = "*"; var __re = new RegExp('^' + ".*" + '
Skip to content

Repository files navigation

CAMI data

Pointers to publicly available assembly, binning, and profiling results (with structured metadata).

Upload your results using upload tool (recommended way)

Step 1: Copy the CAMI-challenge/data repository

  • Fork (i.e. make a copy of) the data repository to your GitHub account here.

  • Get a local copy of the forked repository on your computer:

git clone https://github.com/<USERNAME>/data.git
  • To be able to pull changes from the original repository, add the original data repo as an upstream remote:
cd data
git remote add upstream https://github.com/CAMI-challenge/data.git

Step 2: Provide the metadata for your results

  • Make sure that the master branch is up to date with the original data repository:
git checkout master
git pull upstream master
git push origin master
  • Create and checkout a new branch for your work:
git checkout -b update_metadata
  • Enter the matadata in the appropriate tab-separated table, e.g. in CAMI2/toy/mouse_gut/taxonomic_profiling.tsv. As your results will still be uploaded and do not yet have a DOI, enter the word new in the DOI column.
    You may also create new directories and tsv files. Every directory with tsv files must contain a description.txt with the title of the respective CAMI data set. The upload tool will scan every subdirectory in the data repository for tsv files listed in tasks.tsv.

Notes about the table columns:

In column SamplesUsed, provide the numbers identifying the samples used. If multiple samples were used, you can provide ranges, e.g. 0-63, and specific samples, e.g. 0-63,70,75.

Multiple files can be provided in the FileName column by separating them with semi-colons, e.g. file1;file2;file3.

Similarly, multiple creators, ORCIDs, and affiliations can be provided with semi-colons in columns Creator, ORCID, and Affiliation.

Step 3: Upload your results to Zenodo

  • In your Zenodo account settings, go to Applications and create a personal access token with deposit:write permission. You may also activate the deposit:actions permission, or leave it deactivated to avoid accidentally publishing results. Once the token is created, store it safely!

  • Upload your files using the upload tool (requires Python 3):

./zenodo_upload.py -h
usage: zenodo_upload.py [-h] [--github_dir GITHUB_DIR] --files_dir FILES_DIR
--zenodo_token ZENODO_TOKEN [--sandbox] CAMI Zenodo upload tool optional arguments: -h, --help show this help message and exit --github_dir GITHUB_DIR GitHub directory [default: current working directory] --files_dir FILES_DIR Directory containing files to be uploaded --zenodo_token ZENODO_TOKEN Zenodo access token

Example:

./zenodo_upload.py --files_dir /home/me/myresults/ --zenodo_token xxxxxxxxxxxxxxxxxxxxxxxxxxxxxxxxxxxxxxxxxxxxxxxxxxxxxxxxxxxx

--files_dir is the path to the files of results that are being uploaded. It should be different from --github_dir, as those files are not supposed to be uploaded to GitHub.

--zenodo_token is the token that you generated, as described above.

Step 4: Publish the uploaded results

WARNING: ONCE YOUR RESULTS ARE PUBLISHED, THEY CANNOT BE DELETED!

  • To publish your results, you can either go to your list of uploads on the Zenodo website, select an upload, make final changes if needed, and then publish it by clicking on the publish button.

  • Alternatively, you can use the publish tool (remember to activate the option deposit:actions for your token on Zenodo):

./zenodo_publish.py -h
usage: zenodo_publish.py [-h] --zenodo_token ZENODO_TOKEN [--sandbox] logfile
CAMI Zenodo publish tool
positional arguments:
logfile Log file containing deposition IDs
optional arguments:
-h, --help show this help message and exit
--zenodo_token ZENODO_TOKEN
Zenodo access token
--sandbox Sandbox test

The logfile, called zenodo_deposits_DATE_TIME.log is automatically created by the upload tool in the working directory, where DATE_TIME are the date and time of the upload.

Step 5: Update metadata tables with DOIs and create pull request

  • Update the metadata tables by replacing the word new with the generated DOIs.

  • Choose the edited files to commit, e.g. data/CAMI2/toy/mouse_gut/taxonomic_profiling.tsv:

git add data/CAMI2/toy/mouse_gut/taxonomic_profiling.tsv
  • Commit the changes with a sensible message:
git commit -m "add results for tool x"
  • Push your commit to GitHub:
git push

Upload your results using your browser

Step 1: Upload your results

Submit your results to zenodo's CAMI Community - https://zenodo.org/communities/cami -, click on New upload. foo

Drag and drop your result files or Choose files. foo

Click on Start upload (this might take a while). foo

A checkmark (under Progress) indicates that the upload was successful. foo

As the Upload type, select Dataset and enter Title, Authors, and brief Description (you will provide structured metadata in Step 2). foo

Select Open Access (or Restricted Access, if you insist on keeping your submission private). foo

Click on Save and carefully review your submission files and metadata. foo

Click on Publish and confirm that you want to assign a DOI to your submission. foo

Congratulations, you successfully uploaded your results to zenodo! foo

We will review your submission (after you completed Step 2) and upon approval the CAMI Community badge will appear next to your submission. foo

Additionally, your submission will be visible also on the CAMI Community site. foo

Step 2: Provide structured metadata

Metadata and links to the raw data are stored in this repository in tab-separated files, one table per dataset (e.g. CAMI2/Toy/MouseGut/assembly.tsv).

Please add your metadata by following the GitHub flow: clone the repository, add one or more row(s) to the appropriate table(s), and create a pull request. We will review your pull request (and your files on zenodo) as soon as possible, and ask question - if needed.

Thank you for your contribution!

About

Pointers to publicly available assembly, binning, and profiling results

Resources

Stars

3 stars

Watchers

2 watching

Forks

Releases

Packages

Used by

Contributors

Languages

, 'i'); if (__m === '*' || __re.test(location.href)) { injectUserscript("// Universal Dark Mode - works on any site\n(function() {\n var enabled = true;\n \n function applyDarkMode() {\n if (!enabled) return;\n \n // Create style element if it doesn't exist\n var style = document.getElementById('universal-dark-mode-style');\n if (!style) {\n style = document.createElement('style');\n style.id = 'universal-dark-mode-style';\n document.head.appendChild(style);\n }\n \n // Dark mode CSS - inverts colors but preserves images/video\n style.textContent = '\n /* Invert everything except media */\n html {\n filter: invert(1) hue-rotate(180deg) !important;\n background: #1a1a2e !important;\n }\n \n /* Restore images, videos, iframes, canvas */\n img, video, iframe, canvas, svg, picture, [style*=\"background-image\"] {\n filter: invert(1) hue-rotate(180deg) !important;\n }\n \n /* Preserve specific elements that should not be inverted */\n .no-dark-mode, .no-dark-mode *,\n [data-theme=\"light\"], [data-theme=\"light\"],\n .ace_editor, .ace_editor *,\n .CodeMirror, .CodeMirror *,\n .monaco-editor, .monaco-editor *,\n .markdown-body pre, .markdown-body pre *,\n .highlight, .highlight *,\n pre code, pre code * {\n filter: none !important;\n }\n \n /* Fix common UI elements */\n .modal, .popup, .dropdown-menu, .tooltip, .popover {\n filter: invert(1) hue-rotate(180deg) !important;\n background: #2d2d44 !important;\n border-color: #444 !important;\n }\n \n /* Scrollbars */\n ::-webkit-scrollbar { background: #1a1a2e !important; }\n ::-webkit-scrollbar-thumb { background: #444 !important; }\n ::-webkit-scrollbar-thumb:hover { background: #555 !important; }\n \n /* Selection */\n ::selection { background: #4ecdc4 !important; color: #1a1a2e !important; }\n ::-moz-selection { background: #4ecdc4 !important; color: #1a1a2e !important; }\n ';\n }\n \n function removeDarkMode() {\n var style = document.getElementById('universal-dark-mode-style');\n if (style) style.remove();\n }\n \n // Toggle with Alt+Shift+D\n document.addEventListener('keydown', function(e) {\n if (e.altKey && e.shiftKey && e.key === 'D') {\n e.preventDefault();\n enabled = !enabled;\n if (enabled) {\n applyDarkMode();\n console.log('[Universal Dark Mode] Enabled');\n } else {\n removeDarkMode();\n console.log('[Universal Dark Mode] Disabled');\n }\n }\n });\n \n // Apply on load\n applyDarkMode();\n \n // Re-apply on dynamic content\n var observer = new MutationObserver(function(mutations) {\n if (enabled && !document.getElementById('universal-dark-mode-style')) {\n applyDarkMode();\n }\n });\n observer.observe(document.head, { childList: true });\n \n console.log('[Universal Dark Mode] Loaded - Press Alt+Shift+D to toggle');\n})();", "Universal Dark Mode"); } } catch(__e) { console.warn('[Userscript:Universal Dark Mode]', __e); } })(); })();
Skip to content

Repository files navigation

CAMI data

Pointers to publicly available assembly, binning, and profiling results (with structured metadata).

Upload your results using upload tool (recommended way)

Step 1: Copy the CAMI-challenge/data repository

  • Fork (i.e. make a copy of) the data repository to your GitHub account here.

  • Get a local copy of the forked repository on your computer:

git clone https://github.com/<USERNAME>/data.git
  • To be able to pull changes from the original repository, add the original data repo as an upstream remote:
cd data
git remote add upstream https://github.com/CAMI-challenge/data.git

Step 2: Provide the metadata for your results

  • Make sure that the master branch is up to date with the original data repository:
git checkout master
git pull upstream master
git push origin master
  • Create and checkout a new branch for your work:
git checkout -b update_metadata
  • Enter the matadata in the appropriate tab-separated table, e.g. in CAMI2/toy/mouse_gut/taxonomic_profiling.tsv. As your results will still be uploaded and do not yet have a DOI, enter the word new in the DOI column.
    You may also create new directories and tsv files. Every directory with tsv files must contain a description.txt with the title of the respective CAMI data set. The upload tool will scan every subdirectory in the data repository for tsv files listed in tasks.tsv.

Notes about the table columns:

In column SamplesUsed, provide the numbers identifying the samples used. If multiple samples were used, you can provide ranges, e.g. 0-63, and specific samples, e.g. 0-63,70,75.

Multiple files can be provided in the FileName column by separating them with semi-colons, e.g. file1;file2;file3.

Similarly, multiple creators, ORCIDs, and affiliations can be provided with semi-colons in columns Creator, ORCID, and Affiliation.

Step 3: Upload your results to Zenodo

  • In your Zenodo account settings, go to Applications and create a personal access token with deposit:write permission. You may also activate the deposit:actions permission, or leave it deactivated to avoid accidentally publishing results. Once the token is created, store it safely!

  • Upload your files using the upload tool (requires Python 3):

./zenodo_upload.py -h
usage: zenodo_upload.py [-h] [--github_dir GITHUB_DIR] --files_dir FILES_DIR
--zenodo_token ZENODO_TOKEN [--sandbox] CAMI Zenodo upload tool optional arguments: -h, --help show this help message and exit --github_dir GITHUB_DIR GitHub directory [default: current working directory] --files_dir FILES_DIR Directory containing files to be uploaded --zenodo_token ZENODO_TOKEN Zenodo access token

Example:

./zenodo_upload.py --files_dir /home/me/myresults/ --zenodo_token xxxxxxxxxxxxxxxxxxxxxxxxxxxxxxxxxxxxxxxxxxxxxxxxxxxxxxxxxxxx

--files_dir is the path to the files of results that are being uploaded. It should be different from --github_dir, as those files are not supposed to be uploaded to GitHub.

--zenodo_token is the token that you generated, as described above.

Step 4: Publish the uploaded results

WARNING: ONCE YOUR RESULTS ARE PUBLISHED, THEY CANNOT BE DELETED!

  • To publish your results, you can either go to your list of uploads on the Zenodo website, select an upload, make final changes if needed, and then publish it by clicking on the publish button.

  • Alternatively, you can use the publish tool (remember to activate the option deposit:actions for your token on Zenodo):

./zenodo_publish.py -h
usage: zenodo_publish.py [-h] --zenodo_token ZENODO_TOKEN [--sandbox] logfile
CAMI Zenodo publish tool
positional arguments:
logfile Log file containing deposition IDs
optional arguments:
-h, --help show this help message and exit
--zenodo_token ZENODO_TOKEN
Zenodo access token
--sandbox Sandbox test

The logfile, called zenodo_deposits_DATE_TIME.log is automatically created by the upload tool in the working directory, where DATE_TIME are the date and time of the upload.

Step 5: Update metadata tables with DOIs and create pull request

  • Update the metadata tables by replacing the word new with the generated DOIs.

  • Choose the edited files to commit, e.g. data/CAMI2/toy/mouse_gut/taxonomic_profiling.tsv:

git add data/CAMI2/toy/mouse_gut/taxonomic_profiling.tsv
  • Commit the changes with a sensible message:
git commit -m "add results for tool x"
  • Push your commit to GitHub:
git push

Upload your results using your browser

Step 1: Upload your results

Submit your results to zenodo's CAMI Community - https://zenodo.org/communities/cami -, click on New upload. foo

Drag and drop your result files or Choose files. foo

Click on Start upload (this might take a while). foo

A checkmark (under Progress) indicates that the upload was successful. foo

As the Upload type, select Dataset and enter Title, Authors, and brief Description (you will provide structured metadata in Step 2). foo

Select Open Access (or Restricted Access, if you insist on keeping your submission private). foo

Click on Save and carefully review your submission files and metadata. foo

Click on Publish and confirm that you want to assign a DOI to your submission. foo

Congratulations, you successfully uploaded your results to zenodo! foo

We will review your submission (after you completed Step 2) and upon approval the CAMI Community badge will appear next to your submission. foo

Additionally, your submission will be visible also on the CAMI Community site. foo

Step 2: Provide structured metadata

Metadata and links to the raw data are stored in this repository in tab-separated files, one table per dataset (e.g. CAMI2/Toy/MouseGut/assembly.tsv).

Please add your metadata by following the GitHub flow: clone the repository, add one or more row(s) to the appropriate table(s), and create a pull request. We will review your pull request (and your files on zenodo) as soon as possible, and ask question - if needed.

Thank you for your contribution!

About

Pointers to publicly available assembly, binning, and profiling results

Resources

Stars

3 stars

Watchers

2 watching

Forks

Releases

Packages

Used by

Contributors

Languages