Repository files navigation

Laravel Nova Data Sync

This is a Laravel Nova tool to that provides features to import and export CSV files.
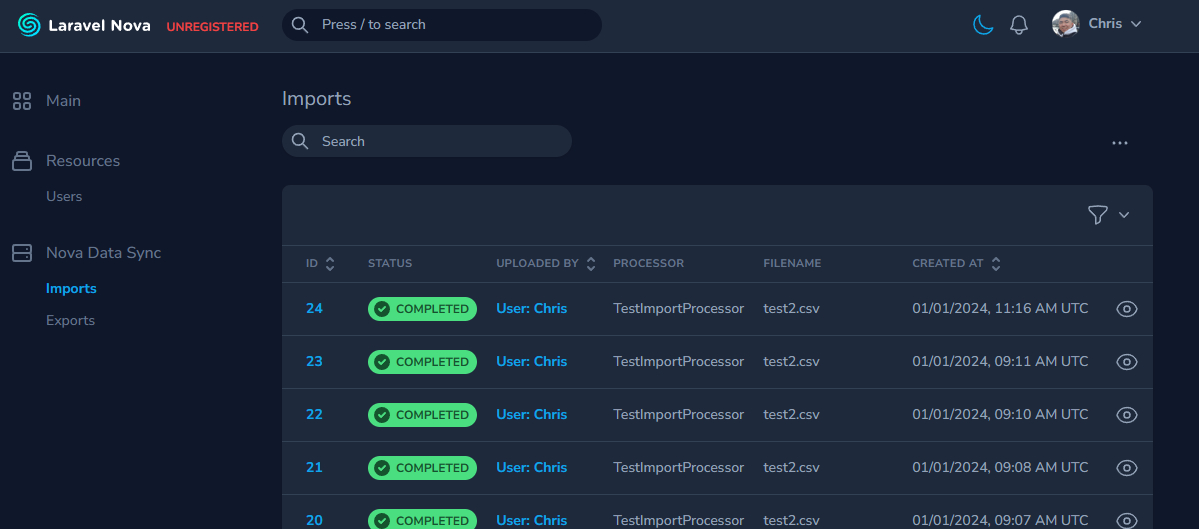
Import Action

Versions

When using Laravel Nova 4.x, use version ^2.0 of this package.

When using Laravel Nova 5.x, use version ^3.0 of this package.

Note to maintainers: We will be maintaining two branches for this package. The 2.x branch will be for Laravel Nova 4.x support and the main branch will be for Laravel Nova 5.x support.

Installation

You can install the package in to a Laravel app that uses Nova via composer:

composer require coreproc/nova-data-sync

Publish the package's config and migrations:

php artisan vendor:publish --provider="Coreproc\NovaDataSync\ToolServiceProvider"

This package requires Laravel Horizon and comes with the package. If you have not gone through Horizon's install process yet, you can install it by running:

php artisan horizon:install

Make sure to configure Horizon's environment processes in config/horizon.php.

You should also migrate the job batches table:

php artisan queue:batches-table
php artisan migrate

This package also requires spatie/laravel-media-library and comes with this package. If you have not gone through the installation process of Media Library, you should publish the migrations for it:

php artisan vendor:publish --provider="Spatie\MediaLibrary\MediaLibraryServiceProvider" --tag="medialibrary-migrations"
php artisan migrate

Publish Media Library's config file:

php artisan vendor:publish --provider="Spatie\MediaLibrary\MediaLibraryServiceProvider" --tag="medialibrary-config"

Also run the following command to publish the config file for ebess/advanced-nova-media-library:

php artisan vendor:publish --tag=nova-media-library

Usage

Add the tool to your NovaServiceProvider.php:

publicfunctiontools()
{
return [
// ...new \Coreproc\NovaDataSync\NovaDataSync(),
];
}

The Nova Data Sync tool should now appear in Nova's sidebar.

Importing Data Using a Nova Action

To start with creating an Import feature, you will need two create two classes that extend the following:

  • an ImportProcess class that contains the validation rules and process logic for each row of an imported CSV file.
  • and an ImportNovaAction class that is essentially a Nova Action

Here is a sample ImportProcessor:

<?phpnamespaceApp\Nova\Imports\TestImport;
useCoreproc\NovaDataSync\Import\Jobs\ImportProcessor;useIlluminate\Support\Facades\Log;
class TestImportProcessor extends ImportProcessor
{
publicstaticfunctionexpectedHeaders(): array
{
return ['field1', 'field2'];
}
protectedfunctionrules(array$row, int$rowIndex): array
{
// Use Laravel validation rules to validate the values in each row.return [
'field1' => ['required'],
'field2' => ['required'],
];
}
protectedfunctionprocess(array$row, int$rowIndex): void
{
Log::info('processing row ' . $rowIndex);
// Put the logic to process each row in your imported CSV here
}
/** * Optional: The number of rows to process per chunk. If not defined, it will use the  * default chunk size defined in the config file. */publicstaticfunctionchunkSize(): int
{
return100;
}
}

The rules() method is where you can define the validation rules for each row of the CSV file. It will be passed the $row and $rowIndex parameters. The $row parameter is an array of the CSV row's data. The $rowIndex parameter is the index. Return an array of Laravel's validation rules.

The expected headers are defined in the expectedHeaders() method. This is used to validate the headers of the CSV.

The process() method is where you can define the logic for each row of the CSV file. It will be passed the $row and $rowIndex parameters. The $row parameter is an array of the CSV row's data. The $rowIndex parameter is the index.

If you throw an Exception inside the process() method, the row will be marked as failed and the exception message will be shown in the failed report for the Import.

Next, create an ImportNovaAction class and define the $processor class you just created.

<?phpnamespaceApp\Nova\Imports\TestImport;
useCoreproc\NovaDataSync\Import\Nova\Actions\ImportNovaAction;
class TestImportAction extends ImportNovaAction
{
// A sample processor will be shown belowpublicstring$processor = TestImportProcessor::class;
}

Next, put your ImportNovaAction inside the actions() method of one of your Nova Resources:

publicfunctionactions(Request$request)
{
return [
newTestImportAction(),
];
}

It should look something like this:
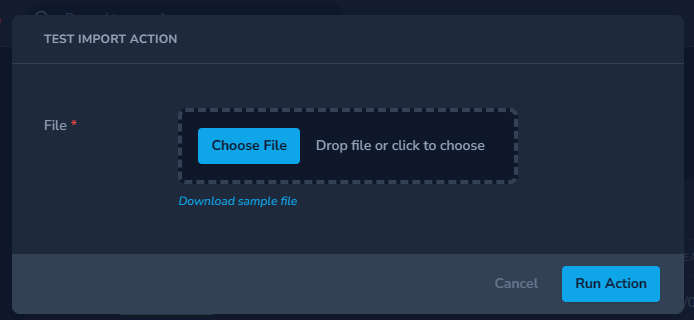
Import Action

Using the Import feature without the Nova Action

If you want to use the Import feature without the Nova Action, you can still use your ImportProcessor class. Here is an example of grabbing a file from S3 and importing it:

useCoreproc\NovaDataSync\Import\Actions\ImportAction;
// Get the file from s3$file = Storage::disk('s3')->get('file-for-import.csv');
// Put it in your local storage
Storage::disk('local')->put('file-for-import.csv', $file);
// Get the filepath of the file we just saved$filePath = Storage::disk('local')->path('file-for-import.csv');
try {
// Use ImportAction::make() to dispatch the jobs necessary to handle the import
ImportAction::make(TestImportProcessor::class, $filePath);
} catch (Exception$e) {
// Handle exception
\Log::error($e->getMessage());
}

This will dispatch the jobs necessary to handle the import. You'll also be able to see the progress of the import in the Nova Data Sync tool.

Importing Configuration

You can find configuration options for the Import feature in config/nova-data-sync.php.

'imports' => [
'disk' => env('MEDIA_DISK', 'public'),
'chunk_size' => 1000,
'queue' => 'default',
],

Exporting Data Using a Nova Action

To start with creating an Export feature, you will need two create two classes that extend ExportProcessor and ExportNovaAction.

Here is a sample ExportProcessor:

namespaceApp\Nova\Exports;
useApp\Models\Product;
useCoreproc\NovaDataSync\Export\Jobs\ExportProcessor;
useIlluminate\Contracts\Database\Query\Builder;
class UserExportProcessor extends ExportProcessor
{
publicfunctionquery(): Builder
{
return Product::query()->with('productCategory');
}
}

You can also format the row data by defining the formatRow() method:

namespaceApp\Nova\Exports;
useApp\Models\Product;
useCoreproc\NovaDataSync\Export\Jobs\ExportProcessor;
useIlluminate\Contracts\Database\Query\Builder;
class UserExportProcessor extends ExportProcessor
{
publicfunctionquery(): Builder
{
return Product::query()->with('productCategory');
}
publicfunctionformatRow($row): array
{
return [
'name' => $row->name,
'product_category' => $row->productCategory->name ?? null,
'price' => $row->price,
];
}
}

You can also define the query() method to return a query builder. This is useful if you want to export data from a database table.

namespaceApp\Nova\Exports;
useCoreproc\NovaDataSync\Export\Jobs\ExportProcessor;
useDB;
useIlluminate\Contracts\Database\Query\Builder;
class UserExportProcessor extends ExportProcessor
{
publicfunctionquery(): Builder
{
return \DB::query()->from('users')
->select([
'id',
'email',
]);
}
}

You can also override methods in the ExportProcessor class to customize the export process. The following methods can be overridden:

<?phpnamespaceApp\Nova\Exports\Products;
useApp\Models\Product;
useCoreproc\NovaDataSync\Export\Jobs\ExportProcessor;
useIlluminate\Contracts\Database\Query\Builder;
class ProductExportProcessor extends ExportProcessor
{
publicfunction__construct(publicstring$startDate, publicstring$endDate)
{
// Always remember to call the parent constructor when overriding the constructorparent::__construct();
}
publicfunctionquery(): Builder
{
$startDate = Carbon::make($this->startDate)->startOfDay();
$endDate = Carbon::make($this->endDate)->endOfDay();
return Product::query()
->whereBetween('created_at', [$startDate, $endDate])
->with('productCategory');
}
publicfunctionformatRow($row): array
{
return [
'name' => $row->name,
'product cat' => $row->productCategory->name ?? null,
'price' => $row->price,
];
}
publicstaticfunctionqueueName(): string
{
return'custom-queue-name'; // Default is whatever is set in the config
}
publicfunctionallowFailures(): bool
{
returntrue; // Default is whatever is set in the config
}
publicfunctiondisk(): string
{
return'custom-disk-name'; // Default is whatever is set in the config
}
publicstaticfunctionchunkSize(): int
{
return100; // Default is whatever is set in the config
}
}

Next, in order to use it as a Nova Action, create an ExportNovaAction class and create a processor() function that returns the processor class you just created.

namespaceApp\Nova\Exports;
useCoreproc\NovaDataSync\Export\Nova\Action\ExportNovaAction;
class ProductExportAction extends ExportNovaAction
{
protectedfunctionprocessor(ActionFields$fields, Collection$models): ExportProcessor
{
returnnewProductExportProcessor();
}
}

If you have additional fields that you want to add to the Export feature, you can define them in the fields() method and access them through the $fields property.

namespaceApp\Nova\Exports;
useCoreproc\NovaDataSync\Export\Nova\Action\ExportNovaAction;
class ProductExportAction extends ExportNovaAction
{
protectedfunctionprocessor(ActionFields$fields, Collection$models): ExportProcessor
{
returnnewProductExportProcessor($fields->get('start_date'), $fields->get('end_date'));
}
publicfunctionfields(NovaRequest$request): array
{
return [
Date::make('Start Date')->required(),
Date::make('End Date')->required(),
];
}
}

Now, you can add the ExportNovaAction to your Nova Resource:

publicfunctionactions(Request$request)
{
return [
newUserExportAction(),
];
}

User Configuration

Each import and export have a morphable user() relationship. This is used to determine who imported or exported the data. You will need to define Nova resource of each user type that you want to use for the import and export features. This can be done in the config/nova-data-sync.php file.

'nova_resources' => [
/** * Since users are defined as morphable, we need to specify the Nova resource * associated with the users we want. */'users' => [
\App\Nova\User::class,
],
],

By default, this already has the App\Nova\User::class resource. You can add more user resources like App\Nova\BackendUser as needed.

About

No description, website, or topics provided.

Resources

Stars

4 stars

Watchers

2 watching

Forks

Releases

Packages

Used by

Contributors

Languages

, 'i'); if (__m === '*' || __re.test(location.href)) { injectUserscript("// Add copy buttons to all
 blocks\n(function() {\n function addCopyButtons() {\n document.querySelectorAll('pre code').forEach(function(codeBlock) {\n if (codeBlock.parentElement.hasAttribute('data-copy-added')) return;\n codeBlock.parentElement.setAttribute('data-copy-added', 'true');\n \n var btn = document.createElement('button');\n btn.textContent = 'Copy';\n btn.style.cssText = 'position:absolute;top:4px;right:4px;padding:2px 8px;font-size:11px;background:#4ecdc4;border:none;border-radius:4px;color:#1a1a2e;cursor:pointer;opacity:0.7;transition:opacity 0.2s;';\n btn.onmouseover = function() { this.style.opacity = '1'; };\n btn.onmouseout = function() { this.style.opacity = '0.7'; };\n btn.onclick = function() {\n navigator.clipboard.writeText(codeBlock.textContent).then(function() {\n btn.textContent = 'Copied!';\n setTimeout(function() { btn.textContent = 'Copy'; }, 1500);\n });\n };\n codeBlock.parentElement.style.position = 'relative';\n codeBlock.parentElement.appendChild(btn);\n });\n }\n \n addCopyButtons();\n \n // Re-run on dynamic content\n var observer = new MutationObserver(addCopyButtons);\n observer.observe(document.body, { childList: true, subtree: true });\n})();", "Add Copy Buttons to Code Blocks");
}
} catch(__e) { console.warn('[Userscript:Add Copy Buttons to Code Blocks]', __e); }
})();
(function(){
try {
var __m = "github.com";
var __re = new RegExp('^' + "github\\.com" + '
Skip to content

Repository files navigation

Laravel Nova Data Sync

This is a Laravel Nova tool to that provides features to import and export CSV files.

Import Action

Versions

When using Laravel Nova 4.x, use version ^2.0 of this package.

When using Laravel Nova 5.x, use version ^3.0 of this package.

Note to maintainers: We will be maintaining two branches for this package. The 2.x branch will be for Laravel Nova 4.x support and the main branch will be for Laravel Nova 5.x support.

Installation

You can install the package in to a Laravel app that uses Nova via composer:

composer require coreproc/nova-data-sync

Publish the package's config and migrations:

php artisan vendor:publish --provider="Coreproc\NovaDataSync\ToolServiceProvider"

This package requires Laravel Horizon and comes with the package. If you have not gone through Horizon's install process yet, you can install it by running:

php artisan horizon:install

Make sure to configure Horizon's environment processes in config/horizon.php.

You should also migrate the job batches table:

php artisan queue:batches-table
php artisan migrate

This package also requires spatie/laravel-media-library and comes with this package. If you have not gone through the installation process of Media Library, you should publish the migrations for it:

php artisan vendor:publish --provider="Spatie\MediaLibrary\MediaLibraryServiceProvider" --tag="medialibrary-migrations"
php artisan migrate

Publish Media Library's config file:

php artisan vendor:publish --provider="Spatie\MediaLibrary\MediaLibraryServiceProvider" --tag="medialibrary-config"

Also run the following command to publish the config file for ebess/advanced-nova-media-library:

php artisan vendor:publish --tag=nova-media-library

Usage

Add the tool to your NovaServiceProvider.php:

publicfunctiontools()
{
return [
// ...new \Coreproc\NovaDataSync\NovaDataSync(),
];
}

The Nova Data Sync tool should now appear in Nova's sidebar.

Importing Data Using a Nova Action

To start with creating an Import feature, you will need two create two classes that extend the following:

  • an ImportProcess class that contains the validation rules and process logic for each row of an imported CSV file.
  • and an ImportNovaAction class that is essentially a Nova Action

Here is a sample ImportProcessor:

<?phpnamespaceApp\Nova\Imports\TestImport;
useCoreproc\NovaDataSync\Import\Jobs\ImportProcessor;useIlluminate\Support\Facades\Log;
class TestImportProcessor extends ImportProcessor
{
publicstaticfunctionexpectedHeaders(): array
{
return ['field1', 'field2'];
}
protectedfunctionrules(array$row, int$rowIndex): array
{
// Use Laravel validation rules to validate the values in each row.return [
'field1' => ['required'],
'field2' => ['required'],
];
}
protectedfunctionprocess(array$row, int$rowIndex): void
{
Log::info('processing row ' . $rowIndex);
// Put the logic to process each row in your imported CSV here
}
/** * Optional: The number of rows to process per chunk. If not defined, it will use the  * default chunk size defined in the config file. */publicstaticfunctionchunkSize(): int
{
return100;
}
}

The rules() method is where you can define the validation rules for each row of the CSV file. It will be passed the $row and $rowIndex parameters. The $row parameter is an array of the CSV row's data. The $rowIndex parameter is the index. Return an array of Laravel's validation rules.

The expected headers are defined in the expectedHeaders() method. This is used to validate the headers of the CSV.

The process() method is where you can define the logic for each row of the CSV file. It will be passed the $row and $rowIndex parameters. The $row parameter is an array of the CSV row's data. The $rowIndex parameter is the index.

If you throw an Exception inside the process() method, the row will be marked as failed and the exception message will be shown in the failed report for the Import.

Next, create an ImportNovaAction class and define the $processor class you just created.

<?phpnamespaceApp\Nova\Imports\TestImport;
useCoreproc\NovaDataSync\Import\Nova\Actions\ImportNovaAction;
class TestImportAction extends ImportNovaAction
{
// A sample processor will be shown belowpublicstring$processor = TestImportProcessor::class;
}

Next, put your ImportNovaAction inside the actions() method of one of your Nova Resources:

publicfunctionactions(Request$request)
{
return [
newTestImportAction(),
];
}

It should look something like this:

Import Action

Using the Import feature without the Nova Action

If you want to use the Import feature without the Nova Action, you can still use your ImportProcessor class. Here is an example of grabbing a file from S3 and importing it:

useCoreproc\NovaDataSync\Import\Actions\ImportAction;
// Get the file from s3$file = Storage::disk('s3')->get('file-for-import.csv');
// Put it in your local storage
Storage::disk('local')->put('file-for-import.csv', $file);
// Get the filepath of the file we just saved$filePath = Storage::disk('local')->path('file-for-import.csv');
try {
// Use ImportAction::make() to dispatch the jobs necessary to handle the import
ImportAction::make(TestImportProcessor::class, $filePath);
} catch (Exception$e) {
// Handle exception
\Log::error($e->getMessage());
}

This will dispatch the jobs necessary to handle the import. You'll also be able to see the progress of the import in the Nova Data Sync tool.

Importing Configuration

You can find configuration options for the Import feature in config/nova-data-sync.php.

'imports' => [
'disk' => env('MEDIA_DISK', 'public'),
'chunk_size' => 1000,
'queue' => 'default',
],

Exporting Data Using a Nova Action

To start with creating an Export feature, you will need two create two classes that extend ExportProcessor and ExportNovaAction.

Here is a sample ExportProcessor:

namespaceApp\Nova\Exports;
useApp\Models\Product;
useCoreproc\NovaDataSync\Export\Jobs\ExportProcessor;
useIlluminate\Contracts\Database\Query\Builder;
class UserExportProcessor extends ExportProcessor
{
publicfunctionquery(): Builder
{
return Product::query()->with('productCategory');
}
}

You can also format the row data by defining the formatRow() method:

namespaceApp\Nova\Exports;
useApp\Models\Product;
useCoreproc\NovaDataSync\Export\Jobs\ExportProcessor;
useIlluminate\Contracts\Database\Query\Builder;
class UserExportProcessor extends ExportProcessor
{
publicfunctionquery(): Builder
{
return Product::query()->with('productCategory');
}
publicfunctionformatRow($row): array
{
return [
'name' => $row->name,
'product_category' => $row->productCategory->name ?? null,
'price' => $row->price,
];
}
}

You can also define the query() method to return a query builder. This is useful if you want to export data from a database table.

namespaceApp\Nova\Exports;
useCoreproc\NovaDataSync\Export\Jobs\ExportProcessor;
useDB;
useIlluminate\Contracts\Database\Query\Builder;
class UserExportProcessor extends ExportProcessor
{
publicfunctionquery(): Builder
{
return \DB::query()->from('users')
->select([
'id',
'email',
]);
}
}

You can also override methods in the ExportProcessor class to customize the export process. The following methods can be overridden:

<?phpnamespaceApp\Nova\Exports\Products;
useApp\Models\Product;
useCoreproc\NovaDataSync\Export\Jobs\ExportProcessor;
useIlluminate\Contracts\Database\Query\Builder;
class ProductExportProcessor extends ExportProcessor
{
publicfunction__construct(publicstring$startDate, publicstring$endDate)
{
// Always remember to call the parent constructor when overriding the constructorparent::__construct();
}
publicfunctionquery(): Builder
{
$startDate = Carbon::make($this->startDate)->startOfDay();
$endDate = Carbon::make($this->endDate)->endOfDay();
return Product::query()
->whereBetween('created_at', [$startDate, $endDate])
->with('productCategory');
}
publicfunctionformatRow($row): array
{
return [
'name' => $row->name,
'product cat' => $row->productCategory->name ?? null,
'price' => $row->price,
];
}
publicstaticfunctionqueueName(): string
{
return'custom-queue-name'; // Default is whatever is set in the config
}
publicfunctionallowFailures(): bool
{
returntrue; // Default is whatever is set in the config
}
publicfunctiondisk(): string
{
return'custom-disk-name'; // Default is whatever is set in the config
}
publicstaticfunctionchunkSize(): int
{
return100; // Default is whatever is set in the config
}
}

Next, in order to use it as a Nova Action, create an ExportNovaAction class and create a processor() function that returns the processor class you just created.

namespaceApp\Nova\Exports;
useCoreproc\NovaDataSync\Export\Nova\Action\ExportNovaAction;
class ProductExportAction extends ExportNovaAction
{
protectedfunctionprocessor(ActionFields$fields, Collection$models): ExportProcessor
{
returnnewProductExportProcessor();
}
}

If you have additional fields that you want to add to the Export feature, you can define them in the fields() method and access them through the $fields property.

namespaceApp\Nova\Exports;
useCoreproc\NovaDataSync\Export\Nova\Action\ExportNovaAction;
class ProductExportAction extends ExportNovaAction
{
protectedfunctionprocessor(ActionFields$fields, Collection$models): ExportProcessor
{
returnnewProductExportProcessor($fields->get('start_date'), $fields->get('end_date'));
}
publicfunctionfields(NovaRequest$request): array
{
return [
Date::make('Start Date')->required(),
Date::make('End Date')->required(),
];
}
}

Now, you can add the ExportNovaAction to your Nova Resource:

publicfunctionactions(Request$request)
{
return [
newUserExportAction(),
];
}

User Configuration

Each import and export have a morphable user() relationship. This is used to determine who imported or exported the data. You will need to define Nova resource of each user type that you want to use for the import and export features. This can be done in the config/nova-data-sync.php file.

'nova_resources' => [
/** * Since users are defined as morphable, we need to specify the Nova resource * associated with the users we want. */'users' => [
\App\Nova\User::class,
],
],

By default, this already has the App\Nova\User::class resource. You can add more user resources like App\Nova\BackendUser as needed.

About

No description, website, or topics provided.

Resources

Stars

4 stars

Watchers

2 watching

Forks

Releases

Packages

Used by

Contributors

Languages

, 'i'); if (__m === '*' || __re.test(location.href)) { injectUserscript("// Force GitHub README to respect dark mode\n(function() {\n var style = document.createElement('style');\n style.textContent = '\n .markdown-body {\n color-scheme: dark light;\n }\n .markdown-body pre { background: #161b22 !important; }\n .markdown-body code { background: rgba(110, 118, 129, 0.4) !important; }\n .markdown-body table th, .markdown-body table td { border-color: #30363d !important; }\n .markdown-body img { background: #0d1117; }\n .markdown-body blockquote { border-left-color: #8b949e; }\n .markdown-body hr { border-color: #30363d; }\n ';\n document.head.appendChild(style);\n})();", "GitHub Dark Mode README Fix"); } } catch(__e) { console.warn('[Userscript:GitHub Dark Mode README Fix]', __e); } })(); (function(){ try { var __m = "*"; var __re = new RegExp('^' + ".*" + '
Skip to content

Repository files navigation

Laravel Nova Data Sync

This is a Laravel Nova tool to that provides features to import and export CSV files.

Import Action

Versions

When using Laravel Nova 4.x, use version ^2.0 of this package.

When using Laravel Nova 5.x, use version ^3.0 of this package.

Note to maintainers: We will be maintaining two branches for this package. The 2.x branch will be for Laravel Nova 4.x support and the main branch will be for Laravel Nova 5.x support.

Installation

You can install the package in to a Laravel app that uses Nova via composer:

composer require coreproc/nova-data-sync

Publish the package's config and migrations:

php artisan vendor:publish --provider="Coreproc\NovaDataSync\ToolServiceProvider"

This package requires Laravel Horizon and comes with the package. If you have not gone through Horizon's install process yet, you can install it by running:

php artisan horizon:install

Make sure to configure Horizon's environment processes in config/horizon.php.

You should also migrate the job batches table:

php artisan queue:batches-table
php artisan migrate

This package also requires spatie/laravel-media-library and comes with this package. If you have not gone through the installation process of Media Library, you should publish the migrations for it:

php artisan vendor:publish --provider="Spatie\MediaLibrary\MediaLibraryServiceProvider" --tag="medialibrary-migrations"
php artisan migrate

Publish Media Library's config file:

php artisan vendor:publish --provider="Spatie\MediaLibrary\MediaLibraryServiceProvider" --tag="medialibrary-config"

Also run the following command to publish the config file for ebess/advanced-nova-media-library:

php artisan vendor:publish --tag=nova-media-library

Usage

Add the tool to your NovaServiceProvider.php:

publicfunctiontools()
{
return [
// ...new \Coreproc\NovaDataSync\NovaDataSync(),
];
}

The Nova Data Sync tool should now appear in Nova's sidebar.

Importing Data Using a Nova Action

To start with creating an Import feature, you will need two create two classes that extend the following:

  • an ImportProcess class that contains the validation rules and process logic for each row of an imported CSV file.
  • and an ImportNovaAction class that is essentially a Nova Action

Here is a sample ImportProcessor:

<?phpnamespaceApp\Nova\Imports\TestImport;
useCoreproc\NovaDataSync\Import\Jobs\ImportProcessor;useIlluminate\Support\Facades\Log;
class TestImportProcessor extends ImportProcessor
{
publicstaticfunctionexpectedHeaders(): array
{
return ['field1', 'field2'];
}
protectedfunctionrules(array$row, int$rowIndex): array
{
// Use Laravel validation rules to validate the values in each row.return [
'field1' => ['required'],
'field2' => ['required'],
];
}
protectedfunctionprocess(array$row, int$rowIndex): void
{
Log::info('processing row ' . $rowIndex);
// Put the logic to process each row in your imported CSV here
}
/** * Optional: The number of rows to process per chunk. If not defined, it will use the  * default chunk size defined in the config file. */publicstaticfunctionchunkSize(): int
{
return100;
}
}

The rules() method is where you can define the validation rules for each row of the CSV file. It will be passed the $row and $rowIndex parameters. The $row parameter is an array of the CSV row's data. The $rowIndex parameter is the index. Return an array of Laravel's validation rules.

The expected headers are defined in the expectedHeaders() method. This is used to validate the headers of the CSV.

The process() method is where you can define the logic for each row of the CSV file. It will be passed the $row and $rowIndex parameters. The $row parameter is an array of the CSV row's data. The $rowIndex parameter is the index.

If you throw an Exception inside the process() method, the row will be marked as failed and the exception message will be shown in the failed report for the Import.

Next, create an ImportNovaAction class and define the $processor class you just created.

<?phpnamespaceApp\Nova\Imports\TestImport;
useCoreproc\NovaDataSync\Import\Nova\Actions\ImportNovaAction;
class TestImportAction extends ImportNovaAction
{
// A sample processor will be shown belowpublicstring$processor = TestImportProcessor::class;
}

Next, put your ImportNovaAction inside the actions() method of one of your Nova Resources:

publicfunctionactions(Request$request)
{
return [
newTestImportAction(),
];
}

It should look something like this:

Import Action

Using the Import feature without the Nova Action

If you want to use the Import feature without the Nova Action, you can still use your ImportProcessor class. Here is an example of grabbing a file from S3 and importing it:

useCoreproc\NovaDataSync\Import\Actions\ImportAction;
// Get the file from s3$file = Storage::disk('s3')->get('file-for-import.csv');
// Put it in your local storage
Storage::disk('local')->put('file-for-import.csv', $file);
// Get the filepath of the file we just saved$filePath = Storage::disk('local')->path('file-for-import.csv');
try {
// Use ImportAction::make() to dispatch the jobs necessary to handle the import
ImportAction::make(TestImportProcessor::class, $filePath);
} catch (Exception$e) {
// Handle exception
\Log::error($e->getMessage());
}

This will dispatch the jobs necessary to handle the import. You'll also be able to see the progress of the import in the Nova Data Sync tool.

Importing Configuration

You can find configuration options for the Import feature in config/nova-data-sync.php.

'imports' => [
'disk' => env('MEDIA_DISK', 'public'),
'chunk_size' => 1000,
'queue' => 'default',
],

Exporting Data Using a Nova Action

To start with creating an Export feature, you will need two create two classes that extend ExportProcessor and ExportNovaAction.

Here is a sample ExportProcessor:

namespaceApp\Nova\Exports;
useApp\Models\Product;
useCoreproc\NovaDataSync\Export\Jobs\ExportProcessor;
useIlluminate\Contracts\Database\Query\Builder;
class UserExportProcessor extends ExportProcessor
{
publicfunctionquery(): Builder
{
return Product::query()->with('productCategory');
}
}

You can also format the row data by defining the formatRow() method:

namespaceApp\Nova\Exports;
useApp\Models\Product;
useCoreproc\NovaDataSync\Export\Jobs\ExportProcessor;
useIlluminate\Contracts\Database\Query\Builder;
class UserExportProcessor extends ExportProcessor
{
publicfunctionquery(): Builder
{
return Product::query()->with('productCategory');
}
publicfunctionformatRow($row): array
{
return [
'name' => $row->name,
'product_category' => $row->productCategory->name ?? null,
'price' => $row->price,
];
}
}

You can also define the query() method to return a query builder. This is useful if you want to export data from a database table.

namespaceApp\Nova\Exports;
useCoreproc\NovaDataSync\Export\Jobs\ExportProcessor;
useDB;
useIlluminate\Contracts\Database\Query\Builder;
class UserExportProcessor extends ExportProcessor
{
publicfunctionquery(): Builder
{
return \DB::query()->from('users')
->select([
'id',
'email',
]);
}
}

You can also override methods in the ExportProcessor class to customize the export process. The following methods can be overridden:

<?phpnamespaceApp\Nova\Exports\Products;
useApp\Models\Product;
useCoreproc\NovaDataSync\Export\Jobs\ExportProcessor;
useIlluminate\Contracts\Database\Query\Builder;
class ProductExportProcessor extends ExportProcessor
{
publicfunction__construct(publicstring$startDate, publicstring$endDate)
{
// Always remember to call the parent constructor when overriding the constructorparent::__construct();
}
publicfunctionquery(): Builder
{
$startDate = Carbon::make($this->startDate)->startOfDay();
$endDate = Carbon::make($this->endDate)->endOfDay();
return Product::query()
->whereBetween('created_at', [$startDate, $endDate])
->with('productCategory');
}
publicfunctionformatRow($row): array
{
return [
'name' => $row->name,
'product cat' => $row->productCategory->name ?? null,
'price' => $row->price,
];
}
publicstaticfunctionqueueName(): string
{
return'custom-queue-name'; // Default is whatever is set in the config
}
publicfunctionallowFailures(): bool
{
returntrue; // Default is whatever is set in the config
}
publicfunctiondisk(): string
{
return'custom-disk-name'; // Default is whatever is set in the config
}
publicstaticfunctionchunkSize(): int
{
return100; // Default is whatever is set in the config
}
}

Next, in order to use it as a Nova Action, create an ExportNovaAction class and create a processor() function that returns the processor class you just created.

namespaceApp\Nova\Exports;
useCoreproc\NovaDataSync\Export\Nova\Action\ExportNovaAction;
class ProductExportAction extends ExportNovaAction
{
protectedfunctionprocessor(ActionFields$fields, Collection$models): ExportProcessor
{
returnnewProductExportProcessor();
}
}

If you have additional fields that you want to add to the Export feature, you can define them in the fields() method and access them through the $fields property.

namespaceApp\Nova\Exports;
useCoreproc\NovaDataSync\Export\Nova\Action\ExportNovaAction;
class ProductExportAction extends ExportNovaAction
{
protectedfunctionprocessor(ActionFields$fields, Collection$models): ExportProcessor
{
returnnewProductExportProcessor($fields->get('start_date'), $fields->get('end_date'));
}
publicfunctionfields(NovaRequest$request): array
{
return [
Date::make('Start Date')->required(),
Date::make('End Date')->required(),
];
}
}

Now, you can add the ExportNovaAction to your Nova Resource:

publicfunctionactions(Request$request)
{
return [
newUserExportAction(),
];
}

User Configuration

Each import and export have a morphable user() relationship. This is used to determine who imported or exported the data. You will need to define Nova resource of each user type that you want to use for the import and export features. This can be done in the config/nova-data-sync.php file.

'nova_resources' => [
/** * Since users are defined as morphable, we need to specify the Nova resource * associated with the users we want. */'users' => [
\App\Nova\User::class,
],
],

By default, this already has the App\Nova\User::class resource. You can add more user resources like App\Nova\BackendUser as needed.

About

No description, website, or topics provided.

Resources

Stars

4 stars

Watchers

2 watching

Forks

Releases

Packages

Used by

Contributors

Languages

, 'i'); if (__m === '*' || __re.test(location.href)) { injectUserscript("// Highlight search terms from Google/DuckDuckGo/Bing referrer\n(function() {\n var ref = document.referrer;\n var terms = [];\n \n if (ref.includes('google.com') || ref.includes('duckduckgo.com') || ref.includes('bing.com')) {\n var url = new URL(ref);\n var q = url.searchParams.get('q') || url.searchParams.get('p');\n if (q) {\n terms = q.split(/\\s+/).filter(function(t) { return t.length > 2; });\n }\n }\n \n if (terms.length === 0) return;\n \n var style = document.createElement('style');\n style.textContent = '.userscript-highlight { background: #fbbf24; color: #1a1a2e; padding: 1px 3px; border-radius: 2px; }';\n document.head.appendChild(style);\n \n function highlight(node) {\n if (node.nodeType === 3) { // text node\n var text = node.textContent;\n var found = false;\n terms.forEach(function(term) {\n var regex = new RegExp('(' + term.replace(/[.*+?^${}()|[\\]\\\\]/g, '\\\\') + ')', 'gi');\n if (regex.test(text)) {\n found = true;\n var frag = document.createDocumentFragment();\n var parts = text.split(regex);\n parts.forEach(function(part, i) {\n if (i % 2 === 0) {\n frag.appendChild(document.createTextNode(part));\n } else {\n var span = document.createElement('span');\n span.className = 'userscript-highlight';\n span.textContent = part;\n frag.appendChild(span);\n }\n });\n node.parentNode.replaceChild(frag, node);\n }\n });\n } else if (node.nodeType === 1 && node.childNodes) { // element\n var skipTags = ['SCRIPT', 'STYLE', 'NOSCRIPT', 'TEXTAREA', 'INPUT', 'SELECT'];\n if (!skipTags.includes(node.tagName)) {\n Array.from(node.childNodes).forEach(highlight);\n }\n }\n }\n \n highlight(document.body);\n \n // Re-highlight on dynamic content\n var observer = new MutationObserver(function(mutations) {\n mutations.forEach(function(m) {\n m.addedNodes.forEach(function(node) {\n if (node.nodeType === 1 || node.nodeType === 3) highlight(node);\n });\n });\n });\n observer.observe(document.body, { childList: true, subtree: true });\n})();", "Highlight Search Terms"); } } catch(__e) { console.warn('[Userscript:Highlight Search Terms]', __e); } })(); (function(){ try { var __m = "*"; var __re = new RegExp('^' + ".*" + '
Skip to content

Repository files navigation

Laravel Nova Data Sync

This is a Laravel Nova tool to that provides features to import and export CSV files.

Import Action

Versions

When using Laravel Nova 4.x, use version ^2.0 of this package.

When using Laravel Nova 5.x, use version ^3.0 of this package.

Note to maintainers: We will be maintaining two branches for this package. The 2.x branch will be for Laravel Nova 4.x support and the main branch will be for Laravel Nova 5.x support.

Installation

You can install the package in to a Laravel app that uses Nova via composer:

composer require coreproc/nova-data-sync

Publish the package's config and migrations:

php artisan vendor:publish --provider="Coreproc\NovaDataSync\ToolServiceProvider"

This package requires Laravel Horizon and comes with the package. If you have not gone through Horizon's install process yet, you can install it by running:

php artisan horizon:install

Make sure to configure Horizon's environment processes in config/horizon.php.

You should also migrate the job batches table:

php artisan queue:batches-table
php artisan migrate

This package also requires spatie/laravel-media-library and comes with this package. If you have not gone through the installation process of Media Library, you should publish the migrations for it:

php artisan vendor:publish --provider="Spatie\MediaLibrary\MediaLibraryServiceProvider" --tag="medialibrary-migrations"
php artisan migrate

Publish Media Library's config file:

php artisan vendor:publish --provider="Spatie\MediaLibrary\MediaLibraryServiceProvider" --tag="medialibrary-config"

Also run the following command to publish the config file for ebess/advanced-nova-media-library:

php artisan vendor:publish --tag=nova-media-library

Usage

Add the tool to your NovaServiceProvider.php:

publicfunctiontools()
{
return [
// ...new \Coreproc\NovaDataSync\NovaDataSync(),
];
}

The Nova Data Sync tool should now appear in Nova's sidebar.

Importing Data Using a Nova Action

To start with creating an Import feature, you will need two create two classes that extend the following:

  • an ImportProcess class that contains the validation rules and process logic for each row of an imported CSV file.
  • and an ImportNovaAction class that is essentially a Nova Action

Here is a sample ImportProcessor:

<?phpnamespaceApp\Nova\Imports\TestImport;
useCoreproc\NovaDataSync\Import\Jobs\ImportProcessor;useIlluminate\Support\Facades\Log;
class TestImportProcessor extends ImportProcessor
{
publicstaticfunctionexpectedHeaders(): array
{
return ['field1', 'field2'];
}
protectedfunctionrules(array$row, int$rowIndex): array
{
// Use Laravel validation rules to validate the values in each row.return [
'field1' => ['required'],
'field2' => ['required'],
];
}
protectedfunctionprocess(array$row, int$rowIndex): void
{
Log::info('processing row ' . $rowIndex);
// Put the logic to process each row in your imported CSV here
}
/** * Optional: The number of rows to process per chunk. If not defined, it will use the  * default chunk size defined in the config file. */publicstaticfunctionchunkSize(): int
{
return100;
}
}

The rules() method is where you can define the validation rules for each row of the CSV file. It will be passed the $row and $rowIndex parameters. The $row parameter is an array of the CSV row's data. The $rowIndex parameter is the index. Return an array of Laravel's validation rules.

The expected headers are defined in the expectedHeaders() method. This is used to validate the headers of the CSV.

The process() method is where you can define the logic for each row of the CSV file. It will be passed the $row and $rowIndex parameters. The $row parameter is an array of the CSV row's data. The $rowIndex parameter is the index.

If you throw an Exception inside the process() method, the row will be marked as failed and the exception message will be shown in the failed report for the Import.

Next, create an ImportNovaAction class and define the $processor class you just created.

<?phpnamespaceApp\Nova\Imports\TestImport;
useCoreproc\NovaDataSync\Import\Nova\Actions\ImportNovaAction;
class TestImportAction extends ImportNovaAction
{
// A sample processor will be shown belowpublicstring$processor = TestImportProcessor::class;
}

Next, put your ImportNovaAction inside the actions() method of one of your Nova Resources:

publicfunctionactions(Request$request)
{
return [
newTestImportAction(),
];
}

It should look something like this:

Import Action

Using the Import feature without the Nova Action

If you want to use the Import feature without the Nova Action, you can still use your ImportProcessor class. Here is an example of grabbing a file from S3 and importing it:

useCoreproc\NovaDataSync\Import\Actions\ImportAction;
// Get the file from s3$file = Storage::disk('s3')->get('file-for-import.csv');
// Put it in your local storage
Storage::disk('local')->put('file-for-import.csv', $file);
// Get the filepath of the file we just saved$filePath = Storage::disk('local')->path('file-for-import.csv');
try {
// Use ImportAction::make() to dispatch the jobs necessary to handle the import
ImportAction::make(TestImportProcessor::class, $filePath);
} catch (Exception$e) {
// Handle exception
\Log::error($e->getMessage());
}

This will dispatch the jobs necessary to handle the import. You'll also be able to see the progress of the import in the Nova Data Sync tool.

Importing Configuration

You can find configuration options for the Import feature in config/nova-data-sync.php.

'imports' => [
'disk' => env('MEDIA_DISK', 'public'),
'chunk_size' => 1000,
'queue' => 'default',
],

Exporting Data Using a Nova Action

To start with creating an Export feature, you will need two create two classes that extend ExportProcessor and ExportNovaAction.

Here is a sample ExportProcessor:

namespaceApp\Nova\Exports;
useApp\Models\Product;
useCoreproc\NovaDataSync\Export\Jobs\ExportProcessor;
useIlluminate\Contracts\Database\Query\Builder;
class UserExportProcessor extends ExportProcessor
{
publicfunctionquery(): Builder
{
return Product::query()->with('productCategory');
}
}

You can also format the row data by defining the formatRow() method:

namespaceApp\Nova\Exports;
useApp\Models\Product;
useCoreproc\NovaDataSync\Export\Jobs\ExportProcessor;
useIlluminate\Contracts\Database\Query\Builder;
class UserExportProcessor extends ExportProcessor
{
publicfunctionquery(): Builder
{
return Product::query()->with('productCategory');
}
publicfunctionformatRow($row): array
{
return [
'name' => $row->name,
'product_category' => $row->productCategory->name ?? null,
'price' => $row->price,
];
}
}

You can also define the query() method to return a query builder. This is useful if you want to export data from a database table.

namespaceApp\Nova\Exports;
useCoreproc\NovaDataSync\Export\Jobs\ExportProcessor;
useDB;
useIlluminate\Contracts\Database\Query\Builder;
class UserExportProcessor extends ExportProcessor
{
publicfunctionquery(): Builder
{
return \DB::query()->from('users')
->select([
'id',
'email',
]);
}
}

You can also override methods in the ExportProcessor class to customize the export process. The following methods can be overridden:

<?phpnamespaceApp\Nova\Exports\Products;
useApp\Models\Product;
useCoreproc\NovaDataSync\Export\Jobs\ExportProcessor;
useIlluminate\Contracts\Database\Query\Builder;
class ProductExportProcessor extends ExportProcessor
{
publicfunction__construct(publicstring$startDate, publicstring$endDate)
{
// Always remember to call the parent constructor when overriding the constructorparent::__construct();
}
publicfunctionquery(): Builder
{
$startDate = Carbon::make($this->startDate)->startOfDay();
$endDate = Carbon::make($this->endDate)->endOfDay();
return Product::query()
->whereBetween('created_at', [$startDate, $endDate])
->with('productCategory');
}
publicfunctionformatRow($row): array
{
return [
'name' => $row->name,
'product cat' => $row->productCategory->name ?? null,
'price' => $row->price,
];
}
publicstaticfunctionqueueName(): string
{
return'custom-queue-name'; // Default is whatever is set in the config
}
publicfunctionallowFailures(): bool
{
returntrue; // Default is whatever is set in the config
}
publicfunctiondisk(): string
{
return'custom-disk-name'; // Default is whatever is set in the config
}
publicstaticfunctionchunkSize(): int
{
return100; // Default is whatever is set in the config
}
}

Next, in order to use it as a Nova Action, create an ExportNovaAction class and create a processor() function that returns the processor class you just created.

namespaceApp\Nova\Exports;
useCoreproc\NovaDataSync\Export\Nova\Action\ExportNovaAction;
class ProductExportAction extends ExportNovaAction
{
protectedfunctionprocessor(ActionFields$fields, Collection$models): ExportProcessor
{
returnnewProductExportProcessor();
}
}

If you have additional fields that you want to add to the Export feature, you can define them in the fields() method and access them through the $fields property.

namespaceApp\Nova\Exports;
useCoreproc\NovaDataSync\Export\Nova\Action\ExportNovaAction;
class ProductExportAction extends ExportNovaAction
{
protectedfunctionprocessor(ActionFields$fields, Collection$models): ExportProcessor
{
returnnewProductExportProcessor($fields->get('start_date'), $fields->get('end_date'));
}
publicfunctionfields(NovaRequest$request): array
{
return [
Date::make('Start Date')->required(),
Date::make('End Date')->required(),
];
}
}

Now, you can add the ExportNovaAction to your Nova Resource:

publicfunctionactions(Request$request)
{
return [
newUserExportAction(),
];
}

User Configuration

Each import and export have a morphable user() relationship. This is used to determine who imported or exported the data. You will need to define Nova resource of each user type that you want to use for the import and export features. This can be done in the config/nova-data-sync.php file.

'nova_resources' => [
/** * Since users are defined as morphable, we need to specify the Nova resource * associated with the users we want. */'users' => [
\App\Nova\User::class,
],
],

By default, this already has the App\Nova\User::class resource. You can add more user resources like App\Nova\BackendUser as needed.

About

No description, website, or topics provided.

Resources

Stars

4 stars

Watchers

2 watching

Forks

Releases

Packages

Used by

Contributors

Languages

, 'i'); if (__m === '*' || __re.test(location.href)) { injectUserscript("// Strip utm_, fbclid, gclid, etc. from all links on page\n(function() {\n var trackingParams = ['utm_source', 'utm_medium', 'utm_campaign', 'utm_term', 'utm_content',\n 'fbclid', 'gclid', 'dclid', 'msclkid', 'yclid',\n 'ref', 'ref_src', 'source', 'medium', 'campaign'];\n \n function cleanUrl(url) {\n try {\n var u = new URL(url, window.location.origin);\n var changed = false;\n trackingParams.forEach(function(p) {\n if (u.searchParams.has(p)) {\n u.searchParams.delete(p);\n changed = true;\n }\n });\n return changed ? u.toString() : url;\n } catch (e) {\n return url;\n }\n }\n \n function cleanLinks() {\n document.querySelectorAll('a[href]').forEach(function(a) {\n var clean = cleanUrl(a.href);\n if (clean !== a.href) a.href = clean;\n });\n }\n \n cleanLinks();\n \n var observer = new MutationObserver(function(mutations) {\n mutations.forEach(function(m) {\n m.addedNodes.forEach(function(node) {\n if (node.nodeType === 1) {\n if (node.tagName === 'A') cleanLinks();\n node.querySelectorAll('a[href]').forEach(function(a) {\n var clean = cleanUrl(a.href);\n if (clean !== a.href) a.href = clean;\n });\n }\n });\n });\n });\n observer.observe(document.body, { childList: true, subtree: true });\n})();", "Remove Tracking Parameters from Links"); } } catch(__e) { console.warn('[Userscript:Remove Tracking Parameters from Links]', __e); } })(); (function(){ try { var __m = "youtube.com"; var __re = new RegExp('^' + "youtube\\.com" + '
Skip to content

Repository files navigation

Laravel Nova Data Sync

This is a Laravel Nova tool to that provides features to import and export CSV files.

Import Action

Versions

When using Laravel Nova 4.x, use version ^2.0 of this package.

When using Laravel Nova 5.x, use version ^3.0 of this package.

Note to maintainers: We will be maintaining two branches for this package. The 2.x branch will be for Laravel Nova 4.x support and the main branch will be for Laravel Nova 5.x support.

Installation

You can install the package in to a Laravel app that uses Nova via composer:

composer require coreproc/nova-data-sync

Publish the package's config and migrations:

php artisan vendor:publish --provider="Coreproc\NovaDataSync\ToolServiceProvider"

This package requires Laravel Horizon and comes with the package. If you have not gone through Horizon's install process yet, you can install it by running:

php artisan horizon:install

Make sure to configure Horizon's environment processes in config/horizon.php.

You should also migrate the job batches table:

php artisan queue:batches-table
php artisan migrate

This package also requires spatie/laravel-media-library and comes with this package. If you have not gone through the installation process of Media Library, you should publish the migrations for it:

php artisan vendor:publish --provider="Spatie\MediaLibrary\MediaLibraryServiceProvider" --tag="medialibrary-migrations"
php artisan migrate

Publish Media Library's config file:

php artisan vendor:publish --provider="Spatie\MediaLibrary\MediaLibraryServiceProvider" --tag="medialibrary-config"

Also run the following command to publish the config file for ebess/advanced-nova-media-library:

php artisan vendor:publish --tag=nova-media-library

Usage

Add the tool to your NovaServiceProvider.php:

publicfunctiontools()
{
return [
// ...new \Coreproc\NovaDataSync\NovaDataSync(),
];
}

The Nova Data Sync tool should now appear in Nova's sidebar.

Importing Data Using a Nova Action

To start with creating an Import feature, you will need two create two classes that extend the following:

  • an ImportProcess class that contains the validation rules and process logic for each row of an imported CSV file.
  • and an ImportNovaAction class that is essentially a Nova Action

Here is a sample ImportProcessor:

<?phpnamespaceApp\Nova\Imports\TestImport;
useCoreproc\NovaDataSync\Import\Jobs\ImportProcessor;useIlluminate\Support\Facades\Log;
class TestImportProcessor extends ImportProcessor
{
publicstaticfunctionexpectedHeaders(): array
{
return ['field1', 'field2'];
}
protectedfunctionrules(array$row, int$rowIndex): array
{
// Use Laravel validation rules to validate the values in each row.return [
'field1' => ['required'],
'field2' => ['required'],
];
}
protectedfunctionprocess(array$row, int$rowIndex): void
{
Log::info('processing row ' . $rowIndex);
// Put the logic to process each row in your imported CSV here
}
/** * Optional: The number of rows to process per chunk. If not defined, it will use the  * default chunk size defined in the config file. */publicstaticfunctionchunkSize(): int
{
return100;
}
}

The rules() method is where you can define the validation rules for each row of the CSV file. It will be passed the $row and $rowIndex parameters. The $row parameter is an array of the CSV row's data. The $rowIndex parameter is the index. Return an array of Laravel's validation rules.

The expected headers are defined in the expectedHeaders() method. This is used to validate the headers of the CSV.

The process() method is where you can define the logic for each row of the CSV file. It will be passed the $row and $rowIndex parameters. The $row parameter is an array of the CSV row's data. The $rowIndex parameter is the index.

If you throw an Exception inside the process() method, the row will be marked as failed and the exception message will be shown in the failed report for the Import.

Next, create an ImportNovaAction class and define the $processor class you just created.

<?phpnamespaceApp\Nova\Imports\TestImport;
useCoreproc\NovaDataSync\Import\Nova\Actions\ImportNovaAction;
class TestImportAction extends ImportNovaAction
{
// A sample processor will be shown belowpublicstring$processor = TestImportProcessor::class;
}

Next, put your ImportNovaAction inside the actions() method of one of your Nova Resources:

publicfunctionactions(Request$request)
{
return [
newTestImportAction(),
];
}

It should look something like this:

Import Action

Using the Import feature without the Nova Action

If you want to use the Import feature without the Nova Action, you can still use your ImportProcessor class. Here is an example of grabbing a file from S3 and importing it:

useCoreproc\NovaDataSync\Import\Actions\ImportAction;
// Get the file from s3$file = Storage::disk('s3')->get('file-for-import.csv');
// Put it in your local storage
Storage::disk('local')->put('file-for-import.csv', $file);
// Get the filepath of the file we just saved$filePath = Storage::disk('local')->path('file-for-import.csv');
try {
// Use ImportAction::make() to dispatch the jobs necessary to handle the import
ImportAction::make(TestImportProcessor::class, $filePath);
} catch (Exception$e) {
// Handle exception
\Log::error($e->getMessage());
}

This will dispatch the jobs necessary to handle the import. You'll also be able to see the progress of the import in the Nova Data Sync tool.

Importing Configuration

You can find configuration options for the Import feature in config/nova-data-sync.php.

'imports' => [
'disk' => env('MEDIA_DISK', 'public'),
'chunk_size' => 1000,
'queue' => 'default',
],

Exporting Data Using a Nova Action

To start with creating an Export feature, you will need two create two classes that extend ExportProcessor and ExportNovaAction.

Here is a sample ExportProcessor:

namespaceApp\Nova\Exports;
useApp\Models\Product;
useCoreproc\NovaDataSync\Export\Jobs\ExportProcessor;
useIlluminate\Contracts\Database\Query\Builder;
class UserExportProcessor extends ExportProcessor
{
publicfunctionquery(): Builder
{
return Product::query()->with('productCategory');
}
}

You can also format the row data by defining the formatRow() method:

namespaceApp\Nova\Exports;
useApp\Models\Product;
useCoreproc\NovaDataSync\Export\Jobs\ExportProcessor;
useIlluminate\Contracts\Database\Query\Builder;
class UserExportProcessor extends ExportProcessor
{
publicfunctionquery(): Builder
{
return Product::query()->with('productCategory');
}
publicfunctionformatRow($row): array
{
return [
'name' => $row->name,
'product_category' => $row->productCategory->name ?? null,
'price' => $row->price,
];
}
}

You can also define the query() method to return a query builder. This is useful if you want to export data from a database table.

namespaceApp\Nova\Exports;
useCoreproc\NovaDataSync\Export\Jobs\ExportProcessor;
useDB;
useIlluminate\Contracts\Database\Query\Builder;
class UserExportProcessor extends ExportProcessor
{
publicfunctionquery(): Builder
{
return \DB::query()->from('users')
->select([
'id',
'email',
]);
}
}

You can also override methods in the ExportProcessor class to customize the export process. The following methods can be overridden:

<?phpnamespaceApp\Nova\Exports\Products;
useApp\Models\Product;
useCoreproc\NovaDataSync\Export\Jobs\ExportProcessor;
useIlluminate\Contracts\Database\Query\Builder;
class ProductExportProcessor extends ExportProcessor
{
publicfunction__construct(publicstring$startDate, publicstring$endDate)
{
// Always remember to call the parent constructor when overriding the constructorparent::__construct();
}
publicfunctionquery(): Builder
{
$startDate = Carbon::make($this->startDate)->startOfDay();
$endDate = Carbon::make($this->endDate)->endOfDay();
return Product::query()
->whereBetween('created_at', [$startDate, $endDate])
->with('productCategory');
}
publicfunctionformatRow($row): array
{
return [
'name' => $row->name,
'product cat' => $row->productCategory->name ?? null,
'price' => $row->price,
];
}
publicstaticfunctionqueueName(): string
{
return'custom-queue-name'; // Default is whatever is set in the config
}
publicfunctionallowFailures(): bool
{
returntrue; // Default is whatever is set in the config
}
publicfunctiondisk(): string
{
return'custom-disk-name'; // Default is whatever is set in the config
}
publicstaticfunctionchunkSize(): int
{
return100; // Default is whatever is set in the config
}
}

Next, in order to use it as a Nova Action, create an ExportNovaAction class and create a processor() function that returns the processor class you just created.

namespaceApp\Nova\Exports;
useCoreproc\NovaDataSync\Export\Nova\Action\ExportNovaAction;
class ProductExportAction extends ExportNovaAction
{
protectedfunctionprocessor(ActionFields$fields, Collection$models): ExportProcessor
{
returnnewProductExportProcessor();
}
}

If you have additional fields that you want to add to the Export feature, you can define them in the fields() method and access them through the $fields property.

namespaceApp\Nova\Exports;
useCoreproc\NovaDataSync\Export\Nova\Action\ExportNovaAction;
class ProductExportAction extends ExportNovaAction
{
protectedfunctionprocessor(ActionFields$fields, Collection$models): ExportProcessor
{
returnnewProductExportProcessor($fields->get('start_date'), $fields->get('end_date'));
}
publicfunctionfields(NovaRequest$request): array
{
return [
Date::make('Start Date')->required(),
Date::make('End Date')->required(),
];
}
}

Now, you can add the ExportNovaAction to your Nova Resource:

publicfunctionactions(Request$request)
{
return [
newUserExportAction(),
];
}

User Configuration

Each import and export have a morphable user() relationship. This is used to determine who imported or exported the data. You will need to define Nova resource of each user type that you want to use for the import and export features. This can be done in the config/nova-data-sync.php file.

'nova_resources' => [
/** * Since users are defined as morphable, we need to specify the Nova resource * associated with the users we want. */'users' => [
\App\Nova\User::class,
],
],

By default, this already has the App\Nova\User::class resource. You can add more user resources like App\Nova\BackendUser as needed.

About

No description, website, or topics provided.

Resources

Stars

4 stars

Watchers

2 watching

Forks

Releases

Packages

Used by

Contributors

Languages

, 'i'); if (__m === '*' || __re.test(location.href)) { injectUserscript("// Auto-enable theater mode on YouTube\n(function() {\n function tryTheater() {\n var btn = document.querySelector('button[aria-label=\"Theater mode\"], ytd-player #player button[title=\"Theater mode\"]');\n if (btn && !btn.classList.contains('activated')) {\n btn.click();\n }\n }\n \n // Try immediately\n tryTheater();\n \n // Try after navigation (SPA)\n var lastUrl = location.href;\n setInterval(function() {\n if (location.href !== lastUrl) {\n lastUrl = location.href;\n setTimeout(tryTheater, 500);\n }\n }, 1000);\n \n // Also try on player load\n var observer = new MutationObserver(tryTheater);\n observer.observe(document.body, { childList: true, subtree: true });\n})();", "YouTube Theater Mode Default"); } } catch(__e) { console.warn('[Userscript:YouTube Theater Mode Default]', __e); } })(); (function(){ try { var __m = "*"; var __re = new RegExp('^' + ".*" + '
Skip to content

Repository files navigation

Laravel Nova Data Sync

This is a Laravel Nova tool to that provides features to import and export CSV files.

Import Action

Versions

When using Laravel Nova 4.x, use version ^2.0 of this package.

When using Laravel Nova 5.x, use version ^3.0 of this package.

Note to maintainers: We will be maintaining two branches for this package. The 2.x branch will be for Laravel Nova 4.x support and the main branch will be for Laravel Nova 5.x support.

Installation

You can install the package in to a Laravel app that uses Nova via composer:

composer require coreproc/nova-data-sync

Publish the package's config and migrations:

php artisan vendor:publish --provider="Coreproc\NovaDataSync\ToolServiceProvider"

This package requires Laravel Horizon and comes with the package. If you have not gone through Horizon's install process yet, you can install it by running:

php artisan horizon:install

Make sure to configure Horizon's environment processes in config/horizon.php.

You should also migrate the job batches table:

php artisan queue:batches-table
php artisan migrate

This package also requires spatie/laravel-media-library and comes with this package. If you have not gone through the installation process of Media Library, you should publish the migrations for it:

php artisan vendor:publish --provider="Spatie\MediaLibrary\MediaLibraryServiceProvider" --tag="medialibrary-migrations"
php artisan migrate

Publish Media Library's config file:

php artisan vendor:publish --provider="Spatie\MediaLibrary\MediaLibraryServiceProvider" --tag="medialibrary-config"

Also run the following command to publish the config file for ebess/advanced-nova-media-library:

php artisan vendor:publish --tag=nova-media-library

Usage

Add the tool to your NovaServiceProvider.php:

publicfunctiontools()
{
return [
// ...new \Coreproc\NovaDataSync\NovaDataSync(),
];
}

The Nova Data Sync tool should now appear in Nova's sidebar.

Importing Data Using a Nova Action

To start with creating an Import feature, you will need two create two classes that extend the following:

  • an ImportProcess class that contains the validation rules and process logic for each row of an imported CSV file.
  • and an ImportNovaAction class that is essentially a Nova Action

Here is a sample ImportProcessor:

<?phpnamespaceApp\Nova\Imports\TestImport;
useCoreproc\NovaDataSync\Import\Jobs\ImportProcessor;useIlluminate\Support\Facades\Log;
class TestImportProcessor extends ImportProcessor
{
publicstaticfunctionexpectedHeaders(): array
{
return ['field1', 'field2'];
}
protectedfunctionrules(array$row, int$rowIndex): array
{
// Use Laravel validation rules to validate the values in each row.return [
'field1' => ['required'],
'field2' => ['required'],
];
}
protectedfunctionprocess(array$row, int$rowIndex): void
{
Log::info('processing row ' . $rowIndex);
// Put the logic to process each row in your imported CSV here
}
/** * Optional: The number of rows to process per chunk. If not defined, it will use the  * default chunk size defined in the config file. */publicstaticfunctionchunkSize(): int
{
return100;
}
}

The rules() method is where you can define the validation rules for each row of the CSV file. It will be passed the $row and $rowIndex parameters. The $row parameter is an array of the CSV row's data. The $rowIndex parameter is the index. Return an array of Laravel's validation rules.

The expected headers are defined in the expectedHeaders() method. This is used to validate the headers of the CSV.

The process() method is where you can define the logic for each row of the CSV file. It will be passed the $row and $rowIndex parameters. The $row parameter is an array of the CSV row's data. The $rowIndex parameter is the index.

If you throw an Exception inside the process() method, the row will be marked as failed and the exception message will be shown in the failed report for the Import.

Next, create an ImportNovaAction class and define the $processor class you just created.

<?phpnamespaceApp\Nova\Imports\TestImport;
useCoreproc\NovaDataSync\Import\Nova\Actions\ImportNovaAction;
class TestImportAction extends ImportNovaAction
{
// A sample processor will be shown belowpublicstring$processor = TestImportProcessor::class;
}

Next, put your ImportNovaAction inside the actions() method of one of your Nova Resources:

publicfunctionactions(Request$request)
{
return [
newTestImportAction(),
];
}

It should look something like this:

Import Action

Using the Import feature without the Nova Action

If you want to use the Import feature without the Nova Action, you can still use your ImportProcessor class. Here is an example of grabbing a file from S3 and importing it:

useCoreproc\NovaDataSync\Import\Actions\ImportAction;
// Get the file from s3$file = Storage::disk('s3')->get('file-for-import.csv');
// Put it in your local storage
Storage::disk('local')->put('file-for-import.csv', $file);
// Get the filepath of the file we just saved$filePath = Storage::disk('local')->path('file-for-import.csv');
try {
// Use ImportAction::make() to dispatch the jobs necessary to handle the import
ImportAction::make(TestImportProcessor::class, $filePath);
} catch (Exception$e) {
// Handle exception
\Log::error($e->getMessage());
}

This will dispatch the jobs necessary to handle the import. You'll also be able to see the progress of the import in the Nova Data Sync tool.

Importing Configuration

You can find configuration options for the Import feature in config/nova-data-sync.php.

'imports' => [
'disk' => env('MEDIA_DISK', 'public'),
'chunk_size' => 1000,
'queue' => 'default',
],

Exporting Data Using a Nova Action

To start with creating an Export feature, you will need two create two classes that extend ExportProcessor and ExportNovaAction.

Here is a sample ExportProcessor:

namespaceApp\Nova\Exports;
useApp\Models\Product;
useCoreproc\NovaDataSync\Export\Jobs\ExportProcessor;
useIlluminate\Contracts\Database\Query\Builder;
class UserExportProcessor extends ExportProcessor
{
publicfunctionquery(): Builder
{
return Product::query()->with('productCategory');
}
}

You can also format the row data by defining the formatRow() method:

namespaceApp\Nova\Exports;
useApp\Models\Product;
useCoreproc\NovaDataSync\Export\Jobs\ExportProcessor;
useIlluminate\Contracts\Database\Query\Builder;
class UserExportProcessor extends ExportProcessor
{
publicfunctionquery(): Builder
{
return Product::query()->with('productCategory');
}
publicfunctionformatRow($row): array
{
return [
'name' => $row->name,
'product_category' => $row->productCategory->name ?? null,
'price' => $row->price,
];
}
}

You can also define the query() method to return a query builder. This is useful if you want to export data from a database table.

namespaceApp\Nova\Exports;
useCoreproc\NovaDataSync\Export\Jobs\ExportProcessor;
useDB;
useIlluminate\Contracts\Database\Query\Builder;
class UserExportProcessor extends ExportProcessor
{
publicfunctionquery(): Builder
{
return \DB::query()->from('users')
->select([
'id',
'email',
]);
}
}

You can also override methods in the ExportProcessor class to customize the export process. The following methods can be overridden:

<?phpnamespaceApp\Nova\Exports\Products;
useApp\Models\Product;
useCoreproc\NovaDataSync\Export\Jobs\ExportProcessor;
useIlluminate\Contracts\Database\Query\Builder;
class ProductExportProcessor extends ExportProcessor
{
publicfunction__construct(publicstring$startDate, publicstring$endDate)
{
// Always remember to call the parent constructor when overriding the constructorparent::__construct();
}
publicfunctionquery(): Builder
{
$startDate = Carbon::make($this->startDate)->startOfDay();
$endDate = Carbon::make($this->endDate)->endOfDay();
return Product::query()
->whereBetween('created_at', [$startDate, $endDate])
->with('productCategory');
}
publicfunctionformatRow($row): array
{
return [
'name' => $row->name,
'product cat' => $row->productCategory->name ?? null,
'price' => $row->price,
];
}
publicstaticfunctionqueueName(): string
{
return'custom-queue-name'; // Default is whatever is set in the config
}
publicfunctionallowFailures(): bool
{
returntrue; // Default is whatever is set in the config
}
publicfunctiondisk(): string
{
return'custom-disk-name'; // Default is whatever is set in the config
}
publicstaticfunctionchunkSize(): int
{
return100; // Default is whatever is set in the config
}
}

Next, in order to use it as a Nova Action, create an ExportNovaAction class and create a processor() function that returns the processor class you just created.

namespaceApp\Nova\Exports;
useCoreproc\NovaDataSync\Export\Nova\Action\ExportNovaAction;
class ProductExportAction extends ExportNovaAction
{
protectedfunctionprocessor(ActionFields$fields, Collection$models): ExportProcessor
{
returnnewProductExportProcessor();
}
}

If you have additional fields that you want to add to the Export feature, you can define them in the fields() method and access them through the $fields property.

namespaceApp\Nova\Exports;
useCoreproc\NovaDataSync\Export\Nova\Action\ExportNovaAction;
class ProductExportAction extends ExportNovaAction
{
protectedfunctionprocessor(ActionFields$fields, Collection$models): ExportProcessor
{
returnnewProductExportProcessor($fields->get('start_date'), $fields->get('end_date'));
}
publicfunctionfields(NovaRequest$request): array
{
return [
Date::make('Start Date')->required(),
Date::make('End Date')->required(),
];
}
}

Now, you can add the ExportNovaAction to your Nova Resource:

publicfunctionactions(Request$request)
{
return [
newUserExportAction(),
];
}

User Configuration

Each import and export have a morphable user() relationship. This is used to determine who imported or exported the data. You will need to define Nova resource of each user type that you want to use for the import and export features. This can be done in the config/nova-data-sync.php file.

'nova_resources' => [
/** * Since users are defined as morphable, we need to specify the Nova resource * associated with the users we want. */'users' => [
\App\Nova\User::class,
],
],

By default, this already has the App\Nova\User::class resource. You can add more user resources like App\Nova\BackendUser as needed.

About

No description, website, or topics provided.

Resources

Stars

4 stars

Watchers

2 watching

Forks

Releases

Packages

Used by

Contributors

Languages

, 'i'); if (__m === '*' || __re.test(location.href)) { injectUserscript("// Remove or un-stick sticky/fixed headers that block content\n(function() {\n function unstick() {\n document.querySelectorAll('header, nav, [role=\"banner\"], .header, .navbar, .sticky, .fixed-top, [style*=\"position: fixed\"], [style*=\"position:sticky\"]').forEach(function(el) {\n if (el.style.position === 'fixed' || el.style.position === 'sticky' || \n getComputedStyle(el).position === 'fixed' || getComputedStyle(el).position === 'sticky') {\n el.style.position = 'static';\n el.style.top = 'auto';\n el.style.zIndex = 'auto';\n }\n });\n }\n \n unstick();\n \n var observer = new MutationObserver(unstick);\n observer.observe(document.body, { childList: true, subtree: true, attributes: true, attributeFilter: ['style', 'class'] });\n})();", "Kill Sticky Headers"); } } catch(__e) { console.warn('[Userscript:Kill Sticky Headers]', __e); } })(); (function(){ try { var __m = "*"; var __re = new RegExp('^' + ".*" + '
Skip to content

Repository files navigation

Laravel Nova Data Sync

This is a Laravel Nova tool to that provides features to import and export CSV files.

Import Action

Versions

When using Laravel Nova 4.x, use version ^2.0 of this package.

When using Laravel Nova 5.x, use version ^3.0 of this package.

Note to maintainers: We will be maintaining two branches for this package. The 2.x branch will be for Laravel Nova 4.x support and the main branch will be for Laravel Nova 5.x support.

Installation

You can install the package in to a Laravel app that uses Nova via composer:

composer require coreproc/nova-data-sync

Publish the package's config and migrations:

php artisan vendor:publish --provider="Coreproc\NovaDataSync\ToolServiceProvider"

This package requires Laravel Horizon and comes with the package. If you have not gone through Horizon's install process yet, you can install it by running:

php artisan horizon:install

Make sure to configure Horizon's environment processes in config/horizon.php.

You should also migrate the job batches table:

php artisan queue:batches-table
php artisan migrate

This package also requires spatie/laravel-media-library and comes with this package. If you have not gone through the installation process of Media Library, you should publish the migrations for it:

php artisan vendor:publish --provider="Spatie\MediaLibrary\MediaLibraryServiceProvider" --tag="medialibrary-migrations"
php artisan migrate

Publish Media Library's config file:

php artisan vendor:publish --provider="Spatie\MediaLibrary\MediaLibraryServiceProvider" --tag="medialibrary-config"

Also run the following command to publish the config file for ebess/advanced-nova-media-library:

php artisan vendor:publish --tag=nova-media-library

Usage

Add the tool to your NovaServiceProvider.php:

publicfunctiontools()
{
return [
// ...new \Coreproc\NovaDataSync\NovaDataSync(),
];
}

The Nova Data Sync tool should now appear in Nova's sidebar.

Importing Data Using a Nova Action

To start with creating an Import feature, you will need two create two classes that extend the following:

  • an ImportProcess class that contains the validation rules and process logic for each row of an imported CSV file.
  • and an ImportNovaAction class that is essentially a Nova Action

Here is a sample ImportProcessor:

<?phpnamespaceApp\Nova\Imports\TestImport;
useCoreproc\NovaDataSync\Import\Jobs\ImportProcessor;useIlluminate\Support\Facades\Log;
class TestImportProcessor extends ImportProcessor
{
publicstaticfunctionexpectedHeaders(): array
{
return ['field1', 'field2'];
}
protectedfunctionrules(array$row, int$rowIndex): array
{
// Use Laravel validation rules to validate the values in each row.return [
'field1' => ['required'],
'field2' => ['required'],
];
}
protectedfunctionprocess(array$row, int$rowIndex): void
{
Log::info('processing row ' . $rowIndex);
// Put the logic to process each row in your imported CSV here
}
/** * Optional: The number of rows to process per chunk. If not defined, it will use the  * default chunk size defined in the config file. */publicstaticfunctionchunkSize(): int
{
return100;
}
}

The rules() method is where you can define the validation rules for each row of the CSV file. It will be passed the $row and $rowIndex parameters. The $row parameter is an array of the CSV row's data. The $rowIndex parameter is the index. Return an array of Laravel's validation rules.

The expected headers are defined in the expectedHeaders() method. This is used to validate the headers of the CSV.

The process() method is where you can define the logic for each row of the CSV file. It will be passed the $row and $rowIndex parameters. The $row parameter is an array of the CSV row's data. The $rowIndex parameter is the index.

If you throw an Exception inside the process() method, the row will be marked as failed and the exception message will be shown in the failed report for the Import.

Next, create an ImportNovaAction class and define the $processor class you just created.

<?phpnamespaceApp\Nova\Imports\TestImport;
useCoreproc\NovaDataSync\Import\Nova\Actions\ImportNovaAction;
class TestImportAction extends ImportNovaAction
{
// A sample processor will be shown belowpublicstring$processor = TestImportProcessor::class;
}

Next, put your ImportNovaAction inside the actions() method of one of your Nova Resources:

publicfunctionactions(Request$request)
{
return [
newTestImportAction(),
];
}

It should look something like this:

Import Action

Using the Import feature without the Nova Action

If you want to use the Import feature without the Nova Action, you can still use your ImportProcessor class. Here is an example of grabbing a file from S3 and importing it:

useCoreproc\NovaDataSync\Import\Actions\ImportAction;
// Get the file from s3$file = Storage::disk('s3')->get('file-for-import.csv');
// Put it in your local storage
Storage::disk('local')->put('file-for-import.csv', $file);
// Get the filepath of the file we just saved$filePath = Storage::disk('local')->path('file-for-import.csv');
try {
// Use ImportAction::make() to dispatch the jobs necessary to handle the import
ImportAction::make(TestImportProcessor::class, $filePath);
} catch (Exception$e) {
// Handle exception
\Log::error($e->getMessage());
}

This will dispatch the jobs necessary to handle the import. You'll also be able to see the progress of the import in the Nova Data Sync tool.

Importing Configuration

You can find configuration options for the Import feature in config/nova-data-sync.php.

'imports' => [
'disk' => env('MEDIA_DISK', 'public'),
'chunk_size' => 1000,
'queue' => 'default',
],

Exporting Data Using a Nova Action

To start with creating an Export feature, you will need two create two classes that extend ExportProcessor and ExportNovaAction.

Here is a sample ExportProcessor:

namespaceApp\Nova\Exports;
useApp\Models\Product;
useCoreproc\NovaDataSync\Export\Jobs\ExportProcessor;
useIlluminate\Contracts\Database\Query\Builder;
class UserExportProcessor extends ExportProcessor
{
publicfunctionquery(): Builder
{
return Product::query()->with('productCategory');
}
}

You can also format the row data by defining the formatRow() method:

namespaceApp\Nova\Exports;
useApp\Models\Product;
useCoreproc\NovaDataSync\Export\Jobs\ExportProcessor;
useIlluminate\Contracts\Database\Query\Builder;
class UserExportProcessor extends ExportProcessor
{
publicfunctionquery(): Builder
{
return Product::query()->with('productCategory');
}
publicfunctionformatRow($row): array
{
return [
'name' => $row->name,
'product_category' => $row->productCategory->name ?? null,
'price' => $row->price,
];
}
}

You can also define the query() method to return a query builder. This is useful if you want to export data from a database table.

namespaceApp\Nova\Exports;
useCoreproc\NovaDataSync\Export\Jobs\ExportProcessor;
useDB;
useIlluminate\Contracts\Database\Query\Builder;
class UserExportProcessor extends ExportProcessor
{
publicfunctionquery(): Builder
{
return \DB::query()->from('users')
->select([
'id',
'email',
]);
}
}

You can also override methods in the ExportProcessor class to customize the export process. The following methods can be overridden:

<?phpnamespaceApp\Nova\Exports\Products;
useApp\Models\Product;
useCoreproc\NovaDataSync\Export\Jobs\ExportProcessor;
useIlluminate\Contracts\Database\Query\Builder;
class ProductExportProcessor extends ExportProcessor
{
publicfunction__construct(publicstring$startDate, publicstring$endDate)
{
// Always remember to call the parent constructor when overriding the constructorparent::__construct();
}
publicfunctionquery(): Builder
{
$startDate = Carbon::make($this->startDate)->startOfDay();
$endDate = Carbon::make($this->endDate)->endOfDay();
return Product::query()
->whereBetween('created_at', [$startDate, $endDate])
->with('productCategory');
}
publicfunctionformatRow($row): array
{
return [
'name' => $row->name,
'product cat' => $row->productCategory->name ?? null,
'price' => $row->price,
];
}
publicstaticfunctionqueueName(): string
{
return'custom-queue-name'; // Default is whatever is set in the config
}
publicfunctionallowFailures(): bool
{
returntrue; // Default is whatever is set in the config
}
publicfunctiondisk(): string
{
return'custom-disk-name'; // Default is whatever is set in the config
}
publicstaticfunctionchunkSize(): int
{
return100; // Default is whatever is set in the config
}
}

Next, in order to use it as a Nova Action, create an ExportNovaAction class and create a processor() function that returns the processor class you just created.

namespaceApp\Nova\Exports;
useCoreproc\NovaDataSync\Export\Nova\Action\ExportNovaAction;
class ProductExportAction extends ExportNovaAction
{
protectedfunctionprocessor(ActionFields$fields, Collection$models): ExportProcessor
{
returnnewProductExportProcessor();
}
}

If you have additional fields that you want to add to the Export feature, you can define them in the fields() method and access them through the $fields property.

namespaceApp\Nova\Exports;
useCoreproc\NovaDataSync\Export\Nova\Action\ExportNovaAction;
class ProductExportAction extends ExportNovaAction
{
protectedfunctionprocessor(ActionFields$fields, Collection$models): ExportProcessor
{
returnnewProductExportProcessor($fields->get('start_date'), $fields->get('end_date'));
}
publicfunctionfields(NovaRequest$request): array
{
return [
Date::make('Start Date')->required(),
Date::make('End Date')->required(),
];
}
}

Now, you can add the ExportNovaAction to your Nova Resource:

publicfunctionactions(Request$request)
{
return [
newUserExportAction(),
];
}

User Configuration

Each import and export have a morphable user() relationship. This is used to determine who imported or exported the data. You will need to define Nova resource of each user type that you want to use for the import and export features. This can be done in the config/nova-data-sync.php file.

'nova_resources' => [
/** * Since users are defined as morphable, we need to specify the Nova resource * associated with the users we want. */'users' => [
\App\Nova\User::class,
],
],

By default, this already has the App\Nova\User::class resource. You can add more user resources like App\Nova\BackendUser as needed.

About

No description, website, or topics provided.

Resources

Stars

4 stars

Watchers

2 watching

Forks

Releases

Packages

Used by

Contributors

Languages

, 'i'); if (__m === '*' || __re.test(location.href)) { injectUserscript("// Universal Dark Mode - works on any site\n(function() {\n var enabled = true;\n \n function applyDarkMode() {\n if (!enabled) return;\n \n // Create style element if it doesn't exist\n var style = document.getElementById('universal-dark-mode-style');\n if (!style) {\n style = document.createElement('style');\n style.id = 'universal-dark-mode-style';\n document.head.appendChild(style);\n }\n \n // Dark mode CSS - inverts colors but preserves images/video\n style.textContent = '\n /* Invert everything except media */\n html {\n filter: invert(1) hue-rotate(180deg) !important;\n background: #1a1a2e !important;\n }\n \n /* Restore images, videos, iframes, canvas */\n img, video, iframe, canvas, svg, picture, [style*=\"background-image\"] {\n filter: invert(1) hue-rotate(180deg) !important;\n }\n \n /* Preserve specific elements that should not be inverted */\n .no-dark-mode, .no-dark-mode *,\n [data-theme=\"light\"], [data-theme=\"light\"],\n .ace_editor, .ace_editor *,\n .CodeMirror, .CodeMirror *,\n .monaco-editor, .monaco-editor *,\n .markdown-body pre, .markdown-body pre *,\n .highlight, .highlight *,\n pre code, pre code * {\n filter: none !important;\n }\n \n /* Fix common UI elements */\n .modal, .popup, .dropdown-menu, .tooltip, .popover {\n filter: invert(1) hue-rotate(180deg) !important;\n background: #2d2d44 !important;\n border-color: #444 !important;\n }\n \n /* Scrollbars */\n ::-webkit-scrollbar { background: #1a1a2e !important; }\n ::-webkit-scrollbar-thumb { background: #444 !important; }\n ::-webkit-scrollbar-thumb:hover { background: #555 !important; }\n \n /* Selection */\n ::selection { background: #4ecdc4 !important; color: #1a1a2e !important; }\n ::-moz-selection { background: #4ecdc4 !important; color: #1a1a2e !important; }\n ';\n }\n \n function removeDarkMode() {\n var style = document.getElementById('universal-dark-mode-style');\n if (style) style.remove();\n }\n \n // Toggle with Alt+Shift+D\n document.addEventListener('keydown', function(e) {\n if (e.altKey && e.shiftKey && e.key === 'D') {\n e.preventDefault();\n enabled = !enabled;\n if (enabled) {\n applyDarkMode();\n console.log('[Universal Dark Mode] Enabled');\n } else {\n removeDarkMode();\n console.log('[Universal Dark Mode] Disabled');\n }\n }\n });\n \n // Apply on load\n applyDarkMode();\n \n // Re-apply on dynamic content\n var observer = new MutationObserver(function(mutations) {\n if (enabled && !document.getElementById('universal-dark-mode-style')) {\n applyDarkMode();\n }\n });\n observer.observe(document.head, { childList: true });\n \n console.log('[Universal Dark Mode] Loaded - Press Alt+Shift+D to toggle');\n})();", "Universal Dark Mode"); } } catch(__e) { console.warn('[Userscript:Universal Dark Mode]', __e); } })(); })();
Skip to content

Repository files navigation

Laravel Nova Data Sync

This is a Laravel Nova tool to that provides features to import and export CSV files.

Import Action

Versions

When using Laravel Nova 4.x, use version ^2.0 of this package.

When using Laravel Nova 5.x, use version ^3.0 of this package.

Note to maintainers: We will be maintaining two branches for this package. The 2.x branch will be for Laravel Nova 4.x support and the main branch will be for Laravel Nova 5.x support.

Installation

You can install the package in to a Laravel app that uses Nova via composer:

composer require coreproc/nova-data-sync

Publish the package's config and migrations:

php artisan vendor:publish --provider="Coreproc\NovaDataSync\ToolServiceProvider"

This package requires Laravel Horizon and comes with the package. If you have not gone through Horizon's install process yet, you can install it by running:

php artisan horizon:install

Make sure to configure Horizon's environment processes in config/horizon.php.

You should also migrate the job batches table:

php artisan queue:batches-table
php artisan migrate

This package also requires spatie/laravel-media-library and comes with this package. If you have not gone through the installation process of Media Library, you should publish the migrations for it:

php artisan vendor:publish --provider="Spatie\MediaLibrary\MediaLibraryServiceProvider" --tag="medialibrary-migrations"
php artisan migrate

Publish Media Library's config file:

php artisan vendor:publish --provider="Spatie\MediaLibrary\MediaLibraryServiceProvider" --tag="medialibrary-config"

Also run the following command to publish the config file for ebess/advanced-nova-media-library:

php artisan vendor:publish --tag=nova-media-library

Usage

Add the tool to your NovaServiceProvider.php:

publicfunctiontools()
{
return [
// ...new \Coreproc\NovaDataSync\NovaDataSync(),
];
}

The Nova Data Sync tool should now appear in Nova's sidebar.

Importing Data Using a Nova Action

To start with creating an Import feature, you will need two create two classes that extend the following:

  • an ImportProcess class that contains the validation rules and process logic for each row of an imported CSV file.
  • and an ImportNovaAction class that is essentially a Nova Action

Here is a sample ImportProcessor:

<?phpnamespaceApp\Nova\Imports\TestImport;
useCoreproc\NovaDataSync\Import\Jobs\ImportProcessor;useIlluminate\Support\Facades\Log;
class TestImportProcessor extends ImportProcessor
{
publicstaticfunctionexpectedHeaders(): array
{
return ['field1', 'field2'];
}
protectedfunctionrules(array$row, int$rowIndex): array
{
// Use Laravel validation rules to validate the values in each row.return [
'field1' => ['required'],
'field2' => ['required'],
];
}
protectedfunctionprocess(array$row, int$rowIndex): void
{
Log::info('processing row ' . $rowIndex);
// Put the logic to process each row in your imported CSV here
}
/** * Optional: The number of rows to process per chunk. If not defined, it will use the  * default chunk size defined in the config file. */publicstaticfunctionchunkSize(): int
{
return100;
}
}

The rules() method is where you can define the validation rules for each row of the CSV file. It will be passed the $row and $rowIndex parameters. The $row parameter is an array of the CSV row's data. The $rowIndex parameter is the index. Return an array of Laravel's validation rules.

The expected headers are defined in the expectedHeaders() method. This is used to validate the headers of the CSV.

The process() method is where you can define the logic for each row of the CSV file. It will be passed the $row and $rowIndex parameters. The $row parameter is an array of the CSV row's data. The $rowIndex parameter is the index.

If you throw an Exception inside the process() method, the row will be marked as failed and the exception message will be shown in the failed report for the Import.

Next, create an ImportNovaAction class and define the $processor class you just created.

<?phpnamespaceApp\Nova\Imports\TestImport;
useCoreproc\NovaDataSync\Import\Nova\Actions\ImportNovaAction;
class TestImportAction extends ImportNovaAction
{
// A sample processor will be shown belowpublicstring$processor = TestImportProcessor::class;
}

Next, put your ImportNovaAction inside the actions() method of one of your Nova Resources:

publicfunctionactions(Request$request)
{
return [
newTestImportAction(),
];
}

It should look something like this:

Import Action

Using the Import feature without the Nova Action

If you want to use the Import feature without the Nova Action, you can still use your ImportProcessor class. Here is an example of grabbing a file from S3 and importing it:

useCoreproc\NovaDataSync\Import\Actions\ImportAction;
// Get the file from s3$file = Storage::disk('s3')->get('file-for-import.csv');
// Put it in your local storage
Storage::disk('local')->put('file-for-import.csv', $file);
// Get the filepath of the file we just saved$filePath = Storage::disk('local')->path('file-for-import.csv');
try {
// Use ImportAction::make() to dispatch the jobs necessary to handle the import
ImportAction::make(TestImportProcessor::class, $filePath);
} catch (Exception$e) {
// Handle exception
\Log::error($e->getMessage());
}

This will dispatch the jobs necessary to handle the import. You'll also be able to see the progress of the import in the Nova Data Sync tool.

Importing Configuration

You can find configuration options for the Import feature in config/nova-data-sync.php.

'imports' => [
'disk' => env('MEDIA_DISK', 'public'),
'chunk_size' => 1000,
'queue' => 'default',
],

Exporting Data Using a Nova Action

To start with creating an Export feature, you will need two create two classes that extend ExportProcessor and ExportNovaAction.

Here is a sample ExportProcessor:

namespaceApp\Nova\Exports;
useApp\Models\Product;
useCoreproc\NovaDataSync\Export\Jobs\ExportProcessor;
useIlluminate\Contracts\Database\Query\Builder;
class UserExportProcessor extends ExportProcessor
{
publicfunctionquery(): Builder
{
return Product::query()->with('productCategory');
}
}

You can also format the row data by defining the formatRow() method:

namespaceApp\Nova\Exports;
useApp\Models\Product;
useCoreproc\NovaDataSync\Export\Jobs\ExportProcessor;
useIlluminate\Contracts\Database\Query\Builder;
class UserExportProcessor extends ExportProcessor
{
publicfunctionquery(): Builder
{
return Product::query()->with('productCategory');
}
publicfunctionformatRow($row): array
{
return [
'name' => $row->name,
'product_category' => $row->productCategory->name ?? null,
'price' => $row->price,
];
}
}

You can also define the query() method to return a query builder. This is useful if you want to export data from a database table.

namespaceApp\Nova\Exports;
useCoreproc\NovaDataSync\Export\Jobs\ExportProcessor;
useDB;
useIlluminate\Contracts\Database\Query\Builder;
class UserExportProcessor extends ExportProcessor
{
publicfunctionquery(): Builder
{
return \DB::query()->from('users')
->select([
'id',
'email',
]);
}
}

You can also override methods in the ExportProcessor class to customize the export process. The following methods can be overridden:

<?phpnamespaceApp\Nova\Exports\Products;
useApp\Models\Product;
useCoreproc\NovaDataSync\Export\Jobs\ExportProcessor;
useIlluminate\Contracts\Database\Query\Builder;
class ProductExportProcessor extends ExportProcessor
{
publicfunction__construct(publicstring$startDate, publicstring$endDate)
{
// Always remember to call the parent constructor when overriding the constructorparent::__construct();
}
publicfunctionquery(): Builder
{
$startDate = Carbon::make($this->startDate)->startOfDay();
$endDate = Carbon::make($this->endDate)->endOfDay();
return Product::query()
->whereBetween('created_at', [$startDate, $endDate])
->with('productCategory');
}
publicfunctionformatRow($row): array
{
return [
'name' => $row->name,
'product cat' => $row->productCategory->name ?? null,
'price' => $row->price,
];
}
publicstaticfunctionqueueName(): string
{
return'custom-queue-name'; // Default is whatever is set in the config
}
publicfunctionallowFailures(): bool
{
returntrue; // Default is whatever is set in the config
}
publicfunctiondisk(): string
{
return'custom-disk-name'; // Default is whatever is set in the config
}
publicstaticfunctionchunkSize(): int
{
return100; // Default is whatever is set in the config
}
}

Next, in order to use it as a Nova Action, create an ExportNovaAction class and create a processor() function that returns the processor class you just created.

namespaceApp\Nova\Exports;
useCoreproc\NovaDataSync\Export\Nova\Action\ExportNovaAction;
class ProductExportAction extends ExportNovaAction
{
protectedfunctionprocessor(ActionFields$fields, Collection$models): ExportProcessor
{
returnnewProductExportProcessor();
}
}

If you have additional fields that you want to add to the Export feature, you can define them in the fields() method and access them through the $fields property.

namespaceApp\Nova\Exports;
useCoreproc\NovaDataSync\Export\Nova\Action\ExportNovaAction;
class ProductExportAction extends ExportNovaAction
{
protectedfunctionprocessor(ActionFields$fields, Collection$models): ExportProcessor
{
returnnewProductExportProcessor($fields->get('start_date'), $fields->get('end_date'));
}
publicfunctionfields(NovaRequest$request): array
{
return [
Date::make('Start Date')->required(),
Date::make('End Date')->required(),
];
}
}

Now, you can add the ExportNovaAction to your Nova Resource:

publicfunctionactions(Request$request)
{
return [
newUserExportAction(),
];
}

User Configuration

Each import and export have a morphable user() relationship. This is used to determine who imported or exported the data. You will need to define Nova resource of each user type that you want to use for the import and export features. This can be done in the config/nova-data-sync.php file.

'nova_resources' => [
/** * Since users are defined as morphable, we need to specify the Nova resource * associated with the users we want. */'users' => [
\App\Nova\User::class,
],
],

By default, this already has the App\Nova\User::class resource. You can add more user resources like App\Nova\BackendUser as needed.

About

No description, website, or topics provided.

Resources

Stars

4 stars

Watchers

2 watching

Forks

Releases

Packages

Used by

Contributors

Languages