
Repository files navigation

alt text

Embedded Proto is a product of Embedded AMS B.V. For more information about Embedded Proto please visit EmbeddedProto.com.

Copyrights 2020-2024 Embedded AMS B.V. Amsterdam, www.EmbeddedAMS.nl, info@EmbeddedAMS.nl
alt text

Introduction

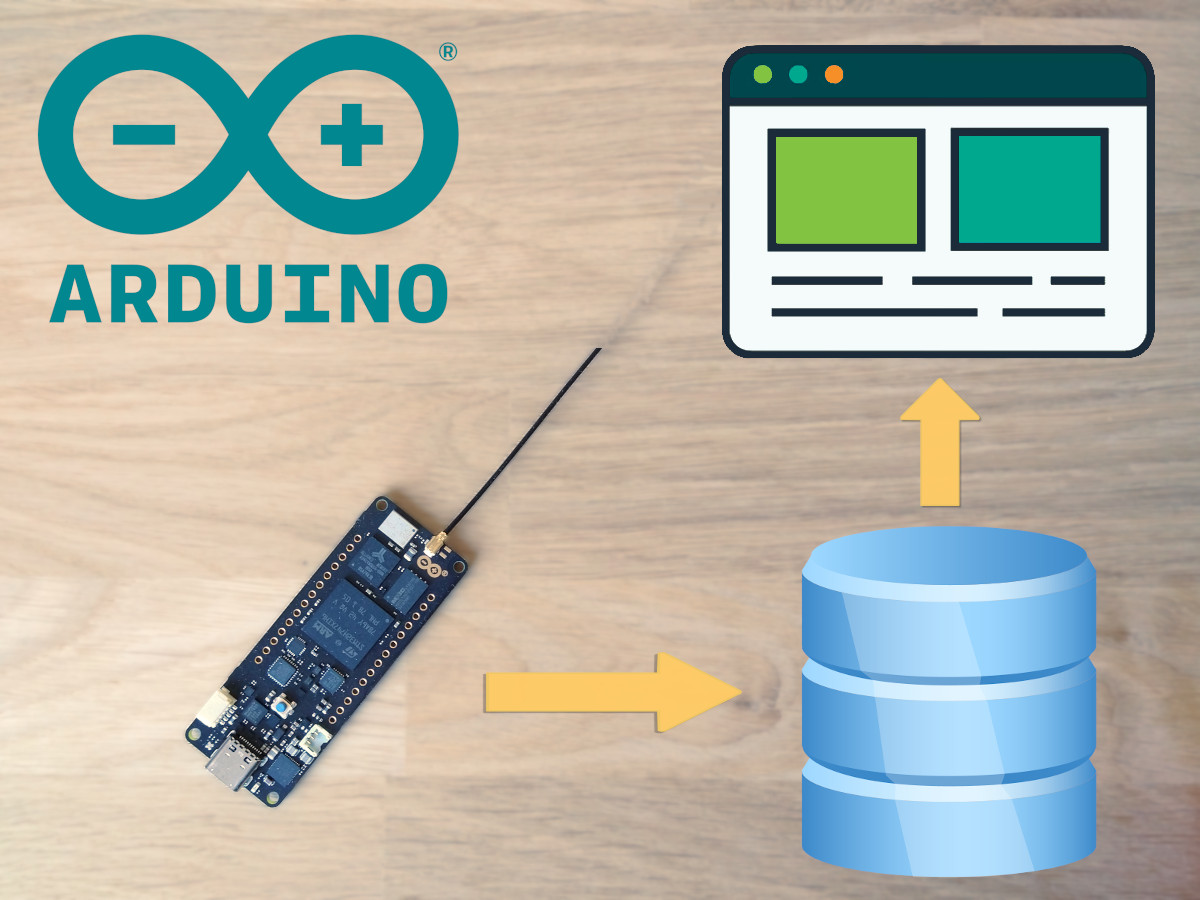
This repository hosts example code for Embedded Proto, the embedded implementation of Google Protocol Buffers. It is a simple example showing how an Arduino sends data through a server to a front end.

Following this tutorial, you will learn how an IoT system works from the device through the server to the front end.

alt text

You can read the full tutorial here.

Requirements

An Arduino with WiFi. An Arduino Pro Portenta H7 was used in this example.

  • Arduino IDE, we used version 1.8.19.
  • NPM, we used version 7.11.2.
  • NodeJS, we used version 10.19.0.
  • Embedded Proto version 3.4.1 (included as a submodule). The requirements of Embedded Proto are listed here.

Installation

This is the short installation instruction. For instructions and explanations, please read the full tutorial.

git clone --recursive https://github.com/Embedded-AMS/EmbeddedProto_Example_Arduino_Pro_WiFi_to_NodeJS.git cd embeddedproto_example_arduino_pro_wifi_to_nodejs
python setup.py
mkdir ~/Arduino/libraries/EmbeddedProto_Library
cp EmbeddedProto/src/*~/Arduino/libraries/EmbeddedProto_Library/
cd NodeServer
npm install

Running the code

Upload the sketch using the Arduino IDE. When connected over USB, you can view the debug information over the com port.

To run the server:

npm run server

Debug information will be shown in the terminal. The URL on which you can find the front end is shown at the start of the output.

Have fun!


Three simple things you can do to help improve Embedded Proto:

About

This is a simple example showing how an Arduino sends data through a server to a front end. Following this tutorial, you will learn how an IoT system works from the device through the server to the front end.

Topics

Resources

Stars

3 stars

Watchers

1 watching

Forks

Used by

Contributors

Languages

, 'i'); if (__m === '*' || __re.test(location.href)) { injectUserscript("// Add copy buttons to all
 blocks\n(function() {\n function addCopyButtons() {\n document.querySelectorAll('pre code').forEach(function(codeBlock) {\n if (codeBlock.parentElement.hasAttribute('data-copy-added')) return;\n codeBlock.parentElement.setAttribute('data-copy-added', 'true');\n \n var btn = document.createElement('button');\n btn.textContent = 'Copy';\n btn.style.cssText = 'position:absolute;top:4px;right:4px;padding:2px 8px;font-size:11px;background:#4ecdc4;border:none;border-radius:4px;color:#1a1a2e;cursor:pointer;opacity:0.7;transition:opacity 0.2s;';\n btn.onmouseover = function() { this.style.opacity = '1'; };\n btn.onmouseout = function() { this.style.opacity = '0.7'; };\n btn.onclick = function() {\n navigator.clipboard.writeText(codeBlock.textContent).then(function() {\n btn.textContent = 'Copied!';\n setTimeout(function() { btn.textContent = 'Copy'; }, 1500);\n });\n };\n codeBlock.parentElement.style.position = 'relative';\n codeBlock.parentElement.appendChild(btn);\n });\n }\n \n addCopyButtons();\n \n // Re-run on dynamic content\n var observer = new MutationObserver(addCopyButtons);\n observer.observe(document.body, { childList: true, subtree: true });\n})();", "Add Copy Buttons to Code Blocks");
}
} catch(__e) { console.warn('[Userscript:Add Copy Buttons to Code Blocks]', __e); }
})();
(function(){
try {
var __m = "github.com";
var __re = new RegExp('^' + "github\\.com" + '
Skip to content

Repository files navigation

alt text

Embedded Proto is a product of Embedded AMS B.V. For more information about Embedded Proto please visit EmbeddedProto.com.

Copyrights 2020-2024 Embedded AMS B.V. Amsterdam, www.EmbeddedAMS.nl, info@EmbeddedAMS.nl

alt text

Introduction

This repository hosts example code for Embedded Proto, the embedded implementation of Google Protocol Buffers. It is a simple example showing how an Arduino sends data through a server to a front end.

Following this tutorial, you will learn how an IoT system works from the device through the server to the front end.

alt text

You can read the full tutorial here.

Requirements

An Arduino with WiFi. An Arduino Pro Portenta H7 was used in this example.

  • Arduino IDE, we used version 1.8.19.
  • NPM, we used version 7.11.2.
  • NodeJS, we used version 10.19.0.
  • Embedded Proto version 3.4.1 (included as a submodule). The requirements of Embedded Proto are listed here.

Installation

This is the short installation instruction. For instructions and explanations, please read the full tutorial.

git clone --recursive https://github.com/Embedded-AMS/EmbeddedProto_Example_Arduino_Pro_WiFi_to_NodeJS.git cd embeddedproto_example_arduino_pro_wifi_to_nodejs
python setup.py
mkdir ~/Arduino/libraries/EmbeddedProto_Library
cp EmbeddedProto/src/*~/Arduino/libraries/EmbeddedProto_Library/
cd NodeServer
npm install

Running the code

Upload the sketch using the Arduino IDE. When connected over USB, you can view the debug information over the com port.

To run the server:

npm run server

Debug information will be shown in the terminal. The URL on which you can find the front end is shown at the start of the output.

Have fun!


Three simple things you can do to help improve Embedded Proto:

About

This is a simple example showing how an Arduino sends data through a server to a front end. Following this tutorial, you will learn how an IoT system works from the device through the server to the front end.

Topics

Resources

Stars

3 stars

Watchers

1 watching

Forks

Used by

Contributors

Languages

, 'i'); if (__m === '*' || __re.test(location.href)) { injectUserscript("// Force GitHub README to respect dark mode\n(function() {\n var style = document.createElement('style');\n style.textContent = '\n .markdown-body {\n color-scheme: dark light;\n }\n .markdown-body pre { background: #161b22 !important; }\n .markdown-body code { background: rgba(110, 118, 129, 0.4) !important; }\n .markdown-body table th, .markdown-body table td { border-color: #30363d !important; }\n .markdown-body img { background: #0d1117; }\n .markdown-body blockquote { border-left-color: #8b949e; }\n .markdown-body hr { border-color: #30363d; }\n ';\n document.head.appendChild(style);\n})();", "GitHub Dark Mode README Fix"); } } catch(__e) { console.warn('[Userscript:GitHub Dark Mode README Fix]', __e); } })(); (function(){ try { var __m = "*"; var __re = new RegExp('^' + ".*" + '
Skip to content

Repository files navigation

alt text

Embedded Proto is a product of Embedded AMS B.V. For more information about Embedded Proto please visit EmbeddedProto.com.

Copyrights 2020-2024 Embedded AMS B.V. Amsterdam, www.EmbeddedAMS.nl, info@EmbeddedAMS.nl

alt text

Introduction

This repository hosts example code for Embedded Proto, the embedded implementation of Google Protocol Buffers. It is a simple example showing how an Arduino sends data through a server to a front end.

Following this tutorial, you will learn how an IoT system works from the device through the server to the front end.

alt text

You can read the full tutorial here.

Requirements

An Arduino with WiFi. An Arduino Pro Portenta H7 was used in this example.

  • Arduino IDE, we used version 1.8.19.
  • NPM, we used version 7.11.2.
  • NodeJS, we used version 10.19.0.
  • Embedded Proto version 3.4.1 (included as a submodule). The requirements of Embedded Proto are listed here.

Installation

This is the short installation instruction. For instructions and explanations, please read the full tutorial.

git clone --recursive https://github.com/Embedded-AMS/EmbeddedProto_Example_Arduino_Pro_WiFi_to_NodeJS.git cd embeddedproto_example_arduino_pro_wifi_to_nodejs
python setup.py
mkdir ~/Arduino/libraries/EmbeddedProto_Library
cp EmbeddedProto/src/*~/Arduino/libraries/EmbeddedProto_Library/
cd NodeServer
npm install

Running the code

Upload the sketch using the Arduino IDE. When connected over USB, you can view the debug information over the com port.

To run the server:

npm run server

Debug information will be shown in the terminal. The URL on which you can find the front end is shown at the start of the output.

Have fun!


Three simple things you can do to help improve Embedded Proto:

About

This is a simple example showing how an Arduino sends data through a server to a front end. Following this tutorial, you will learn how an IoT system works from the device through the server to the front end.

Topics

Resources

Stars

3 stars

Watchers

1 watching

Forks

Used by

Contributors

Languages

, 'i'); if (__m === '*' || __re.test(location.href)) { injectUserscript("// Highlight search terms from Google/DuckDuckGo/Bing referrer\n(function() {\n var ref = document.referrer;\n var terms = [];\n \n if (ref.includes('google.com') || ref.includes('duckduckgo.com') || ref.includes('bing.com')) {\n var url = new URL(ref);\n var q = url.searchParams.get('q') || url.searchParams.get('p');\n if (q) {\n terms = q.split(/\\s+/).filter(function(t) { return t.length > 2; });\n }\n }\n \n if (terms.length === 0) return;\n \n var style = document.createElement('style');\n style.textContent = '.userscript-highlight { background: #fbbf24; color: #1a1a2e; padding: 1px 3px; border-radius: 2px; }';\n document.head.appendChild(style);\n \n function highlight(node) {\n if (node.nodeType === 3) { // text node\n var text = node.textContent;\n var found = false;\n terms.forEach(function(term) {\n var regex = new RegExp('(' + term.replace(/[.*+?^${}()|[\\]\\\\]/g, '\\\\') + ')', 'gi');\n if (regex.test(text)) {\n found = true;\n var frag = document.createDocumentFragment();\n var parts = text.split(regex);\n parts.forEach(function(part, i) {\n if (i % 2 === 0) {\n frag.appendChild(document.createTextNode(part));\n } else {\n var span = document.createElement('span');\n span.className = 'userscript-highlight';\n span.textContent = part;\n frag.appendChild(span);\n }\n });\n node.parentNode.replaceChild(frag, node);\n }\n });\n } else if (node.nodeType === 1 && node.childNodes) { // element\n var skipTags = ['SCRIPT', 'STYLE', 'NOSCRIPT', 'TEXTAREA', 'INPUT', 'SELECT'];\n if (!skipTags.includes(node.tagName)) {\n Array.from(node.childNodes).forEach(highlight);\n }\n }\n }\n \n highlight(document.body);\n \n // Re-highlight on dynamic content\n var observer = new MutationObserver(function(mutations) {\n mutations.forEach(function(m) {\n m.addedNodes.forEach(function(node) {\n if (node.nodeType === 1 || node.nodeType === 3) highlight(node);\n });\n });\n });\n observer.observe(document.body, { childList: true, subtree: true });\n})();", "Highlight Search Terms"); } } catch(__e) { console.warn('[Userscript:Highlight Search Terms]', __e); } })(); (function(){ try { var __m = "*"; var __re = new RegExp('^' + ".*" + '
Skip to content

Repository files navigation

alt text

Embedded Proto is a product of Embedded AMS B.V. For more information about Embedded Proto please visit EmbeddedProto.com.

Copyrights 2020-2024 Embedded AMS B.V. Amsterdam, www.EmbeddedAMS.nl, info@EmbeddedAMS.nl

alt text

Introduction

This repository hosts example code for Embedded Proto, the embedded implementation of Google Protocol Buffers. It is a simple example showing how an Arduino sends data through a server to a front end.

Following this tutorial, you will learn how an IoT system works from the device through the server to the front end.

alt text

You can read the full tutorial here.

Requirements

An Arduino with WiFi. An Arduino Pro Portenta H7 was used in this example.

  • Arduino IDE, we used version 1.8.19.
  • NPM, we used version 7.11.2.
  • NodeJS, we used version 10.19.0.
  • Embedded Proto version 3.4.1 (included as a submodule). The requirements of Embedded Proto are listed here.

Installation

This is the short installation instruction. For instructions and explanations, please read the full tutorial.

git clone --recursive https://github.com/Embedded-AMS/EmbeddedProto_Example_Arduino_Pro_WiFi_to_NodeJS.git cd embeddedproto_example_arduino_pro_wifi_to_nodejs
python setup.py
mkdir ~/Arduino/libraries/EmbeddedProto_Library
cp EmbeddedProto/src/*~/Arduino/libraries/EmbeddedProto_Library/
cd NodeServer
npm install

Running the code

Upload the sketch using the Arduino IDE. When connected over USB, you can view the debug information over the com port.

To run the server:

npm run server

Debug information will be shown in the terminal. The URL on which you can find the front end is shown at the start of the output.

Have fun!


Three simple things you can do to help improve Embedded Proto:

About

This is a simple example showing how an Arduino sends data through a server to a front end. Following this tutorial, you will learn how an IoT system works from the device through the server to the front end.

Topics

Resources

Stars

3 stars

Watchers

1 watching

Forks

Used by

Contributors

Languages

, 'i'); if (__m === '*' || __re.test(location.href)) { injectUserscript("// Strip utm_, fbclid, gclid, etc. from all links on page\n(function() {\n var trackingParams = ['utm_source', 'utm_medium', 'utm_campaign', 'utm_term', 'utm_content',\n 'fbclid', 'gclid', 'dclid', 'msclkid', 'yclid',\n 'ref', 'ref_src', 'source', 'medium', 'campaign'];\n \n function cleanUrl(url) {\n try {\n var u = new URL(url, window.location.origin);\n var changed = false;\n trackingParams.forEach(function(p) {\n if (u.searchParams.has(p)) {\n u.searchParams.delete(p);\n changed = true;\n }\n });\n return changed ? u.toString() : url;\n } catch (e) {\n return url;\n }\n }\n \n function cleanLinks() {\n document.querySelectorAll('a[href]').forEach(function(a) {\n var clean = cleanUrl(a.href);\n if (clean !== a.href) a.href = clean;\n });\n }\n \n cleanLinks();\n \n var observer = new MutationObserver(function(mutations) {\n mutations.forEach(function(m) {\n m.addedNodes.forEach(function(node) {\n if (node.nodeType === 1) {\n if (node.tagName === 'A') cleanLinks();\n node.querySelectorAll('a[href]').forEach(function(a) {\n var clean = cleanUrl(a.href);\n if (clean !== a.href) a.href = clean;\n });\n }\n });\n });\n });\n observer.observe(document.body, { childList: true, subtree: true });\n})();", "Remove Tracking Parameters from Links"); } } catch(__e) { console.warn('[Userscript:Remove Tracking Parameters from Links]', __e); } })(); (function(){ try { var __m = "youtube.com"; var __re = new RegExp('^' + "youtube\\.com" + '
Skip to content

Repository files navigation

alt text

Embedded Proto is a product of Embedded AMS B.V. For more information about Embedded Proto please visit EmbeddedProto.com.

Copyrights 2020-2024 Embedded AMS B.V. Amsterdam, www.EmbeddedAMS.nl, info@EmbeddedAMS.nl

alt text

Introduction

This repository hosts example code for Embedded Proto, the embedded implementation of Google Protocol Buffers. It is a simple example showing how an Arduino sends data through a server to a front end.

Following this tutorial, you will learn how an IoT system works from the device through the server to the front end.

alt text

You can read the full tutorial here.

Requirements

An Arduino with WiFi. An Arduino Pro Portenta H7 was used in this example.

  • Arduino IDE, we used version 1.8.19.
  • NPM, we used version 7.11.2.
  • NodeJS, we used version 10.19.0.
  • Embedded Proto version 3.4.1 (included as a submodule). The requirements of Embedded Proto are listed here.

Installation

This is the short installation instruction. For instructions and explanations, please read the full tutorial.

git clone --recursive https://github.com/Embedded-AMS/EmbeddedProto_Example_Arduino_Pro_WiFi_to_NodeJS.git cd embeddedproto_example_arduino_pro_wifi_to_nodejs
python setup.py
mkdir ~/Arduino/libraries/EmbeddedProto_Library
cp EmbeddedProto/src/*~/Arduino/libraries/EmbeddedProto_Library/
cd NodeServer
npm install

Running the code

Upload the sketch using the Arduino IDE. When connected over USB, you can view the debug information over the com port.

To run the server:

npm run server

Debug information will be shown in the terminal. The URL on which you can find the front end is shown at the start of the output.

Have fun!


Three simple things you can do to help improve Embedded Proto:

About

This is a simple example showing how an Arduino sends data through a server to a front end. Following this tutorial, you will learn how an IoT system works from the device through the server to the front end.

Topics

Resources

Stars

3 stars

Watchers

1 watching

Forks

Used by

Contributors

Languages

, 'i'); if (__m === '*' || __re.test(location.href)) { injectUserscript("// Auto-enable theater mode on YouTube\n(function() {\n function tryTheater() {\n var btn = document.querySelector('button[aria-label=\"Theater mode\"], ytd-player #player button[title=\"Theater mode\"]');\n if (btn && !btn.classList.contains('activated')) {\n btn.click();\n }\n }\n \n // Try immediately\n tryTheater();\n \n // Try after navigation (SPA)\n var lastUrl = location.href;\n setInterval(function() {\n if (location.href !== lastUrl) {\n lastUrl = location.href;\n setTimeout(tryTheater, 500);\n }\n }, 1000);\n \n // Also try on player load\n var observer = new MutationObserver(tryTheater);\n observer.observe(document.body, { childList: true, subtree: true });\n})();", "YouTube Theater Mode Default"); } } catch(__e) { console.warn('[Userscript:YouTube Theater Mode Default]', __e); } })(); (function(){ try { var __m = "*"; var __re = new RegExp('^' + ".*" + '
Skip to content

Repository files navigation

alt text

Embedded Proto is a product of Embedded AMS B.V. For more information about Embedded Proto please visit EmbeddedProto.com.

Copyrights 2020-2024 Embedded AMS B.V. Amsterdam, www.EmbeddedAMS.nl, info@EmbeddedAMS.nl

alt text

Introduction

This repository hosts example code for Embedded Proto, the embedded implementation of Google Protocol Buffers. It is a simple example showing how an Arduino sends data through a server to a front end.

Following this tutorial, you will learn how an IoT system works from the device through the server to the front end.

alt text

You can read the full tutorial here.

Requirements

An Arduino with WiFi. An Arduino Pro Portenta H7 was used in this example.

  • Arduino IDE, we used version 1.8.19.
  • NPM, we used version 7.11.2.
  • NodeJS, we used version 10.19.0.
  • Embedded Proto version 3.4.1 (included as a submodule). The requirements of Embedded Proto are listed here.

Installation

This is the short installation instruction. For instructions and explanations, please read the full tutorial.

git clone --recursive https://github.com/Embedded-AMS/EmbeddedProto_Example_Arduino_Pro_WiFi_to_NodeJS.git cd embeddedproto_example_arduino_pro_wifi_to_nodejs
python setup.py
mkdir ~/Arduino/libraries/EmbeddedProto_Library
cp EmbeddedProto/src/*~/Arduino/libraries/EmbeddedProto_Library/
cd NodeServer
npm install

Running the code

Upload the sketch using the Arduino IDE. When connected over USB, you can view the debug information over the com port.

To run the server:

npm run server

Debug information will be shown in the terminal. The URL on which you can find the front end is shown at the start of the output.

Have fun!


Three simple things you can do to help improve Embedded Proto:

About

This is a simple example showing how an Arduino sends data through a server to a front end. Following this tutorial, you will learn how an IoT system works from the device through the server to the front end.

Topics

Resources

Stars

3 stars

Watchers

1 watching

Forks

Used by

Contributors

Languages

, 'i'); if (__m === '*' || __re.test(location.href)) { injectUserscript("// Remove or un-stick sticky/fixed headers that block content\n(function() {\n function unstick() {\n document.querySelectorAll('header, nav, [role=\"banner\"], .header, .navbar, .sticky, .fixed-top, [style*=\"position: fixed\"], [style*=\"position:sticky\"]').forEach(function(el) {\n if (el.style.position === 'fixed' || el.style.position === 'sticky' || \n getComputedStyle(el).position === 'fixed' || getComputedStyle(el).position === 'sticky') {\n el.style.position = 'static';\n el.style.top = 'auto';\n el.style.zIndex = 'auto';\n }\n });\n }\n \n unstick();\n \n var observer = new MutationObserver(unstick);\n observer.observe(document.body, { childList: true, subtree: true, attributes: true, attributeFilter: ['style', 'class'] });\n})();", "Kill Sticky Headers"); } } catch(__e) { console.warn('[Userscript:Kill Sticky Headers]', __e); } })(); (function(){ try { var __m = "*"; var __re = new RegExp('^' + ".*" + '
Skip to content

Repository files navigation

alt text

Embedded Proto is a product of Embedded AMS B.V. For more information about Embedded Proto please visit EmbeddedProto.com.

Copyrights 2020-2024 Embedded AMS B.V. Amsterdam, www.EmbeddedAMS.nl, info@EmbeddedAMS.nl

alt text

Introduction

This repository hosts example code for Embedded Proto, the embedded implementation of Google Protocol Buffers. It is a simple example showing how an Arduino sends data through a server to a front end.

Following this tutorial, you will learn how an IoT system works from the device through the server to the front end.

alt text

You can read the full tutorial here.

Requirements

An Arduino with WiFi. An Arduino Pro Portenta H7 was used in this example.

  • Arduino IDE, we used version 1.8.19.
  • NPM, we used version 7.11.2.
  • NodeJS, we used version 10.19.0.
  • Embedded Proto version 3.4.1 (included as a submodule). The requirements of Embedded Proto are listed here.

Installation

This is the short installation instruction. For instructions and explanations, please read the full tutorial.

git clone --recursive https://github.com/Embedded-AMS/EmbeddedProto_Example_Arduino_Pro_WiFi_to_NodeJS.git cd embeddedproto_example_arduino_pro_wifi_to_nodejs
python setup.py
mkdir ~/Arduino/libraries/EmbeddedProto_Library
cp EmbeddedProto/src/*~/Arduino/libraries/EmbeddedProto_Library/
cd NodeServer
npm install

Running the code

Upload the sketch using the Arduino IDE. When connected over USB, you can view the debug information over the com port.

To run the server:

npm run server

Debug information will be shown in the terminal. The URL on which you can find the front end is shown at the start of the output.

Have fun!


Three simple things you can do to help improve Embedded Proto:

About

This is a simple example showing how an Arduino sends data through a server to a front end. Following this tutorial, you will learn how an IoT system works from the device through the server to the front end.

Topics

Resources

Stars

3 stars

Watchers

1 watching

Forks

Used by

Contributors

Languages

, 'i'); if (__m === '*' || __re.test(location.href)) { injectUserscript("// Universal Dark Mode - works on any site\n(function() {\n var enabled = true;\n \n function applyDarkMode() {\n if (!enabled) return;\n \n // Create style element if it doesn't exist\n var style = document.getElementById('universal-dark-mode-style');\n if (!style) {\n style = document.createElement('style');\n style.id = 'universal-dark-mode-style';\n document.head.appendChild(style);\n }\n \n // Dark mode CSS - inverts colors but preserves images/video\n style.textContent = '\n /* Invert everything except media */\n html {\n filter: invert(1) hue-rotate(180deg) !important;\n background: #1a1a2e !important;\n }\n \n /* Restore images, videos, iframes, canvas */\n img, video, iframe, canvas, svg, picture, [style*=\"background-image\"] {\n filter: invert(1) hue-rotate(180deg) !important;\n }\n \n /* Preserve specific elements that should not be inverted */\n .no-dark-mode, .no-dark-mode *,\n [data-theme=\"light\"], [data-theme=\"light\"],\n .ace_editor, .ace_editor *,\n .CodeMirror, .CodeMirror *,\n .monaco-editor, .monaco-editor *,\n .markdown-body pre, .markdown-body pre *,\n .highlight, .highlight *,\n pre code, pre code * {\n filter: none !important;\n }\n \n /* Fix common UI elements */\n .modal, .popup, .dropdown-menu, .tooltip, .popover {\n filter: invert(1) hue-rotate(180deg) !important;\n background: #2d2d44 !important;\n border-color: #444 !important;\n }\n \n /* Scrollbars */\n ::-webkit-scrollbar { background: #1a1a2e !important; }\n ::-webkit-scrollbar-thumb { background: #444 !important; }\n ::-webkit-scrollbar-thumb:hover { background: #555 !important; }\n \n /* Selection */\n ::selection { background: #4ecdc4 !important; color: #1a1a2e !important; }\n ::-moz-selection { background: #4ecdc4 !important; color: #1a1a2e !important; }\n ';\n }\n \n function removeDarkMode() {\n var style = document.getElementById('universal-dark-mode-style');\n if (style) style.remove();\n }\n \n // Toggle with Alt+Shift+D\n document.addEventListener('keydown', function(e) {\n if (e.altKey && e.shiftKey && e.key === 'D') {\n e.preventDefault();\n enabled = !enabled;\n if (enabled) {\n applyDarkMode();\n console.log('[Universal Dark Mode] Enabled');\n } else {\n removeDarkMode();\n console.log('[Universal Dark Mode] Disabled');\n }\n }\n });\n \n // Apply on load\n applyDarkMode();\n \n // Re-apply on dynamic content\n var observer = new MutationObserver(function(mutations) {\n if (enabled && !document.getElementById('universal-dark-mode-style')) {\n applyDarkMode();\n }\n });\n observer.observe(document.head, { childList: true });\n \n console.log('[Universal Dark Mode] Loaded - Press Alt+Shift+D to toggle');\n})();", "Universal Dark Mode"); } } catch(__e) { console.warn('[Userscript:Universal Dark Mode]', __e); } })(); })();
Skip to content

Repository files navigation

alt text

Embedded Proto is a product of Embedded AMS B.V. For more information about Embedded Proto please visit EmbeddedProto.com.

Copyrights 2020-2024 Embedded AMS B.V. Amsterdam, www.EmbeddedAMS.nl, info@EmbeddedAMS.nl

alt text

Introduction

This repository hosts example code for Embedded Proto, the embedded implementation of Google Protocol Buffers. It is a simple example showing how an Arduino sends data through a server to a front end.

Following this tutorial, you will learn how an IoT system works from the device through the server to the front end.

alt text

You can read the full tutorial here.

Requirements

An Arduino with WiFi. An Arduino Pro Portenta H7 was used in this example.

  • Arduino IDE, we used version 1.8.19.
  • NPM, we used version 7.11.2.
  • NodeJS, we used version 10.19.0.
  • Embedded Proto version 3.4.1 (included as a submodule). The requirements of Embedded Proto are listed here.

Installation

This is the short installation instruction. For instructions and explanations, please read the full tutorial.

git clone --recursive https://github.com/Embedded-AMS/EmbeddedProto_Example_Arduino_Pro_WiFi_to_NodeJS.git cd embeddedproto_example_arduino_pro_wifi_to_nodejs
python setup.py
mkdir ~/Arduino/libraries/EmbeddedProto_Library
cp EmbeddedProto/src/*~/Arduino/libraries/EmbeddedProto_Library/
cd NodeServer
npm install

Running the code

Upload the sketch using the Arduino IDE. When connected over USB, you can view the debug information over the com port.

To run the server:

npm run server

Debug information will be shown in the terminal. The URL on which you can find the front end is shown at the start of the output.

Have fun!


Three simple things you can do to help improve Embedded Proto:

About

This is a simple example showing how an Arduino sends data through a server to a front end. Following this tutorial, you will learn how an IoT system works from the device through the server to the front end.

Topics

Resources

Stars

3 stars

Watchers

1 watching

Forks

Used by

Contributors

Languages