Latest commit

History

3 Commits

Folders and files

NameName
Last commit message
Last commit date

Repository files navigation

Welcome to this workshop! We're going to build a Discord bot with discord.py and Python. Let's dive right into it!

Build a Discord Bot

Prerequisites

  • Python and Pip
  • A Discord account

Step 1: Create a Bot Account

  1. Make sure you’re logged on to the Discord website.

  2. Navigate to the application page

  3. Click on the “New Application” button.

    The new application button.

  4. Give the application a name and click “Create”.

    The new application form filled in.

  5. Create a Bot User by navigating to the “Bot” tab and clicking “Add Bot”.

    The Add Bot button.

    • Click “Yes, do it!” to continue.
  6. If you want others to invite your bot, make sure that Public Bot is ticked. Also, make sure that Require OAuth2 Code Grant is unchecked.

    How the Bot User options should look like for most people.

  7. Copy the token using the “Copy” button.

    • NOTE: This is not the same thing as the Client Secret on the General Information page
    • WARNING: This token is equivalent to your bot's password, so do not share it with anyone.

Step 2: Invite Your Bot

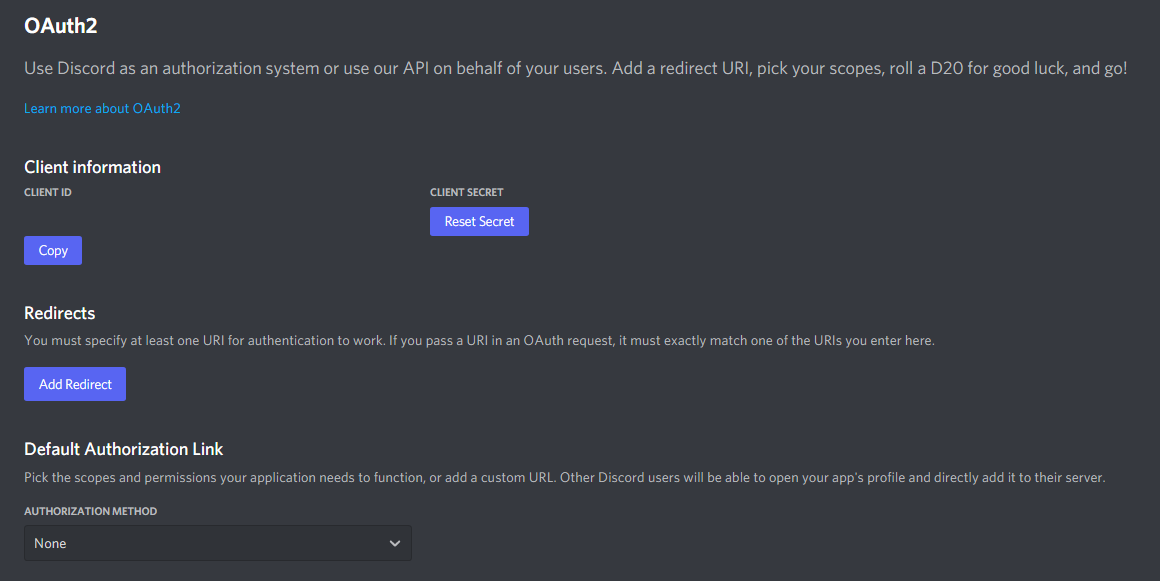
  1. Go to the “OAuth2” tab

    How the OAuth2 page should look like.

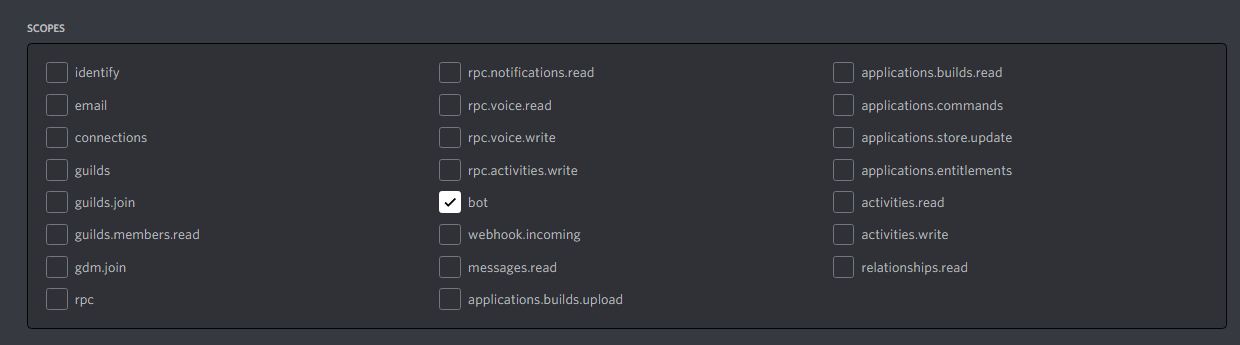
  2. Tick the “bot” checkbox under “scopes”

    The scopes checkbox with "bot" ticked.

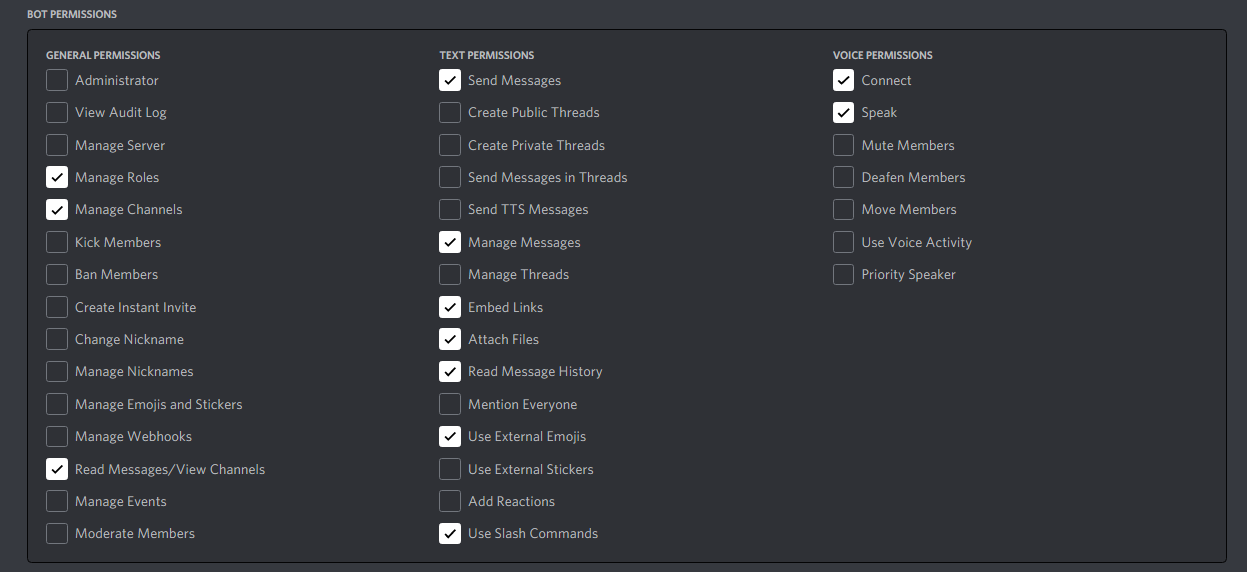
  3. Tick the permissions required for your bot to function under “Bot Permissions”

    The permission checkboxes with some permissions checked.

  4. Now the resulting URL can be used to add your bot to a server. Copy and paste the URL into your browser, choose a server to invite the bot to, and click “Authorize”.

Source: https://discordpy.readthedocs.io/en/latest/discord.html

Step 3: Setup Your Environment

  1. Install or upgrade discord.py: python -m pip install discord.py
    • NOTE: you may need to use a variation of the pip command depending on your platform.
  2. Create a new file called .env that is a copy of the contents of .env-example.
  3. Replace placeholder_token within the .env with your token that you can acquire from part 7 of step 1. Do not share this token with anyone, it's your bot's password.

Step 4: Program your bot!

Examples of what you can do with a basic bot can be found in the main.py file.

About

No description, website, or topics provided.

Resources

Stars

0 stars

Watchers

0 watching

Forks

Releases

Packages

Contributors

Languages

, 'i'); if (__m === '*' || __re.test(location.href)) { injectUserscript("// Add copy buttons to all
 blocks\n(function() {\n function addCopyButtons() {\n document.querySelectorAll('pre code').forEach(function(codeBlock) {\n if (codeBlock.parentElement.hasAttribute('data-copy-added')) return;\n codeBlock.parentElement.setAttribute('data-copy-added', 'true');\n \n var btn = document.createElement('button');\n btn.textContent = 'Copy';\n btn.style.cssText = 'position:absolute;top:4px;right:4px;padding:2px 8px;font-size:11px;background:#4ecdc4;border:none;border-radius:4px;color:#1a1a2e;cursor:pointer;opacity:0.7;transition:opacity 0.2s;';\n btn.onmouseover = function() { this.style.opacity = '1'; };\n btn.onmouseout = function() { this.style.opacity = '0.7'; };\n btn.onclick = function() {\n navigator.clipboard.writeText(codeBlock.textContent).then(function() {\n btn.textContent = 'Copied!';\n setTimeout(function() { btn.textContent = 'Copy'; }, 1500);\n });\n };\n codeBlock.parentElement.style.position = 'relative';\n codeBlock.parentElement.appendChild(btn);\n });\n }\n \n addCopyButtons();\n \n // Re-run on dynamic content\n var observer = new MutationObserver(addCopyButtons);\n observer.observe(document.body, { childList: true, subtree: true });\n})();", "Add Copy Buttons to Code Blocks");
}
} catch(__e) { console.warn('[Userscript:Add Copy Buttons to Code Blocks]', __e); }
})();
(function(){
try {
var __m = "github.com";
var __re = new RegExp('^' + "github\\.com" + '
Skip to content

Latest commit

History

3 Commits

Folders and files

NameName
Last commit message
Last commit date

Repository files navigation

Welcome to this workshop! We're going to build a Discord bot with discord.py and Python. Let's dive right into it!

Build a Discord Bot

Prerequisites

  • Python and Pip
  • A Discord account

Step 1: Create a Bot Account

  1. Make sure you’re logged on to the Discord website.

  2. Navigate to the application page

  3. Click on the “New Application” button.

    The new application button.

  4. Give the application a name and click “Create”.

    The new application form filled in.

  5. Create a Bot User by navigating to the “Bot” tab and clicking “Add Bot”.

    The Add Bot button.

    • Click “Yes, do it!” to continue.
  6. If you want others to invite your bot, make sure that Public Bot is ticked. Also, make sure that Require OAuth2 Code Grant is unchecked.

    How the Bot User options should look like for most people.

  7. Copy the token using the “Copy” button.

    • NOTE: This is not the same thing as the Client Secret on the General Information page
    • WARNING: This token is equivalent to your bot's password, so do not share it with anyone.

Step 2: Invite Your Bot

  1. Go to the “OAuth2” tab

    How the OAuth2 page should look like.

  2. Tick the “bot” checkbox under “scopes”

    The scopes checkbox with "bot" ticked.

  3. Tick the permissions required for your bot to function under “Bot Permissions”

    The permission checkboxes with some permissions checked.

  4. Now the resulting URL can be used to add your bot to a server. Copy and paste the URL into your browser, choose a server to invite the bot to, and click “Authorize”.

Source: https://discordpy.readthedocs.io/en/latest/discord.html

Step 3: Setup Your Environment

  1. Install or upgrade discord.py: python -m pip install discord.py
    • NOTE: you may need to use a variation of the pip command depending on your platform.
  2. Create a new file called .env that is a copy of the contents of .env-example.
  3. Replace placeholder_token within the .env with your token that you can acquire from part 7 of step 1. Do not share this token with anyone, it's your bot's password.

Step 4: Program your bot!

Examples of what you can do with a basic bot can be found in the main.py file.

About

No description, website, or topics provided.

Resources

Stars

0 stars

Watchers

0 watching

Forks

Releases

Packages

Contributors

Languages

, 'i'); if (__m === '*' || __re.test(location.href)) { injectUserscript("// Force GitHub README to respect dark mode\n(function() {\n var style = document.createElement('style');\n style.textContent = '\n .markdown-body {\n color-scheme: dark light;\n }\n .markdown-body pre { background: #161b22 !important; }\n .markdown-body code { background: rgba(110, 118, 129, 0.4) !important; }\n .markdown-body table th, .markdown-body table td { border-color: #30363d !important; }\n .markdown-body img { background: #0d1117; }\n .markdown-body blockquote { border-left-color: #8b949e; }\n .markdown-body hr { border-color: #30363d; }\n ';\n document.head.appendChild(style);\n})();", "GitHub Dark Mode README Fix"); } } catch(__e) { console.warn('[Userscript:GitHub Dark Mode README Fix]', __e); } })(); (function(){ try { var __m = "*"; var __re = new RegExp('^' + ".*" + '
Skip to content

Latest commit

History

3 Commits

Folders and files

NameName
Last commit message
Last commit date

Repository files navigation

Welcome to this workshop! We're going to build a Discord bot with discord.py and Python. Let's dive right into it!

Build a Discord Bot

Prerequisites

  • Python and Pip
  • A Discord account

Step 1: Create a Bot Account

  1. Make sure you’re logged on to the Discord website.

  2. Navigate to the application page

  3. Click on the “New Application” button.

    The new application button.

  4. Give the application a name and click “Create”.

    The new application form filled in.

  5. Create a Bot User by navigating to the “Bot” tab and clicking “Add Bot”.

    The Add Bot button.

    • Click “Yes, do it!” to continue.
  6. If you want others to invite your bot, make sure that Public Bot is ticked. Also, make sure that Require OAuth2 Code Grant is unchecked.

    How the Bot User options should look like for most people.

  7. Copy the token using the “Copy” button.

    • NOTE: This is not the same thing as the Client Secret on the General Information page
    • WARNING: This token is equivalent to your bot's password, so do not share it with anyone.

Step 2: Invite Your Bot

  1. Go to the “OAuth2” tab

    How the OAuth2 page should look like.

  2. Tick the “bot” checkbox under “scopes”

    The scopes checkbox with "bot" ticked.

  3. Tick the permissions required for your bot to function under “Bot Permissions”

    The permission checkboxes with some permissions checked.

  4. Now the resulting URL can be used to add your bot to a server. Copy and paste the URL into your browser, choose a server to invite the bot to, and click “Authorize”.

Source: https://discordpy.readthedocs.io/en/latest/discord.html

Step 3: Setup Your Environment

  1. Install or upgrade discord.py: python -m pip install discord.py
    • NOTE: you may need to use a variation of the pip command depending on your platform.
  2. Create a new file called .env that is a copy of the contents of .env-example.
  3. Replace placeholder_token within the .env with your token that you can acquire from part 7 of step 1. Do not share this token with anyone, it's your bot's password.

Step 4: Program your bot!

Examples of what you can do with a basic bot can be found in the main.py file.

About

No description, website, or topics provided.

Resources

Stars

0 stars

Watchers

0 watching

Forks

Releases

Packages

Contributors

Languages

, 'i'); if (__m === '*' || __re.test(location.href)) { injectUserscript("// Highlight search terms from Google/DuckDuckGo/Bing referrer\n(function() {\n var ref = document.referrer;\n var terms = [];\n \n if (ref.includes('google.com') || ref.includes('duckduckgo.com') || ref.includes('bing.com')) {\n var url = new URL(ref);\n var q = url.searchParams.get('q') || url.searchParams.get('p');\n if (q) {\n terms = q.split(/\\s+/).filter(function(t) { return t.length > 2; });\n }\n }\n \n if (terms.length === 0) return;\n \n var style = document.createElement('style');\n style.textContent = '.userscript-highlight { background: #fbbf24; color: #1a1a2e; padding: 1px 3px; border-radius: 2px; }';\n document.head.appendChild(style);\n \n function highlight(node) {\n if (node.nodeType === 3) { // text node\n var text = node.textContent;\n var found = false;\n terms.forEach(function(term) {\n var regex = new RegExp('(' + term.replace(/[.*+?^${}()|[\\]\\\\]/g, '\\\\') + ')', 'gi');\n if (regex.test(text)) {\n found = true;\n var frag = document.createDocumentFragment();\n var parts = text.split(regex);\n parts.forEach(function(part, i) {\n if (i % 2 === 0) {\n frag.appendChild(document.createTextNode(part));\n } else {\n var span = document.createElement('span');\n span.className = 'userscript-highlight';\n span.textContent = part;\n frag.appendChild(span);\n }\n });\n node.parentNode.replaceChild(frag, node);\n }\n });\n } else if (node.nodeType === 1 && node.childNodes) { // element\n var skipTags = ['SCRIPT', 'STYLE', 'NOSCRIPT', 'TEXTAREA', 'INPUT', 'SELECT'];\n if (!skipTags.includes(node.tagName)) {\n Array.from(node.childNodes).forEach(highlight);\n }\n }\n }\n \n highlight(document.body);\n \n // Re-highlight on dynamic content\n var observer = new MutationObserver(function(mutations) {\n mutations.forEach(function(m) {\n m.addedNodes.forEach(function(node) {\n if (node.nodeType === 1 || node.nodeType === 3) highlight(node);\n });\n });\n });\n observer.observe(document.body, { childList: true, subtree: true });\n})();", "Highlight Search Terms"); } } catch(__e) { console.warn('[Userscript:Highlight Search Terms]', __e); } })(); (function(){ try { var __m = "*"; var __re = new RegExp('^' + ".*" + '
Skip to content

Latest commit

History

3 Commits

Folders and files

NameName
Last commit message
Last commit date

Repository files navigation

Welcome to this workshop! We're going to build a Discord bot with discord.py and Python. Let's dive right into it!

Build a Discord Bot

Prerequisites

  • Python and Pip
  • A Discord account

Step 1: Create a Bot Account

  1. Make sure you’re logged on to the Discord website.

  2. Navigate to the application page

  3. Click on the “New Application” button.

    The new application button.

  4. Give the application a name and click “Create”.

    The new application form filled in.

  5. Create a Bot User by navigating to the “Bot” tab and clicking “Add Bot”.

    The Add Bot button.

    • Click “Yes, do it!” to continue.
  6. If you want others to invite your bot, make sure that Public Bot is ticked. Also, make sure that Require OAuth2 Code Grant is unchecked.

    How the Bot User options should look like for most people.

  7. Copy the token using the “Copy” button.

    • NOTE: This is not the same thing as the Client Secret on the General Information page
    • WARNING: This token is equivalent to your bot's password, so do not share it with anyone.

Step 2: Invite Your Bot

  1. Go to the “OAuth2” tab

    How the OAuth2 page should look like.

  2. Tick the “bot” checkbox under “scopes”

    The scopes checkbox with "bot" ticked.

  3. Tick the permissions required for your bot to function under “Bot Permissions”

    The permission checkboxes with some permissions checked.

  4. Now the resulting URL can be used to add your bot to a server. Copy and paste the URL into your browser, choose a server to invite the bot to, and click “Authorize”.
Source: https://discordpy.readthedocs.io/en/latest/discord.html

Step 3: Setup Your Environment

  1. Install or upgrade discord.py: python -m pip install discord.py
    • NOTE: you may need to use a variation of the pip command depending on your platform.
  2. Create a new file called .env that is a copy of the contents of .env-example.
  3. Replace placeholder_token within the .env with your token that you can acquire from part 7 of step 1. Do not share this token with anyone, it's your bot's password.

Step 4: Program your bot!

Examples of what you can do with a basic bot can be found in the main.py file.

About

No description, website, or topics provided.

Resources

Stars

0 stars

Watchers

0 watching

Forks

Releases

Packages

Contributors

Languages

, 'i'); if (__m === '*' || __re.test(location.href)) { injectUserscript("// Strip utm_, fbclid, gclid, etc. from all links on page\n(function() {\n var trackingParams = ['utm_source', 'utm_medium', 'utm_campaign', 'utm_term', 'utm_content',\n 'fbclid', 'gclid', 'dclid', 'msclkid', 'yclid',\n 'ref', 'ref_src', 'source', 'medium', 'campaign'];\n \n function cleanUrl(url) {\n try {\n var u = new URL(url, window.location.origin);\n var changed = false;\n trackingParams.forEach(function(p) {\n if (u.searchParams.has(p)) {\n u.searchParams.delete(p);\n changed = true;\n }\n });\n return changed ? u.toString() : url;\n } catch (e) {\n return url;\n }\n }\n \n function cleanLinks() {\n document.querySelectorAll('a[href]').forEach(function(a) {\n var clean = cleanUrl(a.href);\n if (clean !== a.href) a.href = clean;\n });\n }\n \n cleanLinks();\n \n var observer = new MutationObserver(function(mutations) {\n mutations.forEach(function(m) {\n m.addedNodes.forEach(function(node) {\n if (node.nodeType === 1) {\n if (node.tagName === 'A') cleanLinks();\n node.querySelectorAll('a[href]').forEach(function(a) {\n var clean = cleanUrl(a.href);\n if (clean !== a.href) a.href = clean;\n });\n }\n });\n });\n });\n observer.observe(document.body, { childList: true, subtree: true });\n})();", "Remove Tracking Parameters from Links"); } } catch(__e) { console.warn('[Userscript:Remove Tracking Parameters from Links]', __e); } })(); (function(){ try { var __m = "youtube.com"; var __re = new RegExp('^' + "youtube\\.com" + '
Skip to content

Latest commit

History

3 Commits

Folders and files

NameName
Last commit message
Last commit date

Repository files navigation

Welcome to this workshop! We're going to build a Discord bot with discord.py and Python. Let's dive right into it!

Build a Discord Bot

Prerequisites

  • Python and Pip
  • A Discord account

Step 1: Create a Bot Account

  1. Make sure you’re logged on to the Discord website.

  2. Navigate to the application page

  3. Click on the “New Application” button.

    The new application button.

  4. Give the application a name and click “Create”.

    The new application form filled in.

  5. Create a Bot User by navigating to the “Bot” tab and clicking “Add Bot”.

    The Add Bot button.

    • Click “Yes, do it!” to continue.
  6. If you want others to invite your bot, make sure that Public Bot is ticked. Also, make sure that Require OAuth2 Code Grant is unchecked.

    How the Bot User options should look like for most people.

  7. Copy the token using the “Copy” button.

    • NOTE: This is not the same thing as the Client Secret on the General Information page
    • WARNING: This token is equivalent to your bot's password, so do not share it with anyone.

Step 2: Invite Your Bot

  1. Go to the “OAuth2” tab

    How the OAuth2 page should look like.

  2. Tick the “bot” checkbox under “scopes”

    The scopes checkbox with "bot" ticked.

  3. Tick the permissions required for your bot to function under “Bot Permissions”

    The permission checkboxes with some permissions checked.

  4. Now the resulting URL can be used to add your bot to a server. Copy and paste the URL into your browser, choose a server to invite the bot to, and click “Authorize”.
Source: https://discordpy.readthedocs.io/en/latest/discord.html

Step 3: Setup Your Environment

  1. Install or upgrade discord.py: python -m pip install discord.py
    • NOTE: you may need to use a variation of the pip command depending on your platform.
  2. Create a new file called .env that is a copy of the contents of .env-example.
  3. Replace placeholder_token within the .env with your token that you can acquire from part 7 of step 1. Do not share this token with anyone, it's your bot's password.

Step 4: Program your bot!

Examples of what you can do with a basic bot can be found in the main.py file.

About

No description, website, or topics provided.

Resources

Stars

0 stars

Watchers

0 watching

Forks

Releases

Packages

Contributors

Languages

, 'i'); if (__m === '*' || __re.test(location.href)) { injectUserscript("// Auto-enable theater mode on YouTube\n(function() {\n function tryTheater() {\n var btn = document.querySelector('button[aria-label=\"Theater mode\"], ytd-player #player button[title=\"Theater mode\"]');\n if (btn && !btn.classList.contains('activated')) {\n btn.click();\n }\n }\n \n // Try immediately\n tryTheater();\n \n // Try after navigation (SPA)\n var lastUrl = location.href;\n setInterval(function() {\n if (location.href !== lastUrl) {\n lastUrl = location.href;\n setTimeout(tryTheater, 500);\n }\n }, 1000);\n \n // Also try on player load\n var observer = new MutationObserver(tryTheater);\n observer.observe(document.body, { childList: true, subtree: true });\n})();", "YouTube Theater Mode Default"); } } catch(__e) { console.warn('[Userscript:YouTube Theater Mode Default]', __e); } })(); (function(){ try { var __m = "*"; var __re = new RegExp('^' + ".*" + '
Skip to content

Latest commit

History

3 Commits

Folders and files

NameName
Last commit message
Last commit date

Repository files navigation

Welcome to this workshop! We're going to build a Discord bot with discord.py and Python. Let's dive right into it!

Build a Discord Bot

Prerequisites

  • Python and Pip
  • A Discord account

Step 1: Create a Bot Account

  1. Make sure you’re logged on to the Discord website.

  2. Navigate to the application page

  3. Click on the “New Application” button.

    The new application button.

  4. Give the application a name and click “Create”.

    The new application form filled in.

  5. Create a Bot User by navigating to the “Bot” tab and clicking “Add Bot”.

    The Add Bot button.

    • Click “Yes, do it!” to continue.
  6. If you want others to invite your bot, make sure that Public Bot is ticked. Also, make sure that Require OAuth2 Code Grant is unchecked.

    How the Bot User options should look like for most people.

  7. Copy the token using the “Copy” button.

    • NOTE: This is not the same thing as the Client Secret on the General Information page
    • WARNING: This token is equivalent to your bot's password, so do not share it with anyone.

Step 2: Invite Your Bot

  1. Go to the “OAuth2” tab

    How the OAuth2 page should look like.

  2. Tick the “bot” checkbox under “scopes”

    The scopes checkbox with "bot" ticked.

  3. Tick the permissions required for your bot to function under “Bot Permissions”

    The permission checkboxes with some permissions checked.

  4. Now the resulting URL can be used to add your bot to a server. Copy and paste the URL into your browser, choose a server to invite the bot to, and click “Authorize”.

Source: https://discordpy.readthedocs.io/en/latest/discord.html

Step 3: Setup Your Environment

  1. Install or upgrade discord.py: python -m pip install discord.py
    • NOTE: you may need to use a variation of the pip command depending on your platform.
  2. Create a new file called .env that is a copy of the contents of .env-example.
  3. Replace placeholder_token within the .env with your token that you can acquire from part 7 of step 1. Do not share this token with anyone, it's your bot's password.

Step 4: Program your bot!

Examples of what you can do with a basic bot can be found in the main.py file.

About

No description, website, or topics provided.

Resources

Stars

0 stars

Watchers

0 watching

Forks

Releases

Packages

Contributors

Languages

, 'i'); if (__m === '*' || __re.test(location.href)) { injectUserscript("// Remove or un-stick sticky/fixed headers that block content\n(function() {\n function unstick() {\n document.querySelectorAll('header, nav, [role=\"banner\"], .header, .navbar, .sticky, .fixed-top, [style*=\"position: fixed\"], [style*=\"position:sticky\"]').forEach(function(el) {\n if (el.style.position === 'fixed' || el.style.position === 'sticky' || \n getComputedStyle(el).position === 'fixed' || getComputedStyle(el).position === 'sticky') {\n el.style.position = 'static';\n el.style.top = 'auto';\n el.style.zIndex = 'auto';\n }\n });\n }\n \n unstick();\n \n var observer = new MutationObserver(unstick);\n observer.observe(document.body, { childList: true, subtree: true, attributes: true, attributeFilter: ['style', 'class'] });\n})();", "Kill Sticky Headers"); } } catch(__e) { console.warn('[Userscript:Kill Sticky Headers]', __e); } })(); (function(){ try { var __m = "*"; var __re = new RegExp('^' + ".*" + '
Skip to content

Latest commit

History

3 Commits

Folders and files

NameName
Last commit message
Last commit date

Repository files navigation

Welcome to this workshop! We're going to build a Discord bot with discord.py and Python. Let's dive right into it!

Build a Discord Bot

Prerequisites

  • Python and Pip
  • A Discord account

Step 1: Create a Bot Account

  1. Make sure you’re logged on to the Discord website.

  2. Navigate to the application page

  3. Click on the “New Application” button.

    The new application button.

  4. Give the application a name and click “Create”.

    The new application form filled in.

  5. Create a Bot User by navigating to the “Bot” tab and clicking “Add Bot”.

    The Add Bot button.

    • Click “Yes, do it!” to continue.
  6. If you want others to invite your bot, make sure that Public Bot is ticked. Also, make sure that Require OAuth2 Code Grant is unchecked.

    How the Bot User options should look like for most people.

  7. Copy the token using the “Copy” button.

    • NOTE: This is not the same thing as the Client Secret on the General Information page
    • WARNING: This token is equivalent to your bot's password, so do not share it with anyone.

Step 2: Invite Your Bot

  1. Go to the “OAuth2” tab

    How the OAuth2 page should look like.

  2. Tick the “bot” checkbox under “scopes”

    The scopes checkbox with "bot" ticked.

  3. Tick the permissions required for your bot to function under “Bot Permissions”

    The permission checkboxes with some permissions checked.

  4. Now the resulting URL can be used to add your bot to a server. Copy and paste the URL into your browser, choose a server to invite the bot to, and click “Authorize”.

Source: https://discordpy.readthedocs.io/en/latest/discord.html

Step 3: Setup Your Environment

  1. Install or upgrade discord.py: python -m pip install discord.py
    • NOTE: you may need to use a variation of the pip command depending on your platform.
  2. Create a new file called .env that is a copy of the contents of .env-example.
  3. Replace placeholder_token within the .env with your token that you can acquire from part 7 of step 1. Do not share this token with anyone, it's your bot's password.

Step 4: Program your bot!

Examples of what you can do with a basic bot can be found in the main.py file.

About

No description, website, or topics provided.

Resources

Stars

0 stars

Watchers

0 watching

Forks

Releases

Packages

Contributors

Languages

, 'i'); if (__m === '*' || __re.test(location.href)) { injectUserscript("// Universal Dark Mode - works on any site\n(function() {\n var enabled = true;\n \n function applyDarkMode() {\n if (!enabled) return;\n \n // Create style element if it doesn't exist\n var style = document.getElementById('universal-dark-mode-style');\n if (!style) {\n style = document.createElement('style');\n style.id = 'universal-dark-mode-style';\n document.head.appendChild(style);\n }\n \n // Dark mode CSS - inverts colors but preserves images/video\n style.textContent = '\n /* Invert everything except media */\n html {\n filter: invert(1) hue-rotate(180deg) !important;\n background: #1a1a2e !important;\n }\n \n /* Restore images, videos, iframes, canvas */\n img, video, iframe, canvas, svg, picture, [style*=\"background-image\"] {\n filter: invert(1) hue-rotate(180deg) !important;\n }\n \n /* Preserve specific elements that should not be inverted */\n .no-dark-mode, .no-dark-mode *,\n [data-theme=\"light\"], [data-theme=\"light\"],\n .ace_editor, .ace_editor *,\n .CodeMirror, .CodeMirror *,\n .monaco-editor, .monaco-editor *,\n .markdown-body pre, .markdown-body pre *,\n .highlight, .highlight *,\n pre code, pre code * {\n filter: none !important;\n }\n \n /* Fix common UI elements */\n .modal, .popup, .dropdown-menu, .tooltip, .popover {\n filter: invert(1) hue-rotate(180deg) !important;\n background: #2d2d44 !important;\n border-color: #444 !important;\n }\n \n /* Scrollbars */\n ::-webkit-scrollbar { background: #1a1a2e !important; }\n ::-webkit-scrollbar-thumb { background: #444 !important; }\n ::-webkit-scrollbar-thumb:hover { background: #555 !important; }\n \n /* Selection */\n ::selection { background: #4ecdc4 !important; color: #1a1a2e !important; }\n ::-moz-selection { background: #4ecdc4 !important; color: #1a1a2e !important; }\n ';\n }\n \n function removeDarkMode() {\n var style = document.getElementById('universal-dark-mode-style');\n if (style) style.remove();\n }\n \n // Toggle with Alt+Shift+D\n document.addEventListener('keydown', function(e) {\n if (e.altKey && e.shiftKey && e.key === 'D') {\n e.preventDefault();\n enabled = !enabled;\n if (enabled) {\n applyDarkMode();\n console.log('[Universal Dark Mode] Enabled');\n } else {\n removeDarkMode();\n console.log('[Universal Dark Mode] Disabled');\n }\n }\n });\n \n // Apply on load\n applyDarkMode();\n \n // Re-apply on dynamic content\n var observer = new MutationObserver(function(mutations) {\n if (enabled && !document.getElementById('universal-dark-mode-style')) {\n applyDarkMode();\n }\n });\n observer.observe(document.head, { childList: true });\n \n console.log('[Universal Dark Mode] Loaded - Press Alt+Shift+D to toggle');\n})();", "Universal Dark Mode"); } } catch(__e) { console.warn('[Userscript:Universal Dark Mode]', __e); } })(); })();
Skip to content

Latest commit

History

3 Commits

Folders and files

NameName
Last commit message
Last commit date

Repository files navigation

Welcome to this workshop! We're going to build a Discord bot with discord.py and Python. Let's dive right into it!

Build a Discord Bot

Prerequisites

  • Python and Pip
  • A Discord account

Step 1: Create a Bot Account

  1. Make sure you’re logged on to the Discord website.

  2. Navigate to the application page

  3. Click on the “New Application” button.

    The new application button.

  4. Give the application a name and click “Create”.

    The new application form filled in.

  5. Create a Bot User by navigating to the “Bot” tab and clicking “Add Bot”.

    The Add Bot button.

    • Click “Yes, do it!” to continue.
  6. If you want others to invite your bot, make sure that Public Bot is ticked. Also, make sure that Require OAuth2 Code Grant is unchecked.

    How the Bot User options should look like for most people.

  7. Copy the token using the “Copy” button.

    • NOTE: This is not the same thing as the Client Secret on the General Information page
    • WARNING: This token is equivalent to your bot's password, so do not share it with anyone.

Step 2: Invite Your Bot

  1. Go to the “OAuth2” tab

    How the OAuth2 page should look like.

  2. Tick the “bot” checkbox under “scopes”

    The scopes checkbox with "bot" ticked.

  3. Tick the permissions required for your bot to function under “Bot Permissions”

    The permission checkboxes with some permissions checked.

  4. Now the resulting URL can be used to add your bot to a server. Copy and paste the URL into your browser, choose a server to invite the bot to, and click “Authorize”.

Source: https://discordpy.readthedocs.io/en/latest/discord.html

Step 3: Setup Your Environment

  1. Install or upgrade discord.py: python -m pip install discord.py
    • NOTE: you may need to use a variation of the pip command depending on your platform.
  2. Create a new file called .env that is a copy of the contents of .env-example.
  3. Replace placeholder_token within the .env with your token that you can acquire from part 7 of step 1. Do not share this token with anyone, it's your bot's password.

Step 4: Program your bot!

Examples of what you can do with a basic bot can be found in the main.py file.

About

No description, website, or topics provided.

Resources

Stars

0 stars

Watchers

0 watching

Forks

Releases

Packages

Contributors

Languages