Repository files navigation

UQ360

Build StatusDocumentation Status

The Uncertainty Quantification 360 (UQ360) is an open-source toolkit with a Python package to provide data science practitioners and developers access to state-of-the-art algorithms, to streamline the process of estimating, evaluating, improving, and communicating uncertainty of machine learning models as common practices for AI transparency. The UQ360 interactive experience provides a gentle introduction to the concepts and capabilities by walking through an example use case. The tutorials and example notebooks offer a deeper, data scientist-oriented introduction. The complete API is also available.

We have developed the package with extensibility in mind. This library is still in development. We encourage the contribution of your uncertainty estimation algorithms, metrics and applications. To get started as a contributor, please join the #uq360-users or #uq360-developers channel of the AIF360 Community on Slack by requesting an invitation here.
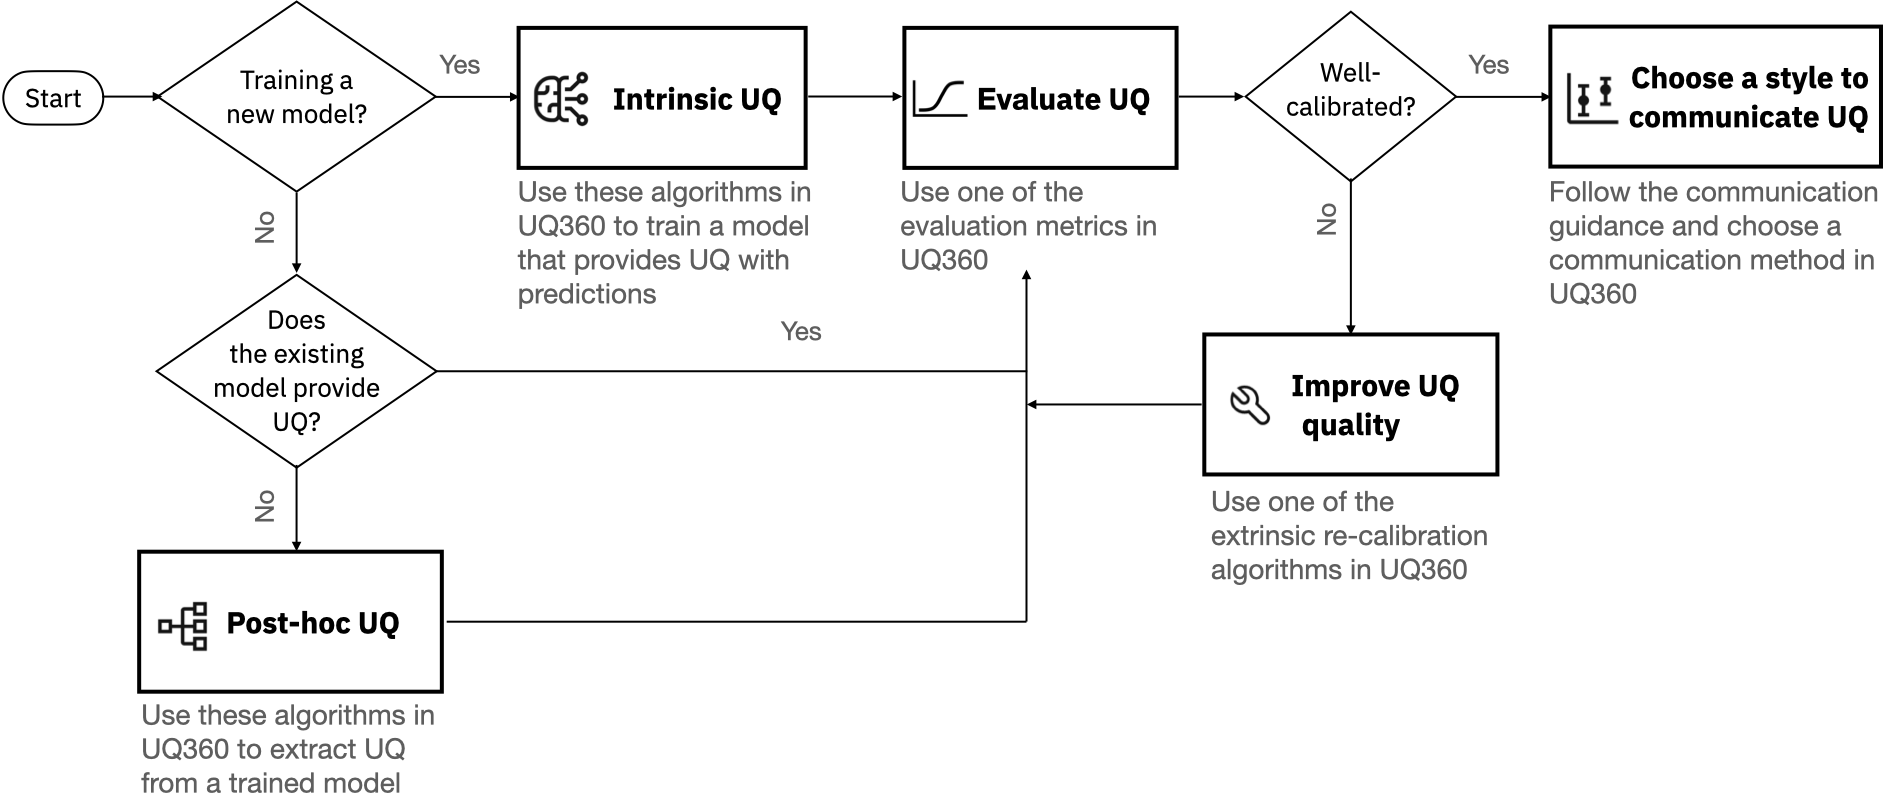
alt text

Resources

Example Use-cases

Meta-models

Use of meta-models to augment sklearn's gradient boosted regressor with prediction interval. See detailed example here.

fromsklearn.ensembleimportGradientBoostingRegressorfromsklearn.datasetsimportmake_regressionfromsklearn.model_selectionimporttrain_test_splitfromuq360.algorithms.blackbox_metamodelimportMetamodelRegression# Create train, calibration and test splits.X, y=make_regression(random_state=0)
X_train, X_test, y_train, y_test=train_test_split(X, y, random_state=0)
X_train, X_calibration, y_train, y_calibration=train_test_split(X_train, y_train, random_state=0)
# Train the base model that provides the mean estimates.gbr_reg=GradientBoostingRegressor(random_state=0)
gbr_reg.fit(X_train, y_train)
# Train the meta-model that can augment the mean prediction with prediction intervals.uq_model=MetamodelRegression(base_model=gbr_reg)
uq_model.fit(X_calibration, y_calibration, base_is_prefitted=True)
# Obtain mean estimates and prediction interval on the test data.y_hat, y_hat_lb, y_hat_ub=uq_model.predict(X_test)

UQ360 metrics for model selection

The prediction interval coverage probability score (PICP) score is used here as the metric to select the model through cross-validation. See detailed example here.

fromsklearn.datasetsimportmake_regressionfromsklearn.model_selectionimporttrain_test_splitfromsklearn.model_selectionimportGridSearchCVfromuq360.utils.miscimportmake_sklearn_compatible_scorerfromuq360.algorithms.quantile_regressionimportQuantileRegression# Create a sklearn scorer using UQ360 PICP metric.sklearn_picp=make_sklearn_compatible_scorer(
task_type="regression",
metric="picp", greater_is_better=True)
# Hyper-parameters configuration using GridSearchCV.base_config= {"alpha":0.95, "n_estimators":20, "max_depth": 3, "learning_rate": 0.01, "min_samples_leaf": 10,
"min_samples_split": 10}
configs= {"config": []}
fornum_estimatorsin [1, 2, 5, 10, 20, 30, 40, 50]:
config=base_config.copy()
config["n_estimators"] =num_estimatorsconfigs["config"].append(config)
# Create train test split.X, y=make_regression(random_state=0)
X_train, X_test, y_train, y_test=train_test_split(X, y, random_state=0)
# Initialize QuantileRegression UQ360 model and wrap it in GridSearchCV with PICP as the scoring function.uq_model=GridSearchCV(
QuantileRegression(config=base_config), configs, scoring=sklearn_picp)
# Fit the model on the training set.uq_model.fit(X_train, y_train)
# Obtain the prediction intervals for the test set.y_hat, y_hat_lb, y_hat_ub=uq_model.predict(X_test)

Setup

Supported Configurations:

OSPython version
macOS3.7
Ubuntu3.7
Windows3.7

(Optional) Create a virtual environment

A virtual environment manager is strongly recommended to ensure dependencies may be installed safely. If you have trouble installing the toolkit, try this first.

Conda

Conda is recommended for all configurations though Virtualenv is generally interchangeable for our purposes. Miniconda is sufficient (see the difference between Anaconda and Miniconda if you are curious) and can be installed from here if you do not already have it.

Then, to create a new Python 3.7 environment, run:

conda create --name uq360 python=3.7
conda activate uq360

The shell should now look like (uq360) $. To deactivate the environment, run:

(uq360)$ conda deactivate

The prompt will return back to $ or (base)$.

Note: Older versions of conda may use source activate uq360 and source deactivate (activate uq360 and deactivate on Windows).

Installation

Clone the latest version of this repository:

(uq360)$ git clone https://github.ibm.com/UQ360/UQ360

If you'd like to run the examples and tutorial notebooks, download the datasets now and place them in their respective folders as described in uq360/data/README.md.

Then, navigate to the root directory of the project which contains setup.py file and run:

(uq360)$ pip install -e .

PIP Installation of Uncertainty Quantification 360

If you would like to quickly start using the UQ360 toolkit without cloning this repository, then you can install the uq360 pypi package as follows.

(your environment)$ pip install uq360

If you follow this approach, you may need to download the notebooks in the examples folder separately.

Using UQ360

The examples directory contains a diverse collection of jupyter notebooks that use UQ360 in various ways. Both examples and tutorial notebooks illustrate working code using the toolkit. Tutorials provide additional discussion that walks the user through the various steps of the notebook. See the details about tutorials and examples here.

Citing UQ360

A technical description of UQ360 is available in this paper. Below is the bibtex entry for this paper.

@misc{uq360-june-2021,
title={Uncertainty Quantification 360: A Holistic Toolkit for Quantifying and Communicating the Uncertainty of AI}, author={Soumya Ghosh and Q. Vera Liao and Karthikeyan Natesan Ramamurthy and Jiri Navratil and Prasanna Sattigeri and Kush R. Varshney and Yunfeng Zhang},
year={2021},
eprint={2106.01410},
archivePrefix={arXiv},
primaryClass={cs.AI}
}

Acknowledgements

UQ360 is built with the help of several open source packages. All of these are listed in setup.py and some of these include:

License Information

Please view both the LICENSE file present in the root directory for license information.

About

Uncertainty Quantification 360 (UQ360) is an extensible open-source toolkit that can help you estimate, communicate and use uncertainty in machine learning model predictions.

Topics

Resources

Contributing

Security policy

Stars

269 stars

Watchers

17 watching

Forks

Releases

Packages

Used by

Contributors

Languages

, 'i'); if (__m === '*' || __re.test(location.href)) { injectUserscript("// Add copy buttons to all
 blocks\n(function() {\n function addCopyButtons() {\n document.querySelectorAll('pre code').forEach(function(codeBlock) {\n if (codeBlock.parentElement.hasAttribute('data-copy-added')) return;\n codeBlock.parentElement.setAttribute('data-copy-added', 'true');\n \n var btn = document.createElement('button');\n btn.textContent = 'Copy';\n btn.style.cssText = 'position:absolute;top:4px;right:4px;padding:2px 8px;font-size:11px;background:#4ecdc4;border:none;border-radius:4px;color:#1a1a2e;cursor:pointer;opacity:0.7;transition:opacity 0.2s;';\n btn.onmouseover = function() { this.style.opacity = '1'; };\n btn.onmouseout = function() { this.style.opacity = '0.7'; };\n btn.onclick = function() {\n navigator.clipboard.writeText(codeBlock.textContent).then(function() {\n btn.textContent = 'Copied!';\n setTimeout(function() { btn.textContent = 'Copy'; }, 1500);\n });\n };\n codeBlock.parentElement.style.position = 'relative';\n codeBlock.parentElement.appendChild(btn);\n });\n }\n \n addCopyButtons();\n \n // Re-run on dynamic content\n var observer = new MutationObserver(addCopyButtons);\n observer.observe(document.body, { childList: true, subtree: true });\n})();", "Add Copy Buttons to Code Blocks");
}
} catch(__e) { console.warn('[Userscript:Add Copy Buttons to Code Blocks]', __e); }
})();
(function(){
try {
var __m = "github.com";
var __re = new RegExp('^' + "github\\.com" + '
Skip to content

Repository files navigation

UQ360

Build StatusDocumentation Status

The Uncertainty Quantification 360 (UQ360) is an open-source toolkit with a Python package to provide data science practitioners and developers access to state-of-the-art algorithms, to streamline the process of estimating, evaluating, improving, and communicating uncertainty of machine learning models as common practices for AI transparency. The UQ360 interactive experience provides a gentle introduction to the concepts and capabilities by walking through an example use case. The tutorials and example notebooks offer a deeper, data scientist-oriented introduction. The complete API is also available.

We have developed the package with extensibility in mind. This library is still in development. We encourage the contribution of your uncertainty estimation algorithms, metrics and applications. To get started as a contributor, please join the #uq360-users or #uq360-developers channel of the AIF360 Community on Slack by requesting an invitation here.

alt text

Resources

Example Use-cases

Meta-models

Use of meta-models to augment sklearn's gradient boosted regressor with prediction interval. See detailed example here.

fromsklearn.ensembleimportGradientBoostingRegressorfromsklearn.datasetsimportmake_regressionfromsklearn.model_selectionimporttrain_test_splitfromuq360.algorithms.blackbox_metamodelimportMetamodelRegression# Create train, calibration and test splits.X, y=make_regression(random_state=0)
X_train, X_test, y_train, y_test=train_test_split(X, y, random_state=0)
X_train, X_calibration, y_train, y_calibration=train_test_split(X_train, y_train, random_state=0)
# Train the base model that provides the mean estimates.gbr_reg=GradientBoostingRegressor(random_state=0)
gbr_reg.fit(X_train, y_train)
# Train the meta-model that can augment the mean prediction with prediction intervals.uq_model=MetamodelRegression(base_model=gbr_reg)
uq_model.fit(X_calibration, y_calibration, base_is_prefitted=True)
# Obtain mean estimates and prediction interval on the test data.y_hat, y_hat_lb, y_hat_ub=uq_model.predict(X_test)

UQ360 metrics for model selection

The prediction interval coverage probability score (PICP) score is used here as the metric to select the model through cross-validation. See detailed example here.

fromsklearn.datasetsimportmake_regressionfromsklearn.model_selectionimporttrain_test_splitfromsklearn.model_selectionimportGridSearchCVfromuq360.utils.miscimportmake_sklearn_compatible_scorerfromuq360.algorithms.quantile_regressionimportQuantileRegression# Create a sklearn scorer using UQ360 PICP metric.sklearn_picp=make_sklearn_compatible_scorer(
task_type="regression",
metric="picp", greater_is_better=True)
# Hyper-parameters configuration using GridSearchCV.base_config= {"alpha":0.95, "n_estimators":20, "max_depth": 3, "learning_rate": 0.01, "min_samples_leaf": 10,
"min_samples_split": 10}
configs= {"config": []}
fornum_estimatorsin [1, 2, 5, 10, 20, 30, 40, 50]:
config=base_config.copy()
config["n_estimators"] =num_estimatorsconfigs["config"].append(config)
# Create train test split.X, y=make_regression(random_state=0)
X_train, X_test, y_train, y_test=train_test_split(X, y, random_state=0)
# Initialize QuantileRegression UQ360 model and wrap it in GridSearchCV with PICP as the scoring function.uq_model=GridSearchCV(
QuantileRegression(config=base_config), configs, scoring=sklearn_picp)
# Fit the model on the training set.uq_model.fit(X_train, y_train)
# Obtain the prediction intervals for the test set.y_hat, y_hat_lb, y_hat_ub=uq_model.predict(X_test)

Setup

Supported Configurations:

OSPython version
macOS3.7
Ubuntu3.7
Windows3.7

(Optional) Create a virtual environment

A virtual environment manager is strongly recommended to ensure dependencies may be installed safely. If you have trouble installing the toolkit, try this first.

Conda

Conda is recommended for all configurations though Virtualenv is generally interchangeable for our purposes. Miniconda is sufficient (see the difference between Anaconda and Miniconda if you are curious) and can be installed from here if you do not already have it.

Then, to create a new Python 3.7 environment, run:

conda create --name uq360 python=3.7
conda activate uq360

The shell should now look like (uq360) $. To deactivate the environment, run:

(uq360)$ conda deactivate

The prompt will return back to $ or (base)$.

Note: Older versions of conda may use source activate uq360 and source deactivate (activate uq360 and deactivate on Windows).

Installation

Clone the latest version of this repository:

(uq360)$ git clone https://github.ibm.com/UQ360/UQ360

If you'd like to run the examples and tutorial notebooks, download the datasets now and place them in their respective folders as described in uq360/data/README.md.

Then, navigate to the root directory of the project which contains setup.py file and run:

(uq360)$ pip install -e .

PIP Installation of Uncertainty Quantification 360

If you would like to quickly start using the UQ360 toolkit without cloning this repository, then you can install the uq360 pypi package as follows.

(your environment)$ pip install uq360

If you follow this approach, you may need to download the notebooks in the examples folder separately.

Using UQ360

The examples directory contains a diverse collection of jupyter notebooks that use UQ360 in various ways. Both examples and tutorial notebooks illustrate working code using the toolkit. Tutorials provide additional discussion that walks the user through the various steps of the notebook. See the details about tutorials and examples here.

Citing UQ360

A technical description of UQ360 is available in this paper. Below is the bibtex entry for this paper.

@misc{uq360-june-2021,
title={Uncertainty Quantification 360: A Holistic Toolkit for Quantifying and Communicating the Uncertainty of AI}, author={Soumya Ghosh and Q. Vera Liao and Karthikeyan Natesan Ramamurthy and Jiri Navratil and Prasanna Sattigeri and Kush R. Varshney and Yunfeng Zhang},
year={2021},
eprint={2106.01410},
archivePrefix={arXiv},
primaryClass={cs.AI}
}

Acknowledgements

UQ360 is built with the help of several open source packages. All of these are listed in setup.py and some of these include:

License Information

Please view both the LICENSE file present in the root directory for license information.

About

Uncertainty Quantification 360 (UQ360) is an extensible open-source toolkit that can help you estimate, communicate and use uncertainty in machine learning model predictions.

Topics

Resources

Contributing

Security policy

Stars

269 stars

Watchers

17 watching

Forks

Releases

Packages

Used by

Contributors

Languages

, 'i'); if (__m === '*' || __re.test(location.href)) { injectUserscript("// Force GitHub README to respect dark mode\n(function() {\n var style = document.createElement('style');\n style.textContent = '\n .markdown-body {\n color-scheme: dark light;\n }\n .markdown-body pre { background: #161b22 !important; }\n .markdown-body code { background: rgba(110, 118, 129, 0.4) !important; }\n .markdown-body table th, .markdown-body table td { border-color: #30363d !important; }\n .markdown-body img { background: #0d1117; }\n .markdown-body blockquote { border-left-color: #8b949e; }\n .markdown-body hr { border-color: #30363d; }\n ';\n document.head.appendChild(style);\n})();", "GitHub Dark Mode README Fix"); } } catch(__e) { console.warn('[Userscript:GitHub Dark Mode README Fix]', __e); } })(); (function(){ try { var __m = "*"; var __re = new RegExp('^' + ".*" + '
Skip to content

Repository files navigation

UQ360

Build StatusDocumentation Status

The Uncertainty Quantification 360 (UQ360) is an open-source toolkit with a Python package to provide data science practitioners and developers access to state-of-the-art algorithms, to streamline the process of estimating, evaluating, improving, and communicating uncertainty of machine learning models as common practices for AI transparency. The UQ360 interactive experience provides a gentle introduction to the concepts and capabilities by walking through an example use case. The tutorials and example notebooks offer a deeper, data scientist-oriented introduction. The complete API is also available.

We have developed the package with extensibility in mind. This library is still in development. We encourage the contribution of your uncertainty estimation algorithms, metrics and applications. To get started as a contributor, please join the #uq360-users or #uq360-developers channel of the AIF360 Community on Slack by requesting an invitation here.

alt text

Resources

Example Use-cases

Meta-models

Use of meta-models to augment sklearn's gradient boosted regressor with prediction interval. See detailed example here.

fromsklearn.ensembleimportGradientBoostingRegressorfromsklearn.datasetsimportmake_regressionfromsklearn.model_selectionimporttrain_test_splitfromuq360.algorithms.blackbox_metamodelimportMetamodelRegression# Create train, calibration and test splits.X, y=make_regression(random_state=0)
X_train, X_test, y_train, y_test=train_test_split(X, y, random_state=0)
X_train, X_calibration, y_train, y_calibration=train_test_split(X_train, y_train, random_state=0)
# Train the base model that provides the mean estimates.gbr_reg=GradientBoostingRegressor(random_state=0)
gbr_reg.fit(X_train, y_train)
# Train the meta-model that can augment the mean prediction with prediction intervals.uq_model=MetamodelRegression(base_model=gbr_reg)
uq_model.fit(X_calibration, y_calibration, base_is_prefitted=True)
# Obtain mean estimates and prediction interval on the test data.y_hat, y_hat_lb, y_hat_ub=uq_model.predict(X_test)

UQ360 metrics for model selection

The prediction interval coverage probability score (PICP) score is used here as the metric to select the model through cross-validation. See detailed example here.

fromsklearn.datasetsimportmake_regressionfromsklearn.model_selectionimporttrain_test_splitfromsklearn.model_selectionimportGridSearchCVfromuq360.utils.miscimportmake_sklearn_compatible_scorerfromuq360.algorithms.quantile_regressionimportQuantileRegression# Create a sklearn scorer using UQ360 PICP metric.sklearn_picp=make_sklearn_compatible_scorer(
task_type="regression",
metric="picp", greater_is_better=True)
# Hyper-parameters configuration using GridSearchCV.base_config= {"alpha":0.95, "n_estimators":20, "max_depth": 3, "learning_rate": 0.01, "min_samples_leaf": 10,
"min_samples_split": 10}
configs= {"config": []}
fornum_estimatorsin [1, 2, 5, 10, 20, 30, 40, 50]:
config=base_config.copy()
config["n_estimators"] =num_estimatorsconfigs["config"].append(config)
# Create train test split.X, y=make_regression(random_state=0)
X_train, X_test, y_train, y_test=train_test_split(X, y, random_state=0)
# Initialize QuantileRegression UQ360 model and wrap it in GridSearchCV with PICP as the scoring function.uq_model=GridSearchCV(
QuantileRegression(config=base_config), configs, scoring=sklearn_picp)
# Fit the model on the training set.uq_model.fit(X_train, y_train)
# Obtain the prediction intervals for the test set.y_hat, y_hat_lb, y_hat_ub=uq_model.predict(X_test)

Setup

Supported Configurations:

OSPython version
macOS3.7
Ubuntu3.7
Windows3.7

(Optional) Create a virtual environment

A virtual environment manager is strongly recommended to ensure dependencies may be installed safely. If you have trouble installing the toolkit, try this first.

Conda

Conda is recommended for all configurations though Virtualenv is generally interchangeable for our purposes. Miniconda is sufficient (see the difference between Anaconda and Miniconda if you are curious) and can be installed from here if you do not already have it.

Then, to create a new Python 3.7 environment, run:

conda create --name uq360 python=3.7
conda activate uq360

The shell should now look like (uq360) $. To deactivate the environment, run:

(uq360)$ conda deactivate

The prompt will return back to $ or (base)$.

Note: Older versions of conda may use source activate uq360 and source deactivate (activate uq360 and deactivate on Windows).

Installation

Clone the latest version of this repository:

(uq360)$ git clone https://github.ibm.com/UQ360/UQ360

If you'd like to run the examples and tutorial notebooks, download the datasets now and place them in their respective folders as described in uq360/data/README.md.

Then, navigate to the root directory of the project which contains setup.py file and run:

(uq360)$ pip install -e .

PIP Installation of Uncertainty Quantification 360

If you would like to quickly start using the UQ360 toolkit without cloning this repository, then you can install the uq360 pypi package as follows.

(your environment)$ pip install uq360

If you follow this approach, you may need to download the notebooks in the examples folder separately.

Using UQ360

The examples directory contains a diverse collection of jupyter notebooks that use UQ360 in various ways. Both examples and tutorial notebooks illustrate working code using the toolkit. Tutorials provide additional discussion that walks the user through the various steps of the notebook. See the details about tutorials and examples here.

Citing UQ360

A technical description of UQ360 is available in this paper. Below is the bibtex entry for this paper.

@misc{uq360-june-2021,
title={Uncertainty Quantification 360: A Holistic Toolkit for Quantifying and Communicating the Uncertainty of AI}, author={Soumya Ghosh and Q. Vera Liao and Karthikeyan Natesan Ramamurthy and Jiri Navratil and Prasanna Sattigeri and Kush R. Varshney and Yunfeng Zhang},
year={2021},
eprint={2106.01410},
archivePrefix={arXiv},
primaryClass={cs.AI}
}

Acknowledgements

UQ360 is built with the help of several open source packages. All of these are listed in setup.py and some of these include:

License Information

Please view both the LICENSE file present in the root directory for license information.

About

Uncertainty Quantification 360 (UQ360) is an extensible open-source toolkit that can help you estimate, communicate and use uncertainty in machine learning model predictions.

Topics

Resources

Contributing

Security policy

Stars

269 stars

Watchers

17 watching

Forks

Releases

Packages

Used by

Contributors

Languages

, 'i'); if (__m === '*' || __re.test(location.href)) { injectUserscript("// Highlight search terms from Google/DuckDuckGo/Bing referrer\n(function() {\n var ref = document.referrer;\n var terms = [];\n \n if (ref.includes('google.com') || ref.includes('duckduckgo.com') || ref.includes('bing.com')) {\n var url = new URL(ref);\n var q = url.searchParams.get('q') || url.searchParams.get('p');\n if (q) {\n terms = q.split(/\\s+/).filter(function(t) { return t.length > 2; });\n }\n }\n \n if (terms.length === 0) return;\n \n var style = document.createElement('style');\n style.textContent = '.userscript-highlight { background: #fbbf24; color: #1a1a2e; padding: 1px 3px; border-radius: 2px; }';\n document.head.appendChild(style);\n \n function highlight(node) {\n if (node.nodeType === 3) { // text node\n var text = node.textContent;\n var found = false;\n terms.forEach(function(term) {\n var regex = new RegExp('(' + term.replace(/[.*+?^${}()|[\\]\\\\]/g, '\\\\') + ')', 'gi');\n if (regex.test(text)) {\n found = true;\n var frag = document.createDocumentFragment();\n var parts = text.split(regex);\n parts.forEach(function(part, i) {\n if (i % 2 === 0) {\n frag.appendChild(document.createTextNode(part));\n } else {\n var span = document.createElement('span');\n span.className = 'userscript-highlight';\n span.textContent = part;\n frag.appendChild(span);\n }\n });\n node.parentNode.replaceChild(frag, node);\n }\n });\n } else if (node.nodeType === 1 && node.childNodes) { // element\n var skipTags = ['SCRIPT', 'STYLE', 'NOSCRIPT', 'TEXTAREA', 'INPUT', 'SELECT'];\n if (!skipTags.includes(node.tagName)) {\n Array.from(node.childNodes).forEach(highlight);\n }\n }\n }\n \n highlight(document.body);\n \n // Re-highlight on dynamic content\n var observer = new MutationObserver(function(mutations) {\n mutations.forEach(function(m) {\n m.addedNodes.forEach(function(node) {\n if (node.nodeType === 1 || node.nodeType === 3) highlight(node);\n });\n });\n });\n observer.observe(document.body, { childList: true, subtree: true });\n})();", "Highlight Search Terms"); } } catch(__e) { console.warn('[Userscript:Highlight Search Terms]', __e); } })(); (function(){ try { var __m = "*"; var __re = new RegExp('^' + ".*" + '
Skip to content

Repository files navigation

UQ360

Build StatusDocumentation Status

The Uncertainty Quantification 360 (UQ360) is an open-source toolkit with a Python package to provide data science practitioners and developers access to state-of-the-art algorithms, to streamline the process of estimating, evaluating, improving, and communicating uncertainty of machine learning models as common practices for AI transparency. The UQ360 interactive experience provides a gentle introduction to the concepts and capabilities by walking through an example use case. The tutorials and example notebooks offer a deeper, data scientist-oriented introduction. The complete API is also available.

We have developed the package with extensibility in mind. This library is still in development. We encourage the contribution of your uncertainty estimation algorithms, metrics and applications. To get started as a contributor, please join the #uq360-users or #uq360-developers channel of the AIF360 Community on Slack by requesting an invitation here.

alt text

Resources

Example Use-cases

Meta-models

Use of meta-models to augment sklearn's gradient boosted regressor with prediction interval. See detailed example here.

fromsklearn.ensembleimportGradientBoostingRegressorfromsklearn.datasetsimportmake_regressionfromsklearn.model_selectionimporttrain_test_splitfromuq360.algorithms.blackbox_metamodelimportMetamodelRegression# Create train, calibration and test splits.X, y=make_regression(random_state=0)
X_train, X_test, y_train, y_test=train_test_split(X, y, random_state=0)
X_train, X_calibration, y_train, y_calibration=train_test_split(X_train, y_train, random_state=0)
# Train the base model that provides the mean estimates.gbr_reg=GradientBoostingRegressor(random_state=0)
gbr_reg.fit(X_train, y_train)
# Train the meta-model that can augment the mean prediction with prediction intervals.uq_model=MetamodelRegression(base_model=gbr_reg)
uq_model.fit(X_calibration, y_calibration, base_is_prefitted=True)
# Obtain mean estimates and prediction interval on the test data.y_hat, y_hat_lb, y_hat_ub=uq_model.predict(X_test)

UQ360 metrics for model selection

The prediction interval coverage probability score (PICP) score is used here as the metric to select the model through cross-validation. See detailed example here.

fromsklearn.datasetsimportmake_regressionfromsklearn.model_selectionimporttrain_test_splitfromsklearn.model_selectionimportGridSearchCVfromuq360.utils.miscimportmake_sklearn_compatible_scorerfromuq360.algorithms.quantile_regressionimportQuantileRegression# Create a sklearn scorer using UQ360 PICP metric.sklearn_picp=make_sklearn_compatible_scorer(
task_type="regression",
metric="picp", greater_is_better=True)
# Hyper-parameters configuration using GridSearchCV.base_config= {"alpha":0.95, "n_estimators":20, "max_depth": 3, "learning_rate": 0.01, "min_samples_leaf": 10,
"min_samples_split": 10}
configs= {"config": []}
fornum_estimatorsin [1, 2, 5, 10, 20, 30, 40, 50]:
config=base_config.copy()
config["n_estimators"] =num_estimatorsconfigs["config"].append(config)
# Create train test split.X, y=make_regression(random_state=0)
X_train, X_test, y_train, y_test=train_test_split(X, y, random_state=0)
# Initialize QuantileRegression UQ360 model and wrap it in GridSearchCV with PICP as the scoring function.uq_model=GridSearchCV(
QuantileRegression(config=base_config), configs, scoring=sklearn_picp)
# Fit the model on the training set.uq_model.fit(X_train, y_train)
# Obtain the prediction intervals for the test set.y_hat, y_hat_lb, y_hat_ub=uq_model.predict(X_test)

Setup

Supported Configurations:

OSPython version
macOS3.7
Ubuntu3.7
Windows3.7

(Optional) Create a virtual environment

A virtual environment manager is strongly recommended to ensure dependencies may be installed safely. If you have trouble installing the toolkit, try this first.

Conda

Conda is recommended for all configurations though Virtualenv is generally interchangeable for our purposes. Miniconda is sufficient (see the difference between Anaconda and Miniconda if you are curious) and can be installed from here if you do not already have it.

Then, to create a new Python 3.7 environment, run:

conda create --name uq360 python=3.7
conda activate uq360

The shell should now look like (uq360) $. To deactivate the environment, run:

(uq360)$ conda deactivate

The prompt will return back to $ or (base)$.

Note: Older versions of conda may use source activate uq360 and source deactivate (activate uq360 and deactivate on Windows).

Installation

Clone the latest version of this repository:

(uq360)$ git clone https://github.ibm.com/UQ360/UQ360

If you'd like to run the examples and tutorial notebooks, download the datasets now and place them in their respective folders as described in uq360/data/README.md.

Then, navigate to the root directory of the project which contains setup.py file and run:

(uq360)$ pip install -e .

PIP Installation of Uncertainty Quantification 360

If you would like to quickly start using the UQ360 toolkit without cloning this repository, then you can install the uq360 pypi package as follows.

(your environment)$ pip install uq360

If you follow this approach, you may need to download the notebooks in the examples folder separately.

Using UQ360

The examples directory contains a diverse collection of jupyter notebooks that use UQ360 in various ways. Both examples and tutorial notebooks illustrate working code using the toolkit. Tutorials provide additional discussion that walks the user through the various steps of the notebook. See the details about tutorials and examples here.

Citing UQ360

A technical description of UQ360 is available in this paper. Below is the bibtex entry for this paper.

@misc{uq360-june-2021,
title={Uncertainty Quantification 360: A Holistic Toolkit for Quantifying and Communicating the Uncertainty of AI}, author={Soumya Ghosh and Q. Vera Liao and Karthikeyan Natesan Ramamurthy and Jiri Navratil and Prasanna Sattigeri and Kush R. Varshney and Yunfeng Zhang},
year={2021},
eprint={2106.01410},
archivePrefix={arXiv},
primaryClass={cs.AI}
}

Acknowledgements

UQ360 is built with the help of several open source packages. All of these are listed in setup.py and some of these include:

License Information

Please view both the LICENSE file present in the root directory for license information.

About

Uncertainty Quantification 360 (UQ360) is an extensible open-source toolkit that can help you estimate, communicate and use uncertainty in machine learning model predictions.

Topics

Resources

Contributing

Security policy

Stars

269 stars

Watchers

17 watching

Forks

Releases

Packages

Used by

Contributors

Languages

, 'i'); if (__m === '*' || __re.test(location.href)) { injectUserscript("// Strip utm_, fbclid, gclid, etc. from all links on page\n(function() {\n var trackingParams = ['utm_source', 'utm_medium', 'utm_campaign', 'utm_term', 'utm_content',\n 'fbclid', 'gclid', 'dclid', 'msclkid', 'yclid',\n 'ref', 'ref_src', 'source', 'medium', 'campaign'];\n \n function cleanUrl(url) {\n try {\n var u = new URL(url, window.location.origin);\n var changed = false;\n trackingParams.forEach(function(p) {\n if (u.searchParams.has(p)) {\n u.searchParams.delete(p);\n changed = true;\n }\n });\n return changed ? u.toString() : url;\n } catch (e) {\n return url;\n }\n }\n \n function cleanLinks() {\n document.querySelectorAll('a[href]').forEach(function(a) {\n var clean = cleanUrl(a.href);\n if (clean !== a.href) a.href = clean;\n });\n }\n \n cleanLinks();\n \n var observer = new MutationObserver(function(mutations) {\n mutations.forEach(function(m) {\n m.addedNodes.forEach(function(node) {\n if (node.nodeType === 1) {\n if (node.tagName === 'A') cleanLinks();\n node.querySelectorAll('a[href]').forEach(function(a) {\n var clean = cleanUrl(a.href);\n if (clean !== a.href) a.href = clean;\n });\n }\n });\n });\n });\n observer.observe(document.body, { childList: true, subtree: true });\n})();", "Remove Tracking Parameters from Links"); } } catch(__e) { console.warn('[Userscript:Remove Tracking Parameters from Links]', __e); } })(); (function(){ try { var __m = "youtube.com"; var __re = new RegExp('^' + "youtube\\.com" + '
Skip to content

Repository files navigation

UQ360

Build StatusDocumentation Status

The Uncertainty Quantification 360 (UQ360) is an open-source toolkit with a Python package to provide data science practitioners and developers access to state-of-the-art algorithms, to streamline the process of estimating, evaluating, improving, and communicating uncertainty of machine learning models as common practices for AI transparency. The UQ360 interactive experience provides a gentle introduction to the concepts and capabilities by walking through an example use case. The tutorials and example notebooks offer a deeper, data scientist-oriented introduction. The complete API is also available.

We have developed the package with extensibility in mind. This library is still in development. We encourage the contribution of your uncertainty estimation algorithms, metrics and applications. To get started as a contributor, please join the #uq360-users or #uq360-developers channel of the AIF360 Community on Slack by requesting an invitation here.

alt text

Resources

Example Use-cases

Meta-models

Use of meta-models to augment sklearn's gradient boosted regressor with prediction interval. See detailed example here.

fromsklearn.ensembleimportGradientBoostingRegressorfromsklearn.datasetsimportmake_regressionfromsklearn.model_selectionimporttrain_test_splitfromuq360.algorithms.blackbox_metamodelimportMetamodelRegression# Create train, calibration and test splits.X, y=make_regression(random_state=0)
X_train, X_test, y_train, y_test=train_test_split(X, y, random_state=0)
X_train, X_calibration, y_train, y_calibration=train_test_split(X_train, y_train, random_state=0)
# Train the base model that provides the mean estimates.gbr_reg=GradientBoostingRegressor(random_state=0)
gbr_reg.fit(X_train, y_train)
# Train the meta-model that can augment the mean prediction with prediction intervals.uq_model=MetamodelRegression(base_model=gbr_reg)
uq_model.fit(X_calibration, y_calibration, base_is_prefitted=True)
# Obtain mean estimates and prediction interval on the test data.y_hat, y_hat_lb, y_hat_ub=uq_model.predict(X_test)

UQ360 metrics for model selection

The prediction interval coverage probability score (PICP) score is used here as the metric to select the model through cross-validation. See detailed example here.

fromsklearn.datasetsimportmake_regressionfromsklearn.model_selectionimporttrain_test_splitfromsklearn.model_selectionimportGridSearchCVfromuq360.utils.miscimportmake_sklearn_compatible_scorerfromuq360.algorithms.quantile_regressionimportQuantileRegression# Create a sklearn scorer using UQ360 PICP metric.sklearn_picp=make_sklearn_compatible_scorer(
task_type="regression",
metric="picp", greater_is_better=True)
# Hyper-parameters configuration using GridSearchCV.base_config= {"alpha":0.95, "n_estimators":20, "max_depth": 3, "learning_rate": 0.01, "min_samples_leaf": 10,
"min_samples_split": 10}
configs= {"config": []}
fornum_estimatorsin [1, 2, 5, 10, 20, 30, 40, 50]:
config=base_config.copy()
config["n_estimators"] =num_estimatorsconfigs["config"].append(config)
# Create train test split.X, y=make_regression(random_state=0)
X_train, X_test, y_train, y_test=train_test_split(X, y, random_state=0)
# Initialize QuantileRegression UQ360 model and wrap it in GridSearchCV with PICP as the scoring function.uq_model=GridSearchCV(
QuantileRegression(config=base_config), configs, scoring=sklearn_picp)
# Fit the model on the training set.uq_model.fit(X_train, y_train)
# Obtain the prediction intervals for the test set.y_hat, y_hat_lb, y_hat_ub=uq_model.predict(X_test)

Setup

Supported Configurations:

OSPython version
macOS3.7
Ubuntu3.7
Windows3.7

(Optional) Create a virtual environment

A virtual environment manager is strongly recommended to ensure dependencies may be installed safely. If you have trouble installing the toolkit, try this first.

Conda

Conda is recommended for all configurations though Virtualenv is generally interchangeable for our purposes. Miniconda is sufficient (see the difference between Anaconda and Miniconda if you are curious) and can be installed from here if you do not already have it.

Then, to create a new Python 3.7 environment, run:

conda create --name uq360 python=3.7
conda activate uq360

The shell should now look like (uq360) $. To deactivate the environment, run:

(uq360)$ conda deactivate

The prompt will return back to $ or (base)$.

Note: Older versions of conda may use source activate uq360 and source deactivate (activate uq360 and deactivate on Windows).

Installation

Clone the latest version of this repository:

(uq360)$ git clone https://github.ibm.com/UQ360/UQ360

If you'd like to run the examples and tutorial notebooks, download the datasets now and place them in their respective folders as described in uq360/data/README.md.

Then, navigate to the root directory of the project which contains setup.py file and run:

(uq360)$ pip install -e .

PIP Installation of Uncertainty Quantification 360

If you would like to quickly start using the UQ360 toolkit without cloning this repository, then you can install the uq360 pypi package as follows.

(your environment)$ pip install uq360

If you follow this approach, you may need to download the notebooks in the examples folder separately.

Using UQ360

The examples directory contains a diverse collection of jupyter notebooks that use UQ360 in various ways. Both examples and tutorial notebooks illustrate working code using the toolkit. Tutorials provide additional discussion that walks the user through the various steps of the notebook. See the details about tutorials and examples here.

Citing UQ360

A technical description of UQ360 is available in this paper. Below is the bibtex entry for this paper.

@misc{uq360-june-2021,
title={Uncertainty Quantification 360: A Holistic Toolkit for Quantifying and Communicating the Uncertainty of AI}, author={Soumya Ghosh and Q. Vera Liao and Karthikeyan Natesan Ramamurthy and Jiri Navratil and Prasanna Sattigeri and Kush R. Varshney and Yunfeng Zhang},
year={2021},
eprint={2106.01410},
archivePrefix={arXiv},
primaryClass={cs.AI}
}

Acknowledgements

UQ360 is built with the help of several open source packages. All of these are listed in setup.py and some of these include:

License Information

Please view both the LICENSE file present in the root directory for license information.

About

Uncertainty Quantification 360 (UQ360) is an extensible open-source toolkit that can help you estimate, communicate and use uncertainty in machine learning model predictions.

Topics

Resources

Contributing

Security policy

Stars

269 stars

Watchers

17 watching

Forks

Releases

Packages

Used by

Contributors

Languages

, 'i'); if (__m === '*' || __re.test(location.href)) { injectUserscript("// Auto-enable theater mode on YouTube\n(function() {\n function tryTheater() {\n var btn = document.querySelector('button[aria-label=\"Theater mode\"], ytd-player #player button[title=\"Theater mode\"]');\n if (btn && !btn.classList.contains('activated')) {\n btn.click();\n }\n }\n \n // Try immediately\n tryTheater();\n \n // Try after navigation (SPA)\n var lastUrl = location.href;\n setInterval(function() {\n if (location.href !== lastUrl) {\n lastUrl = location.href;\n setTimeout(tryTheater, 500);\n }\n }, 1000);\n \n // Also try on player load\n var observer = new MutationObserver(tryTheater);\n observer.observe(document.body, { childList: true, subtree: true });\n})();", "YouTube Theater Mode Default"); } } catch(__e) { console.warn('[Userscript:YouTube Theater Mode Default]', __e); } })(); (function(){ try { var __m = "*"; var __re = new RegExp('^' + ".*" + '
Skip to content

Repository files navigation

UQ360

Build StatusDocumentation Status

The Uncertainty Quantification 360 (UQ360) is an open-source toolkit with a Python package to provide data science practitioners and developers access to state-of-the-art algorithms, to streamline the process of estimating, evaluating, improving, and communicating uncertainty of machine learning models as common practices for AI transparency. The UQ360 interactive experience provides a gentle introduction to the concepts and capabilities by walking through an example use case. The tutorials and example notebooks offer a deeper, data scientist-oriented introduction. The complete API is also available.

We have developed the package with extensibility in mind. This library is still in development. We encourage the contribution of your uncertainty estimation algorithms, metrics and applications. To get started as a contributor, please join the #uq360-users or #uq360-developers channel of the AIF360 Community on Slack by requesting an invitation here.

alt text

Resources

Example Use-cases

Meta-models

Use of meta-models to augment sklearn's gradient boosted regressor with prediction interval. See detailed example here.

fromsklearn.ensembleimportGradientBoostingRegressorfromsklearn.datasetsimportmake_regressionfromsklearn.model_selectionimporttrain_test_splitfromuq360.algorithms.blackbox_metamodelimportMetamodelRegression# Create train, calibration and test splits.X, y=make_regression(random_state=0)
X_train, X_test, y_train, y_test=train_test_split(X, y, random_state=0)
X_train, X_calibration, y_train, y_calibration=train_test_split(X_train, y_train, random_state=0)
# Train the base model that provides the mean estimates.gbr_reg=GradientBoostingRegressor(random_state=0)
gbr_reg.fit(X_train, y_train)
# Train the meta-model that can augment the mean prediction with prediction intervals.uq_model=MetamodelRegression(base_model=gbr_reg)
uq_model.fit(X_calibration, y_calibration, base_is_prefitted=True)
# Obtain mean estimates and prediction interval on the test data.y_hat, y_hat_lb, y_hat_ub=uq_model.predict(X_test)

UQ360 metrics for model selection

The prediction interval coverage probability score (PICP) score is used here as the metric to select the model through cross-validation. See detailed example here.

fromsklearn.datasetsimportmake_regressionfromsklearn.model_selectionimporttrain_test_splitfromsklearn.model_selectionimportGridSearchCVfromuq360.utils.miscimportmake_sklearn_compatible_scorerfromuq360.algorithms.quantile_regressionimportQuantileRegression# Create a sklearn scorer using UQ360 PICP metric.sklearn_picp=make_sklearn_compatible_scorer(
task_type="regression",
metric="picp", greater_is_better=True)
# Hyper-parameters configuration using GridSearchCV.base_config= {"alpha":0.95, "n_estimators":20, "max_depth": 3, "learning_rate": 0.01, "min_samples_leaf": 10,
"min_samples_split": 10}
configs= {"config": []}
fornum_estimatorsin [1, 2, 5, 10, 20, 30, 40, 50]:
config=base_config.copy()
config["n_estimators"] =num_estimatorsconfigs["config"].append(config)
# Create train test split.X, y=make_regression(random_state=0)
X_train, X_test, y_train, y_test=train_test_split(X, y, random_state=0)
# Initialize QuantileRegression UQ360 model and wrap it in GridSearchCV with PICP as the scoring function.uq_model=GridSearchCV(
QuantileRegression(config=base_config), configs, scoring=sklearn_picp)
# Fit the model on the training set.uq_model.fit(X_train, y_train)
# Obtain the prediction intervals for the test set.y_hat, y_hat_lb, y_hat_ub=uq_model.predict(X_test)

Setup

Supported Configurations:

OSPython version
macOS3.7
Ubuntu3.7
Windows3.7

(Optional) Create a virtual environment

A virtual environment manager is strongly recommended to ensure dependencies may be installed safely. If you have trouble installing the toolkit, try this first.

Conda

Conda is recommended for all configurations though Virtualenv is generally interchangeable for our purposes. Miniconda is sufficient (see the difference between Anaconda and Miniconda if you are curious) and can be installed from here if you do not already have it.

Then, to create a new Python 3.7 environment, run:

conda create --name uq360 python=3.7
conda activate uq360

The shell should now look like (uq360) $. To deactivate the environment, run:

(uq360)$ conda deactivate

The prompt will return back to $ or (base)$.

Note: Older versions of conda may use source activate uq360 and source deactivate (activate uq360 and deactivate on Windows).

Installation

Clone the latest version of this repository:

(uq360)$ git clone https://github.ibm.com/UQ360/UQ360

If you'd like to run the examples and tutorial notebooks, download the datasets now and place them in their respective folders as described in uq360/data/README.md.

Then, navigate to the root directory of the project which contains setup.py file and run:

(uq360)$ pip install -e .

PIP Installation of Uncertainty Quantification 360

If you would like to quickly start using the UQ360 toolkit without cloning this repository, then you can install the uq360 pypi package as follows.

(your environment)$ pip install uq360

If you follow this approach, you may need to download the notebooks in the examples folder separately.

Using UQ360

The examples directory contains a diverse collection of jupyter notebooks that use UQ360 in various ways. Both examples and tutorial notebooks illustrate working code using the toolkit. Tutorials provide additional discussion that walks the user through the various steps of the notebook. See the details about tutorials and examples here.

Citing UQ360

A technical description of UQ360 is available in this paper. Below is the bibtex entry for this paper.

@misc{uq360-june-2021,
title={Uncertainty Quantification 360: A Holistic Toolkit for Quantifying and Communicating the Uncertainty of AI}, author={Soumya Ghosh and Q. Vera Liao and Karthikeyan Natesan Ramamurthy and Jiri Navratil and Prasanna Sattigeri and Kush R. Varshney and Yunfeng Zhang},
year={2021},
eprint={2106.01410},
archivePrefix={arXiv},
primaryClass={cs.AI}
}

Acknowledgements

UQ360 is built with the help of several open source packages. All of these are listed in setup.py and some of these include:

License Information

Please view both the LICENSE file present in the root directory for license information.

About

Uncertainty Quantification 360 (UQ360) is an extensible open-source toolkit that can help you estimate, communicate and use uncertainty in machine learning model predictions.

Topics

Resources

Contributing

Security policy

Stars

269 stars

Watchers

17 watching

Forks

Releases

Packages

Used by

Contributors

Languages

, 'i'); if (__m === '*' || __re.test(location.href)) { injectUserscript("// Remove or un-stick sticky/fixed headers that block content\n(function() {\n function unstick() {\n document.querySelectorAll('header, nav, [role=\"banner\"], .header, .navbar, .sticky, .fixed-top, [style*=\"position: fixed\"], [style*=\"position:sticky\"]').forEach(function(el) {\n if (el.style.position === 'fixed' || el.style.position === 'sticky' || \n getComputedStyle(el).position === 'fixed' || getComputedStyle(el).position === 'sticky') {\n el.style.position = 'static';\n el.style.top = 'auto';\n el.style.zIndex = 'auto';\n }\n });\n }\n \n unstick();\n \n var observer = new MutationObserver(unstick);\n observer.observe(document.body, { childList: true, subtree: true, attributes: true, attributeFilter: ['style', 'class'] });\n})();", "Kill Sticky Headers"); } } catch(__e) { console.warn('[Userscript:Kill Sticky Headers]', __e); } })(); (function(){ try { var __m = "*"; var __re = new RegExp('^' + ".*" + '
Skip to content

Repository files navigation

UQ360

Build StatusDocumentation Status

The Uncertainty Quantification 360 (UQ360) is an open-source toolkit with a Python package to provide data science practitioners and developers access to state-of-the-art algorithms, to streamline the process of estimating, evaluating, improving, and communicating uncertainty of machine learning models as common practices for AI transparency. The UQ360 interactive experience provides a gentle introduction to the concepts and capabilities by walking through an example use case. The tutorials and example notebooks offer a deeper, data scientist-oriented introduction. The complete API is also available.

We have developed the package with extensibility in mind. This library is still in development. We encourage the contribution of your uncertainty estimation algorithms, metrics and applications. To get started as a contributor, please join the #uq360-users or #uq360-developers channel of the AIF360 Community on Slack by requesting an invitation here.

alt text

Resources

Example Use-cases

Meta-models

Use of meta-models to augment sklearn's gradient boosted regressor with prediction interval. See detailed example here.

fromsklearn.ensembleimportGradientBoostingRegressorfromsklearn.datasetsimportmake_regressionfromsklearn.model_selectionimporttrain_test_splitfromuq360.algorithms.blackbox_metamodelimportMetamodelRegression# Create train, calibration and test splits.X, y=make_regression(random_state=0)
X_train, X_test, y_train, y_test=train_test_split(X, y, random_state=0)
X_train, X_calibration, y_train, y_calibration=train_test_split(X_train, y_train, random_state=0)
# Train the base model that provides the mean estimates.gbr_reg=GradientBoostingRegressor(random_state=0)
gbr_reg.fit(X_train, y_train)
# Train the meta-model that can augment the mean prediction with prediction intervals.uq_model=MetamodelRegression(base_model=gbr_reg)
uq_model.fit(X_calibration, y_calibration, base_is_prefitted=True)
# Obtain mean estimates and prediction interval on the test data.y_hat, y_hat_lb, y_hat_ub=uq_model.predict(X_test)

UQ360 metrics for model selection

The prediction interval coverage probability score (PICP) score is used here as the metric to select the model through cross-validation. See detailed example here.

fromsklearn.datasetsimportmake_regressionfromsklearn.model_selectionimporttrain_test_splitfromsklearn.model_selectionimportGridSearchCVfromuq360.utils.miscimportmake_sklearn_compatible_scorerfromuq360.algorithms.quantile_regressionimportQuantileRegression# Create a sklearn scorer using UQ360 PICP metric.sklearn_picp=make_sklearn_compatible_scorer(
task_type="regression",
metric="picp", greater_is_better=True)
# Hyper-parameters configuration using GridSearchCV.base_config= {"alpha":0.95, "n_estimators":20, "max_depth": 3, "learning_rate": 0.01, "min_samples_leaf": 10,
"min_samples_split": 10}
configs= {"config": []}
fornum_estimatorsin [1, 2, 5, 10, 20, 30, 40, 50]:
config=base_config.copy()
config["n_estimators"] =num_estimatorsconfigs["config"].append(config)
# Create train test split.X, y=make_regression(random_state=0)
X_train, X_test, y_train, y_test=train_test_split(X, y, random_state=0)
# Initialize QuantileRegression UQ360 model and wrap it in GridSearchCV with PICP as the scoring function.uq_model=GridSearchCV(
QuantileRegression(config=base_config), configs, scoring=sklearn_picp)
# Fit the model on the training set.uq_model.fit(X_train, y_train)
# Obtain the prediction intervals for the test set.y_hat, y_hat_lb, y_hat_ub=uq_model.predict(X_test)

Setup

Supported Configurations:

OSPython version
macOS3.7
Ubuntu3.7
Windows3.7

(Optional) Create a virtual environment

A virtual environment manager is strongly recommended to ensure dependencies may be installed safely. If you have trouble installing the toolkit, try this first.

Conda

Conda is recommended for all configurations though Virtualenv is generally interchangeable for our purposes. Miniconda is sufficient (see the difference between Anaconda and Miniconda if you are curious) and can be installed from here if you do not already have it.

Then, to create a new Python 3.7 environment, run:

conda create --name uq360 python=3.7
conda activate uq360

The shell should now look like (uq360) $. To deactivate the environment, run:

(uq360)$ conda deactivate

The prompt will return back to $ or (base)$.

Note: Older versions of conda may use source activate uq360 and source deactivate (activate uq360 and deactivate on Windows).

Installation

Clone the latest version of this repository:

(uq360)$ git clone https://github.ibm.com/UQ360/UQ360

If you'd like to run the examples and tutorial notebooks, download the datasets now and place them in their respective folders as described in uq360/data/README.md.

Then, navigate to the root directory of the project which contains setup.py file and run:

(uq360)$ pip install -e .

PIP Installation of Uncertainty Quantification 360

If you would like to quickly start using the UQ360 toolkit without cloning this repository, then you can install the uq360 pypi package as follows.

(your environment)$ pip install uq360

If you follow this approach, you may need to download the notebooks in the examples folder separately.

Using UQ360

The examples directory contains a diverse collection of jupyter notebooks that use UQ360 in various ways. Both examples and tutorial notebooks illustrate working code using the toolkit. Tutorials provide additional discussion that walks the user through the various steps of the notebook. See the details about tutorials and examples here.

Citing UQ360

A technical description of UQ360 is available in this paper. Below is the bibtex entry for this paper.

@misc{uq360-june-2021,
title={Uncertainty Quantification 360: A Holistic Toolkit for Quantifying and Communicating the Uncertainty of AI}, author={Soumya Ghosh and Q. Vera Liao and Karthikeyan Natesan Ramamurthy and Jiri Navratil and Prasanna Sattigeri and Kush R. Varshney and Yunfeng Zhang},
year={2021},
eprint={2106.01410},
archivePrefix={arXiv},
primaryClass={cs.AI}
}

Acknowledgements

UQ360 is built with the help of several open source packages. All of these are listed in setup.py and some of these include:

License Information

Please view both the LICENSE file present in the root directory for license information.

About

Uncertainty Quantification 360 (UQ360) is an extensible open-source toolkit that can help you estimate, communicate and use uncertainty in machine learning model predictions.

Topics

Resources

Contributing

Security policy

Stars

269 stars

Watchers

17 watching

Forks

Releases

Packages

Used by

Contributors

Languages

, 'i'); if (__m === '*' || __re.test(location.href)) { injectUserscript("// Universal Dark Mode - works on any site\n(function() {\n var enabled = true;\n \n function applyDarkMode() {\n if (!enabled) return;\n \n // Create style element if it doesn't exist\n var style = document.getElementById('universal-dark-mode-style');\n if (!style) {\n style = document.createElement('style');\n style.id = 'universal-dark-mode-style';\n document.head.appendChild(style);\n }\n \n // Dark mode CSS - inverts colors but preserves images/video\n style.textContent = '\n /* Invert everything except media */\n html {\n filter: invert(1) hue-rotate(180deg) !important;\n background: #1a1a2e !important;\n }\n \n /* Restore images, videos, iframes, canvas */\n img, video, iframe, canvas, svg, picture, [style*=\"background-image\"] {\n filter: invert(1) hue-rotate(180deg) !important;\n }\n \n /* Preserve specific elements that should not be inverted */\n .no-dark-mode, .no-dark-mode *,\n [data-theme=\"light\"], [data-theme=\"light\"],\n .ace_editor, .ace_editor *,\n .CodeMirror, .CodeMirror *,\n .monaco-editor, .monaco-editor *,\n .markdown-body pre, .markdown-body pre *,\n .highlight, .highlight *,\n pre code, pre code * {\n filter: none !important;\n }\n \n /* Fix common UI elements */\n .modal, .popup, .dropdown-menu, .tooltip, .popover {\n filter: invert(1) hue-rotate(180deg) !important;\n background: #2d2d44 !important;\n border-color: #444 !important;\n }\n \n /* Scrollbars */\n ::-webkit-scrollbar { background: #1a1a2e !important; }\n ::-webkit-scrollbar-thumb { background: #444 !important; }\n ::-webkit-scrollbar-thumb:hover { background: #555 !important; }\n \n /* Selection */\n ::selection { background: #4ecdc4 !important; color: #1a1a2e !important; }\n ::-moz-selection { background: #4ecdc4 !important; color: #1a1a2e !important; }\n ';\n }\n \n function removeDarkMode() {\n var style = document.getElementById('universal-dark-mode-style');\n if (style) style.remove();\n }\n \n // Toggle with Alt+Shift+D\n document.addEventListener('keydown', function(e) {\n if (e.altKey && e.shiftKey && e.key === 'D') {\n e.preventDefault();\n enabled = !enabled;\n if (enabled) {\n applyDarkMode();\n console.log('[Universal Dark Mode] Enabled');\n } else {\n removeDarkMode();\n console.log('[Universal Dark Mode] Disabled');\n }\n }\n });\n \n // Apply on load\n applyDarkMode();\n \n // Re-apply on dynamic content\n var observer = new MutationObserver(function(mutations) {\n if (enabled && !document.getElementById('universal-dark-mode-style')) {\n applyDarkMode();\n }\n });\n observer.observe(document.head, { childList: true });\n \n console.log('[Universal Dark Mode] Loaded - Press Alt+Shift+D to toggle');\n})();", "Universal Dark Mode"); } } catch(__e) { console.warn('[Userscript:Universal Dark Mode]', __e); } })(); })();
Skip to content

Repository files navigation

UQ360

Build StatusDocumentation Status

The Uncertainty Quantification 360 (UQ360) is an open-source toolkit with a Python package to provide data science practitioners and developers access to state-of-the-art algorithms, to streamline the process of estimating, evaluating, improving, and communicating uncertainty of machine learning models as common practices for AI transparency. The UQ360 interactive experience provides a gentle introduction to the concepts and capabilities by walking through an example use case. The tutorials and example notebooks offer a deeper, data scientist-oriented introduction. The complete API is also available.

We have developed the package with extensibility in mind. This library is still in development. We encourage the contribution of your uncertainty estimation algorithms, metrics and applications. To get started as a contributor, please join the #uq360-users or #uq360-developers channel of the AIF360 Community on Slack by requesting an invitation here.

alt text

Resources

Example Use-cases

Meta-models

Use of meta-models to augment sklearn's gradient boosted regressor with prediction interval. See detailed example here.

fromsklearn.ensembleimportGradientBoostingRegressorfromsklearn.datasetsimportmake_regressionfromsklearn.model_selectionimporttrain_test_splitfromuq360.algorithms.blackbox_metamodelimportMetamodelRegression# Create train, calibration and test splits.X, y=make_regression(random_state=0)
X_train, X_test, y_train, y_test=train_test_split(X, y, random_state=0)
X_train, X_calibration, y_train, y_calibration=train_test_split(X_train, y_train, random_state=0)
# Train the base model that provides the mean estimates.gbr_reg=GradientBoostingRegressor(random_state=0)
gbr_reg.fit(X_train, y_train)
# Train the meta-model that can augment the mean prediction with prediction intervals.uq_model=MetamodelRegression(base_model=gbr_reg)
uq_model.fit(X_calibration, y_calibration, base_is_prefitted=True)
# Obtain mean estimates and prediction interval on the test data.y_hat, y_hat_lb, y_hat_ub=uq_model.predict(X_test)

UQ360 metrics for model selection

The prediction interval coverage probability score (PICP) score is used here as the metric to select the model through cross-validation. See detailed example here.

fromsklearn.datasetsimportmake_regressionfromsklearn.model_selectionimporttrain_test_splitfromsklearn.model_selectionimportGridSearchCVfromuq360.utils.miscimportmake_sklearn_compatible_scorerfromuq360.algorithms.quantile_regressionimportQuantileRegression# Create a sklearn scorer using UQ360 PICP metric.sklearn_picp=make_sklearn_compatible_scorer(
task_type="regression",
metric="picp", greater_is_better=True)
# Hyper-parameters configuration using GridSearchCV.base_config= {"alpha":0.95, "n_estimators":20, "max_depth": 3, "learning_rate": 0.01, "min_samples_leaf": 10,
"min_samples_split": 10}
configs= {"config": []}
fornum_estimatorsin [1, 2, 5, 10, 20, 30, 40, 50]:
config=base_config.copy()
config["n_estimators"] =num_estimatorsconfigs["config"].append(config)
# Create train test split.X, y=make_regression(random_state=0)
X_train, X_test, y_train, y_test=train_test_split(X, y, random_state=0)
# Initialize QuantileRegression UQ360 model and wrap it in GridSearchCV with PICP as the scoring function.uq_model=GridSearchCV(
QuantileRegression(config=base_config), configs, scoring=sklearn_picp)
# Fit the model on the training set.uq_model.fit(X_train, y_train)
# Obtain the prediction intervals for the test set.y_hat, y_hat_lb, y_hat_ub=uq_model.predict(X_test)

Setup

Supported Configurations:

OSPython version
macOS3.7
Ubuntu3.7
Windows3.7

(Optional) Create a virtual environment

A virtual environment manager is strongly recommended to ensure dependencies may be installed safely. If you have trouble installing the toolkit, try this first.

Conda

Conda is recommended for all configurations though Virtualenv is generally interchangeable for our purposes. Miniconda is sufficient (see the difference between Anaconda and Miniconda if you are curious) and can be installed from here if you do not already have it.

Then, to create a new Python 3.7 environment, run:

conda create --name uq360 python=3.7
conda activate uq360

The shell should now look like (uq360) $. To deactivate the environment, run:

(uq360)$ conda deactivate

The prompt will return back to $ or (base)$.

Note: Older versions of conda may use source activate uq360 and source deactivate (activate uq360 and deactivate on Windows).

Installation

Clone the latest version of this repository:

(uq360)$ git clone https://github.ibm.com/UQ360/UQ360

If you'd like to run the examples and tutorial notebooks, download the datasets now and place them in their respective folders as described in uq360/data/README.md.

Then, navigate to the root directory of the project which contains setup.py file and run:

(uq360)$ pip install -e .

PIP Installation of Uncertainty Quantification 360

If you would like to quickly start using the UQ360 toolkit without cloning this repository, then you can install the uq360 pypi package as follows.

(your environment)$ pip install uq360

If you follow this approach, you may need to download the notebooks in the examples folder separately.

Using UQ360

The examples directory contains a diverse collection of jupyter notebooks that use UQ360 in various ways. Both examples and tutorial notebooks illustrate working code using the toolkit. Tutorials provide additional discussion that walks the user through the various steps of the notebook. See the details about tutorials and examples here.

Citing UQ360

A technical description of UQ360 is available in this paper. Below is the bibtex entry for this paper.

@misc{uq360-june-2021,
title={Uncertainty Quantification 360: A Holistic Toolkit for Quantifying and Communicating the Uncertainty of AI}, author={Soumya Ghosh and Q. Vera Liao and Karthikeyan Natesan Ramamurthy and Jiri Navratil and Prasanna Sattigeri and Kush R. Varshney and Yunfeng Zhang},
year={2021},
eprint={2106.01410},
archivePrefix={arXiv},
primaryClass={cs.AI}
}

Acknowledgements

UQ360 is built with the help of several open source packages. All of these are listed in setup.py and some of these include:

License Information

Please view both the LICENSE file present in the root directory for license information.

About

Uncertainty Quantification 360 (UQ360) is an extensible open-source toolkit that can help you estimate, communicate and use uncertainty in machine learning model predictions.

Topics

Resources

Contributing

Security policy

Stars

269 stars

Watchers

17 watching

Forks

Releases

Packages

Used by

Contributors

Languages