Latest commit

History

17 Commits

Folders and files

NameName
Last commit message
Last commit date

Repository files navigation

Myvi

Myvi is a 3D visualization tool, the name comes from mayavi (Myvi is a lighter one, it also means mine), Myvi is not as powerful as Mayavi, but to do some simple work it is enough, what is more, mayavi has a heavy dependence, vtk, traits, chaco..., it is difficult to install, has many historical burdens, and did not support wxpython-phoenix. However, myvi just needs ModernGL, supports wxpython-phoenix and you can use Myvi's Manager with any UI Framework (such as QT) easily.

Tutorial

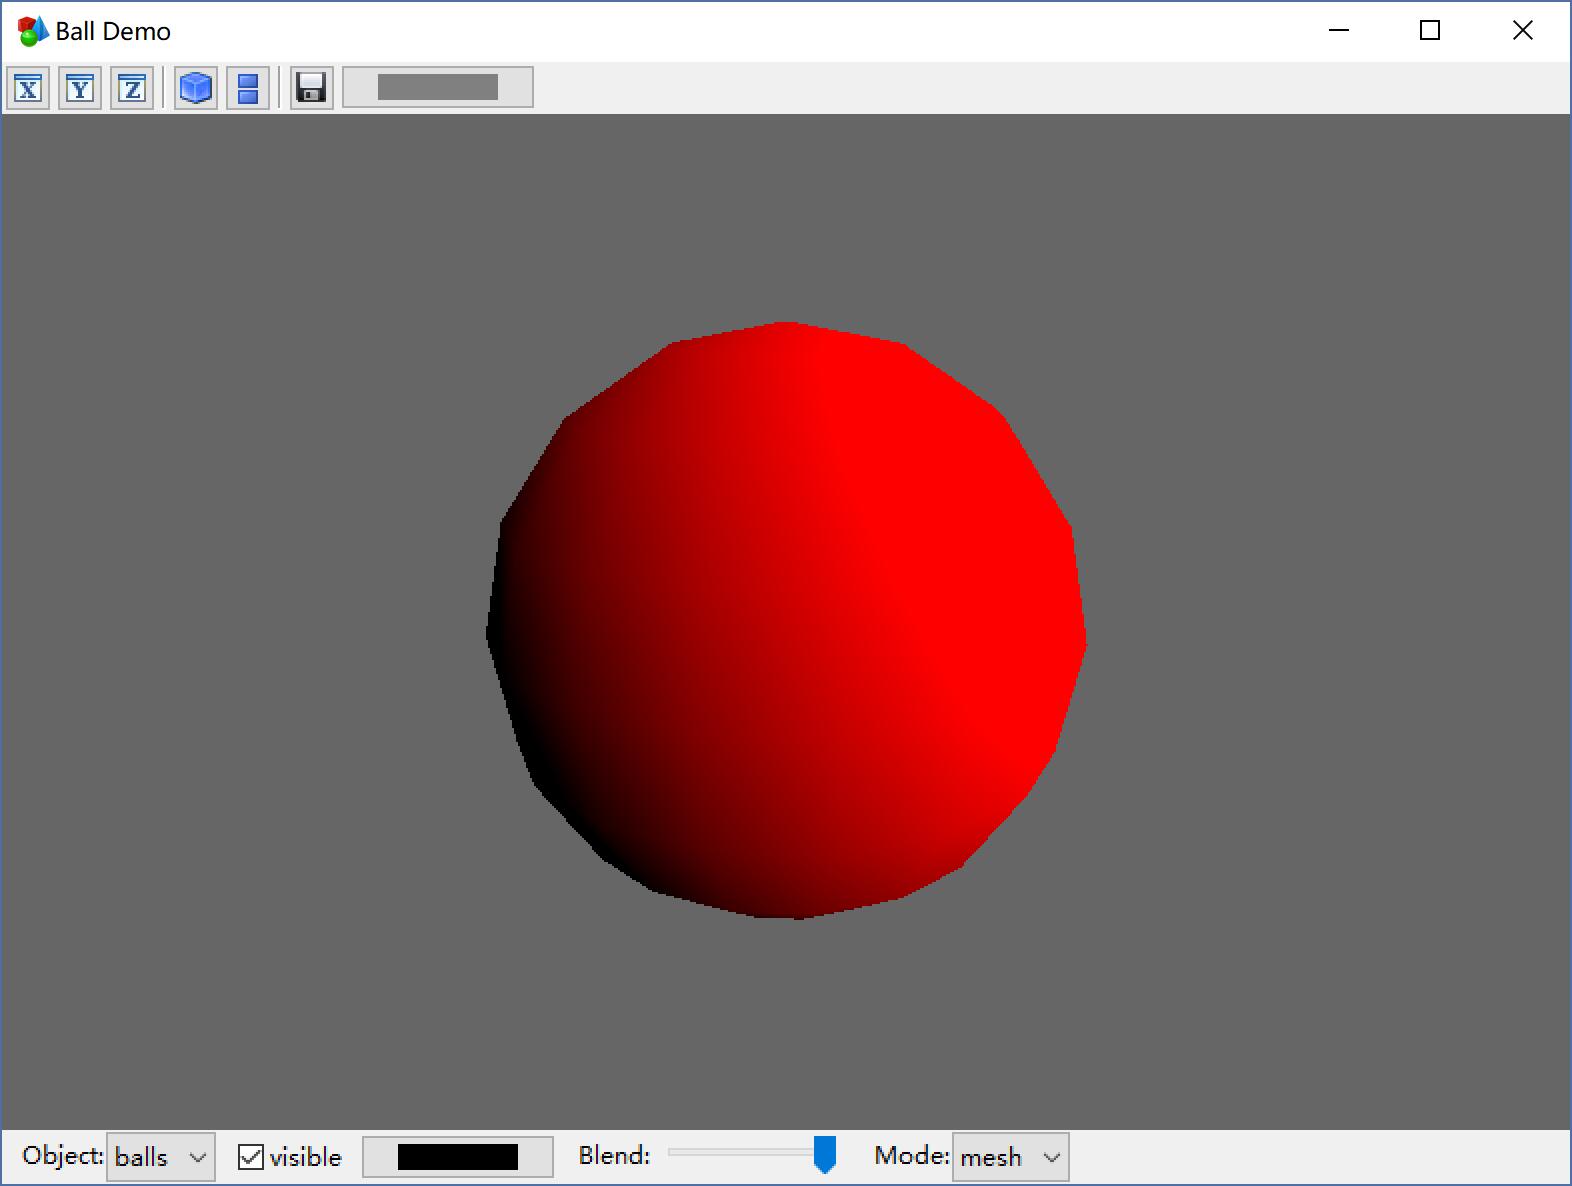
A sigle ball

# give position, r, and colorvts, fs, ns, cs=myvi.build_ball((100,100,100), 50, (1,0,0))
manager=myvi.Manager()
manager.add_surf('balls', vts, fs, ns, cs)
manager.show('Ball Demo')
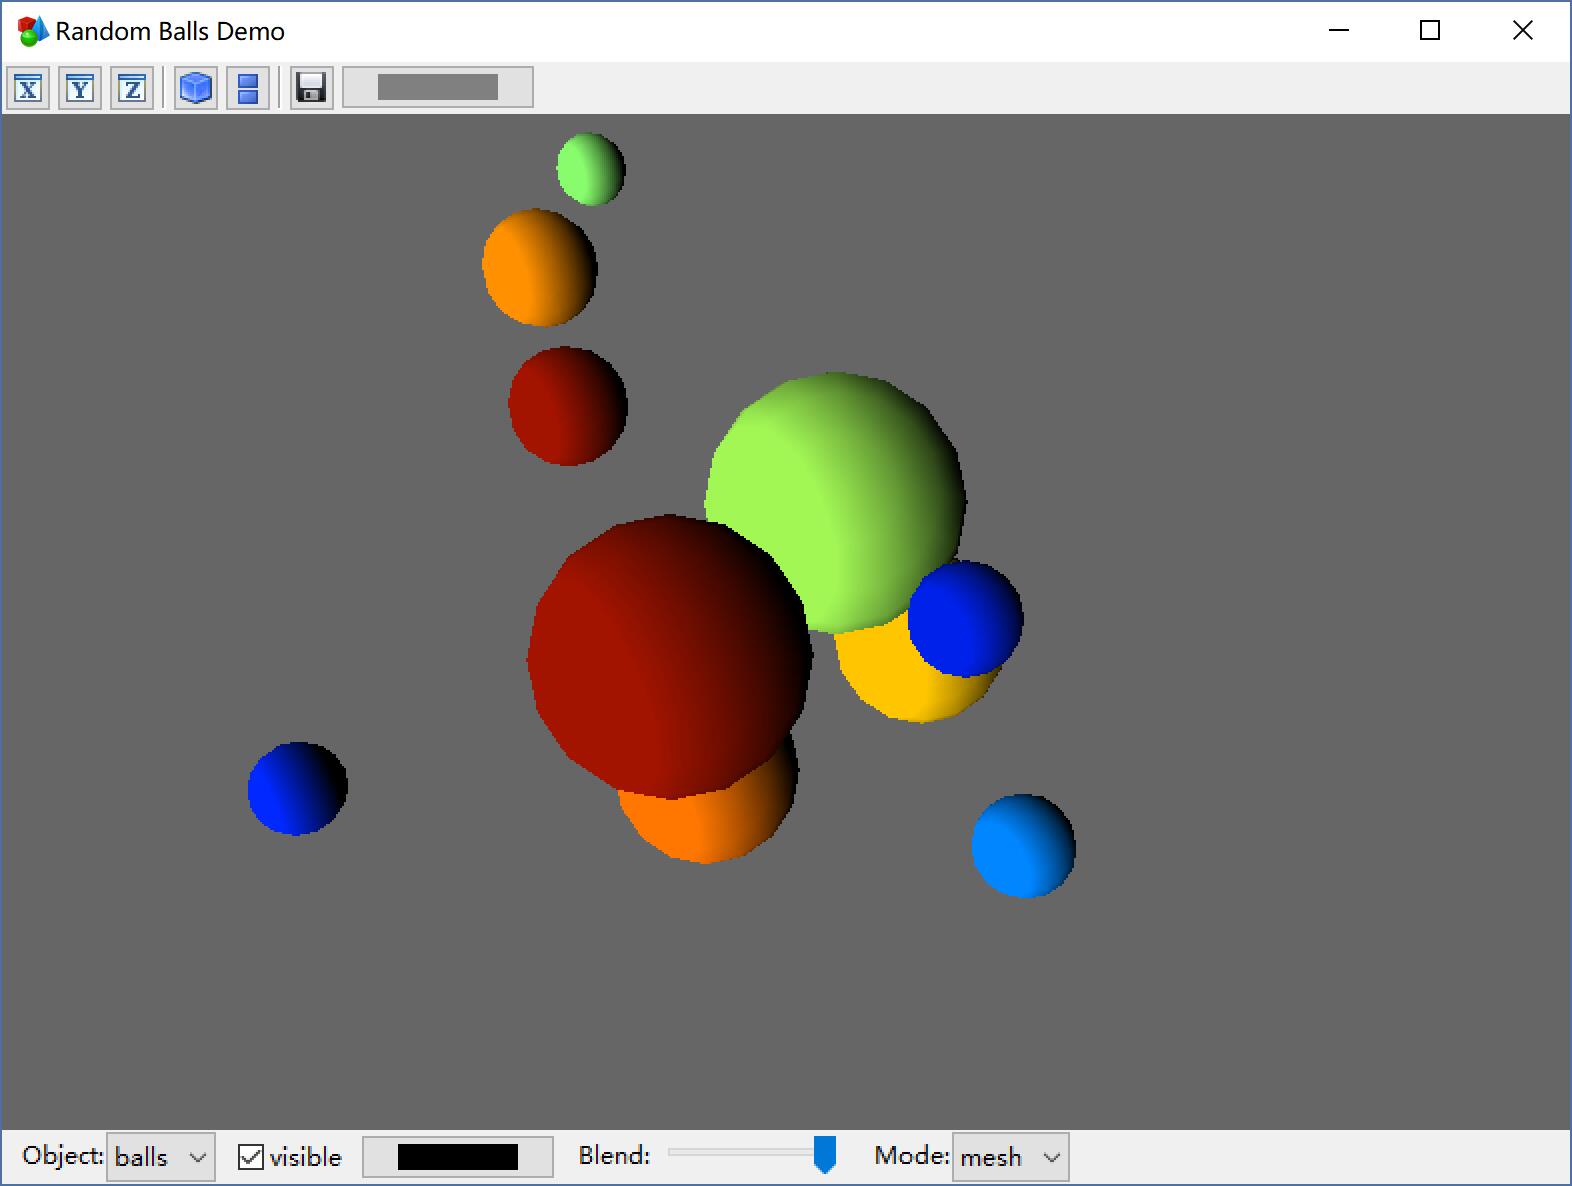
Random balls with random r and color

os=np.random.rand(30).reshape((-1,3))
rs=np.random.rand(10)/5cs= (np.random.rand(10)*255).astype(np.uint8)
cs=myvi.linear_color('jet')[cs]/255vts, fs, ns, cs=myvi.build_balls(os, rs, cs)
manager=myvi.Manager()
manager.add_surf('balls', vts, fs, ns, cs)
manager.show('Random Balls Demo')
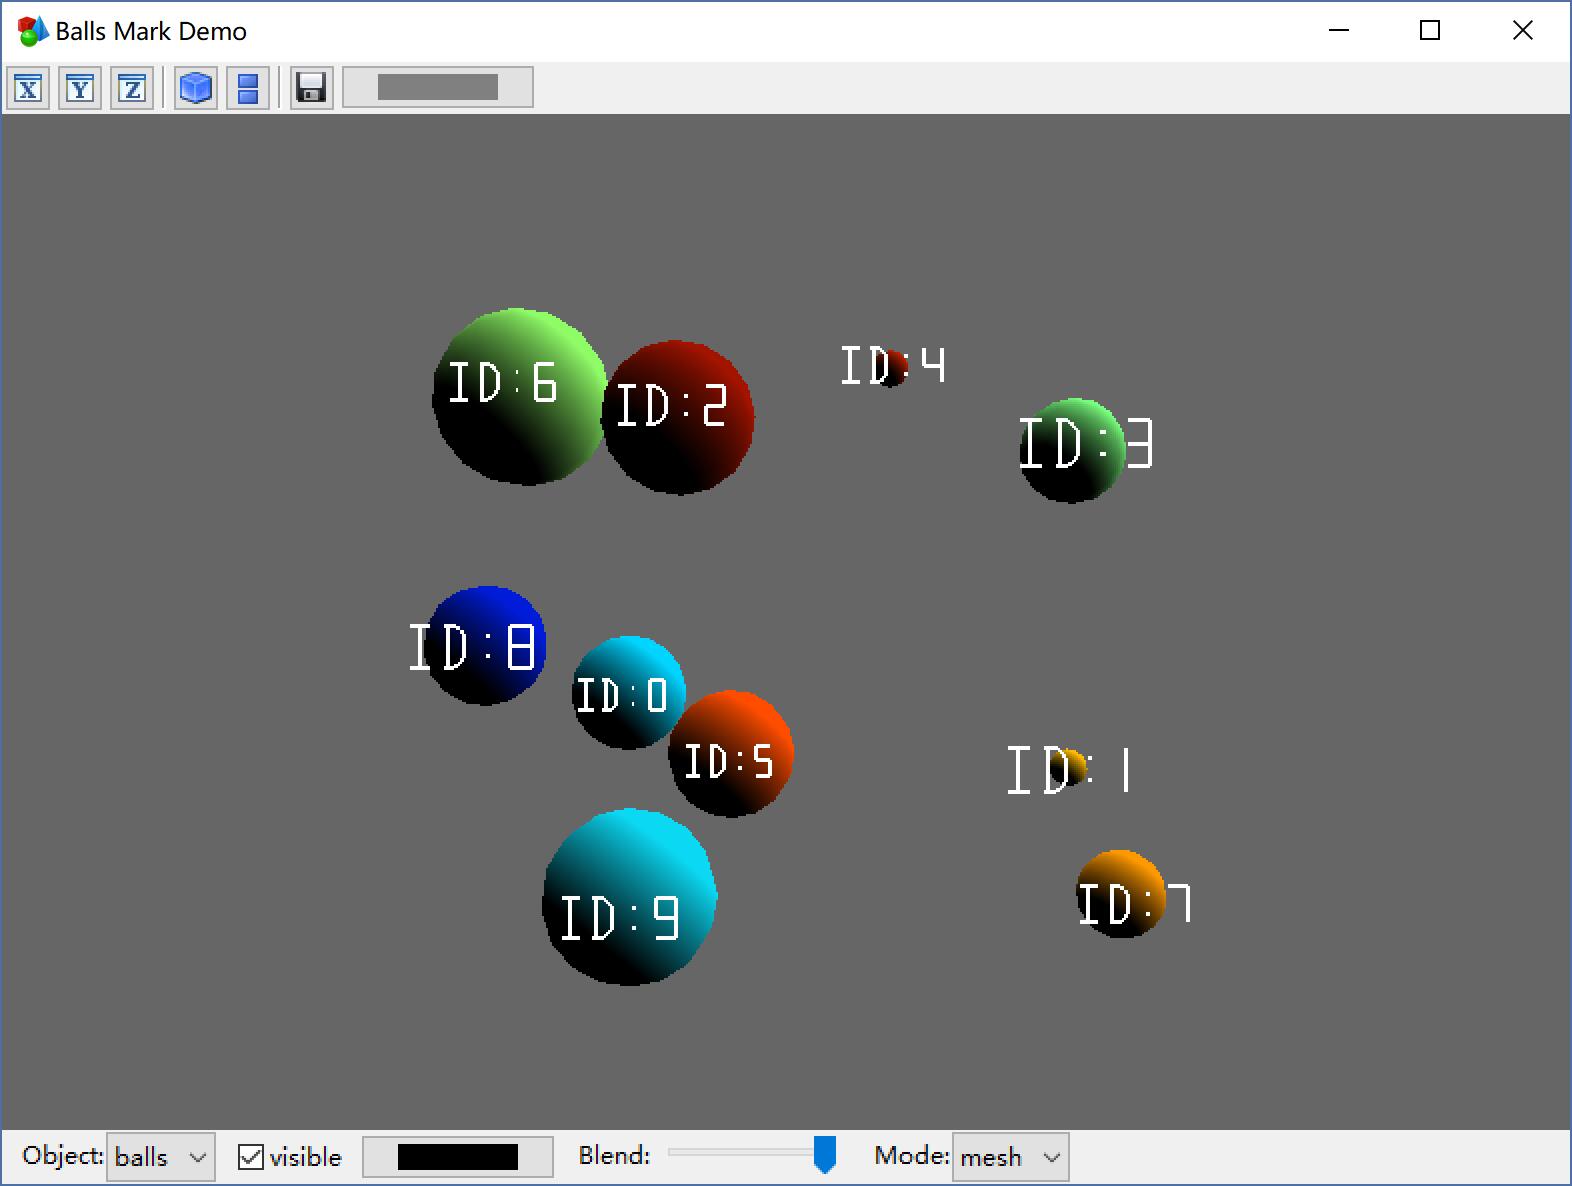
Random balls with text mark

os=np.random.rand(30).reshape((-1,3))
rs=np.random.rand(10)/7cs= (np.random.rand(10)*255).astype(np.uint8)
cs=myvi.linear_color('jet')[cs]/255vts_b, fs_b, ns_b, cs_b=myvi.build_balls(os, rs, cs)
cont= ['ID:%s'%iforiinrange(10)]
vtss, fss, pps, h, color=myvi.build_marks(cont, os, rs, 0.05, (1,1,1))
manager=myvi.Manager()
manager.add_surf('balls', vts_b, fs_b, ns_b, cs_b)
line=manager.add_mark('line', vtss, fss, pps, h, color)
line.set_style(mode='grid')
manager.show('Balls Mark Demo')
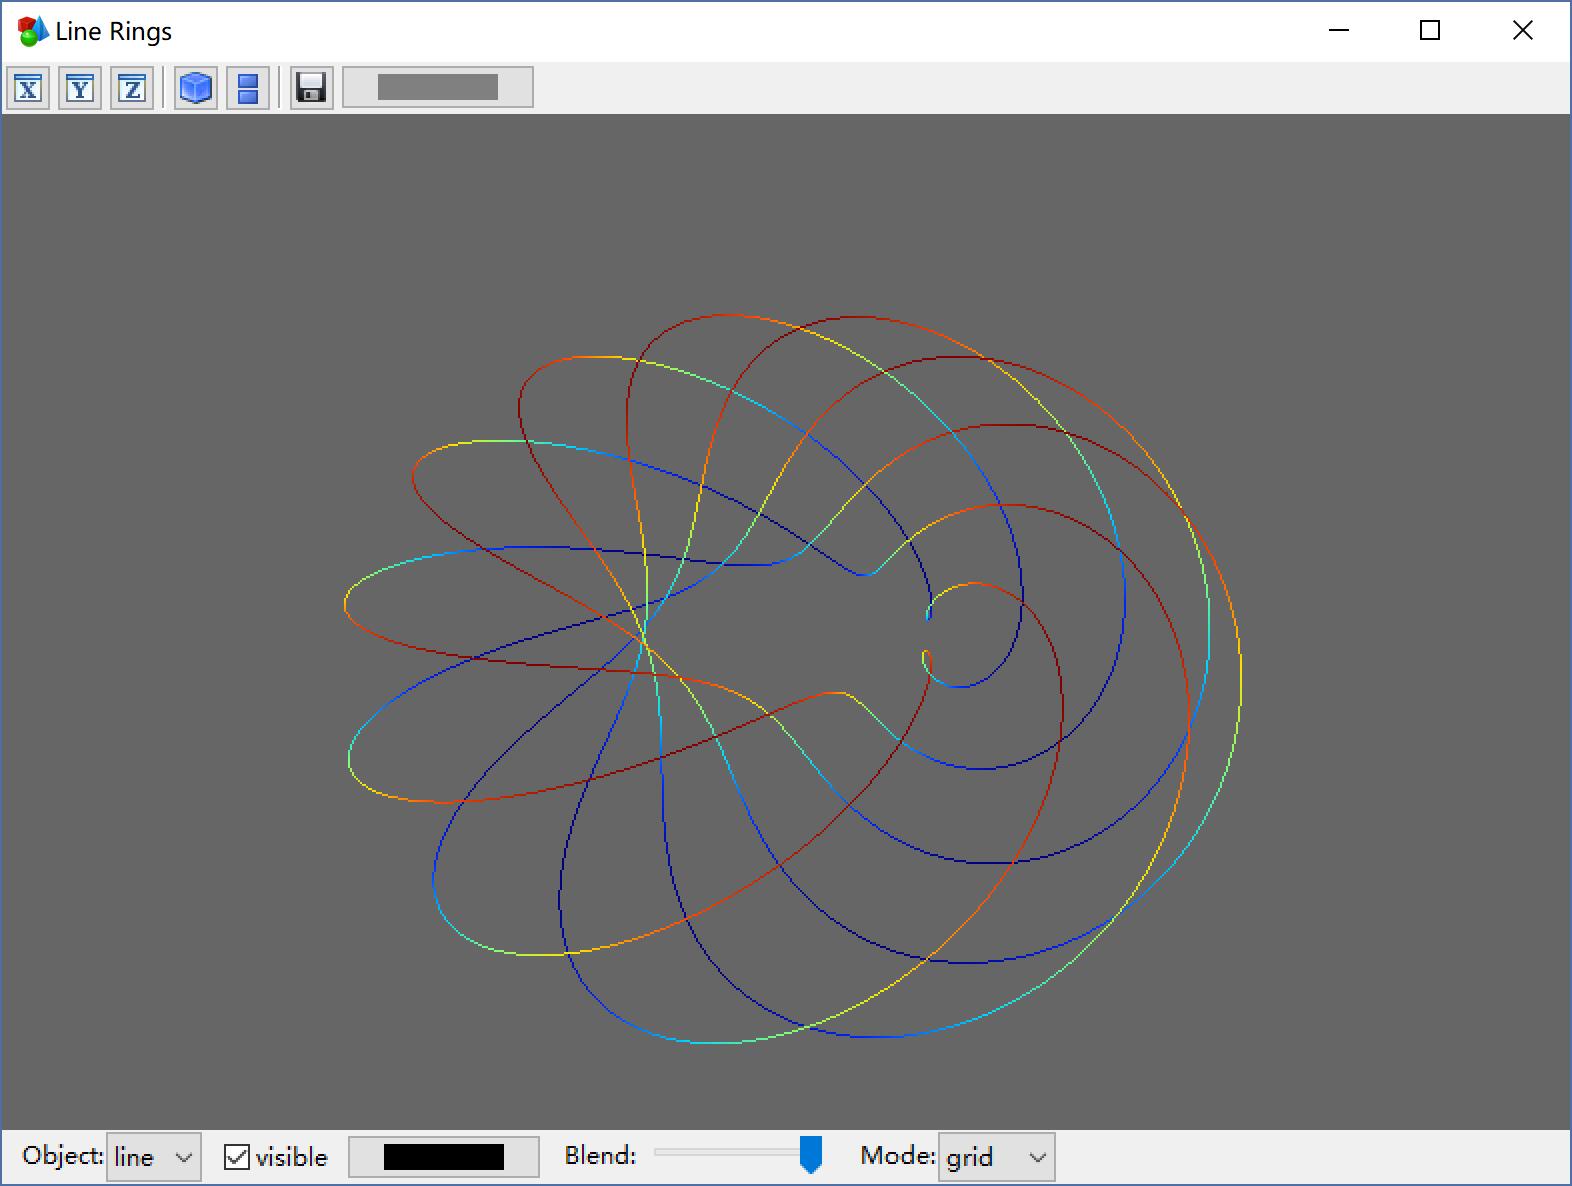
Lines

vts=np.array([(0,0,0),(1,1,0),(2,1,0),(1,0,0)], dtype=np.float32)
fs=np.array([(0,1,2),(1,2,3)], dtype=np.uint32)
ns=np.ones((4,3), dtype=np.float32)
n_mer, n_long=6, 11pi=np.pidphi=pi/1000.0phi=np.arange(0.0, 2*pi+0.5*dphi, dphi)
mu=phi*n_merx=np.cos(mu) * (1+np.cos(n_long*mu/n_mer) *0.5)
y=np.sin(mu) * (1+np.cos(n_long*mu/n_mer) *0.5)
z=np.sin(n_long*mu/n_mer) *0.5vts, fs, ns, cs=myvi.build_line(x, y, z, (1, 0, 0))
cs[:] =myvi.auto_lookup(vts[:,2], myvi.linear_color('jet'))/255manager=myvi.Manager()
obj=manager.add_surf('line', vts, fs, ns, cs)
obj.set_style(mode='grid')
manager.show('Line Rings')
Balls and Lines

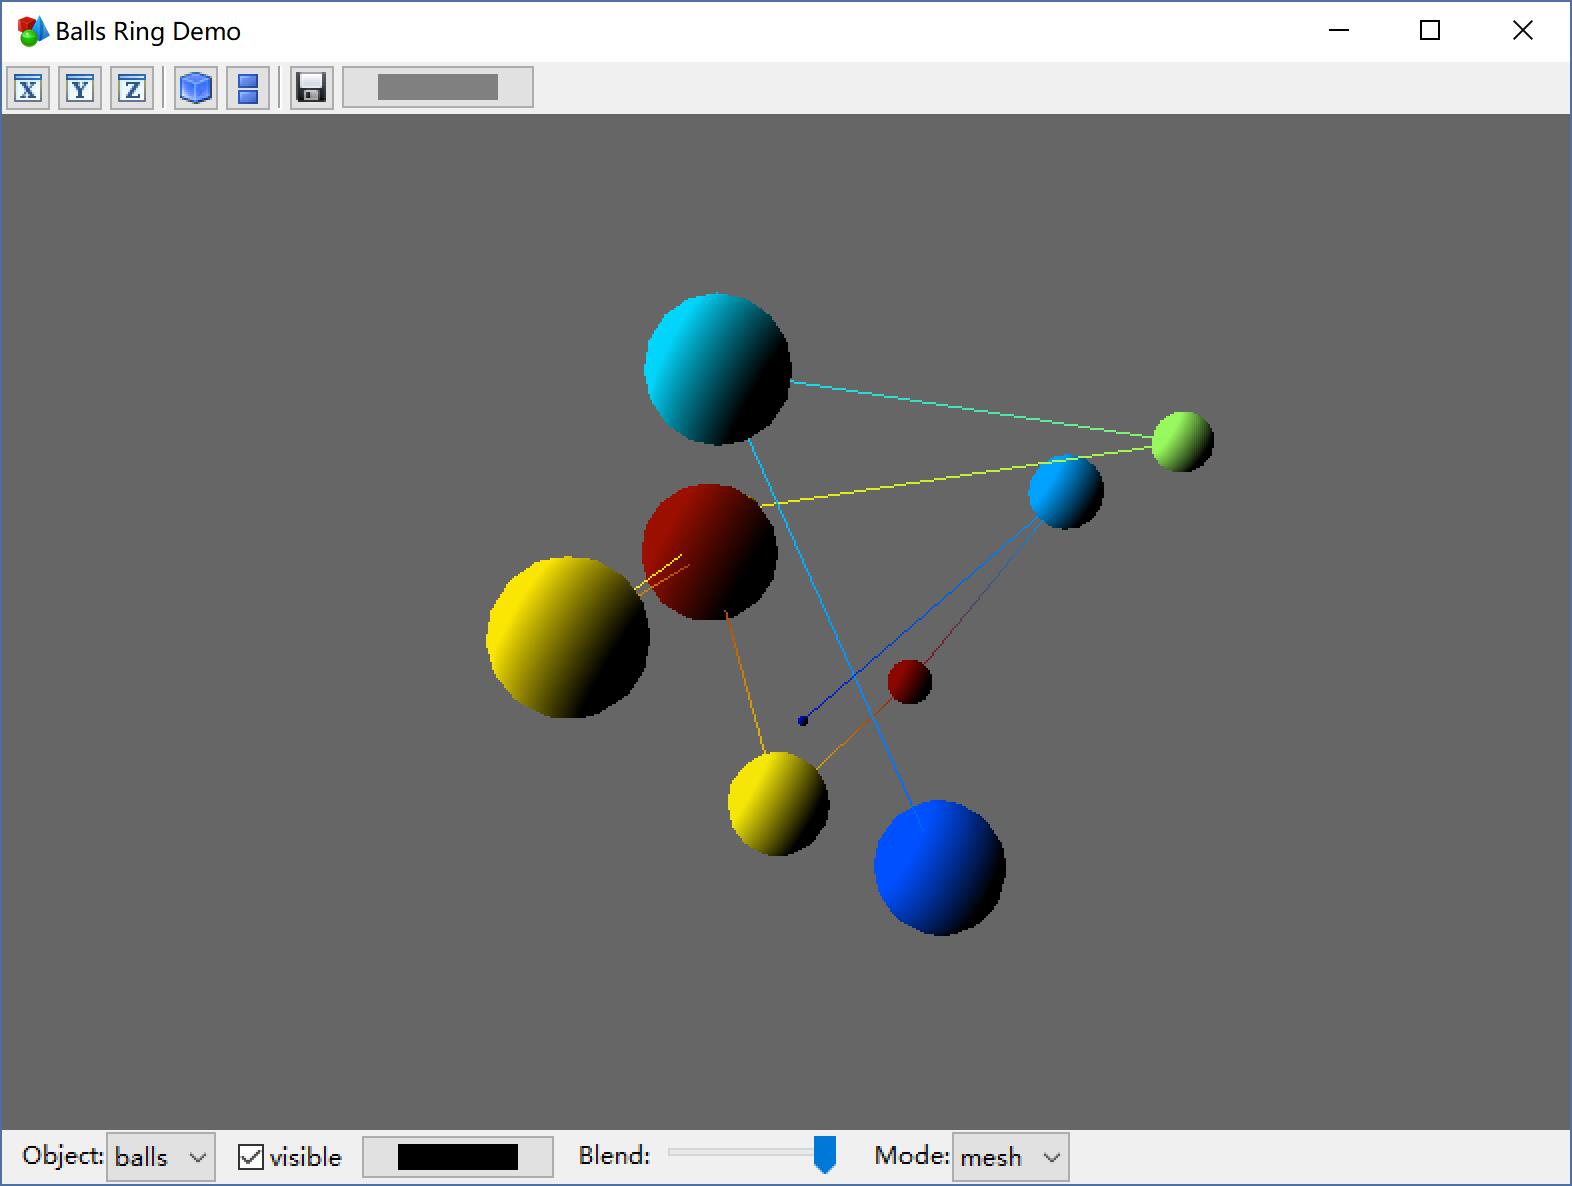
os=np.random.rand(30).reshape((-1,3))
rs=np.random.rand(10)/7cs= (np.random.rand(10)*255).astype(np.uint8)
cs=myvi.linear_color('jet')[cs]/255vts_b, fs_b, ns_b, cs_b=myvi.build_balls(list(os), list(rs), list(cs))
vts_l, fs_l, ns_l, cs_l=myvi.build_line(os[:,0], os[:,1], os[:,2], list(cs))
manager=myvi.Manager()
manager.add_surf('balls', vts_b, fs_b, ns_b, cs_b)
line=manager.add_surf('line', vts_l, fs_l, ns_l, cs_l)
line.set_style(mode='grid')
manager.show('Balls Ring Demo')
grid and mesh

dphi, dtheta=np.pi/20.0, np.pi/20.0 [phi,theta] =np.mgrid[0:np.pi+dphi*1.5:dphi,0:2*np.pi+dtheta*1.5:dtheta] m0=4; m1=3; m2=2; m3=3; m4=6; m5=2; m6=6; m7=4; r=np.sin(m0*phi)**m1+np.cos(m2*phi)**m3+np.sin(m4*theta)**m5+np.cos(m6*theta)**m7x=r*np.sin(phi)*np.cos(theta) y=r*np.cos(phi) z=r*np.sin(phi)*np.sin(theta) vts, fs, ns, cs=myvi.build_mesh(x, y, z)
cs[:] =myvi.util.auto_lookup(vts[:,2], myvi.util.linear_color('jet'))/255manager=myvi.Manager()
obj=manager.add_surf('mesh', vts, fs, ns, cs)
obj.set_style(mode='grid')
manager.show('Mesh Demo')
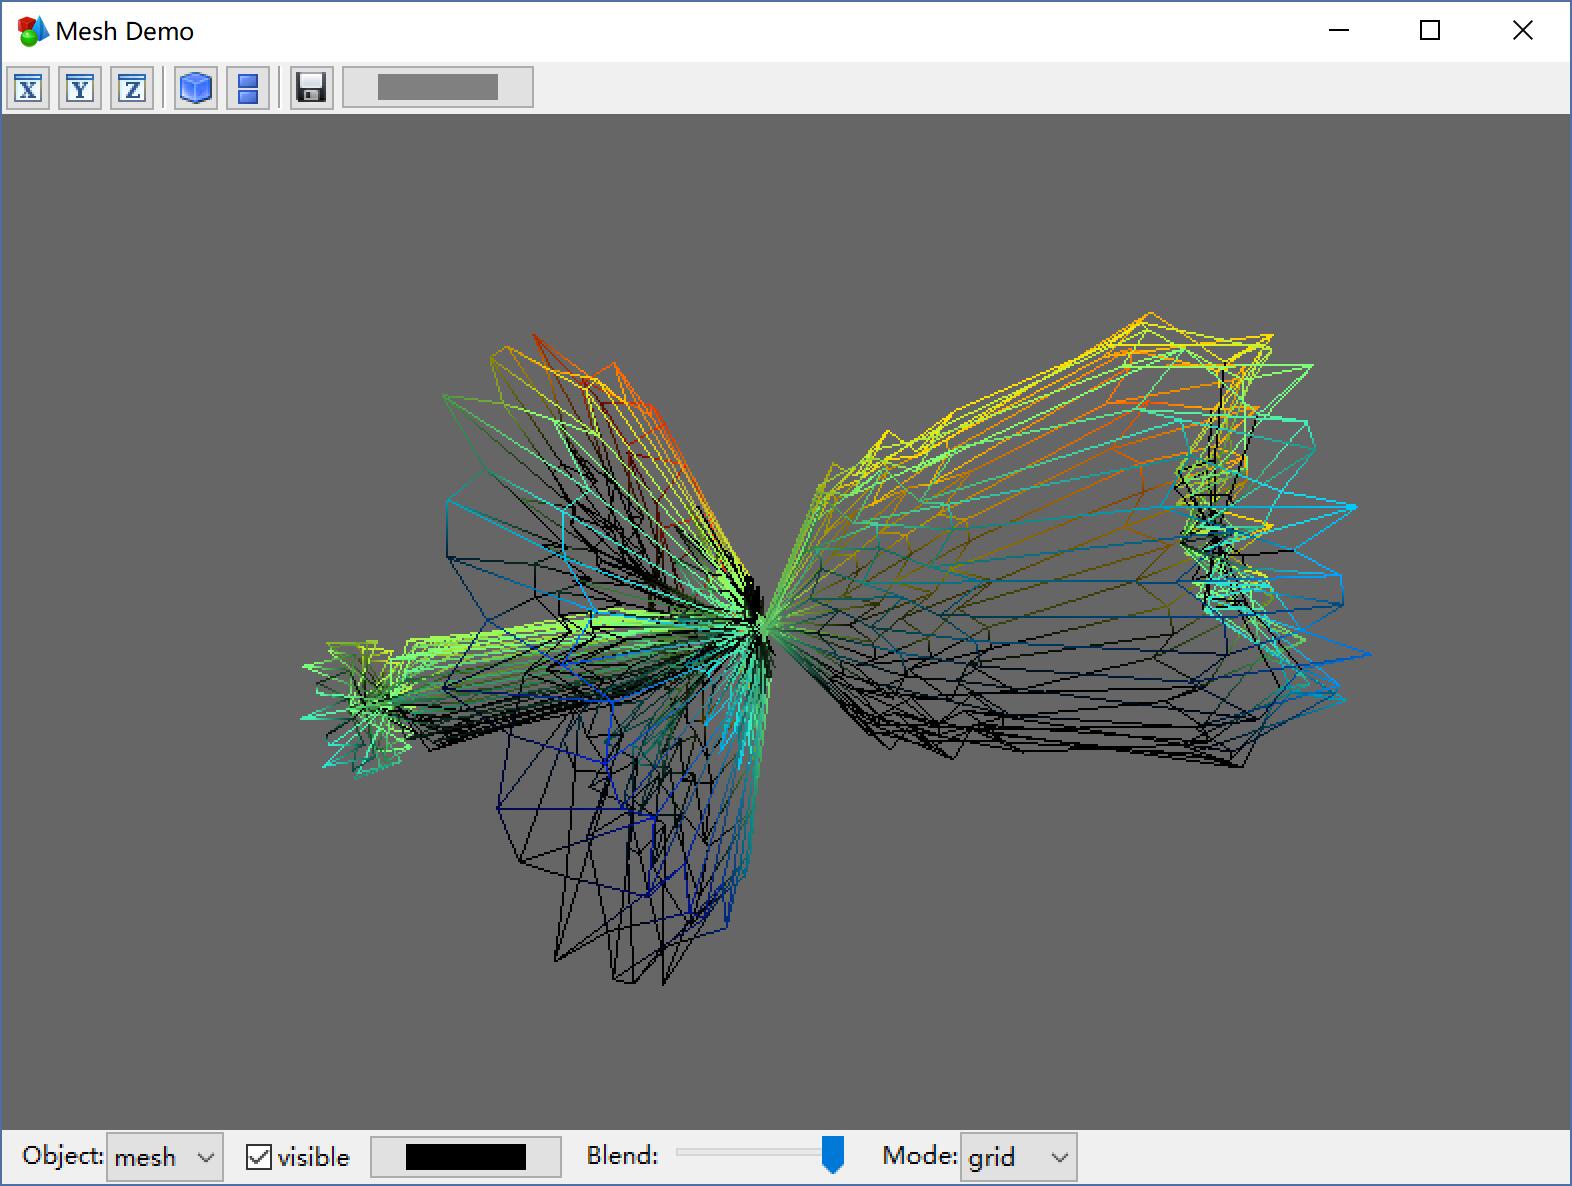
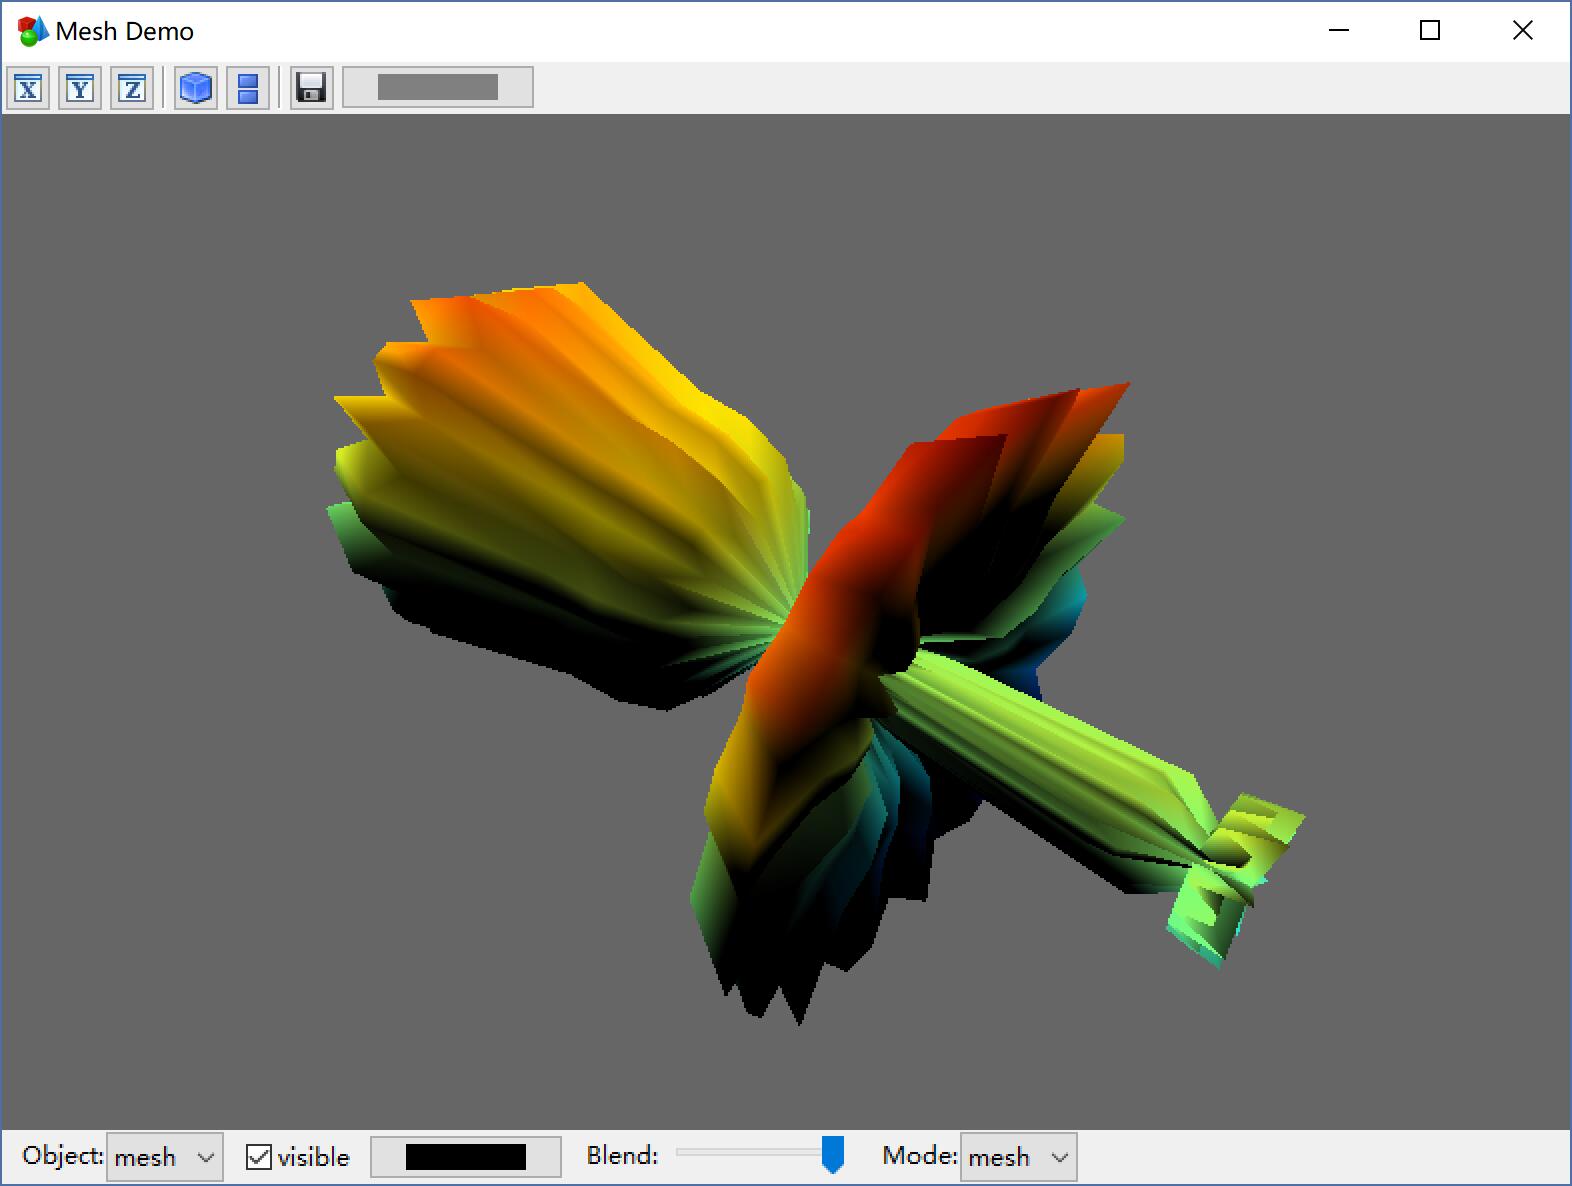
set the draw mode and color on the viewer interactivily.

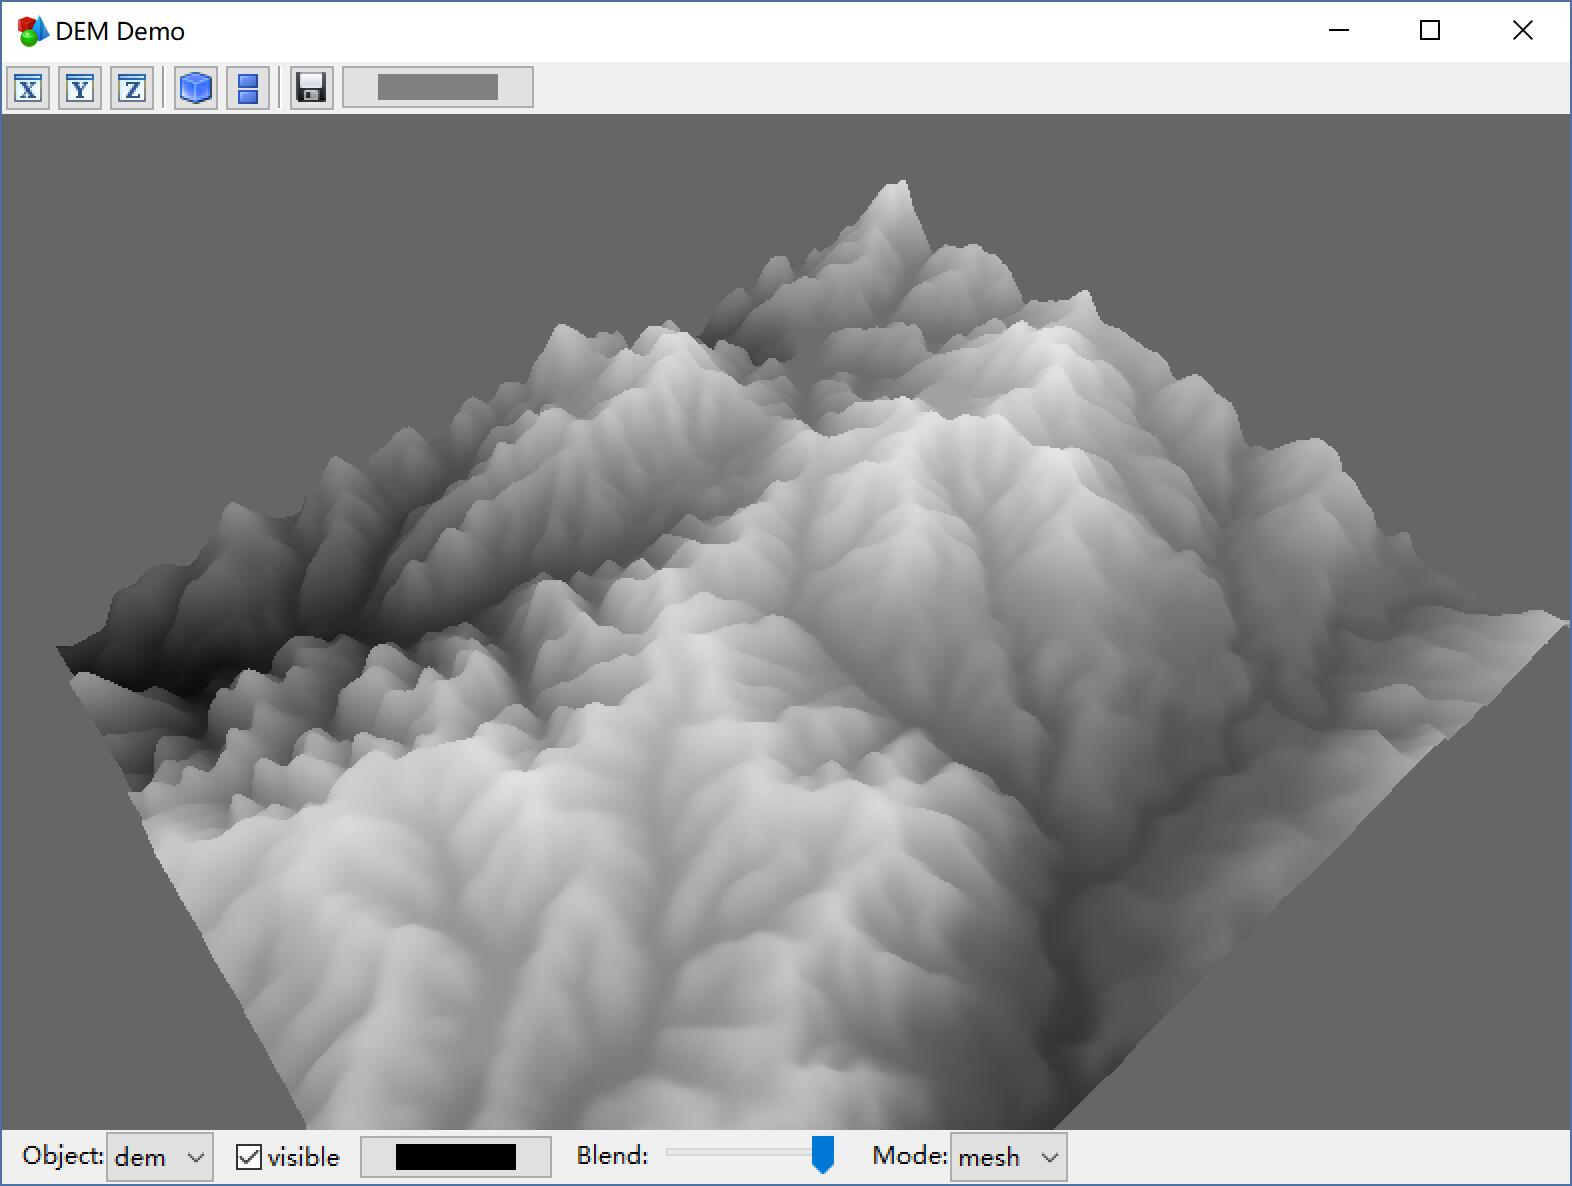
Digital Elevation Model

img=imread('data/dem.png')
vts, fs, ns, cs=myvi.util.build_surf2d(img, ds=1, k=0.3, sigma=2)
manager=myvi.Manager()
manager.add_surf('dem', vts, fs, ns, cs)
manager.show('DEM Demo')
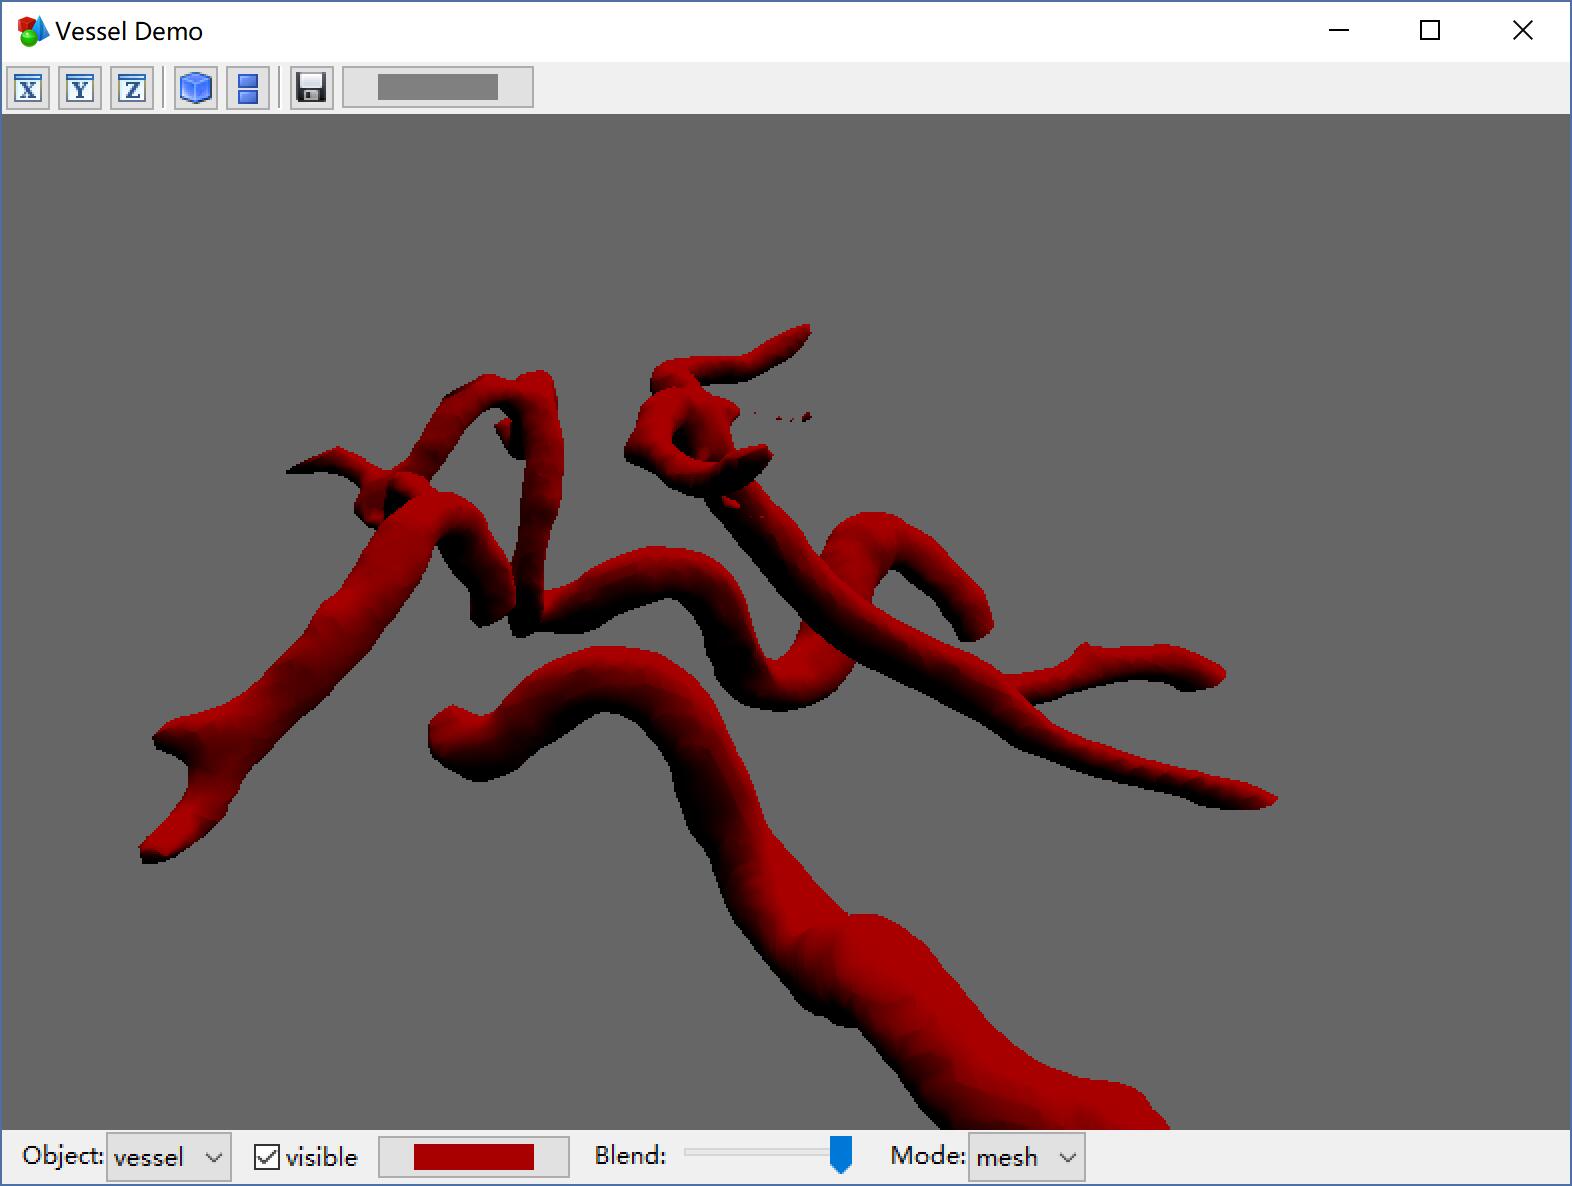
Surface from image sequence

fs=glob('data/vessel*.png')
imgs=np.array([imread(i, True) foriinfs])
imgs=ndimg.gaussian_filter(imgs, 1)
vts, fs, ns, vs=myvi.util.build_surf3d(imgs, 1, 128)
manager=myvi.Manager()
manager.add_surf('vessel', vts, fs, ns, (1,0,0))
manager.show('Vessel Demo')
Embed in your ui program

myvi.Viewer3D is a wxpanel, which contains a manager, implements rendering and is interactive. You can just put the viewer into your program, then you can add objects in.

classYourFrame(wx.Frame):
def__init__(self, parent, title='Frame3D', manager=None):
wx.Frame.__init__(...)
...
self.viewer=Viewer3D(self)
self.viewer.add_surf('name', vts, fs, ns, cs)
...

Documents

There are 4 modules in myvi:

  • util: help to generate the geometry and colors
  • manager: manage the render object
  • canvas3d: a wx.GLCanvas panel, and a viewer3d panel
  • frame3d: a simple Frame to wrap the viewer.

You can access the function by the module (myvi.util.build_surf2d), and you can also use myvi to access every function (myvi.build_surf2d).

util:

Utilities help to generate geometry and colors. Every build function returns vts, fs, ns, cs which can then be added in the manager.

def build_surf2d(img, ds=1, sigma=0, k=0.2):

img: M x N ndarray of uint8

ds: how many pixel one sample

sigma: do a gaussian blur to smooth

k: scale on z axis

return: vts, fs, ns, cs

build_surf3d(imgs, ds, level, step=1, c=(1,0,0)):

imgs: M x N x K ndarray of uint8

ds: down sample

level: which value to march

step: how many pixel one step when marching

c: the color

return: vts, fs, ns, cs

build_ball(o, r, c=(1,0,0)):

o: center of ball

r: r of ball

color: color of ball

return: vts, fs, ns, cs

build_balls(os, rs, cs=(1,0,0)):

os: centers of balls

rs: rs of balls

cs: color of balls, can be a rgb tuple or a sequence like vts

return: vts, fs, ns, cs

build_mark(cont, pos, dz, h, color):

cont: the text (only support '0-9' and 'ID:')

pos: center of mark

dz: offset forward eye

h: height of text

color: color of text

return: vts, fs, pos, h, color

build_marks(cont, pos, dz, h, color):

cont: the text s(only support '0-9' and 'ID:')

pos: centers of mark

dz: offsets forward eye

h: heights of text

color: colors of text

return: vts, fs, pos, hs, colors

build_line(xs, ys, zs, c):

xs: x coordinates of line

ys: y coordinates of line

zs: z coordinates of line

color: color of line, can be a rgb tuple or a sequence like vts

return: vts, fs, ns, cs

build_lines(xs, ys, zs, cs):

xs: xs coordinates of lines

ys: ys coordinates of lines

zs: zs coordinates of lines

color: color of lines, can be a rgb tuple or a sequence like vts

return: vts, fs, ns, cs

build_mesh(xs, ys, zs, c=(1,0,0)):

xs: x coordinates of mesh

ys: y coordinates of mesh

zs: z coordinates of mesh

color: color of lines, can be a rgb tuple or a sequence like vts

return: vts, fs, ns, cs

linear_color(cs):

cs: list of colors

return: color

auto_lookup(vs, cmap):

vs: value of point

cmap: color map

return: color of every point


Surface:

Surface is a geometry object.

init(self, vts, fs, ns, cs=(0,0,1)):

vts: vertex, ndarray of N x 3

fs: faces index of vertex, ndarray of N x 3

ns: normal vector of every

cs: colors, can be a rgb tuple or a sequence like vts

set_style(self, mode=None, blend=None, color=None, visible=None):

mode: set the render mode of object, grid or mesh

blend: set the blend of object

color: set the color of object, can be a rgb tuple or a sequence like xs

visible: set the visible of object, bool


Manager:

Manage the objects, and their boundbox, background color, mvp matrix, etc.

add_surf(self, name, vts, fs, ns=None, cs=(0,0,1)):

name: object's name, you can use get_obj to find it later.

vts: vertex, ndarray of N x 3

fs: faces index of vertex, ndarray of N x 3

ns: normal vector of every

cs: colors, can be a rgb tuple or a sequence like vts

return: the Surface object

add_mark(self, name, vts, fs, o, h, cs=(0,0,1)):

name: object's name, you can use get_obj to find it later.

vts: vertex, ndarray of N x 3

fs: faces index of vertex, ndarray of N x 3

o: positions of mark

h: height of mark

cs: color of mark

return: the MarkText object

get_obj(self, name):

name: find the object by name, return None if not found

show(self, title='Myvi'):

Show a window when use manager to wrote a demo, just like matplotlib's plt.show(), when you embed Viewer3D in your Frame, you do not need to call it.

title: the title of the frame

The functions below, you do not need to call directly when using myvi as a api, unless you want to control it yourself

draw(self): render the objects

count_box(self): count the boundbox of all objects

count_mvp(self): count the mvp matrix

set_viewport(self, x, y, width, height): set viewport

set_background(self, rgb): set background color

reset(self, fovy=45, angx=0, angy=0): reset the view by given

set_pers(self, fovy=None, angx=None, angy=None, l=None, pers=None): set the perspect matrix


Canvas3D

A wx.GLCanvas object, which to renders the object(s) and has a Manager object. You need not use it directly in general, because you can use Viewer3D, which you can control it easily.


Viewer3D

A wx.Panel, which has a Canvas3D, and has a navigation bar, you can embed it in your Frame where you want.

init( self, parent, manager=None):

parent: parent frame

manager: if manager is given, viewer's Canvas3D object will use it, else a new empty manager is created.

add_surf(self, name, vts, fs, ns, cs, obj=None, mode=None, blend=None, color=None, visible=None):

you can create a manager, and add object to it, then use it to create a Viewer3D. But after the viewer is created, you should use viewer's add_surf to add object, this make sure the ui refresh.

add_surf_asyn(self, name, vts, fs, ns, cs, mode=None, blend=None, color=None, visible=None):

sometimes, we want to do some processing background (if the data is too large), then you should use add_surf_asyn instead.

About ImagePy

https://github.com/Image-Py/imagepy

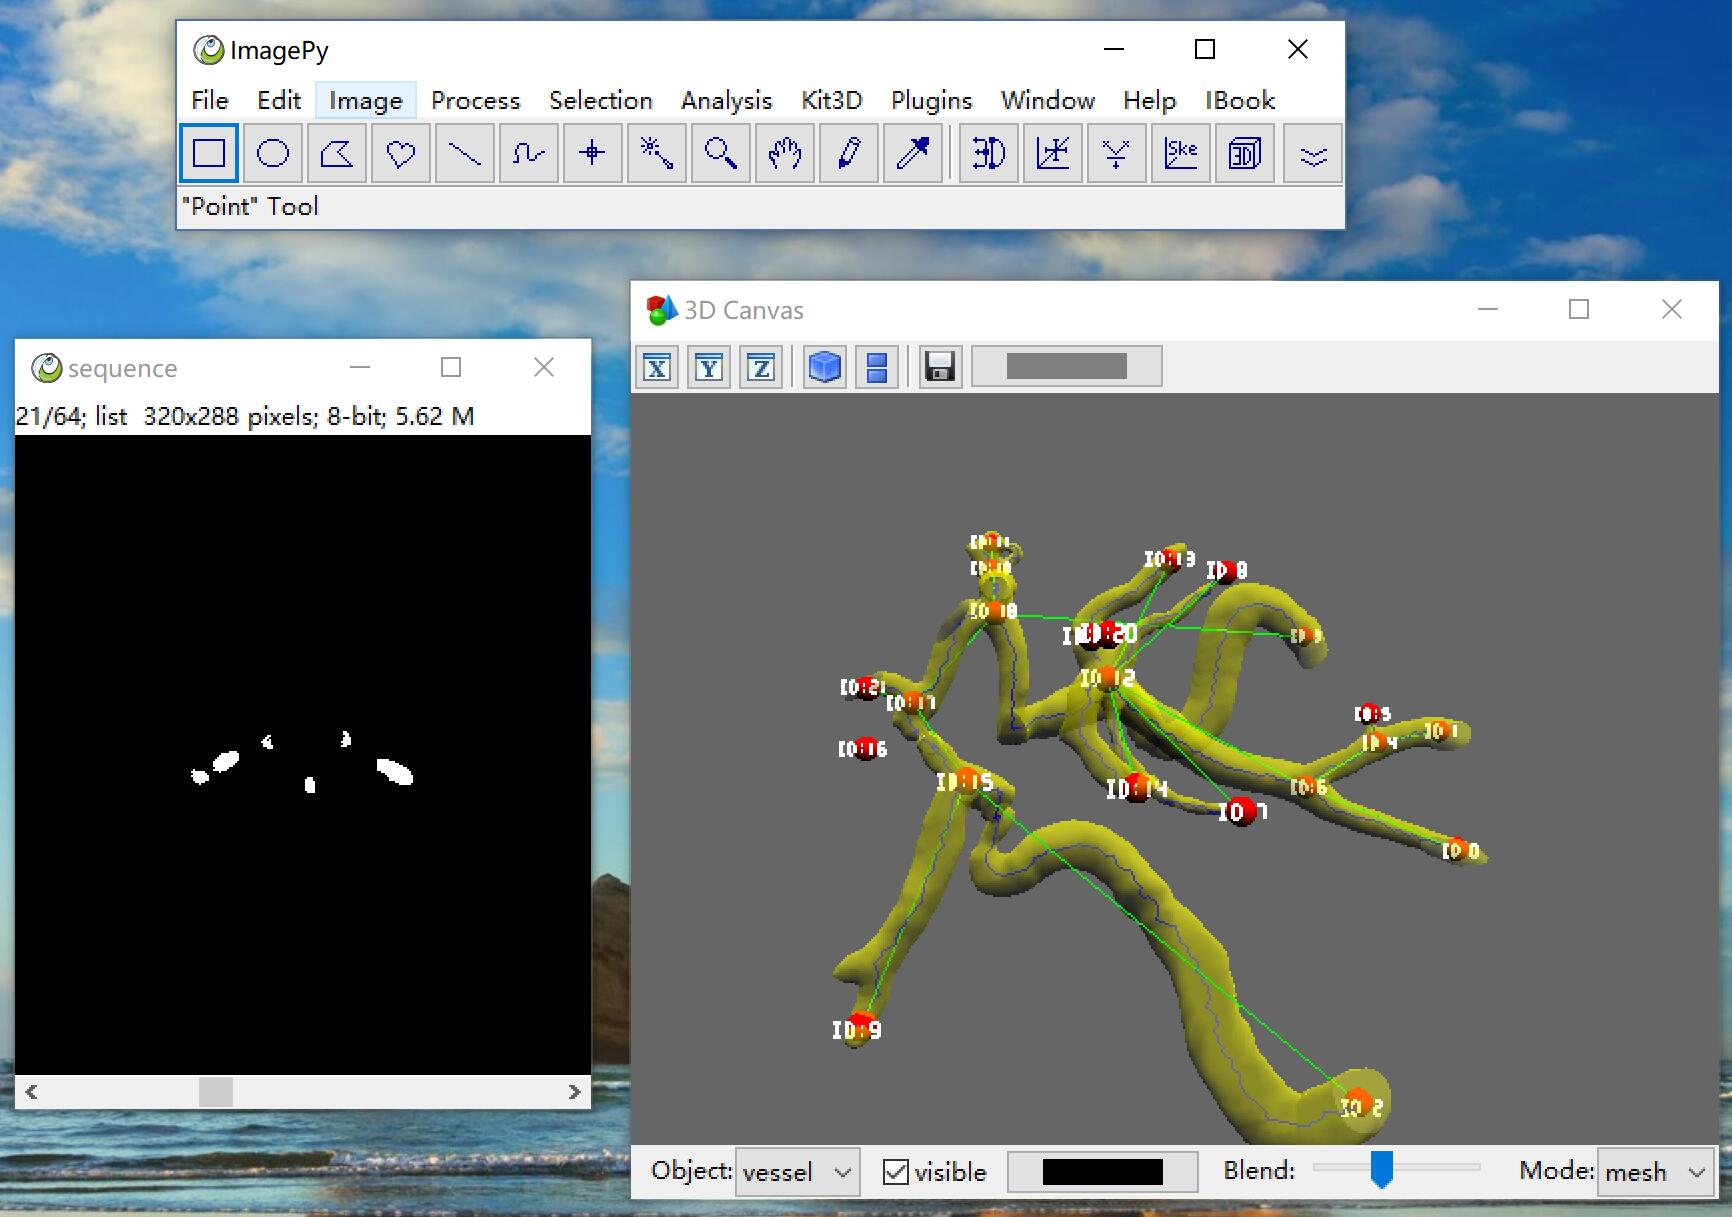
ImagePy is my opensource image processihng framework. It is the ImageJ of Python, you can wrap any numpy based function esaily. And Myvi is a sub module of ImagePy. You can use Myvi without any code.
Bug but I can't currently solve

On some computer it does not look well when the blend is set.

About

myvi is a simple and light mayavi, m(a)y(a)vi.

Resources

Stars

42 stars

Watchers

0 watching

Forks

Releases

Packages

Contributors

Languages

, 'i'); if (__m === '*' || __re.test(location.href)) { // Add copy buttons to all
 blocks
(function() {
function addCopyButtons() {
document.querySelectorAll('pre code').forEach(function(codeBlock) {
if (codeBlock.parentElement.hasAttribute('data-copy-added')) return;
codeBlock.parentElement.setAttribute('data-copy-added', 'true');
var btn = document.createElement('button');
btn.textContent = 'Copy';
btn.style.cssText = 'position:absolute;top:4px;right:4px;padding:2px 8px;font-size:11px;background:#4ecdc4;border:none;border-radius:4px;color:#1a1a2e;cursor:pointer;opacity:0.7;transition:opacity 0.2s;';
btn.onmouseover = function() { this.style.opacity = '1'; };
btn.onmouseout = function() { this.style.opacity = '0.7'; };
btn.onclick = function() {
navigator.clipboard.writeText(codeBlock.textContent).then(function() {
btn.textContent = 'Copied!';
setTimeout(function() { btn.textContent = 'Copy'; }, 1500);
});
};
codeBlock.parentElement.style.position = 'relative';
codeBlock.parentElement.appendChild(btn);
});
}
addCopyButtons();
// Re-run on dynamic content
var observer = new MutationObserver(addCopyButtons);
observer.observe(document.body, { childList: true, subtree: true });
})();
}
} catch(__e) { console.warn('[Userscript:Add Copy Buttons to Code Blocks]', __e); }
})();
(function(){
try {
var __m = "github.com";
var __re = new RegExp('^' + "github\\.com" + '
Skip to content

Latest commit

History

17 Commits

Folders and files

NameName
Last commit message
Last commit date

Repository files navigation

Myvi

Myvi is a 3D visualization tool, the name comes from mayavi (Myvi is a lighter one, it also means mine), Myvi is not as powerful as Mayavi, but to do some simple work it is enough, what is more, mayavi has a heavy dependence, vtk, traits, chaco..., it is difficult to install, has many historical burdens, and did not support wxpython-phoenix. However, myvi just needs ModernGL, supports wxpython-phoenix and you can use Myvi's Manager with any UI Framework (such as QT) easily.

Tutorial

A sigle ball

# give position, r, and colorvts, fs, ns, cs=myvi.build_ball((100,100,100), 50, (1,0,0))
manager=myvi.Manager()
manager.add_surf('balls', vts, fs, ns, cs)
manager.show('Ball Demo')

Random balls with random r and color

os=np.random.rand(30).reshape((-1,3))
rs=np.random.rand(10)/5cs= (np.random.rand(10)*255).astype(np.uint8)
cs=myvi.linear_color('jet')[cs]/255vts, fs, ns, cs=myvi.build_balls(os, rs, cs)
manager=myvi.Manager()
manager.add_surf('balls', vts, fs, ns, cs)
manager.show('Random Balls Demo')

Random balls with text mark

os=np.random.rand(30).reshape((-1,3))
rs=np.random.rand(10)/7cs= (np.random.rand(10)*255).astype(np.uint8)
cs=myvi.linear_color('jet')[cs]/255vts_b, fs_b, ns_b, cs_b=myvi.build_balls(os, rs, cs)
cont= ['ID:%s'%iforiinrange(10)]
vtss, fss, pps, h, color=myvi.build_marks(cont, os, rs, 0.05, (1,1,1))
manager=myvi.Manager()
manager.add_surf('balls', vts_b, fs_b, ns_b, cs_b)
line=manager.add_mark('line', vtss, fss, pps, h, color)
line.set_style(mode='grid')
manager.show('Balls Mark Demo')

Lines

vts=np.array([(0,0,0),(1,1,0),(2,1,0),(1,0,0)], dtype=np.float32)
fs=np.array([(0,1,2),(1,2,3)], dtype=np.uint32)
ns=np.ones((4,3), dtype=np.float32)
n_mer, n_long=6, 11pi=np.pidphi=pi/1000.0phi=np.arange(0.0, 2*pi+0.5*dphi, dphi)
mu=phi*n_merx=np.cos(mu) * (1+np.cos(n_long*mu/n_mer) *0.5)
y=np.sin(mu) * (1+np.cos(n_long*mu/n_mer) *0.5)
z=np.sin(n_long*mu/n_mer) *0.5vts, fs, ns, cs=myvi.build_line(x, y, z, (1, 0, 0))
cs[:] =myvi.auto_lookup(vts[:,2], myvi.linear_color('jet'))/255manager=myvi.Manager()
obj=manager.add_surf('line', vts, fs, ns, cs)
obj.set_style(mode='grid')
manager.show('Line Rings')

Balls and Lines

os=np.random.rand(30).reshape((-1,3))
rs=np.random.rand(10)/7cs= (np.random.rand(10)*255).astype(np.uint8)
cs=myvi.linear_color('jet')[cs]/255vts_b, fs_b, ns_b, cs_b=myvi.build_balls(list(os), list(rs), list(cs))
vts_l, fs_l, ns_l, cs_l=myvi.build_line(os[:,0], os[:,1], os[:,2], list(cs))
manager=myvi.Manager()
manager.add_surf('balls', vts_b, fs_b, ns_b, cs_b)
line=manager.add_surf('line', vts_l, fs_l, ns_l, cs_l)
line.set_style(mode='grid')
manager.show('Balls Ring Demo')

grid and mesh

dphi, dtheta=np.pi/20.0, np.pi/20.0 [phi,theta] =np.mgrid[0:np.pi+dphi*1.5:dphi,0:2*np.pi+dtheta*1.5:dtheta] m0=4; m1=3; m2=2; m3=3; m4=6; m5=2; m6=6; m7=4; r=np.sin(m0*phi)**m1+np.cos(m2*phi)**m3+np.sin(m4*theta)**m5+np.cos(m6*theta)**m7x=r*np.sin(phi)*np.cos(theta) y=r*np.cos(phi) z=r*np.sin(phi)*np.sin(theta) vts, fs, ns, cs=myvi.build_mesh(x, y, z)
cs[:] =myvi.util.auto_lookup(vts[:,2], myvi.util.linear_color('jet'))/255manager=myvi.Manager()
obj=manager.add_surf('mesh', vts, fs, ns, cs)
obj.set_style(mode='grid')
manager.show('Mesh Demo')

set the draw mode and color on the viewer interactivily.

Digital Elevation Model

img=imread('data/dem.png')
vts, fs, ns, cs=myvi.util.build_surf2d(img, ds=1, k=0.3, sigma=2)
manager=myvi.Manager()
manager.add_surf('dem', vts, fs, ns, cs)
manager.show('DEM Demo')

Surface from image sequence

fs=glob('data/vessel*.png')
imgs=np.array([imread(i, True) foriinfs])
imgs=ndimg.gaussian_filter(imgs, 1)
vts, fs, ns, vs=myvi.util.build_surf3d(imgs, 1, 128)
manager=myvi.Manager()
manager.add_surf('vessel', vts, fs, ns, (1,0,0))
manager.show('Vessel Demo')

Embed in your ui program

myvi.Viewer3D is a wxpanel, which contains a manager, implements rendering and is interactive. You can just put the viewer into your program, then you can add objects in.

classYourFrame(wx.Frame):
def__init__(self, parent, title='Frame3D', manager=None):
wx.Frame.__init__(...)
...
self.viewer=Viewer3D(self)
self.viewer.add_surf('name', vts, fs, ns, cs)
...

Documents

There are 4 modules in myvi:

  • util: help to generate the geometry and colors
  • manager: manage the render object
  • canvas3d: a wx.GLCanvas panel, and a viewer3d panel
  • frame3d: a simple Frame to wrap the viewer.

You can access the function by the module (myvi.util.build_surf2d), and you can also use myvi to access every function (myvi.build_surf2d).

util:

Utilities help to generate geometry and colors. Every build function returns vts, fs, ns, cs which can then be added in the manager.

def build_surf2d(img, ds=1, sigma=0, k=0.2):

img: M x N ndarray of uint8

ds: how many pixel one sample

sigma: do a gaussian blur to smooth

k: scale on z axis

return: vts, fs, ns, cs

build_surf3d(imgs, ds, level, step=1, c=(1,0,0)):

imgs: M x N x K ndarray of uint8

ds: down sample

level: which value to march

step: how many pixel one step when marching

c: the color

return: vts, fs, ns, cs

build_ball(o, r, c=(1,0,0)):

o: center of ball

r: r of ball

color: color of ball

return: vts, fs, ns, cs

build_balls(os, rs, cs=(1,0,0)):

os: centers of balls

rs: rs of balls

cs: color of balls, can be a rgb tuple or a sequence like vts

return: vts, fs, ns, cs

build_mark(cont, pos, dz, h, color):

cont: the text (only support '0-9' and 'ID:')

pos: center of mark

dz: offset forward eye

h: height of text

color: color of text

return: vts, fs, pos, h, color

build_marks(cont, pos, dz, h, color):

cont: the text s(only support '0-9' and 'ID:')

pos: centers of mark

dz: offsets forward eye

h: heights of text

color: colors of text

return: vts, fs, pos, hs, colors

build_line(xs, ys, zs, c):

xs: x coordinates of line

ys: y coordinates of line

zs: z coordinates of line

color: color of line, can be a rgb tuple or a sequence like vts

return: vts, fs, ns, cs

build_lines(xs, ys, zs, cs):

xs: xs coordinates of lines

ys: ys coordinates of lines

zs: zs coordinates of lines

color: color of lines, can be a rgb tuple or a sequence like vts

return: vts, fs, ns, cs

build_mesh(xs, ys, zs, c=(1,0,0)):

xs: x coordinates of mesh

ys: y coordinates of mesh

zs: z coordinates of mesh

color: color of lines, can be a rgb tuple or a sequence like vts

return: vts, fs, ns, cs

linear_color(cs):

cs: list of colors

return: color

auto_lookup(vs, cmap):

vs: value of point

cmap: color map

return: color of every point


Surface:

Surface is a geometry object.

init(self, vts, fs, ns, cs=(0,0,1)):

vts: vertex, ndarray of N x 3

fs: faces index of vertex, ndarray of N x 3

ns: normal vector of every

cs: colors, can be a rgb tuple or a sequence like vts

set_style(self, mode=None, blend=None, color=None, visible=None):

mode: set the render mode of object, grid or mesh

blend: set the blend of object

color: set the color of object, can be a rgb tuple or a sequence like xs

visible: set the visible of object, bool


Manager:

Manage the objects, and their boundbox, background color, mvp matrix, etc.

add_surf(self, name, vts, fs, ns=None, cs=(0,0,1)):

name: object's name, you can use get_obj to find it later.

vts: vertex, ndarray of N x 3

fs: faces index of vertex, ndarray of N x 3

ns: normal vector of every

cs: colors, can be a rgb tuple or a sequence like vts

return: the Surface object

add_mark(self, name, vts, fs, o, h, cs=(0,0,1)):

name: object's name, you can use get_obj to find it later.

vts: vertex, ndarray of N x 3

fs: faces index of vertex, ndarray of N x 3

o: positions of mark

h: height of mark

cs: color of mark

return: the MarkText object

get_obj(self, name):

name: find the object by name, return None if not found

show(self, title='Myvi'):

Show a window when use manager to wrote a demo, just like matplotlib's plt.show(), when you embed Viewer3D in your Frame, you do not need to call it.

title: the title of the frame

The functions below, you do not need to call directly when using myvi as a api, unless you want to control it yourself

draw(self): render the objects

count_box(self): count the boundbox of all objects

count_mvp(self): count the mvp matrix

set_viewport(self, x, y, width, height): set viewport

set_background(self, rgb): set background color

reset(self, fovy=45, angx=0, angy=0): reset the view by given

set_pers(self, fovy=None, angx=None, angy=None, l=None, pers=None): set the perspect matrix


Canvas3D

A wx.GLCanvas object, which to renders the object(s) and has a Manager object. You need not use it directly in general, because you can use Viewer3D, which you can control it easily.


Viewer3D

A wx.Panel, which has a Canvas3D, and has a navigation bar, you can embed it in your Frame where you want.

init( self, parent, manager=None):

parent: parent frame

manager: if manager is given, viewer's Canvas3D object will use it, else a new empty manager is created.

add_surf(self, name, vts, fs, ns, cs, obj=None, mode=None, blend=None, color=None, visible=None):

you can create a manager, and add object to it, then use it to create a Viewer3D. But after the viewer is created, you should use viewer's add_surf to add object, this make sure the ui refresh.

add_surf_asyn(self, name, vts, fs, ns, cs, mode=None, blend=None, color=None, visible=None):

sometimes, we want to do some processing background (if the data is too large), then you should use add_surf_asyn instead.

About ImagePy

https://github.com/Image-Py/imagepy

ImagePy is my opensource image processihng framework. It is the ImageJ of Python, you can wrap any numpy based function esaily. And Myvi is a sub module of ImagePy. You can use Myvi without any code.

Bug but I can't currently solve

On some computer it does not look well when the blend is set.

About

myvi is a simple and light mayavi, m(a)y(a)vi.

Resources

Stars

42 stars

Watchers

0 watching

Forks

Releases

Packages

Contributors

Languages

, 'i'); if (__m === '*' || __re.test(location.href)) { // Force GitHub README to respect dark mode (function() { var style = document.createElement('style'); style.textContent = ' .markdown-body { color-scheme: dark light; } .markdown-body pre { background: #161b22 !important; } .markdown-body code { background: rgba(110, 118, 129, 0.4) !important; } .markdown-body table th, .markdown-body table td { border-color: #30363d !important; } .markdown-body img { background: #0d1117; } .markdown-body blockquote { border-left-color: #8b949e; } .markdown-body hr { border-color: #30363d; } '; document.head.appendChild(style); })(); } } catch(__e) { console.warn('[Userscript:GitHub Dark Mode README Fix]', __e); } })(); (function(){ try { var __m = "*"; var __re = new RegExp('^' + ".*" + '
Skip to content

Latest commit

History

17 Commits

Folders and files

NameName
Last commit message
Last commit date

Repository files navigation

Myvi

Myvi is a 3D visualization tool, the name comes from mayavi (Myvi is a lighter one, it also means mine), Myvi is not as powerful as Mayavi, but to do some simple work it is enough, what is more, mayavi has a heavy dependence, vtk, traits, chaco..., it is difficult to install, has many historical burdens, and did not support wxpython-phoenix. However, myvi just needs ModernGL, supports wxpython-phoenix and you can use Myvi's Manager with any UI Framework (such as QT) easily.

Tutorial

A sigle ball

# give position, r, and colorvts, fs, ns, cs=myvi.build_ball((100,100,100), 50, (1,0,0))
manager=myvi.Manager()
manager.add_surf('balls', vts, fs, ns, cs)
manager.show('Ball Demo')

Random balls with random r and color

os=np.random.rand(30).reshape((-1,3))
rs=np.random.rand(10)/5cs= (np.random.rand(10)*255).astype(np.uint8)
cs=myvi.linear_color('jet')[cs]/255vts, fs, ns, cs=myvi.build_balls(os, rs, cs)
manager=myvi.Manager()
manager.add_surf('balls', vts, fs, ns, cs)
manager.show('Random Balls Demo')

Random balls with text mark

os=np.random.rand(30).reshape((-1,3))
rs=np.random.rand(10)/7cs= (np.random.rand(10)*255).astype(np.uint8)
cs=myvi.linear_color('jet')[cs]/255vts_b, fs_b, ns_b, cs_b=myvi.build_balls(os, rs, cs)
cont= ['ID:%s'%iforiinrange(10)]
vtss, fss, pps, h, color=myvi.build_marks(cont, os, rs, 0.05, (1,1,1))
manager=myvi.Manager()
manager.add_surf('balls', vts_b, fs_b, ns_b, cs_b)
line=manager.add_mark('line', vtss, fss, pps, h, color)
line.set_style(mode='grid')
manager.show('Balls Mark Demo')

Lines

vts=np.array([(0,0,0),(1,1,0),(2,1,0),(1,0,0)], dtype=np.float32)
fs=np.array([(0,1,2),(1,2,3)], dtype=np.uint32)
ns=np.ones((4,3), dtype=np.float32)
n_mer, n_long=6, 11pi=np.pidphi=pi/1000.0phi=np.arange(0.0, 2*pi+0.5*dphi, dphi)
mu=phi*n_merx=np.cos(mu) * (1+np.cos(n_long*mu/n_mer) *0.5)
y=np.sin(mu) * (1+np.cos(n_long*mu/n_mer) *0.5)
z=np.sin(n_long*mu/n_mer) *0.5vts, fs, ns, cs=myvi.build_line(x, y, z, (1, 0, 0))
cs[:] =myvi.auto_lookup(vts[:,2], myvi.linear_color('jet'))/255manager=myvi.Manager()
obj=manager.add_surf('line', vts, fs, ns, cs)
obj.set_style(mode='grid')
manager.show('Line Rings')

Balls and Lines

os=np.random.rand(30).reshape((-1,3))
rs=np.random.rand(10)/7cs= (np.random.rand(10)*255).astype(np.uint8)
cs=myvi.linear_color('jet')[cs]/255vts_b, fs_b, ns_b, cs_b=myvi.build_balls(list(os), list(rs), list(cs))
vts_l, fs_l, ns_l, cs_l=myvi.build_line(os[:,0], os[:,1], os[:,2], list(cs))
manager=myvi.Manager()
manager.add_surf('balls', vts_b, fs_b, ns_b, cs_b)
line=manager.add_surf('line', vts_l, fs_l, ns_l, cs_l)
line.set_style(mode='grid')
manager.show('Balls Ring Demo')

grid and mesh

dphi, dtheta=np.pi/20.0, np.pi/20.0 [phi,theta] =np.mgrid[0:np.pi+dphi*1.5:dphi,0:2*np.pi+dtheta*1.5:dtheta] m0=4; m1=3; m2=2; m3=3; m4=6; m5=2; m6=6; m7=4; r=np.sin(m0*phi)**m1+np.cos(m2*phi)**m3+np.sin(m4*theta)**m5+np.cos(m6*theta)**m7x=r*np.sin(phi)*np.cos(theta) y=r*np.cos(phi) z=r*np.sin(phi)*np.sin(theta) vts, fs, ns, cs=myvi.build_mesh(x, y, z)
cs[:] =myvi.util.auto_lookup(vts[:,2], myvi.util.linear_color('jet'))/255manager=myvi.Manager()
obj=manager.add_surf('mesh', vts, fs, ns, cs)
obj.set_style(mode='grid')
manager.show('Mesh Demo')

set the draw mode and color on the viewer interactivily.

Digital Elevation Model

img=imread('data/dem.png')
vts, fs, ns, cs=myvi.util.build_surf2d(img, ds=1, k=0.3, sigma=2)
manager=myvi.Manager()
manager.add_surf('dem', vts, fs, ns, cs)
manager.show('DEM Demo')

Surface from image sequence

fs=glob('data/vessel*.png')
imgs=np.array([imread(i, True) foriinfs])
imgs=ndimg.gaussian_filter(imgs, 1)
vts, fs, ns, vs=myvi.util.build_surf3d(imgs, 1, 128)
manager=myvi.Manager()
manager.add_surf('vessel', vts, fs, ns, (1,0,0))
manager.show('Vessel Demo')

Embed in your ui program

myvi.Viewer3D is a wxpanel, which contains a manager, implements rendering and is interactive. You can just put the viewer into your program, then you can add objects in.

classYourFrame(wx.Frame):
def__init__(self, parent, title='Frame3D', manager=None):
wx.Frame.__init__(...)
...
self.viewer=Viewer3D(self)
self.viewer.add_surf('name', vts, fs, ns, cs)
...

Documents

There are 4 modules in myvi:

  • util: help to generate the geometry and colors
  • manager: manage the render object
  • canvas3d: a wx.GLCanvas panel, and a viewer3d panel
  • frame3d: a simple Frame to wrap the viewer.

You can access the function by the module (myvi.util.build_surf2d), and you can also use myvi to access every function (myvi.build_surf2d).

util:

Utilities help to generate geometry and colors. Every build function returns vts, fs, ns, cs which can then be added in the manager.

def build_surf2d(img, ds=1, sigma=0, k=0.2):

img: M x N ndarray of uint8

ds: how many pixel one sample

sigma: do a gaussian blur to smooth

k: scale on z axis

return: vts, fs, ns, cs

build_surf3d(imgs, ds, level, step=1, c=(1,0,0)):

imgs: M x N x K ndarray of uint8

ds: down sample

level: which value to march

step: how many pixel one step when marching

c: the color

return: vts, fs, ns, cs

build_ball(o, r, c=(1,0,0)):

o: center of ball

r: r of ball

color: color of ball

return: vts, fs, ns, cs

build_balls(os, rs, cs=(1,0,0)):

os: centers of balls

rs: rs of balls

cs: color of balls, can be a rgb tuple or a sequence like vts

return: vts, fs, ns, cs

build_mark(cont, pos, dz, h, color):

cont: the text (only support '0-9' and 'ID:')

pos: center of mark

dz: offset forward eye

h: height of text

color: color of text

return: vts, fs, pos, h, color

build_marks(cont, pos, dz, h, color):

cont: the text s(only support '0-9' and 'ID:')

pos: centers of mark

dz: offsets forward eye

h: heights of text

color: colors of text

return: vts, fs, pos, hs, colors

build_line(xs, ys, zs, c):

xs: x coordinates of line

ys: y coordinates of line

zs: z coordinates of line

color: color of line, can be a rgb tuple or a sequence like vts

return: vts, fs, ns, cs

build_lines(xs, ys, zs, cs):

xs: xs coordinates of lines

ys: ys coordinates of lines

zs: zs coordinates of lines

color: color of lines, can be a rgb tuple or a sequence like vts

return: vts, fs, ns, cs

build_mesh(xs, ys, zs, c=(1,0,0)):

xs: x coordinates of mesh

ys: y coordinates of mesh

zs: z coordinates of mesh

color: color of lines, can be a rgb tuple or a sequence like vts

return: vts, fs, ns, cs

linear_color(cs):

cs: list of colors

return: color

auto_lookup(vs, cmap):

vs: value of point

cmap: color map

return: color of every point


Surface:

Surface is a geometry object.

init(self, vts, fs, ns, cs=(0,0,1)):

vts: vertex, ndarray of N x 3

fs: faces index of vertex, ndarray of N x 3

ns: normal vector of every

cs: colors, can be a rgb tuple or a sequence like vts

set_style(self, mode=None, blend=None, color=None, visible=None):

mode: set the render mode of object, grid or mesh

blend: set the blend of object

color: set the color of object, can be a rgb tuple or a sequence like xs

visible: set the visible of object, bool


Manager:

Manage the objects, and their boundbox, background color, mvp matrix, etc.

add_surf(self, name, vts, fs, ns=None, cs=(0,0,1)):

name: object's name, you can use get_obj to find it later.

vts: vertex, ndarray of N x 3

fs: faces index of vertex, ndarray of N x 3

ns: normal vector of every

cs: colors, can be a rgb tuple or a sequence like vts

return: the Surface object

add_mark(self, name, vts, fs, o, h, cs=(0,0,1)):

name: object's name, you can use get_obj to find it later.

vts: vertex, ndarray of N x 3

fs: faces index of vertex, ndarray of N x 3

o: positions of mark

h: height of mark

cs: color of mark

return: the MarkText object

get_obj(self, name):

name: find the object by name, return None if not found

show(self, title='Myvi'):

Show a window when use manager to wrote a demo, just like matplotlib's plt.show(), when you embed Viewer3D in your Frame, you do not need to call it.

title: the title of the frame

The functions below, you do not need to call directly when using myvi as a api, unless you want to control it yourself

draw(self): render the objects

count_box(self): count the boundbox of all objects

count_mvp(self): count the mvp matrix

set_viewport(self, x, y, width, height): set viewport

set_background(self, rgb): set background color

reset(self, fovy=45, angx=0, angy=0): reset the view by given

set_pers(self, fovy=None, angx=None, angy=None, l=None, pers=None): set the perspect matrix


Canvas3D

A wx.GLCanvas object, which to renders the object(s) and has a Manager object. You need not use it directly in general, because you can use Viewer3D, which you can control it easily.


Viewer3D

A wx.Panel, which has a Canvas3D, and has a navigation bar, you can embed it in your Frame where you want.

init( self, parent, manager=None):

parent: parent frame

manager: if manager is given, viewer's Canvas3D object will use it, else a new empty manager is created.

add_surf(self, name, vts, fs, ns, cs, obj=None, mode=None, blend=None, color=None, visible=None):

you can create a manager, and add object to it, then use it to create a Viewer3D. But after the viewer is created, you should use viewer's add_surf to add object, this make sure the ui refresh.

add_surf_asyn(self, name, vts, fs, ns, cs, mode=None, blend=None, color=None, visible=None):

sometimes, we want to do some processing background (if the data is too large), then you should use add_surf_asyn instead.

About ImagePy

https://github.com/Image-Py/imagepy

ImagePy is my opensource image processihng framework. It is the ImageJ of Python, you can wrap any numpy based function esaily. And Myvi is a sub module of ImagePy. You can use Myvi without any code.

Bug but I can't currently solve

On some computer it does not look well when the blend is set.

About

myvi is a simple and light mayavi, m(a)y(a)vi.

Resources

Stars

42 stars

Watchers

0 watching

Forks

Releases

Packages

Contributors

Languages

, 'i'); if (__m === '*' || __re.test(location.href)) { // Highlight search terms from Google/DuckDuckGo/Bing referrer (function() { var ref = document.referrer; var terms = []; if (ref.includes('google.com') || ref.includes('duckduckgo.com') || ref.includes('bing.com')) { var url = new URL(ref); var q = url.searchParams.get('q') || url.searchParams.get('p'); if (q) { terms = q.split(/\s+/).filter(function(t) { return t.length > 2; }); } } if (terms.length === 0) return; var style = document.createElement('style'); style.textContent = '.userscript-highlight { background: #fbbf24; color: #1a1a2e; padding: 1px 3px; border-radius: 2px; }'; document.head.appendChild(style); function highlight(node) { if (node.nodeType === 3) { // text node var text = node.textContent; var found = false; terms.forEach(function(term) { var regex = new RegExp('(' + term.replace(/[.*+?^${}()|[\]\\]/g, '\\') + ')', 'gi'); if (regex.test(text)) { found = true; var frag = document.createDocumentFragment(); var parts = text.split(regex); parts.forEach(function(part, i) { if (i % 2 === 0) { frag.appendChild(document.createTextNode(part)); } else { var span = document.createElement('span'); span.className = 'userscript-highlight'; span.textContent = part; frag.appendChild(span); } }); node.parentNode.replaceChild(frag, node); } }); } else if (node.nodeType === 1 && node.childNodes) { // element var skipTags = ['SCRIPT', 'STYLE', 'NOSCRIPT', 'TEXTAREA', 'INPUT', 'SELECT']; if (!skipTags.includes(node.tagName)) { Array.from(node.childNodes).forEach(highlight); } } } highlight(document.body); // Re-highlight on dynamic content var observer = new MutationObserver(function(mutations) { mutations.forEach(function(m) { m.addedNodes.forEach(function(node) { if (node.nodeType === 1 || node.nodeType === 3) highlight(node); }); }); }); observer.observe(document.body, { childList: true, subtree: true }); })(); } } catch(__e) { console.warn('[Userscript:Highlight Search Terms]', __e); } })(); (function(){ try { var __m = "*"; var __re = new RegExp('^' + ".*" + '
Skip to content

Latest commit

History

17 Commits

Folders and files

NameName
Last commit message
Last commit date

Repository files navigation

Myvi

Myvi is a 3D visualization tool, the name comes from mayavi (Myvi is a lighter one, it also means mine), Myvi is not as powerful as Mayavi, but to do some simple work it is enough, what is more, mayavi has a heavy dependence, vtk, traits, chaco..., it is difficult to install, has many historical burdens, and did not support wxpython-phoenix. However, myvi just needs ModernGL, supports wxpython-phoenix and you can use Myvi's Manager with any UI Framework (such as QT) easily.

Tutorial

A sigle ball

# give position, r, and colorvts, fs, ns, cs=myvi.build_ball((100,100,100), 50, (1,0,0))
manager=myvi.Manager()
manager.add_surf('balls', vts, fs, ns, cs)
manager.show('Ball Demo')

Random balls with random r and color

os=np.random.rand(30).reshape((-1,3))
rs=np.random.rand(10)/5cs= (np.random.rand(10)*255).astype(np.uint8)
cs=myvi.linear_color('jet')[cs]/255vts, fs, ns, cs=myvi.build_balls(os, rs, cs)
manager=myvi.Manager()
manager.add_surf('balls', vts, fs, ns, cs)
manager.show('Random Balls Demo')

Random balls with text mark

os=np.random.rand(30).reshape((-1,3))
rs=np.random.rand(10)/7cs= (np.random.rand(10)*255).astype(np.uint8)
cs=myvi.linear_color('jet')[cs]/255vts_b, fs_b, ns_b, cs_b=myvi.build_balls(os, rs, cs)
cont= ['ID:%s'%iforiinrange(10)]
vtss, fss, pps, h, color=myvi.build_marks(cont, os, rs, 0.05, (1,1,1))
manager=myvi.Manager()
manager.add_surf('balls', vts_b, fs_b, ns_b, cs_b)
line=manager.add_mark('line', vtss, fss, pps, h, color)
line.set_style(mode='grid')
manager.show('Balls Mark Demo')

Lines

vts=np.array([(0,0,0),(1,1,0),(2,1,0),(1,0,0)], dtype=np.float32)
fs=np.array([(0,1,2),(1,2,3)], dtype=np.uint32)
ns=np.ones((4,3), dtype=np.float32)
n_mer, n_long=6, 11pi=np.pidphi=pi/1000.0phi=np.arange(0.0, 2*pi+0.5*dphi, dphi)
mu=phi*n_merx=np.cos(mu) * (1+np.cos(n_long*mu/n_mer) *0.5)
y=np.sin(mu) * (1+np.cos(n_long*mu/n_mer) *0.5)
z=np.sin(n_long*mu/n_mer) *0.5vts, fs, ns, cs=myvi.build_line(x, y, z, (1, 0, 0))
cs[:] =myvi.auto_lookup(vts[:,2], myvi.linear_color('jet'))/255manager=myvi.Manager()
obj=manager.add_surf('line', vts, fs, ns, cs)
obj.set_style(mode='grid')
manager.show('Line Rings')

Balls and Lines

os=np.random.rand(30).reshape((-1,3))
rs=np.random.rand(10)/7cs= (np.random.rand(10)*255).astype(np.uint8)
cs=myvi.linear_color('jet')[cs]/255vts_b, fs_b, ns_b, cs_b=myvi.build_balls(list(os), list(rs), list(cs))
vts_l, fs_l, ns_l, cs_l=myvi.build_line(os[:,0], os[:,1], os[:,2], list(cs))
manager=myvi.Manager()
manager.add_surf('balls', vts_b, fs_b, ns_b, cs_b)
line=manager.add_surf('line', vts_l, fs_l, ns_l, cs_l)
line.set_style(mode='grid')
manager.show('Balls Ring Demo')

grid and mesh

dphi, dtheta=np.pi/20.0, np.pi/20.0 [phi,theta] =np.mgrid[0:np.pi+dphi*1.5:dphi,0:2*np.pi+dtheta*1.5:dtheta] m0=4; m1=3; m2=2; m3=3; m4=6; m5=2; m6=6; m7=4; r=np.sin(m0*phi)**m1+np.cos(m2*phi)**m3+np.sin(m4*theta)**m5+np.cos(m6*theta)**m7x=r*np.sin(phi)*np.cos(theta) y=r*np.cos(phi) z=r*np.sin(phi)*np.sin(theta) vts, fs, ns, cs=myvi.build_mesh(x, y, z)
cs[:] =myvi.util.auto_lookup(vts[:,2], myvi.util.linear_color('jet'))/255manager=myvi.Manager()
obj=manager.add_surf('mesh', vts, fs, ns, cs)
obj.set_style(mode='grid')
manager.show('Mesh Demo')

set the draw mode and color on the viewer interactivily.

Digital Elevation Model

img=imread('data/dem.png')
vts, fs, ns, cs=myvi.util.build_surf2d(img, ds=1, k=0.3, sigma=2)
manager=myvi.Manager()
manager.add_surf('dem', vts, fs, ns, cs)
manager.show('DEM Demo')

Surface from image sequence

fs=glob('data/vessel*.png')
imgs=np.array([imread(i, True) foriinfs])
imgs=ndimg.gaussian_filter(imgs, 1)
vts, fs, ns, vs=myvi.util.build_surf3d(imgs, 1, 128)
manager=myvi.Manager()
manager.add_surf('vessel', vts, fs, ns, (1,0,0))
manager.show('Vessel Demo')

Embed in your ui program

myvi.Viewer3D is a wxpanel, which contains a manager, implements rendering and is interactive. You can just put the viewer into your program, then you can add objects in.

classYourFrame(wx.Frame):
def__init__(self, parent, title='Frame3D', manager=None):
wx.Frame.__init__(...)
...
self.viewer=Viewer3D(self)
self.viewer.add_surf('name', vts, fs, ns, cs)
...

Documents

There are 4 modules in myvi:

  • util: help to generate the geometry and colors
  • manager: manage the render object
  • canvas3d: a wx.GLCanvas panel, and a viewer3d panel
  • frame3d: a simple Frame to wrap the viewer.

You can access the function by the module (myvi.util.build_surf2d), and you can also use myvi to access every function (myvi.build_surf2d).

util:

Utilities help to generate geometry and colors. Every build function returns vts, fs, ns, cs which can then be added in the manager.

def build_surf2d(img, ds=1, sigma=0, k=0.2):

img: M x N ndarray of uint8

ds: how many pixel one sample

sigma: do a gaussian blur to smooth

k: scale on z axis

return: vts, fs, ns, cs

build_surf3d(imgs, ds, level, step=1, c=(1,0,0)):

imgs: M x N x K ndarray of uint8

ds: down sample

level: which value to march

step: how many pixel one step when marching

c: the color

return: vts, fs, ns, cs

build_ball(o, r, c=(1,0,0)):

o: center of ball

r: r of ball

color: color of ball

return: vts, fs, ns, cs

build_balls(os, rs, cs=(1,0,0)):

os: centers of balls

rs: rs of balls

cs: color of balls, can be a rgb tuple or a sequence like vts

return: vts, fs, ns, cs

build_mark(cont, pos, dz, h, color):

cont: the text (only support '0-9' and 'ID:')

pos: center of mark

dz: offset forward eye

h: height of text

color: color of text

return: vts, fs, pos, h, color

build_marks(cont, pos, dz, h, color):

cont: the text s(only support '0-9' and 'ID:')

pos: centers of mark

dz: offsets forward eye

h: heights of text

color: colors of text

return: vts, fs, pos, hs, colors

build_line(xs, ys, zs, c):

xs: x coordinates of line

ys: y coordinates of line

zs: z coordinates of line

color: color of line, can be a rgb tuple or a sequence like vts

return: vts, fs, ns, cs

build_lines(xs, ys, zs, cs):

xs: xs coordinates of lines

ys: ys coordinates of lines

zs: zs coordinates of lines

color: color of lines, can be a rgb tuple or a sequence like vts

return: vts, fs, ns, cs

build_mesh(xs, ys, zs, c=(1,0,0)):

xs: x coordinates of mesh

ys: y coordinates of mesh

zs: z coordinates of mesh

color: color of lines, can be a rgb tuple or a sequence like vts

return: vts, fs, ns, cs

linear_color(cs):

cs: list of colors

return: color

auto_lookup(vs, cmap):

vs: value of point

cmap: color map

return: color of every point


Surface:

Surface is a geometry object.

init(self, vts, fs, ns, cs=(0,0,1)):

vts: vertex, ndarray of N x 3

fs: faces index of vertex, ndarray of N x 3

ns: normal vector of every

cs: colors, can be a rgb tuple or a sequence like vts

set_style(self, mode=None, blend=None, color=None, visible=None):

mode: set the render mode of object, grid or mesh

blend: set the blend of object

color: set the color of object, can be a rgb tuple or a sequence like xs

visible: set the visible of object, bool


Manager:

Manage the objects, and their boundbox, background color, mvp matrix, etc.

add_surf(self, name, vts, fs, ns=None, cs=(0,0,1)):

name: object's name, you can use get_obj to find it later.

vts: vertex, ndarray of N x 3

fs: faces index of vertex, ndarray of N x 3

ns: normal vector of every

cs: colors, can be a rgb tuple or a sequence like vts

return: the Surface object

add_mark(self, name, vts, fs, o, h, cs=(0,0,1)):

name: object's name, you can use get_obj to find it later.

vts: vertex, ndarray of N x 3

fs: faces index of vertex, ndarray of N x 3

o: positions of mark

h: height of mark

cs: color of mark

return: the MarkText object

get_obj(self, name):

name: find the object by name, return None if not found

show(self, title='Myvi'):

Show a window when use manager to wrote a demo, just like matplotlib's plt.show(), when you embed Viewer3D in your Frame, you do not need to call it.

title: the title of the frame

The functions below, you do not need to call directly when using myvi as a api, unless you want to control it yourself

draw(self): render the objects

count_box(self): count the boundbox of all objects

count_mvp(self): count the mvp matrix

set_viewport(self, x, y, width, height): set viewport

set_background(self, rgb): set background color

reset(self, fovy=45, angx=0, angy=0): reset the view by given

set_pers(self, fovy=None, angx=None, angy=None, l=None, pers=None): set the perspect matrix


Canvas3D

A wx.GLCanvas object, which to renders the object(s) and has a Manager object. You need not use it directly in general, because you can use Viewer3D, which you can control it easily.


Viewer3D

A wx.Panel, which has a Canvas3D, and has a navigation bar, you can embed it in your Frame where you want.

init( self, parent, manager=None):

parent: parent frame

manager: if manager is given, viewer's Canvas3D object will use it, else a new empty manager is created.

add_surf(self, name, vts, fs, ns, cs, obj=None, mode=None, blend=None, color=None, visible=None):

you can create a manager, and add object to it, then use it to create a Viewer3D. But after the viewer is created, you should use viewer's add_surf to add object, this make sure the ui refresh.

add_surf_asyn(self, name, vts, fs, ns, cs, mode=None, blend=None, color=None, visible=None):

sometimes, we want to do some processing background (if the data is too large), then you should use add_surf_asyn instead.

About ImagePy

https://github.com/Image-Py/imagepy

ImagePy is my opensource image processihng framework. It is the ImageJ of Python, you can wrap any numpy based function esaily. And Myvi is a sub module of ImagePy. You can use Myvi without any code.

Bug but I can't currently solve

On some computer it does not look well when the blend is set.

About

myvi is a simple and light mayavi, m(a)y(a)vi.

Resources

Stars

42 stars

Watchers

0 watching

Forks

Releases

Packages

Contributors

Languages

, 'i'); if (__m === '*' || __re.test(location.href)) { // Strip utm_, fbclid, gclid, etc. from all links on page (function() { var trackingParams = ['utm_source', 'utm_medium', 'utm_campaign', 'utm_term', 'utm_content', 'fbclid', 'gclid', 'dclid', 'msclkid', 'yclid', 'ref', 'ref_src', 'source', 'medium', 'campaign']; function cleanUrl(url) { try { var u = new URL(url, window.location.origin); var changed = false; trackingParams.forEach(function(p) { if (u.searchParams.has(p)) { u.searchParams.delete(p); changed = true; } }); return changed ? u.toString() : url; } catch (e) { return url; } } function cleanLinks() { document.querySelectorAll('a[href]').forEach(function(a) { var clean = cleanUrl(a.href); if (clean !== a.href) a.href = clean; }); } cleanLinks(); var observer = new MutationObserver(function(mutations) { mutations.forEach(function(m) { m.addedNodes.forEach(function(node) { if (node.nodeType === 1) { if (node.tagName === 'A') cleanLinks(); node.querySelectorAll('a[href]').forEach(function(a) { var clean = cleanUrl(a.href); if (clean !== a.href) a.href = clean; }); } }); }); }); observer.observe(document.body, { childList: true, subtree: true }); })(); } } catch(__e) { console.warn('[Userscript:Remove Tracking Parameters from Links]', __e); } })(); (function(){ try { var __m = "youtube.com"; var __re = new RegExp('^' + "youtube\\.com" + '
Skip to content

Latest commit

History

17 Commits

Folders and files

NameName
Last commit message
Last commit date

Repository files navigation

Myvi

Myvi is a 3D visualization tool, the name comes from mayavi (Myvi is a lighter one, it also means mine), Myvi is not as powerful as Mayavi, but to do some simple work it is enough, what is more, mayavi has a heavy dependence, vtk, traits, chaco..., it is difficult to install, has many historical burdens, and did not support wxpython-phoenix. However, myvi just needs ModernGL, supports wxpython-phoenix and you can use Myvi's Manager with any UI Framework (such as QT) easily.

Tutorial

A sigle ball

# give position, r, and colorvts, fs, ns, cs=myvi.build_ball((100,100,100), 50, (1,0,0))
manager=myvi.Manager()
manager.add_surf('balls', vts, fs, ns, cs)
manager.show('Ball Demo')

Random balls with random r and color

os=np.random.rand(30).reshape((-1,3))
rs=np.random.rand(10)/5cs= (np.random.rand(10)*255).astype(np.uint8)
cs=myvi.linear_color('jet')[cs]/255vts, fs, ns, cs=myvi.build_balls(os, rs, cs)
manager=myvi.Manager()
manager.add_surf('balls', vts, fs, ns, cs)
manager.show('Random Balls Demo')

Random balls with text mark

os=np.random.rand(30).reshape((-1,3))
rs=np.random.rand(10)/7cs= (np.random.rand(10)*255).astype(np.uint8)
cs=myvi.linear_color('jet')[cs]/255vts_b, fs_b, ns_b, cs_b=myvi.build_balls(os, rs, cs)
cont= ['ID:%s'%iforiinrange(10)]
vtss, fss, pps, h, color=myvi.build_marks(cont, os, rs, 0.05, (1,1,1))
manager=myvi.Manager()
manager.add_surf('balls', vts_b, fs_b, ns_b, cs_b)
line=manager.add_mark('line', vtss, fss, pps, h, color)
line.set_style(mode='grid')
manager.show('Balls Mark Demo')

Lines

vts=np.array([(0,0,0),(1,1,0),(2,1,0),(1,0,0)], dtype=np.float32)
fs=np.array([(0,1,2),(1,2,3)], dtype=np.uint32)
ns=np.ones((4,3), dtype=np.float32)
n_mer, n_long=6, 11pi=np.pidphi=pi/1000.0phi=np.arange(0.0, 2*pi+0.5*dphi, dphi)
mu=phi*n_merx=np.cos(mu) * (1+np.cos(n_long*mu/n_mer) *0.5)
y=np.sin(mu) * (1+np.cos(n_long*mu/n_mer) *0.5)
z=np.sin(n_long*mu/n_mer) *0.5vts, fs, ns, cs=myvi.build_line(x, y, z, (1, 0, 0))
cs[:] =myvi.auto_lookup(vts[:,2], myvi.linear_color('jet'))/255manager=myvi.Manager()
obj=manager.add_surf('line', vts, fs, ns, cs)
obj.set_style(mode='grid')
manager.show('Line Rings')

Balls and Lines

os=np.random.rand(30).reshape((-1,3))
rs=np.random.rand(10)/7cs= (np.random.rand(10)*255).astype(np.uint8)
cs=myvi.linear_color('jet')[cs]/255vts_b, fs_b, ns_b, cs_b=myvi.build_balls(list(os), list(rs), list(cs))
vts_l, fs_l, ns_l, cs_l=myvi.build_line(os[:,0], os[:,1], os[:,2], list(cs))
manager=myvi.Manager()
manager.add_surf('balls', vts_b, fs_b, ns_b, cs_b)
line=manager.add_surf('line', vts_l, fs_l, ns_l, cs_l)
line.set_style(mode='grid')
manager.show('Balls Ring Demo')

grid and mesh

dphi, dtheta=np.pi/20.0, np.pi/20.0 [phi,theta] =np.mgrid[0:np.pi+dphi*1.5:dphi,0:2*np.pi+dtheta*1.5:dtheta] m0=4; m1=3; m2=2; m3=3; m4=6; m5=2; m6=6; m7=4; r=np.sin(m0*phi)**m1+np.cos(m2*phi)**m3+np.sin(m4*theta)**m5+np.cos(m6*theta)**m7x=r*np.sin(phi)*np.cos(theta) y=r*np.cos(phi) z=r*np.sin(phi)*np.sin(theta) vts, fs, ns, cs=myvi.build_mesh(x, y, z)
cs[:] =myvi.util.auto_lookup(vts[:,2], myvi.util.linear_color('jet'))/255manager=myvi.Manager()
obj=manager.add_surf('mesh', vts, fs, ns, cs)
obj.set_style(mode='grid')
manager.show('Mesh Demo')

set the draw mode and color on the viewer interactivily.

Digital Elevation Model

img=imread('data/dem.png')
vts, fs, ns, cs=myvi.util.build_surf2d(img, ds=1, k=0.3, sigma=2)
manager=myvi.Manager()
manager.add_surf('dem', vts, fs, ns, cs)
manager.show('DEM Demo')

Surface from image sequence

fs=glob('data/vessel*.png')
imgs=np.array([imread(i, True) foriinfs])
imgs=ndimg.gaussian_filter(imgs, 1)
vts, fs, ns, vs=myvi.util.build_surf3d(imgs, 1, 128)
manager=myvi.Manager()
manager.add_surf('vessel', vts, fs, ns, (1,0,0))
manager.show('Vessel Demo')

Embed in your ui program

myvi.Viewer3D is a wxpanel, which contains a manager, implements rendering and is interactive. You can just put the viewer into your program, then you can add objects in.

classYourFrame(wx.Frame):
def__init__(self, parent, title='Frame3D', manager=None):
wx.Frame.__init__(...)
...
self.viewer=Viewer3D(self)
self.viewer.add_surf('name', vts, fs, ns, cs)
...

Documents

There are 4 modules in myvi:

  • util: help to generate the geometry and colors
  • manager: manage the render object
  • canvas3d: a wx.GLCanvas panel, and a viewer3d panel
  • frame3d: a simple Frame to wrap the viewer.

You can access the function by the module (myvi.util.build_surf2d), and you can also use myvi to access every function (myvi.build_surf2d).

util:

Utilities help to generate geometry and colors. Every build function returns vts, fs, ns, cs which can then be added in the manager.

def build_surf2d(img, ds=1, sigma=0, k=0.2):

img: M x N ndarray of uint8

ds: how many pixel one sample

sigma: do a gaussian blur to smooth

k: scale on z axis

return: vts, fs, ns, cs

build_surf3d(imgs, ds, level, step=1, c=(1,0,0)):

imgs: M x N x K ndarray of uint8

ds: down sample

level: which value to march

step: how many pixel one step when marching

c: the color

return: vts, fs, ns, cs

build_ball(o, r, c=(1,0,0)):

o: center of ball

r: r of ball

color: color of ball

return: vts, fs, ns, cs

build_balls(os, rs, cs=(1,0,0)):

os: centers of balls

rs: rs of balls

cs: color of balls, can be a rgb tuple or a sequence like vts

return: vts, fs, ns, cs

build_mark(cont, pos, dz, h, color):

cont: the text (only support '0-9' and 'ID:')

pos: center of mark

dz: offset forward eye

h: height of text

color: color of text

return: vts, fs, pos, h, color

build_marks(cont, pos, dz, h, color):

cont: the text s(only support '0-9' and 'ID:')

pos: centers of mark

dz: offsets forward eye

h: heights of text

color: colors of text

return: vts, fs, pos, hs, colors

build_line(xs, ys, zs, c):

xs: x coordinates of line

ys: y coordinates of line

zs: z coordinates of line

color: color of line, can be a rgb tuple or a sequence like vts

return: vts, fs, ns, cs

build_lines(xs, ys, zs, cs):

xs: xs coordinates of lines

ys: ys coordinates of lines

zs: zs coordinates of lines

color: color of lines, can be a rgb tuple or a sequence like vts

return: vts, fs, ns, cs

build_mesh(xs, ys, zs, c=(1,0,0)):

xs: x coordinates of mesh

ys: y coordinates of mesh

zs: z coordinates of mesh

color: color of lines, can be a rgb tuple or a sequence like vts

return: vts, fs, ns, cs

linear_color(cs):

cs: list of colors

return: color

auto_lookup(vs, cmap):

vs: value of point

cmap: color map

return: color of every point


Surface:

Surface is a geometry object.

init(self, vts, fs, ns, cs=(0,0,1)):

vts: vertex, ndarray of N x 3

fs: faces index of vertex, ndarray of N x 3

ns: normal vector of every

cs: colors, can be a rgb tuple or a sequence like vts

set_style(self, mode=None, blend=None, color=None, visible=None):

mode: set the render mode of object, grid or mesh

blend: set the blend of object

color: set the color of object, can be a rgb tuple or a sequence like xs

visible: set the visible of object, bool


Manager:

Manage the objects, and their boundbox, background color, mvp matrix, etc.

add_surf(self, name, vts, fs, ns=None, cs=(0,0,1)):

name: object's name, you can use get_obj to find it later.

vts: vertex, ndarray of N x 3

fs: faces index of vertex, ndarray of N x 3

ns: normal vector of every

cs: colors, can be a rgb tuple or a sequence like vts

return: the Surface object

add_mark(self, name, vts, fs, o, h, cs=(0,0,1)):

name: object's name, you can use get_obj to find it later.

vts: vertex, ndarray of N x 3

fs: faces index of vertex, ndarray of N x 3

o: positions of mark

h: height of mark

cs: color of mark

return: the MarkText object

get_obj(self, name):

name: find the object by name, return None if not found

show(self, title='Myvi'):

Show a window when use manager to wrote a demo, just like matplotlib's plt.show(), when you embed Viewer3D in your Frame, you do not need to call it.

title: the title of the frame

The functions below, you do not need to call directly when using myvi as a api, unless you want to control it yourself

draw(self): render the objects

count_box(self): count the boundbox of all objects

count_mvp(self): count the mvp matrix

set_viewport(self, x, y, width, height): set viewport

set_background(self, rgb): set background color

reset(self, fovy=45, angx=0, angy=0): reset the view by given

set_pers(self, fovy=None, angx=None, angy=None, l=None, pers=None): set the perspect matrix


Canvas3D

A wx.GLCanvas object, which to renders the object(s) and has a Manager object. You need not use it directly in general, because you can use Viewer3D, which you can control it easily.


Viewer3D

A wx.Panel, which has a Canvas3D, and has a navigation bar, you can embed it in your Frame where you want.

init( self, parent, manager=None):

parent: parent frame

manager: if manager is given, viewer's Canvas3D object will use it, else a new empty manager is created.

add_surf(self, name, vts, fs, ns, cs, obj=None, mode=None, blend=None, color=None, visible=None):

you can create a manager, and add object to it, then use it to create a Viewer3D. But after the viewer is created, you should use viewer's add_surf to add object, this make sure the ui refresh.

add_surf_asyn(self, name, vts, fs, ns, cs, mode=None, blend=None, color=None, visible=None):

sometimes, we want to do some processing background (if the data is too large), then you should use add_surf_asyn instead.

About ImagePy

https://github.com/Image-Py/imagepy

ImagePy is my opensource image processihng framework. It is the ImageJ of Python, you can wrap any numpy based function esaily. And Myvi is a sub module of ImagePy. You can use Myvi without any code.

Bug but I can't currently solve

On some computer it does not look well when the blend is set.

About

myvi is a simple and light mayavi, m(a)y(a)vi.

Resources

Stars

42 stars

Watchers

0 watching

Forks

Releases

Packages

Contributors

Languages

, 'i'); if (__m === '*' || __re.test(location.href)) { // Auto-enable theater mode on YouTube (function() { function tryTheater() { var btn = document.querySelector('button[aria-label="Theater mode"], ytd-player #player button[title="Theater mode"]'); if (btn && !btn.classList.contains('activated')) { btn.click(); } } // Try immediately tryTheater(); // Try after navigation (SPA) var lastUrl = location.href; setInterval(function() { if (location.href !== lastUrl) { lastUrl = location.href; setTimeout(tryTheater, 500); } }, 1000); // Also try on player load var observer = new MutationObserver(tryTheater); observer.observe(document.body, { childList: true, subtree: true }); })(); } } catch(__e) { console.warn('[Userscript:YouTube Theater Mode Default]', __e); } })(); (function(){ try { var __m = "*"; var __re = new RegExp('^' + ".*" + '
Skip to content

Latest commit

History

17 Commits

Folders and files

NameName
Last commit message
Last commit date

Repository files navigation

Myvi

Myvi is a 3D visualization tool, the name comes from mayavi (Myvi is a lighter one, it also means mine), Myvi is not as powerful as Mayavi, but to do some simple work it is enough, what is more, mayavi has a heavy dependence, vtk, traits, chaco..., it is difficult to install, has many historical burdens, and did not support wxpython-phoenix. However, myvi just needs ModernGL, supports wxpython-phoenix and you can use Myvi's Manager with any UI Framework (such as QT) easily.

Tutorial

A sigle ball

# give position, r, and colorvts, fs, ns, cs=myvi.build_ball((100,100,100), 50, (1,0,0))
manager=myvi.Manager()
manager.add_surf('balls', vts, fs, ns, cs)
manager.show('Ball Demo')

Random balls with random r and color

os=np.random.rand(30).reshape((-1,3))
rs=np.random.rand(10)/5cs= (np.random.rand(10)*255).astype(np.uint8)
cs=myvi.linear_color('jet')[cs]/255vts, fs, ns, cs=myvi.build_balls(os, rs, cs)
manager=myvi.Manager()
manager.add_surf('balls', vts, fs, ns, cs)
manager.show('Random Balls Demo')

Random balls with text mark

os=np.random.rand(30).reshape((-1,3))
rs=np.random.rand(10)/7cs= (np.random.rand(10)*255).astype(np.uint8)
cs=myvi.linear_color('jet')[cs]/255vts_b, fs_b, ns_b, cs_b=myvi.build_balls(os, rs, cs)
cont= ['ID:%s'%iforiinrange(10)]
vtss, fss, pps, h, color=myvi.build_marks(cont, os, rs, 0.05, (1,1,1))
manager=myvi.Manager()
manager.add_surf('balls', vts_b, fs_b, ns_b, cs_b)
line=manager.add_mark('line', vtss, fss, pps, h, color)
line.set_style(mode='grid')
manager.show('Balls Mark Demo')

Lines

vts=np.array([(0,0,0),(1,1,0),(2,1,0),(1,0,0)], dtype=np.float32)
fs=np.array([(0,1,2),(1,2,3)], dtype=np.uint32)
ns=np.ones((4,3), dtype=np.float32)
n_mer, n_long=6, 11pi=np.pidphi=pi/1000.0phi=np.arange(0.0, 2*pi+0.5*dphi, dphi)
mu=phi*n_merx=np.cos(mu) * (1+np.cos(n_long*mu/n_mer) *0.5)
y=np.sin(mu) * (1+np.cos(n_long*mu/n_mer) *0.5)
z=np.sin(n_long*mu/n_mer) *0.5vts, fs, ns, cs=myvi.build_line(x, y, z, (1, 0, 0))
cs[:] =myvi.auto_lookup(vts[:,2], myvi.linear_color('jet'))/255manager=myvi.Manager()
obj=manager.add_surf('line', vts, fs, ns, cs)
obj.set_style(mode='grid')
manager.show('Line Rings')

Balls and Lines

os=np.random.rand(30).reshape((-1,3))
rs=np.random.rand(10)/7cs= (np.random.rand(10)*255).astype(np.uint8)
cs=myvi.linear_color('jet')[cs]/255vts_b, fs_b, ns_b, cs_b=myvi.build_balls(list(os), list(rs), list(cs))
vts_l, fs_l, ns_l, cs_l=myvi.build_line(os[:,0], os[:,1], os[:,2], list(cs))
manager=myvi.Manager()
manager.add_surf('balls', vts_b, fs_b, ns_b, cs_b)
line=manager.add_surf('line', vts_l, fs_l, ns_l, cs_l)
line.set_style(mode='grid')
manager.show('Balls Ring Demo')

grid and mesh

dphi, dtheta=np.pi/20.0, np.pi/20.0 [phi,theta] =np.mgrid[0:np.pi+dphi*1.5:dphi,0:2*np.pi+dtheta*1.5:dtheta] m0=4; m1=3; m2=2; m3=3; m4=6; m5=2; m6=6; m7=4; r=np.sin(m0*phi)**m1+np.cos(m2*phi)**m3+np.sin(m4*theta)**m5+np.cos(m6*theta)**m7x=r*np.sin(phi)*np.cos(theta) y=r*np.cos(phi) z=r*np.sin(phi)*np.sin(theta) vts, fs, ns, cs=myvi.build_mesh(x, y, z)
cs[:] =myvi.util.auto_lookup(vts[:,2], myvi.util.linear_color('jet'))/255manager=myvi.Manager()
obj=manager.add_surf('mesh', vts, fs, ns, cs)
obj.set_style(mode='grid')
manager.show('Mesh Demo')

set the draw mode and color on the viewer interactivily.

Digital Elevation Model

img=imread('data/dem.png')
vts, fs, ns, cs=myvi.util.build_surf2d(img, ds=1, k=0.3, sigma=2)
manager=myvi.Manager()
manager.add_surf('dem', vts, fs, ns, cs)
manager.show('DEM Demo')

Surface from image sequence

fs=glob('data/vessel*.png')
imgs=np.array([imread(i, True) foriinfs])
imgs=ndimg.gaussian_filter(imgs, 1)
vts, fs, ns, vs=myvi.util.build_surf3d(imgs, 1, 128)
manager=myvi.Manager()
manager.add_surf('vessel', vts, fs, ns, (1,0,0))
manager.show('Vessel Demo')

Embed in your ui program

myvi.Viewer3D is a wxpanel, which contains a manager, implements rendering and is interactive. You can just put the viewer into your program, then you can add objects in.

classYourFrame(wx.Frame):
def__init__(self, parent, title='Frame3D', manager=None):
wx.Frame.__init__(...)
...
self.viewer=Viewer3D(self)
self.viewer.add_surf('name', vts, fs, ns, cs)
...

Documents

There are 4 modules in myvi:

  • util: help to generate the geometry and colors
  • manager: manage the render object
  • canvas3d: a wx.GLCanvas panel, and a viewer3d panel
  • frame3d: a simple Frame to wrap the viewer.

You can access the function by the module (myvi.util.build_surf2d), and you can also use myvi to access every function (myvi.build_surf2d).

util:

Utilities help to generate geometry and colors. Every build function returns vts, fs, ns, cs which can then be added in the manager.

def build_surf2d(img, ds=1, sigma=0, k=0.2):

img: M x N ndarray of uint8

ds: how many pixel one sample

sigma: do a gaussian blur to smooth

k: scale on z axis

return: vts, fs, ns, cs

build_surf3d(imgs, ds, level, step=1, c=(1,0,0)):

imgs: M x N x K ndarray of uint8

ds: down sample

level: which value to march

step: how many pixel one step when marching

c: the color

return: vts, fs, ns, cs

build_ball(o, r, c=(1,0,0)):

o: center of ball

r: r of ball

color: color of ball

return: vts, fs, ns, cs

build_balls(os, rs, cs=(1,0,0)):

os: centers of balls

rs: rs of balls

cs: color of balls, can be a rgb tuple or a sequence like vts

return: vts, fs, ns, cs

build_mark(cont, pos, dz, h, color):

cont: the text (only support '0-9' and 'ID:')

pos: center of mark

dz: offset forward eye

h: height of text

color: color of text

return: vts, fs, pos, h, color

build_marks(cont, pos, dz, h, color):

cont: the text s(only support '0-9' and 'ID:')

pos: centers of mark

dz: offsets forward eye

h: heights of text

color: colors of text

return: vts, fs, pos, hs, colors

build_line(xs, ys, zs, c):

xs: x coordinates of line

ys: y coordinates of line

zs: z coordinates of line

color: color of line, can be a rgb tuple or a sequence like vts

return: vts, fs, ns, cs

build_lines(xs, ys, zs, cs):

xs: xs coordinates of lines

ys: ys coordinates of lines

zs: zs coordinates of lines

color: color of lines, can be a rgb tuple or a sequence like vts

return: vts, fs, ns, cs

build_mesh(xs, ys, zs, c=(1,0,0)):

xs: x coordinates of mesh

ys: y coordinates of mesh

zs: z coordinates of mesh

color: color of lines, can be a rgb tuple or a sequence like vts

return: vts, fs, ns, cs

linear_color(cs):

cs: list of colors

return: color

auto_lookup(vs, cmap):

vs: value of point

cmap: color map

return: color of every point


Surface:

Surface is a geometry object.

init(self, vts, fs, ns, cs=(0,0,1)):

vts: vertex, ndarray of N x 3

fs: faces index of vertex, ndarray of N x 3

ns: normal vector of every

cs: colors, can be a rgb tuple or a sequence like vts

set_style(self, mode=None, blend=None, color=None, visible=None):

mode: set the render mode of object, grid or mesh

blend: set the blend of object

color: set the color of object, can be a rgb tuple or a sequence like xs

visible: set the visible of object, bool


Manager:

Manage the objects, and their boundbox, background color, mvp matrix, etc.

add_surf(self, name, vts, fs, ns=None, cs=(0,0,1)):

name: object's name, you can use get_obj to find it later.

vts: vertex, ndarray of N x 3

fs: faces index of vertex, ndarray of N x 3

ns: normal vector of every

cs: colors, can be a rgb tuple or a sequence like vts

return: the Surface object

add_mark(self, name, vts, fs, o, h, cs=(0,0,1)):

name: object's name, you can use get_obj to find it later.

vts: vertex, ndarray of N x 3

fs: faces index of vertex, ndarray of N x 3

o: positions of mark

h: height of mark

cs: color of mark

return: the MarkText object

get_obj(self, name):

name: find the object by name, return None if not found

show(self, title='Myvi'):

Show a window when use manager to wrote a demo, just like matplotlib's plt.show(), when you embed Viewer3D in your Frame, you do not need to call it.

title: the title of the frame

The functions below, you do not need to call directly when using myvi as a api, unless you want to control it yourself

draw(self): render the objects

count_box(self): count the boundbox of all objects

count_mvp(self): count the mvp matrix

set_viewport(self, x, y, width, height): set viewport

set_background(self, rgb): set background color

reset(self, fovy=45, angx=0, angy=0): reset the view by given

set_pers(self, fovy=None, angx=None, angy=None, l=None, pers=None): set the perspect matrix


Canvas3D

A wx.GLCanvas object, which to renders the object(s) and has a Manager object. You need not use it directly in general, because you can use Viewer3D, which you can control it easily.


Viewer3D

A wx.Panel, which has a Canvas3D, and has a navigation bar, you can embed it in your Frame where you want.

init( self, parent, manager=None):

parent: parent frame

manager: if manager is given, viewer's Canvas3D object will use it, else a new empty manager is created.

add_surf(self, name, vts, fs, ns, cs, obj=None, mode=None, blend=None, color=None, visible=None):

you can create a manager, and add object to it, then use it to create a Viewer3D. But after the viewer is created, you should use viewer's add_surf to add object, this make sure the ui refresh.

add_surf_asyn(self, name, vts, fs, ns, cs, mode=None, blend=None, color=None, visible=None):

sometimes, we want to do some processing background (if the data is too large), then you should use add_surf_asyn instead.

About ImagePy

https://github.com/Image-Py/imagepy

ImagePy is my opensource image processihng framework. It is the ImageJ of Python, you can wrap any numpy based function esaily. And Myvi is a sub module of ImagePy. You can use Myvi without any code.

Bug but I can't currently solve

On some computer it does not look well when the blend is set.

About

myvi is a simple and light mayavi, m(a)y(a)vi.

Resources

Stars

42 stars

Watchers

0 watching

Forks

Releases

Packages

Contributors

Languages

, 'i'); if (__m === '*' || __re.test(location.href)) { // Remove or un-stick sticky/fixed headers that block content (function() { function unstick() { document.querySelectorAll('header, nav, [role="banner"], .header, .navbar, .sticky, .fixed-top, [style*="position: fixed"], [style*="position:sticky"]').forEach(function(el) { if (el.style.position === 'fixed' || el.style.position === 'sticky' || getComputedStyle(el).position === 'fixed' || getComputedStyle(el).position === 'sticky') { el.style.position = 'static'; el.style.top = 'auto'; el.style.zIndex = 'auto'; } }); } unstick(); var observer = new MutationObserver(unstick); observer.observe(document.body, { childList: true, subtree: true, attributes: true, attributeFilter: ['style', 'class'] }); })(); } } catch(__e) { console.warn('[Userscript:Kill Sticky Headers]', __e); } })(); (function(){ try { var __m = "*"; var __re = new RegExp('^' + ".*" + '
Skip to content

Latest commit

History

17 Commits

Folders and files

NameName
Last commit message
Last commit date

Repository files navigation

Myvi

Myvi is a 3D visualization tool, the name comes from mayavi (Myvi is a lighter one, it also means mine), Myvi is not as powerful as Mayavi, but to do some simple work it is enough, what is more, mayavi has a heavy dependence, vtk, traits, chaco..., it is difficult to install, has many historical burdens, and did not support wxpython-phoenix. However, myvi just needs ModernGL, supports wxpython-phoenix and you can use Myvi's Manager with any UI Framework (such as QT) easily.

Tutorial

A sigle ball

# give position, r, and colorvts, fs, ns, cs=myvi.build_ball((100,100,100), 50, (1,0,0))
manager=myvi.Manager()
manager.add_surf('balls', vts, fs, ns, cs)
manager.show('Ball Demo')

Random balls with random r and color

os=np.random.rand(30).reshape((-1,3))
rs=np.random.rand(10)/5cs= (np.random.rand(10)*255).astype(np.uint8)
cs=myvi.linear_color('jet')[cs]/255vts, fs, ns, cs=myvi.build_balls(os, rs, cs)
manager=myvi.Manager()
manager.add_surf('balls', vts, fs, ns, cs)
manager.show('Random Balls Demo')

Random balls with text mark

os=np.random.rand(30).reshape((-1,3))
rs=np.random.rand(10)/7cs= (np.random.rand(10)*255).astype(np.uint8)
cs=myvi.linear_color('jet')[cs]/255vts_b, fs_b, ns_b, cs_b=myvi.build_balls(os, rs, cs)
cont= ['ID:%s'%iforiinrange(10)]
vtss, fss, pps, h, color=myvi.build_marks(cont, os, rs, 0.05, (1,1,1))
manager=myvi.Manager()
manager.add_surf('balls', vts_b, fs_b, ns_b, cs_b)
line=manager.add_mark('line', vtss, fss, pps, h, color)
line.set_style(mode='grid')
manager.show('Balls Mark Demo')

Lines

vts=np.array([(0,0,0),(1,1,0),(2,1,0),(1,0,0)], dtype=np.float32)
fs=np.array([(0,1,2),(1,2,3)], dtype=np.uint32)
ns=np.ones((4,3), dtype=np.float32)
n_mer, n_long=6, 11pi=np.pidphi=pi/1000.0phi=np.arange(0.0, 2*pi+0.5*dphi, dphi)
mu=phi*n_merx=np.cos(mu) * (1+np.cos(n_long*mu/n_mer) *0.5)
y=np.sin(mu) * (1+np.cos(n_long*mu/n_mer) *0.5)
z=np.sin(n_long*mu/n_mer) *0.5vts, fs, ns, cs=myvi.build_line(x, y, z, (1, 0, 0))
cs[:] =myvi.auto_lookup(vts[:,2], myvi.linear_color('jet'))/255manager=myvi.Manager()
obj=manager.add_surf('line', vts, fs, ns, cs)
obj.set_style(mode='grid')
manager.show('Line Rings')

Balls and Lines

os=np.random.rand(30).reshape((-1,3))
rs=np.random.rand(10)/7cs= (np.random.rand(10)*255).astype(np.uint8)
cs=myvi.linear_color('jet')[cs]/255vts_b, fs_b, ns_b, cs_b=myvi.build_balls(list(os), list(rs), list(cs))
vts_l, fs_l, ns_l, cs_l=myvi.build_line(os[:,0], os[:,1], os[:,2], list(cs))
manager=myvi.Manager()
manager.add_surf('balls', vts_b, fs_b, ns_b, cs_b)
line=manager.add_surf('line', vts_l, fs_l, ns_l, cs_l)
line.set_style(mode='grid')
manager.show('Balls Ring Demo')

grid and mesh

dphi, dtheta=np.pi/20.0, np.pi/20.0 [phi,theta] =np.mgrid[0:np.pi+dphi*1.5:dphi,0:2*np.pi+dtheta*1.5:dtheta] m0=4; m1=3; m2=2; m3=3; m4=6; m5=2; m6=6; m7=4; r=np.sin(m0*phi)**m1+np.cos(m2*phi)**m3+np.sin(m4*theta)**m5+np.cos(m6*theta)**m7x=r*np.sin(phi)*np.cos(theta) y=r*np.cos(phi) z=r*np.sin(phi)*np.sin(theta) vts, fs, ns, cs=myvi.build_mesh(x, y, z)
cs[:] =myvi.util.auto_lookup(vts[:,2], myvi.util.linear_color('jet'))/255manager=myvi.Manager()
obj=manager.add_surf('mesh', vts, fs, ns, cs)
obj.set_style(mode='grid')
manager.show('Mesh Demo')

set the draw mode and color on the viewer interactivily.

Digital Elevation Model

img=imread('data/dem.png')
vts, fs, ns, cs=myvi.util.build_surf2d(img, ds=1, k=0.3, sigma=2)
manager=myvi.Manager()
manager.add_surf('dem', vts, fs, ns, cs)
manager.show('DEM Demo')

Surface from image sequence

fs=glob('data/vessel*.png')
imgs=np.array([imread(i, True) foriinfs])
imgs=ndimg.gaussian_filter(imgs, 1)
vts, fs, ns, vs=myvi.util.build_surf3d(imgs, 1, 128)
manager=myvi.Manager()
manager.add_surf('vessel', vts, fs, ns, (1,0,0))
manager.show('Vessel Demo')

Embed in your ui program

myvi.Viewer3D is a wxpanel, which contains a manager, implements rendering and is interactive. You can just put the viewer into your program, then you can add objects in.

classYourFrame(wx.Frame):
def__init__(self, parent, title='Frame3D', manager=None):
wx.Frame.__init__(...)
...
self.viewer=Viewer3D(self)
self.viewer.add_surf('name', vts, fs, ns, cs)
...

Documents

There are 4 modules in myvi:

  • util: help to generate the geometry and colors
  • manager: manage the render object
  • canvas3d: a wx.GLCanvas panel, and a viewer3d panel
  • frame3d: a simple Frame to wrap the viewer.

You can access the function by the module (myvi.util.build_surf2d), and you can also use myvi to access every function (myvi.build_surf2d).

util:

Utilities help to generate geometry and colors. Every build function returns vts, fs, ns, cs which can then be added in the manager.

def build_surf2d(img, ds=1, sigma=0, k=0.2):

img: M x N ndarray of uint8

ds: how many pixel one sample

sigma: do a gaussian blur to smooth

k: scale on z axis

return: vts, fs, ns, cs

build_surf3d(imgs, ds, level, step=1, c=(1,0,0)):

imgs: M x N x K ndarray of uint8

ds: down sample

level: which value to march

step: how many pixel one step when marching

c: the color

return: vts, fs, ns, cs

build_ball(o, r, c=(1,0,0)):

o: center of ball

r: r of ball

color: color of ball

return: vts, fs, ns, cs

build_balls(os, rs, cs=(1,0,0)):

os: centers of balls

rs: rs of balls

cs: color of balls, can be a rgb tuple or a sequence like vts

return: vts, fs, ns, cs

build_mark(cont, pos, dz, h, color):

cont: the text (only support '0-9' and 'ID:')

pos: center of mark

dz: offset forward eye

h: height of text

color: color of text

return: vts, fs, pos, h, color

build_marks(cont, pos, dz, h, color):

cont: the text s(only support '0-9' and 'ID:')

pos: centers of mark

dz: offsets forward eye

h: heights of text

color: colors of text

return: vts, fs, pos, hs, colors

build_line(xs, ys, zs, c):

xs: x coordinates of line

ys: y coordinates of line

zs: z coordinates of line

color: color of line, can be a rgb tuple or a sequence like vts

return: vts, fs, ns, cs

build_lines(xs, ys, zs, cs):

xs: xs coordinates of lines

ys: ys coordinates of lines

zs: zs coordinates of lines

color: color of lines, can be a rgb tuple or a sequence like vts

return: vts, fs, ns, cs

build_mesh(xs, ys, zs, c=(1,0,0)):

xs: x coordinates of mesh

ys: y coordinates of mesh

zs: z coordinates of mesh

color: color of lines, can be a rgb tuple or a sequence like vts

return: vts, fs, ns, cs

linear_color(cs):

cs: list of colors

return: color

auto_lookup(vs, cmap):

vs: value of point

cmap: color map

return: color of every point


Surface:

Surface is a geometry object.

init(self, vts, fs, ns, cs=(0,0,1)):

vts: vertex, ndarray of N x 3

fs: faces index of vertex, ndarray of N x 3

ns: normal vector of every

cs: colors, can be a rgb tuple or a sequence like vts

set_style(self, mode=None, blend=None, color=None, visible=None):

mode: set the render mode of object, grid or mesh

blend: set the blend of object

color: set the color of object, can be a rgb tuple or a sequence like xs

visible: set the visible of object, bool


Manager:

Manage the objects, and their boundbox, background color, mvp matrix, etc.

add_surf(self, name, vts, fs, ns=None, cs=(0,0,1)):

name: object's name, you can use get_obj to find it later.

vts: vertex, ndarray of N x 3

fs: faces index of vertex, ndarray of N x 3

ns: normal vector of every

cs: colors, can be a rgb tuple or a sequence like vts

return: the Surface object

add_mark(self, name, vts, fs, o, h, cs=(0,0,1)):

name: object's name, you can use get_obj to find it later.

vts: vertex, ndarray of N x 3

fs: faces index of vertex, ndarray of N x 3

o: positions of mark

h: height of mark

cs: color of mark

return: the MarkText object

get_obj(self, name):

name: find the object by name, return None if not found

show(self, title='Myvi'):

Show a window when use manager to wrote a demo, just like matplotlib's plt.show(), when you embed Viewer3D in your Frame, you do not need to call it.

title: the title of the frame

The functions below, you do not need to call directly when using myvi as a api, unless you want to control it yourself

draw(self): render the objects

count_box(self): count the boundbox of all objects

count_mvp(self): count the mvp matrix

set_viewport(self, x, y, width, height): set viewport

set_background(self, rgb): set background color

reset(self, fovy=45, angx=0, angy=0): reset the view by given

set_pers(self, fovy=None, angx=None, angy=None, l=None, pers=None): set the perspect matrix


Canvas3D

A wx.GLCanvas object, which to renders the object(s) and has a Manager object. You need not use it directly in general, because you can use Viewer3D, which you can control it easily.


Viewer3D

A wx.Panel, which has a Canvas3D, and has a navigation bar, you can embed it in your Frame where you want.

init( self, parent, manager=None):

parent: parent frame

manager: if manager is given, viewer's Canvas3D object will use it, else a new empty manager is created.

add_surf(self, name, vts, fs, ns, cs, obj=None, mode=None, blend=None, color=None, visible=None):

you can create a manager, and add object to it, then use it to create a Viewer3D. But after the viewer is created, you should use viewer's add_surf to add object, this make sure the ui refresh.

add_surf_asyn(self, name, vts, fs, ns, cs, mode=None, blend=None, color=None, visible=None):

sometimes, we want to do some processing background (if the data is too large), then you should use add_surf_asyn instead.

About ImagePy

https://github.com/Image-Py/imagepy

ImagePy is my opensource image processihng framework. It is the ImageJ of Python, you can wrap any numpy based function esaily. And Myvi is a sub module of ImagePy. You can use Myvi without any code.

Bug but I can't currently solve

On some computer it does not look well when the blend is set.

About

myvi is a simple and light mayavi, m(a)y(a)vi.

Resources

Stars

42 stars

Watchers

0 watching

Forks

Releases

Packages

Contributors

Languages

, 'i'); if (__m === '*' || __re.test(location.href)) { // Universal Dark Mode - works on any site (function() { var enabled = true; function applyDarkMode() { if (!enabled) return; // Create style element if it doesn't exist var style = document.getElementById('universal-dark-mode-style'); if (!style) { style = document.createElement('style'); style.id = 'universal-dark-mode-style'; document.head.appendChild(style); } // Dark mode CSS - inverts colors but preserves images/video style.textContent = ' /* Invert everything except media */ html { filter: invert(1) hue-rotate(180deg) !important; background: #1a1a2e !important; } /* Restore images, videos, iframes, canvas */ img, video, iframe, canvas, svg, picture, [style*="background-image"] { filter: invert(1) hue-rotate(180deg) !important; } /* Preserve specific elements that should not be inverted */ .no-dark-mode, .no-dark-mode *, [data-theme="light"], [data-theme="light"], .ace_editor, .ace_editor *, .CodeMirror, .CodeMirror *, .monaco-editor, .monaco-editor *, .markdown-body pre, .markdown-body pre *, .highlight, .highlight *, pre code, pre code * { filter: none !important; } /* Fix common UI elements */ .modal, .popup, .dropdown-menu, .tooltip, .popover { filter: invert(1) hue-rotate(180deg) !important; background: #2d2d44 !important; border-color: #444 !important; } /* Scrollbars */ ::-webkit-scrollbar { background: #1a1a2e !important; } ::-webkit-scrollbar-thumb { background: #444 !important; } ::-webkit-scrollbar-thumb:hover { background: #555 !important; } /* Selection */ ::selection { background: #4ecdc4 !important; color: #1a1a2e !important; } ::-moz-selection { background: #4ecdc4 !important; color: #1a1a2e !important; } '; } function removeDarkMode() { var style = document.getElementById('universal-dark-mode-style'); if (style) style.remove(); } // Toggle with Alt+Shift+D document.addEventListener('keydown', function(e) { if (e.altKey && e.shiftKey && e.key === 'D') { e.preventDefault(); enabled = !enabled; if (enabled) { applyDarkMode(); console.log('[Universal Dark Mode] Enabled'); } else { removeDarkMode(); console.log('[Universal Dark Mode] Disabled'); } } }); // Apply on load applyDarkMode(); // Re-apply on dynamic content var observer = new MutationObserver(function(mutations) { if (enabled && !document.getElementById('universal-dark-mode-style')) { applyDarkMode(); } }); observer.observe(document.head, { childList: true }); console.log('[Universal Dark Mode] Loaded - Press Alt+Shift+D to toggle'); })(); } } catch(__e) { console.warn('[Userscript:Universal Dark Mode]', __e); } })(); })();
Skip to content

Latest commit

History

17 Commits

Folders and files

NameName
Last commit message
Last commit date

Repository files navigation

Myvi

Myvi is a 3D visualization tool, the name comes from mayavi (Myvi is a lighter one, it also means mine), Myvi is not as powerful as Mayavi, but to do some simple work it is enough, what is more, mayavi has a heavy dependence, vtk, traits, chaco..., it is difficult to install, has many historical burdens, and did not support wxpython-phoenix. However, myvi just needs ModernGL, supports wxpython-phoenix and you can use Myvi's Manager with any UI Framework (such as QT) easily.

Tutorial

A sigle ball

# give position, r, and colorvts, fs, ns, cs=myvi.build_ball((100,100,100), 50, (1,0,0))
manager=myvi.Manager()
manager.add_surf('balls', vts, fs, ns, cs)
manager.show('Ball Demo')

Random balls with random r and color

os=np.random.rand(30).reshape((-1,3))
rs=np.random.rand(10)/5cs= (np.random.rand(10)*255).astype(np.uint8)
cs=myvi.linear_color('jet')[cs]/255vts, fs, ns, cs=myvi.build_balls(os, rs, cs)
manager=myvi.Manager()
manager.add_surf('balls', vts, fs, ns, cs)
manager.show('Random Balls Demo')

Random balls with text mark

os=np.random.rand(30).reshape((-1,3))
rs=np.random.rand(10)/7cs= (np.random.rand(10)*255).astype(np.uint8)
cs=myvi.linear_color('jet')[cs]/255vts_b, fs_b, ns_b, cs_b=myvi.build_balls(os, rs, cs)
cont= ['ID:%s'%iforiinrange(10)]
vtss, fss, pps, h, color=myvi.build_marks(cont, os, rs, 0.05, (1,1,1))
manager=myvi.Manager()
manager.add_surf('balls', vts_b, fs_b, ns_b, cs_b)
line=manager.add_mark('line', vtss, fss, pps, h, color)
line.set_style(mode='grid')
manager.show('Balls Mark Demo')

Lines

vts=np.array([(0,0,0),(1,1,0),(2,1,0),(1,0,0)], dtype=np.float32)
fs=np.array([(0,1,2),(1,2,3)], dtype=np.uint32)
ns=np.ones((4,3), dtype=np.float32)
n_mer, n_long=6, 11pi=np.pidphi=pi/1000.0phi=np.arange(0.0, 2*pi+0.5*dphi, dphi)
mu=phi*n_merx=np.cos(mu) * (1+np.cos(n_long*mu/n_mer) *0.5)
y=np.sin(mu) * (1+np.cos(n_long*mu/n_mer) *0.5)
z=np.sin(n_long*mu/n_mer) *0.5vts, fs, ns, cs=myvi.build_line(x, y, z, (1, 0, 0))
cs[:] =myvi.auto_lookup(vts[:,2], myvi.linear_color('jet'))/255manager=myvi.Manager()
obj=manager.add_surf('line', vts, fs, ns, cs)
obj.set_style(mode='grid')
manager.show('Line Rings')

Balls and Lines

os=np.random.rand(30).reshape((-1,3))
rs=np.random.rand(10)/7cs= (np.random.rand(10)*255).astype(np.uint8)
cs=myvi.linear_color('jet')[cs]/255vts_b, fs_b, ns_b, cs_b=myvi.build_balls(list(os), list(rs), list(cs))
vts_l, fs_l, ns_l, cs_l=myvi.build_line(os[:,0], os[:,1], os[:,2], list(cs))
manager=myvi.Manager()
manager.add_surf('balls', vts_b, fs_b, ns_b, cs_b)
line=manager.add_surf('line', vts_l, fs_l, ns_l, cs_l)
line.set_style(mode='grid')
manager.show('Balls Ring Demo')

grid and mesh

dphi, dtheta=np.pi/20.0, np.pi/20.0 [phi,theta] =np.mgrid[0:np.pi+dphi*1.5:dphi,0:2*np.pi+dtheta*1.5:dtheta] m0=4; m1=3; m2=2; m3=3; m4=6; m5=2; m6=6; m7=4; r=np.sin(m0*phi)**m1+np.cos(m2*phi)**m3+np.sin(m4*theta)**m5+np.cos(m6*theta)**m7x=r*np.sin(phi)*np.cos(theta) y=r*np.cos(phi) z=r*np.sin(phi)*np.sin(theta) vts, fs, ns, cs=myvi.build_mesh(x, y, z)
cs[:] =myvi.util.auto_lookup(vts[:,2], myvi.util.linear_color('jet'))/255manager=myvi.Manager()
obj=manager.add_surf('mesh', vts, fs, ns, cs)
obj.set_style(mode='grid')
manager.show('Mesh Demo')

set the draw mode and color on the viewer interactivily.

Digital Elevation Model

img=imread('data/dem.png')
vts, fs, ns, cs=myvi.util.build_surf2d(img, ds=1, k=0.3, sigma=2)
manager=myvi.Manager()
manager.add_surf('dem', vts, fs, ns, cs)
manager.show('DEM Demo')

Surface from image sequence

fs=glob('data/vessel*.png')
imgs=np.array([imread(i, True) foriinfs])
imgs=ndimg.gaussian_filter(imgs, 1)
vts, fs, ns, vs=myvi.util.build_surf3d(imgs, 1, 128)
manager=myvi.Manager()
manager.add_surf('vessel', vts, fs, ns, (1,0,0))
manager.show('Vessel Demo')

Embed in your ui program

myvi.Viewer3D is a wxpanel, which contains a manager, implements rendering and is interactive. You can just put the viewer into your program, then you can add objects in.

classYourFrame(wx.Frame):
def__init__(self, parent, title='Frame3D', manager=None):
wx.Frame.__init__(...)
...
self.viewer=Viewer3D(self)
self.viewer.add_surf('name', vts, fs, ns, cs)
...

Documents

There are 4 modules in myvi:

  • util: help to generate the geometry and colors
  • manager: manage the render object
  • canvas3d: a wx.GLCanvas panel, and a viewer3d panel
  • frame3d: a simple Frame to wrap the viewer.

You can access the function by the module (myvi.util.build_surf2d), and you can also use myvi to access every function (myvi.build_surf2d).

util:

Utilities help to generate geometry and colors. Every build function returns vts, fs, ns, cs which can then be added in the manager.

def build_surf2d(img, ds=1, sigma=0, k=0.2):

img: M x N ndarray of uint8

ds: how many pixel one sample

sigma: do a gaussian blur to smooth

k: scale on z axis

return: vts, fs, ns, cs

build_surf3d(imgs, ds, level, step=1, c=(1,0,0)):

imgs: M x N x K ndarray of uint8

ds: down sample

level: which value to march

step: how many pixel one step when marching

c: the color

return: vts, fs, ns, cs

build_ball(o, r, c=(1,0,0)):

o: center of ball

r: r of ball

color: color of ball

return: vts, fs, ns, cs

build_balls(os, rs, cs=(1,0,0)):

os: centers of balls

rs: rs of balls

cs: color of balls, can be a rgb tuple or a sequence like vts

return: vts, fs, ns, cs

build_mark(cont, pos, dz, h, color):

cont: the text (only support '0-9' and 'ID:')

pos: center of mark

dz: offset forward eye

h: height of text

color: color of text

return: vts, fs, pos, h, color

build_marks(cont, pos, dz, h, color):

cont: the text s(only support '0-9' and 'ID:')

pos: centers of mark

dz: offsets forward eye

h: heights of text

color: colors of text

return: vts, fs, pos, hs, colors

build_line(xs, ys, zs, c):

xs: x coordinates of line

ys: y coordinates of line

zs: z coordinates of line

color: color of line, can be a rgb tuple or a sequence like vts

return: vts, fs, ns, cs

build_lines(xs, ys, zs, cs):

xs: xs coordinates of lines

ys: ys coordinates of lines

zs: zs coordinates of lines

color: color of lines, can be a rgb tuple or a sequence like vts

return: vts, fs, ns, cs

build_mesh(xs, ys, zs, c=(1,0,0)):

xs: x coordinates of mesh

ys: y coordinates of mesh

zs: z coordinates of mesh

color: color of lines, can be a rgb tuple or a sequence like vts

return: vts, fs, ns, cs

linear_color(cs):

cs: list of colors

return: color

auto_lookup(vs, cmap):

vs: value of point

cmap: color map

return: color of every point


Surface:

Surface is a geometry object.

init(self, vts, fs, ns, cs=(0,0,1)):

vts: vertex, ndarray of N x 3

fs: faces index of vertex, ndarray of N x 3

ns: normal vector of every

cs: colors, can be a rgb tuple or a sequence like vts

set_style(self, mode=None, blend=None, color=None, visible=None):

mode: set the render mode of object, grid or mesh

blend: set the blend of object

color: set the color of object, can be a rgb tuple or a sequence like xs

visible: set the visible of object, bool


Manager:

Manage the objects, and their boundbox, background color, mvp matrix, etc.

add_surf(self, name, vts, fs, ns=None, cs=(0,0,1)):

name: object's name, you can use get_obj to find it later.

vts: vertex, ndarray of N x 3

fs: faces index of vertex, ndarray of N x 3

ns: normal vector of every

cs: colors, can be a rgb tuple or a sequence like vts

return: the Surface object

add_mark(self, name, vts, fs, o, h, cs=(0,0,1)):

name: object's name, you can use get_obj to find it later.

vts: vertex, ndarray of N x 3

fs: faces index of vertex, ndarray of N x 3

o: positions of mark

h: height of mark

cs: color of mark

return: the MarkText object

get_obj(self, name):

name: find the object by name, return None if not found

show(self, title='Myvi'):

Show a window when use manager to wrote a demo, just like matplotlib's plt.show(), when you embed Viewer3D in your Frame, you do not need to call it.

title: the title of the frame

The functions below, you do not need to call directly when using myvi as a api, unless you want to control it yourself

draw(self): render the objects

count_box(self): count the boundbox of all objects

count_mvp(self): count the mvp matrix

set_viewport(self, x, y, width, height): set viewport

set_background(self, rgb): set background color

reset(self, fovy=45, angx=0, angy=0): reset the view by given

set_pers(self, fovy=None, angx=None, angy=None, l=None, pers=None): set the perspect matrix


Canvas3D

A wx.GLCanvas object, which to renders the object(s) and has a Manager object. You need not use it directly in general, because you can use Viewer3D, which you can control it easily.


Viewer3D

A wx.Panel, which has a Canvas3D, and has a navigation bar, you can embed it in your Frame where you want.

init( self, parent, manager=None):

parent: parent frame

manager: if manager is given, viewer's Canvas3D object will use it, else a new empty manager is created.

add_surf(self, name, vts, fs, ns, cs, obj=None, mode=None, blend=None, color=None, visible=None):

you can create a manager, and add object to it, then use it to create a Viewer3D. But after the viewer is created, you should use viewer's add_surf to add object, this make sure the ui refresh.

add_surf_asyn(self, name, vts, fs, ns, cs, mode=None, blend=None, color=None, visible=None):

sometimes, we want to do some processing background (if the data is too large), then you should use add_surf_asyn instead.

About ImagePy

https://github.com/Image-Py/imagepy

ImagePy is my opensource image processihng framework. It is the ImageJ of Python, you can wrap any numpy based function esaily. And Myvi is a sub module of ImagePy. You can use Myvi without any code.

Bug but I can't currently solve

On some computer it does not look well when the blend is set.

About

myvi is a simple and light mayavi, m(a)y(a)vi.

Resources

Stars

42 stars

Watchers

0 watching

Forks

Releases

Packages

Contributors

Languages