A cross-platform library that makes it easy to create your own Match 3 game.
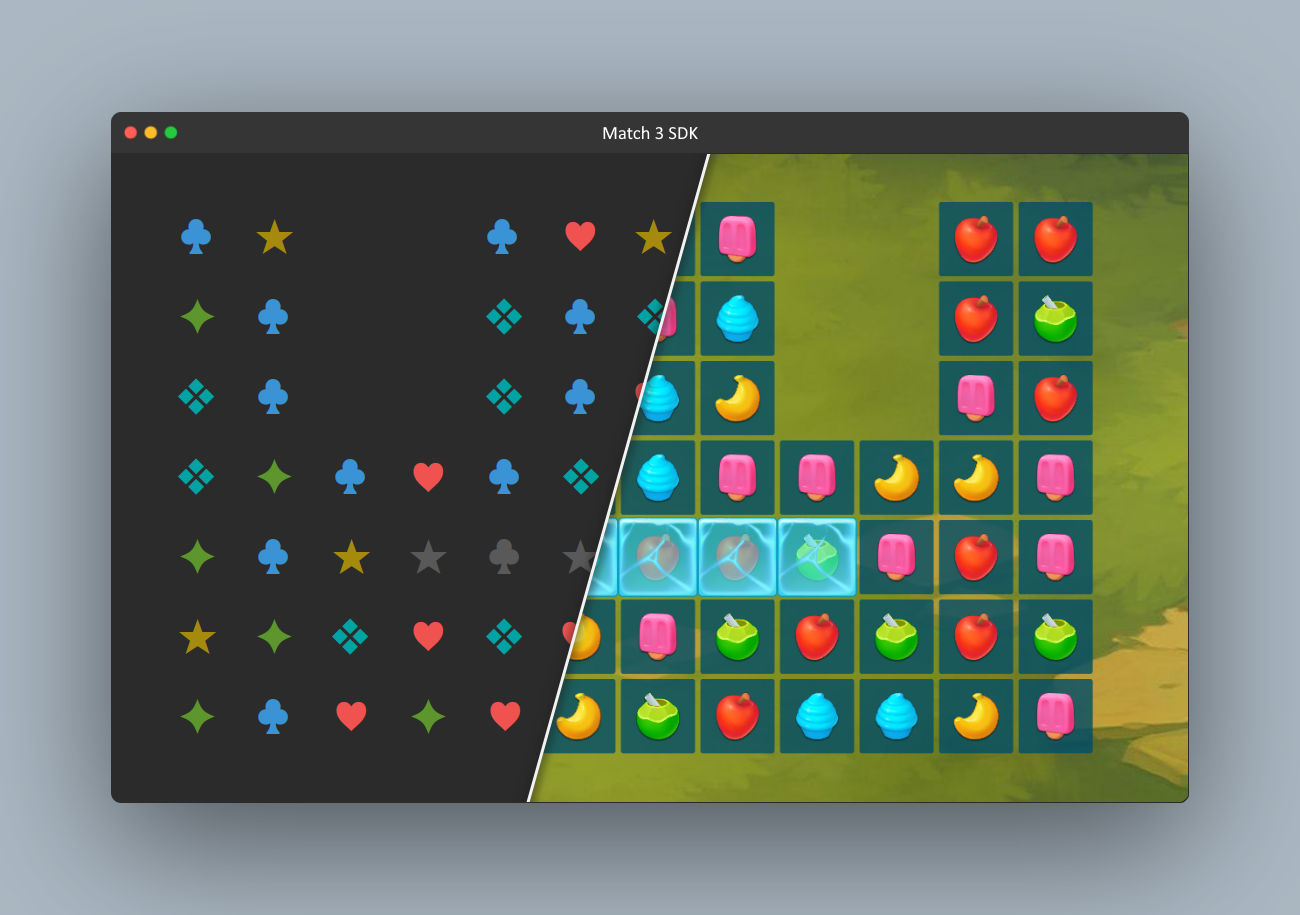
The Match 3 SDK is designed to speed up the development of Match 3 games. Use the samples as a starting point for creating your own Match 3 game.
A Match 3 game sample with three implementations to fill the playing field.
| Simple Fill Strategy | Fall Down Fill Strategy | Slide Down Fill Strategy |
 |  |  |
Note: The
FallDownFillStrategy&SlideDownFillStrategyare given as an example. Consider to implement an object pooling technique for theItemMoveDatato reduce memory pressure.
Gameplay Demonstration
UnityMatch3Gameplay.mp4
A Match 3 game sample designed for text terminals.
Gameplay Demonstration
TerminalMatch3Gameplay.mp4
Note: The sample was tested using Rider's internal console. If you have a problem displaying symbols, configure your terminal to support Unicode (in UTF-8 form). For Windows, you can use the new Windows Terminal.
.
├── samples
│ ├── Terminal.Match3
│ └── Unity.Match3
│
├── src
│ ├── Match3.App
│ ├── Match3.Core
│ ├── Match3.Template
│ └── Match3.UnityPackage # Auto-generated
│
├── Match3.sln
Dependencies:
- Match3-SDK: UniTask
- Unity Match3-SDK: UniTask
- Unity Match3-Sample: UniTask, DOTween & Match3-SDK
You can install Match3-SDK in one of the following ways:
1. Install via Package Manager
The package is available on the OpenUPM.
Open
Edit/Project Settings/Package ManagerAdd a new
Scoped Registry(or edit the existing OpenUPM entry)Name package.openupm.com URL https://package.openupm.com Scope(s) com.cysharp.unitask com.chebanovdd.match3sdkOpen
Window/Package ManagerSelect
My RegistriesInstall
UniTaskandMatch3-SDKpackages
2. Install via Git URL
You can add https://github.com/ChebanovDD/Match3-SDK.git?path=src/Match3.UnityPackage/Assets/Plugins/Match3 to the Package Manager.
If you want to set a target version, Match3-SDK uses the v*.*.* release tag, so you can specify a version like #v0.1.2. For example https://github.com/ChebanovDD/Match3-SDK.git?path=src/Match3.UnityPackage/Assets/Plugins/Match3#v0.1.2.
Note: Dependencies must be installed before installing the package.
- Match3.SDK.zip - to use the Match3-SDK outside of Unity (eg. just as a normal C# project)
- Match3.Unity.SDK.unitypackage - contains Match3-SDK source code
- Match3.Unity.Sample.unitypackage - contains the sample project for Unity
- com.chebanovdd.match3sdk-*.tgz - for installing the Match3-SDK from a local tarball file
Note: Dependencies must be installed before installing the packages.
To add a new icons set, simply create a SpriteAtlas and add it to the AppContext via the Inspector.
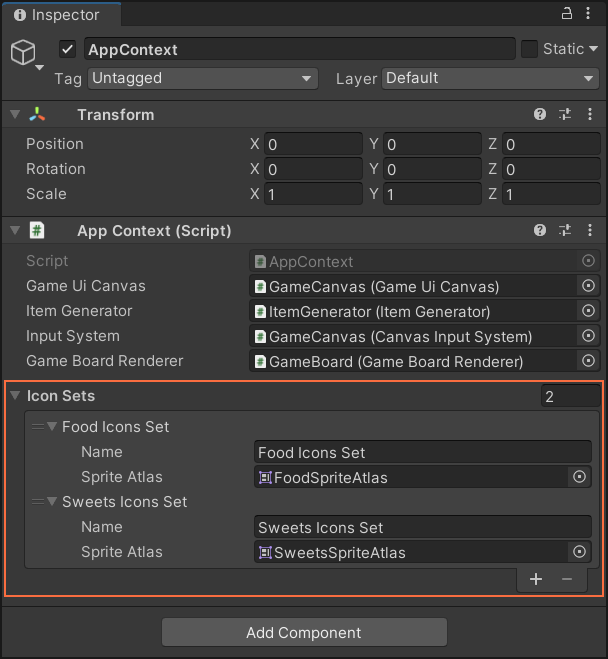
Note: You can change icons size by changing the
Pixels Per Unitoption in the sprite settings.
Let's create a SlideIn animation to show the items and a SlideOut animation to hide the items. These animations will be used further.
Сreate a class ItemsSlideOutJob and inherit from the Job.
publicclassItemsSlideOutJob:Job{privateconstfloatFadeDuration=0.15f;privateconstfloatSlideDuration=0.2f;privatereadonlyIEnumerable<IUnityItem>_items;publicItemsSlideOutJob(IEnumerable<IUnityItem>items,intexecutionOrder=0):base(executionOrder){_items=items;// Items to animate.}publicoverrideasyncUniTaskExecuteAsync(CancellationTokencancellationToken=default){varitemsSequence=DOTween.Sequence();foreach(varitemin_items){// Calculate the item destination position.vardestinationPosition=item.GetWorldPosition()+Vector3.right;_=itemsSequence.Join(item.Transform.DOMove(destinationPosition,SlideDuration))// Smoothly move the item..Join(item.SpriteRenderer.DOFade(0,FadeDuration));// Smoothly hide the item.}awaititemsSequence.SetEase(Ease.Flash).WithCancellation(cancellationToken);}}Then create a class ItemsSlideInJob.
publicclassItemsSlideInJob:Job{privateconstfloatFadeDuration=0.15f;privateconstfloatSlideDuration=0.2f;privatereadonlyIEnumerable<IUnityItem>_items;publicItemsSlideInJob(IEnumerable<IUnityItem>items,intexecutionOrder=0):base(executionOrder){_items=items;// Items to animate.}publicoverrideasyncUniTaskExecuteAsync(CancellationTokencancellationToken=default){varitemsSequence=DOTween.Sequence();foreach(varitemin_items){// Save the item current position.vardestinationPosition=item.GetWorldPosition();// Move the item to the starting position.item.SetWorldPosition(destinationPosition+Vector3.left);// Reset the sprite alpha to zero.item.SpriteRenderer.SetAlpha(0);// Reset the item scale.item.SetScale(1);// Activate the item game object.item.Show();_=itemsSequence.Join(item.Transform.DOMove(destinationPosition,SlideDuration))// Smoothly move the item..Join(item.SpriteRenderer.DOFade(1,FadeDuration));// Smoothly show the item.}awaititemsSequence.SetEase(Ease.Flash).WithCancellation(cancellationToken);}}Jobs with the same executionOrder run in parallel. Otherwise, they run one after the other according to the executionOrder.
Execution Order Demonstration
| SlideOutJob: 0 SlideInJob: 0 | SlideOutJob: 0 SlideInJob: 1 |
 |  |
First of all, create a class SidewayFillStrategy and inherit from the IBoardFillStrategy<TGridSlot>.
We'll need an IUnityGameBoardRenderer to transform grid positions to world positions and an IItemsPool<TItem> to get the pre-created items from the pool. Let's pass them to the constructor.
publicclassSidewayFillStrategy:IBoardFillStrategy<IUnityGridSlot>{privatereadonlyIItemsPool<IUnityItem>_itemsPool;privatereadonlyIUnityGameBoardRenderer_gameBoardRenderer;publicSidewayFillStrategy(IUnityGameBoardRenderergameBoardRenderer,IItemsPool<IUnityItem>itemsPool){_itemsPool=itemsPool;_gameBoardRenderer=gameBoardRenderer;}publicstringName=>"Sideway Fill Strategy";publicIEnumerable<IJob>GetFillJobs(IGameBoard<IUnityGridSlot>gameBoard){thrownewNotImplementedException();}publicIEnumerable<IJob>GetSolveJobs(IGameBoard<IUnityGridSlot>gameBoard,SolvedData<IUnityGridSlot>solvedData){thrownewNotImplementedException();}}Then let's implement the GetFillJobs method. This method is used to fill the playing field.
publicIEnumerable<IJob>GetFillJobs(IGameBoard<IUnityGridSlot>gameBoard){// List of items to show.varitemsToShow=newList<IUnityItem>();for(varrowIndex=0;rowIndex<gameBoard.RowCount;rowIndex++){for(varcolumnIndex=0;columnIndex<gameBoard.ColumnCount;columnIndex++){vargridSlot=gameBoard[rowIndex,columnIndex];if(gridSlot.CanSetItem==false){continue;}// Get an item from the pool.varitem=_itemsPool.GetItem();// Set the position of the item.item.SetWorldPosition(_gameBoardRenderer.GetWorldPosition(gridSlot.GridPosition));// Set the item to the grid slot.gridSlot.SetItem(item);// Add the item to the list to show.itemsToShow.Add(item);}}// Create a job to show items.returnnew[]{newItemsShowJob(itemsToShow)};}Next, we implement the GetSolveJobs method. This method is used to deal with solved sequences of items.
publicIEnumerable<IJob>GetSolveJobs(IGameBoard<IUnityGridSlot>gameBoard,SolvedData<IUnityGridSlot>solvedData){// List of items to hide.varitemsToHide=newList<IUnityItem>();// List of items to show.varitemsToShow=newList<IUnityItem>();// Iterate through the solved items.// Get unique and only movable items.foreach(varsolvedGridSlotinsolvedData.GetUniqueSolvedGridSlots(true)){// Get a new item from the pool.varnewItem=_itemsPool.GetItem();// Get the current item of the grid slot.varcurrentItem=solvedGridSlot.Item;// Set the position of the new item.newItem.SetWorldPosition(currentItem.GetWorldPosition());// Set the new item to the grid slot.solvedGridSlot.SetItem(newItem);// Add the current item to the list to hide.itemsToHide.Add(currentItem);// Add the new item to the list to show.itemsToShow.Add(newItem);// Return the current item to the pool._itemsPool.ReturnItem(currentItem);}// Iterate through the special items (can be empty).// Get all special items except occupied.foreach(varspecialItemGridSlotinsolvedData.GetSpecialItemGridSlots(true)){varitem=_itemsPool.GetItem();item.SetWorldPosition(_gameBoardRenderer.GetWorldPosition(specialItemGridSlot.GridPosition));specialItemGridSlot.SetItem(item);itemsToShow.Add(item);}// Create jobs to hide and show items using the animations we created above.returnnewIJob[]{newItemsSlideOutJob(itemsToHide),newItemsSlideInJob(itemsToShow)};}Note: The
SolvedSequences&SpecialItemGridSlotscan contain overlapping items.
Once the SidewayFillStrategy is implemented. Register it in the AppContext class.
publicclassAppContext:MonoBehaviour,IAppContext{
...privateIBoardFillStrategy<IUnityGridSlot>[]GetBoardFillStrategies(IUnityGameBoardRenderergameBoardRenderer,IItemsPool<IUnityItem>itemsPool){returnnewIBoardFillStrategy<IUnityGridSlot>[]{
...
new SidewayFillStrategy(gameBoardRenderer,itemsPool)};}
...}
Video Demonstration
ItemsSlideFillStrategy.mp4
Let's say we want to add a goal to collect a certain number of specific items. First of all, create a class CollectItems and inherit from the LevelGoal<TGridSlot>.
publicclassCollectItems:LevelGoal<IUnityGridSlot>{privatereadonlyint_contentId;privatereadonlyint_itemsCount;privateint_collectedItemsCount;publicCollectItems(intcontentId,intitemsCount){_contentId=contentId;_itemsCount=itemsCount;}publicoverridevoidOnSequencesSolved(SolvedData<IUnityGridSlot>solvedData){// Get unique and only movable items.foreach(varsolvedGridSlotinsolvedData.GetUniqueSolvedGridSlots(true)){if(solvedGridSlot.Item.ContentId==_contentId){_collectedItemsCount++;}}if(_collectedItemsCount>=_itemsCount){MarkAchieved();}}}Once the level goal is implemented. Don't forget to register it in the LevelGoalsProvider.
publicclassLevelGoalsProvider:ILevelGoalsProvider<IUnityGridSlot>{publicLevelGoal<IUnityGridSlot>[]GetLevelGoals(intlevel,IGameBoard<IUnityGridSlot>gameBoard){returnnewLevelGoal<IUnityGridSlot>[]{
...
new CollectItems(0,25)};}}Let's implement a new sequence detector to detect square shapes. Create a class SquareShapeDetector and inherit from the ISequenceDetector<TGridSlot>.
First of all, we have to declare an array of lookup directions.
publicclassSquareShapeDetector:ISequenceDetector<IUnityGridSlot>{privatereadonlyGridPosition[][]_squareLookupDirections;publicSquareShapeDetector(){_squareLookupDirections=new[]{new[]{GridPosition.Up,GridPosition.Left,GridPosition.Up+GridPosition.Left},new[]{GridPosition.Up,GridPosition.Right,GridPosition.Up+GridPosition.Right},new[]{GridPosition.Down,GridPosition.Left,GridPosition.Down+GridPosition.Left},new[]{GridPosition.Down,GridPosition.Right,GridPosition.Down+GridPosition.Right},};}publicItemSequence<IUnityGridSlot>GetSequence(IGameBoard<IUnityGridSlot>gameBoard,GridPositiongridPosition){thrownewNotImplementedException();}}Then let's implement the GetSequence method.
publicItemSequence<IUnityGridSlot>GetSequence(IGameBoard<IUnityGridSlot>gameBoard,GridPositiongridPosition){varsampleGridSlot=gameBoard[gridPosition];varresultGridSlots=newList<IUnityGridSlot>(4);foreach(varlookupDirectionsin_squareLookupDirections){foreach(varlookupDirectioninlookupDirections){varlookupPosition=gridPosition+lookupDirection;if(gameBoard.IsPositionOnBoard(lookupPosition)==false){break;}varlookupGridSlot=gameBoard[lookupPosition];if(lookupGridSlot.HasItem==false){break;}if(lookupGridSlot.Item.ContentId==sampleGridSlot.Item.ContentId){resultGridSlots.Add(lookupGridSlot);}}if(resultGridSlots.Count==3){resultGridSlots.Add(sampleGridSlot);break;}resultGridSlots.Clear();}returnresultGridSlots.Count>0?newItemSequence<IUnityGridSlot>(GetType(),resultGridSlots):null;}Finally, add the SquareShapeDetector to the sequence detector list in the AppContext class.
publicclassAppContext:MonoBehaviour,IAppContext{
...privateISequenceDetector<IUnityGridSlot>[]GetSequenceDetectors(){returnnewISequenceDetector<IUnityGridSlot>[]{
...
new SquareShapeDetector()};}
...}Let's create a stone item that is only destroyed when a match happens in one of the neighbour tiles.
Add a Stone value to the TileGroup enum.
publicenumTileGroup{Unavailable=0,Available=1,Ice=2,Stone=3}Create a class StoneState and inherit from the StatefulGridTile.
publicclassStoneState:StatefulGridTile{privatebool_isLocked=true;privatebool_canContainItem;privateint_group=(int)TileGroup.Stone;// Defines the tile group id.publicoverrideintGroupId=>_group;// Prevents the block from move.publicoverrideboolIsLocked=>_isLocked;// Prevents the item creation.publicoverrideboolCanContainItem=>_canContainItem;// Occurs when all block states have completed.protectedoverridevoidOnComplete(){_isLocked=false;_canContainItem=true;_group=(int)TileGroup.Available;}// Occurs when the block state is reset.protectedoverridevoidOnReset(){_isLocked=true;_canContainItem=false;_group=(int)TileGroup.Stone;}}To respond to any changes in one of the neighbour tiles, we have to implement an ISpecialItemDetector<TGridSlot> interface. Create a StoneItemDetector class and inherit from the ISpecialItemDetector<TGridSlot>.
publicclassStoneItemDetector:ISpecialItemDetector<IUnityGridSlot>{privatereadonlyGridPosition[]_lookupDirections;publicStoneItemDetector(){_lookupDirections=new[]{GridPosition.Up,GridPosition.Down,GridPosition.Left,GridPosition.Right};}publicIEnumerable<IUnityGridSlot>GetSpecialItemGridSlots(IGameBoard<IUnityGridSlot>gameBoard,IUnityGridSlotgridSlot){if(gridSlot.IsMovable==false){yieldbreak;}foreach(varlookupDirectionin_lookupDirections){varlookupPosition=gridSlot.GridPosition+lookupDirection;if(gameBoard.IsPositionOnGrid(lookupPosition)==false){continue;}varlookupGridSlot=gameBoard[lookupPosition];if(lookupGridSlot.State.GroupId==(int)TileGroup.Stone){yieldreturnlookupGridSlot;}}}}Once the StoneItemDetector is implemented. Register it in the AppContext class.
publicclassAppContext:MonoBehaviour,IAppContext{
...privateISpecialItemDetector<IUnityGridSlot>[]GetSpecialItemDetectors(){returnnewISpecialItemDetector<IUnityGridSlot>[]{
...
new StoneItemDetector()};}
...}
Next, move on to setting up the scene and prefabs.
First of all, add a block state sprites to the TilesSpriteAtlas and create a StoneTilePrefab prefab varian from the StatefulBlankPrefab.
Prefab Variant Creation
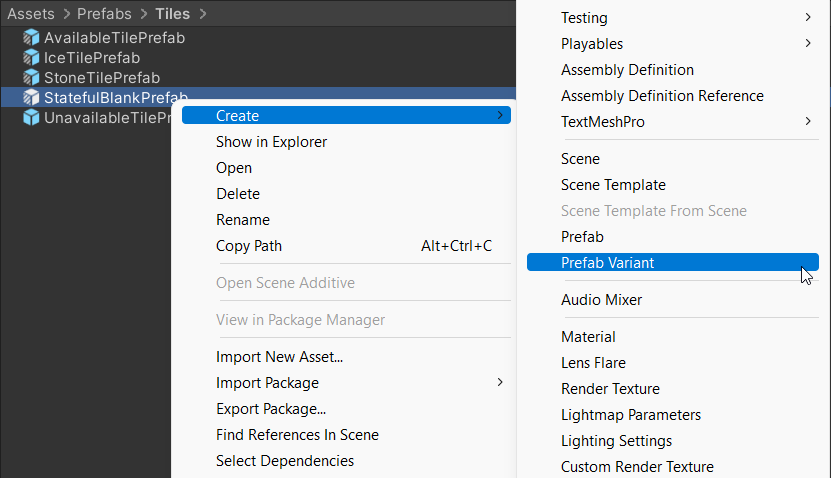
Configure the StoneTilePrefab by adding the StoneState script to it and filling in a State Sprite Names list.
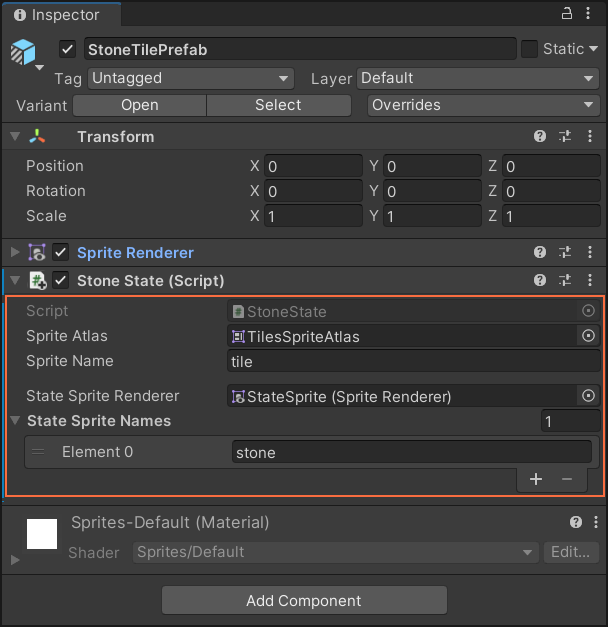
Note: You can create more than one visual state for a block by adding more state sprites.
Finally, select a GameBoard object in the scene and add the StoneTilePrefab to a GridTiles list of the UnityGameBoardRenderer script.
Video Demonstration
StoneBlockGameplay.mp4
You may contribute in several ways like creating new features, fixing bugs or improving documentation and examples.
Use discussions to have conversations and post answers without opening issues.
Discussions is a place to:
- Share ideas
- Ask questions
- Engage with other community members
If you find a bug in the source code, please create bug report.
Please browse existing issues to see whether a bug has previously been reported.
If you have an idea, or you're missing a capability that would make development easier, please submit feature request.
If a similar feature request already exists, don't forget to leave a "+1" or add additional information, such as your thoughts and vision about the feature.
Give a ⭐ if this project helped you!

Usage is provided under the MIT License.