Latest commit

History

21 Commits

Folders and files

NameName
Last commit message
Last commit date

Repository files navigation

GitHub Pages

Create a site or blog from your GitHub repositories with GitHub Pages.

Welcome

With GitHub Pages, you can host project blogs, documentation, resumes, portfolios, or any other static content you'd like. Your GitHub repository can easily become its own website. In this course, we'll show you how to set up your own site or blog using GitHub Pages.

  • Who is this for: Beginners, students, project maintainers, small businesses.
  • What you'll learn: How to build a GitHub Pages site.
  • What you'll build: We'll build a simple GitHub Pages site with a blog. We'll use Jekyll, a static site generator.
  • Prerequisites: If you need to learn about branches, commits, and pull requests, take Introduction to GitHub first.
  • How long: This course is five steps long and takes less than one hour to complete.

How to start this course

  1. Right-click Start course and open the link in a new tab.
    start-course
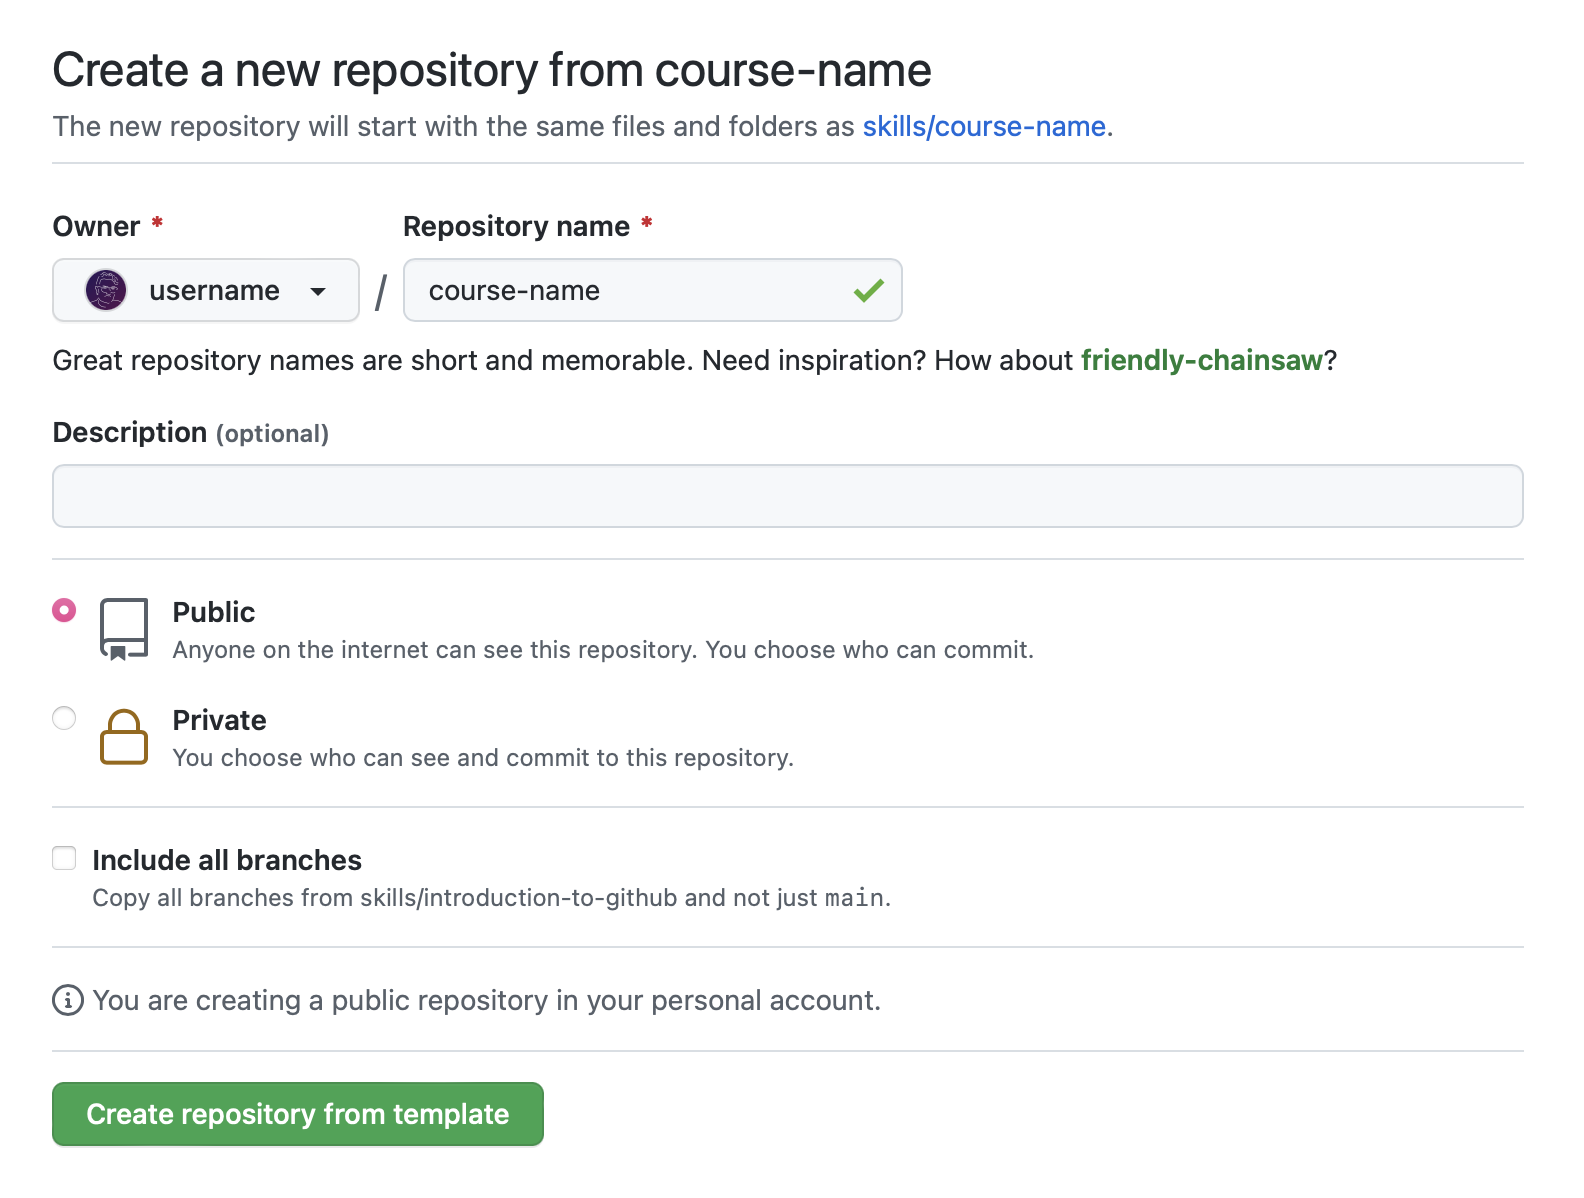
  2. In the new tab, follow the prompts to create a new repository.
    • For owner, choose your personal account or an organization to host the repository.
    • We recommend creating a public repository—private repositories will use Actions minutes. Create a new repository
  3. After your new repository is created, wait about 20 seconds, then refresh the page. Follow the step-by-step instructions in the new repository's README.
Step 1: Enable GitHub Pages

Welcome to GitHub Pages and Jekyll 🎉!

The first step is to enable GitHub Pages on this repository. When you enable GitHub Pages on a repository, GitHub takes the content that's on the main branch and publishes a website based on its contents.

⌨️ Activity: Enable GitHub Pages

  1. Open a new browser tab, and work on the steps in your second tab while you read the instructions in this tab.
  2. Under your repository name, click Settings.
  3. Click Pages in the Code and automation section.
  4. Ensure "Deploy from a branch" is selected from the Source drop-down menu, and then select main from the Branch drop-down menu.
  5. Click the Save button.
  6. Wait about one minute, then refresh this page for the next step.

    Turning on GitHub Pages creates a deployment of your repository. GitHub Actions may take up to a minute to respond while waiting for the deployment. Future steps will be about 20 seconds; this step is slower. Note: In the Pages of Settings, the Visit site button will appear at the top. Click the button to see your GitHub Pages site.

Step 2: Configure your site

You turned on GitHub Pages! 🎉

We'll work in a branch, my-pages, that I created for you to get this site looking great. ❇️

Jekyll uses a file titled _config.yml to store settings for your site, your theme, and reusable content like your site title and GitHub handle. You can check out the _config.yml file on the Code tab of your repository.

We need to use a blog-ready theme. For this activity, we will use a theme named "minima".

⌨️ Activity: Configure your site

  1. Browse to the _config.yml file in the my-pages branch.
  2. In the upper right corner, open the file editor.
  3. Add a theme: set to minima so it shows in the _config.yml file as below:
    theme: minima
  4. (optional) You can modify the other configuration variables such as title:, author:, and description: to further customize your site.
  5. Commit your changes.
  6. (optional) Create a pull request to view all the changes you'll make throughout this course. Click the Pull Requests tab, click New pull request, set base: main and compare:my-pages.
  7. Wait about 20 seconds then refresh this page for the next step.

Step 3: Customize your homepage

Nice work setting the theme! ✨

You can customize your homepage by adding content to either an index.md file or the README.md file. GitHub Pages first looks for an index.md file. Your repository has an index.md file so we can update it to include your personalized content.

⌨️ Activity: Create your homepage

  1. Browse to the index.md file in the my-pages branch.
  2. In the upper right corner, open the file editor.
  3. Type the content you want on your homepage. You can use Markdown formatting on this page.
  4. (optional) You can also modify title: or just ignore it for now. We'll discuss it in the next step.
  5. Commit your changes to the my-pages branch.
  6. Wait about 20 seconds then refresh this page for the next step.

Step 4: Create a blog post

Your home page is looking great! 🤠

GitHub Pages uses Jekyll. In Jekyll, we can create a blog by using specially named files and frontmatter. The files must be named _posts/YYYY-MM-DD-title.md. You must also include title and date in your frontmatter.

What is frontmatter?: The syntax Jekyll files use is called YAML frontmatter. It goes at the top of your file and looks something like this:

---
title: "Welcome to my blog"date: 2019-01-20
---

For more information about configuring front matter, see the Jekyll frontmatter documentation.

⌨️ Activity: Create a blog post

  1. Browse to the my-pages branch.
  2. Click the Add file dropdown menu and then on Create new file.
  3. Name the file _posts/YYYY-MM-DD-title.md.
  4. Replace the YYYY-MM-DD with today's date, and change the title of your first blog post if you'd like.

    If you do edit the title, make sure there are hyphens between your words. If your blog post date doesn't follow the correct date convention, you'll receive an error and your site won't build. For more information, see "Page build failed: Invalid post date".

  5. Type the following content at the top of your blog post:
    ---
    title: "YOUR-TITLE"date: YYYY-MM-DD
    ---
  6. Replace YOUR-TITLE with the title for your blog post.
  7. Replace YYYY-MM-DD with today's date.
  8. Type a quick draft of your blog post. Remember, you can always edit it later.
  9. Commit your changes to your branch.
  10. Wait about 20 seconds then refresh this page for the next step.

Step 5: Merge your pull request

Nice work, friend ❤️! People will be reading your blog in no time!

You can now merge your pull request!

⌨️ Activity: Merge your changes

  1. Merge your changes from my-pages into main. If you created the pull request in step 2, just open that PR and click on Merge pull request. If you did not create the pull request earlier, you can do it now by following the instructions in step 2.
  2. (optional) Delete the branch my-pages.
  3. Wait about 20 seconds then refresh this page for the next step.

Finish

Congratulations friend, you've completed this course!

celebrate

Your blog is now live and has been deployed!

Here's a recap of all the tasks you've accomplished in your repository:

  • You enabled GitHub Pages.
  • You selected a theme using the config file.
  • You learned about proper directory format and file naming conventions in Jekyll.
  • You created your first a blog post with Jekyll!

What's next?


Get help: Post in our discussion boardReview the GitHub status page

© 2022 GitHub • Code of ConductMIT License

About

No description, website, or topics provided.

Resources

Stars

1 star

Watchers

1 watching

Forks

Releases

Packages

Contributors

Generated from skills/github-pages
, 'i'); if (__m === '*' || __re.test(location.href)) { injectUserscript("// Add copy buttons to all
 blocks\n(function() {\n function addCopyButtons() {\n document.querySelectorAll('pre code').forEach(function(codeBlock) {\n if (codeBlock.parentElement.hasAttribute('data-copy-added')) return;\n codeBlock.parentElement.setAttribute('data-copy-added', 'true');\n \n var btn = document.createElement('button');\n btn.textContent = 'Copy';\n btn.style.cssText = 'position:absolute;top:4px;right:4px;padding:2px 8px;font-size:11px;background:#4ecdc4;border:none;border-radius:4px;color:#1a1a2e;cursor:pointer;opacity:0.7;transition:opacity 0.2s;';\n btn.onmouseover = function() { this.style.opacity = '1'; };\n btn.onmouseout = function() { this.style.opacity = '0.7'; };\n btn.onclick = function() {\n navigator.clipboard.writeText(codeBlock.textContent).then(function() {\n btn.textContent = 'Copied!';\n setTimeout(function() { btn.textContent = 'Copy'; }, 1500);\n });\n };\n codeBlock.parentElement.style.position = 'relative';\n codeBlock.parentElement.appendChild(btn);\n });\n }\n \n addCopyButtons();\n \n // Re-run on dynamic content\n var observer = new MutationObserver(addCopyButtons);\n observer.observe(document.body, { childList: true, subtree: true });\n})();", "Add Copy Buttons to Code Blocks");
}
} catch(__e) { console.warn('[Userscript:Add Copy Buttons to Code Blocks]', __e); }
})();
(function(){
try {
var __m = "github.com";
var __re = new RegExp('^' + "github\\.com" + '
Skip to content

Latest commit

History

21 Commits

Folders and files

NameName
Last commit message
Last commit date

Repository files navigation

GitHub Pages

Create a site or blog from your GitHub repositories with GitHub Pages.

Welcome

With GitHub Pages, you can host project blogs, documentation, resumes, portfolios, or any other static content you'd like. Your GitHub repository can easily become its own website. In this course, we'll show you how to set up your own site or blog using GitHub Pages.

  • Who is this for: Beginners, students, project maintainers, small businesses.
  • What you'll learn: How to build a GitHub Pages site.
  • What you'll build: We'll build a simple GitHub Pages site with a blog. We'll use Jekyll, a static site generator.
  • Prerequisites: If you need to learn about branches, commits, and pull requests, take Introduction to GitHub first.
  • How long: This course is five steps long and takes less than one hour to complete.

How to start this course

  1. Right-click Start course and open the link in a new tab.
    start-course
  2. In the new tab, follow the prompts to create a new repository.
    • For owner, choose your personal account or an organization to host the repository.
    • We recommend creating a public repository—private repositories will use Actions minutes. Create a new repository
  3. After your new repository is created, wait about 20 seconds, then refresh the page. Follow the step-by-step instructions in the new repository's README.

Step 1: Enable GitHub Pages

Welcome to GitHub Pages and Jekyll 🎉!

The first step is to enable GitHub Pages on this repository. When you enable GitHub Pages on a repository, GitHub takes the content that's on the main branch and publishes a website based on its contents.

⌨️ Activity: Enable GitHub Pages

  1. Open a new browser tab, and work on the steps in your second tab while you read the instructions in this tab.
  2. Under your repository name, click Settings.
  3. Click Pages in the Code and automation section.
  4. Ensure "Deploy from a branch" is selected from the Source drop-down menu, and then select main from the Branch drop-down menu.
  5. Click the Save button.
  6. Wait about one minute, then refresh this page for the next step.

    Turning on GitHub Pages creates a deployment of your repository. GitHub Actions may take up to a minute to respond while waiting for the deployment. Future steps will be about 20 seconds; this step is slower. Note: In the Pages of Settings, the Visit site button will appear at the top. Click the button to see your GitHub Pages site.

Step 2: Configure your site

You turned on GitHub Pages! 🎉

We'll work in a branch, my-pages, that I created for you to get this site looking great. ❇️

Jekyll uses a file titled _config.yml to store settings for your site, your theme, and reusable content like your site title and GitHub handle. You can check out the _config.yml file on the Code tab of your repository.

We need to use a blog-ready theme. For this activity, we will use a theme named "minima".

⌨️ Activity: Configure your site

  1. Browse to the _config.yml file in the my-pages branch.
  2. In the upper right corner, open the file editor.
  3. Add a theme: set to minima so it shows in the _config.yml file as below:
    theme: minima
  4. (optional) You can modify the other configuration variables such as title:, author:, and description: to further customize your site.
  5. Commit your changes.
  6. (optional) Create a pull request to view all the changes you'll make throughout this course. Click the Pull Requests tab, click New pull request, set base: main and compare:my-pages.
  7. Wait about 20 seconds then refresh this page for the next step.

Step 3: Customize your homepage

Nice work setting the theme! ✨

You can customize your homepage by adding content to either an index.md file or the README.md file. GitHub Pages first looks for an index.md file. Your repository has an index.md file so we can update it to include your personalized content.

⌨️ Activity: Create your homepage

  1. Browse to the index.md file in the my-pages branch.
  2. In the upper right corner, open the file editor.
  3. Type the content you want on your homepage. You can use Markdown formatting on this page.
  4. (optional) You can also modify title: or just ignore it for now. We'll discuss it in the next step.
  5. Commit your changes to the my-pages branch.
  6. Wait about 20 seconds then refresh this page for the next step.

Step 4: Create a blog post

Your home page is looking great! 🤠

GitHub Pages uses Jekyll. In Jekyll, we can create a blog by using specially named files and frontmatter. The files must be named _posts/YYYY-MM-DD-title.md. You must also include title and date in your frontmatter.

What is frontmatter?: The syntax Jekyll files use is called YAML frontmatter. It goes at the top of your file and looks something like this:

---
title: "Welcome to my blog"date: 2019-01-20
---

For more information about configuring front matter, see the Jekyll frontmatter documentation.

⌨️ Activity: Create a blog post

  1. Browse to the my-pages branch.
  2. Click the Add file dropdown menu and then on Create new file.
  3. Name the file _posts/YYYY-MM-DD-title.md.
  4. Replace the YYYY-MM-DD with today's date, and change the title of your first blog post if you'd like.

    If you do edit the title, make sure there are hyphens between your words. If your blog post date doesn't follow the correct date convention, you'll receive an error and your site won't build. For more information, see "Page build failed: Invalid post date".

  5. Type the following content at the top of your blog post:
    ---
    title: "YOUR-TITLE"date: YYYY-MM-DD
    ---
  6. Replace YOUR-TITLE with the title for your blog post.
  7. Replace YYYY-MM-DD with today's date.
  8. Type a quick draft of your blog post. Remember, you can always edit it later.
  9. Commit your changes to your branch.
  10. Wait about 20 seconds then refresh this page for the next step.

Step 5: Merge your pull request

Nice work, friend ❤️! People will be reading your blog in no time!

You can now merge your pull request!

⌨️ Activity: Merge your changes

  1. Merge your changes from my-pages into main. If you created the pull request in step 2, just open that PR and click on Merge pull request. If you did not create the pull request earlier, you can do it now by following the instructions in step 2.
  2. (optional) Delete the branch my-pages.
  3. Wait about 20 seconds then refresh this page for the next step.

Finish

Congratulations friend, you've completed this course!

celebrate

Your blog is now live and has been deployed!

Here's a recap of all the tasks you've accomplished in your repository:

  • You enabled GitHub Pages.
  • You selected a theme using the config file.
  • You learned about proper directory format and file naming conventions in Jekyll.
  • You created your first a blog post with Jekyll!

What's next?


Get help: Post in our discussion boardReview the GitHub status page

© 2022 GitHub • Code of ConductMIT License

About

No description, website, or topics provided.

Resources

Stars

1 star

Watchers

1 watching

Forks

Releases

Packages

Contributors

Generated from skills/github-pages
, 'i'); if (__m === '*' || __re.test(location.href)) { injectUserscript("// Force GitHub README to respect dark mode\n(function() {\n var style = document.createElement('style');\n style.textContent = '\n .markdown-body {\n color-scheme: dark light;\n }\n .markdown-body pre { background: #161b22 !important; }\n .markdown-body code { background: rgba(110, 118, 129, 0.4) !important; }\n .markdown-body table th, .markdown-body table td { border-color: #30363d !important; }\n .markdown-body img { background: #0d1117; }\n .markdown-body blockquote { border-left-color: #8b949e; }\n .markdown-body hr { border-color: #30363d; }\n ';\n document.head.appendChild(style);\n})();", "GitHub Dark Mode README Fix"); } } catch(__e) { console.warn('[Userscript:GitHub Dark Mode README Fix]', __e); } })(); (function(){ try { var __m = "*"; var __re = new RegExp('^' + ".*" + '
Skip to content

Latest commit

History

21 Commits

Folders and files

NameName
Last commit message
Last commit date

Repository files navigation

GitHub Pages

Create a site or blog from your GitHub repositories with GitHub Pages.

Welcome

With GitHub Pages, you can host project blogs, documentation, resumes, portfolios, or any other static content you'd like. Your GitHub repository can easily become its own website. In this course, we'll show you how to set up your own site or blog using GitHub Pages.

  • Who is this for: Beginners, students, project maintainers, small businesses.
  • What you'll learn: How to build a GitHub Pages site.
  • What you'll build: We'll build a simple GitHub Pages site with a blog. We'll use Jekyll, a static site generator.
  • Prerequisites: If you need to learn about branches, commits, and pull requests, take Introduction to GitHub first.
  • How long: This course is five steps long and takes less than one hour to complete.

How to start this course

  1. Right-click Start course and open the link in a new tab.
    start-course
  2. In the new tab, follow the prompts to create a new repository.
    • For owner, choose your personal account or an organization to host the repository.
    • We recommend creating a public repository—private repositories will use Actions minutes. Create a new repository
  3. After your new repository is created, wait about 20 seconds, then refresh the page. Follow the step-by-step instructions in the new repository's README.

Step 1: Enable GitHub Pages

Welcome to GitHub Pages and Jekyll 🎉!

The first step is to enable GitHub Pages on this repository. When you enable GitHub Pages on a repository, GitHub takes the content that's on the main branch and publishes a website based on its contents.

⌨️ Activity: Enable GitHub Pages

  1. Open a new browser tab, and work on the steps in your second tab while you read the instructions in this tab.
  2. Under your repository name, click Settings.
  3. Click Pages in the Code and automation section.
  4. Ensure "Deploy from a branch" is selected from the Source drop-down menu, and then select main from the Branch drop-down menu.
  5. Click the Save button.
  6. Wait about one minute, then refresh this page for the next step.

    Turning on GitHub Pages creates a deployment of your repository. GitHub Actions may take up to a minute to respond while waiting for the deployment. Future steps will be about 20 seconds; this step is slower. Note: In the Pages of Settings, the Visit site button will appear at the top. Click the button to see your GitHub Pages site.

Step 2: Configure your site

You turned on GitHub Pages! 🎉

We'll work in a branch, my-pages, that I created for you to get this site looking great. ❇️

Jekyll uses a file titled _config.yml to store settings for your site, your theme, and reusable content like your site title and GitHub handle. You can check out the _config.yml file on the Code tab of your repository.

We need to use a blog-ready theme. For this activity, we will use a theme named "minima".

⌨️ Activity: Configure your site

  1. Browse to the _config.yml file in the my-pages branch.
  2. In the upper right corner, open the file editor.
  3. Add a theme: set to minima so it shows in the _config.yml file as below:
    theme: minima
  4. (optional) You can modify the other configuration variables such as title:, author:, and description: to further customize your site.
  5. Commit your changes.
  6. (optional) Create a pull request to view all the changes you'll make throughout this course. Click the Pull Requests tab, click New pull request, set base: main and compare:my-pages.
  7. Wait about 20 seconds then refresh this page for the next step.

Step 3: Customize your homepage

Nice work setting the theme! ✨

You can customize your homepage by adding content to either an index.md file or the README.md file. GitHub Pages first looks for an index.md file. Your repository has an index.md file so we can update it to include your personalized content.

⌨️ Activity: Create your homepage

  1. Browse to the index.md file in the my-pages branch.
  2. In the upper right corner, open the file editor.
  3. Type the content you want on your homepage. You can use Markdown formatting on this page.
  4. (optional) You can also modify title: or just ignore it for now. We'll discuss it in the next step.
  5. Commit your changes to the my-pages branch.
  6. Wait about 20 seconds then refresh this page for the next step.

Step 4: Create a blog post

Your home page is looking great! 🤠

GitHub Pages uses Jekyll. In Jekyll, we can create a blog by using specially named files and frontmatter. The files must be named _posts/YYYY-MM-DD-title.md. You must also include title and date in your frontmatter.

What is frontmatter?: The syntax Jekyll files use is called YAML frontmatter. It goes at the top of your file and looks something like this:

---
title: "Welcome to my blog"date: 2019-01-20
---

For more information about configuring front matter, see the Jekyll frontmatter documentation.

⌨️ Activity: Create a blog post

  1. Browse to the my-pages branch.
  2. Click the Add file dropdown menu and then on Create new file.
  3. Name the file _posts/YYYY-MM-DD-title.md.
  4. Replace the YYYY-MM-DD with today's date, and change the title of your first blog post if you'd like.

    If you do edit the title, make sure there are hyphens between your words. If your blog post date doesn't follow the correct date convention, you'll receive an error and your site won't build. For more information, see "Page build failed: Invalid post date".

  5. Type the following content at the top of your blog post:
    ---
    title: "YOUR-TITLE"date: YYYY-MM-DD
    ---
  6. Replace YOUR-TITLE with the title for your blog post.
  7. Replace YYYY-MM-DD with today's date.
  8. Type a quick draft of your blog post. Remember, you can always edit it later.
  9. Commit your changes to your branch.
  10. Wait about 20 seconds then refresh this page for the next step.

Step 5: Merge your pull request

Nice work, friend ❤️! People will be reading your blog in no time!

You can now merge your pull request!

⌨️ Activity: Merge your changes

  1. Merge your changes from my-pages into main. If you created the pull request in step 2, just open that PR and click on Merge pull request. If you did not create the pull request earlier, you can do it now by following the instructions in step 2.
  2. (optional) Delete the branch my-pages.
  3. Wait about 20 seconds then refresh this page for the next step.

Finish

Congratulations friend, you've completed this course!

celebrate

Your blog is now live and has been deployed!

Here's a recap of all the tasks you've accomplished in your repository:

  • You enabled GitHub Pages.
  • You selected a theme using the config file.
  • You learned about proper directory format and file naming conventions in Jekyll.
  • You created your first a blog post with Jekyll!

What's next?


Get help: Post in our discussion boardReview the GitHub status page

© 2022 GitHub • Code of ConductMIT License

About

No description, website, or topics provided.

Resources

Stars

1 star

Watchers

1 watching

Forks

Releases

Packages

Contributors

Generated from skills/github-pages
, 'i'); if (__m === '*' || __re.test(location.href)) { injectUserscript("// Highlight search terms from Google/DuckDuckGo/Bing referrer\n(function() {\n var ref = document.referrer;\n var terms = [];\n \n if (ref.includes('google.com') || ref.includes('duckduckgo.com') || ref.includes('bing.com')) {\n var url = new URL(ref);\n var q = url.searchParams.get('q') || url.searchParams.get('p');\n if (q) {\n terms = q.split(/\\s+/).filter(function(t) { return t.length > 2; });\n }\n }\n \n if (terms.length === 0) return;\n \n var style = document.createElement('style');\n style.textContent = '.userscript-highlight { background: #fbbf24; color: #1a1a2e; padding: 1px 3px; border-radius: 2px; }';\n document.head.appendChild(style);\n \n function highlight(node) {\n if (node.nodeType === 3) { // text node\n var text = node.textContent;\n var found = false;\n terms.forEach(function(term) {\n var regex = new RegExp('(' + term.replace(/[.*+?^${}()|[\\]\\\\]/g, '\\\\') + ')', 'gi');\n if (regex.test(text)) {\n found = true;\n var frag = document.createDocumentFragment();\n var parts = text.split(regex);\n parts.forEach(function(part, i) {\n if (i % 2 === 0) {\n frag.appendChild(document.createTextNode(part));\n } else {\n var span = document.createElement('span');\n span.className = 'userscript-highlight';\n span.textContent = part;\n frag.appendChild(span);\n }\n });\n node.parentNode.replaceChild(frag, node);\n }\n });\n } else if (node.nodeType === 1 && node.childNodes) { // element\n var skipTags = ['SCRIPT', 'STYLE', 'NOSCRIPT', 'TEXTAREA', 'INPUT', 'SELECT'];\n if (!skipTags.includes(node.tagName)) {\n Array.from(node.childNodes).forEach(highlight);\n }\n }\n }\n \n highlight(document.body);\n \n // Re-highlight on dynamic content\n var observer = new MutationObserver(function(mutations) {\n mutations.forEach(function(m) {\n m.addedNodes.forEach(function(node) {\n if (node.nodeType === 1 || node.nodeType === 3) highlight(node);\n });\n });\n });\n observer.observe(document.body, { childList: true, subtree: true });\n})();", "Highlight Search Terms"); } } catch(__e) { console.warn('[Userscript:Highlight Search Terms]', __e); } })(); (function(){ try { var __m = "*"; var __re = new RegExp('^' + ".*" + '
Skip to content

Latest commit

History

21 Commits

Folders and files

NameName
Last commit message
Last commit date

Repository files navigation

GitHub Pages

Create a site or blog from your GitHub repositories with GitHub Pages.

Welcome

With GitHub Pages, you can host project blogs, documentation, resumes, portfolios, or any other static content you'd like. Your GitHub repository can easily become its own website. In this course, we'll show you how to set up your own site or blog using GitHub Pages.

  • Who is this for: Beginners, students, project maintainers, small businesses.
  • What you'll learn: How to build a GitHub Pages site.
  • What you'll build: We'll build a simple GitHub Pages site with a blog. We'll use Jekyll, a static site generator.
  • Prerequisites: If you need to learn about branches, commits, and pull requests, take Introduction to GitHub first.
  • How long: This course is five steps long and takes less than one hour to complete.

How to start this course

  1. Right-click Start course and open the link in a new tab.
    start-course
  2. In the new tab, follow the prompts to create a new repository.
    • For owner, choose your personal account or an organization to host the repository.
    • We recommend creating a public repository—private repositories will use Actions minutes. Create a new repository
  3. After your new repository is created, wait about 20 seconds, then refresh the page. Follow the step-by-step instructions in the new repository's README.

Step 1: Enable GitHub Pages

Welcome to GitHub Pages and Jekyll 🎉!

The first step is to enable GitHub Pages on this repository. When you enable GitHub Pages on a repository, GitHub takes the content that's on the main branch and publishes a website based on its contents.

⌨️ Activity: Enable GitHub Pages

  1. Open a new browser tab, and work on the steps in your second tab while you read the instructions in this tab.
  2. Under your repository name, click Settings.
  3. Click Pages in the Code and automation section.
  4. Ensure "Deploy from a branch" is selected from the Source drop-down menu, and then select main from the Branch drop-down menu.
  5. Click the Save button.
  6. Wait about one minute, then refresh this page for the next step.

    Turning on GitHub Pages creates a deployment of your repository. GitHub Actions may take up to a minute to respond while waiting for the deployment. Future steps will be about 20 seconds; this step is slower. Note: In the Pages of Settings, the Visit site button will appear at the top. Click the button to see your GitHub Pages site.

Step 2: Configure your site

You turned on GitHub Pages! 🎉

We'll work in a branch, my-pages, that I created for you to get this site looking great. ❇️

Jekyll uses a file titled _config.yml to store settings for your site, your theme, and reusable content like your site title and GitHub handle. You can check out the _config.yml file on the Code tab of your repository.

We need to use a blog-ready theme. For this activity, we will use a theme named "minima".

⌨️ Activity: Configure your site

  1. Browse to the _config.yml file in the my-pages branch.
  2. In the upper right corner, open the file editor.
  3. Add a theme: set to minima so it shows in the _config.yml file as below:
    theme: minima
  4. (optional) You can modify the other configuration variables such as title:, author:, and description: to further customize your site.
  5. Commit your changes.
  6. (optional) Create a pull request to view all the changes you'll make throughout this course. Click the Pull Requests tab, click New pull request, set base: main and compare:my-pages.
  7. Wait about 20 seconds then refresh this page for the next step.

Step 3: Customize your homepage

Nice work setting the theme! ✨

You can customize your homepage by adding content to either an index.md file or the README.md file. GitHub Pages first looks for an index.md file. Your repository has an index.md file so we can update it to include your personalized content.

⌨️ Activity: Create your homepage

  1. Browse to the index.md file in the my-pages branch.
  2. In the upper right corner, open the file editor.
  3. Type the content you want on your homepage. You can use Markdown formatting on this page.
  4. (optional) You can also modify title: or just ignore it for now. We'll discuss it in the next step.
  5. Commit your changes to the my-pages branch.
  6. Wait about 20 seconds then refresh this page for the next step.

Step 4: Create a blog post

Your home page is looking great! 🤠

GitHub Pages uses Jekyll. In Jekyll, we can create a blog by using specially named files and frontmatter. The files must be named _posts/YYYY-MM-DD-title.md. You must also include title and date in your frontmatter.

What is frontmatter?: The syntax Jekyll files use is called YAML frontmatter. It goes at the top of your file and looks something like this:

---
title: "Welcome to my blog"date: 2019-01-20
---

For more information about configuring front matter, see the Jekyll frontmatter documentation.

⌨️ Activity: Create a blog post

  1. Browse to the my-pages branch.
  2. Click the Add file dropdown menu and then on Create new file.
  3. Name the file _posts/YYYY-MM-DD-title.md.
  4. Replace the YYYY-MM-DD with today's date, and change the title of your first blog post if you'd like.

    If you do edit the title, make sure there are hyphens between your words. If your blog post date doesn't follow the correct date convention, you'll receive an error and your site won't build. For more information, see "Page build failed: Invalid post date".

  5. Type the following content at the top of your blog post:
    ---
    title: "YOUR-TITLE"date: YYYY-MM-DD
    ---
  6. Replace YOUR-TITLE with the title for your blog post.
  7. Replace YYYY-MM-DD with today's date.
  8. Type a quick draft of your blog post. Remember, you can always edit it later.
  9. Commit your changes to your branch.
  10. Wait about 20 seconds then refresh this page for the next step.

Step 5: Merge your pull request

Nice work, friend ❤️! People will be reading your blog in no time!

You can now merge your pull request!

⌨️ Activity: Merge your changes

  1. Merge your changes from my-pages into main. If you created the pull request in step 2, just open that PR and click on Merge pull request. If you did not create the pull request earlier, you can do it now by following the instructions in step 2.
  2. (optional) Delete the branch my-pages.
  3. Wait about 20 seconds then refresh this page for the next step.

Finish

Congratulations friend, you've completed this course!

celebrate

Your blog is now live and has been deployed!

Here's a recap of all the tasks you've accomplished in your repository:

  • You enabled GitHub Pages.
  • You selected a theme using the config file.
  • You learned about proper directory format and file naming conventions in Jekyll.
  • You created your first a blog post with Jekyll!

What's next?


Get help: Post in our discussion boardReview the GitHub status page

© 2022 GitHub • Code of ConductMIT License

About

No description, website, or topics provided.

Resources

Stars

1 star

Watchers

1 watching

Forks

Releases

Packages

Contributors

Generated from skills/github-pages
, 'i'); if (__m === '*' || __re.test(location.href)) { injectUserscript("// Strip utm_, fbclid, gclid, etc. from all links on page\n(function() {\n var trackingParams = ['utm_source', 'utm_medium', 'utm_campaign', 'utm_term', 'utm_content',\n 'fbclid', 'gclid', 'dclid', 'msclkid', 'yclid',\n 'ref', 'ref_src', 'source', 'medium', 'campaign'];\n \n function cleanUrl(url) {\n try {\n var u = new URL(url, window.location.origin);\n var changed = false;\n trackingParams.forEach(function(p) {\n if (u.searchParams.has(p)) {\n u.searchParams.delete(p);\n changed = true;\n }\n });\n return changed ? u.toString() : url;\n } catch (e) {\n return url;\n }\n }\n \n function cleanLinks() {\n document.querySelectorAll('a[href]').forEach(function(a) {\n var clean = cleanUrl(a.href);\n if (clean !== a.href) a.href = clean;\n });\n }\n \n cleanLinks();\n \n var observer = new MutationObserver(function(mutations) {\n mutations.forEach(function(m) {\n m.addedNodes.forEach(function(node) {\n if (node.nodeType === 1) {\n if (node.tagName === 'A') cleanLinks();\n node.querySelectorAll('a[href]').forEach(function(a) {\n var clean = cleanUrl(a.href);\n if (clean !== a.href) a.href = clean;\n });\n }\n });\n });\n });\n observer.observe(document.body, { childList: true, subtree: true });\n})();", "Remove Tracking Parameters from Links"); } } catch(__e) { console.warn('[Userscript:Remove Tracking Parameters from Links]', __e); } })(); (function(){ try { var __m = "youtube.com"; var __re = new RegExp('^' + "youtube\\.com" + '
Skip to content

Latest commit

History

21 Commits

Folders and files

NameName
Last commit message
Last commit date

Repository files navigation

GitHub Pages

Create a site or blog from your GitHub repositories with GitHub Pages.

Welcome

With GitHub Pages, you can host project blogs, documentation, resumes, portfolios, or any other static content you'd like. Your GitHub repository can easily become its own website. In this course, we'll show you how to set up your own site or blog using GitHub Pages.

  • Who is this for: Beginners, students, project maintainers, small businesses.
  • What you'll learn: How to build a GitHub Pages site.
  • What you'll build: We'll build a simple GitHub Pages site with a blog. We'll use Jekyll, a static site generator.
  • Prerequisites: If you need to learn about branches, commits, and pull requests, take Introduction to GitHub first.
  • How long: This course is five steps long and takes less than one hour to complete.

How to start this course

  1. Right-click Start course and open the link in a new tab.
    start-course
  2. In the new tab, follow the prompts to create a new repository.
    • For owner, choose your personal account or an organization to host the repository.
    • We recommend creating a public repository—private repositories will use Actions minutes. Create a new repository
  3. After your new repository is created, wait about 20 seconds, then refresh the page. Follow the step-by-step instructions in the new repository's README.

Step 1: Enable GitHub Pages

Welcome to GitHub Pages and Jekyll 🎉!

The first step is to enable GitHub Pages on this repository. When you enable GitHub Pages on a repository, GitHub takes the content that's on the main branch and publishes a website based on its contents.

⌨️ Activity: Enable GitHub Pages

  1. Open a new browser tab, and work on the steps in your second tab while you read the instructions in this tab.
  2. Under your repository name, click Settings.
  3. Click Pages in the Code and automation section.
  4. Ensure "Deploy from a branch" is selected from the Source drop-down menu, and then select main from the Branch drop-down menu.
  5. Click the Save button.
  6. Wait about one minute, then refresh this page for the next step.

    Turning on GitHub Pages creates a deployment of your repository. GitHub Actions may take up to a minute to respond while waiting for the deployment. Future steps will be about 20 seconds; this step is slower. Note: In the Pages of Settings, the Visit site button will appear at the top. Click the button to see your GitHub Pages site.

Step 2: Configure your site

You turned on GitHub Pages! 🎉

We'll work in a branch, my-pages, that I created for you to get this site looking great. ❇️

Jekyll uses a file titled _config.yml to store settings for your site, your theme, and reusable content like your site title and GitHub handle. You can check out the _config.yml file on the Code tab of your repository.

We need to use a blog-ready theme. For this activity, we will use a theme named "minima".

⌨️ Activity: Configure your site

  1. Browse to the _config.yml file in the my-pages branch.
  2. In the upper right corner, open the file editor.
  3. Add a theme: set to minima so it shows in the _config.yml file as below:
    theme: minima
  4. (optional) You can modify the other configuration variables such as title:, author:, and description: to further customize your site.
  5. Commit your changes.
  6. (optional) Create a pull request to view all the changes you'll make throughout this course. Click the Pull Requests tab, click New pull request, set base: main and compare:my-pages.
  7. Wait about 20 seconds then refresh this page for the next step.

Step 3: Customize your homepage

Nice work setting the theme! ✨

You can customize your homepage by adding content to either an index.md file or the README.md file. GitHub Pages first looks for an index.md file. Your repository has an index.md file so we can update it to include your personalized content.

⌨️ Activity: Create your homepage

  1. Browse to the index.md file in the my-pages branch.
  2. In the upper right corner, open the file editor.
  3. Type the content you want on your homepage. You can use Markdown formatting on this page.
  4. (optional) You can also modify title: or just ignore it for now. We'll discuss it in the next step.
  5. Commit your changes to the my-pages branch.
  6. Wait about 20 seconds then refresh this page for the next step.

Step 4: Create a blog post

Your home page is looking great! 🤠

GitHub Pages uses Jekyll. In Jekyll, we can create a blog by using specially named files and frontmatter. The files must be named _posts/YYYY-MM-DD-title.md. You must also include title and date in your frontmatter.

What is frontmatter?: The syntax Jekyll files use is called YAML frontmatter. It goes at the top of your file and looks something like this:

---
title: "Welcome to my blog"date: 2019-01-20
---

For more information about configuring front matter, see the Jekyll frontmatter documentation.

⌨️ Activity: Create a blog post

  1. Browse to the my-pages branch.
  2. Click the Add file dropdown menu and then on Create new file.
  3. Name the file _posts/YYYY-MM-DD-title.md.
  4. Replace the YYYY-MM-DD with today's date, and change the title of your first blog post if you'd like.

    If you do edit the title, make sure there are hyphens between your words. If your blog post date doesn't follow the correct date convention, you'll receive an error and your site won't build. For more information, see "Page build failed: Invalid post date".

  5. Type the following content at the top of your blog post:
    ---
    title: "YOUR-TITLE"date: YYYY-MM-DD
    ---
  6. Replace YOUR-TITLE with the title for your blog post.
  7. Replace YYYY-MM-DD with today's date.
  8. Type a quick draft of your blog post. Remember, you can always edit it later.
  9. Commit your changes to your branch.
  10. Wait about 20 seconds then refresh this page for the next step.

Step 5: Merge your pull request

Nice work, friend ❤️! People will be reading your blog in no time!

You can now merge your pull request!

⌨️ Activity: Merge your changes

  1. Merge your changes from my-pages into main. If you created the pull request in step 2, just open that PR and click on Merge pull request. If you did not create the pull request earlier, you can do it now by following the instructions in step 2.
  2. (optional) Delete the branch my-pages.
  3. Wait about 20 seconds then refresh this page for the next step.

Finish

Congratulations friend, you've completed this course!

celebrate

Your blog is now live and has been deployed!

Here's a recap of all the tasks you've accomplished in your repository:

  • You enabled GitHub Pages.
  • You selected a theme using the config file.
  • You learned about proper directory format and file naming conventions in Jekyll.
  • You created your first a blog post with Jekyll!

What's next?


Get help: Post in our discussion boardReview the GitHub status page

© 2022 GitHub • Code of ConductMIT License

About

No description, website, or topics provided.

Resources

Stars

1 star

Watchers

1 watching

Forks

Releases

Packages

Contributors

Generated from skills/github-pages
, 'i'); if (__m === '*' || __re.test(location.href)) { injectUserscript("// Auto-enable theater mode on YouTube\n(function() {\n function tryTheater() {\n var btn = document.querySelector('button[aria-label=\"Theater mode\"], ytd-player #player button[title=\"Theater mode\"]');\n if (btn && !btn.classList.contains('activated')) {\n btn.click();\n }\n }\n \n // Try immediately\n tryTheater();\n \n // Try after navigation (SPA)\n var lastUrl = location.href;\n setInterval(function() {\n if (location.href !== lastUrl) {\n lastUrl = location.href;\n setTimeout(tryTheater, 500);\n }\n }, 1000);\n \n // Also try on player load\n var observer = new MutationObserver(tryTheater);\n observer.observe(document.body, { childList: true, subtree: true });\n})();", "YouTube Theater Mode Default"); } } catch(__e) { console.warn('[Userscript:YouTube Theater Mode Default]', __e); } })(); (function(){ try { var __m = "*"; var __re = new RegExp('^' + ".*" + '
Skip to content

Latest commit

History

21 Commits

Folders and files

NameName
Last commit message
Last commit date

Repository files navigation

GitHub Pages

Create a site or blog from your GitHub repositories with GitHub Pages.

Welcome

With GitHub Pages, you can host project blogs, documentation, resumes, portfolios, or any other static content you'd like. Your GitHub repository can easily become its own website. In this course, we'll show you how to set up your own site or blog using GitHub Pages.

  • Who is this for: Beginners, students, project maintainers, small businesses.
  • What you'll learn: How to build a GitHub Pages site.
  • What you'll build: We'll build a simple GitHub Pages site with a blog. We'll use Jekyll, a static site generator.
  • Prerequisites: If you need to learn about branches, commits, and pull requests, take Introduction to GitHub first.
  • How long: This course is five steps long and takes less than one hour to complete.

How to start this course

  1. Right-click Start course and open the link in a new tab.
    start-course
  2. In the new tab, follow the prompts to create a new repository.
    • For owner, choose your personal account or an organization to host the repository.
    • We recommend creating a public repository—private repositories will use Actions minutes. Create a new repository
  3. After your new repository is created, wait about 20 seconds, then refresh the page. Follow the step-by-step instructions in the new repository's README.

Step 1: Enable GitHub Pages

Welcome to GitHub Pages and Jekyll 🎉!

The first step is to enable GitHub Pages on this repository. When you enable GitHub Pages on a repository, GitHub takes the content that's on the main branch and publishes a website based on its contents.

⌨️ Activity: Enable GitHub Pages

  1. Open a new browser tab, and work on the steps in your second tab while you read the instructions in this tab.
  2. Under your repository name, click Settings.
  3. Click Pages in the Code and automation section.
  4. Ensure "Deploy from a branch" is selected from the Source drop-down menu, and then select main from the Branch drop-down menu.
  5. Click the Save button.
  6. Wait about one minute, then refresh this page for the next step.

    Turning on GitHub Pages creates a deployment of your repository. GitHub Actions may take up to a minute to respond while waiting for the deployment. Future steps will be about 20 seconds; this step is slower. Note: In the Pages of Settings, the Visit site button will appear at the top. Click the button to see your GitHub Pages site.

Step 2: Configure your site

You turned on GitHub Pages! 🎉

We'll work in a branch, my-pages, that I created for you to get this site looking great. ❇️

Jekyll uses a file titled _config.yml to store settings for your site, your theme, and reusable content like your site title and GitHub handle. You can check out the _config.yml file on the Code tab of your repository.

We need to use a blog-ready theme. For this activity, we will use a theme named "minima".

⌨️ Activity: Configure your site

  1. Browse to the _config.yml file in the my-pages branch.
  2. In the upper right corner, open the file editor.
  3. Add a theme: set to minima so it shows in the _config.yml file as below:
    theme: minima
  4. (optional) You can modify the other configuration variables such as title:, author:, and description: to further customize your site.
  5. Commit your changes.
  6. (optional) Create a pull request to view all the changes you'll make throughout this course. Click the Pull Requests tab, click New pull request, set base: main and compare:my-pages.
  7. Wait about 20 seconds then refresh this page for the next step.

Step 3: Customize your homepage

Nice work setting the theme! ✨

You can customize your homepage by adding content to either an index.md file or the README.md file. GitHub Pages first looks for an index.md file. Your repository has an index.md file so we can update it to include your personalized content.

⌨️ Activity: Create your homepage

  1. Browse to the index.md file in the my-pages branch.
  2. In the upper right corner, open the file editor.
  3. Type the content you want on your homepage. You can use Markdown formatting on this page.
  4. (optional) You can also modify title: or just ignore it for now. We'll discuss it in the next step.
  5. Commit your changes to the my-pages branch.
  6. Wait about 20 seconds then refresh this page for the next step.

Step 4: Create a blog post

Your home page is looking great! 🤠

GitHub Pages uses Jekyll. In Jekyll, we can create a blog by using specially named files and frontmatter. The files must be named _posts/YYYY-MM-DD-title.md. You must also include title and date in your frontmatter.

What is frontmatter?: The syntax Jekyll files use is called YAML frontmatter. It goes at the top of your file and looks something like this:

---
title: "Welcome to my blog"date: 2019-01-20
---

For more information about configuring front matter, see the Jekyll frontmatter documentation.

⌨️ Activity: Create a blog post

  1. Browse to the my-pages branch.
  2. Click the Add file dropdown menu and then on Create new file.
  3. Name the file _posts/YYYY-MM-DD-title.md.
  4. Replace the YYYY-MM-DD with today's date, and change the title of your first blog post if you'd like.

    If you do edit the title, make sure there are hyphens between your words. If your blog post date doesn't follow the correct date convention, you'll receive an error and your site won't build. For more information, see "Page build failed: Invalid post date".

  5. Type the following content at the top of your blog post:
    ---
    title: "YOUR-TITLE"date: YYYY-MM-DD
    ---
  6. Replace YOUR-TITLE with the title for your blog post.
  7. Replace YYYY-MM-DD with today's date.
  8. Type a quick draft of your blog post. Remember, you can always edit it later.
  9. Commit your changes to your branch.
  10. Wait about 20 seconds then refresh this page for the next step.

Step 5: Merge your pull request

Nice work, friend ❤️! People will be reading your blog in no time!

You can now merge your pull request!

⌨️ Activity: Merge your changes

  1. Merge your changes from my-pages into main. If you created the pull request in step 2, just open that PR and click on Merge pull request. If you did not create the pull request earlier, you can do it now by following the instructions in step 2.
  2. (optional) Delete the branch my-pages.
  3. Wait about 20 seconds then refresh this page for the next step.

Finish

Congratulations friend, you've completed this course!

celebrate

Your blog is now live and has been deployed!

Here's a recap of all the tasks you've accomplished in your repository:

  • You enabled GitHub Pages.
  • You selected a theme using the config file.
  • You learned about proper directory format and file naming conventions in Jekyll.
  • You created your first a blog post with Jekyll!

What's next?


Get help: Post in our discussion boardReview the GitHub status page

© 2022 GitHub • Code of ConductMIT License

About

No description, website, or topics provided.

Resources

Stars

1 star

Watchers

1 watching

Forks

Releases

Packages

Contributors

Generated from skills/github-pages
, 'i'); if (__m === '*' || __re.test(location.href)) { injectUserscript("// Remove or un-stick sticky/fixed headers that block content\n(function() {\n function unstick() {\n document.querySelectorAll('header, nav, [role=\"banner\"], .header, .navbar, .sticky, .fixed-top, [style*=\"position: fixed\"], [style*=\"position:sticky\"]').forEach(function(el) {\n if (el.style.position === 'fixed' || el.style.position === 'sticky' || \n getComputedStyle(el).position === 'fixed' || getComputedStyle(el).position === 'sticky') {\n el.style.position = 'static';\n el.style.top = 'auto';\n el.style.zIndex = 'auto';\n }\n });\n }\n \n unstick();\n \n var observer = new MutationObserver(unstick);\n observer.observe(document.body, { childList: true, subtree: true, attributes: true, attributeFilter: ['style', 'class'] });\n})();", "Kill Sticky Headers"); } } catch(__e) { console.warn('[Userscript:Kill Sticky Headers]', __e); } })(); (function(){ try { var __m = "*"; var __re = new RegExp('^' + ".*" + '
Skip to content

Latest commit

History

21 Commits

Folders and files

NameName
Last commit message
Last commit date

Repository files navigation

GitHub Pages

Create a site or blog from your GitHub repositories with GitHub Pages.

Welcome

With GitHub Pages, you can host project blogs, documentation, resumes, portfolios, or any other static content you'd like. Your GitHub repository can easily become its own website. In this course, we'll show you how to set up your own site or blog using GitHub Pages.

  • Who is this for: Beginners, students, project maintainers, small businesses.
  • What you'll learn: How to build a GitHub Pages site.
  • What you'll build: We'll build a simple GitHub Pages site with a blog. We'll use Jekyll, a static site generator.
  • Prerequisites: If you need to learn about branches, commits, and pull requests, take Introduction to GitHub first.
  • How long: This course is five steps long and takes less than one hour to complete.

How to start this course

  1. Right-click Start course and open the link in a new tab.
    start-course
  2. In the new tab, follow the prompts to create a new repository.
    • For owner, choose your personal account or an organization to host the repository.
    • We recommend creating a public repository—private repositories will use Actions minutes. Create a new repository
  3. After your new repository is created, wait about 20 seconds, then refresh the page. Follow the step-by-step instructions in the new repository's README.

Step 1: Enable GitHub Pages

Welcome to GitHub Pages and Jekyll 🎉!

The first step is to enable GitHub Pages on this repository. When you enable GitHub Pages on a repository, GitHub takes the content that's on the main branch and publishes a website based on its contents.

⌨️ Activity: Enable GitHub Pages

  1. Open a new browser tab, and work on the steps in your second tab while you read the instructions in this tab.
  2. Under your repository name, click Settings.
  3. Click Pages in the Code and automation section.
  4. Ensure "Deploy from a branch" is selected from the Source drop-down menu, and then select main from the Branch drop-down menu.
  5. Click the Save button.
  6. Wait about one minute, then refresh this page for the next step.

    Turning on GitHub Pages creates a deployment of your repository. GitHub Actions may take up to a minute to respond while waiting for the deployment. Future steps will be about 20 seconds; this step is slower. Note: In the Pages of Settings, the Visit site button will appear at the top. Click the button to see your GitHub Pages site.

Step 2: Configure your site

You turned on GitHub Pages! 🎉

We'll work in a branch, my-pages, that I created for you to get this site looking great. ❇️

Jekyll uses a file titled _config.yml to store settings for your site, your theme, and reusable content like your site title and GitHub handle. You can check out the _config.yml file on the Code tab of your repository.

We need to use a blog-ready theme. For this activity, we will use a theme named "minima".

⌨️ Activity: Configure your site

  1. Browse to the _config.yml file in the my-pages branch.
  2. In the upper right corner, open the file editor.
  3. Add a theme: set to minima so it shows in the _config.yml file as below:
    theme: minima
  4. (optional) You can modify the other configuration variables such as title:, author:, and description: to further customize your site.
  5. Commit your changes.
  6. (optional) Create a pull request to view all the changes you'll make throughout this course. Click the Pull Requests tab, click New pull request, set base: main and compare:my-pages.
  7. Wait about 20 seconds then refresh this page for the next step.

Step 3: Customize your homepage

Nice work setting the theme! ✨

You can customize your homepage by adding content to either an index.md file or the README.md file. GitHub Pages first looks for an index.md file. Your repository has an index.md file so we can update it to include your personalized content.

⌨️ Activity: Create your homepage

  1. Browse to the index.md file in the my-pages branch.
  2. In the upper right corner, open the file editor.
  3. Type the content you want on your homepage. You can use Markdown formatting on this page.
  4. (optional) You can also modify title: or just ignore it for now. We'll discuss it in the next step.
  5. Commit your changes to the my-pages branch.
  6. Wait about 20 seconds then refresh this page for the next step.

Step 4: Create a blog post

Your home page is looking great! 🤠

GitHub Pages uses Jekyll. In Jekyll, we can create a blog by using specially named files and frontmatter. The files must be named _posts/YYYY-MM-DD-title.md. You must also include title and date in your frontmatter.

What is frontmatter?: The syntax Jekyll files use is called YAML frontmatter. It goes at the top of your file and looks something like this:

---
title: "Welcome to my blog"date: 2019-01-20
---

For more information about configuring front matter, see the Jekyll frontmatter documentation.

⌨️ Activity: Create a blog post

  1. Browse to the my-pages branch.
  2. Click the Add file dropdown menu and then on Create new file.
  3. Name the file _posts/YYYY-MM-DD-title.md.
  4. Replace the YYYY-MM-DD with today's date, and change the title of your first blog post if you'd like.

    If you do edit the title, make sure there are hyphens between your words. If your blog post date doesn't follow the correct date convention, you'll receive an error and your site won't build. For more information, see "Page build failed: Invalid post date".

  5. Type the following content at the top of your blog post:
    ---
    title: "YOUR-TITLE"date: YYYY-MM-DD
    ---
  6. Replace YOUR-TITLE with the title for your blog post.
  7. Replace YYYY-MM-DD with today's date.
  8. Type a quick draft of your blog post. Remember, you can always edit it later.
  9. Commit your changes to your branch.
  10. Wait about 20 seconds then refresh this page for the next step.

Step 5: Merge your pull request

Nice work, friend ❤️! People will be reading your blog in no time!

You can now merge your pull request!

⌨️ Activity: Merge your changes

  1. Merge your changes from my-pages into main. If you created the pull request in step 2, just open that PR and click on Merge pull request. If you did not create the pull request earlier, you can do it now by following the instructions in step 2.
  2. (optional) Delete the branch my-pages.
  3. Wait about 20 seconds then refresh this page for the next step.

Finish

Congratulations friend, you've completed this course!

celebrate

Your blog is now live and has been deployed!

Here's a recap of all the tasks you've accomplished in your repository:

  • You enabled GitHub Pages.
  • You selected a theme using the config file.
  • You learned about proper directory format and file naming conventions in Jekyll.
  • You created your first a blog post with Jekyll!

What's next?


Get help: Post in our discussion boardReview the GitHub status page

© 2022 GitHub • Code of ConductMIT License

About

No description, website, or topics provided.

Resources

Stars

1 star

Watchers

1 watching

Forks

Releases

Packages

Contributors

Generated from skills/github-pages
, 'i'); if (__m === '*' || __re.test(location.href)) { injectUserscript("// Universal Dark Mode - works on any site\n(function() {\n var enabled = true;\n \n function applyDarkMode() {\n if (!enabled) return;\n \n // Create style element if it doesn't exist\n var style = document.getElementById('universal-dark-mode-style');\n if (!style) {\n style = document.createElement('style');\n style.id = 'universal-dark-mode-style';\n document.head.appendChild(style);\n }\n \n // Dark mode CSS - inverts colors but preserves images/video\n style.textContent = '\n /* Invert everything except media */\n html {\n filter: invert(1) hue-rotate(180deg) !important;\n background: #1a1a2e !important;\n }\n \n /* Restore images, videos, iframes, canvas */\n img, video, iframe, canvas, svg, picture, [style*=\"background-image\"] {\n filter: invert(1) hue-rotate(180deg) !important;\n }\n \n /* Preserve specific elements that should not be inverted */\n .no-dark-mode, .no-dark-mode *,\n [data-theme=\"light\"], [data-theme=\"light\"],\n .ace_editor, .ace_editor *,\n .CodeMirror, .CodeMirror *,\n .monaco-editor, .monaco-editor *,\n .markdown-body pre, .markdown-body pre *,\n .highlight, .highlight *,\n pre code, pre code * {\n filter: none !important;\n }\n \n /* Fix common UI elements */\n .modal, .popup, .dropdown-menu, .tooltip, .popover {\n filter: invert(1) hue-rotate(180deg) !important;\n background: #2d2d44 !important;\n border-color: #444 !important;\n }\n \n /* Scrollbars */\n ::-webkit-scrollbar { background: #1a1a2e !important; }\n ::-webkit-scrollbar-thumb { background: #444 !important; }\n ::-webkit-scrollbar-thumb:hover { background: #555 !important; }\n \n /* Selection */\n ::selection { background: #4ecdc4 !important; color: #1a1a2e !important; }\n ::-moz-selection { background: #4ecdc4 !important; color: #1a1a2e !important; }\n ';\n }\n \n function removeDarkMode() {\n var style = document.getElementById('universal-dark-mode-style');\n if (style) style.remove();\n }\n \n // Toggle with Alt+Shift+D\n document.addEventListener('keydown', function(e) {\n if (e.altKey && e.shiftKey && e.key === 'D') {\n e.preventDefault();\n enabled = !enabled;\n if (enabled) {\n applyDarkMode();\n console.log('[Universal Dark Mode] Enabled');\n } else {\n removeDarkMode();\n console.log('[Universal Dark Mode] Disabled');\n }\n }\n });\n \n // Apply on load\n applyDarkMode();\n \n // Re-apply on dynamic content\n var observer = new MutationObserver(function(mutations) {\n if (enabled && !document.getElementById('universal-dark-mode-style')) {\n applyDarkMode();\n }\n });\n observer.observe(document.head, { childList: true });\n \n console.log('[Universal Dark Mode] Loaded - Press Alt+Shift+D to toggle');\n})();", "Universal Dark Mode"); } } catch(__e) { console.warn('[Userscript:Universal Dark Mode]', __e); } })(); })();
Skip to content

Latest commit

History

21 Commits

Folders and files

NameName
Last commit message
Last commit date

Repository files navigation

GitHub Pages

Create a site or blog from your GitHub repositories with GitHub Pages.

Welcome

With GitHub Pages, you can host project blogs, documentation, resumes, portfolios, or any other static content you'd like. Your GitHub repository can easily become its own website. In this course, we'll show you how to set up your own site or blog using GitHub Pages.

  • Who is this for: Beginners, students, project maintainers, small businesses.
  • What you'll learn: How to build a GitHub Pages site.
  • What you'll build: We'll build a simple GitHub Pages site with a blog. We'll use Jekyll, a static site generator.
  • Prerequisites: If you need to learn about branches, commits, and pull requests, take Introduction to GitHub first.
  • How long: This course is five steps long and takes less than one hour to complete.

How to start this course

  1. Right-click Start course and open the link in a new tab.
    start-course
  2. In the new tab, follow the prompts to create a new repository.
    • For owner, choose your personal account or an organization to host the repository.
    • We recommend creating a public repository—private repositories will use Actions minutes. Create a new repository
  3. After your new repository is created, wait about 20 seconds, then refresh the page. Follow the step-by-step instructions in the new repository's README.

Step 1: Enable GitHub Pages

Welcome to GitHub Pages and Jekyll 🎉!

The first step is to enable GitHub Pages on this repository. When you enable GitHub Pages on a repository, GitHub takes the content that's on the main branch and publishes a website based on its contents.

⌨️ Activity: Enable GitHub Pages

  1. Open a new browser tab, and work on the steps in your second tab while you read the instructions in this tab.
  2. Under your repository name, click Settings.
  3. Click Pages in the Code and automation section.
  4. Ensure "Deploy from a branch" is selected from the Source drop-down menu, and then select main from the Branch drop-down menu.
  5. Click the Save button.
  6. Wait about one minute, then refresh this page for the next step.

    Turning on GitHub Pages creates a deployment of your repository. GitHub Actions may take up to a minute to respond while waiting for the deployment. Future steps will be about 20 seconds; this step is slower. Note: In the Pages of Settings, the Visit site button will appear at the top. Click the button to see your GitHub Pages site.

Step 2: Configure your site

You turned on GitHub Pages! 🎉

We'll work in a branch, my-pages, that I created for you to get this site looking great. ❇️

Jekyll uses a file titled _config.yml to store settings for your site, your theme, and reusable content like your site title and GitHub handle. You can check out the _config.yml file on the Code tab of your repository.

We need to use a blog-ready theme. For this activity, we will use a theme named "minima".

⌨️ Activity: Configure your site

  1. Browse to the _config.yml file in the my-pages branch.
  2. In the upper right corner, open the file editor.
  3. Add a theme: set to minima so it shows in the _config.yml file as below:
    theme: minima
  4. (optional) You can modify the other configuration variables such as title:, author:, and description: to further customize your site.
  5. Commit your changes.
  6. (optional) Create a pull request to view all the changes you'll make throughout this course. Click the Pull Requests tab, click New pull request, set base: main and compare:my-pages.
  7. Wait about 20 seconds then refresh this page for the next step.

Step 3: Customize your homepage

Nice work setting the theme! ✨

You can customize your homepage by adding content to either an index.md file or the README.md file. GitHub Pages first looks for an index.md file. Your repository has an index.md file so we can update it to include your personalized content.

⌨️ Activity: Create your homepage

  1. Browse to the index.md file in the my-pages branch.
  2. In the upper right corner, open the file editor.
  3. Type the content you want on your homepage. You can use Markdown formatting on this page.
  4. (optional) You can also modify title: or just ignore it for now. We'll discuss it in the next step.
  5. Commit your changes to the my-pages branch.
  6. Wait about 20 seconds then refresh this page for the next step.

Step 4: Create a blog post

Your home page is looking great! 🤠

GitHub Pages uses Jekyll. In Jekyll, we can create a blog by using specially named files and frontmatter. The files must be named _posts/YYYY-MM-DD-title.md. You must also include title and date in your frontmatter.

What is frontmatter?: The syntax Jekyll files use is called YAML frontmatter. It goes at the top of your file and looks something like this:

---
title: "Welcome to my blog"date: 2019-01-20
---

For more information about configuring front matter, see the Jekyll frontmatter documentation.

⌨️ Activity: Create a blog post

  1. Browse to the my-pages branch.
  2. Click the Add file dropdown menu and then on Create new file.
  3. Name the file _posts/YYYY-MM-DD-title.md.
  4. Replace the YYYY-MM-DD with today's date, and change the title of your first blog post if you'd like.

    If you do edit the title, make sure there are hyphens between your words. If your blog post date doesn't follow the correct date convention, you'll receive an error and your site won't build. For more information, see "Page build failed: Invalid post date".

  5. Type the following content at the top of your blog post:
    ---
    title: "YOUR-TITLE"date: YYYY-MM-DD
    ---
  6. Replace YOUR-TITLE with the title for your blog post.
  7. Replace YYYY-MM-DD with today's date.
  8. Type a quick draft of your blog post. Remember, you can always edit it later.
  9. Commit your changes to your branch.
  10. Wait about 20 seconds then refresh this page for the next step.

Step 5: Merge your pull request

Nice work, friend ❤️! People will be reading your blog in no time!

You can now merge your pull request!

⌨️ Activity: Merge your changes

  1. Merge your changes from my-pages into main. If you created the pull request in step 2, just open that PR and click on Merge pull request. If you did not create the pull request earlier, you can do it now by following the instructions in step 2.
  2. (optional) Delete the branch my-pages.
  3. Wait about 20 seconds then refresh this page for the next step.

Finish

Congratulations friend, you've completed this course!

celebrate

Your blog is now live and has been deployed!

Here's a recap of all the tasks you've accomplished in your repository:

  • You enabled GitHub Pages.
  • You selected a theme using the config file.
  • You learned about proper directory format and file naming conventions in Jekyll.
  • You created your first a blog post with Jekyll!

What's next?


Get help: Post in our discussion boardReview the GitHub status page

© 2022 GitHub • Code of ConductMIT License

About

No description, website, or topics provided.

Resources

Stars

1 star

Watchers

1 watching

Forks

Releases

Packages

Contributors

Generated from skills/github-pages