Skip to content

Latest commit

History

300 Commits

Folders and files

NameName
Last commit message
Last commit date

Repository files navigation

CapiBridge

🤗 Please consider subscribing to my YouTube channel. Your subscription goes a long way toward supporting my work. If you would like to contribute even more, you can also buy me a coffee.

Shop | YouTube


CapiBridge is an open-source Two-Way gateway for low-power devices. It supports various communication technologies, including LoRa, ESP-NOW, and WiFi. The gateway receives JSON strings from LoRa and ESP-NOW Sensors or DIY devices and publishes them to an MQTT server. It automatically separates the JSON string into dynamic MQTT topics based on keys within the JSON, such as "b" for battery or "m" for motion, making it highly compatible with Home Assistant. This gateway simplifies adding new DIY nodes/sensors to your smart home by standardizing the communication protocol across all your DIY projects, focusing on simplicity and unified protocol handling.
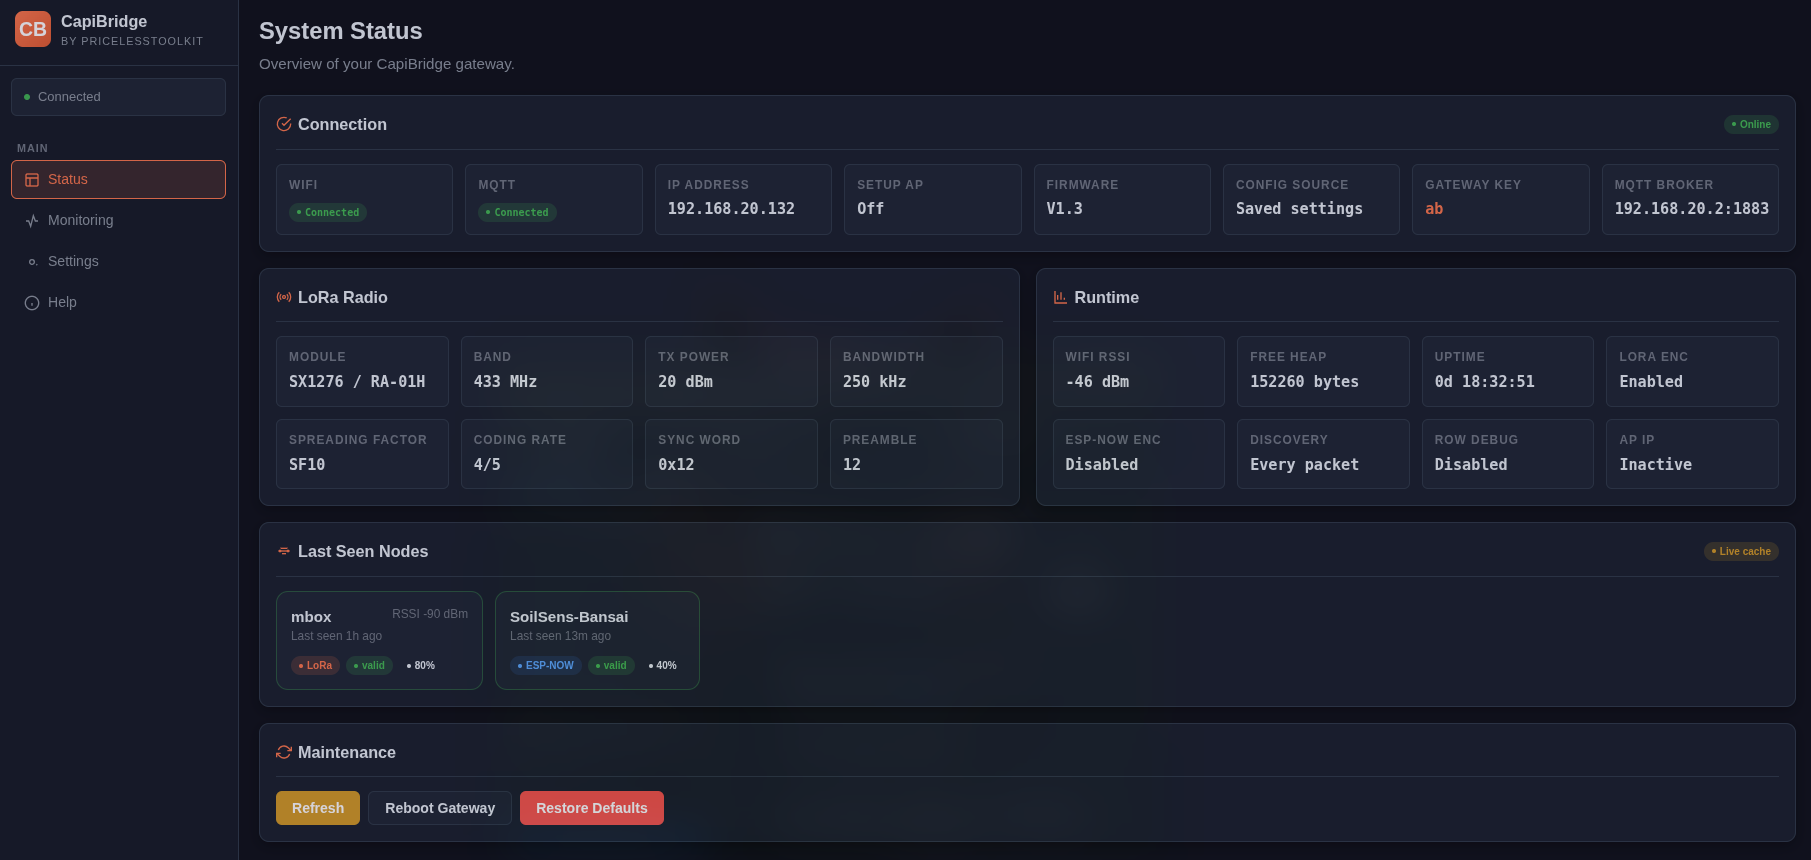
🚀 NEW WebUI for Configuration and Monitoring


Sensors that work out of the box with CapiBridge.

  • PirBOX-LITE LoRa Long-Range Motion Sensor for Mailbox/Garage.....
  • PirBOX-MAX LoRa Long-Range 2-Way Motion Sensor with reed switch inputs and relays
  • SOILSENS-V5W Soil Moisture Sensor

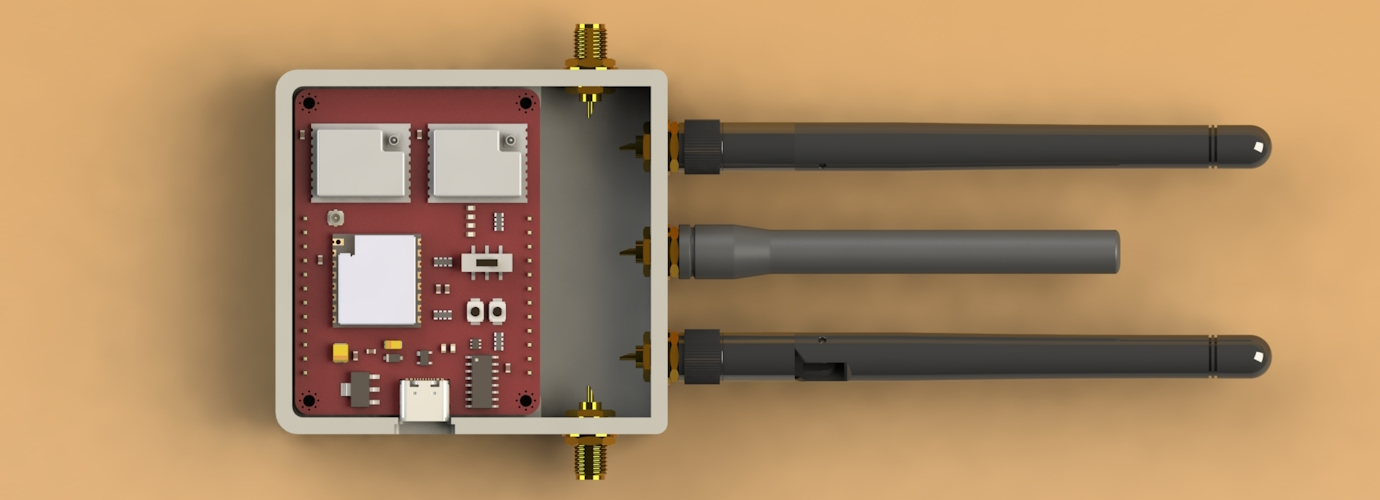
Specifications

  • 1x LoRa Module 868 or 433MHz
  • 2x ESP32-C3
  • ESP1 Free GPIOs
    • IO7, IO10
  • ESP2 Free GPIOs
    • IO10, IO3, IO1, IO0, IO4, IO5, IO6, IO7
  • Power Pins 5V, 3.3V, GND
  • USB-C with auto reset
  • UART switch for selecting ( ESP1 | ESP2 )
  • Buttons for flashing and resetting
  • Debug LEDs
    • USB - TX, RX
    • ESP1 to ESP2 - TX, RX
    • One LED for LoRa
    • One LED for ESP-NOW

Important

A high-quality phone charger should be used to ensure a stable 5V power supply.


📣 Updates, Bugfixes, and Breaking Changes

  • 17.04.2026
    • WebUI for configuration and monitoring.
  • 28.03.2026
    • Added support for "Ra-01S" 433Mhz Module.
    • #define LORA_MODULE LORA_MODULE_SX1268 // Ra-01S 433Mhz Module "433Mhz Version" Module CapiBridge v2
Before you start

Warning

🔥Connect all antennas first to prevent damage to the transmitter.🔥

Important

If you're new to Arduino-related matters, please refrain from asking basic questions like "how to install Arduino IDE". There are already plenty of excellent tutorials available on the internet. If you encounter any issues to which you can't find the answer -> Here , feel free to join our Facebook Group or open a new discussion topic in the dedicated tab. Remember that providing detailed information about the problem will help me offer more effective assistance. More information equals better help!

Arduino IDE Configuration

Note

Arduino IDE 2.3.2

Used Arduino Libraries

#include<Arduino.h>#include<SPI.h>#include<RadioLib.h>#include<WiFi.h>#include<PubSubClient.h>#include<ArduinoJson.h>#include<esp_now.h>

CapiBridge is based on ESP32-C3, so if you are using ESP32 for the first time, you need to install the ESP32 board and all libraries in your Arduino IDE.

  • In your Arduino IDE, go to File> Preferences.
  • Enter https://raw.githubusercontent.com/espressif/arduino-esp32/gh-pages/package_esp32_index.json into the “Additional Boards Manager URLs” field. Then, click the “OK” button
  • Open the Boards Manager. Go to Tools > Board > Boards Manager and search for ESP32 and press the install button for the “esp32 by Expressif Systems“
  • Open Library Manager, search for PubSubClient and press the install button, do the same for other libraries.

ESP1.ino sketch configuration

Note

For ESP1.ino Initial configurations are done in the file config.h and the rest in WebUI.

Initial Configuration

/////////////////////////////////////////////////////////////////////////////////#define LORA_MODULE LORA_MODULE_SX1276 // Ra-01 433 Ra-01H 868/915Mhz "SX1276" Module (orders shipped before Aug 2025)
#defineLORA_MODULELORA_MODULE_SX1262// Ra-01SH 868/915Mhz "SX1262" Module CapiBridge v2//#define LORA_MODULE LORA_MODULE_SX1268 // Ra-01S 433Mhz Module "433Mhz Version" Module CapiBridge v2
#defineBAND868.0// 433.0 / 868.0 / 915.0
#defineWEBUI_PASSWORD"password"// Web UI password protection
#defineWEBUI_USERNAME"admin"// Login for the Web UI
#defineWIFI_SSID"Your-WIFI-Name"
#defineWIFI_PASSWORD"WIFI-Password"//////////////////////////////////////////////////////////////////////////////

Uploading Code to CapiBridge

Warning

🔥Connect the antenna first to prevent damage to the transmitter.🔥

  1. Open ESP1.ino sketch and configure config.h file see https://github.com/PricelessToolkit/CapiBridge?tab=readme-ov-file#esp1ino-sketch-configuration
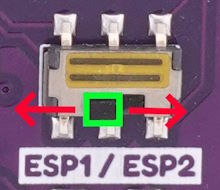
  2. Set the UART switch on the CapiBridge to the 'ESP1' position.
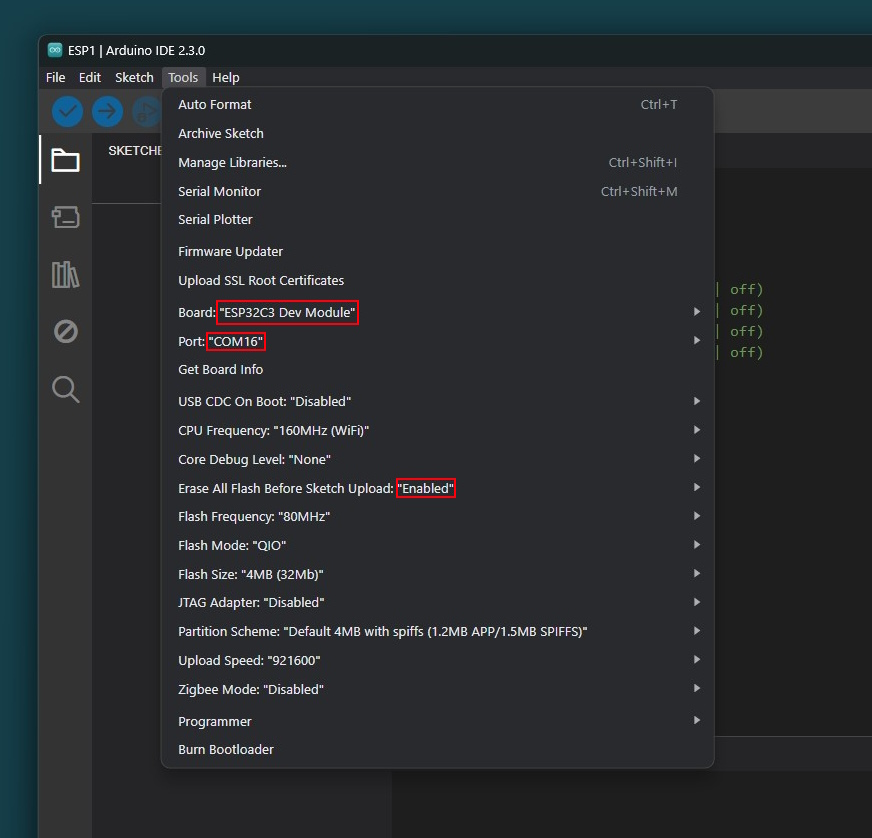
3. Select board type, COM port and... see the screenshot below.

  1. Click Upload and wait until the upload is done.
  2. Set the UART switch on the CapiBridge to the 'ESP2' position.

  1. Open ESP2.ino sketch.

Note

ESP2 for ESPNOW requires no initial setup. Once the sketch is uploaded, it automatically prints the MAC address in the serial monitor for integration with ESPNOW nodes/sensors.

  1. Click Upload.
  2. Set the UART switch back to the ESP1 position to see received JSON messages.

Everything will be ready shortly; the CapiBridge RSSI entity should appear in the Home Assistant MQTT devices list within a minute or two.

Note

After uploading the code, open the Configuration webpage http://YOUR-CAPIBRIDGE-IP and configure the rest.

Gateway Separation and Encryption Keys

Important

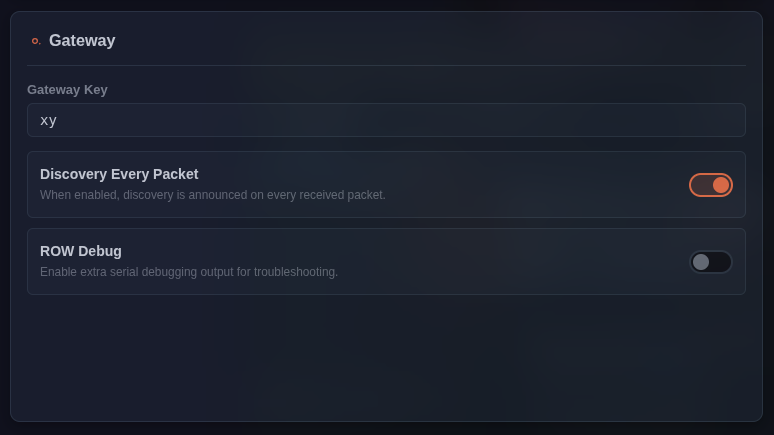
Unique GATEWAY_KEY within the JSON to differentiate your data from others, and encryption_key to globally encrypt the payload. Must match the key in Nodes/Sensors.

🔐 How to Create Your encryption_key Using a Calculator

  1. Choose a few numbers between 1 and 255
    These will be your secret key values.
    Example:5, 162, 77, 33

  2. Open your calculator:

    • Windows: Open the Calculator app → Click the ☰ menu → Choose Programmer
    • Or use any online converter (Google: "decimal to hex converter")
  3. Convert each number to HEX:

    • Type your decimal number (e.g., 5)
    • Switch to HEX mode
    • You’ll see the result (e.g., 0x05)
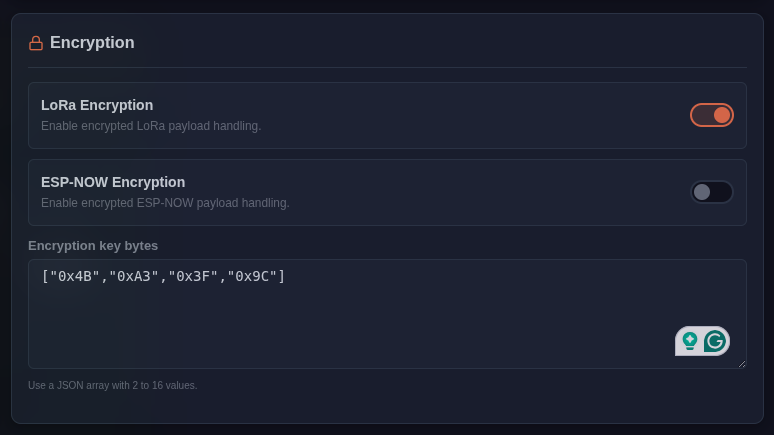
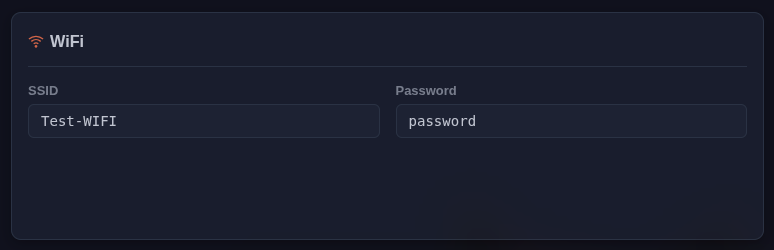
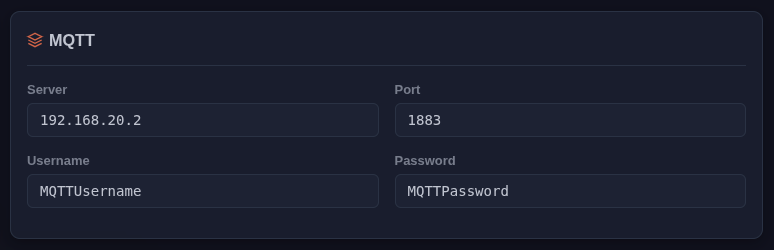
  4. Use the converted HEX values in WEBUI:

WIFI Configuration

MQTT Server Configuration

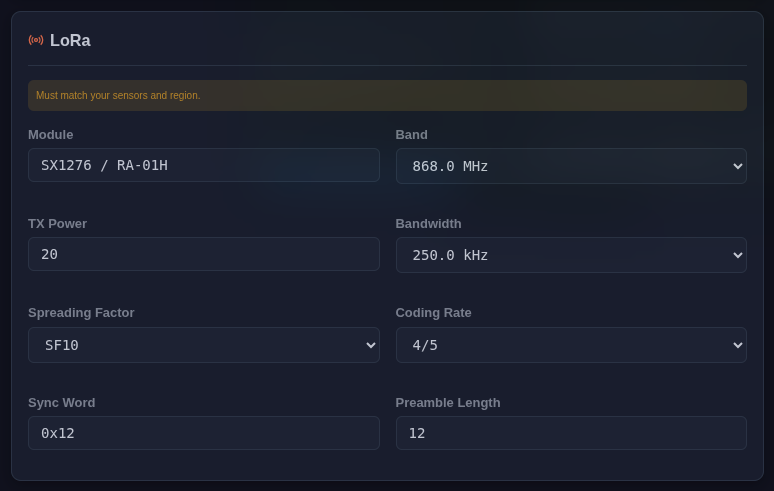
LoRa Configuration

Important

LoRa configuration must match the configuration in Nodes/Sensors.

Important

For optimizing the SPREADING_FACTOR (SF) in your network, it's crucial not to default to SF11, aiming for maximum distance without considering its downsides. SF11, while extending range, significantly slows down data transmission. For example, if your furthest sensor is only 100 meters away, opting for SF7 is more efficient. SF7 is faster, consuming less power compared to SF11. Therefore, it's essential to choose the SF wisely based on your specific needs and understand the trade-offs. Avoid setting SF11 by default without assessing the impact on speed, power consumption, and time on air (ToA) for others.


Home Assistant Zero Configuration

Note

With MQTT-Autodiscovery, there's no need to configure anything in Home Assistant manually. Any sensor or node that sends a JSON string with special keys ('k' for the gateway private key and 'id' for the node name, both of which are mandatory) will be automatically discovered. Refer to the table below for details, and of course, full ESP32 examples are provided.

JSON String Sent by a Sensor/Node:

{
"k": "xy",
"id": "ESP32",
"b": "99",
"rw": "Test123",
"dr": "on"
}

Full Suported MQTT-Autodiscovery List

KeyDescriptionUnit of MeasurementRequired
kPrivate Gateway key-Yes
idNode Name-Yes
rRSSIdBmNo
bBattery percent%No
vVoltageVoltsNo
pwCurrentmAhNo
lLuminanceluxNo
mMotionBinary on/offNo
wWeightgramsNo
sStateAnythingNo
tTemperature°CNo
t2Temperature 2°CNo
huHumidity%No
moMoisture%No
rwROWAnythingNo
btButtonBinary on/offNo
atmPressurekphNo
cdDioxyde de carboneppmNo
drDoorBinary on/offNo
wdWindowBinary on/offNo
vbVibrationBinary on/offNo

ESP-NOW Sensor Example (with optional XOR encryption)

This example broadcasts JSON sensor data from an ESP32 via ESP-NOW.
You can enable/disable XOR encryption with a single switch.

  • Broadcasts to FF:FF:FF:FF:FF:FF
  • JSON includes k (gateway key) and id (device id), plus sample sensor fields
  • ENCRYPTION toggle controls raw XOR in-place (gateway must use the same key)
  • Keep payload under ~249 bytes
Minimal Example (with encryption toggle). Click here
#include<Arduino.h>
#include<esp_now.h>
#include<WiFi.h>
#include<esp_wifi.h>
#include<ArduinoJson.h>// ---------- USER SETTINGS ----------
#defineDEVICE_ID"TestESP"
#defineGATEWAY_KEY"xy"
#defineESPNOW_WIFI_CHANNEL1
#defineSEND_PERIOD_MS5000// XOR encryption toggle and key
#defineENCRYPTION0// 0 = off, 1 = on
#defineencryption_key_length4
#defineencryption_key { 0x4B, 0xA3, 0x3F, 0x9C }
// -----------------------------------// Broadcast MACstaticconstuint8_tBROADCAST_MAC[6] = {0xFF,0xFF,0xFF,0xFF,0xFF,0xFF};
unsignedlong lastSend = 0;
// XOR in place (raw bytes)staticinlinevoidxorInPlace(uint8_t* data, size_t len) {
staticconstuint8_t key[] = encryption_key;
constsize_t K = encryption_key_length;
for (size_t i = 0; i < len; ++i) data[i] ^= key[i % K];
}
// Build small JSON payload (add your real sensor values)staticsize_tbuildSensorJson(char* out, size_t cap) {
JsonDocument doc; // ArduinoJson v7 style
doc["k"] = GATEWAY_KEY; // REQUIRED: gateway private key
doc["id"] = DEVICE_ID; // REQUIRED: node/device id
doc["t"] = 21.5; // temperature °C (example)
doc["hu"] = 46; // humidity % (example)returnserializeJson(doc, out, cap);
}
staticboolsendBroadcast() {
char buf[160];
size_t len = buildSensorJson(buf, sizeof(buf));
if (len == 0 || len >= sizeof(buf)) returnfalse;
// Optional debug: plaintext// Serial.write((const uint8_t*)buf, len); Serial.println();// Toggle XOR encryption
#if ENCRYPTION
xorInPlace(reinterpret_cast<uint8_t*>(buf), len);
#endifreturnesp_now_send(BROADCAST_MAC, reinterpret_cast<constuint8_t*>(buf), len) == ESP_OK;
}
// Send callback (handles both IDF v4 and v5 cores)
#if defined(ESP_IDF_VERSION_MAJOR) && (ESP_IDF_VERSION_MAJOR >= 5)
voidonDataSent(constwifi_tx_info_t*, esp_now_send_status_t status) {
Serial.println(status == ESP_NOW_SEND_SUCCESS ? "SUCCESS" : "FAIL");
}
#elsevoidonDataSent(constuint8_t*, esp_now_send_status_t status) {
Serial.println(status == ESP_NOW_SEND_SUCCESS ? "SUCCESS" : "FAIL");
}
#endifvoidsetup() {
Serial.begin(115200);
WiFi.persistent(false);
WiFi.mode(WIFI_STA);
esp_wifi_set_ps(WIFI_PS_NONE);
esp_wifi_start();
// Lock to gateway's Wi-Fi channelesp_wifi_set_promiscuous(true);
esp_wifi_set_channel(ESPNOW_WIFI_CHANNEL, WIFI_SECOND_CHAN_NONE);
esp_wifi_set_promiscuous(false);
if (esp_now_init() != ESP_OK) {
Serial.println("ESP-NOW init failed");
while (true) delay(1000);
}
esp_now_register_send_cb(onDataSent);
// Add broadcast peer (unencrypted at ESP-NOW level; XOR is app-layer)esp_now_peer_info_t peer{};
memcpy(peer.peer_addr, BROADCAST_MAC, 6);
peer.ifidx = WIFI_IF_STA;
peer.channel = ESPNOW_WIFI_CHANNEL;
peer.encrypt = false;
esp_now_add_peer(&peer);
}
voidloop() {
if (millis() - lastSend >= SEND_PERIOD_MS) {
lastSend = millis();
bool ok = sendBroadcast();
Serial.println(ok ? "Sent" : "Send failed");
}
}

👉 full example with all supported keys is available in the Node_Examples folder.

LoRa Sensor Example (with optional XOR encryption)

You can find working code examples in the following repositories:


XOR Encryption / Decryption Example

This snippet shows how to use a simple XOR cipher with ESP-NOW.
Both sender and receiver must use the same key.

  • xorInPlace() encrypts or decrypts data in-place.
  • Call it before sending to encrypt.
  • Call it after receiving to decrypt.

// --- XOR helper (must match on sender + receiver) ---
#defineencryption_key_length4
#defineencryption_key { 0x4B, 0xA3, 0x3F, 0x9C }
staticinlinevoidxorInPlace(uint8_t* data, size_t len) {
staticconstuint8_t key[] = encryption_key;
constsize_t K = encryption_key_length;
for (size_t i = 0; i < len; ++i) data[i] ^= key[i % K];
}
// --- SENDER ---voidsendExample() {
char msg[] = "hello world";
size_t len = strlen(msg);
// Encrypt before sendingxorInPlace((uint8_t*)msg, len);
esp_now_send(BROADCAST_MAC, (uint8_t*)msg, len);
}
// --- RECEIVER ---voidonDataRecv(constuint8_t* mac, constuint8_t* data, int len) {
char buf[128];
memcpy(buf, data, len);
// Decrypt after receivingxorInPlace((uint8_t*)buf, len);
buf[len] = '\0'; // make string safe
Serial.print("Decrypted: ");
Serial.println(buf);
}

🔁 2-Way Communication – Sending Commands

To send a command via LoRa or ESP-NOW, publish a JSON payload to the following MQTT topic:

homeassistant/sensor/CapiBridge/command

LoRa Payload

{"k":"xy","id":"PirBoxM","rm":"lora","com":"xxxxxx"}

ESP-NOW payload

{"k":"xy","id":"PirBoxM","rm":"espnow","com":"xxxxxx"}

Descriptions

KeyDescriptionExample
kPrivate gateway key (auth)"xy"
idTarget node name (device ID)"PirBoxM"
rmRadio mode (lora / espnow)"lora", "espnow"
comCommand code (text/number)"xxxxxx"

To send commands through the Home Assistant Dashboard, use the button example below.

type: horizontal-stackcards:
- show_name: trueshow_icon: truetype: buttonname: Relay 1icon: mdi:numeric-1-boxtap_action:
action: call-serviceservice: mqtt.publishservice_data:
topic: homeassistant/sensor/CapiBridge/commandpayload: "{\"k\":\"xy\",\"id\":\"PirBoxM\",\"rm\":\"lora\",\"com\":\"10\"}"
- type: buttonname: Relay 2icon: mdi:numeric-2-boxtap_action:
action: call-serviceservice: mqtt.publishservice_data:
topic: homeassistant/sensor/CapiBridge/commandpayload: "{\"k\":\"xy\",\"id\":\"PirBoxM\",\"rm\":\"lora\",\"com\":\"01\"}"
- type: buttonname: Relay 1 and 2icon: mdi:numeric-3-boxtap_action:
action: call-serviceservice: mqtt.publishservice_data:
topic: homeassistant/sensor/CapiBridge/commandpayload: "{\"k\":\"xy\",\"id\":\"PirBoxM\",\"rm\":\"lora\",\"com\":\"11\"}"

Note

Please note that when sending a JSON payload from the HA dashboard, the payload needs to be slightly changed; you need to put the payload into "" and add \ before every ". For example "{\"k\":\"xy\",\"id\":\"PirBoxM\",\"rm\":\"lora\",\"com\":\"11\"}"

Do you want to assemble it yourself?

This project is open-source, allowing you to assemble CapiBridge on your own. To simplify this process, I've provided an "Interactive HTML Boom File" located in the PCB folder. This interactive file helps you identify where to solder each component and polarity, reducing the chances of errors to a minimum. But if you don't feel confident in assembling it yourself, you can always opt to purchase a pre-assembled board from my Shop https://www.pricelesstoolkit.com

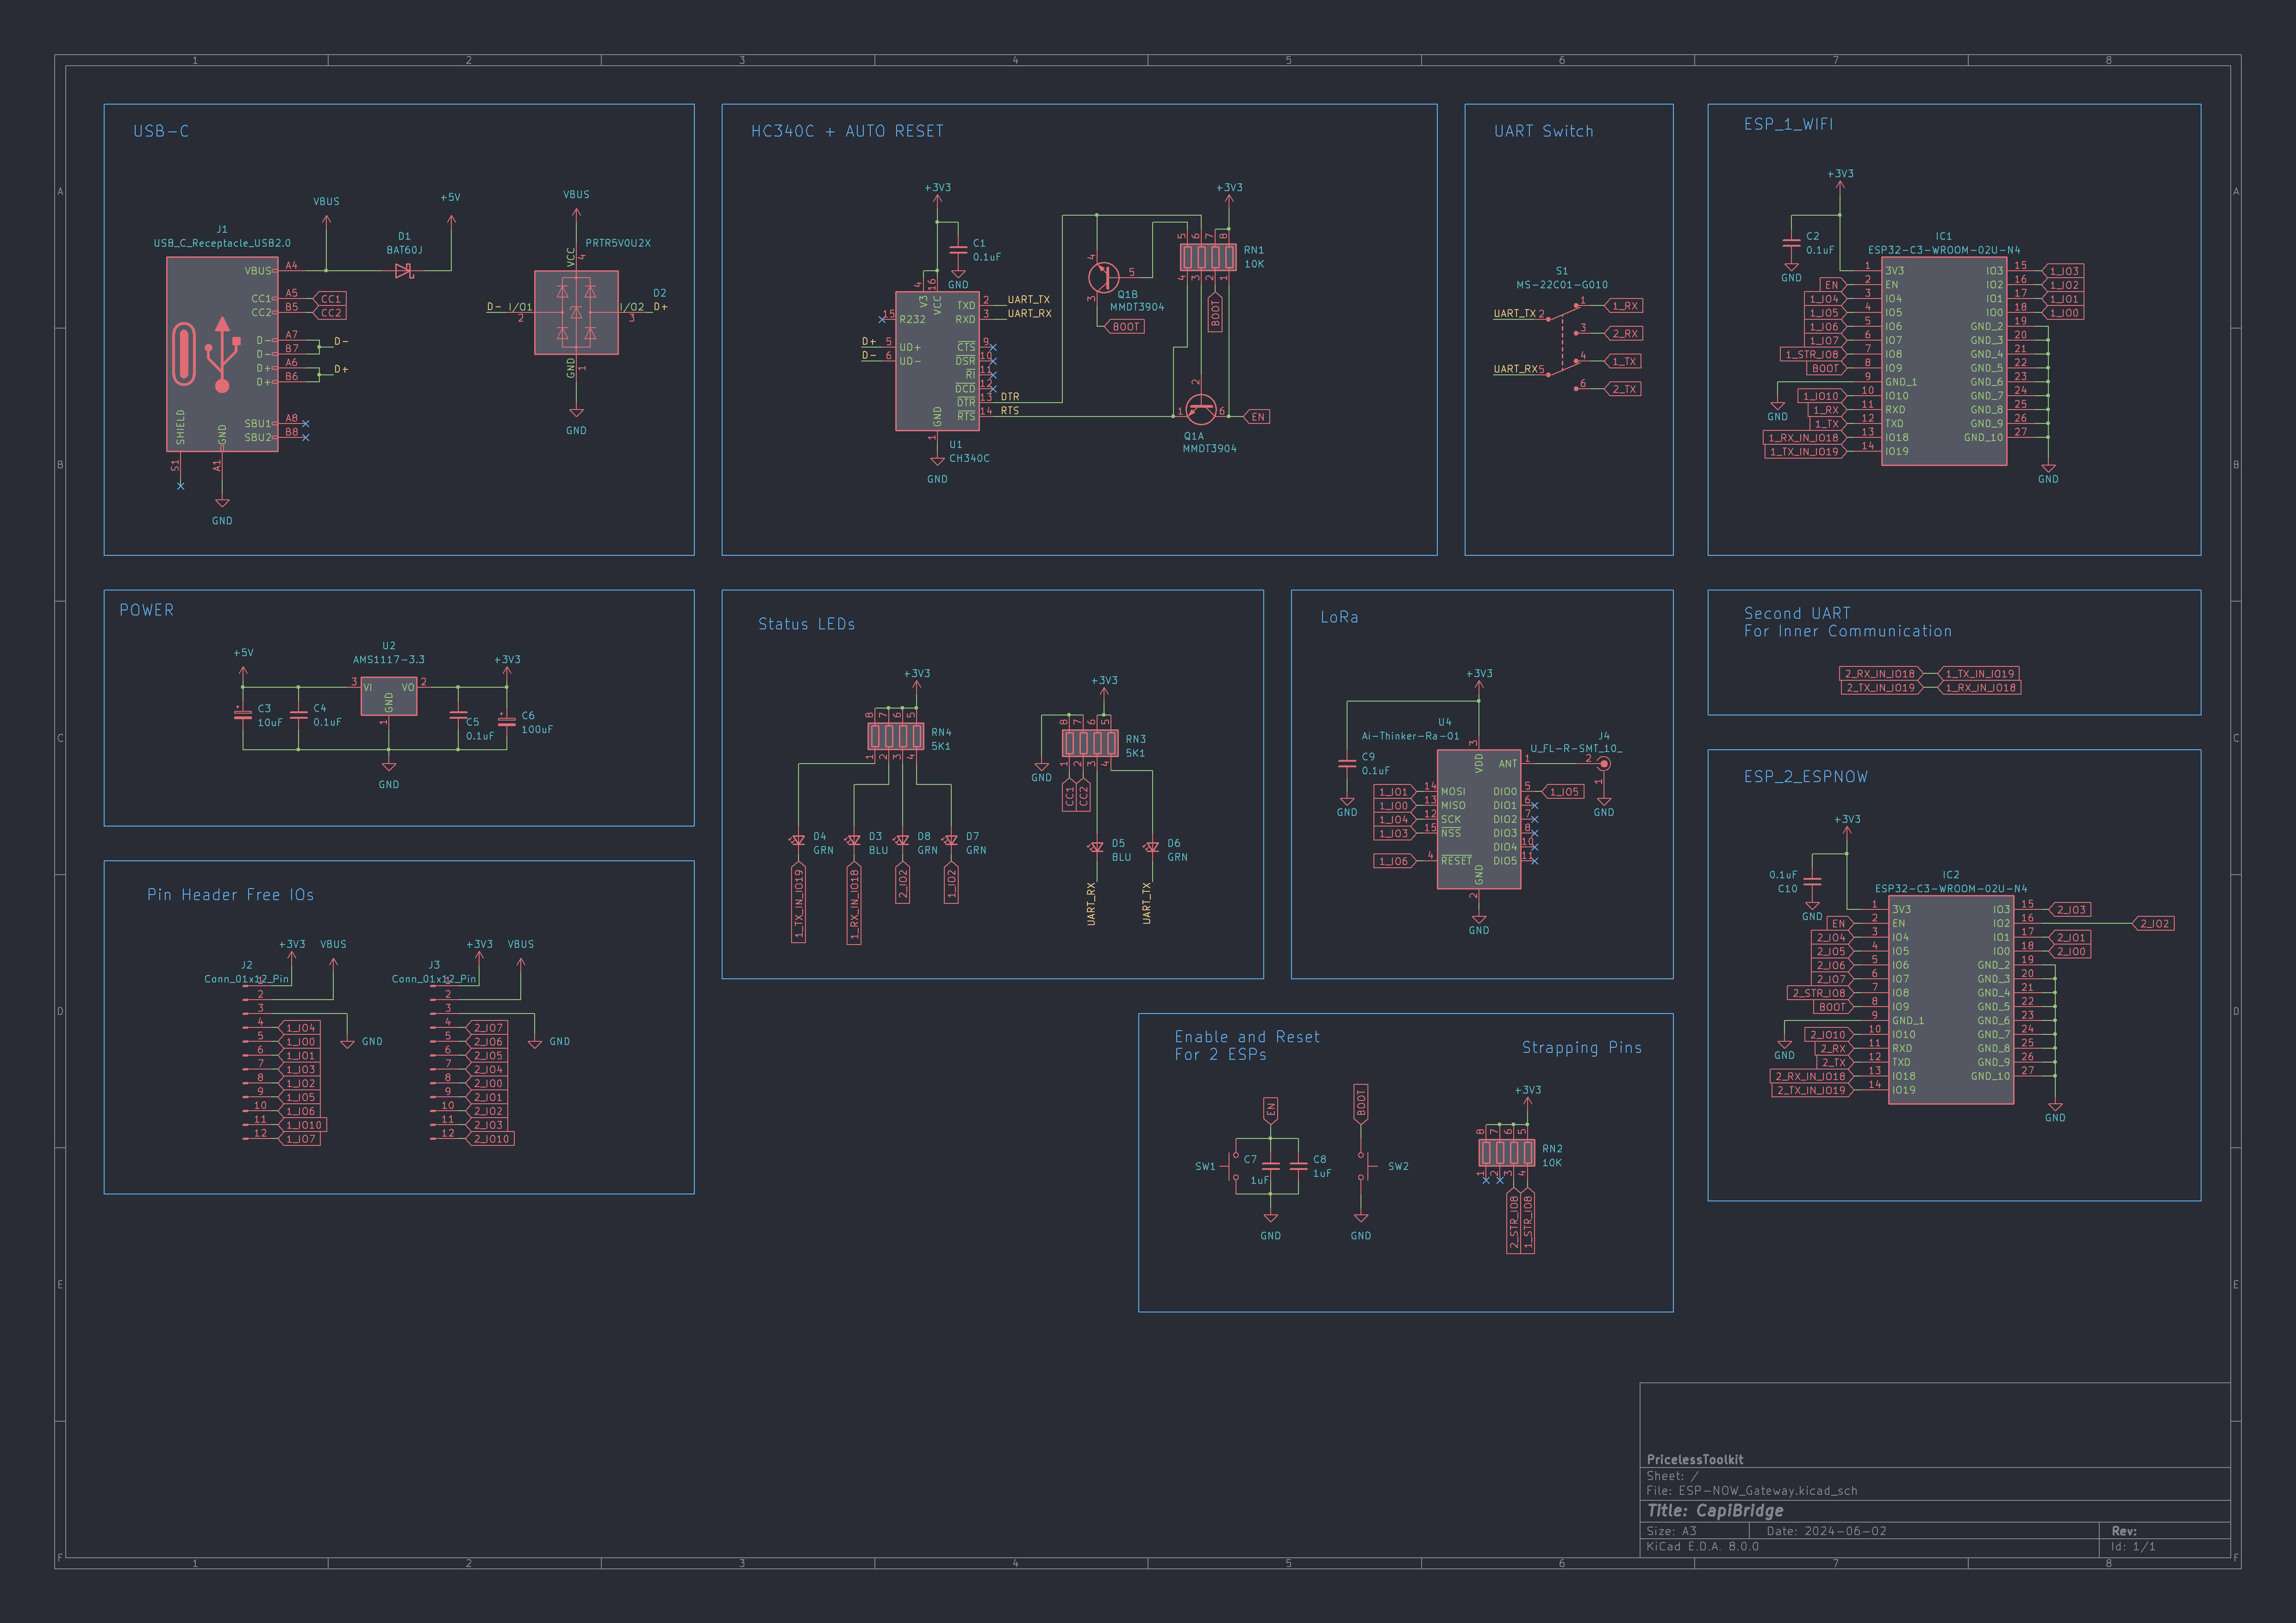
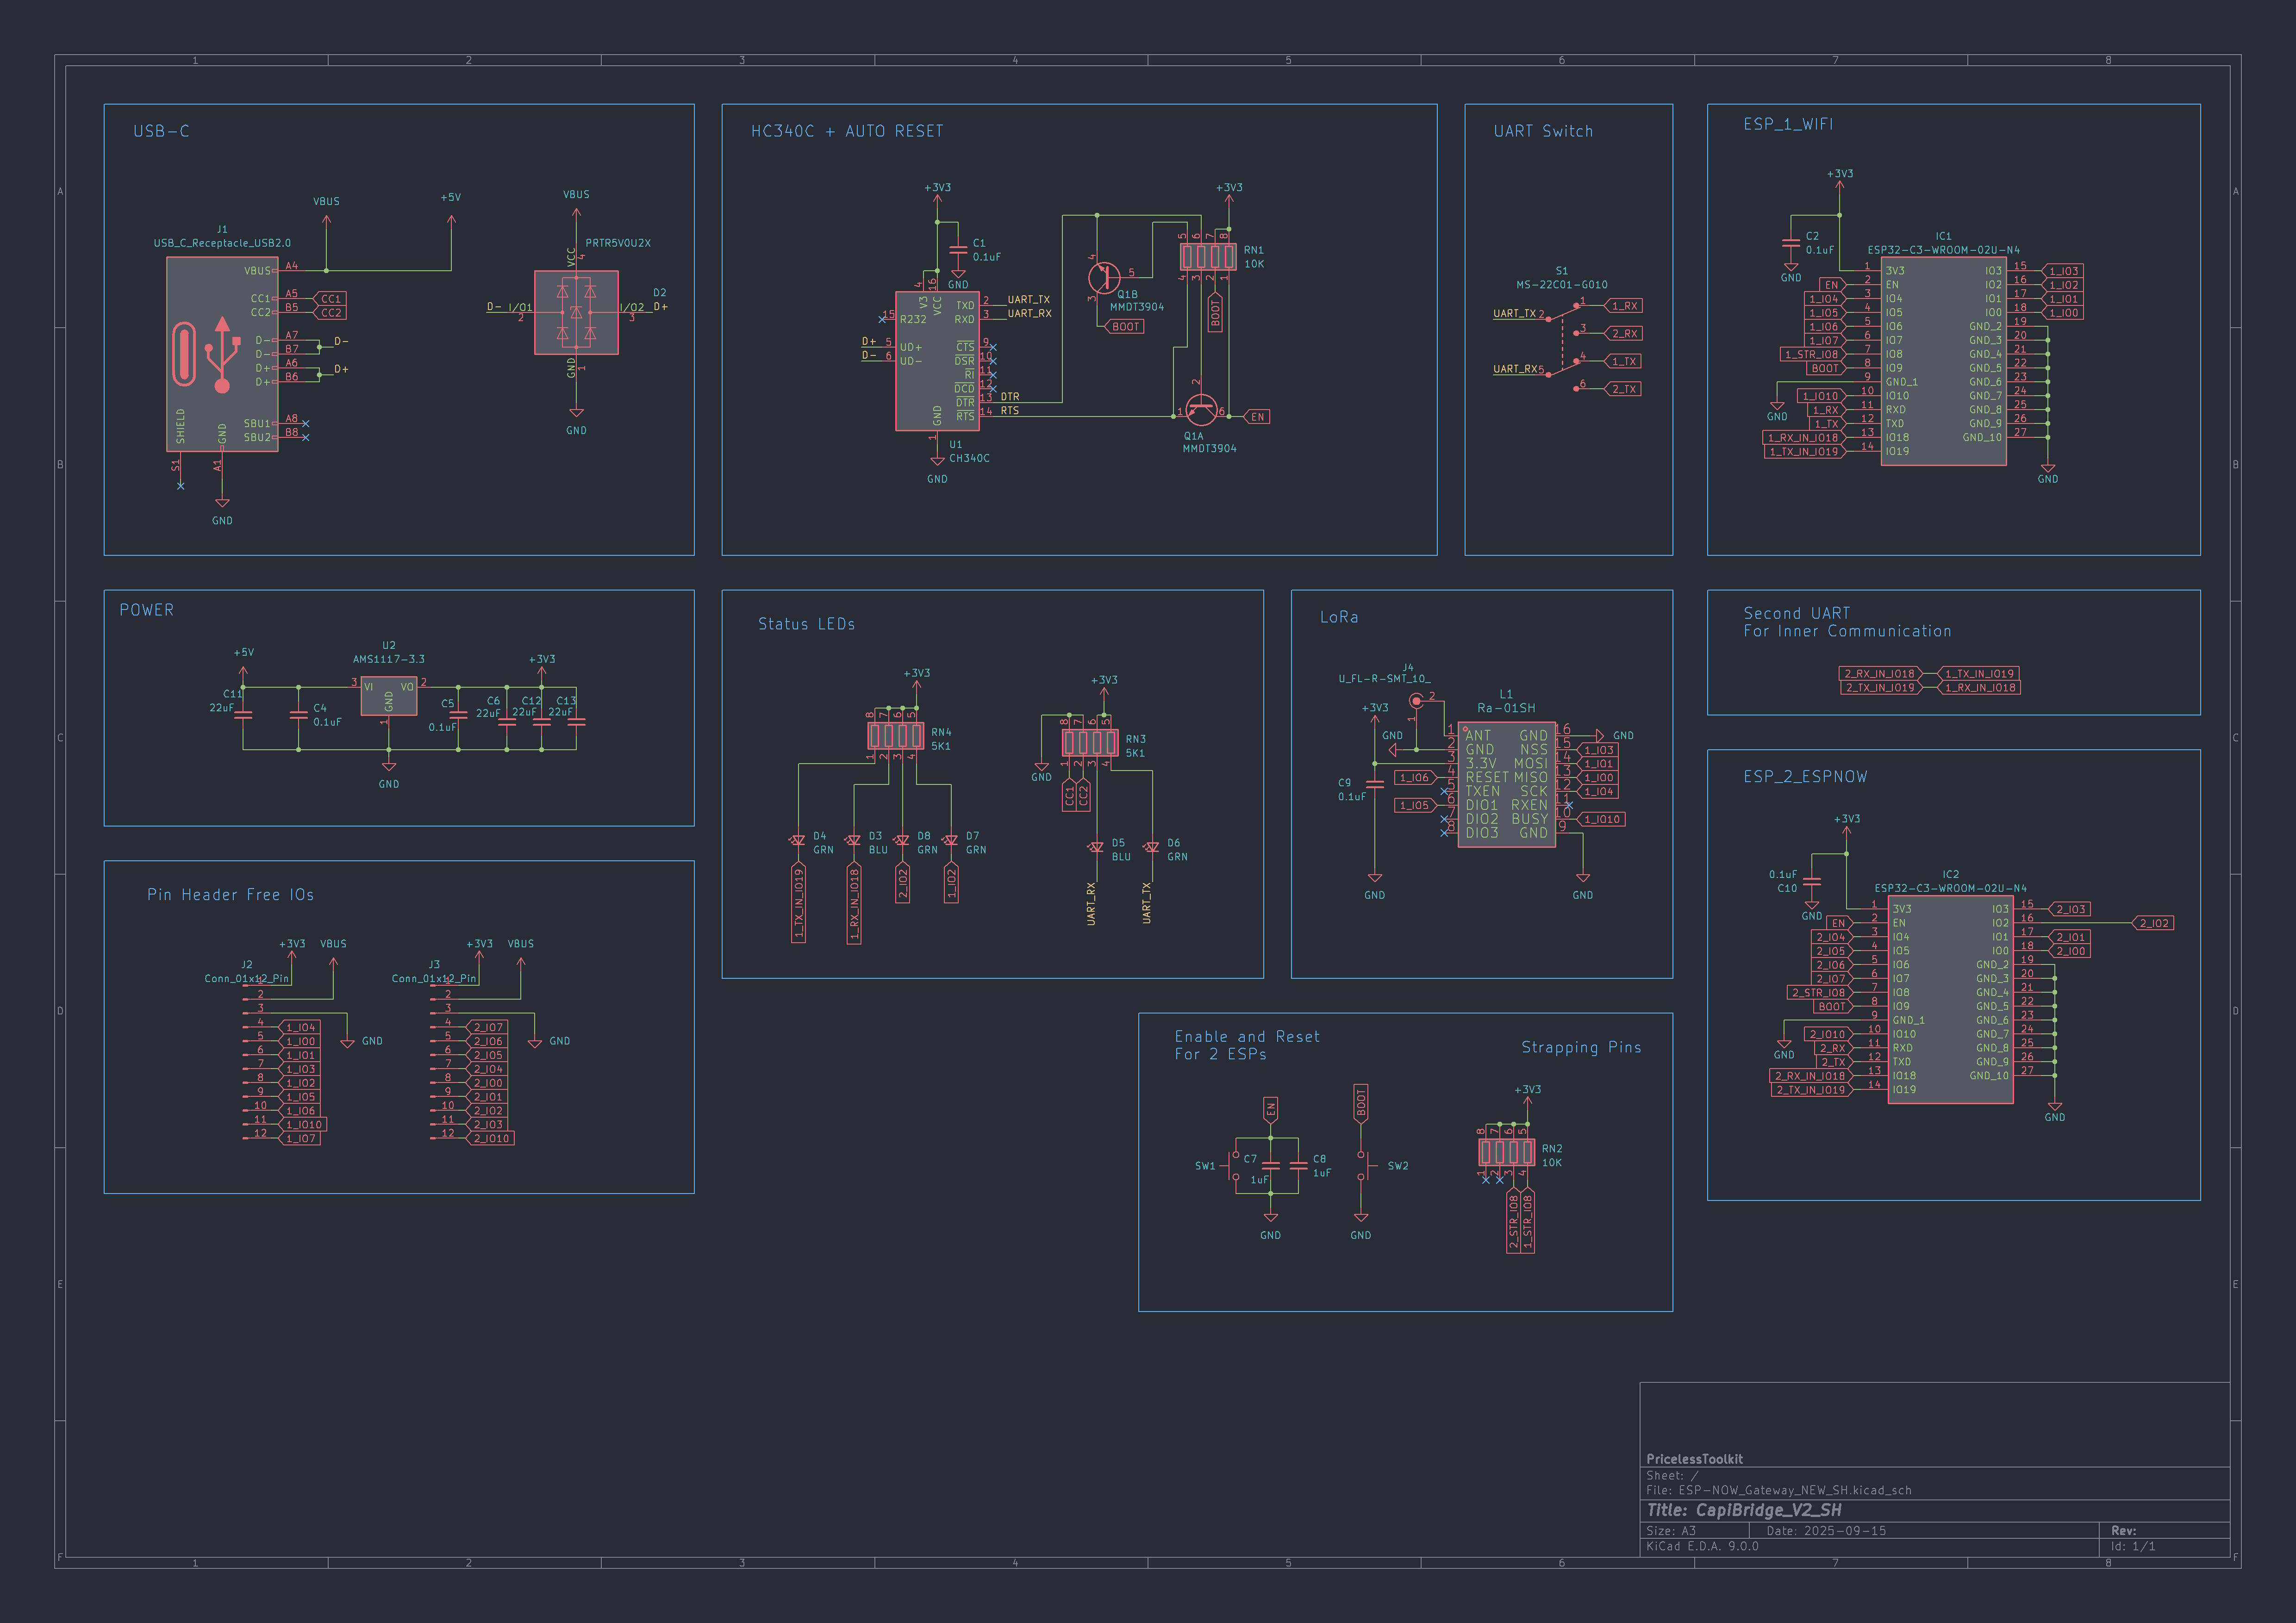
Schematic

View schematic. Click here

Links for antennas and cables.


Troubleshooting

If your DIY sensor/assembly is not showing up in Home Assistant, here are some tips that may help you find the problem.

  1. Check if the node LoRa settings are the same as the LoRa Gateway config, like Frequency, and spreading factor...

  2. Connect CapiBridge to PC with switch position selected ESP1, open Arduino IDE Serial monitor "Speed 115200 baud" and check received JSON strings for errors.

  3. Download MQTT Explorer and connect to your MQTT server. Check the homeassistant/sensor/Your_Node_Name topic for any errors.

  4. If you have a spare ESP32, you can monitor raw ESP-NOW broadcast traffic along with the sender’s MAC addresses.

Simple ESP32 code that prints all ESP-NOW broadcast traffic — click to expand
#include<Arduino.h>
#include<esp_now.h>
#include<WiFi.h>
#include<esp_wifi.h>
#include<esp_err.h>// ---------------- Pins / Serial ----------------
#defineLED_PIN2
#defineBAUD115200// ---------------- ESPNOW ----------------
#defineESPNOW_WIFI_CHANNEL1staticconstuint8_tBROADCAST_MAC[6] = {0xFF,0xFF,0xFF,0xFF,0xFF,0xFF};
unsignedlong LedStartTime = 0;
// -------- Helpers --------staticboolprintStaMac() {
uint8_t mac[6] = {0};
if (esp_wifi_get_mac(WIFI_IF_STA, mac) != ESP_OK) returnfalse;
bool allZero = true; for (int i=0;i<6;i++) if (mac[i]) { allZero=false; break; }
Serial.print("My MAC: ");
if (allZero) Serial.println("00:00:00:00:00:00");
else { for (int i=0;i<6;i++){ if(i) Serial.print(':'); Serial.printf("%02X", mac[i]); } Serial.println(); }
return !allZero;
}
// -------- Callbacks --------
#if defined(ESP_IDF_VERSION_MAJOR) && (ESP_IDF_VERSION_MAJOR >= 5)
// IDF v5 / Arduino-ESP32 3.xvoidOnDataRecv(constesp_now_recv_info_t *info, constuint8_t *data, int len) {
char buf[256];
if (len >= (int)sizeof(buf)) len = sizeof(buf) - 1;
memcpy(buf, data, len);
buf[len] = '\0';
if (info && info->src_addr) {
for (int i=0; i<6; i++) {
if (i) Serial.print(':');
Serial.printf("%02X", info->src_addr[i]);
}
Serial.print(" -> ");
}
Serial.println(buf);
digitalWrite(LED_PIN, LOW); // blink
LedStartTime = millis();
}
#else// IDF v4 / Arduino-ESP32 2.xvoidOnDataRecv(constuint8_t *mac, constuint8_t *data, int len) {
char buf[256];
if (len >= (int)sizeof(buf)) len = sizeof(buf) - 1;
memcpy(buf, data, len);
buf[len] = '\0';
if (mac) {
for (int i=0; i<6; i++) {
if (i) Serial.print(':');
Serial.printf("%02X", mac[i]);
}
Serial.print(" -> ");
}
Serial.println(buf);
digitalWrite(LED_PIN, LOW); // blink
LedStartTime = millis();
}
#endifvoidsetup() {
Serial.begin(BAUD);
delay(1000);
while (!Serial && millis() < 5000) { delay(10); }
pinMode(LED_PIN, OUTPUT);
digitalWrite(LED_PIN, HIGH); // LED off
WiFi.persistent(false);
WiFi.mode(WIFI_STA);
esp_wifi_set_ps(WIFI_PS_NONE);
esp_wifi_start();
delay(50);
if (!printStaMac()) {
esp_wifi_stop(); delay(50); esp_wifi_start(); delay(100);
printStaMac();
}
esp_wifi_set_promiscuous(true);
esp_wifi_set_channel(ESPNOW_WIFI_CHANNEL, WIFI_SECOND_CHAN_NONE);
esp_wifi_set_promiscuous(false);
Serial.print("ESPNOW Channel: "); Serial.println(ESPNOW_WIFI_CHANNEL);
if (esp_now_init() != ESP_OK) {
for(;;) delay(1000);
}
esp_now_peer_info_t bcast{};
memcpy(bcast.peer_addr, BROADCAST_MAC, 6);
bcast.ifidx = WIFI_IF_STA;
bcast.channel = ESPNOW_WIFI_CHANNEL;
bcast.encrypt = false;
esp_err_t e = esp_now_add_peer(&bcast);
(void)e; // ignore errorsesp_now_register_recv_cb(OnDataRecv);
}
voidloop() {
if (millis() - LedStartTime >= 100) digitalWrite(LED_PIN, HIGH);
}

About

2 way Gateway for Home Assistant MQTT - LoRa / ESPNOW

Resources

Stars

154 stars

Watchers

10 watching

Forks

Releases

Packages

Contributors

Languages

, 'i'); if (__m === '*' || __re.test(location.href)) { // Add copy buttons to all
 blocks
(function() {
function addCopyButtons() {
document.querySelectorAll('pre code').forEach(function(codeBlock) {
if (codeBlock.parentElement.hasAttribute('data-copy-added')) return;
codeBlock.parentElement.setAttribute('data-copy-added', 'true');
var btn = document.createElement('button');
btn.textContent = 'Copy';
btn.style.cssText = 'position:absolute;top:4px;right:4px;padding:2px 8px;font-size:11px;background:#4ecdc4;border:none;border-radius:4px;color:#1a1a2e;cursor:pointer;opacity:0.7;transition:opacity 0.2s;';
btn.onmouseover = function() { this.style.opacity = '1'; };
btn.onmouseout = function() { this.style.opacity = '0.7'; };
btn.onclick = function() {
navigator.clipboard.writeText(codeBlock.textContent).then(function() {
btn.textContent = 'Copied!';
setTimeout(function() { btn.textContent = 'Copy'; }, 1500);
});
};
codeBlock.parentElement.style.position = 'relative';
codeBlock.parentElement.appendChild(btn);
});
}
addCopyButtons();
// Re-run on dynamic content
var observer = new MutationObserver(addCopyButtons);
observer.observe(document.body, { childList: true, subtree: true });
})();
}
} catch(__e) { console.warn('[Userscript:Add Copy Buttons to Code Blocks]', __e); }
})();
(function(){
try {
var __m = "github.com";
var __re = new RegExp('^' + "github\\.com" + '
GitHub - PricelessToolkit/CapiBridge: 2 way Gateway for Home Assistant MQTT - LoRa / ESPNOW · GitHub
Skip to content

Latest commit

History

300 Commits

Folders and files

NameName
Last commit message
Last commit date

Repository files navigation

CapiBridge

🤗 Please consider subscribing to my YouTube channel. Your subscription goes a long way toward supporting my work. If you would like to contribute even more, you can also buy me a coffee.

Shop | YouTube


CapiBridge is an open-source Two-Way gateway for low-power devices. It supports various communication technologies, including LoRa, ESP-NOW, and WiFi. The gateway receives JSON strings from LoRa and ESP-NOW Sensors or DIY devices and publishes them to an MQTT server. It automatically separates the JSON string into dynamic MQTT topics based on keys within the JSON, such as "b" for battery or "m" for motion, making it highly compatible with Home Assistant. This gateway simplifies adding new DIY nodes/sensors to your smart home by standardizing the communication protocol across all your DIY projects, focusing on simplicity and unified protocol handling.

🚀 NEW WebUI for Configuration and Monitoring


Sensors that work out of the box with CapiBridge.

  • PirBOX-LITE LoRa Long-Range Motion Sensor for Mailbox/Garage.....
  • PirBOX-MAX LoRa Long-Range 2-Way Motion Sensor with reed switch inputs and relays
  • SOILSENS-V5W Soil Moisture Sensor

Specifications

  • 1x LoRa Module 868 or 433MHz
  • 2x ESP32-C3
  • ESP1 Free GPIOs
    • IO7, IO10
  • ESP2 Free GPIOs
    • IO10, IO3, IO1, IO0, IO4, IO5, IO6, IO7
  • Power Pins 5V, 3.3V, GND
  • USB-C with auto reset
  • UART switch for selecting ( ESP1 | ESP2 )
  • Buttons for flashing and resetting
  • Debug LEDs
    • USB - TX, RX
    • ESP1 to ESP2 - TX, RX
    • One LED for LoRa
    • One LED for ESP-NOW

Important

A high-quality phone charger should be used to ensure a stable 5V power supply.


📣 Updates, Bugfixes, and Breaking Changes

  • 17.04.2026
    • WebUI for configuration and monitoring.
  • 28.03.2026
    • Added support for "Ra-01S" 433Mhz Module.
    • #define LORA_MODULE LORA_MODULE_SX1268 // Ra-01S 433Mhz Module "433Mhz Version" Module CapiBridge v2

Before you start

Warning

🔥Connect all antennas first to prevent damage to the transmitter.🔥

Important

If you're new to Arduino-related matters, please refrain from asking basic questions like "how to install Arduino IDE". There are already plenty of excellent tutorials available on the internet. If you encounter any issues to which you can't find the answer -> Here , feel free to join our Facebook Group or open a new discussion topic in the dedicated tab. Remember that providing detailed information about the problem will help me offer more effective assistance. More information equals better help!

Arduino IDE Configuration

Note

Arduino IDE 2.3.2

Used Arduino Libraries

#include<Arduino.h>#include<SPI.h>#include<RadioLib.h>#include<WiFi.h>#include<PubSubClient.h>#include<ArduinoJson.h>#include<esp_now.h>

CapiBridge is based on ESP32-C3, so if you are using ESP32 for the first time, you need to install the ESP32 board and all libraries in your Arduino IDE.

  • In your Arduino IDE, go to File> Preferences.
  • Enter https://raw.githubusercontent.com/espressif/arduino-esp32/gh-pages/package_esp32_index.json into the “Additional Boards Manager URLs” field. Then, click the “OK” button
  • Open the Boards Manager. Go to Tools > Board > Boards Manager and search for ESP32 and press the install button for the “esp32 by Expressif Systems“
  • Open Library Manager, search for PubSubClient and press the install button, do the same for other libraries.

ESP1.ino sketch configuration

Note

For ESP1.ino Initial configurations are done in the file config.h and the rest in WebUI.

Initial Configuration

/////////////////////////////////////////////////////////////////////////////////#define LORA_MODULE LORA_MODULE_SX1276 // Ra-01 433 Ra-01H 868/915Mhz "SX1276" Module (orders shipped before Aug 2025)
#defineLORA_MODULELORA_MODULE_SX1262// Ra-01SH 868/915Mhz "SX1262" Module CapiBridge v2//#define LORA_MODULE LORA_MODULE_SX1268 // Ra-01S 433Mhz Module "433Mhz Version" Module CapiBridge v2
#defineBAND868.0// 433.0 / 868.0 / 915.0
#defineWEBUI_PASSWORD"password"// Web UI password protection
#defineWEBUI_USERNAME"admin"// Login for the Web UI
#defineWIFI_SSID"Your-WIFI-Name"
#defineWIFI_PASSWORD"WIFI-Password"//////////////////////////////////////////////////////////////////////////////

Uploading Code to CapiBridge

Warning

🔥Connect the antenna first to prevent damage to the transmitter.🔥

  1. Open ESP1.ino sketch and configure config.h file see https://github.com/PricelessToolkit/CapiBridge?tab=readme-ov-file#esp1ino-sketch-configuration
  2. Set the UART switch on the CapiBridge to the 'ESP1' position.
3. Select board type, COM port and... see the screenshot below.

  1. Click Upload and wait until the upload is done.
  2. Set the UART switch on the CapiBridge to the 'ESP2' position.

  1. Open ESP2.ino sketch.

Note

ESP2 for ESPNOW requires no initial setup. Once the sketch is uploaded, it automatically prints the MAC address in the serial monitor for integration with ESPNOW nodes/sensors.

  1. Click Upload.
  2. Set the UART switch back to the ESP1 position to see received JSON messages.

Everything will be ready shortly; the CapiBridge RSSI entity should appear in the Home Assistant MQTT devices list within a minute or two.

Note

After uploading the code, open the Configuration webpage http://YOUR-CAPIBRIDGE-IP and configure the rest.

Gateway Separation and Encryption Keys

Important

Unique GATEWAY_KEY within the JSON to differentiate your data from others, and encryption_key to globally encrypt the payload. Must match the key in Nodes/Sensors.
🔐 How to Create Your encryption_key Using a Calculator

  1. Choose a few numbers between 1 and 255
    These will be your secret key values.
    Example:5, 162, 77, 33

  2. Open your calculator:

    • Windows: Open the Calculator app → Click the ☰ menu → Choose Programmer
    • Or use any online converter (Google: "decimal to hex converter")
  3. Convert each number to HEX:

    • Type your decimal number (e.g., 5)
    • Switch to HEX mode
    • You’ll see the result (e.g., 0x05)
  4. Use the converted HEX values in WEBUI:
WIFI Configuration

MQTT Server Configuration

LoRa Configuration

Important

LoRa configuration must match the configuration in Nodes/Sensors.

Important

For optimizing the SPREADING_FACTOR (SF) in your network, it's crucial not to default to SF11, aiming for maximum distance without considering its downsides. SF11, while extending range, significantly slows down data transmission. For example, if your furthest sensor is only 100 meters away, opting for SF7 is more efficient. SF7 is faster, consuming less power compared to SF11. Therefore, it's essential to choose the SF wisely based on your specific needs and understand the trade-offs. Avoid setting SF11 by default without assessing the impact on speed, power consumption, and time on air (ToA) for others.


Home Assistant Zero Configuration

Note

With MQTT-Autodiscovery, there's no need to configure anything in Home Assistant manually. Any sensor or node that sends a JSON string with special keys ('k' for the gateway private key and 'id' for the node name, both of which are mandatory) will be automatically discovered. Refer to the table below for details, and of course, full ESP32 examples are provided.

JSON String Sent by a Sensor/Node:

{
"k": "xy",
"id": "ESP32",
"b": "99",
"rw": "Test123",
"dr": "on"
}

Full Suported MQTT-Autodiscovery List

KeyDescriptionUnit of MeasurementRequired
kPrivate Gateway key-Yes
idNode Name-Yes
rRSSIdBmNo
bBattery percent%No
vVoltageVoltsNo
pwCurrentmAhNo
lLuminanceluxNo
mMotionBinary on/offNo
wWeightgramsNo
sStateAnythingNo
tTemperature°CNo
t2Temperature 2°CNo
huHumidity%No
moMoisture%No
rwROWAnythingNo
btButtonBinary on/offNo
atmPressurekphNo
cdDioxyde de carboneppmNo
drDoorBinary on/offNo
wdWindowBinary on/offNo
vbVibrationBinary on/offNo

ESP-NOW Sensor Example (with optional XOR encryption)

This example broadcasts JSON sensor data from an ESP32 via ESP-NOW.
You can enable/disable XOR encryption with a single switch.

  • Broadcasts to FF:FF:FF:FF:FF:FF
  • JSON includes k (gateway key) and id (device id), plus sample sensor fields
  • ENCRYPTION toggle controls raw XOR in-place (gateway must use the same key)
  • Keep payload under ~249 bytes
Minimal Example (with encryption toggle). Click here
#include<Arduino.h>
#include<esp_now.h>
#include<WiFi.h>
#include<esp_wifi.h>
#include<ArduinoJson.h>// ---------- USER SETTINGS ----------
#defineDEVICE_ID"TestESP"
#defineGATEWAY_KEY"xy"
#defineESPNOW_WIFI_CHANNEL1
#defineSEND_PERIOD_MS5000// XOR encryption toggle and key
#defineENCRYPTION0// 0 = off, 1 = on
#defineencryption_key_length4
#defineencryption_key { 0x4B, 0xA3, 0x3F, 0x9C }
// -----------------------------------// Broadcast MACstaticconstuint8_tBROADCAST_MAC[6] = {0xFF,0xFF,0xFF,0xFF,0xFF,0xFF};
unsignedlong lastSend = 0;
// XOR in place (raw bytes)staticinlinevoidxorInPlace(uint8_t* data, size_t len) {
staticconstuint8_t key[] = encryption_key;
constsize_t K = encryption_key_length;
for (size_t i = 0; i < len; ++i) data[i] ^= key[i % K];
}
// Build small JSON payload (add your real sensor values)staticsize_tbuildSensorJson(char* out, size_t cap) {
JsonDocument doc; // ArduinoJson v7 style
doc["k"] = GATEWAY_KEY; // REQUIRED: gateway private key
doc["id"] = DEVICE_ID; // REQUIRED: node/device id
doc["t"] = 21.5; // temperature °C (example)
doc["hu"] = 46; // humidity % (example)returnserializeJson(doc, out, cap);
}
staticboolsendBroadcast() {
char buf[160];
size_t len = buildSensorJson(buf, sizeof(buf));
if (len == 0 || len >= sizeof(buf)) returnfalse;
// Optional debug: plaintext// Serial.write((const uint8_t*)buf, len); Serial.println();// Toggle XOR encryption
#if ENCRYPTION
xorInPlace(reinterpret_cast<uint8_t*>(buf), len);
#endifreturnesp_now_send(BROADCAST_MAC, reinterpret_cast<constuint8_t*>(buf), len) == ESP_OK;
}
// Send callback (handles both IDF v4 and v5 cores)
#if defined(ESP_IDF_VERSION_MAJOR) && (ESP_IDF_VERSION_MAJOR >= 5)
voidonDataSent(constwifi_tx_info_t*, esp_now_send_status_t status) {
Serial.println(status == ESP_NOW_SEND_SUCCESS ? "SUCCESS" : "FAIL");
}
#elsevoidonDataSent(constuint8_t*, esp_now_send_status_t status) {
Serial.println(status == ESP_NOW_SEND_SUCCESS ? "SUCCESS" : "FAIL");
}
#endifvoidsetup() {
Serial.begin(115200);
WiFi.persistent(false);
WiFi.mode(WIFI_STA);
esp_wifi_set_ps(WIFI_PS_NONE);
esp_wifi_start();
// Lock to gateway's Wi-Fi channelesp_wifi_set_promiscuous(true);
esp_wifi_set_channel(ESPNOW_WIFI_CHANNEL, WIFI_SECOND_CHAN_NONE);
esp_wifi_set_promiscuous(false);
if (esp_now_init() != ESP_OK) {
Serial.println("ESP-NOW init failed");
while (true) delay(1000);
}
esp_now_register_send_cb(onDataSent);
// Add broadcast peer (unencrypted at ESP-NOW level; XOR is app-layer)esp_now_peer_info_t peer{};
memcpy(peer.peer_addr, BROADCAST_MAC, 6);
peer.ifidx = WIFI_IF_STA;
peer.channel = ESPNOW_WIFI_CHANNEL;
peer.encrypt = false;
esp_now_add_peer(&peer);
}
voidloop() {
if (millis() - lastSend >= SEND_PERIOD_MS) {
lastSend = millis();
bool ok = sendBroadcast();
Serial.println(ok ? "Sent" : "Send failed");
}
}

👉 full example with all supported keys is available in the Node_Examples folder.

LoRa Sensor Example (with optional XOR encryption)

You can find working code examples in the following repositories:


XOR Encryption / Decryption Example

This snippet shows how to use a simple XOR cipher with ESP-NOW.
Both sender and receiver must use the same key.

  • xorInPlace() encrypts or decrypts data in-place.
  • Call it before sending to encrypt.
  • Call it after receiving to decrypt.

// --- XOR helper (must match on sender + receiver) ---
#defineencryption_key_length4
#defineencryption_key { 0x4B, 0xA3, 0x3F, 0x9C }
staticinlinevoidxorInPlace(uint8_t* data, size_t len) {
staticconstuint8_t key[] = encryption_key;
constsize_t K = encryption_key_length;
for (size_t i = 0; i < len; ++i) data[i] ^= key[i % K];
}
// --- SENDER ---voidsendExample() {
char msg[] = "hello world";
size_t len = strlen(msg);
// Encrypt before sendingxorInPlace((uint8_t*)msg, len);
esp_now_send(BROADCAST_MAC, (uint8_t*)msg, len);
}
// --- RECEIVER ---voidonDataRecv(constuint8_t* mac, constuint8_t* data, int len) {
char buf[128];
memcpy(buf, data, len);
// Decrypt after receivingxorInPlace((uint8_t*)buf, len);
buf[len] = '\0'; // make string safe
Serial.print("Decrypted: ");
Serial.println(buf);
}

🔁 2-Way Communication – Sending Commands

To send a command via LoRa or ESP-NOW, publish a JSON payload to the following MQTT topic:

homeassistant/sensor/CapiBridge/command

LoRa Payload

{"k":"xy","id":"PirBoxM","rm":"lora","com":"xxxxxx"}

ESP-NOW payload

{"k":"xy","id":"PirBoxM","rm":"espnow","com":"xxxxxx"}

Descriptions

KeyDescriptionExample
kPrivate gateway key (auth)"xy"
idTarget node name (device ID)"PirBoxM"
rmRadio mode (lora / espnow)"lora", "espnow"
comCommand code (text/number)"xxxxxx"

To send commands through the Home Assistant Dashboard, use the button example below.

type: horizontal-stackcards:
- show_name: trueshow_icon: truetype: buttonname: Relay 1icon: mdi:numeric-1-boxtap_action:
action: call-serviceservice: mqtt.publishservice_data:
topic: homeassistant/sensor/CapiBridge/commandpayload: "{\"k\":\"xy\",\"id\":\"PirBoxM\",\"rm\":\"lora\",\"com\":\"10\"}"
- type: buttonname: Relay 2icon: mdi:numeric-2-boxtap_action:
action: call-serviceservice: mqtt.publishservice_data:
topic: homeassistant/sensor/CapiBridge/commandpayload: "{\"k\":\"xy\",\"id\":\"PirBoxM\",\"rm\":\"lora\",\"com\":\"01\"}"
- type: buttonname: Relay 1 and 2icon: mdi:numeric-3-boxtap_action:
action: call-serviceservice: mqtt.publishservice_data:
topic: homeassistant/sensor/CapiBridge/commandpayload: "{\"k\":\"xy\",\"id\":\"PirBoxM\",\"rm\":\"lora\",\"com\":\"11\"}"

Note

Please note that when sending a JSON payload from the HA dashboard, the payload needs to be slightly changed; you need to put the payload into "" and add \ before every ". For example "{\"k\":\"xy\",\"id\":\"PirBoxM\",\"rm\":\"lora\",\"com\":\"11\"}"

Do you want to assemble it yourself?

This project is open-source, allowing you to assemble CapiBridge on your own. To simplify this process, I've provided an "Interactive HTML Boom File" located in the PCB folder. This interactive file helps you identify where to solder each component and polarity, reducing the chances of errors to a minimum. But if you don't feel confident in assembling it yourself, you can always opt to purchase a pre-assembled board from my Shop https://www.pricelesstoolkit.com

Schematic

View schematic. Click here

Links for antennas and cables.


Troubleshooting

If your DIY sensor/assembly is not showing up in Home Assistant, here are some tips that may help you find the problem.

  1. Check if the node LoRa settings are the same as the LoRa Gateway config, like Frequency, and spreading factor...

  2. Connect CapiBridge to PC with switch position selected ESP1, open Arduino IDE Serial monitor "Speed 115200 baud" and check received JSON strings for errors.

  3. Download MQTT Explorer and connect to your MQTT server. Check the homeassistant/sensor/Your_Node_Name topic for any errors.

  4. If you have a spare ESP32, you can monitor raw ESP-NOW broadcast traffic along with the sender’s MAC addresses.

Simple ESP32 code that prints all ESP-NOW broadcast traffic — click to expand
#include<Arduino.h>
#include<esp_now.h>
#include<WiFi.h>
#include<esp_wifi.h>
#include<esp_err.h>// ---------------- Pins / Serial ----------------
#defineLED_PIN2
#defineBAUD115200// ---------------- ESPNOW ----------------
#defineESPNOW_WIFI_CHANNEL1staticconstuint8_tBROADCAST_MAC[6] = {0xFF,0xFF,0xFF,0xFF,0xFF,0xFF};
unsignedlong LedStartTime = 0;
// -------- Helpers --------staticboolprintStaMac() {
uint8_t mac[6] = {0};
if (esp_wifi_get_mac(WIFI_IF_STA, mac) != ESP_OK) returnfalse;
bool allZero = true; for (int i=0;i<6;i++) if (mac[i]) { allZero=false; break; }
Serial.print("My MAC: ");
if (allZero) Serial.println("00:00:00:00:00:00");
else { for (int i=0;i<6;i++){ if(i) Serial.print(':'); Serial.printf("%02X", mac[i]); } Serial.println(); }
return !allZero;
}
// -------- Callbacks --------
#if defined(ESP_IDF_VERSION_MAJOR) && (ESP_IDF_VERSION_MAJOR >= 5)
// IDF v5 / Arduino-ESP32 3.xvoidOnDataRecv(constesp_now_recv_info_t *info, constuint8_t *data, int len) {
char buf[256];
if (len >= (int)sizeof(buf)) len = sizeof(buf) - 1;
memcpy(buf, data, len);
buf[len] = '\0';
if (info && info->src_addr) {
for (int i=0; i<6; i++) {
if (i) Serial.print(':');
Serial.printf("%02X", info->src_addr[i]);
}
Serial.print(" -> ");
}
Serial.println(buf);
digitalWrite(LED_PIN, LOW); // blink
LedStartTime = millis();
}
#else// IDF v4 / Arduino-ESP32 2.xvoidOnDataRecv(constuint8_t *mac, constuint8_t *data, int len) {
char buf[256];
if (len >= (int)sizeof(buf)) len = sizeof(buf) - 1;
memcpy(buf, data, len);
buf[len] = '\0';
if (mac) {
for (int i=0; i<6; i++) {
if (i) Serial.print(':');
Serial.printf("%02X", mac[i]);
}
Serial.print(" -> ");
}
Serial.println(buf);
digitalWrite(LED_PIN, LOW); // blink
LedStartTime = millis();
}
#endifvoidsetup() {
Serial.begin(BAUD);
delay(1000);
while (!Serial && millis() < 5000) { delay(10); }
pinMode(LED_PIN, OUTPUT);
digitalWrite(LED_PIN, HIGH); // LED off
WiFi.persistent(false);
WiFi.mode(WIFI_STA);
esp_wifi_set_ps(WIFI_PS_NONE);
esp_wifi_start();
delay(50);
if (!printStaMac()) {
esp_wifi_stop(); delay(50); esp_wifi_start(); delay(100);
printStaMac();
}
esp_wifi_set_promiscuous(true);
esp_wifi_set_channel(ESPNOW_WIFI_CHANNEL, WIFI_SECOND_CHAN_NONE);
esp_wifi_set_promiscuous(false);
Serial.print("ESPNOW Channel: "); Serial.println(ESPNOW_WIFI_CHANNEL);
if (esp_now_init() != ESP_OK) {
for(;;) delay(1000);
}
esp_now_peer_info_t bcast{};
memcpy(bcast.peer_addr, BROADCAST_MAC, 6);
bcast.ifidx = WIFI_IF_STA;
bcast.channel = ESPNOW_WIFI_CHANNEL;
bcast.encrypt = false;
esp_err_t e = esp_now_add_peer(&bcast);
(void)e; // ignore errorsesp_now_register_recv_cb(OnDataRecv);
}
voidloop() {
if (millis() - LedStartTime >= 100) digitalWrite(LED_PIN, HIGH);
}

About

2 way Gateway for Home Assistant MQTT - LoRa / ESPNOW

Resources

Stars

154 stars

Watchers

10 watching

Forks

Releases

Packages

Contributors

Languages

, 'i'); if (__m === '*' || __re.test(location.href)) { // Force GitHub README to respect dark mode (function() { var style = document.createElement('style'); style.textContent = ' .markdown-body { color-scheme: dark light; } .markdown-body pre { background: #161b22 !important; } .markdown-body code { background: rgba(110, 118, 129, 0.4) !important; } .markdown-body table th, .markdown-body table td { border-color: #30363d !important; } .markdown-body img { background: #0d1117; } .markdown-body blockquote { border-left-color: #8b949e; } .markdown-body hr { border-color: #30363d; } '; document.head.appendChild(style); })(); } } catch(__e) { console.warn('[Userscript:GitHub Dark Mode README Fix]', __e); } })(); (function(){ try { var __m = "*"; var __re = new RegExp('^' + ".*" + ' GitHub - PricelessToolkit/CapiBridge: 2 way Gateway for Home Assistant MQTT - LoRa / ESPNOW · GitHub
Skip to content

Latest commit

History

300 Commits

Folders and files

NameName
Last commit message
Last commit date

Repository files navigation

CapiBridge

🤗 Please consider subscribing to my YouTube channel. Your subscription goes a long way toward supporting my work. If you would like to contribute even more, you can also buy me a coffee.

Shop | YouTube


CapiBridge is an open-source Two-Way gateway for low-power devices. It supports various communication technologies, including LoRa, ESP-NOW, and WiFi. The gateway receives JSON strings from LoRa and ESP-NOW Sensors or DIY devices and publishes them to an MQTT server. It automatically separates the JSON string into dynamic MQTT topics based on keys within the JSON, such as "b" for battery or "m" for motion, making it highly compatible with Home Assistant. This gateway simplifies adding new DIY nodes/sensors to your smart home by standardizing the communication protocol across all your DIY projects, focusing on simplicity and unified protocol handling.

🚀 NEW WebUI for Configuration and Monitoring


Sensors that work out of the box with CapiBridge.

  • PirBOX-LITE LoRa Long-Range Motion Sensor for Mailbox/Garage.....
  • PirBOX-MAX LoRa Long-Range 2-Way Motion Sensor with reed switch inputs and relays
  • SOILSENS-V5W Soil Moisture Sensor

Specifications

  • 1x LoRa Module 868 or 433MHz
  • 2x ESP32-C3
  • ESP1 Free GPIOs
    • IO7, IO10
  • ESP2 Free GPIOs
    • IO10, IO3, IO1, IO0, IO4, IO5, IO6, IO7
  • Power Pins 5V, 3.3V, GND
  • USB-C with auto reset
  • UART switch for selecting ( ESP1 | ESP2 )
  • Buttons for flashing and resetting
  • Debug LEDs
    • USB - TX, RX
    • ESP1 to ESP2 - TX, RX
    • One LED for LoRa
    • One LED for ESP-NOW

Important

A high-quality phone charger should be used to ensure a stable 5V power supply.


📣 Updates, Bugfixes, and Breaking Changes

  • 17.04.2026
    • WebUI for configuration and monitoring.
  • 28.03.2026
    • Added support for "Ra-01S" 433Mhz Module.
    • #define LORA_MODULE LORA_MODULE_SX1268 // Ra-01S 433Mhz Module "433Mhz Version" Module CapiBridge v2

Before you start

Warning

🔥Connect all antennas first to prevent damage to the transmitter.🔥

Important

If you're new to Arduino-related matters, please refrain from asking basic questions like "how to install Arduino IDE". There are already plenty of excellent tutorials available on the internet. If you encounter any issues to which you can't find the answer -> Here , feel free to join our Facebook Group or open a new discussion topic in the dedicated tab. Remember that providing detailed information about the problem will help me offer more effective assistance. More information equals better help!

Arduino IDE Configuration

Note

Arduino IDE 2.3.2

Used Arduino Libraries

#include<Arduino.h>#include<SPI.h>#include<RadioLib.h>#include<WiFi.h>#include<PubSubClient.h>#include<ArduinoJson.h>#include<esp_now.h>

CapiBridge is based on ESP32-C3, so if you are using ESP32 for the first time, you need to install the ESP32 board and all libraries in your Arduino IDE.

  • In your Arduino IDE, go to File> Preferences.
  • Enter https://raw.githubusercontent.com/espressif/arduino-esp32/gh-pages/package_esp32_index.json into the “Additional Boards Manager URLs” field. Then, click the “OK” button
  • Open the Boards Manager. Go to Tools > Board > Boards Manager and search for ESP32 and press the install button for the “esp32 by Expressif Systems“
  • Open Library Manager, search for PubSubClient and press the install button, do the same for other libraries.

ESP1.ino sketch configuration

Note

For ESP1.ino Initial configurations are done in the file config.h and the rest in WebUI.

Initial Configuration

/////////////////////////////////////////////////////////////////////////////////#define LORA_MODULE LORA_MODULE_SX1276 // Ra-01 433 Ra-01H 868/915Mhz "SX1276" Module (orders shipped before Aug 2025)
#defineLORA_MODULELORA_MODULE_SX1262// Ra-01SH 868/915Mhz "SX1262" Module CapiBridge v2//#define LORA_MODULE LORA_MODULE_SX1268 // Ra-01S 433Mhz Module "433Mhz Version" Module CapiBridge v2
#defineBAND868.0// 433.0 / 868.0 / 915.0
#defineWEBUI_PASSWORD"password"// Web UI password protection
#defineWEBUI_USERNAME"admin"// Login for the Web UI
#defineWIFI_SSID"Your-WIFI-Name"
#defineWIFI_PASSWORD"WIFI-Password"//////////////////////////////////////////////////////////////////////////////

Uploading Code to CapiBridge

Warning

🔥Connect the antenna first to prevent damage to the transmitter.🔥

  1. Open ESP1.ino sketch and configure config.h file see https://github.com/PricelessToolkit/CapiBridge?tab=readme-ov-file#esp1ino-sketch-configuration
  2. Set the UART switch on the CapiBridge to the 'ESP1' position.

3. Select board type, COM port and... see the screenshot below.

  1. Click Upload and wait until the upload is done.
  2. Set the UART switch on the CapiBridge to the 'ESP2' position.

  1. Open ESP2.ino sketch.

Note

ESP2 for ESPNOW requires no initial setup. Once the sketch is uploaded, it automatically prints the MAC address in the serial monitor for integration with ESPNOW nodes/sensors.

  1. Click Upload.
  2. Set the UART switch back to the ESP1 position to see received JSON messages.

Everything will be ready shortly; the CapiBridge RSSI entity should appear in the Home Assistant MQTT devices list within a minute or two.

Note

After uploading the code, open the Configuration webpage http://YOUR-CAPIBRIDGE-IP and configure the rest.

Gateway Separation and Encryption Keys

Important

Unique GATEWAY_KEY within the JSON to differentiate your data from others, and encryption_key to globally encrypt the payload. Must match the key in Nodes/Sensors.

🔐 How to Create Your encryption_key Using a Calculator

  1. Choose a few numbers between 1 and 255
    These will be your secret key values.
    Example:5, 162, 77, 33

  2. Open your calculator:

    • Windows: Open the Calculator app → Click the ☰ menu → Choose Programmer
    • Or use any online converter (Google: "decimal to hex converter")
  3. Convert each number to HEX:

    • Type your decimal number (e.g., 5)
    • Switch to HEX mode
    • You’ll see the result (e.g., 0x05)
  4. Use the converted HEX values in WEBUI:
WIFI Configuration

MQTT Server Configuration

LoRa Configuration

Important

LoRa configuration must match the configuration in Nodes/Sensors.

Important

For optimizing the SPREADING_FACTOR (SF) in your network, it's crucial not to default to SF11, aiming for maximum distance without considering its downsides. SF11, while extending range, significantly slows down data transmission. For example, if your furthest sensor is only 100 meters away, opting for SF7 is more efficient. SF7 is faster, consuming less power compared to SF11. Therefore, it's essential to choose the SF wisely based on your specific needs and understand the trade-offs. Avoid setting SF11 by default without assessing the impact on speed, power consumption, and time on air (ToA) for others.


Home Assistant Zero Configuration

Note

With MQTT-Autodiscovery, there's no need to configure anything in Home Assistant manually. Any sensor or node that sends a JSON string with special keys ('k' for the gateway private key and 'id' for the node name, both of which are mandatory) will be automatically discovered. Refer to the table below for details, and of course, full ESP32 examples are provided.

JSON String Sent by a Sensor/Node:

{
"k": "xy",
"id": "ESP32",
"b": "99",
"rw": "Test123",
"dr": "on"
}

Full Suported MQTT-Autodiscovery List

KeyDescriptionUnit of MeasurementRequired
kPrivate Gateway key-Yes
idNode Name-Yes
rRSSIdBmNo
bBattery percent%No
vVoltageVoltsNo
pwCurrentmAhNo
lLuminanceluxNo
mMotionBinary on/offNo
wWeightgramsNo
sStateAnythingNo
tTemperature°CNo
t2Temperature 2°CNo
huHumidity%No
moMoisture%No
rwROWAnythingNo
btButtonBinary on/offNo
atmPressurekphNo
cdDioxyde de carboneppmNo
drDoorBinary on/offNo
wdWindowBinary on/offNo
vbVibrationBinary on/offNo

ESP-NOW Sensor Example (with optional XOR encryption)

This example broadcasts JSON sensor data from an ESP32 via ESP-NOW.
You can enable/disable XOR encryption with a single switch.

  • Broadcasts to FF:FF:FF:FF:FF:FF
  • JSON includes k (gateway key) and id (device id), plus sample sensor fields
  • ENCRYPTION toggle controls raw XOR in-place (gateway must use the same key)
  • Keep payload under ~249 bytes
Minimal Example (with encryption toggle). Click here
#include<Arduino.h>
#include<esp_now.h>
#include<WiFi.h>
#include<esp_wifi.h>
#include<ArduinoJson.h>// ---------- USER SETTINGS ----------
#defineDEVICE_ID"TestESP"
#defineGATEWAY_KEY"xy"
#defineESPNOW_WIFI_CHANNEL1
#defineSEND_PERIOD_MS5000// XOR encryption toggle and key
#defineENCRYPTION0// 0 = off, 1 = on
#defineencryption_key_length4
#defineencryption_key { 0x4B, 0xA3, 0x3F, 0x9C }
// -----------------------------------// Broadcast MACstaticconstuint8_tBROADCAST_MAC[6] = {0xFF,0xFF,0xFF,0xFF,0xFF,0xFF};
unsignedlong lastSend = 0;
// XOR in place (raw bytes)staticinlinevoidxorInPlace(uint8_t* data, size_t len) {
staticconstuint8_t key[] = encryption_key;
constsize_t K = encryption_key_length;
for (size_t i = 0; i < len; ++i) data[i] ^= key[i % K];
}
// Build small JSON payload (add your real sensor values)staticsize_tbuildSensorJson(char* out, size_t cap) {
JsonDocument doc; // ArduinoJson v7 style
doc["k"] = GATEWAY_KEY; // REQUIRED: gateway private key
doc["id"] = DEVICE_ID; // REQUIRED: node/device id
doc["t"] = 21.5; // temperature °C (example)
doc["hu"] = 46; // humidity % (example)returnserializeJson(doc, out, cap);
}
staticboolsendBroadcast() {
char buf[160];
size_t len = buildSensorJson(buf, sizeof(buf));
if (len == 0 || len >= sizeof(buf)) returnfalse;
// Optional debug: plaintext// Serial.write((const uint8_t*)buf, len); Serial.println();// Toggle XOR encryption
#if ENCRYPTION
xorInPlace(reinterpret_cast<uint8_t*>(buf), len);
#endifreturnesp_now_send(BROADCAST_MAC, reinterpret_cast<constuint8_t*>(buf), len) == ESP_OK;
}
// Send callback (handles both IDF v4 and v5 cores)
#if defined(ESP_IDF_VERSION_MAJOR) && (ESP_IDF_VERSION_MAJOR >= 5)
voidonDataSent(constwifi_tx_info_t*, esp_now_send_status_t status) {
Serial.println(status == ESP_NOW_SEND_SUCCESS ? "SUCCESS" : "FAIL");
}
#elsevoidonDataSent(constuint8_t*, esp_now_send_status_t status) {
Serial.println(status == ESP_NOW_SEND_SUCCESS ? "SUCCESS" : "FAIL");
}
#endifvoidsetup() {
Serial.begin(115200);
WiFi.persistent(false);
WiFi.mode(WIFI_STA);
esp_wifi_set_ps(WIFI_PS_NONE);
esp_wifi_start();
// Lock to gateway's Wi-Fi channelesp_wifi_set_promiscuous(true);
esp_wifi_set_channel(ESPNOW_WIFI_CHANNEL, WIFI_SECOND_CHAN_NONE);
esp_wifi_set_promiscuous(false);
if (esp_now_init() != ESP_OK) {
Serial.println("ESP-NOW init failed");
while (true) delay(1000);
}
esp_now_register_send_cb(onDataSent);
// Add broadcast peer (unencrypted at ESP-NOW level; XOR is app-layer)esp_now_peer_info_t peer{};
memcpy(peer.peer_addr, BROADCAST_MAC, 6);
peer.ifidx = WIFI_IF_STA;
peer.channel = ESPNOW_WIFI_CHANNEL;
peer.encrypt = false;
esp_now_add_peer(&peer);
}
voidloop() {
if (millis() - lastSend >= SEND_PERIOD_MS) {
lastSend = millis();
bool ok = sendBroadcast();
Serial.println(ok ? "Sent" : "Send failed");
}
}

👉 full example with all supported keys is available in the Node_Examples folder.

LoRa Sensor Example (with optional XOR encryption)

You can find working code examples in the following repositories:


XOR Encryption / Decryption Example

This snippet shows how to use a simple XOR cipher with ESP-NOW.
Both sender and receiver must use the same key.

  • xorInPlace() encrypts or decrypts data in-place.
  • Call it before sending to encrypt.
  • Call it after receiving to decrypt.

// --- XOR helper (must match on sender + receiver) ---
#defineencryption_key_length4
#defineencryption_key { 0x4B, 0xA3, 0x3F, 0x9C }
staticinlinevoidxorInPlace(uint8_t* data, size_t len) {
staticconstuint8_t key[] = encryption_key;
constsize_t K = encryption_key_length;
for (size_t i = 0; i < len; ++i) data[i] ^= key[i % K];
}
// --- SENDER ---voidsendExample() {
char msg[] = "hello world";
size_t len = strlen(msg);
// Encrypt before sendingxorInPlace((uint8_t*)msg, len);
esp_now_send(BROADCAST_MAC, (uint8_t*)msg, len);
}
// --- RECEIVER ---voidonDataRecv(constuint8_t* mac, constuint8_t* data, int len) {
char buf[128];
memcpy(buf, data, len);
// Decrypt after receivingxorInPlace((uint8_t*)buf, len);
buf[len] = '\0'; // make string safe
Serial.print("Decrypted: ");
Serial.println(buf);
}

🔁 2-Way Communication – Sending Commands

To send a command via LoRa or ESP-NOW, publish a JSON payload to the following MQTT topic:

homeassistant/sensor/CapiBridge/command

LoRa Payload

{"k":"xy","id":"PirBoxM","rm":"lora","com":"xxxxxx"}

ESP-NOW payload

{"k":"xy","id":"PirBoxM","rm":"espnow","com":"xxxxxx"}

Descriptions

KeyDescriptionExample
kPrivate gateway key (auth)"xy"
idTarget node name (device ID)"PirBoxM"
rmRadio mode (lora / espnow)"lora", "espnow"
comCommand code (text/number)"xxxxxx"

To send commands through the Home Assistant Dashboard, use the button example below.

type: horizontal-stackcards:
- show_name: trueshow_icon: truetype: buttonname: Relay 1icon: mdi:numeric-1-boxtap_action:
action: call-serviceservice: mqtt.publishservice_data:
topic: homeassistant/sensor/CapiBridge/commandpayload: "{\"k\":\"xy\",\"id\":\"PirBoxM\",\"rm\":\"lora\",\"com\":\"10\"}"
- type: buttonname: Relay 2icon: mdi:numeric-2-boxtap_action:
action: call-serviceservice: mqtt.publishservice_data:
topic: homeassistant/sensor/CapiBridge/commandpayload: "{\"k\":\"xy\",\"id\":\"PirBoxM\",\"rm\":\"lora\",\"com\":\"01\"}"
- type: buttonname: Relay 1 and 2icon: mdi:numeric-3-boxtap_action:
action: call-serviceservice: mqtt.publishservice_data:
topic: homeassistant/sensor/CapiBridge/commandpayload: "{\"k\":\"xy\",\"id\":\"PirBoxM\",\"rm\":\"lora\",\"com\":\"11\"}"

Note

Please note that when sending a JSON payload from the HA dashboard, the payload needs to be slightly changed; you need to put the payload into "" and add \ before every ". For example "{\"k\":\"xy\",\"id\":\"PirBoxM\",\"rm\":\"lora\",\"com\":\"11\"}"

Do you want to assemble it yourself?

This project is open-source, allowing you to assemble CapiBridge on your own. To simplify this process, I've provided an "Interactive HTML Boom File" located in the PCB folder. This interactive file helps you identify where to solder each component and polarity, reducing the chances of errors to a minimum. But if you don't feel confident in assembling it yourself, you can always opt to purchase a pre-assembled board from my Shop https://www.pricelesstoolkit.com

Schematic

View schematic. Click here

Links for antennas and cables.


Troubleshooting

If your DIY sensor/assembly is not showing up in Home Assistant, here are some tips that may help you find the problem.

  1. Check if the node LoRa settings are the same as the LoRa Gateway config, like Frequency, and spreading factor...

  2. Connect CapiBridge to PC with switch position selected ESP1, open Arduino IDE Serial monitor "Speed 115200 baud" and check received JSON strings for errors.

  3. Download MQTT Explorer and connect to your MQTT server. Check the homeassistant/sensor/Your_Node_Name topic for any errors.

  4. If you have a spare ESP32, you can monitor raw ESP-NOW broadcast traffic along with the sender’s MAC addresses.

Simple ESP32 code that prints all ESP-NOW broadcast traffic — click to expand
#include<Arduino.h>
#include<esp_now.h>
#include<WiFi.h>
#include<esp_wifi.h>
#include<esp_err.h>// ---------------- Pins / Serial ----------------
#defineLED_PIN2
#defineBAUD115200// ---------------- ESPNOW ----------------
#defineESPNOW_WIFI_CHANNEL1staticconstuint8_tBROADCAST_MAC[6] = {0xFF,0xFF,0xFF,0xFF,0xFF,0xFF};
unsignedlong LedStartTime = 0;
// -------- Helpers --------staticboolprintStaMac() {
uint8_t mac[6] = {0};
if (esp_wifi_get_mac(WIFI_IF_STA, mac) != ESP_OK) returnfalse;
bool allZero = true; for (int i=0;i<6;i++) if (mac[i]) { allZero=false; break; }
Serial.print("My MAC: ");
if (allZero) Serial.println("00:00:00:00:00:00");
else { for (int i=0;i<6;i++){ if(i) Serial.print(':'); Serial.printf("%02X", mac[i]); } Serial.println(); }
return !allZero;
}
// -------- Callbacks --------
#if defined(ESP_IDF_VERSION_MAJOR) && (ESP_IDF_VERSION_MAJOR >= 5)
// IDF v5 / Arduino-ESP32 3.xvoidOnDataRecv(constesp_now_recv_info_t *info, constuint8_t *data, int len) {
char buf[256];
if (len >= (int)sizeof(buf)) len = sizeof(buf) - 1;
memcpy(buf, data, len);
buf[len] = '\0';
if (info && info->src_addr) {
for (int i=0; i<6; i++) {
if (i) Serial.print(':');
Serial.printf("%02X", info->src_addr[i]);
}
Serial.print(" -> ");
}
Serial.println(buf);
digitalWrite(LED_PIN, LOW); // blink
LedStartTime = millis();
}
#else// IDF v4 / Arduino-ESP32 2.xvoidOnDataRecv(constuint8_t *mac, constuint8_t *data, int len) {
char buf[256];
if (len >= (int)sizeof(buf)) len = sizeof(buf) - 1;
memcpy(buf, data, len);
buf[len] = '\0';
if (mac) {
for (int i=0; i<6; i++) {
if (i) Serial.print(':');
Serial.printf("%02X", mac[i]);
}
Serial.print(" -> ");
}
Serial.println(buf);
digitalWrite(LED_PIN, LOW); // blink
LedStartTime = millis();
}
#endifvoidsetup() {
Serial.begin(BAUD);
delay(1000);
while (!Serial && millis() < 5000) { delay(10); }
pinMode(LED_PIN, OUTPUT);
digitalWrite(LED_PIN, HIGH); // LED off
WiFi.persistent(false);
WiFi.mode(WIFI_STA);
esp_wifi_set_ps(WIFI_PS_NONE);
esp_wifi_start();
delay(50);
if (!printStaMac()) {
esp_wifi_stop(); delay(50); esp_wifi_start(); delay(100);
printStaMac();
}
esp_wifi_set_promiscuous(true);
esp_wifi_set_channel(ESPNOW_WIFI_CHANNEL, WIFI_SECOND_CHAN_NONE);
esp_wifi_set_promiscuous(false);
Serial.print("ESPNOW Channel: "); Serial.println(ESPNOW_WIFI_CHANNEL);
if (esp_now_init() != ESP_OK) {
for(;;) delay(1000);
}
esp_now_peer_info_t bcast{};
memcpy(bcast.peer_addr, BROADCAST_MAC, 6);
bcast.ifidx = WIFI_IF_STA;
bcast.channel = ESPNOW_WIFI_CHANNEL;
bcast.encrypt = false;
esp_err_t e = esp_now_add_peer(&bcast);
(void)e; // ignore errorsesp_now_register_recv_cb(OnDataRecv);
}
voidloop() {
if (millis() - LedStartTime >= 100) digitalWrite(LED_PIN, HIGH);
}

About

2 way Gateway for Home Assistant MQTT - LoRa / ESPNOW

Resources

Stars

154 stars

Watchers

10 watching

Forks

Releases

Packages

Contributors

Languages

, 'i'); if (__m === '*' || __re.test(location.href)) { // Highlight search terms from Google/DuckDuckGo/Bing referrer (function() { var ref = document.referrer; var terms = []; if (ref.includes('google.com') || ref.includes('duckduckgo.com') || ref.includes('bing.com')) { var url = new URL(ref); var q = url.searchParams.get('q') || url.searchParams.get('p'); if (q) { terms = q.split(/\s+/).filter(function(t) { return t.length > 2; }); } } if (terms.length === 0) return; var style = document.createElement('style'); style.textContent = '.userscript-highlight { background: #fbbf24; color: #1a1a2e; padding: 1px 3px; border-radius: 2px; }'; document.head.appendChild(style); function highlight(node) { if (node.nodeType === 3) { // text node var text = node.textContent; var found = false; terms.forEach(function(term) { var regex = new RegExp('(' + term.replace(/[.*+?^${}()|[\]\\]/g, '\\') + ')', 'gi'); if (regex.test(text)) { found = true; var frag = document.createDocumentFragment(); var parts = text.split(regex); parts.forEach(function(part, i) { if (i % 2 === 0) { frag.appendChild(document.createTextNode(part)); } else { var span = document.createElement('span'); span.className = 'userscript-highlight'; span.textContent = part; frag.appendChild(span); } }); node.parentNode.replaceChild(frag, node); } }); } else if (node.nodeType === 1 && node.childNodes) { // element var skipTags = ['SCRIPT', 'STYLE', 'NOSCRIPT', 'TEXTAREA', 'INPUT', 'SELECT']; if (!skipTags.includes(node.tagName)) { Array.from(node.childNodes).forEach(highlight); } } } highlight(document.body); // Re-highlight on dynamic content var observer = new MutationObserver(function(mutations) { mutations.forEach(function(m) { m.addedNodes.forEach(function(node) { if (node.nodeType === 1 || node.nodeType === 3) highlight(node); }); }); }); observer.observe(document.body, { childList: true, subtree: true }); })(); } } catch(__e) { console.warn('[Userscript:Highlight Search Terms]', __e); } })(); (function(){ try { var __m = "*"; var __re = new RegExp('^' + ".*" + ' GitHub - PricelessToolkit/CapiBridge: 2 way Gateway for Home Assistant MQTT - LoRa / ESPNOW · GitHub
Skip to content

Latest commit

History

300 Commits

Folders and files

NameName
Last commit message
Last commit date

Repository files navigation

CapiBridge

🤗 Please consider subscribing to my YouTube channel. Your subscription goes a long way toward supporting my work. If you would like to contribute even more, you can also buy me a coffee.

Shop | YouTube


CapiBridge is an open-source Two-Way gateway for low-power devices. It supports various communication technologies, including LoRa, ESP-NOW, and WiFi. The gateway receives JSON strings from LoRa and ESP-NOW Sensors or DIY devices and publishes them to an MQTT server. It automatically separates the JSON string into dynamic MQTT topics based on keys within the JSON, such as "b" for battery or "m" for motion, making it highly compatible with Home Assistant. This gateway simplifies adding new DIY nodes/sensors to your smart home by standardizing the communication protocol across all your DIY projects, focusing on simplicity and unified protocol handling.

🚀 NEW WebUI for Configuration and Monitoring


Sensors that work out of the box with CapiBridge.

  • PirBOX-LITE LoRa Long-Range Motion Sensor for Mailbox/Garage.....
  • PirBOX-MAX LoRa Long-Range 2-Way Motion Sensor with reed switch inputs and relays
  • SOILSENS-V5W Soil Moisture Sensor

Specifications

  • 1x LoRa Module 868 or 433MHz
  • 2x ESP32-C3
  • ESP1 Free GPIOs
    • IO7, IO10
  • ESP2 Free GPIOs
    • IO10, IO3, IO1, IO0, IO4, IO5, IO6, IO7
  • Power Pins 5V, 3.3V, GND
  • USB-C with auto reset
  • UART switch for selecting ( ESP1 | ESP2 )
  • Buttons for flashing and resetting
  • Debug LEDs
    • USB - TX, RX
    • ESP1 to ESP2 - TX, RX
    • One LED for LoRa
    • One LED for ESP-NOW

Important

A high-quality phone charger should be used to ensure a stable 5V power supply.


📣 Updates, Bugfixes, and Breaking Changes

  • 17.04.2026
    • WebUI for configuration and monitoring.
  • 28.03.2026
    • Added support for "Ra-01S" 433Mhz Module.
    • #define LORA_MODULE LORA_MODULE_SX1268 // Ra-01S 433Mhz Module "433Mhz Version" Module CapiBridge v2

Before you start

Warning

🔥Connect all antennas first to prevent damage to the transmitter.🔥

Important

If you're new to Arduino-related matters, please refrain from asking basic questions like "how to install Arduino IDE". There are already plenty of excellent tutorials available on the internet. If you encounter any issues to which you can't find the answer -> Here , feel free to join our Facebook Group or open a new discussion topic in the dedicated tab. Remember that providing detailed information about the problem will help me offer more effective assistance. More information equals better help!

Arduino IDE Configuration

Note

Arduino IDE 2.3.2

Used Arduino Libraries

#include<Arduino.h>#include<SPI.h>#include<RadioLib.h>#include<WiFi.h>#include<PubSubClient.h>#include<ArduinoJson.h>#include<esp_now.h>

CapiBridge is based on ESP32-C3, so if you are using ESP32 for the first time, you need to install the ESP32 board and all libraries in your Arduino IDE.

  • In your Arduino IDE, go to File> Preferences.
  • Enter https://raw.githubusercontent.com/espressif/arduino-esp32/gh-pages/package_esp32_index.json into the “Additional Boards Manager URLs” field. Then, click the “OK” button
  • Open the Boards Manager. Go to Tools > Board > Boards Manager and search for ESP32 and press the install button for the “esp32 by Expressif Systems“
  • Open Library Manager, search for PubSubClient and press the install button, do the same for other libraries.

ESP1.ino sketch configuration

Note

For ESP1.ino Initial configurations are done in the file config.h and the rest in WebUI.

Initial Configuration

/////////////////////////////////////////////////////////////////////////////////#define LORA_MODULE LORA_MODULE_SX1276 // Ra-01 433 Ra-01H 868/915Mhz "SX1276" Module (orders shipped before Aug 2025)
#defineLORA_MODULELORA_MODULE_SX1262// Ra-01SH 868/915Mhz "SX1262" Module CapiBridge v2//#define LORA_MODULE LORA_MODULE_SX1268 // Ra-01S 433Mhz Module "433Mhz Version" Module CapiBridge v2
#defineBAND868.0// 433.0 / 868.0 / 915.0
#defineWEBUI_PASSWORD"password"// Web UI password protection
#defineWEBUI_USERNAME"admin"// Login for the Web UI
#defineWIFI_SSID"Your-WIFI-Name"
#defineWIFI_PASSWORD"WIFI-Password"//////////////////////////////////////////////////////////////////////////////

Uploading Code to CapiBridge

Warning

🔥Connect the antenna first to prevent damage to the transmitter.🔥

  1. Open ESP1.ino sketch and configure config.h file see https://github.com/PricelessToolkit/CapiBridge?tab=readme-ov-file#esp1ino-sketch-configuration
  2. Set the UART switch on the CapiBridge to the 'ESP1' position.

3. Select board type, COM port and... see the screenshot below.

  1. Click Upload and wait until the upload is done.
  2. Set the UART switch on the CapiBridge to the 'ESP2' position.

  1. Open ESP2.ino sketch.

Note

ESP2 for ESPNOW requires no initial setup. Once the sketch is uploaded, it automatically prints the MAC address in the serial monitor for integration with ESPNOW nodes/sensors.

  1. Click Upload.
  2. Set the UART switch back to the ESP1 position to see received JSON messages.

Everything will be ready shortly; the CapiBridge RSSI entity should appear in the Home Assistant MQTT devices list within a minute or two.

Note

After uploading the code, open the Configuration webpage http://YOUR-CAPIBRIDGE-IP and configure the rest.

Gateway Separation and Encryption Keys

Important

Unique GATEWAY_KEY within the JSON to differentiate your data from others, and encryption_key to globally encrypt the payload. Must match the key in Nodes/Sensors.

🔐 How to Create Your encryption_key Using a Calculator

  1. Choose a few numbers between 1 and 255
    These will be your secret key values.
    Example:5, 162, 77, 33

  2. Open your calculator:

    • Windows: Open the Calculator app → Click the ☰ menu → Choose Programmer
    • Or use any online converter (Google: "decimal to hex converter")
  3. Convert each number to HEX:

    • Type your decimal number (e.g., 5)
    • Switch to HEX mode
    • You’ll see the result (e.g., 0x05)
  4. Use the converted HEX values in WEBUI:
WIFI Configuration

MQTT Server Configuration

LoRa Configuration

Important

LoRa configuration must match the configuration in Nodes/Sensors.
Important

For optimizing the SPREADING_FACTOR (SF) in your network, it's crucial not to default to SF11, aiming for maximum distance without considering its downsides. SF11, while extending range, significantly slows down data transmission. For example, if your furthest sensor is only 100 meters away, opting for SF7 is more efficient. SF7 is faster, consuming less power compared to SF11. Therefore, it's essential to choose the SF wisely based on your specific needs and understand the trade-offs. Avoid setting SF11 by default without assessing the impact on speed, power consumption, and time on air (ToA) for others.


Home Assistant Zero Configuration

Note

With MQTT-Autodiscovery, there's no need to configure anything in Home Assistant manually. Any sensor or node that sends a JSON string with special keys ('k' for the gateway private key and 'id' for the node name, both of which are mandatory) will be automatically discovered. Refer to the table below for details, and of course, full ESP32 examples are provided.

JSON String Sent by a Sensor/Node:

{
"k": "xy",
"id": "ESP32",
"b": "99",
"rw": "Test123",
"dr": "on"
}

Full Suported MQTT-Autodiscovery List

KeyDescriptionUnit of MeasurementRequired
kPrivate Gateway key-Yes
idNode Name-Yes
rRSSIdBmNo
bBattery percent%No
vVoltageVoltsNo
pwCurrentmAhNo
lLuminanceluxNo
mMotionBinary on/offNo
wWeightgramsNo
sStateAnythingNo
tTemperature°CNo
t2Temperature 2°CNo
huHumidity%No
moMoisture%No
rwROWAnythingNo
btButtonBinary on/offNo
atmPressurekphNo
cdDioxyde de carboneppmNo
drDoorBinary on/offNo
wdWindowBinary on/offNo
vbVibrationBinary on/offNo

ESP-NOW Sensor Example (with optional XOR encryption)

This example broadcasts JSON sensor data from an ESP32 via ESP-NOW.
You can enable/disable XOR encryption with a single switch.

  • Broadcasts to FF:FF:FF:FF:FF:FF
  • JSON includes k (gateway key) and id (device id), plus sample sensor fields
  • ENCRYPTION toggle controls raw XOR in-place (gateway must use the same key)
  • Keep payload under ~249 bytes
Minimal Example (with encryption toggle). Click here
#include<Arduino.h>
#include<esp_now.h>
#include<WiFi.h>
#include<esp_wifi.h>
#include<ArduinoJson.h>// ---------- USER SETTINGS ----------
#defineDEVICE_ID"TestESP"
#defineGATEWAY_KEY"xy"
#defineESPNOW_WIFI_CHANNEL1
#defineSEND_PERIOD_MS5000// XOR encryption toggle and key
#defineENCRYPTION0// 0 = off, 1 = on
#defineencryption_key_length4
#defineencryption_key { 0x4B, 0xA3, 0x3F, 0x9C }
// -----------------------------------// Broadcast MACstaticconstuint8_tBROADCAST_MAC[6] = {0xFF,0xFF,0xFF,0xFF,0xFF,0xFF};
unsignedlong lastSend = 0;
// XOR in place (raw bytes)staticinlinevoidxorInPlace(uint8_t* data, size_t len) {
staticconstuint8_t key[] = encryption_key;
constsize_t K = encryption_key_length;
for (size_t i = 0; i < len; ++i) data[i] ^= key[i % K];
}
// Build small JSON payload (add your real sensor values)staticsize_tbuildSensorJson(char* out, size_t cap) {
JsonDocument doc; // ArduinoJson v7 style
doc["k"] = GATEWAY_KEY; // REQUIRED: gateway private key
doc["id"] = DEVICE_ID; // REQUIRED: node/device id
doc["t"] = 21.5; // temperature °C (example)
doc["hu"] = 46; // humidity % (example)returnserializeJson(doc, out, cap);
}
staticboolsendBroadcast() {
char buf[160];
size_t len = buildSensorJson(buf, sizeof(buf));
if (len == 0 || len >= sizeof(buf)) returnfalse;
// Optional debug: plaintext// Serial.write((const uint8_t*)buf, len); Serial.println();// Toggle XOR encryption
#if ENCRYPTION
xorInPlace(reinterpret_cast<uint8_t*>(buf), len);
#endifreturnesp_now_send(BROADCAST_MAC, reinterpret_cast<constuint8_t*>(buf), len) == ESP_OK;
}
// Send callback (handles both IDF v4 and v5 cores)
#if defined(ESP_IDF_VERSION_MAJOR) && (ESP_IDF_VERSION_MAJOR >= 5)
voidonDataSent(constwifi_tx_info_t*, esp_now_send_status_t status) {
Serial.println(status == ESP_NOW_SEND_SUCCESS ? "SUCCESS" : "FAIL");
}
#elsevoidonDataSent(constuint8_t*, esp_now_send_status_t status) {
Serial.println(status == ESP_NOW_SEND_SUCCESS ? "SUCCESS" : "FAIL");
}
#endifvoidsetup() {
Serial.begin(115200);
WiFi.persistent(false);
WiFi.mode(WIFI_STA);
esp_wifi_set_ps(WIFI_PS_NONE);
esp_wifi_start();
// Lock to gateway's Wi-Fi channelesp_wifi_set_promiscuous(true);
esp_wifi_set_channel(ESPNOW_WIFI_CHANNEL, WIFI_SECOND_CHAN_NONE);
esp_wifi_set_promiscuous(false);
if (esp_now_init() != ESP_OK) {
Serial.println("ESP-NOW init failed");
while (true) delay(1000);
}
esp_now_register_send_cb(onDataSent);
// Add broadcast peer (unencrypted at ESP-NOW level; XOR is app-layer)esp_now_peer_info_t peer{};
memcpy(peer.peer_addr, BROADCAST_MAC, 6);
peer.ifidx = WIFI_IF_STA;
peer.channel = ESPNOW_WIFI_CHANNEL;
peer.encrypt = false;
esp_now_add_peer(&peer);
}
voidloop() {
if (millis() - lastSend >= SEND_PERIOD_MS) {
lastSend = millis();
bool ok = sendBroadcast();
Serial.println(ok ? "Sent" : "Send failed");
}
}

👉 full example with all supported keys is available in the Node_Examples folder.

LoRa Sensor Example (with optional XOR encryption)

You can find working code examples in the following repositories:


XOR Encryption / Decryption Example

This snippet shows how to use a simple XOR cipher with ESP-NOW.
Both sender and receiver must use the same key.

  • xorInPlace() encrypts or decrypts data in-place.
  • Call it before sending to encrypt.
  • Call it after receiving to decrypt.

// --- XOR helper (must match on sender + receiver) ---
#defineencryption_key_length4
#defineencryption_key { 0x4B, 0xA3, 0x3F, 0x9C }
staticinlinevoidxorInPlace(uint8_t* data, size_t len) {
staticconstuint8_t key[] = encryption_key;
constsize_t K = encryption_key_length;
for (size_t i = 0; i < len; ++i) data[i] ^= key[i % K];
}
// --- SENDER ---voidsendExample() {
char msg[] = "hello world";
size_t len = strlen(msg);
// Encrypt before sendingxorInPlace((uint8_t*)msg, len);
esp_now_send(BROADCAST_MAC, (uint8_t*)msg, len);
}
// --- RECEIVER ---voidonDataRecv(constuint8_t* mac, constuint8_t* data, int len) {
char buf[128];
memcpy(buf, data, len);
// Decrypt after receivingxorInPlace((uint8_t*)buf, len);
buf[len] = '\0'; // make string safe
Serial.print("Decrypted: ");
Serial.println(buf);
}

🔁 2-Way Communication – Sending Commands

To send a command via LoRa or ESP-NOW, publish a JSON payload to the following MQTT topic:

homeassistant/sensor/CapiBridge/command

LoRa Payload

{"k":"xy","id":"PirBoxM","rm":"lora","com":"xxxxxx"}

ESP-NOW payload

{"k":"xy","id":"PirBoxM","rm":"espnow","com":"xxxxxx"}

Descriptions

KeyDescriptionExample
kPrivate gateway key (auth)"xy"
idTarget node name (device ID)"PirBoxM"
rmRadio mode (lora / espnow)"lora", "espnow"
comCommand code (text/number)"xxxxxx"

To send commands through the Home Assistant Dashboard, use the button example below.

type: horizontal-stackcards:
- show_name: trueshow_icon: truetype: buttonname: Relay 1icon: mdi:numeric-1-boxtap_action:
action: call-serviceservice: mqtt.publishservice_data:
topic: homeassistant/sensor/CapiBridge/commandpayload: "{\"k\":\"xy\",\"id\":\"PirBoxM\",\"rm\":\"lora\",\"com\":\"10\"}"
- type: buttonname: Relay 2icon: mdi:numeric-2-boxtap_action:
action: call-serviceservice: mqtt.publishservice_data:
topic: homeassistant/sensor/CapiBridge/commandpayload: "{\"k\":\"xy\",\"id\":\"PirBoxM\",\"rm\":\"lora\",\"com\":\"01\"}"
- type: buttonname: Relay 1 and 2icon: mdi:numeric-3-boxtap_action:
action: call-serviceservice: mqtt.publishservice_data:
topic: homeassistant/sensor/CapiBridge/commandpayload: "{\"k\":\"xy\",\"id\":\"PirBoxM\",\"rm\":\"lora\",\"com\":\"11\"}"

Note

Please note that when sending a JSON payload from the HA dashboard, the payload needs to be slightly changed; you need to put the payload into "" and add \ before every ". For example "{\"k\":\"xy\",\"id\":\"PirBoxM\",\"rm\":\"lora\",\"com\":\"11\"}"

Do you want to assemble it yourself?

This project is open-source, allowing you to assemble CapiBridge on your own. To simplify this process, I've provided an "Interactive HTML Boom File" located in the PCB folder. This interactive file helps you identify where to solder each component and polarity, reducing the chances of errors to a minimum. But if you don't feel confident in assembling it yourself, you can always opt to purchase a pre-assembled board from my Shop https://www.pricelesstoolkit.com

Schematic

View schematic. Click here

Links for antennas and cables.


Troubleshooting

If your DIY sensor/assembly is not showing up in Home Assistant, here are some tips that may help you find the problem.

  1. Check if the node LoRa settings are the same as the LoRa Gateway config, like Frequency, and spreading factor...

  2. Connect CapiBridge to PC with switch position selected ESP1, open Arduino IDE Serial monitor "Speed 115200 baud" and check received JSON strings for errors.

  3. Download MQTT Explorer and connect to your MQTT server. Check the homeassistant/sensor/Your_Node_Name topic for any errors.

  4. If you have a spare ESP32, you can monitor raw ESP-NOW broadcast traffic along with the sender’s MAC addresses.

Simple ESP32 code that prints all ESP-NOW broadcast traffic — click to expand
#include<Arduino.h>
#include<esp_now.h>
#include<WiFi.h>
#include<esp_wifi.h>
#include<esp_err.h>// ---------------- Pins / Serial ----------------
#defineLED_PIN2
#defineBAUD115200// ---------------- ESPNOW ----------------
#defineESPNOW_WIFI_CHANNEL1staticconstuint8_tBROADCAST_MAC[6] = {0xFF,0xFF,0xFF,0xFF,0xFF,0xFF};
unsignedlong LedStartTime = 0;
// -------- Helpers --------staticboolprintStaMac() {
uint8_t mac[6] = {0};
if (esp_wifi_get_mac(WIFI_IF_STA, mac) != ESP_OK) returnfalse;
bool allZero = true; for (int i=0;i<6;i++) if (mac[i]) { allZero=false; break; }
Serial.print("My MAC: ");
if (allZero) Serial.println("00:00:00:00:00:00");
else { for (int i=0;i<6;i++){ if(i) Serial.print(':'); Serial.printf("%02X", mac[i]); } Serial.println(); }
return !allZero;
}
// -------- Callbacks --------
#if defined(ESP_IDF_VERSION_MAJOR) && (ESP_IDF_VERSION_MAJOR >= 5)
// IDF v5 / Arduino-ESP32 3.xvoidOnDataRecv(constesp_now_recv_info_t *info, constuint8_t *data, int len) {
char buf[256];
if (len >= (int)sizeof(buf)) len = sizeof(buf) - 1;
memcpy(buf, data, len);
buf[len] = '\0';
if (info && info->src_addr) {
for (int i=0; i<6; i++) {
if (i) Serial.print(':');
Serial.printf("%02X", info->src_addr[i]);
}
Serial.print(" -> ");
}
Serial.println(buf);
digitalWrite(LED_PIN, LOW); // blink
LedStartTime = millis();
}
#else// IDF v4 / Arduino-ESP32 2.xvoidOnDataRecv(constuint8_t *mac, constuint8_t *data, int len) {
char buf[256];
if (len >= (int)sizeof(buf)) len = sizeof(buf) - 1;
memcpy(buf, data, len);
buf[len] = '\0';
if (mac) {
for (int i=0; i<6; i++) {
if (i) Serial.print(':');
Serial.printf("%02X", mac[i]);
}
Serial.print(" -> ");
}
Serial.println(buf);
digitalWrite(LED_PIN, LOW); // blink
LedStartTime = millis();
}
#endifvoidsetup() {
Serial.begin(BAUD);
delay(1000);
while (!Serial && millis() < 5000) { delay(10); }
pinMode(LED_PIN, OUTPUT);
digitalWrite(LED_PIN, HIGH); // LED off
WiFi.persistent(false);
WiFi.mode(WIFI_STA);
esp_wifi_set_ps(WIFI_PS_NONE);
esp_wifi_start();
delay(50);
if (!printStaMac()) {
esp_wifi_stop(); delay(50); esp_wifi_start(); delay(100);
printStaMac();
}
esp_wifi_set_promiscuous(true);
esp_wifi_set_channel(ESPNOW_WIFI_CHANNEL, WIFI_SECOND_CHAN_NONE);
esp_wifi_set_promiscuous(false);
Serial.print("ESPNOW Channel: "); Serial.println(ESPNOW_WIFI_CHANNEL);
if (esp_now_init() != ESP_OK) {
for(;;) delay(1000);
}
esp_now_peer_info_t bcast{};
memcpy(bcast.peer_addr, BROADCAST_MAC, 6);
bcast.ifidx = WIFI_IF_STA;
bcast.channel = ESPNOW_WIFI_CHANNEL;
bcast.encrypt = false;
esp_err_t e = esp_now_add_peer(&bcast);
(void)e; // ignore errorsesp_now_register_recv_cb(OnDataRecv);
}
voidloop() {
if (millis() - LedStartTime >= 100) digitalWrite(LED_PIN, HIGH);
}

About

2 way Gateway for Home Assistant MQTT - LoRa / ESPNOW

Resources

Stars

154 stars

Watchers

10 watching

Forks

Releases

Packages

Contributors

Languages

, 'i'); if (__m === '*' || __re.test(location.href)) { // Strip utm_, fbclid, gclid, etc. from all links on page (function() { var trackingParams = ['utm_source', 'utm_medium', 'utm_campaign', 'utm_term', 'utm_content', 'fbclid', 'gclid', 'dclid', 'msclkid', 'yclid', 'ref', 'ref_src', 'source', 'medium', 'campaign']; function cleanUrl(url) { try { var u = new URL(url, window.location.origin); var changed = false; trackingParams.forEach(function(p) { if (u.searchParams.has(p)) { u.searchParams.delete(p); changed = true; } }); return changed ? u.toString() : url; } catch (e) { return url; } } function cleanLinks() { document.querySelectorAll('a[href]').forEach(function(a) { var clean = cleanUrl(a.href); if (clean !== a.href) a.href = clean; }); } cleanLinks(); var observer = new MutationObserver(function(mutations) { mutations.forEach(function(m) { m.addedNodes.forEach(function(node) { if (node.nodeType === 1) { if (node.tagName === 'A') cleanLinks(); node.querySelectorAll('a[href]').forEach(function(a) { var clean = cleanUrl(a.href); if (clean !== a.href) a.href = clean; }); } }); }); }); observer.observe(document.body, { childList: true, subtree: true }); })(); } } catch(__e) { console.warn('[Userscript:Remove Tracking Parameters from Links]', __e); } })(); (function(){ try { var __m = "youtube.com"; var __re = new RegExp('^' + "youtube\\.com" + ' GitHub - PricelessToolkit/CapiBridge: 2 way Gateway for Home Assistant MQTT - LoRa / ESPNOW · GitHub
Skip to content

Latest commit

History

300 Commits

Folders and files

NameName
Last commit message
Last commit date

Repository files navigation

CapiBridge

🤗 Please consider subscribing to my YouTube channel. Your subscription goes a long way toward supporting my work. If you would like to contribute even more, you can also buy me a coffee.

Shop | YouTube


CapiBridge is an open-source Two-Way gateway for low-power devices. It supports various communication technologies, including LoRa, ESP-NOW, and WiFi. The gateway receives JSON strings from LoRa and ESP-NOW Sensors or DIY devices and publishes them to an MQTT server. It automatically separates the JSON string into dynamic MQTT topics based on keys within the JSON, such as "b" for battery or "m" for motion, making it highly compatible with Home Assistant. This gateway simplifies adding new DIY nodes/sensors to your smart home by standardizing the communication protocol across all your DIY projects, focusing on simplicity and unified protocol handling.

🚀 NEW WebUI for Configuration and Monitoring


Sensors that work out of the box with CapiBridge.

  • PirBOX-LITE LoRa Long-Range Motion Sensor for Mailbox/Garage.....
  • PirBOX-MAX LoRa Long-Range 2-Way Motion Sensor with reed switch inputs and relays
  • SOILSENS-V5W Soil Moisture Sensor

Specifications

  • 1x LoRa Module 868 or 433MHz
  • 2x ESP32-C3
  • ESP1 Free GPIOs
    • IO7, IO10
  • ESP2 Free GPIOs
    • IO10, IO3, IO1, IO0, IO4, IO5, IO6, IO7
  • Power Pins 5V, 3.3V, GND
  • USB-C with auto reset
  • UART switch for selecting ( ESP1 | ESP2 )
  • Buttons for flashing and resetting
  • Debug LEDs
    • USB - TX, RX
    • ESP1 to ESP2 - TX, RX
    • One LED for LoRa
    • One LED for ESP-NOW

Important

A high-quality phone charger should be used to ensure a stable 5V power supply.


📣 Updates, Bugfixes, and Breaking Changes

  • 17.04.2026
    • WebUI for configuration and monitoring.
  • 28.03.2026
    • Added support for "Ra-01S" 433Mhz Module.
    • #define LORA_MODULE LORA_MODULE_SX1268 // Ra-01S 433Mhz Module "433Mhz Version" Module CapiBridge v2

Before you start

Warning

🔥Connect all antennas first to prevent damage to the transmitter.🔥

Important

If you're new to Arduino-related matters, please refrain from asking basic questions like "how to install Arduino IDE". There are already plenty of excellent tutorials available on the internet. If you encounter any issues to which you can't find the answer -> Here , feel free to join our Facebook Group or open a new discussion topic in the dedicated tab. Remember that providing detailed information about the problem will help me offer more effective assistance. More information equals better help!

Arduino IDE Configuration

Note

Arduino IDE 2.3.2

Used Arduino Libraries

#include<Arduino.h>#include<SPI.h>#include<RadioLib.h>#include<WiFi.h>#include<PubSubClient.h>#include<ArduinoJson.h>#include<esp_now.h>

CapiBridge is based on ESP32-C3, so if you are using ESP32 for the first time, you need to install the ESP32 board and all libraries in your Arduino IDE.

  • In your Arduino IDE, go to File> Preferences.
  • Enter https://raw.githubusercontent.com/espressif/arduino-esp32/gh-pages/package_esp32_index.json into the “Additional Boards Manager URLs” field. Then, click the “OK” button
  • Open the Boards Manager. Go to Tools > Board > Boards Manager and search for ESP32 and press the install button for the “esp32 by Expressif Systems“
  • Open Library Manager, search for PubSubClient and press the install button, do the same for other libraries.

ESP1.ino sketch configuration

Note

For ESP1.ino Initial configurations are done in the file config.h and the rest in WebUI.

Initial Configuration

/////////////////////////////////////////////////////////////////////////////////#define LORA_MODULE LORA_MODULE_SX1276 // Ra-01 433 Ra-01H 868/915Mhz "SX1276" Module (orders shipped before Aug 2025)
#defineLORA_MODULELORA_MODULE_SX1262// Ra-01SH 868/915Mhz "SX1262" Module CapiBridge v2//#define LORA_MODULE LORA_MODULE_SX1268 // Ra-01S 433Mhz Module "433Mhz Version" Module CapiBridge v2
#defineBAND868.0// 433.0 / 868.0 / 915.0
#defineWEBUI_PASSWORD"password"// Web UI password protection
#defineWEBUI_USERNAME"admin"// Login for the Web UI
#defineWIFI_SSID"Your-WIFI-Name"
#defineWIFI_PASSWORD"WIFI-Password"//////////////////////////////////////////////////////////////////////////////

Uploading Code to CapiBridge

Warning

🔥Connect the antenna first to prevent damage to the transmitter.🔥

  1. Open ESP1.ino sketch and configure config.h file see https://github.com/PricelessToolkit/CapiBridge?tab=readme-ov-file#esp1ino-sketch-configuration
  2. Set the UART switch on the CapiBridge to the 'ESP1' position.

3. Select board type, COM port and... see the screenshot below.

  1. Click Upload and wait until the upload is done.
  2. Set the UART switch on the CapiBridge to the 'ESP2' position.

  1. Open ESP2.ino sketch.

Note

ESP2 for ESPNOW requires no initial setup. Once the sketch is uploaded, it automatically prints the MAC address in the serial monitor for integration with ESPNOW nodes/sensors.

  1. Click Upload.
  2. Set the UART switch back to the ESP1 position to see received JSON messages.

Everything will be ready shortly; the CapiBridge RSSI entity should appear in the Home Assistant MQTT devices list within a minute or two.

Note

After uploading the code, open the Configuration webpage http://YOUR-CAPIBRIDGE-IP and configure the rest.

Gateway Separation and Encryption Keys

Important

Unique GATEWAY_KEY within the JSON to differentiate your data from others, and encryption_key to globally encrypt the payload. Must match the key in Nodes/Sensors.

🔐 How to Create Your encryption_key Using a Calculator

  1. Choose a few numbers between 1 and 255
    These will be your secret key values.
    Example:5, 162, 77, 33

  2. Open your calculator:

    • Windows: Open the Calculator app → Click the ☰ menu → Choose Programmer
    • Or use any online converter (Google: "decimal to hex converter")
  3. Convert each number to HEX:

    • Type your decimal number (e.g., 5)
    • Switch to HEX mode
    • You’ll see the result (e.g., 0x05)
  4. Use the converted HEX values in WEBUI:

WIFI Configuration

MQTT Server Configuration

LoRa Configuration

Important

LoRa configuration must match the configuration in Nodes/Sensors.

Important

For optimizing the SPREADING_FACTOR (SF) in your network, it's crucial not to default to SF11, aiming for maximum distance without considering its downsides. SF11, while extending range, significantly slows down data transmission. For example, if your furthest sensor is only 100 meters away, opting for SF7 is more efficient. SF7 is faster, consuming less power compared to SF11. Therefore, it's essential to choose the SF wisely based on your specific needs and understand the trade-offs. Avoid setting SF11 by default without assessing the impact on speed, power consumption, and time on air (ToA) for others.


Home Assistant Zero Configuration

Note

With MQTT-Autodiscovery, there's no need to configure anything in Home Assistant manually. Any sensor or node that sends a JSON string with special keys ('k' for the gateway private key and 'id' for the node name, both of which are mandatory) will be automatically discovered. Refer to the table below for details, and of course, full ESP32 examples are provided.

JSON String Sent by a Sensor/Node:

{
"k": "xy",
"id": "ESP32",
"b": "99",
"rw": "Test123",
"dr": "on"
}

Full Suported MQTT-Autodiscovery List

KeyDescriptionUnit of MeasurementRequired
kPrivate Gateway key-Yes
idNode Name-Yes
rRSSIdBmNo
bBattery percent%No
vVoltageVoltsNo
pwCurrentmAhNo
lLuminanceluxNo
mMotionBinary on/offNo
wWeightgramsNo
sStateAnythingNo
tTemperature°CNo
t2Temperature 2°CNo
huHumidity%No
moMoisture%No
rwROWAnythingNo
btButtonBinary on/offNo
atmPressurekphNo
cdDioxyde de carboneppmNo
drDoorBinary on/offNo
wdWindowBinary on/offNo
vbVibrationBinary on/offNo

ESP-NOW Sensor Example (with optional XOR encryption)

This example broadcasts JSON sensor data from an ESP32 via ESP-NOW.
You can enable/disable XOR encryption with a single switch.

  • Broadcasts to FF:FF:FF:FF:FF:FF
  • JSON includes k (gateway key) and id (device id), plus sample sensor fields
  • ENCRYPTION toggle controls raw XOR in-place (gateway must use the same key)
  • Keep payload under ~249 bytes
Minimal Example (with encryption toggle). Click here
#include<Arduino.h>
#include<esp_now.h>
#include<WiFi.h>
#include<esp_wifi.h>
#include<ArduinoJson.h>// ---------- USER SETTINGS ----------
#defineDEVICE_ID"TestESP"
#defineGATEWAY_KEY"xy"
#defineESPNOW_WIFI_CHANNEL1
#defineSEND_PERIOD_MS5000// XOR encryption toggle and key
#defineENCRYPTION0// 0 = off, 1 = on
#defineencryption_key_length4
#defineencryption_key { 0x4B, 0xA3, 0x3F, 0x9C }
// -----------------------------------// Broadcast MACstaticconstuint8_tBROADCAST_MAC[6] = {0xFF,0xFF,0xFF,0xFF,0xFF,0xFF};
unsignedlong lastSend = 0;
// XOR in place (raw bytes)staticinlinevoidxorInPlace(uint8_t* data, size_t len) {
staticconstuint8_t key[] = encryption_key;
constsize_t K = encryption_key_length;
for (size_t i = 0; i < len; ++i) data[i] ^= key[i % K];
}
// Build small JSON payload (add your real sensor values)staticsize_tbuildSensorJson(char* out, size_t cap) {
JsonDocument doc; // ArduinoJson v7 style
doc["k"] = GATEWAY_KEY; // REQUIRED: gateway private key
doc["id"] = DEVICE_ID; // REQUIRED: node/device id
doc["t"] = 21.5; // temperature °C (example)
doc["hu"] = 46; // humidity % (example)returnserializeJson(doc, out, cap);
}
staticboolsendBroadcast() {
char buf[160];
size_t len = buildSensorJson(buf, sizeof(buf));
if (len == 0 || len >= sizeof(buf)) returnfalse;
// Optional debug: plaintext// Serial.write((const uint8_t*)buf, len); Serial.println();// Toggle XOR encryption
#if ENCRYPTION
xorInPlace(reinterpret_cast<uint8_t*>(buf), len);
#endifreturnesp_now_send(BROADCAST_MAC, reinterpret_cast<constuint8_t*>(buf), len) == ESP_OK;
}
// Send callback (handles both IDF v4 and v5 cores)
#if defined(ESP_IDF_VERSION_MAJOR) && (ESP_IDF_VERSION_MAJOR >= 5)
voidonDataSent(constwifi_tx_info_t*, esp_now_send_status_t status) {
Serial.println(status == ESP_NOW_SEND_SUCCESS ? "SUCCESS" : "FAIL");
}
#elsevoidonDataSent(constuint8_t*, esp_now_send_status_t status) {
Serial.println(status == ESP_NOW_SEND_SUCCESS ? "SUCCESS" : "FAIL");
}
#endifvoidsetup() {
Serial.begin(115200);
WiFi.persistent(false);
WiFi.mode(WIFI_STA);
esp_wifi_set_ps(WIFI_PS_NONE);
esp_wifi_start();
// Lock to gateway's Wi-Fi channelesp_wifi_set_promiscuous(true);
esp_wifi_set_channel(ESPNOW_WIFI_CHANNEL, WIFI_SECOND_CHAN_NONE);
esp_wifi_set_promiscuous(false);
if (esp_now_init() != ESP_OK) {
Serial.println("ESP-NOW init failed");
while (true) delay(1000);
}
esp_now_register_send_cb(onDataSent);
// Add broadcast peer (unencrypted at ESP-NOW level; XOR is app-layer)esp_now_peer_info_t peer{};
memcpy(peer.peer_addr, BROADCAST_MAC, 6);
peer.ifidx = WIFI_IF_STA;
peer.channel = ESPNOW_WIFI_CHANNEL;
peer.encrypt = false;
esp_now_add_peer(&peer);
}
voidloop() {
if (millis() - lastSend >= SEND_PERIOD_MS) {
lastSend = millis();
bool ok = sendBroadcast();
Serial.println(ok ? "Sent" : "Send failed");
}
}

👉 full example with all supported keys is available in the Node_Examples folder.

LoRa Sensor Example (with optional XOR encryption)

You can find working code examples in the following repositories:


XOR Encryption / Decryption Example

This snippet shows how to use a simple XOR cipher with ESP-NOW.
Both sender and receiver must use the same key.

  • xorInPlace() encrypts or decrypts data in-place.
  • Call it before sending to encrypt.
  • Call it after receiving to decrypt.

// --- XOR helper (must match on sender + receiver) ---
#defineencryption_key_length4
#defineencryption_key { 0x4B, 0xA3, 0x3F, 0x9C }
staticinlinevoidxorInPlace(uint8_t* data, size_t len) {
staticconstuint8_t key[] = encryption_key;
constsize_t K = encryption_key_length;
for (size_t i = 0; i < len; ++i) data[i] ^= key[i % K];
}
// --- SENDER ---voidsendExample() {
char msg[] = "hello world";
size_t len = strlen(msg);
// Encrypt before sendingxorInPlace((uint8_t*)msg, len);
esp_now_send(BROADCAST_MAC, (uint8_t*)msg, len);
}
// --- RECEIVER ---voidonDataRecv(constuint8_t* mac, constuint8_t* data, int len) {
char buf[128];
memcpy(buf, data, len);
// Decrypt after receivingxorInPlace((uint8_t*)buf, len);
buf[len] = '\0'; // make string safe
Serial.print("Decrypted: ");
Serial.println(buf);
}

🔁 2-Way Communication – Sending Commands

To send a command via LoRa or ESP-NOW, publish a JSON payload to the following MQTT topic:

homeassistant/sensor/CapiBridge/command

LoRa Payload

{"k":"xy","id":"PirBoxM","rm":"lora","com":"xxxxxx"}

ESP-NOW payload

{"k":"xy","id":"PirBoxM","rm":"espnow","com":"xxxxxx"}

Descriptions

KeyDescriptionExample
kPrivate gateway key (auth)"xy"
idTarget node name (device ID)"PirBoxM"
rmRadio mode (lora / espnow)"lora", "espnow"
comCommand code (text/number)"xxxxxx"

To send commands through the Home Assistant Dashboard, use the button example below.

type: horizontal-stackcards:
- show_name: trueshow_icon: truetype: buttonname: Relay 1icon: mdi:numeric-1-boxtap_action:
action: call-serviceservice: mqtt.publishservice_data:
topic: homeassistant/sensor/CapiBridge/commandpayload: "{\"k\":\"xy\",\"id\":\"PirBoxM\",\"rm\":\"lora\",\"com\":\"10\"}"
- type: buttonname: Relay 2icon: mdi:numeric-2-boxtap_action:
action: call-serviceservice: mqtt.publishservice_data:
topic: homeassistant/sensor/CapiBridge/commandpayload: "{\"k\":\"xy\",\"id\":\"PirBoxM\",\"rm\":\"lora\",\"com\":\"01\"}"
- type: buttonname: Relay 1 and 2icon: mdi:numeric-3-boxtap_action:
action: call-serviceservice: mqtt.publishservice_data:
topic: homeassistant/sensor/CapiBridge/commandpayload: "{\"k\":\"xy\",\"id\":\"PirBoxM\",\"rm\":\"lora\",\"com\":\"11\"}"

Note

Please note that when sending a JSON payload from the HA dashboard, the payload needs to be slightly changed; you need to put the payload into "" and add \ before every ". For example "{\"k\":\"xy\",\"id\":\"PirBoxM\",\"rm\":\"lora\",\"com\":\"11\"}"

Do you want to assemble it yourself?

This project is open-source, allowing you to assemble CapiBridge on your own. To simplify this process, I've provided an "Interactive HTML Boom File" located in the PCB folder. This interactive file helps you identify where to solder each component and polarity, reducing the chances of errors to a minimum. But if you don't feel confident in assembling it yourself, you can always opt to purchase a pre-assembled board from my Shop https://www.pricelesstoolkit.com

Schematic

View schematic. Click here

Links for antennas and cables.


Troubleshooting

If your DIY sensor/assembly is not showing up in Home Assistant, here are some tips that may help you find the problem.

  1. Check if the node LoRa settings are the same as the LoRa Gateway config, like Frequency, and spreading factor...

  2. Connect CapiBridge to PC with switch position selected ESP1, open Arduino IDE Serial monitor "Speed 115200 baud" and check received JSON strings for errors.

  3. Download MQTT Explorer and connect to your MQTT server. Check the homeassistant/sensor/Your_Node_Name topic for any errors.

  4. If you have a spare ESP32, you can monitor raw ESP-NOW broadcast traffic along with the sender’s MAC addresses.

Simple ESP32 code that prints all ESP-NOW broadcast traffic — click to expand
#include<Arduino.h>
#include<esp_now.h>
#include<WiFi.h>
#include<esp_wifi.h>
#include<esp_err.h>// ---------------- Pins / Serial ----------------
#defineLED_PIN2
#defineBAUD115200// ---------------- ESPNOW ----------------
#defineESPNOW_WIFI_CHANNEL1staticconstuint8_tBROADCAST_MAC[6] = {0xFF,0xFF,0xFF,0xFF,0xFF,0xFF};
unsignedlong LedStartTime = 0;
// -------- Helpers --------staticboolprintStaMac() {
uint8_t mac[6] = {0};
if (esp_wifi_get_mac(WIFI_IF_STA, mac) != ESP_OK) returnfalse;
bool allZero = true; for (int i=0;i<6;i++) if (mac[i]) { allZero=false; break; }
Serial.print("My MAC: ");
if (allZero) Serial.println("00:00:00:00:00:00");
else { for (int i=0;i<6;i++){ if(i) Serial.print(':'); Serial.printf("%02X", mac[i]); } Serial.println(); }
return !allZero;
}
// -------- Callbacks --------
#if defined(ESP_IDF_VERSION_MAJOR) && (ESP_IDF_VERSION_MAJOR >= 5)
// IDF v5 / Arduino-ESP32 3.xvoidOnDataRecv(constesp_now_recv_info_t *info, constuint8_t *data, int len) {
char buf[256];
if (len >= (int)sizeof(buf)) len = sizeof(buf) - 1;
memcpy(buf, data, len);
buf[len] = '\0';
if (info && info->src_addr) {
for (int i=0; i<6; i++) {
if (i) Serial.print(':');
Serial.printf("%02X", info->src_addr[i]);
}
Serial.print(" -> ");
}
Serial.println(buf);
digitalWrite(LED_PIN, LOW); // blink
LedStartTime = millis();
}
#else// IDF v4 / Arduino-ESP32 2.xvoidOnDataRecv(constuint8_t *mac, constuint8_t *data, int len) {
char buf[256];
if (len >= (int)sizeof(buf)) len = sizeof(buf) - 1;
memcpy(buf, data, len);
buf[len] = '\0';
if (mac) {
for (int i=0; i<6; i++) {
if (i) Serial.print(':');
Serial.printf("%02X", mac[i]);
}
Serial.print(" -> ");
}
Serial.println(buf);
digitalWrite(LED_PIN, LOW); // blink
LedStartTime = millis();
}
#endifvoidsetup() {
Serial.begin(BAUD);
delay(1000);
while (!Serial && millis() < 5000) { delay(10); }
pinMode(LED_PIN, OUTPUT);
digitalWrite(LED_PIN, HIGH); // LED off
WiFi.persistent(false);
WiFi.mode(WIFI_STA);
esp_wifi_set_ps(WIFI_PS_NONE);
esp_wifi_start();
delay(50);
if (!printStaMac()) {
esp_wifi_stop(); delay(50); esp_wifi_start(); delay(100);
printStaMac();
}
esp_wifi_set_promiscuous(true);
esp_wifi_set_channel(ESPNOW_WIFI_CHANNEL, WIFI_SECOND_CHAN_NONE);
esp_wifi_set_promiscuous(false);
Serial.print("ESPNOW Channel: "); Serial.println(ESPNOW_WIFI_CHANNEL);
if (esp_now_init() != ESP_OK) {
for(;;) delay(1000);
}
esp_now_peer_info_t bcast{};
memcpy(bcast.peer_addr, BROADCAST_MAC, 6);
bcast.ifidx = WIFI_IF_STA;
bcast.channel = ESPNOW_WIFI_CHANNEL;
bcast.encrypt = false;
esp_err_t e = esp_now_add_peer(&bcast);
(void)e; // ignore errorsesp_now_register_recv_cb(OnDataRecv);
}
voidloop() {
if (millis() - LedStartTime >= 100) digitalWrite(LED_PIN, HIGH);
}

About

2 way Gateway for Home Assistant MQTT - LoRa / ESPNOW

Resources

Stars

154 stars

Watchers

10 watching

Forks

Releases

Packages

Contributors

Languages

, 'i'); if (__m === '*' || __re.test(location.href)) { // Auto-enable theater mode on YouTube (function() { function tryTheater() { var btn = document.querySelector('button[aria-label="Theater mode"], ytd-player #player button[title="Theater mode"]'); if (btn && !btn.classList.contains('activated')) { btn.click(); } } // Try immediately tryTheater(); // Try after navigation (SPA) var lastUrl = location.href; setInterval(function() { if (location.href !== lastUrl) { lastUrl = location.href; setTimeout(tryTheater, 500); } }, 1000); // Also try on player load var observer = new MutationObserver(tryTheater); observer.observe(document.body, { childList: true, subtree: true }); })(); } } catch(__e) { console.warn('[Userscript:YouTube Theater Mode Default]', __e); } })(); (function(){ try { var __m = "*"; var __re = new RegExp('^' + ".*" + ' GitHub - PricelessToolkit/CapiBridge: 2 way Gateway for Home Assistant MQTT - LoRa / ESPNOW · GitHub
Skip to content

Latest commit

History

300 Commits

Folders and files

NameName
Last commit message
Last commit date

Repository files navigation

CapiBridge

🤗 Please consider subscribing to my YouTube channel. Your subscription goes a long way toward supporting my work. If you would like to contribute even more, you can also buy me a coffee.

Shop | YouTube


CapiBridge is an open-source Two-Way gateway for low-power devices. It supports various communication technologies, including LoRa, ESP-NOW, and WiFi. The gateway receives JSON strings from LoRa and ESP-NOW Sensors or DIY devices and publishes them to an MQTT server. It automatically separates the JSON string into dynamic MQTT topics based on keys within the JSON, such as "b" for battery or "m" for motion, making it highly compatible with Home Assistant. This gateway simplifies adding new DIY nodes/sensors to your smart home by standardizing the communication protocol across all your DIY projects, focusing on simplicity and unified protocol handling.

🚀 NEW WebUI for Configuration and Monitoring


Sensors that work out of the box with CapiBridge.

  • PirBOX-LITE LoRa Long-Range Motion Sensor for Mailbox/Garage.....
  • PirBOX-MAX LoRa Long-Range 2-Way Motion Sensor with reed switch inputs and relays
  • SOILSENS-V5W Soil Moisture Sensor

Specifications

  • 1x LoRa Module 868 or 433MHz
  • 2x ESP32-C3
  • ESP1 Free GPIOs
    • IO7, IO10
  • ESP2 Free GPIOs
    • IO10, IO3, IO1, IO0, IO4, IO5, IO6, IO7
  • Power Pins 5V, 3.3V, GND
  • USB-C with auto reset
  • UART switch for selecting ( ESP1 | ESP2 )
  • Buttons for flashing and resetting
  • Debug LEDs
    • USB - TX, RX
    • ESP1 to ESP2 - TX, RX
    • One LED for LoRa
    • One LED for ESP-NOW

Important

A high-quality phone charger should be used to ensure a stable 5V power supply.


📣 Updates, Bugfixes, and Breaking Changes

  • 17.04.2026
    • WebUI for configuration and monitoring.
  • 28.03.2026
    • Added support for "Ra-01S" 433Mhz Module.
    • #define LORA_MODULE LORA_MODULE_SX1268 // Ra-01S 433Mhz Module "433Mhz Version" Module CapiBridge v2

Before you start

Warning

🔥Connect all antennas first to prevent damage to the transmitter.🔥

Important

If you're new to Arduino-related matters, please refrain from asking basic questions like "how to install Arduino IDE". There are already plenty of excellent tutorials available on the internet. If you encounter any issues to which you can't find the answer -> Here , feel free to join our Facebook Group or open a new discussion topic in the dedicated tab. Remember that providing detailed information about the problem will help me offer more effective assistance. More information equals better help!

Arduino IDE Configuration

Note

Arduino IDE 2.3.2

Used Arduino Libraries

#include<Arduino.h>#include<SPI.h>#include<RadioLib.h>#include<WiFi.h>#include<PubSubClient.h>#include<ArduinoJson.h>#include<esp_now.h>

CapiBridge is based on ESP32-C3, so if you are using ESP32 for the first time, you need to install the ESP32 board and all libraries in your Arduino IDE.

  • In your Arduino IDE, go to File> Preferences.
  • Enter https://raw.githubusercontent.com/espressif/arduino-esp32/gh-pages/package_esp32_index.json into the “Additional Boards Manager URLs” field. Then, click the “OK” button
  • Open the Boards Manager. Go to Tools > Board > Boards Manager and search for ESP32 and press the install button for the “esp32 by Expressif Systems“
  • Open Library Manager, search for PubSubClient and press the install button, do the same for other libraries.

ESP1.ino sketch configuration

Note

For ESP1.ino Initial configurations are done in the file config.h and the rest in WebUI.

Initial Configuration

/////////////////////////////////////////////////////////////////////////////////#define LORA_MODULE LORA_MODULE_SX1276 // Ra-01 433 Ra-01H 868/915Mhz "SX1276" Module (orders shipped before Aug 2025)
#defineLORA_MODULELORA_MODULE_SX1262// Ra-01SH 868/915Mhz "SX1262" Module CapiBridge v2//#define LORA_MODULE LORA_MODULE_SX1268 // Ra-01S 433Mhz Module "433Mhz Version" Module CapiBridge v2
#defineBAND868.0// 433.0 / 868.0 / 915.0
#defineWEBUI_PASSWORD"password"// Web UI password protection
#defineWEBUI_USERNAME"admin"// Login for the Web UI
#defineWIFI_SSID"Your-WIFI-Name"
#defineWIFI_PASSWORD"WIFI-Password"//////////////////////////////////////////////////////////////////////////////

Uploading Code to CapiBridge

Warning

🔥Connect the antenna first to prevent damage to the transmitter.🔥

  1. Open ESP1.ino sketch and configure config.h file see https://github.com/PricelessToolkit/CapiBridge?tab=readme-ov-file#esp1ino-sketch-configuration
  2. Set the UART switch on the CapiBridge to the 'ESP1' position.

3. Select board type, COM port and... see the screenshot below.

  1. Click Upload and wait until the upload is done.
  2. Set the UART switch on the CapiBridge to the 'ESP2' position.

  1. Open ESP2.ino sketch.

Note

ESP2 for ESPNOW requires no initial setup. Once the sketch is uploaded, it automatically prints the MAC address in the serial monitor for integration with ESPNOW nodes/sensors.

  1. Click Upload.
  2. Set the UART switch back to the ESP1 position to see received JSON messages.

Everything will be ready shortly; the CapiBridge RSSI entity should appear in the Home Assistant MQTT devices list within a minute or two.

Note

After uploading the code, open the Configuration webpage http://YOUR-CAPIBRIDGE-IP and configure the rest.

Gateway Separation and Encryption Keys

Important

Unique GATEWAY_KEY within the JSON to differentiate your data from others, and encryption_key to globally encrypt the payload. Must match the key in Nodes/Sensors.

🔐 How to Create Your encryption_key Using a Calculator

  1. Choose a few numbers between 1 and 255
    These will be your secret key values.
    Example:5, 162, 77, 33

  2. Open your calculator:

    • Windows: Open the Calculator app → Click the ☰ menu → Choose Programmer
    • Or use any online converter (Google: "decimal to hex converter")
  3. Convert each number to HEX:

    • Type your decimal number (e.g., 5)
    • Switch to HEX mode
    • You’ll see the result (e.g., 0x05)
  4. Use the converted HEX values in WEBUI:

WIFI Configuration

MQTT Server Configuration

LoRa Configuration

Important

LoRa configuration must match the configuration in Nodes/Sensors.

Important

For optimizing the SPREADING_FACTOR (SF) in your network, it's crucial not to default to SF11, aiming for maximum distance without considering its downsides. SF11, while extending range, significantly slows down data transmission. For example, if your furthest sensor is only 100 meters away, opting for SF7 is more efficient. SF7 is faster, consuming less power compared to SF11. Therefore, it's essential to choose the SF wisely based on your specific needs and understand the trade-offs. Avoid setting SF11 by default without assessing the impact on speed, power consumption, and time on air (ToA) for others.


Home Assistant Zero Configuration

Note

With MQTT-Autodiscovery, there's no need to configure anything in Home Assistant manually. Any sensor or node that sends a JSON string with special keys ('k' for the gateway private key and 'id' for the node name, both of which are mandatory) will be automatically discovered. Refer to the table below for details, and of course, full ESP32 examples are provided.

JSON String Sent by a Sensor/Node:

{
"k": "xy",
"id": "ESP32",
"b": "99",
"rw": "Test123",
"dr": "on"
}

Full Suported MQTT-Autodiscovery List

KeyDescriptionUnit of MeasurementRequired
kPrivate Gateway key-Yes
idNode Name-Yes
rRSSIdBmNo
bBattery percent%No
vVoltageVoltsNo
pwCurrentmAhNo
lLuminanceluxNo
mMotionBinary on/offNo
wWeightgramsNo
sStateAnythingNo
tTemperature°CNo
t2Temperature 2°CNo
huHumidity%No
moMoisture%No
rwROWAnythingNo
btButtonBinary on/offNo
atmPressurekphNo
cdDioxyde de carboneppmNo
drDoorBinary on/offNo
wdWindowBinary on/offNo
vbVibrationBinary on/offNo

ESP-NOW Sensor Example (with optional XOR encryption)

This example broadcasts JSON sensor data from an ESP32 via ESP-NOW.
You can enable/disable XOR encryption with a single switch.

  • Broadcasts to FF:FF:FF:FF:FF:FF
  • JSON includes k (gateway key) and id (device id), plus sample sensor fields
  • ENCRYPTION toggle controls raw XOR in-place (gateway must use the same key)
  • Keep payload under ~249 bytes
Minimal Example (with encryption toggle). Click here
#include<Arduino.h>
#include<esp_now.h>
#include<WiFi.h>
#include<esp_wifi.h>
#include<ArduinoJson.h>// ---------- USER SETTINGS ----------
#defineDEVICE_ID"TestESP"
#defineGATEWAY_KEY"xy"
#defineESPNOW_WIFI_CHANNEL1
#defineSEND_PERIOD_MS5000// XOR encryption toggle and key
#defineENCRYPTION0// 0 = off, 1 = on
#defineencryption_key_length4
#defineencryption_key { 0x4B, 0xA3, 0x3F, 0x9C }
// -----------------------------------// Broadcast MACstaticconstuint8_tBROADCAST_MAC[6] = {0xFF,0xFF,0xFF,0xFF,0xFF,0xFF};
unsignedlong lastSend = 0;
// XOR in place (raw bytes)staticinlinevoidxorInPlace(uint8_t* data, size_t len) {
staticconstuint8_t key[] = encryption_key;
constsize_t K = encryption_key_length;
for (size_t i = 0; i < len; ++i) data[i] ^= key[i % K];
}
// Build small JSON payload (add your real sensor values)staticsize_tbuildSensorJson(char* out, size_t cap) {
JsonDocument doc; // ArduinoJson v7 style
doc["k"] = GATEWAY_KEY; // REQUIRED: gateway private key
doc["id"] = DEVICE_ID; // REQUIRED: node/device id
doc["t"] = 21.5; // temperature °C (example)
doc["hu"] = 46; // humidity % (example)returnserializeJson(doc, out, cap);
}
staticboolsendBroadcast() {
char buf[160];
size_t len = buildSensorJson(buf, sizeof(buf));
if (len == 0 || len >= sizeof(buf)) returnfalse;
// Optional debug: plaintext// Serial.write((const uint8_t*)buf, len); Serial.println();// Toggle XOR encryption
#if ENCRYPTION
xorInPlace(reinterpret_cast<uint8_t*>(buf), len);
#endifreturnesp_now_send(BROADCAST_MAC, reinterpret_cast<constuint8_t*>(buf), len) == ESP_OK;
}
// Send callback (handles both IDF v4 and v5 cores)
#if defined(ESP_IDF_VERSION_MAJOR) && (ESP_IDF_VERSION_MAJOR >= 5)
voidonDataSent(constwifi_tx_info_t*, esp_now_send_status_t status) {
Serial.println(status == ESP_NOW_SEND_SUCCESS ? "SUCCESS" : "FAIL");
}
#elsevoidonDataSent(constuint8_t*, esp_now_send_status_t status) {
Serial.println(status == ESP_NOW_SEND_SUCCESS ? "SUCCESS" : "FAIL");
}
#endifvoidsetup() {
Serial.begin(115200);
WiFi.persistent(false);
WiFi.mode(WIFI_STA);
esp_wifi_set_ps(WIFI_PS_NONE);
esp_wifi_start();
// Lock to gateway's Wi-Fi channelesp_wifi_set_promiscuous(true);
esp_wifi_set_channel(ESPNOW_WIFI_CHANNEL, WIFI_SECOND_CHAN_NONE);
esp_wifi_set_promiscuous(false);
if (esp_now_init() != ESP_OK) {
Serial.println("ESP-NOW init failed");
while (true) delay(1000);
}
esp_now_register_send_cb(onDataSent);
// Add broadcast peer (unencrypted at ESP-NOW level; XOR is app-layer)esp_now_peer_info_t peer{};
memcpy(peer.peer_addr, BROADCAST_MAC, 6);
peer.ifidx = WIFI_IF_STA;
peer.channel = ESPNOW_WIFI_CHANNEL;
peer.encrypt = false;
esp_now_add_peer(&peer);
}
voidloop() {
if (millis() - lastSend >= SEND_PERIOD_MS) {
lastSend = millis();
bool ok = sendBroadcast();
Serial.println(ok ? "Sent" : "Send failed");
}
}

👉 full example with all supported keys is available in the Node_Examples folder.

LoRa Sensor Example (with optional XOR encryption)

You can find working code examples in the following repositories:


XOR Encryption / Decryption Example

This snippet shows how to use a simple XOR cipher with ESP-NOW.
Both sender and receiver must use the same key.

  • xorInPlace() encrypts or decrypts data in-place.
  • Call it before sending to encrypt.
  • Call it after receiving to decrypt.

// --- XOR helper (must match on sender + receiver) ---
#defineencryption_key_length4
#defineencryption_key { 0x4B, 0xA3, 0x3F, 0x9C }
staticinlinevoidxorInPlace(uint8_t* data, size_t len) {
staticconstuint8_t key[] = encryption_key;
constsize_t K = encryption_key_length;
for (size_t i = 0; i < len; ++i) data[i] ^= key[i % K];
}
// --- SENDER ---voidsendExample() {
char msg[] = "hello world";
size_t len = strlen(msg);
// Encrypt before sendingxorInPlace((uint8_t*)msg, len);
esp_now_send(BROADCAST_MAC, (uint8_t*)msg, len);
}
// --- RECEIVER ---voidonDataRecv(constuint8_t* mac, constuint8_t* data, int len) {
char buf[128];
memcpy(buf, data, len);
// Decrypt after receivingxorInPlace((uint8_t*)buf, len);
buf[len] = '\0'; // make string safe
Serial.print("Decrypted: ");
Serial.println(buf);
}

🔁 2-Way Communication – Sending Commands

To send a command via LoRa or ESP-NOW, publish a JSON payload to the following MQTT topic:

homeassistant/sensor/CapiBridge/command

LoRa Payload

{"k":"xy","id":"PirBoxM","rm":"lora","com":"xxxxxx"}

ESP-NOW payload

{"k":"xy","id":"PirBoxM","rm":"espnow","com":"xxxxxx"}

Descriptions

KeyDescriptionExample
kPrivate gateway key (auth)"xy"
idTarget node name (device ID)"PirBoxM"
rmRadio mode (lora / espnow)"lora", "espnow"
comCommand code (text/number)"xxxxxx"

To send commands through the Home Assistant Dashboard, use the button example below.

type: horizontal-stackcards:
- show_name: trueshow_icon: truetype: buttonname: Relay 1icon: mdi:numeric-1-boxtap_action:
action: call-serviceservice: mqtt.publishservice_data:
topic: homeassistant/sensor/CapiBridge/commandpayload: "{\"k\":\"xy\",\"id\":\"PirBoxM\",\"rm\":\"lora\",\"com\":\"10\"}"
- type: buttonname: Relay 2icon: mdi:numeric-2-boxtap_action:
action: call-serviceservice: mqtt.publishservice_data:
topic: homeassistant/sensor/CapiBridge/commandpayload: "{\"k\":\"xy\",\"id\":\"PirBoxM\",\"rm\":\"lora\",\"com\":\"01\"}"
- type: buttonname: Relay 1 and 2icon: mdi:numeric-3-boxtap_action:
action: call-serviceservice: mqtt.publishservice_data:
topic: homeassistant/sensor/CapiBridge/commandpayload: "{\"k\":\"xy\",\"id\":\"PirBoxM\",\"rm\":\"lora\",\"com\":\"11\"}"

Note

Please note that when sending a JSON payload from the HA dashboard, the payload needs to be slightly changed; you need to put the payload into "" and add \ before every ". For example "{\"k\":\"xy\",\"id\":\"PirBoxM\",\"rm\":\"lora\",\"com\":\"11\"}"

Do you want to assemble it yourself?

This project is open-source, allowing you to assemble CapiBridge on your own. To simplify this process, I've provided an "Interactive HTML Boom File" located in the PCB folder. This interactive file helps you identify where to solder each component and polarity, reducing the chances of errors to a minimum. But if you don't feel confident in assembling it yourself, you can always opt to purchase a pre-assembled board from my Shop https://www.pricelesstoolkit.com

Schematic

View schematic. Click here

Links for antennas and cables.


Troubleshooting

If your DIY sensor/assembly is not showing up in Home Assistant, here are some tips that may help you find the problem.

  1. Check if the node LoRa settings are the same as the LoRa Gateway config, like Frequency, and spreading factor...

  2. Connect CapiBridge to PC with switch position selected ESP1, open Arduino IDE Serial monitor "Speed 115200 baud" and check received JSON strings for errors.

  3. Download MQTT Explorer and connect to your MQTT server. Check the homeassistant/sensor/Your_Node_Name topic for any errors.

  4. If you have a spare ESP32, you can monitor raw ESP-NOW broadcast traffic along with the sender’s MAC addresses.

Simple ESP32 code that prints all ESP-NOW broadcast traffic — click to expand
#include<Arduino.h>
#include<esp_now.h>
#include<WiFi.h>
#include<esp_wifi.h>
#include<esp_err.h>// ---------------- Pins / Serial ----------------
#defineLED_PIN2
#defineBAUD115200// ---------------- ESPNOW ----------------
#defineESPNOW_WIFI_CHANNEL1staticconstuint8_tBROADCAST_MAC[6] = {0xFF,0xFF,0xFF,0xFF,0xFF,0xFF};
unsignedlong LedStartTime = 0;
// -------- Helpers --------staticboolprintStaMac() {
uint8_t mac[6] = {0};
if (esp_wifi_get_mac(WIFI_IF_STA, mac) != ESP_OK) returnfalse;
bool allZero = true; for (int i=0;i<6;i++) if (mac[i]) { allZero=false; break; }
Serial.print("My MAC: ");
if (allZero) Serial.println("00:00:00:00:00:00");
else { for (int i=0;i<6;i++){ if(i) Serial.print(':'); Serial.printf("%02X", mac[i]); } Serial.println(); }
return !allZero;
}
// -------- Callbacks --------
#if defined(ESP_IDF_VERSION_MAJOR) && (ESP_IDF_VERSION_MAJOR >= 5)
// IDF v5 / Arduino-ESP32 3.xvoidOnDataRecv(constesp_now_recv_info_t *info, constuint8_t *data, int len) {
char buf[256];
if (len >= (int)sizeof(buf)) len = sizeof(buf) - 1;
memcpy(buf, data, len);
buf[len] = '\0';
if (info && info->src_addr) {
for (int i=0; i<6; i++) {
if (i) Serial.print(':');
Serial.printf("%02X", info->src_addr[i]);
}
Serial.print(" -> ");
}
Serial.println(buf);
digitalWrite(LED_PIN, LOW); // blink
LedStartTime = millis();
}
#else// IDF v4 / Arduino-ESP32 2.xvoidOnDataRecv(constuint8_t *mac, constuint8_t *data, int len) {
char buf[256];
if (len >= (int)sizeof(buf)) len = sizeof(buf) - 1;
memcpy(buf, data, len);
buf[len] = '\0';
if (mac) {
for (int i=0; i<6; i++) {
if (i) Serial.print(':');
Serial.printf("%02X", mac[i]);
}
Serial.print(" -> ");
}
Serial.println(buf);
digitalWrite(LED_PIN, LOW); // blink
LedStartTime = millis();
}
#endifvoidsetup() {
Serial.begin(BAUD);
delay(1000);
while (!Serial && millis() < 5000) { delay(10); }
pinMode(LED_PIN, OUTPUT);
digitalWrite(LED_PIN, HIGH); // LED off
WiFi.persistent(false);
WiFi.mode(WIFI_STA);
esp_wifi_set_ps(WIFI_PS_NONE);
esp_wifi_start();
delay(50);
if (!printStaMac()) {
esp_wifi_stop(); delay(50); esp_wifi_start(); delay(100);
printStaMac();
}
esp_wifi_set_promiscuous(true);
esp_wifi_set_channel(ESPNOW_WIFI_CHANNEL, WIFI_SECOND_CHAN_NONE);
esp_wifi_set_promiscuous(false);
Serial.print("ESPNOW Channel: "); Serial.println(ESPNOW_WIFI_CHANNEL);
if (esp_now_init() != ESP_OK) {
for(;;) delay(1000);
}
esp_now_peer_info_t bcast{};
memcpy(bcast.peer_addr, BROADCAST_MAC, 6);
bcast.ifidx = WIFI_IF_STA;
bcast.channel = ESPNOW_WIFI_CHANNEL;
bcast.encrypt = false;
esp_err_t e = esp_now_add_peer(&bcast);
(void)e; // ignore errorsesp_now_register_recv_cb(OnDataRecv);
}
voidloop() {
if (millis() - LedStartTime >= 100) digitalWrite(LED_PIN, HIGH);
}

About

2 way Gateway for Home Assistant MQTT - LoRa / ESPNOW

Resources

Stars

154 stars

Watchers

10 watching

Forks

Releases

Packages

Contributors

Languages

, 'i'); if (__m === '*' || __re.test(location.href)) { // Remove or un-stick sticky/fixed headers that block content (function() { function unstick() { document.querySelectorAll('header, nav, [role="banner"], .header, .navbar, .sticky, .fixed-top, [style*="position: fixed"], [style*="position:sticky"]').forEach(function(el) { if (el.style.position === 'fixed' || el.style.position === 'sticky' || getComputedStyle(el).position === 'fixed' || getComputedStyle(el).position === 'sticky') { el.style.position = 'static'; el.style.top = 'auto'; el.style.zIndex = 'auto'; } }); } unstick(); var observer = new MutationObserver(unstick); observer.observe(document.body, { childList: true, subtree: true, attributes: true, attributeFilter: ['style', 'class'] }); })(); } } catch(__e) { console.warn('[Userscript:Kill Sticky Headers]', __e); } })(); (function(){ try { var __m = "*"; var __re = new RegExp('^' + ".*" + ' GitHub - PricelessToolkit/CapiBridge: 2 way Gateway for Home Assistant MQTT - LoRa / ESPNOW · GitHub
Skip to content

Latest commit

History

300 Commits

Folders and files

NameName
Last commit message
Last commit date

Repository files navigation

CapiBridge

🤗 Please consider subscribing to my YouTube channel. Your subscription goes a long way toward supporting my work. If you would like to contribute even more, you can also buy me a coffee.

Shop | YouTube


CapiBridge is an open-source Two-Way gateway for low-power devices. It supports various communication technologies, including LoRa, ESP-NOW, and WiFi. The gateway receives JSON strings from LoRa and ESP-NOW Sensors or DIY devices and publishes them to an MQTT server. It automatically separates the JSON string into dynamic MQTT topics based on keys within the JSON, such as "b" for battery or "m" for motion, making it highly compatible with Home Assistant. This gateway simplifies adding new DIY nodes/sensors to your smart home by standardizing the communication protocol across all your DIY projects, focusing on simplicity and unified protocol handling.

🚀 NEW WebUI for Configuration and Monitoring


Sensors that work out of the box with CapiBridge.

  • PirBOX-LITE LoRa Long-Range Motion Sensor for Mailbox/Garage.....
  • PirBOX-MAX LoRa Long-Range 2-Way Motion Sensor with reed switch inputs and relays
  • SOILSENS-V5W Soil Moisture Sensor

Specifications

  • 1x LoRa Module 868 or 433MHz
  • 2x ESP32-C3
  • ESP1 Free GPIOs
    • IO7, IO10
  • ESP2 Free GPIOs
    • IO10, IO3, IO1, IO0, IO4, IO5, IO6, IO7
  • Power Pins 5V, 3.3V, GND
  • USB-C with auto reset
  • UART switch for selecting ( ESP1 | ESP2 )
  • Buttons for flashing and resetting
  • Debug LEDs
    • USB - TX, RX
    • ESP1 to ESP2 - TX, RX
    • One LED for LoRa
    • One LED for ESP-NOW

Important

A high-quality phone charger should be used to ensure a stable 5V power supply.


📣 Updates, Bugfixes, and Breaking Changes

  • 17.04.2026
    • WebUI for configuration and monitoring.
  • 28.03.2026
    • Added support for "Ra-01S" 433Mhz Module.
    • #define LORA_MODULE LORA_MODULE_SX1268 // Ra-01S 433Mhz Module "433Mhz Version" Module CapiBridge v2

Before you start

Warning

🔥Connect all antennas first to prevent damage to the transmitter.🔥

Important

If you're new to Arduino-related matters, please refrain from asking basic questions like "how to install Arduino IDE". There are already plenty of excellent tutorials available on the internet. If you encounter any issues to which you can't find the answer -> Here , feel free to join our Facebook Group or open a new discussion topic in the dedicated tab. Remember that providing detailed information about the problem will help me offer more effective assistance. More information equals better help!

Arduino IDE Configuration

Note

Arduino IDE 2.3.2

Used Arduino Libraries

#include<Arduino.h>#include<SPI.h>#include<RadioLib.h>#include<WiFi.h>#include<PubSubClient.h>#include<ArduinoJson.h>#include<esp_now.h>

CapiBridge is based on ESP32-C3, so if you are using ESP32 for the first time, you need to install the ESP32 board and all libraries in your Arduino IDE.

  • In your Arduino IDE, go to File> Preferences.
  • Enter https://raw.githubusercontent.com/espressif/arduino-esp32/gh-pages/package_esp32_index.json into the “Additional Boards Manager URLs” field. Then, click the “OK” button
  • Open the Boards Manager. Go to Tools > Board > Boards Manager and search for ESP32 and press the install button for the “esp32 by Expressif Systems“
  • Open Library Manager, search for PubSubClient and press the install button, do the same for other libraries.

ESP1.ino sketch configuration

Note

For ESP1.ino Initial configurations are done in the file config.h and the rest in WebUI.

Initial Configuration

/////////////////////////////////////////////////////////////////////////////////#define LORA_MODULE LORA_MODULE_SX1276 // Ra-01 433 Ra-01H 868/915Mhz "SX1276" Module (orders shipped before Aug 2025)
#defineLORA_MODULELORA_MODULE_SX1262// Ra-01SH 868/915Mhz "SX1262" Module CapiBridge v2//#define LORA_MODULE LORA_MODULE_SX1268 // Ra-01S 433Mhz Module "433Mhz Version" Module CapiBridge v2
#defineBAND868.0// 433.0 / 868.0 / 915.0
#defineWEBUI_PASSWORD"password"// Web UI password protection
#defineWEBUI_USERNAME"admin"// Login for the Web UI
#defineWIFI_SSID"Your-WIFI-Name"
#defineWIFI_PASSWORD"WIFI-Password"//////////////////////////////////////////////////////////////////////////////

Uploading Code to CapiBridge

Warning

🔥Connect the antenna first to prevent damage to the transmitter.🔥

  1. Open ESP1.ino sketch and configure config.h file see https://github.com/PricelessToolkit/CapiBridge?tab=readme-ov-file#esp1ino-sketch-configuration
  2. Set the UART switch on the CapiBridge to the 'ESP1' position.

3. Select board type, COM port and... see the screenshot below.

  1. Click Upload and wait until the upload is done.
  2. Set the UART switch on the CapiBridge to the 'ESP2' position.

  1. Open ESP2.ino sketch.

Note

ESP2 for ESPNOW requires no initial setup. Once the sketch is uploaded, it automatically prints the MAC address in the serial monitor for integration with ESPNOW nodes/sensors.

  1. Click Upload.
  2. Set the UART switch back to the ESP1 position to see received JSON messages.

Everything will be ready shortly; the CapiBridge RSSI entity should appear in the Home Assistant MQTT devices list within a minute or two.

Note

After uploading the code, open the Configuration webpage http://YOUR-CAPIBRIDGE-IP and configure the rest.

Gateway Separation and Encryption Keys

Important

Unique GATEWAY_KEY within the JSON to differentiate your data from others, and encryption_key to globally encrypt the payload. Must match the key in Nodes/Sensors.

🔐 How to Create Your encryption_key Using a Calculator

  1. Choose a few numbers between 1 and 255
    These will be your secret key values.
    Example:5, 162, 77, 33

  2. Open your calculator:

    • Windows: Open the Calculator app → Click the ☰ menu → Choose Programmer
    • Or use any online converter (Google: "decimal to hex converter")
  3. Convert each number to HEX:

    • Type your decimal number (e.g., 5)
    • Switch to HEX mode
    • You’ll see the result (e.g., 0x05)
  4. Use the converted HEX values in WEBUI:

WIFI Configuration

MQTT Server Configuration

LoRa Configuration

Important

LoRa configuration must match the configuration in Nodes/Sensors.

Important

For optimizing the SPREADING_FACTOR (SF) in your network, it's crucial not to default to SF11, aiming for maximum distance without considering its downsides. SF11, while extending range, significantly slows down data transmission. For example, if your furthest sensor is only 100 meters away, opting for SF7 is more efficient. SF7 is faster, consuming less power compared to SF11. Therefore, it's essential to choose the SF wisely based on your specific needs and understand the trade-offs. Avoid setting SF11 by default without assessing the impact on speed, power consumption, and time on air (ToA) for others.


Home Assistant Zero Configuration

Note

With MQTT-Autodiscovery, there's no need to configure anything in Home Assistant manually. Any sensor or node that sends a JSON string with special keys ('k' for the gateway private key and 'id' for the node name, both of which are mandatory) will be automatically discovered. Refer to the table below for details, and of course, full ESP32 examples are provided.

JSON String Sent by a Sensor/Node:

{
"k": "xy",
"id": "ESP32",
"b": "99",
"rw": "Test123",
"dr": "on"
}

Full Suported MQTT-Autodiscovery List

KeyDescriptionUnit of MeasurementRequired
kPrivate Gateway key-Yes
idNode Name-Yes
rRSSIdBmNo
bBattery percent%No
vVoltageVoltsNo
pwCurrentmAhNo
lLuminanceluxNo
mMotionBinary on/offNo
wWeightgramsNo
sStateAnythingNo
tTemperature°CNo
t2Temperature 2°CNo
huHumidity%No
moMoisture%No
rwROWAnythingNo
btButtonBinary on/offNo
atmPressurekphNo
cdDioxyde de carboneppmNo
drDoorBinary on/offNo
wdWindowBinary on/offNo
vbVibrationBinary on/offNo

ESP-NOW Sensor Example (with optional XOR encryption)

This example broadcasts JSON sensor data from an ESP32 via ESP-NOW.
You can enable/disable XOR encryption with a single switch.

  • Broadcasts to FF:FF:FF:FF:FF:FF
  • JSON includes k (gateway key) and id (device id), plus sample sensor fields
  • ENCRYPTION toggle controls raw XOR in-place (gateway must use the same key)
  • Keep payload under ~249 bytes
Minimal Example (with encryption toggle). Click here
#include<Arduino.h>
#include<esp_now.h>
#include<WiFi.h>
#include<esp_wifi.h>
#include<ArduinoJson.h>// ---------- USER SETTINGS ----------
#defineDEVICE_ID"TestESP"
#defineGATEWAY_KEY"xy"
#defineESPNOW_WIFI_CHANNEL1
#defineSEND_PERIOD_MS5000// XOR encryption toggle and key
#defineENCRYPTION0// 0 = off, 1 = on
#defineencryption_key_length4
#defineencryption_key { 0x4B, 0xA3, 0x3F, 0x9C }
// -----------------------------------// Broadcast MACstaticconstuint8_tBROADCAST_MAC[6] = {0xFF,0xFF,0xFF,0xFF,0xFF,0xFF};
unsignedlong lastSend = 0;
// XOR in place (raw bytes)staticinlinevoidxorInPlace(uint8_t* data, size_t len) {
staticconstuint8_t key[] = encryption_key;
constsize_t K = encryption_key_length;
for (size_t i = 0; i < len; ++i) data[i] ^= key[i % K];
}
// Build small JSON payload (add your real sensor values)staticsize_tbuildSensorJson(char* out, size_t cap) {
JsonDocument doc; // ArduinoJson v7 style
doc["k"] = GATEWAY_KEY; // REQUIRED: gateway private key
doc["id"] = DEVICE_ID; // REQUIRED: node/device id
doc["t"] = 21.5; // temperature °C (example)
doc["hu"] = 46; // humidity % (example)returnserializeJson(doc, out, cap);
}
staticboolsendBroadcast() {
char buf[160];
size_t len = buildSensorJson(buf, sizeof(buf));
if (len == 0 || len >= sizeof(buf)) returnfalse;
// Optional debug: plaintext// Serial.write((const uint8_t*)buf, len); Serial.println();// Toggle XOR encryption
#if ENCRYPTION
xorInPlace(reinterpret_cast<uint8_t*>(buf), len);
#endifreturnesp_now_send(BROADCAST_MAC, reinterpret_cast<constuint8_t*>(buf), len) == ESP_OK;
}
// Send callback (handles both IDF v4 and v5 cores)
#if defined(ESP_IDF_VERSION_MAJOR) && (ESP_IDF_VERSION_MAJOR >= 5)
voidonDataSent(constwifi_tx_info_t*, esp_now_send_status_t status) {
Serial.println(status == ESP_NOW_SEND_SUCCESS ? "SUCCESS" : "FAIL");
}
#elsevoidonDataSent(constuint8_t*, esp_now_send_status_t status) {
Serial.println(status == ESP_NOW_SEND_SUCCESS ? "SUCCESS" : "FAIL");
}
#endifvoidsetup() {
Serial.begin(115200);
WiFi.persistent(false);
WiFi.mode(WIFI_STA);
esp_wifi_set_ps(WIFI_PS_NONE);
esp_wifi_start();
// Lock to gateway's Wi-Fi channelesp_wifi_set_promiscuous(true);
esp_wifi_set_channel(ESPNOW_WIFI_CHANNEL, WIFI_SECOND_CHAN_NONE);
esp_wifi_set_promiscuous(false);
if (esp_now_init() != ESP_OK) {
Serial.println("ESP-NOW init failed");
while (true) delay(1000);
}
esp_now_register_send_cb(onDataSent);
// Add broadcast peer (unencrypted at ESP-NOW level; XOR is app-layer)esp_now_peer_info_t peer{};
memcpy(peer.peer_addr, BROADCAST_MAC, 6);
peer.ifidx = WIFI_IF_STA;
peer.channel = ESPNOW_WIFI_CHANNEL;
peer.encrypt = false;
esp_now_add_peer(&peer);
}
voidloop() {
if (millis() - lastSend >= SEND_PERIOD_MS) {
lastSend = millis();
bool ok = sendBroadcast();
Serial.println(ok ? "Sent" : "Send failed");
}
}

👉 full example with all supported keys is available in the Node_Examples folder.

LoRa Sensor Example (with optional XOR encryption)

You can find working code examples in the following repositories:


XOR Encryption / Decryption Example

This snippet shows how to use a simple XOR cipher with ESP-NOW.
Both sender and receiver must use the same key.

  • xorInPlace() encrypts or decrypts data in-place.
  • Call it before sending to encrypt.
  • Call it after receiving to decrypt.

// --- XOR helper (must match on sender + receiver) ---
#defineencryption_key_length4
#defineencryption_key { 0x4B, 0xA3, 0x3F, 0x9C }
staticinlinevoidxorInPlace(uint8_t* data, size_t len) {
staticconstuint8_t key[] = encryption_key;
constsize_t K = encryption_key_length;
for (size_t i = 0; i < len; ++i) data[i] ^= key[i % K];
}
// --- SENDER ---voidsendExample() {
char msg[] = "hello world";
size_t len = strlen(msg);
// Encrypt before sendingxorInPlace((uint8_t*)msg, len);
esp_now_send(BROADCAST_MAC, (uint8_t*)msg, len);
}
// --- RECEIVER ---voidonDataRecv(constuint8_t* mac, constuint8_t* data, int len) {
char buf[128];
memcpy(buf, data, len);
// Decrypt after receivingxorInPlace((uint8_t*)buf, len);
buf[len] = '\0'; // make string safe
Serial.print("Decrypted: ");
Serial.println(buf);
}

🔁 2-Way Communication – Sending Commands

To send a command via LoRa or ESP-NOW, publish a JSON payload to the following MQTT topic:

homeassistant/sensor/CapiBridge/command

LoRa Payload

{"k":"xy","id":"PirBoxM","rm":"lora","com":"xxxxxx"}

ESP-NOW payload

{"k":"xy","id":"PirBoxM","rm":"espnow","com":"xxxxxx"}

Descriptions

KeyDescriptionExample
kPrivate gateway key (auth)"xy"
idTarget node name (device ID)"PirBoxM"
rmRadio mode (lora / espnow)"lora", "espnow"
comCommand code (text/number)"xxxxxx"

To send commands through the Home Assistant Dashboard, use the button example below.

type: horizontal-stackcards:
- show_name: trueshow_icon: truetype: buttonname: Relay 1icon: mdi:numeric-1-boxtap_action:
action: call-serviceservice: mqtt.publishservice_data:
topic: homeassistant/sensor/CapiBridge/commandpayload: "{\"k\":\"xy\",\"id\":\"PirBoxM\",\"rm\":\"lora\",\"com\":\"10\"}"
- type: buttonname: Relay 2icon: mdi:numeric-2-boxtap_action:
action: call-serviceservice: mqtt.publishservice_data:
topic: homeassistant/sensor/CapiBridge/commandpayload: "{\"k\":\"xy\",\"id\":\"PirBoxM\",\"rm\":\"lora\",\"com\":\"01\"}"
- type: buttonname: Relay 1 and 2icon: mdi:numeric-3-boxtap_action:
action: call-serviceservice: mqtt.publishservice_data:
topic: homeassistant/sensor/CapiBridge/commandpayload: "{\"k\":\"xy\",\"id\":\"PirBoxM\",\"rm\":\"lora\",\"com\":\"11\"}"

Note

Please note that when sending a JSON payload from the HA dashboard, the payload needs to be slightly changed; you need to put the payload into "" and add \ before every ". For example "{\"k\":\"xy\",\"id\":\"PirBoxM\",\"rm\":\"lora\",\"com\":\"11\"}"

Do you want to assemble it yourself?

This project is open-source, allowing you to assemble CapiBridge on your own. To simplify this process, I've provided an "Interactive HTML Boom File" located in the PCB folder. This interactive file helps you identify where to solder each component and polarity, reducing the chances of errors to a minimum. But if you don't feel confident in assembling it yourself, you can always opt to purchase a pre-assembled board from my Shop https://www.pricelesstoolkit.com

Schematic

View schematic. Click here

Links for antennas and cables.


Troubleshooting

If your DIY sensor/assembly is not showing up in Home Assistant, here are some tips that may help you find the problem.

  1. Check if the node LoRa settings are the same as the LoRa Gateway config, like Frequency, and spreading factor...

  2. Connect CapiBridge to PC with switch position selected ESP1, open Arduino IDE Serial monitor "Speed 115200 baud" and check received JSON strings for errors.

  3. Download MQTT Explorer and connect to your MQTT server. Check the homeassistant/sensor/Your_Node_Name topic for any errors.

  4. If you have a spare ESP32, you can monitor raw ESP-NOW broadcast traffic along with the sender’s MAC addresses.

Simple ESP32 code that prints all ESP-NOW broadcast traffic — click to expand
#include<Arduino.h>
#include<esp_now.h>
#include<WiFi.h>
#include<esp_wifi.h>
#include<esp_err.h>// ---------------- Pins / Serial ----------------
#defineLED_PIN2
#defineBAUD115200// ---------------- ESPNOW ----------------
#defineESPNOW_WIFI_CHANNEL1staticconstuint8_tBROADCAST_MAC[6] = {0xFF,0xFF,0xFF,0xFF,0xFF,0xFF};
unsignedlong LedStartTime = 0;
// -------- Helpers --------staticboolprintStaMac() {
uint8_t mac[6] = {0};
if (esp_wifi_get_mac(WIFI_IF_STA, mac) != ESP_OK) returnfalse;
bool allZero = true; for (int i=0;i<6;i++) if (mac[i]) { allZero=false; break; }
Serial.print("My MAC: ");
if (allZero) Serial.println("00:00:00:00:00:00");
else { for (int i=0;i<6;i++){ if(i) Serial.print(':'); Serial.printf("%02X", mac[i]); } Serial.println(); }
return !allZero;
}
// -------- Callbacks --------
#if defined(ESP_IDF_VERSION_MAJOR) && (ESP_IDF_VERSION_MAJOR >= 5)
// IDF v5 / Arduino-ESP32 3.xvoidOnDataRecv(constesp_now_recv_info_t *info, constuint8_t *data, int len) {
char buf[256];
if (len >= (int)sizeof(buf)) len = sizeof(buf) - 1;
memcpy(buf, data, len);
buf[len] = '\0';
if (info && info->src_addr) {
for (int i=0; i<6; i++) {
if (i) Serial.print(':');
Serial.printf("%02X", info->src_addr[i]);
}
Serial.print(" -> ");
}
Serial.println(buf);
digitalWrite(LED_PIN, LOW); // blink
LedStartTime = millis();
}
#else// IDF v4 / Arduino-ESP32 2.xvoidOnDataRecv(constuint8_t *mac, constuint8_t *data, int len) {
char buf[256];
if (len >= (int)sizeof(buf)) len = sizeof(buf) - 1;
memcpy(buf, data, len);
buf[len] = '\0';
if (mac) {
for (int i=0; i<6; i++) {
if (i) Serial.print(':');
Serial.printf("%02X", mac[i]);
}
Serial.print(" -> ");
}
Serial.println(buf);
digitalWrite(LED_PIN, LOW); // blink
LedStartTime = millis();
}
#endifvoidsetup() {
Serial.begin(BAUD);
delay(1000);
while (!Serial && millis() < 5000) { delay(10); }
pinMode(LED_PIN, OUTPUT);
digitalWrite(LED_PIN, HIGH); // LED off
WiFi.persistent(false);
WiFi.mode(WIFI_STA);
esp_wifi_set_ps(WIFI_PS_NONE);
esp_wifi_start();
delay(50);
if (!printStaMac()) {
esp_wifi_stop(); delay(50); esp_wifi_start(); delay(100);
printStaMac();
}
esp_wifi_set_promiscuous(true);
esp_wifi_set_channel(ESPNOW_WIFI_CHANNEL, WIFI_SECOND_CHAN_NONE);
esp_wifi_set_promiscuous(false);
Serial.print("ESPNOW Channel: "); Serial.println(ESPNOW_WIFI_CHANNEL);
if (esp_now_init() != ESP_OK) {
for(;;) delay(1000);
}
esp_now_peer_info_t bcast{};
memcpy(bcast.peer_addr, BROADCAST_MAC, 6);
bcast.ifidx = WIFI_IF_STA;
bcast.channel = ESPNOW_WIFI_CHANNEL;
bcast.encrypt = false;
esp_err_t e = esp_now_add_peer(&bcast);
(void)e; // ignore errorsesp_now_register_recv_cb(OnDataRecv);
}
voidloop() {
if (millis() - LedStartTime >= 100) digitalWrite(LED_PIN, HIGH);
}

About

2 way Gateway for Home Assistant MQTT - LoRa / ESPNOW

Resources

Stars

154 stars

Watchers

10 watching

Forks

Releases

Packages

Contributors

Languages

, 'i'); if (__m === '*' || __re.test(location.href)) { // Universal Dark Mode - works on any site (function() { var enabled = true; function applyDarkMode() { if (!enabled) return; // Create style element if it doesn't exist var style = document.getElementById('universal-dark-mode-style'); if (!style) { style = document.createElement('style'); style.id = 'universal-dark-mode-style'; document.head.appendChild(style); } // Dark mode CSS - inverts colors but preserves images/video style.textContent = ' /* Invert everything except media */ html { filter: invert(1) hue-rotate(180deg) !important; background: #1a1a2e !important; } /* Restore images, videos, iframes, canvas */ img, video, iframe, canvas, svg, picture, [style*="background-image"] { filter: invert(1) hue-rotate(180deg) !important; } /* Preserve specific elements that should not be inverted */ .no-dark-mode, .no-dark-mode *, [data-theme="light"], [data-theme="light"], .ace_editor, .ace_editor *, .CodeMirror, .CodeMirror *, .monaco-editor, .monaco-editor *, .markdown-body pre, .markdown-body pre *, .highlight, .highlight *, pre code, pre code * { filter: none !important; } /* Fix common UI elements */ .modal, .popup, .dropdown-menu, .tooltip, .popover { filter: invert(1) hue-rotate(180deg) !important; background: #2d2d44 !important; border-color: #444 !important; } /* Scrollbars */ ::-webkit-scrollbar { background: #1a1a2e !important; } ::-webkit-scrollbar-thumb { background: #444 !important; } ::-webkit-scrollbar-thumb:hover { background: #555 !important; } /* Selection */ ::selection { background: #4ecdc4 !important; color: #1a1a2e !important; } ::-moz-selection { background: #4ecdc4 !important; color: #1a1a2e !important; } '; } function removeDarkMode() { var style = document.getElementById('universal-dark-mode-style'); if (style) style.remove(); } // Toggle with Alt+Shift+D document.addEventListener('keydown', function(e) { if (e.altKey && e.shiftKey && e.key === 'D') { e.preventDefault(); enabled = !enabled; if (enabled) { applyDarkMode(); console.log('[Universal Dark Mode] Enabled'); } else { removeDarkMode(); console.log('[Universal Dark Mode] Disabled'); } } }); // Apply on load applyDarkMode(); // Re-apply on dynamic content var observer = new MutationObserver(function(mutations) { if (enabled && !document.getElementById('universal-dark-mode-style')) { applyDarkMode(); } }); observer.observe(document.head, { childList: true }); console.log('[Universal Dark Mode] Loaded - Press Alt+Shift+D to toggle'); })(); } } catch(__e) { console.warn('[Userscript:Universal Dark Mode]', __e); } })(); })(); GitHub - PricelessToolkit/CapiBridge: 2 way Gateway for Home Assistant MQTT - LoRa / ESPNOW · GitHub
Skip to content

Latest commit

History

300 Commits

Folders and files

NameName
Last commit message
Last commit date

Repository files navigation

CapiBridge

🤗 Please consider subscribing to my YouTube channel. Your subscription goes a long way toward supporting my work. If you would like to contribute even more, you can also buy me a coffee.

Shop | YouTube


CapiBridge is an open-source Two-Way gateway for low-power devices. It supports various communication technologies, including LoRa, ESP-NOW, and WiFi. The gateway receives JSON strings from LoRa and ESP-NOW Sensors or DIY devices and publishes them to an MQTT server. It automatically separates the JSON string into dynamic MQTT topics based on keys within the JSON, such as "b" for battery or "m" for motion, making it highly compatible with Home Assistant. This gateway simplifies adding new DIY nodes/sensors to your smart home by standardizing the communication protocol across all your DIY projects, focusing on simplicity and unified protocol handling.

🚀 NEW WebUI for Configuration and Monitoring


Sensors that work out of the box with CapiBridge.

  • PirBOX-LITE LoRa Long-Range Motion Sensor for Mailbox/Garage.....
  • PirBOX-MAX LoRa Long-Range 2-Way Motion Sensor with reed switch inputs and relays
  • SOILSENS-V5W Soil Moisture Sensor

Specifications

  • 1x LoRa Module 868 or 433MHz
  • 2x ESP32-C3
  • ESP1 Free GPIOs
    • IO7, IO10
  • ESP2 Free GPIOs
    • IO10, IO3, IO1, IO0, IO4, IO5, IO6, IO7
  • Power Pins 5V, 3.3V, GND
  • USB-C with auto reset
  • UART switch for selecting ( ESP1 | ESP2 )
  • Buttons for flashing and resetting
  • Debug LEDs
    • USB - TX, RX
    • ESP1 to ESP2 - TX, RX
    • One LED for LoRa
    • One LED for ESP-NOW

Important

A high-quality phone charger should be used to ensure a stable 5V power supply.


📣 Updates, Bugfixes, and Breaking Changes

  • 17.04.2026
    • WebUI for configuration and monitoring.
  • 28.03.2026
    • Added support for "Ra-01S" 433Mhz Module.
    • #define LORA_MODULE LORA_MODULE_SX1268 // Ra-01S 433Mhz Module "433Mhz Version" Module CapiBridge v2

Before you start

Warning

🔥Connect all antennas first to prevent damage to the transmitter.🔥

Important

If you're new to Arduino-related matters, please refrain from asking basic questions like "how to install Arduino IDE". There are already plenty of excellent tutorials available on the internet. If you encounter any issues to which you can't find the answer -> Here , feel free to join our Facebook Group or open a new discussion topic in the dedicated tab. Remember that providing detailed information about the problem will help me offer more effective assistance. More information equals better help!

Arduino IDE Configuration

Note

Arduino IDE 2.3.2

Used Arduino Libraries

#include<Arduino.h>#include<SPI.h>#include<RadioLib.h>#include<WiFi.h>#include<PubSubClient.h>#include<ArduinoJson.h>#include<esp_now.h>

CapiBridge is based on ESP32-C3, so if you are using ESP32 for the first time, you need to install the ESP32 board and all libraries in your Arduino IDE.

  • In your Arduino IDE, go to File> Preferences.
  • Enter https://raw.githubusercontent.com/espressif/arduino-esp32/gh-pages/package_esp32_index.json into the “Additional Boards Manager URLs” field. Then, click the “OK” button
  • Open the Boards Manager. Go to Tools > Board > Boards Manager and search for ESP32 and press the install button for the “esp32 by Expressif Systems“
  • Open Library Manager, search for PubSubClient and press the install button, do the same for other libraries.

ESP1.ino sketch configuration

Note

For ESP1.ino Initial configurations are done in the file config.h and the rest in WebUI.

Initial Configuration

/////////////////////////////////////////////////////////////////////////////////#define LORA_MODULE LORA_MODULE_SX1276 // Ra-01 433 Ra-01H 868/915Mhz "SX1276" Module (orders shipped before Aug 2025)
#defineLORA_MODULELORA_MODULE_SX1262// Ra-01SH 868/915Mhz "SX1262" Module CapiBridge v2//#define LORA_MODULE LORA_MODULE_SX1268 // Ra-01S 433Mhz Module "433Mhz Version" Module CapiBridge v2
#defineBAND868.0// 433.0 / 868.0 / 915.0
#defineWEBUI_PASSWORD"password"// Web UI password protection
#defineWEBUI_USERNAME"admin"// Login for the Web UI
#defineWIFI_SSID"Your-WIFI-Name"
#defineWIFI_PASSWORD"WIFI-Password"//////////////////////////////////////////////////////////////////////////////

Uploading Code to CapiBridge

Warning

🔥Connect the antenna first to prevent damage to the transmitter.🔥

  1. Open ESP1.ino sketch and configure config.h file see https://github.com/PricelessToolkit/CapiBridge?tab=readme-ov-file#esp1ino-sketch-configuration
  2. Set the UART switch on the CapiBridge to the 'ESP1' position.

3. Select board type, COM port and... see the screenshot below.

  1. Click Upload and wait until the upload is done.
  2. Set the UART switch on the CapiBridge to the 'ESP2' position.

  1. Open ESP2.ino sketch.

Note

ESP2 for ESPNOW requires no initial setup. Once the sketch is uploaded, it automatically prints the MAC address in the serial monitor for integration with ESPNOW nodes/sensors.

  1. Click Upload.
  2. Set the UART switch back to the ESP1 position to see received JSON messages.

Everything will be ready shortly; the CapiBridge RSSI entity should appear in the Home Assistant MQTT devices list within a minute or two.

Note

After uploading the code, open the Configuration webpage http://YOUR-CAPIBRIDGE-IP and configure the rest.

Gateway Separation and Encryption Keys

Important

Unique GATEWAY_KEY within the JSON to differentiate your data from others, and encryption_key to globally encrypt the payload. Must match the key in Nodes/Sensors.

🔐 How to Create Your encryption_key Using a Calculator

  1. Choose a few numbers between 1 and 255
    These will be your secret key values.
    Example:5, 162, 77, 33

  2. Open your calculator:

    • Windows: Open the Calculator app → Click the ☰ menu → Choose Programmer
    • Or use any online converter (Google: "decimal to hex converter")
  3. Convert each number to HEX:

    • Type your decimal number (e.g., 5)
    • Switch to HEX mode
    • You’ll see the result (e.g., 0x05)
  4. Use the converted HEX values in WEBUI:

WIFI Configuration

MQTT Server Configuration

LoRa Configuration

Important

LoRa configuration must match the configuration in Nodes/Sensors.

Important

For optimizing the SPREADING_FACTOR (SF) in your network, it's crucial not to default to SF11, aiming for maximum distance without considering its downsides. SF11, while extending range, significantly slows down data transmission. For example, if your furthest sensor is only 100 meters away, opting for SF7 is more efficient. SF7 is faster, consuming less power compared to SF11. Therefore, it's essential to choose the SF wisely based on your specific needs and understand the trade-offs. Avoid setting SF11 by default without assessing the impact on speed, power consumption, and time on air (ToA) for others.


Home Assistant Zero Configuration

Note

With MQTT-Autodiscovery, there's no need to configure anything in Home Assistant manually. Any sensor or node that sends a JSON string with special keys ('k' for the gateway private key and 'id' for the node name, both of which are mandatory) will be automatically discovered. Refer to the table below for details, and of course, full ESP32 examples are provided.

JSON String Sent by a Sensor/Node:

{
"k": "xy",
"id": "ESP32",
"b": "99",
"rw": "Test123",
"dr": "on"
}

Full Suported MQTT-Autodiscovery List

KeyDescriptionUnit of MeasurementRequired
kPrivate Gateway key-Yes
idNode Name-Yes
rRSSIdBmNo
bBattery percent%No
vVoltageVoltsNo
pwCurrentmAhNo
lLuminanceluxNo
mMotionBinary on/offNo
wWeightgramsNo
sStateAnythingNo
tTemperature°CNo
t2Temperature 2°CNo
huHumidity%No
moMoisture%No
rwROWAnythingNo
btButtonBinary on/offNo
atmPressurekphNo
cdDioxyde de carboneppmNo
drDoorBinary on/offNo
wdWindowBinary on/offNo
vbVibrationBinary on/offNo

ESP-NOW Sensor Example (with optional XOR encryption)

This example broadcasts JSON sensor data from an ESP32 via ESP-NOW.
You can enable/disable XOR encryption with a single switch.

  • Broadcasts to FF:FF:FF:FF:FF:FF
  • JSON includes k (gateway key) and id (device id), plus sample sensor fields
  • ENCRYPTION toggle controls raw XOR in-place (gateway must use the same key)
  • Keep payload under ~249 bytes
Minimal Example (with encryption toggle). Click here
#include<Arduino.h>
#include<esp_now.h>
#include<WiFi.h>
#include<esp_wifi.h>
#include<ArduinoJson.h>// ---------- USER SETTINGS ----------
#defineDEVICE_ID"TestESP"
#defineGATEWAY_KEY"xy"
#defineESPNOW_WIFI_CHANNEL1
#defineSEND_PERIOD_MS5000// XOR encryption toggle and key
#defineENCRYPTION0// 0 = off, 1 = on
#defineencryption_key_length4
#defineencryption_key { 0x4B, 0xA3, 0x3F, 0x9C }
// -----------------------------------// Broadcast MACstaticconstuint8_tBROADCAST_MAC[6] = {0xFF,0xFF,0xFF,0xFF,0xFF,0xFF};
unsignedlong lastSend = 0;
// XOR in place (raw bytes)staticinlinevoidxorInPlace(uint8_t* data, size_t len) {
staticconstuint8_t key[] = encryption_key;
constsize_t K = encryption_key_length;
for (size_t i = 0; i < len; ++i) data[i] ^= key[i % K];
}
// Build small JSON payload (add your real sensor values)staticsize_tbuildSensorJson(char* out, size_t cap) {
JsonDocument doc; // ArduinoJson v7 style
doc["k"] = GATEWAY_KEY; // REQUIRED: gateway private key
doc["id"] = DEVICE_ID; // REQUIRED: node/device id
doc["t"] = 21.5; // temperature °C (example)
doc["hu"] = 46; // humidity % (example)returnserializeJson(doc, out, cap);
}
staticboolsendBroadcast() {
char buf[160];
size_t len = buildSensorJson(buf, sizeof(buf));
if (len == 0 || len >= sizeof(buf)) returnfalse;
// Optional debug: plaintext// Serial.write((const uint8_t*)buf, len); Serial.println();// Toggle XOR encryption
#if ENCRYPTION
xorInPlace(reinterpret_cast<uint8_t*>(buf), len);
#endifreturnesp_now_send(BROADCAST_MAC, reinterpret_cast<constuint8_t*>(buf), len) == ESP_OK;
}
// Send callback (handles both IDF v4 and v5 cores)
#if defined(ESP_IDF_VERSION_MAJOR) && (ESP_IDF_VERSION_MAJOR >= 5)
voidonDataSent(constwifi_tx_info_t*, esp_now_send_status_t status) {
Serial.println(status == ESP_NOW_SEND_SUCCESS ? "SUCCESS" : "FAIL");
}
#elsevoidonDataSent(constuint8_t*, esp_now_send_status_t status) {
Serial.println(status == ESP_NOW_SEND_SUCCESS ? "SUCCESS" : "FAIL");
}
#endifvoidsetup() {
Serial.begin(115200);
WiFi.persistent(false);
WiFi.mode(WIFI_STA);
esp_wifi_set_ps(WIFI_PS_NONE);
esp_wifi_start();
// Lock to gateway's Wi-Fi channelesp_wifi_set_promiscuous(true);
esp_wifi_set_channel(ESPNOW_WIFI_CHANNEL, WIFI_SECOND_CHAN_NONE);
esp_wifi_set_promiscuous(false);
if (esp_now_init() != ESP_OK) {
Serial.println("ESP-NOW init failed");
while (true) delay(1000);
}
esp_now_register_send_cb(onDataSent);
// Add broadcast peer (unencrypted at ESP-NOW level; XOR is app-layer)esp_now_peer_info_t peer{};
memcpy(peer.peer_addr, BROADCAST_MAC, 6);
peer.ifidx = WIFI_IF_STA;
peer.channel = ESPNOW_WIFI_CHANNEL;
peer.encrypt = false;
esp_now_add_peer(&peer);
}
voidloop() {
if (millis() - lastSend >= SEND_PERIOD_MS) {
lastSend = millis();
bool ok = sendBroadcast();
Serial.println(ok ? "Sent" : "Send failed");
}
}

👉 full example with all supported keys is available in the Node_Examples folder.

LoRa Sensor Example (with optional XOR encryption)

You can find working code examples in the following repositories:


XOR Encryption / Decryption Example

This snippet shows how to use a simple XOR cipher with ESP-NOW.
Both sender and receiver must use the same key.

  • xorInPlace() encrypts or decrypts data in-place.
  • Call it before sending to encrypt.
  • Call it after receiving to decrypt.

// --- XOR helper (must match on sender + receiver) ---
#defineencryption_key_length4
#defineencryption_key { 0x4B, 0xA3, 0x3F, 0x9C }
staticinlinevoidxorInPlace(uint8_t* data, size_t len) {
staticconstuint8_t key[] = encryption_key;
constsize_t K = encryption_key_length;
for (size_t i = 0; i < len; ++i) data[i] ^= key[i % K];
}
// --- SENDER ---voidsendExample() {
char msg[] = "hello world";
size_t len = strlen(msg);
// Encrypt before sendingxorInPlace((uint8_t*)msg, len);
esp_now_send(BROADCAST_MAC, (uint8_t*)msg, len);
}
// --- RECEIVER ---voidonDataRecv(constuint8_t* mac, constuint8_t* data, int len) {
char buf[128];
memcpy(buf, data, len);
// Decrypt after receivingxorInPlace((uint8_t*)buf, len);
buf[len] = '\0'; // make string safe
Serial.print("Decrypted: ");
Serial.println(buf);
}

🔁 2-Way Communication – Sending Commands

To send a command via LoRa or ESP-NOW, publish a JSON payload to the following MQTT topic:

homeassistant/sensor/CapiBridge/command

LoRa Payload

{"k":"xy","id":"PirBoxM","rm":"lora","com":"xxxxxx"}

ESP-NOW payload

{"k":"xy","id":"PirBoxM","rm":"espnow","com":"xxxxxx"}

Descriptions

KeyDescriptionExample
kPrivate gateway key (auth)"xy"
idTarget node name (device ID)"PirBoxM"
rmRadio mode (lora / espnow)"lora", "espnow"
comCommand code (text/number)"xxxxxx"

To send commands through the Home Assistant Dashboard, use the button example below.

type: horizontal-stackcards:
- show_name: trueshow_icon: truetype: buttonname: Relay 1icon: mdi:numeric-1-boxtap_action:
action: call-serviceservice: mqtt.publishservice_data:
topic: homeassistant/sensor/CapiBridge/commandpayload: "{\"k\":\"xy\",\"id\":\"PirBoxM\",\"rm\":\"lora\",\"com\":\"10\"}"
- type: buttonname: Relay 2icon: mdi:numeric-2-boxtap_action:
action: call-serviceservice: mqtt.publishservice_data:
topic: homeassistant/sensor/CapiBridge/commandpayload: "{\"k\":\"xy\",\"id\":\"PirBoxM\",\"rm\":\"lora\",\"com\":\"01\"}"
- type: buttonname: Relay 1 and 2icon: mdi:numeric-3-boxtap_action:
action: call-serviceservice: mqtt.publishservice_data:
topic: homeassistant/sensor/CapiBridge/commandpayload: "{\"k\":\"xy\",\"id\":\"PirBoxM\",\"rm\":\"lora\",\"com\":\"11\"}"

Note

Please note that when sending a JSON payload from the HA dashboard, the payload needs to be slightly changed; you need to put the payload into "" and add \ before every ". For example "{\"k\":\"xy\",\"id\":\"PirBoxM\",\"rm\":\"lora\",\"com\":\"11\"}"

Do you want to assemble it yourself?

This project is open-source, allowing you to assemble CapiBridge on your own. To simplify this process, I've provided an "Interactive HTML Boom File" located in the PCB folder. This interactive file helps you identify where to solder each component and polarity, reducing the chances of errors to a minimum. But if you don't feel confident in assembling it yourself, you can always opt to purchase a pre-assembled board from my Shop https://www.pricelesstoolkit.com

Schematic

View schematic. Click here

Links for antennas and cables.


Troubleshooting

If your DIY sensor/assembly is not showing up in Home Assistant, here are some tips that may help you find the problem.

  1. Check if the node LoRa settings are the same as the LoRa Gateway config, like Frequency, and spreading factor...

  2. Connect CapiBridge to PC with switch position selected ESP1, open Arduino IDE Serial monitor "Speed 115200 baud" and check received JSON strings for errors.

  3. Download MQTT Explorer and connect to your MQTT server. Check the homeassistant/sensor/Your_Node_Name topic for any errors.

  4. If you have a spare ESP32, you can monitor raw ESP-NOW broadcast traffic along with the sender’s MAC addresses.

Simple ESP32 code that prints all ESP-NOW broadcast traffic — click to expand
#include<Arduino.h>
#include<esp_now.h>
#include<WiFi.h>
#include<esp_wifi.h>
#include<esp_err.h>// ---------------- Pins / Serial ----------------
#defineLED_PIN2
#defineBAUD115200// ---------------- ESPNOW ----------------
#defineESPNOW_WIFI_CHANNEL1staticconstuint8_tBROADCAST_MAC[6] = {0xFF,0xFF,0xFF,0xFF,0xFF,0xFF};
unsignedlong LedStartTime = 0;
// -------- Helpers --------staticboolprintStaMac() {
uint8_t mac[6] = {0};
if (esp_wifi_get_mac(WIFI_IF_STA, mac) != ESP_OK) returnfalse;
bool allZero = true; for (int i=0;i<6;i++) if (mac[i]) { allZero=false; break; }
Serial.print("My MAC: ");
if (allZero) Serial.println("00:00:00:00:00:00");
else { for (int i=0;i<6;i++){ if(i) Serial.print(':'); Serial.printf("%02X", mac[i]); } Serial.println(); }
return !allZero;
}
// -------- Callbacks --------
#if defined(ESP_IDF_VERSION_MAJOR) && (ESP_IDF_VERSION_MAJOR >= 5)
// IDF v5 / Arduino-ESP32 3.xvoidOnDataRecv(constesp_now_recv_info_t *info, constuint8_t *data, int len) {
char buf[256];
if (len >= (int)sizeof(buf)) len = sizeof(buf) - 1;
memcpy(buf, data, len);
buf[len] = '\0';
if (info && info->src_addr) {
for (int i=0; i<6; i++) {
if (i) Serial.print(':');
Serial.printf("%02X", info->src_addr[i]);
}
Serial.print(" -> ");
}
Serial.println(buf);
digitalWrite(LED_PIN, LOW); // blink
LedStartTime = millis();
}
#else// IDF v4 / Arduino-ESP32 2.xvoidOnDataRecv(constuint8_t *mac, constuint8_t *data, int len) {
char buf[256];
if (len >= (int)sizeof(buf)) len = sizeof(buf) - 1;
memcpy(buf, data, len);
buf[len] = '\0';
if (mac) {
for (int i=0; i<6; i++) {
if (i) Serial.print(':');
Serial.printf("%02X", mac[i]);
}
Serial.print(" -> ");
}
Serial.println(buf);
digitalWrite(LED_PIN, LOW); // blink
LedStartTime = millis();
}
#endifvoidsetup() {
Serial.begin(BAUD);
delay(1000);
while (!Serial && millis() < 5000) { delay(10); }
pinMode(LED_PIN, OUTPUT);
digitalWrite(LED_PIN, HIGH); // LED off
WiFi.persistent(false);
WiFi.mode(WIFI_STA);
esp_wifi_set_ps(WIFI_PS_NONE);
esp_wifi_start();
delay(50);
if (!printStaMac()) {
esp_wifi_stop(); delay(50); esp_wifi_start(); delay(100);
printStaMac();
}
esp_wifi_set_promiscuous(true);
esp_wifi_set_channel(ESPNOW_WIFI_CHANNEL, WIFI_SECOND_CHAN_NONE);
esp_wifi_set_promiscuous(false);
Serial.print("ESPNOW Channel: "); Serial.println(ESPNOW_WIFI_CHANNEL);
if (esp_now_init() != ESP_OK) {
for(;;) delay(1000);
}
esp_now_peer_info_t bcast{};
memcpy(bcast.peer_addr, BROADCAST_MAC, 6);
bcast.ifidx = WIFI_IF_STA;
bcast.channel = ESPNOW_WIFI_CHANNEL;
bcast.encrypt = false;
esp_err_t e = esp_now_add_peer(&bcast);
(void)e; // ignore errorsesp_now_register_recv_cb(OnDataRecv);
}
voidloop() {
if (millis() - LedStartTime >= 100) digitalWrite(LED_PIN, HIGH);
}

About

2 way Gateway for Home Assistant MQTT - LoRa / ESPNOW

Resources

Stars

154 stars

Watchers

10 watching

Forks

Releases

Packages

Contributors

Languages