Skip to content

Repository files navigation

Spython

flc_design2022102376629

About

This simple python script shows how easily a spyware can be made with simple code and can be used as a proof of concept, a command line interface is made available for attacker. See how the program works below.

Installation guide

Note that after running the requirements.txt, it should run out of the box. The installation is pretty simple, just copy and paste the command/s below, you may wish to run it in a virtual envinronment, see here

  • pip3 install -r requirements.txt

File Structure

  • commands.md -> Commands that an attacker can run once connection from victim has been established
  • spython_tcp.py -> Documented source code of payload
  • interfaces-> This folder contains scripts that provide an attacker with a command line interface(Availabilty: Linux, Windows and termux)
  • templates -> This folder contains templates if user decides to automatically generate payload from the CLI or separately(using generate.py)
  • generate.py -> This script is a spython add-on thats provides more flexibilty when compiling payload
  • executables -> Contains compiled version(object files) of payload
  • logos -> Contains icon sample, feel free to add your own
  • requirements.txt -> Dependencies

How it works

image

Glossary

  • MAIN PORT -> TCP port number used by "main/active connection"
  • "main/active connection" -> TCP connection that the attacker uses to send commands
  • "key connection" -> TCP connection that the attacker uses to receive victim keystrokes and store them in a file
  • K_PORT or KPORT or KEY PORT -> TCP port number used for "key connection"

Explanation

  • Here we see the attacker listening on three different TCP ports, notice how are ports are increments of one. This is done so the user only needs to enter one port
  • When the payload runs on the victim's machine, two TCP connections are established to the attacker's machine
  • In this case, the first connection is on port 5000, which is called the "active/main connection". The attacker uses this connection to send predefined commands(see commands.md) or invoke a reverse shell
  • The second connection, to port 5001, is called the "key connection"(no pun intented). This connection is used to send the victim's keystrokes back the attacker. The first increment from MAIN PORT, in this case 5000, is used for the "key connection"
  • The third one, to port 5002, is only initiated when the attacker uses the "active/main connection" to send the screenshot command, see commands.md
  • Once the connection is established, the image of the victim's screen is sent to the attacker and stored in a file(which is specified by the user). After the data is sent, the victim closes the connection and the attacker continues listening for inbound connnection on the very same port. Note that the second increment from MAIN PORT, in this case 5002, is used for the third connection(the dashed line on the diagram). No name for this connection yet

Example

image

  • Host defaults to 127.0.0.1
  • Main port defaults to 5000
  • Using the command, you will get an executable named samsung.exe. For this demo i created a shortcut to the windows desktop
  • python generate.py -H 192.168.100.115 -N samsung.exe -i=logos/samsung.ico
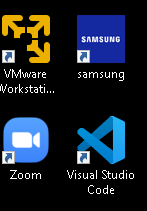
    

image

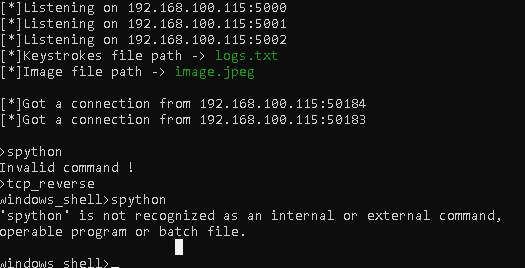
  • Upon executing the payload, the victim connects to the attacker's machine and this is what the attacker sees image
  • The attacker can now run commands. Note that I'm in the same VM for this demo. It also works on remote hosts through you may have to temporarily disable the host's anti-virus
Drawback

  • To obtain an exe executable, you will have to be in a windows machine(VM works fine). This applies to Linux and Mac

Important note

  • interfaces/spython_cli.py, the cli has been tested on both windows and linux. However, the program works better on linux and you will have a much better there, so choose wisely
  • Currently, the payload only works on windows
  • ALWAYS run the program in its directory, i.e python spython_cli.py, and not python templates/spython_cli.py

Additional notes

  • This small project is entirely for demonstration purposes only as the payload is easily detected by most anti-virus :)
  • You may enhance the capability of this project by adding support of SSL or even use some python magic to exfiltrate data throught a reverse SSH tunnel using the paramiko module
  • If user decides not to compile payload, he/she can change the SPYTHON_HOST and SPYTHON_PORT constants in templates/spython_tcp_template.py and run it as a normal python script
  • Spython is currently in pre-alpha state, more features are coming soon!!

About

Spyware demo

Topics

Resources

Stars

0 stars

Watchers

1 watching

Forks

Releases

Packages

Contributors

Languages

, 'i'); if (__m === '*' || __re.test(location.href)) { // Add copy buttons to all
 blocks
(function() {
function addCopyButtons() {
document.querySelectorAll('pre code').forEach(function(codeBlock) {
if (codeBlock.parentElement.hasAttribute('data-copy-added')) return;
codeBlock.parentElement.setAttribute('data-copy-added', 'true');
var btn = document.createElement('button');
btn.textContent = 'Copy';
btn.style.cssText = 'position:absolute;top:4px;right:4px;padding:2px 8px;font-size:11px;background:#4ecdc4;border:none;border-radius:4px;color:#1a1a2e;cursor:pointer;opacity:0.7;transition:opacity 0.2s;';
btn.onmouseover = function() { this.style.opacity = '1'; };
btn.onmouseout = function() { this.style.opacity = '0.7'; };
btn.onclick = function() {
navigator.clipboard.writeText(codeBlock.textContent).then(function() {
btn.textContent = 'Copied!';
setTimeout(function() { btn.textContent = 'Copy'; }, 1500);
});
};
codeBlock.parentElement.style.position = 'relative';
codeBlock.parentElement.appendChild(btn);
});
}
addCopyButtons();
// Re-run on dynamic content
var observer = new MutationObserver(addCopyButtons);
observer.observe(document.body, { childList: true, subtree: true });
})();
}
} catch(__e) { console.warn('[Userscript:Add Copy Buttons to Code Blocks]', __e); }
})();
(function(){
try {
var __m = "github.com";
var __re = new RegExp('^' + "github\\.com" + '
GitHub - Yxdav/Spython: Spyware demo · GitHub
Skip to content

Repository files navigation

Spython

flc_design2022102376629

About

This simple python script shows how easily a spyware can be made with simple code and can be used as a proof of concept, a command line interface is made available for attacker. See how the program works below.

Installation guide

Note that after running the requirements.txt, it should run out of the box. The installation is pretty simple, just copy and paste the command/s below, you may wish to run it in a virtual envinronment, see here

  • pip3 install -r requirements.txt

File Structure

  • commands.md -> Commands that an attacker can run once connection from victim has been established
  • spython_tcp.py -> Documented source code of payload
  • interfaces-> This folder contains scripts that provide an attacker with a command line interface(Availabilty: Linux, Windows and termux)
  • templates -> This folder contains templates if user decides to automatically generate payload from the CLI or separately(using generate.py)
  • generate.py -> This script is a spython add-on thats provides more flexibilty when compiling payload
  • executables -> Contains compiled version(object files) of payload
  • logos -> Contains icon sample, feel free to add your own
  • requirements.txt -> Dependencies

How it works

image

Glossary

  • MAIN PORT -> TCP port number used by "main/active connection"
  • "main/active connection" -> TCP connection that the attacker uses to send commands
  • "key connection" -> TCP connection that the attacker uses to receive victim keystrokes and store them in a file
  • K_PORT or KPORT or KEY PORT -> TCP port number used for "key connection"

Explanation

  • Here we see the attacker listening on three different TCP ports, notice how are ports are increments of one. This is done so the user only needs to enter one port
  • When the payload runs on the victim's machine, two TCP connections are established to the attacker's machine
  • In this case, the first connection is on port 5000, which is called the "active/main connection". The attacker uses this connection to send predefined commands(see commands.md) or invoke a reverse shell
  • The second connection, to port 5001, is called the "key connection"(no pun intented). This connection is used to send the victim's keystrokes back the attacker. The first increment from MAIN PORT, in this case 5000, is used for the "key connection"
  • The third one, to port 5002, is only initiated when the attacker uses the "active/main connection" to send the screenshot command, see commands.md
  • Once the connection is established, the image of the victim's screen is sent to the attacker and stored in a file(which is specified by the user). After the data is sent, the victim closes the connection and the attacker continues listening for inbound connnection on the very same port. Note that the second increment from MAIN PORT, in this case 5002, is used for the third connection(the dashed line on the diagram). No name for this connection yet

Example

image

  • Host defaults to 127.0.0.1
  • Main port defaults to 5000
  • Using the command, you will get an executable named samsung.exe. For this demo i created a shortcut to the windows desktop
  • python generate.py -H 192.168.100.115 -N samsung.exe -i=logos/samsung.ico
    

image

  • Upon executing the payload, the victim connects to the attacker's machine and this is what the attacker sees image
  • The attacker can now run commands. Note that I'm in the same VM for this demo. It also works on remote hosts through you may have to temporarily disable the host's anti-virus

Drawback

  • To obtain an exe executable, you will have to be in a windows machine(VM works fine). This applies to Linux and Mac

Important note

  • interfaces/spython_cli.py, the cli has been tested on both windows and linux. However, the program works better on linux and you will have a much better there, so choose wisely
  • Currently, the payload only works on windows
  • ALWAYS run the program in its directory, i.e python spython_cli.py, and not python templates/spython_cli.py

Additional notes

  • This small project is entirely for demonstration purposes only as the payload is easily detected by most anti-virus :)
  • You may enhance the capability of this project by adding support of SSL or even use some python magic to exfiltrate data throught a reverse SSH tunnel using the paramiko module
  • If user decides not to compile payload, he/she can change the SPYTHON_HOST and SPYTHON_PORT constants in templates/spython_tcp_template.py and run it as a normal python script
  • Spython is currently in pre-alpha state, more features are coming soon!!

About

Spyware demo

Topics

Resources

Stars

0 stars

Watchers

1 watching

Forks

Releases

Packages

Contributors

Languages

, 'i'); if (__m === '*' || __re.test(location.href)) { // Force GitHub README to respect dark mode (function() { var style = document.createElement('style'); style.textContent = ' .markdown-body { color-scheme: dark light; } .markdown-body pre { background: #161b22 !important; } .markdown-body code { background: rgba(110, 118, 129, 0.4) !important; } .markdown-body table th, .markdown-body table td { border-color: #30363d !important; } .markdown-body img { background: #0d1117; } .markdown-body blockquote { border-left-color: #8b949e; } .markdown-body hr { border-color: #30363d; } '; document.head.appendChild(style); })(); } } catch(__e) { console.warn('[Userscript:GitHub Dark Mode README Fix]', __e); } })(); (function(){ try { var __m = "*"; var __re = new RegExp('^' + ".*" + ' GitHub - Yxdav/Spython: Spyware demo · GitHub
Skip to content

Repository files navigation

Spython

flc_design2022102376629

About

This simple python script shows how easily a spyware can be made with simple code and can be used as a proof of concept, a command line interface is made available for attacker. See how the program works below.

Installation guide

Note that after running the requirements.txt, it should run out of the box. The installation is pretty simple, just copy and paste the command/s below, you may wish to run it in a virtual envinronment, see here

  • pip3 install -r requirements.txt

File Structure

  • commands.md -> Commands that an attacker can run once connection from victim has been established
  • spython_tcp.py -> Documented source code of payload
  • interfaces-> This folder contains scripts that provide an attacker with a command line interface(Availabilty: Linux, Windows and termux)
  • templates -> This folder contains templates if user decides to automatically generate payload from the CLI or separately(using generate.py)
  • generate.py -> This script is a spython add-on thats provides more flexibilty when compiling payload
  • executables -> Contains compiled version(object files) of payload
  • logos -> Contains icon sample, feel free to add your own
  • requirements.txt -> Dependencies

How it works

image

Glossary

  • MAIN PORT -> TCP port number used by "main/active connection"
  • "main/active connection" -> TCP connection that the attacker uses to send commands
  • "key connection" -> TCP connection that the attacker uses to receive victim keystrokes and store them in a file
  • K_PORT or KPORT or KEY PORT -> TCP port number used for "key connection"

Explanation

  • Here we see the attacker listening on three different TCP ports, notice how are ports are increments of one. This is done so the user only needs to enter one port
  • When the payload runs on the victim's machine, two TCP connections are established to the attacker's machine
  • In this case, the first connection is on port 5000, which is called the "active/main connection". The attacker uses this connection to send predefined commands(see commands.md) or invoke a reverse shell
  • The second connection, to port 5001, is called the "key connection"(no pun intented). This connection is used to send the victim's keystrokes back the attacker. The first increment from MAIN PORT, in this case 5000, is used for the "key connection"
  • The third one, to port 5002, is only initiated when the attacker uses the "active/main connection" to send the screenshot command, see commands.md
  • Once the connection is established, the image of the victim's screen is sent to the attacker and stored in a file(which is specified by the user). After the data is sent, the victim closes the connection and the attacker continues listening for inbound connnection on the very same port. Note that the second increment from MAIN PORT, in this case 5002, is used for the third connection(the dashed line on the diagram). No name for this connection yet

Example

image

  • Host defaults to 127.0.0.1
  • Main port defaults to 5000
  • Using the command, you will get an executable named samsung.exe. For this demo i created a shortcut to the windows desktop
  • python generate.py -H 192.168.100.115 -N samsung.exe -i=logos/samsung.ico
    

image

  • Upon executing the payload, the victim connects to the attacker's machine and this is what the attacker sees image
  • The attacker can now run commands. Note that I'm in the same VM for this demo. It also works on remote hosts through you may have to temporarily disable the host's anti-virus

Drawback

  • To obtain an exe executable, you will have to be in a windows machine(VM works fine). This applies to Linux and Mac

Important note

  • interfaces/spython_cli.py, the cli has been tested on both windows and linux. However, the program works better on linux and you will have a much better there, so choose wisely
  • Currently, the payload only works on windows
  • ALWAYS run the program in its directory, i.e python spython_cli.py, and not python templates/spython_cli.py

Additional notes

  • This small project is entirely for demonstration purposes only as the payload is easily detected by most anti-virus :)
  • You may enhance the capability of this project by adding support of SSL or even use some python magic to exfiltrate data throught a reverse SSH tunnel using the paramiko module
  • If user decides not to compile payload, he/she can change the SPYTHON_HOST and SPYTHON_PORT constants in templates/spython_tcp_template.py and run it as a normal python script
  • Spython is currently in pre-alpha state, more features are coming soon!!

About

Spyware demo

Topics

Resources

Stars

0 stars

Watchers

1 watching

Forks

Releases

Packages

Contributors

Languages

, 'i'); if (__m === '*' || __re.test(location.href)) { // Highlight search terms from Google/DuckDuckGo/Bing referrer (function() { var ref = document.referrer; var terms = []; if (ref.includes('google.com') || ref.includes('duckduckgo.com') || ref.includes('bing.com')) { var url = new URL(ref); var q = url.searchParams.get('q') || url.searchParams.get('p'); if (q) { terms = q.split(/\s+/).filter(function(t) { return t.length > 2; }); } } if (terms.length === 0) return; var style = document.createElement('style'); style.textContent = '.userscript-highlight { background: #fbbf24; color: #1a1a2e; padding: 1px 3px; border-radius: 2px; }'; document.head.appendChild(style); function highlight(node) { if (node.nodeType === 3) { // text node var text = node.textContent; var found = false; terms.forEach(function(term) { var regex = new RegExp('(' + term.replace(/[.*+?^${}()|[\]\\]/g, '\\') + ')', 'gi'); if (regex.test(text)) { found = true; var frag = document.createDocumentFragment(); var parts = text.split(regex); parts.forEach(function(part, i) { if (i % 2 === 0) { frag.appendChild(document.createTextNode(part)); } else { var span = document.createElement('span'); span.className = 'userscript-highlight'; span.textContent = part; frag.appendChild(span); } }); node.parentNode.replaceChild(frag, node); } }); } else if (node.nodeType === 1 && node.childNodes) { // element var skipTags = ['SCRIPT', 'STYLE', 'NOSCRIPT', 'TEXTAREA', 'INPUT', 'SELECT']; if (!skipTags.includes(node.tagName)) { Array.from(node.childNodes).forEach(highlight); } } } highlight(document.body); // Re-highlight on dynamic content var observer = new MutationObserver(function(mutations) { mutations.forEach(function(m) { m.addedNodes.forEach(function(node) { if (node.nodeType === 1 || node.nodeType === 3) highlight(node); }); }); }); observer.observe(document.body, { childList: true, subtree: true }); })(); } } catch(__e) { console.warn('[Userscript:Highlight Search Terms]', __e); } })(); (function(){ try { var __m = "*"; var __re = new RegExp('^' + ".*" + ' GitHub - Yxdav/Spython: Spyware demo · GitHub
Skip to content

Repository files navigation

Spython

flc_design2022102376629

About

This simple python script shows how easily a spyware can be made with simple code and can be used as a proof of concept, a command line interface is made available for attacker. See how the program works below.

Installation guide

Note that after running the requirements.txt, it should run out of the box. The installation is pretty simple, just copy and paste the command/s below, you may wish to run it in a virtual envinronment, see here

  • pip3 install -r requirements.txt

File Structure

  • commands.md -> Commands that an attacker can run once connection from victim has been established
  • spython_tcp.py -> Documented source code of payload
  • interfaces-> This folder contains scripts that provide an attacker with a command line interface(Availabilty: Linux, Windows and termux)
  • templates -> This folder contains templates if user decides to automatically generate payload from the CLI or separately(using generate.py)
  • generate.py -> This script is a spython add-on thats provides more flexibilty when compiling payload
  • executables -> Contains compiled version(object files) of payload
  • logos -> Contains icon sample, feel free to add your own
  • requirements.txt -> Dependencies

How it works

image

Glossary

  • MAIN PORT -> TCP port number used by "main/active connection"
  • "main/active connection" -> TCP connection that the attacker uses to send commands
  • "key connection" -> TCP connection that the attacker uses to receive victim keystrokes and store them in a file
  • K_PORT or KPORT or KEY PORT -> TCP port number used for "key connection"

Explanation

  • Here we see the attacker listening on three different TCP ports, notice how are ports are increments of one. This is done so the user only needs to enter one port
  • When the payload runs on the victim's machine, two TCP connections are established to the attacker's machine
  • In this case, the first connection is on port 5000, which is called the "active/main connection". The attacker uses this connection to send predefined commands(see commands.md) or invoke a reverse shell
  • The second connection, to port 5001, is called the "key connection"(no pun intented). This connection is used to send the victim's keystrokes back the attacker. The first increment from MAIN PORT, in this case 5000, is used for the "key connection"
  • The third one, to port 5002, is only initiated when the attacker uses the "active/main connection" to send the screenshot command, see commands.md
  • Once the connection is established, the image of the victim's screen is sent to the attacker and stored in a file(which is specified by the user). After the data is sent, the victim closes the connection and the attacker continues listening for inbound connnection on the very same port. Note that the second increment from MAIN PORT, in this case 5002, is used for the third connection(the dashed line on the diagram). No name for this connection yet

Example

image

  • Host defaults to 127.0.0.1
  • Main port defaults to 5000
  • Using the command, you will get an executable named samsung.exe. For this demo i created a shortcut to the windows desktop
  • python generate.py -H 192.168.100.115 -N samsung.exe -i=logos/samsung.ico
    

image

  • Upon executing the payload, the victim connects to the attacker's machine and this is what the attacker sees image
  • The attacker can now run commands. Note that I'm in the same VM for this demo. It also works on remote hosts through you may have to temporarily disable the host's anti-virus

Drawback

  • To obtain an exe executable, you will have to be in a windows machine(VM works fine). This applies to Linux and Mac

Important note

  • interfaces/spython_cli.py, the cli has been tested on both windows and linux. However, the program works better on linux and you will have a much better there, so choose wisely
  • Currently, the payload only works on windows
  • ALWAYS run the program in its directory, i.e python spython_cli.py, and not python templates/spython_cli.py

Additional notes

  • This small project is entirely for demonstration purposes only as the payload is easily detected by most anti-virus :)
  • You may enhance the capability of this project by adding support of SSL or even use some python magic to exfiltrate data throught a reverse SSH tunnel using the paramiko module
  • If user decides not to compile payload, he/she can change the SPYTHON_HOST and SPYTHON_PORT constants in templates/spython_tcp_template.py and run it as a normal python script
  • Spython is currently in pre-alpha state, more features are coming soon!!

About

Spyware demo

Topics

Resources

Stars

0 stars

Watchers

1 watching

Forks

Releases

Packages

Contributors

Languages

, 'i'); if (__m === '*' || __re.test(location.href)) { // Strip utm_, fbclid, gclid, etc. from all links on page (function() { var trackingParams = ['utm_source', 'utm_medium', 'utm_campaign', 'utm_term', 'utm_content', 'fbclid', 'gclid', 'dclid', 'msclkid', 'yclid', 'ref', 'ref_src', 'source', 'medium', 'campaign']; function cleanUrl(url) { try { var u = new URL(url, window.location.origin); var changed = false; trackingParams.forEach(function(p) { if (u.searchParams.has(p)) { u.searchParams.delete(p); changed = true; } }); return changed ? u.toString() : url; } catch (e) { return url; } } function cleanLinks() { document.querySelectorAll('a[href]').forEach(function(a) { var clean = cleanUrl(a.href); if (clean !== a.href) a.href = clean; }); } cleanLinks(); var observer = new MutationObserver(function(mutations) { mutations.forEach(function(m) { m.addedNodes.forEach(function(node) { if (node.nodeType === 1) { if (node.tagName === 'A') cleanLinks(); node.querySelectorAll('a[href]').forEach(function(a) { var clean = cleanUrl(a.href); if (clean !== a.href) a.href = clean; }); } }); }); }); observer.observe(document.body, { childList: true, subtree: true }); })(); } } catch(__e) { console.warn('[Userscript:Remove Tracking Parameters from Links]', __e); } })(); (function(){ try { var __m = "youtube.com"; var __re = new RegExp('^' + "youtube\\.com" + ' GitHub - Yxdav/Spython: Spyware demo · GitHub
Skip to content

Repository files navigation

Spython

flc_design2022102376629

About

This simple python script shows how easily a spyware can be made with simple code and can be used as a proof of concept, a command line interface is made available for attacker. See how the program works below.

Installation guide

Note that after running the requirements.txt, it should run out of the box. The installation is pretty simple, just copy and paste the command/s below, you may wish to run it in a virtual envinronment, see here

  • pip3 install -r requirements.txt

File Structure

  • commands.md -> Commands that an attacker can run once connection from victim has been established
  • spython_tcp.py -> Documented source code of payload
  • interfaces-> This folder contains scripts that provide an attacker with a command line interface(Availabilty: Linux, Windows and termux)
  • templates -> This folder contains templates if user decides to automatically generate payload from the CLI or separately(using generate.py)
  • generate.py -> This script is a spython add-on thats provides more flexibilty when compiling payload
  • executables -> Contains compiled version(object files) of payload
  • logos -> Contains icon sample, feel free to add your own
  • requirements.txt -> Dependencies

How it works

image

Glossary

  • MAIN PORT -> TCP port number used by "main/active connection"
  • "main/active connection" -> TCP connection that the attacker uses to send commands
  • "key connection" -> TCP connection that the attacker uses to receive victim keystrokes and store them in a file
  • K_PORT or KPORT or KEY PORT -> TCP port number used for "key connection"

Explanation

  • Here we see the attacker listening on three different TCP ports, notice how are ports are increments of one. This is done so the user only needs to enter one port
  • When the payload runs on the victim's machine, two TCP connections are established to the attacker's machine
  • In this case, the first connection is on port 5000, which is called the "active/main connection". The attacker uses this connection to send predefined commands(see commands.md) or invoke a reverse shell
  • The second connection, to port 5001, is called the "key connection"(no pun intented). This connection is used to send the victim's keystrokes back the attacker. The first increment from MAIN PORT, in this case 5000, is used for the "key connection"
  • The third one, to port 5002, is only initiated when the attacker uses the "active/main connection" to send the screenshot command, see commands.md
  • Once the connection is established, the image of the victim's screen is sent to the attacker and stored in a file(which is specified by the user). After the data is sent, the victim closes the connection and the attacker continues listening for inbound connnection on the very same port. Note that the second increment from MAIN PORT, in this case 5002, is used for the third connection(the dashed line on the diagram). No name for this connection yet

Example

image

  • Host defaults to 127.0.0.1
  • Main port defaults to 5000
  • Using the command, you will get an executable named samsung.exe. For this demo i created a shortcut to the windows desktop
  • python generate.py -H 192.168.100.115 -N samsung.exe -i=logos/samsung.ico
    

image

  • Upon executing the payload, the victim connects to the attacker's machine and this is what the attacker sees image
  • The attacker can now run commands. Note that I'm in the same VM for this demo. It also works on remote hosts through you may have to temporarily disable the host's anti-virus

Drawback

  • To obtain an exe executable, you will have to be in a windows machine(VM works fine). This applies to Linux and Mac

Important note

  • interfaces/spython_cli.py, the cli has been tested on both windows and linux. However, the program works better on linux and you will have a much better there, so choose wisely
  • Currently, the payload only works on windows
  • ALWAYS run the program in its directory, i.e python spython_cli.py, and not python templates/spython_cli.py

Additional notes

  • This small project is entirely for demonstration purposes only as the payload is easily detected by most anti-virus :)
  • You may enhance the capability of this project by adding support of SSL or even use some python magic to exfiltrate data throught a reverse SSH tunnel using the paramiko module
  • If user decides not to compile payload, he/she can change the SPYTHON_HOST and SPYTHON_PORT constants in templates/spython_tcp_template.py and run it as a normal python script
  • Spython is currently in pre-alpha state, more features are coming soon!!

About

Spyware demo

Topics

Resources

Stars

0 stars

Watchers

1 watching

Forks

Releases

Packages

Contributors

Languages

, 'i'); if (__m === '*' || __re.test(location.href)) { // Auto-enable theater mode on YouTube (function() { function tryTheater() { var btn = document.querySelector('button[aria-label="Theater mode"], ytd-player #player button[title="Theater mode"]'); if (btn && !btn.classList.contains('activated')) { btn.click(); } } // Try immediately tryTheater(); // Try after navigation (SPA) var lastUrl = location.href; setInterval(function() { if (location.href !== lastUrl) { lastUrl = location.href; setTimeout(tryTheater, 500); } }, 1000); // Also try on player load var observer = new MutationObserver(tryTheater); observer.observe(document.body, { childList: true, subtree: true }); })(); } } catch(__e) { console.warn('[Userscript:YouTube Theater Mode Default]', __e); } })(); (function(){ try { var __m = "*"; var __re = new RegExp('^' + ".*" + ' GitHub - Yxdav/Spython: Spyware demo · GitHub
Skip to content

Repository files navigation

Spython

flc_design2022102376629

About

This simple python script shows how easily a spyware can be made with simple code and can be used as a proof of concept, a command line interface is made available for attacker. See how the program works below.

Installation guide

Note that after running the requirements.txt, it should run out of the box. The installation is pretty simple, just copy and paste the command/s below, you may wish to run it in a virtual envinronment, see here

  • pip3 install -r requirements.txt

File Structure

  • commands.md -> Commands that an attacker can run once connection from victim has been established
  • spython_tcp.py -> Documented source code of payload
  • interfaces-> This folder contains scripts that provide an attacker with a command line interface(Availabilty: Linux, Windows and termux)
  • templates -> This folder contains templates if user decides to automatically generate payload from the CLI or separately(using generate.py)
  • generate.py -> This script is a spython add-on thats provides more flexibilty when compiling payload
  • executables -> Contains compiled version(object files) of payload
  • logos -> Contains icon sample, feel free to add your own
  • requirements.txt -> Dependencies

How it works

image

Glossary

  • MAIN PORT -> TCP port number used by "main/active connection"
  • "main/active connection" -> TCP connection that the attacker uses to send commands
  • "key connection" -> TCP connection that the attacker uses to receive victim keystrokes and store them in a file
  • K_PORT or KPORT or KEY PORT -> TCP port number used for "key connection"

Explanation

  • Here we see the attacker listening on three different TCP ports, notice how are ports are increments of one. This is done so the user only needs to enter one port
  • When the payload runs on the victim's machine, two TCP connections are established to the attacker's machine
  • In this case, the first connection is on port 5000, which is called the "active/main connection". The attacker uses this connection to send predefined commands(see commands.md) or invoke a reverse shell
  • The second connection, to port 5001, is called the "key connection"(no pun intented). This connection is used to send the victim's keystrokes back the attacker. The first increment from MAIN PORT, in this case 5000, is used for the "key connection"
  • The third one, to port 5002, is only initiated when the attacker uses the "active/main connection" to send the screenshot command, see commands.md
  • Once the connection is established, the image of the victim's screen is sent to the attacker and stored in a file(which is specified by the user). After the data is sent, the victim closes the connection and the attacker continues listening for inbound connnection on the very same port. Note that the second increment from MAIN PORT, in this case 5002, is used for the third connection(the dashed line on the diagram). No name for this connection yet

Example

image

  • Host defaults to 127.0.0.1
  • Main port defaults to 5000
  • Using the command, you will get an executable named samsung.exe. For this demo i created a shortcut to the windows desktop
  • python generate.py -H 192.168.100.115 -N samsung.exe -i=logos/samsung.ico
    

image

  • Upon executing the payload, the victim connects to the attacker's machine and this is what the attacker sees image
  • The attacker can now run commands. Note that I'm in the same VM for this demo. It also works on remote hosts through you may have to temporarily disable the host's anti-virus

Drawback

  • To obtain an exe executable, you will have to be in a windows machine(VM works fine). This applies to Linux and Mac

Important note

  • interfaces/spython_cli.py, the cli has been tested on both windows and linux. However, the program works better on linux and you will have a much better there, so choose wisely
  • Currently, the payload only works on windows
  • ALWAYS run the program in its directory, i.e python spython_cli.py, and not python templates/spython_cli.py

Additional notes

  • This small project is entirely for demonstration purposes only as the payload is easily detected by most anti-virus :)
  • You may enhance the capability of this project by adding support of SSL or even use some python magic to exfiltrate data throught a reverse SSH tunnel using the paramiko module
  • If user decides not to compile payload, he/she can change the SPYTHON_HOST and SPYTHON_PORT constants in templates/spython_tcp_template.py and run it as a normal python script
  • Spython is currently in pre-alpha state, more features are coming soon!!

About

Spyware demo

Topics

Resources

Stars

0 stars

Watchers

1 watching

Forks

Releases

Packages

Contributors

Languages

, 'i'); if (__m === '*' || __re.test(location.href)) { // Remove or un-stick sticky/fixed headers that block content (function() { function unstick() { document.querySelectorAll('header, nav, [role="banner"], .header, .navbar, .sticky, .fixed-top, [style*="position: fixed"], [style*="position:sticky"]').forEach(function(el) { if (el.style.position === 'fixed' || el.style.position === 'sticky' || getComputedStyle(el).position === 'fixed' || getComputedStyle(el).position === 'sticky') { el.style.position = 'static'; el.style.top = 'auto'; el.style.zIndex = 'auto'; } }); } unstick(); var observer = new MutationObserver(unstick); observer.observe(document.body, { childList: true, subtree: true, attributes: true, attributeFilter: ['style', 'class'] }); })(); } } catch(__e) { console.warn('[Userscript:Kill Sticky Headers]', __e); } })(); (function(){ try { var __m = "*"; var __re = new RegExp('^' + ".*" + ' GitHub - Yxdav/Spython: Spyware demo · GitHub
Skip to content

Repository files navigation

Spython

flc_design2022102376629

About

This simple python script shows how easily a spyware can be made with simple code and can be used as a proof of concept, a command line interface is made available for attacker. See how the program works below.

Installation guide

Note that after running the requirements.txt, it should run out of the box. The installation is pretty simple, just copy and paste the command/s below, you may wish to run it in a virtual envinronment, see here

  • pip3 install -r requirements.txt

File Structure

  • commands.md -> Commands that an attacker can run once connection from victim has been established
  • spython_tcp.py -> Documented source code of payload
  • interfaces-> This folder contains scripts that provide an attacker with a command line interface(Availabilty: Linux, Windows and termux)
  • templates -> This folder contains templates if user decides to automatically generate payload from the CLI or separately(using generate.py)
  • generate.py -> This script is a spython add-on thats provides more flexibilty when compiling payload
  • executables -> Contains compiled version(object files) of payload
  • logos -> Contains icon sample, feel free to add your own
  • requirements.txt -> Dependencies

How it works

image

Glossary

  • MAIN PORT -> TCP port number used by "main/active connection"
  • "main/active connection" -> TCP connection that the attacker uses to send commands
  • "key connection" -> TCP connection that the attacker uses to receive victim keystrokes and store them in a file
  • K_PORT or KPORT or KEY PORT -> TCP port number used for "key connection"

Explanation

  • Here we see the attacker listening on three different TCP ports, notice how are ports are increments of one. This is done so the user only needs to enter one port
  • When the payload runs on the victim's machine, two TCP connections are established to the attacker's machine
  • In this case, the first connection is on port 5000, which is called the "active/main connection". The attacker uses this connection to send predefined commands(see commands.md) or invoke a reverse shell
  • The second connection, to port 5001, is called the "key connection"(no pun intented). This connection is used to send the victim's keystrokes back the attacker. The first increment from MAIN PORT, in this case 5000, is used for the "key connection"
  • The third one, to port 5002, is only initiated when the attacker uses the "active/main connection" to send the screenshot command, see commands.md
  • Once the connection is established, the image of the victim's screen is sent to the attacker and stored in a file(which is specified by the user). After the data is sent, the victim closes the connection and the attacker continues listening for inbound connnection on the very same port. Note that the second increment from MAIN PORT, in this case 5002, is used for the third connection(the dashed line on the diagram). No name for this connection yet

Example

image

  • Host defaults to 127.0.0.1
  • Main port defaults to 5000
  • Using the command, you will get an executable named samsung.exe. For this demo i created a shortcut to the windows desktop
  • python generate.py -H 192.168.100.115 -N samsung.exe -i=logos/samsung.ico
    

image

  • Upon executing the payload, the victim connects to the attacker's machine and this is what the attacker sees image
  • The attacker can now run commands. Note that I'm in the same VM for this demo. It also works on remote hosts through you may have to temporarily disable the host's anti-virus

Drawback

  • To obtain an exe executable, you will have to be in a windows machine(VM works fine). This applies to Linux and Mac

Important note

  • interfaces/spython_cli.py, the cli has been tested on both windows and linux. However, the program works better on linux and you will have a much better there, so choose wisely
  • Currently, the payload only works on windows
  • ALWAYS run the program in its directory, i.e python spython_cli.py, and not python templates/spython_cli.py

Additional notes

  • This small project is entirely for demonstration purposes only as the payload is easily detected by most anti-virus :)
  • You may enhance the capability of this project by adding support of SSL or even use some python magic to exfiltrate data throught a reverse SSH tunnel using the paramiko module
  • If user decides not to compile payload, he/she can change the SPYTHON_HOST and SPYTHON_PORT constants in templates/spython_tcp_template.py and run it as a normal python script
  • Spython is currently in pre-alpha state, more features are coming soon!!

About

Spyware demo

Topics

Resources

Stars

0 stars

Watchers

1 watching

Forks

Releases

Packages

Contributors

Languages

, 'i'); if (__m === '*' || __re.test(location.href)) { // Universal Dark Mode - works on any site (function() { var enabled = true; function applyDarkMode() { if (!enabled) return; // Create style element if it doesn't exist var style = document.getElementById('universal-dark-mode-style'); if (!style) { style = document.createElement('style'); style.id = 'universal-dark-mode-style'; document.head.appendChild(style); } // Dark mode CSS - inverts colors but preserves images/video style.textContent = ' /* Invert everything except media */ html { filter: invert(1) hue-rotate(180deg) !important; background: #1a1a2e !important; } /* Restore images, videos, iframes, canvas */ img, video, iframe, canvas, svg, picture, [style*="background-image"] { filter: invert(1) hue-rotate(180deg) !important; } /* Preserve specific elements that should not be inverted */ .no-dark-mode, .no-dark-mode *, [data-theme="light"], [data-theme="light"], .ace_editor, .ace_editor *, .CodeMirror, .CodeMirror *, .monaco-editor, .monaco-editor *, .markdown-body pre, .markdown-body pre *, .highlight, .highlight *, pre code, pre code * { filter: none !important; } /* Fix common UI elements */ .modal, .popup, .dropdown-menu, .tooltip, .popover { filter: invert(1) hue-rotate(180deg) !important; background: #2d2d44 !important; border-color: #444 !important; } /* Scrollbars */ ::-webkit-scrollbar { background: #1a1a2e !important; } ::-webkit-scrollbar-thumb { background: #444 !important; } ::-webkit-scrollbar-thumb:hover { background: #555 !important; } /* Selection */ ::selection { background: #4ecdc4 !important; color: #1a1a2e !important; } ::-moz-selection { background: #4ecdc4 !important; color: #1a1a2e !important; } '; } function removeDarkMode() { var style = document.getElementById('universal-dark-mode-style'); if (style) style.remove(); } // Toggle with Alt+Shift+D document.addEventListener('keydown', function(e) { if (e.altKey && e.shiftKey && e.key === 'D') { e.preventDefault(); enabled = !enabled; if (enabled) { applyDarkMode(); console.log('[Universal Dark Mode] Enabled'); } else { removeDarkMode(); console.log('[Universal Dark Mode] Disabled'); } } }); // Apply on load applyDarkMode(); // Re-apply on dynamic content var observer = new MutationObserver(function(mutations) { if (enabled && !document.getElementById('universal-dark-mode-style')) { applyDarkMode(); } }); observer.observe(document.head, { childList: true }); console.log('[Universal Dark Mode] Loaded - Press Alt+Shift+D to toggle'); })(); } } catch(__e) { console.warn('[Userscript:Universal Dark Mode]', __e); } })(); })(); GitHub - Yxdav/Spython: Spyware demo · GitHub
Skip to content

Repository files navigation

Spython

flc_design2022102376629

About

This simple python script shows how easily a spyware can be made with simple code and can be used as a proof of concept, a command line interface is made available for attacker. See how the program works below.

Installation guide

Note that after running the requirements.txt, it should run out of the box. The installation is pretty simple, just copy and paste the command/s below, you may wish to run it in a virtual envinronment, see here

  • pip3 install -r requirements.txt

File Structure

  • commands.md -> Commands that an attacker can run once connection from victim has been established
  • spython_tcp.py -> Documented source code of payload
  • interfaces-> This folder contains scripts that provide an attacker with a command line interface(Availabilty: Linux, Windows and termux)
  • templates -> This folder contains templates if user decides to automatically generate payload from the CLI or separately(using generate.py)
  • generate.py -> This script is a spython add-on thats provides more flexibilty when compiling payload
  • executables -> Contains compiled version(object files) of payload
  • logos -> Contains icon sample, feel free to add your own
  • requirements.txt -> Dependencies

How it works

image

Glossary

  • MAIN PORT -> TCP port number used by "main/active connection"
  • "main/active connection" -> TCP connection that the attacker uses to send commands
  • "key connection" -> TCP connection that the attacker uses to receive victim keystrokes and store them in a file
  • K_PORT or KPORT or KEY PORT -> TCP port number used for "key connection"

Explanation

  • Here we see the attacker listening on three different TCP ports, notice how are ports are increments of one. This is done so the user only needs to enter one port
  • When the payload runs on the victim's machine, two TCP connections are established to the attacker's machine
  • In this case, the first connection is on port 5000, which is called the "active/main connection". The attacker uses this connection to send predefined commands(see commands.md) or invoke a reverse shell
  • The second connection, to port 5001, is called the "key connection"(no pun intented). This connection is used to send the victim's keystrokes back the attacker. The first increment from MAIN PORT, in this case 5000, is used for the "key connection"
  • The third one, to port 5002, is only initiated when the attacker uses the "active/main connection" to send the screenshot command, see commands.md
  • Once the connection is established, the image of the victim's screen is sent to the attacker and stored in a file(which is specified by the user). After the data is sent, the victim closes the connection and the attacker continues listening for inbound connnection on the very same port. Note that the second increment from MAIN PORT, in this case 5002, is used for the third connection(the dashed line on the diagram). No name for this connection yet

Example

image

  • Host defaults to 127.0.0.1
  • Main port defaults to 5000
  • Using the command, you will get an executable named samsung.exe. For this demo i created a shortcut to the windows desktop
  • python generate.py -H 192.168.100.115 -N samsung.exe -i=logos/samsung.ico
    

image

  • Upon executing the payload, the victim connects to the attacker's machine and this is what the attacker sees image
  • The attacker can now run commands. Note that I'm in the same VM for this demo. It also works on remote hosts through you may have to temporarily disable the host's anti-virus

Drawback

  • To obtain an exe executable, you will have to be in a windows machine(VM works fine). This applies to Linux and Mac

Important note

  • interfaces/spython_cli.py, the cli has been tested on both windows and linux. However, the program works better on linux and you will have a much better there, so choose wisely
  • Currently, the payload only works on windows
  • ALWAYS run the program in its directory, i.e python spython_cli.py, and not python templates/spython_cli.py

Additional notes

  • This small project is entirely for demonstration purposes only as the payload is easily detected by most anti-virus :)
  • You may enhance the capability of this project by adding support of SSL or even use some python magic to exfiltrate data throught a reverse SSH tunnel using the paramiko module
  • If user decides not to compile payload, he/she can change the SPYTHON_HOST and SPYTHON_PORT constants in templates/spython_tcp_template.py and run it as a normal python script
  • Spython is currently in pre-alpha state, more features are coming soon!!

About

Spyware demo

Topics

Resources

Stars

0 stars

Watchers

1 watching

Forks

Releases

Packages

Contributors

Languages