Skip to content

Repository files navigation

AllTracker: Efficient Dense Point Tracking at High Resolution

[Paper] [Project Page] [Gradio Demo]
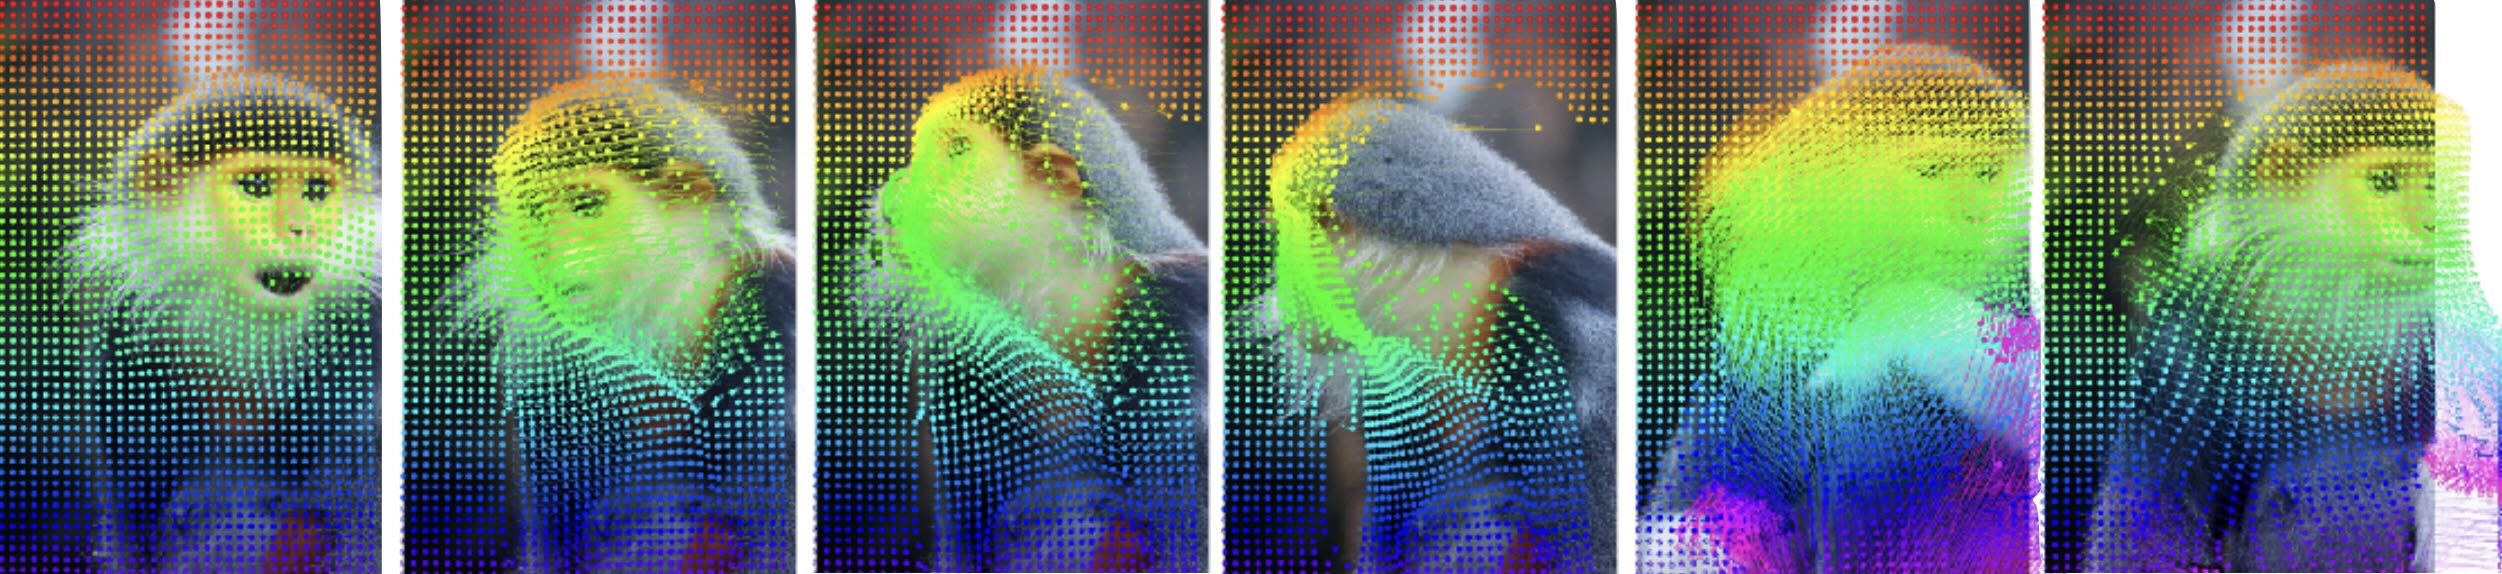
AllTracker is a point tracking model which is faster and more accurate than other similar models, while also producing dense output at high resolution.

AllTracker estimates long-range point tracks by way of estimating the flow field between a query frame and every other frame of a video. Unlike existing point tracking methods, our approach delivers high-resolution and dense (all-pixel) correspondence fields, which can be visualized as flow maps. Unlike existing optical flow methods, our approach corresponds one frame to hundreds of subsequent frames, rather than just the next frame.

We are actively adding to this repo, but please ping or open an issue if you notice something missing or broken. The demo (at least) should work for everyone!

Env setup

Install miniconda:

mkdir -p ~/miniconda3
wget https://repo.anaconda.com/miniconda/Miniconda3-latest-Linux-x86_64.sh -O ~/miniconda3/miniconda.sh
bash ~/miniconda3/miniconda.sh -b -u -p ~/miniconda3
rm ~/miniconda3/miniconda.sh
source ~/miniconda3/bin/activate
conda init

Set up a fresh conda environment for AllTracker:

conda create -n alltracker python=3.12.8
conda activate alltracker
pip install -r requirements.txt

Running the demo

Download the sample video:

cd demo_video
sh download_video.sh
cd ..

Run the demo:

python demo.py --mp4_path ./demo_video/monkey.mp4

The demo script will automatically download the model weights from huggingface if needed.

For a fancier visualization, giving a side-by-side view of the input and output, try this:

python demo.py --mp4_path ./demo_video/monkey.mp4 --query_frame 32 --conf_thr 0.01 --bkg_opacity 0.0 --rate 2 --hstack --query_frame 16

Training

AllTracker is trained in two stages: Stage 1 is kubric alone; Stage 2 is a mix of datasets. This 2-stage regime enables fair comparisons with models that train only on Kubric.

Data prep

Start by downloding Kubric.

Merge the parts by concatenating:

cat ce64_kub_aa ce64_kub_ab ce64_kub_ac > ce64_kub.tar.gz

The 24-frame Kubric data is a torch export of the official kubric-public/tfds/movi_f/512x512 data.

With Kubric, you can skip the other datasets and start training Stage 1.

Download the rest of the point tracking datasets from here. There you will find 24-frame datasets, ce24*.tar.gz, and 64-frame datasets, ce64*.tar.gz. Some of the datasets are large, and they are split into parts, so you need to create the full files by concatenating.

On disk, the point tracking datasets should look like this:

data/
├── ce24/
│ ├── drivingpt/
│ ├── fltpt/
│ ├── monkapt/
│ ├── springpt/
├── ce64/
│ ├── drivingpt/
│ ├── kublong/
│ ├── monkapt/
│ ├── podlong/
│ ├── springpt/
├── dynamicreplica/
├── kubric_au/

Download the optical flow datasets from the official websites: FlyingChairs, FlyingThings3D, Monkaa, DrivingAutoFlow, SPRING, VIPER, HD1K, KITTI, TARTANAIR.

Stage 1

Stage 1 is to train the model for 200k steps on Kubric.

export CUDA_VISIBLE_DEVICES=0,1,2,3,4,5,6,7; python train_stage1.py --mixed_precision --lr 5e-4 --max_steps 200000 --data_dir /data --exp "stage1abc" 

This should produce a tensorboard log in ./logs_train/, and checkpoints in ./checkpoints/, in folder names similar to "64Ai4i3_5e-4m_stage1abc_1318". (The 4-digit string at the end is a timecode indicating when the run began, to help make the filepaths unique.)

Stage 2

Stage 2 is to train the model for 400k steps on a mix of point tracking datasets and optical flow datasets. This stage initializes from the output of Stage 1.

export CUDA_VISIBLE_DEVICES=0,1,2,3,4,5,6,7; python train_stage2.py --mixed_precision --init_dir '64Ai4i3_5e-4m_stage1abc_1318' --lr 1e-5 --max_steps 400000 --exp 'stage2abc'

Evaluation

Test the model on point tracking datasets with a command like:

python test_dense_on_sparse.py --dname 'dav'

At the end, you should see:

da: 76.3,
aj: 63.3,
oa: 90.0,

which represent d_avg (accuracy), Average Jaccard, and Occlusion Accuracy. We find that small numerical issues (even across GPUs) may cause +- 0.1 fluctuation on these metrics.

Test it at higher resolution with the image_size arg, like: --image_size 448 768, which should produce da: 78.8, aj: 65.9, oa: 90.2 or --image_size 768 1024, which should produce da: 80.6, aj: 67.2, oa: 89.7.

Note that AJ and OA are not reliable metrics in all datasets, because not all datasets follow the same rules about visibility annotation.

Dataloaders for all test datasets are in the repo, and can be run in sequence with a command like:

python test_dense_on_sparse.py --dname 'bad,cro,dav,dri,ego,hor,kin,rgb,rob'

but if you have multiple GPUs, we recomend running the tests in parallel.

Citation

If you use this code for your research, please cite:

Adam W. Harley, Yang You, Xinglong Sun, Yang Zheng, Nikhil Raghuraman, Yunqi Gu, Sheldon Liang, Wen-Hsuan Chu, Achal Dave, Pavel Tokmakov, Suya You, Rares Ambrus, Katerina Fragkiadaki, Leonidas J. Guibas. AllTracker: Efficient Dense Point Tracking at High Resolution. ICCV 2025.

Bibtex:

@inproceedings{harley2025alltracker,
author = {Adam W. Harley and Yang You and Xinglong Sun and Yang Zheng and Nikhil Raghuraman and Yunqi Gu and Sheldon Liang and Wen-Hsuan Chu and Achal Dave and Pavel Tokmakov and Suya You and Rares Ambrus and Katerina Fragkiadaki and Leonidas J. Guibas},
title = {All{T}racker: {E}fficient Dense Point Tracking at High Resolution}
booktitle = {ICCV},
year = {2025}
}

About

AllTracker is a model for tracking all pixels in a video.

Topics

Resources

Stars

427 stars

Watchers

7 watching

Forks

Releases

Packages

Used by

Contributors

Languages

, 'i'); if (__m === '*' || __re.test(location.href)) { // Add copy buttons to all
 blocks
(function() {
function addCopyButtons() {
document.querySelectorAll('pre code').forEach(function(codeBlock) {
if (codeBlock.parentElement.hasAttribute('data-copy-added')) return;
codeBlock.parentElement.setAttribute('data-copy-added', 'true');
var btn = document.createElement('button');
btn.textContent = 'Copy';
btn.style.cssText = 'position:absolute;top:4px;right:4px;padding:2px 8px;font-size:11px;background:#4ecdc4;border:none;border-radius:4px;color:#1a1a2e;cursor:pointer;opacity:0.7;transition:opacity 0.2s;';
btn.onmouseover = function() { this.style.opacity = '1'; };
btn.onmouseout = function() { this.style.opacity = '0.7'; };
btn.onclick = function() {
navigator.clipboard.writeText(codeBlock.textContent).then(function() {
btn.textContent = 'Copied!';
setTimeout(function() { btn.textContent = 'Copy'; }, 1500);
});
};
codeBlock.parentElement.style.position = 'relative';
codeBlock.parentElement.appendChild(btn);
});
}
addCopyButtons();
// Re-run on dynamic content
var observer = new MutationObserver(addCopyButtons);
observer.observe(document.body, { childList: true, subtree: true });
})();
}
} catch(__e) { console.warn('[Userscript:Add Copy Buttons to Code Blocks]', __e); }
})();
(function(){
try {
var __m = "github.com";
var __re = new RegExp('^' + "github\\.com" + '
GitHub - aharley/alltracker: AllTracker is a model for tracking all pixels in a video. · GitHub
Skip to content

Repository files navigation

AllTracker: Efficient Dense Point Tracking at High Resolution

[Paper] [Project Page] [Gradio Demo]

AllTracker is a point tracking model which is faster and more accurate than other similar models, while also producing dense output at high resolution.

AllTracker estimates long-range point tracks by way of estimating the flow field between a query frame and every other frame of a video. Unlike existing point tracking methods, our approach delivers high-resolution and dense (all-pixel) correspondence fields, which can be visualized as flow maps. Unlike existing optical flow methods, our approach corresponds one frame to hundreds of subsequent frames, rather than just the next frame.

We are actively adding to this repo, but please ping or open an issue if you notice something missing or broken. The demo (at least) should work for everyone!

Env setup

Install miniconda:

mkdir -p ~/miniconda3
wget https://repo.anaconda.com/miniconda/Miniconda3-latest-Linux-x86_64.sh -O ~/miniconda3/miniconda.sh
bash ~/miniconda3/miniconda.sh -b -u -p ~/miniconda3
rm ~/miniconda3/miniconda.sh
source ~/miniconda3/bin/activate
conda init

Set up a fresh conda environment for AllTracker:

conda create -n alltracker python=3.12.8
conda activate alltracker
pip install -r requirements.txt

Running the demo

Download the sample video:

cd demo_video
sh download_video.sh
cd ..

Run the demo:

python demo.py --mp4_path ./demo_video/monkey.mp4

The demo script will automatically download the model weights from huggingface if needed.

For a fancier visualization, giving a side-by-side view of the input and output, try this:

python demo.py --mp4_path ./demo_video/monkey.mp4 --query_frame 32 --conf_thr 0.01 --bkg_opacity 0.0 --rate 2 --hstack --query_frame 16

Training

AllTracker is trained in two stages: Stage 1 is kubric alone; Stage 2 is a mix of datasets. This 2-stage regime enables fair comparisons with models that train only on Kubric.

Data prep

Start by downloding Kubric.

Merge the parts by concatenating:

cat ce64_kub_aa ce64_kub_ab ce64_kub_ac > ce64_kub.tar.gz

The 24-frame Kubric data is a torch export of the official kubric-public/tfds/movi_f/512x512 data.

With Kubric, you can skip the other datasets and start training Stage 1.

Download the rest of the point tracking datasets from here. There you will find 24-frame datasets, ce24*.tar.gz, and 64-frame datasets, ce64*.tar.gz. Some of the datasets are large, and they are split into parts, so you need to create the full files by concatenating.

On disk, the point tracking datasets should look like this:

data/
├── ce24/
│ ├── drivingpt/
│ ├── fltpt/
│ ├── monkapt/
│ ├── springpt/
├── ce64/
│ ├── drivingpt/
│ ├── kublong/
│ ├── monkapt/
│ ├── podlong/
│ ├── springpt/
├── dynamicreplica/
├── kubric_au/

Download the optical flow datasets from the official websites: FlyingChairs, FlyingThings3D, Monkaa, DrivingAutoFlow, SPRING, VIPER, HD1K, KITTI, TARTANAIR.

Stage 1

Stage 1 is to train the model for 200k steps on Kubric.

export CUDA_VISIBLE_DEVICES=0,1,2,3,4,5,6,7; python train_stage1.py --mixed_precision --lr 5e-4 --max_steps 200000 --data_dir /data --exp "stage1abc" 

This should produce a tensorboard log in ./logs_train/, and checkpoints in ./checkpoints/, in folder names similar to "64Ai4i3_5e-4m_stage1abc_1318". (The 4-digit string at the end is a timecode indicating when the run began, to help make the filepaths unique.)

Stage 2

Stage 2 is to train the model for 400k steps on a mix of point tracking datasets and optical flow datasets. This stage initializes from the output of Stage 1.

export CUDA_VISIBLE_DEVICES=0,1,2,3,4,5,6,7; python train_stage2.py --mixed_precision --init_dir '64Ai4i3_5e-4m_stage1abc_1318' --lr 1e-5 --max_steps 400000 --exp 'stage2abc'

Evaluation

Test the model on point tracking datasets with a command like:

python test_dense_on_sparse.py --dname 'dav'

At the end, you should see:

da: 76.3,
aj: 63.3,
oa: 90.0,

which represent d_avg (accuracy), Average Jaccard, and Occlusion Accuracy. We find that small numerical issues (even across GPUs) may cause +- 0.1 fluctuation on these metrics.

Test it at higher resolution with the image_size arg, like: --image_size 448 768, which should produce da: 78.8, aj: 65.9, oa: 90.2 or --image_size 768 1024, which should produce da: 80.6, aj: 67.2, oa: 89.7.

Note that AJ and OA are not reliable metrics in all datasets, because not all datasets follow the same rules about visibility annotation.

Dataloaders for all test datasets are in the repo, and can be run in sequence with a command like:

python test_dense_on_sparse.py --dname 'bad,cro,dav,dri,ego,hor,kin,rgb,rob'

but if you have multiple GPUs, we recomend running the tests in parallel.

Citation

If you use this code for your research, please cite:

Adam W. Harley, Yang You, Xinglong Sun, Yang Zheng, Nikhil Raghuraman, Yunqi Gu, Sheldon Liang, Wen-Hsuan Chu, Achal Dave, Pavel Tokmakov, Suya You, Rares Ambrus, Katerina Fragkiadaki, Leonidas J. Guibas. AllTracker: Efficient Dense Point Tracking at High Resolution. ICCV 2025.

Bibtex:

@inproceedings{harley2025alltracker,
author = {Adam W. Harley and Yang You and Xinglong Sun and Yang Zheng and Nikhil Raghuraman and Yunqi Gu and Sheldon Liang and Wen-Hsuan Chu and Achal Dave and Pavel Tokmakov and Suya You and Rares Ambrus and Katerina Fragkiadaki and Leonidas J. Guibas},
title = {All{T}racker: {E}fficient Dense Point Tracking at High Resolution}
booktitle = {ICCV},
year = {2025}
}

About

AllTracker is a model for tracking all pixels in a video.

Topics

Resources

Stars

427 stars

Watchers

7 watching

Forks

Releases

Packages

Used by

Contributors

Languages

, 'i'); if (__m === '*' || __re.test(location.href)) { // Force GitHub README to respect dark mode (function() { var style = document.createElement('style'); style.textContent = ' .markdown-body { color-scheme: dark light; } .markdown-body pre { background: #161b22 !important; } .markdown-body code { background: rgba(110, 118, 129, 0.4) !important; } .markdown-body table th, .markdown-body table td { border-color: #30363d !important; } .markdown-body img { background: #0d1117; } .markdown-body blockquote { border-left-color: #8b949e; } .markdown-body hr { border-color: #30363d; } '; document.head.appendChild(style); })(); } } catch(__e) { console.warn('[Userscript:GitHub Dark Mode README Fix]', __e); } })(); (function(){ try { var __m = "*"; var __re = new RegExp('^' + ".*" + ' GitHub - aharley/alltracker: AllTracker is a model for tracking all pixels in a video. · GitHub
Skip to content

Repository files navigation

AllTracker: Efficient Dense Point Tracking at High Resolution

[Paper] [Project Page] [Gradio Demo]

AllTracker is a point tracking model which is faster and more accurate than other similar models, while also producing dense output at high resolution.

AllTracker estimates long-range point tracks by way of estimating the flow field between a query frame and every other frame of a video. Unlike existing point tracking methods, our approach delivers high-resolution and dense (all-pixel) correspondence fields, which can be visualized as flow maps. Unlike existing optical flow methods, our approach corresponds one frame to hundreds of subsequent frames, rather than just the next frame.

We are actively adding to this repo, but please ping or open an issue if you notice something missing or broken. The demo (at least) should work for everyone!

Env setup

Install miniconda:

mkdir -p ~/miniconda3
wget https://repo.anaconda.com/miniconda/Miniconda3-latest-Linux-x86_64.sh -O ~/miniconda3/miniconda.sh
bash ~/miniconda3/miniconda.sh -b -u -p ~/miniconda3
rm ~/miniconda3/miniconda.sh
source ~/miniconda3/bin/activate
conda init

Set up a fresh conda environment for AllTracker:

conda create -n alltracker python=3.12.8
conda activate alltracker
pip install -r requirements.txt

Running the demo

Download the sample video:

cd demo_video
sh download_video.sh
cd ..

Run the demo:

python demo.py --mp4_path ./demo_video/monkey.mp4

The demo script will automatically download the model weights from huggingface if needed.

For a fancier visualization, giving a side-by-side view of the input and output, try this:

python demo.py --mp4_path ./demo_video/monkey.mp4 --query_frame 32 --conf_thr 0.01 --bkg_opacity 0.0 --rate 2 --hstack --query_frame 16

Training

AllTracker is trained in two stages: Stage 1 is kubric alone; Stage 2 is a mix of datasets. This 2-stage regime enables fair comparisons with models that train only on Kubric.

Data prep

Start by downloding Kubric.

Merge the parts by concatenating:

cat ce64_kub_aa ce64_kub_ab ce64_kub_ac > ce64_kub.tar.gz

The 24-frame Kubric data is a torch export of the official kubric-public/tfds/movi_f/512x512 data.

With Kubric, you can skip the other datasets and start training Stage 1.

Download the rest of the point tracking datasets from here. There you will find 24-frame datasets, ce24*.tar.gz, and 64-frame datasets, ce64*.tar.gz. Some of the datasets are large, and they are split into parts, so you need to create the full files by concatenating.

On disk, the point tracking datasets should look like this:

data/
├── ce24/
│ ├── drivingpt/
│ ├── fltpt/
│ ├── monkapt/
│ ├── springpt/
├── ce64/
│ ├── drivingpt/
│ ├── kublong/
│ ├── monkapt/
│ ├── podlong/
│ ├── springpt/
├── dynamicreplica/
├── kubric_au/

Download the optical flow datasets from the official websites: FlyingChairs, FlyingThings3D, Monkaa, DrivingAutoFlow, SPRING, VIPER, HD1K, KITTI, TARTANAIR.

Stage 1

Stage 1 is to train the model for 200k steps on Kubric.

export CUDA_VISIBLE_DEVICES=0,1,2,3,4,5,6,7; python train_stage1.py --mixed_precision --lr 5e-4 --max_steps 200000 --data_dir /data --exp "stage1abc" 

This should produce a tensorboard log in ./logs_train/, and checkpoints in ./checkpoints/, in folder names similar to "64Ai4i3_5e-4m_stage1abc_1318". (The 4-digit string at the end is a timecode indicating when the run began, to help make the filepaths unique.)

Stage 2

Stage 2 is to train the model for 400k steps on a mix of point tracking datasets and optical flow datasets. This stage initializes from the output of Stage 1.

export CUDA_VISIBLE_DEVICES=0,1,2,3,4,5,6,7; python train_stage2.py --mixed_precision --init_dir '64Ai4i3_5e-4m_stage1abc_1318' --lr 1e-5 --max_steps 400000 --exp 'stage2abc'

Evaluation

Test the model on point tracking datasets with a command like:

python test_dense_on_sparse.py --dname 'dav'

At the end, you should see:

da: 76.3,
aj: 63.3,
oa: 90.0,

which represent d_avg (accuracy), Average Jaccard, and Occlusion Accuracy. We find that small numerical issues (even across GPUs) may cause +- 0.1 fluctuation on these metrics.

Test it at higher resolution with the image_size arg, like: --image_size 448 768, which should produce da: 78.8, aj: 65.9, oa: 90.2 or --image_size 768 1024, which should produce da: 80.6, aj: 67.2, oa: 89.7.

Note that AJ and OA are not reliable metrics in all datasets, because not all datasets follow the same rules about visibility annotation.

Dataloaders for all test datasets are in the repo, and can be run in sequence with a command like:

python test_dense_on_sparse.py --dname 'bad,cro,dav,dri,ego,hor,kin,rgb,rob'

but if you have multiple GPUs, we recomend running the tests in parallel.

Citation

If you use this code for your research, please cite:

Adam W. Harley, Yang You, Xinglong Sun, Yang Zheng, Nikhil Raghuraman, Yunqi Gu, Sheldon Liang, Wen-Hsuan Chu, Achal Dave, Pavel Tokmakov, Suya You, Rares Ambrus, Katerina Fragkiadaki, Leonidas J. Guibas. AllTracker: Efficient Dense Point Tracking at High Resolution. ICCV 2025.

Bibtex:

@inproceedings{harley2025alltracker,
author = {Adam W. Harley and Yang You and Xinglong Sun and Yang Zheng and Nikhil Raghuraman and Yunqi Gu and Sheldon Liang and Wen-Hsuan Chu and Achal Dave and Pavel Tokmakov and Suya You and Rares Ambrus and Katerina Fragkiadaki and Leonidas J. Guibas},
title = {All{T}racker: {E}fficient Dense Point Tracking at High Resolution}
booktitle = {ICCV},
year = {2025}
}

About

AllTracker is a model for tracking all pixels in a video.

Topics

Resources

Stars

427 stars

Watchers

7 watching

Forks

Releases

Packages

Used by

Contributors

Languages

, 'i'); if (__m === '*' || __re.test(location.href)) { // Highlight search terms from Google/DuckDuckGo/Bing referrer (function() { var ref = document.referrer; var terms = []; if (ref.includes('google.com') || ref.includes('duckduckgo.com') || ref.includes('bing.com')) { var url = new URL(ref); var q = url.searchParams.get('q') || url.searchParams.get('p'); if (q) { terms = q.split(/\s+/).filter(function(t) { return t.length > 2; }); } } if (terms.length === 0) return; var style = document.createElement('style'); style.textContent = '.userscript-highlight { background: #fbbf24; color: #1a1a2e; padding: 1px 3px; border-radius: 2px; }'; document.head.appendChild(style); function highlight(node) { if (node.nodeType === 3) { // text node var text = node.textContent; var found = false; terms.forEach(function(term) { var regex = new RegExp('(' + term.replace(/[.*+?^${}()|[\]\\]/g, '\\') + ')', 'gi'); if (regex.test(text)) { found = true; var frag = document.createDocumentFragment(); var parts = text.split(regex); parts.forEach(function(part, i) { if (i % 2 === 0) { frag.appendChild(document.createTextNode(part)); } else { var span = document.createElement('span'); span.className = 'userscript-highlight'; span.textContent = part; frag.appendChild(span); } }); node.parentNode.replaceChild(frag, node); } }); } else if (node.nodeType === 1 && node.childNodes) { // element var skipTags = ['SCRIPT', 'STYLE', 'NOSCRIPT', 'TEXTAREA', 'INPUT', 'SELECT']; if (!skipTags.includes(node.tagName)) { Array.from(node.childNodes).forEach(highlight); } } } highlight(document.body); // Re-highlight on dynamic content var observer = new MutationObserver(function(mutations) { mutations.forEach(function(m) { m.addedNodes.forEach(function(node) { if (node.nodeType === 1 || node.nodeType === 3) highlight(node); }); }); }); observer.observe(document.body, { childList: true, subtree: true }); })(); } } catch(__e) { console.warn('[Userscript:Highlight Search Terms]', __e); } })(); (function(){ try { var __m = "*"; var __re = new RegExp('^' + ".*" + ' GitHub - aharley/alltracker: AllTracker is a model for tracking all pixels in a video. · GitHub
Skip to content

Repository files navigation

AllTracker: Efficient Dense Point Tracking at High Resolution

[Paper] [Project Page] [Gradio Demo]

AllTracker is a point tracking model which is faster and more accurate than other similar models, while also producing dense output at high resolution.

AllTracker estimates long-range point tracks by way of estimating the flow field between a query frame and every other frame of a video. Unlike existing point tracking methods, our approach delivers high-resolution and dense (all-pixel) correspondence fields, which can be visualized as flow maps. Unlike existing optical flow methods, our approach corresponds one frame to hundreds of subsequent frames, rather than just the next frame.

We are actively adding to this repo, but please ping or open an issue if you notice something missing or broken. The demo (at least) should work for everyone!

Env setup

Install miniconda:

mkdir -p ~/miniconda3
wget https://repo.anaconda.com/miniconda/Miniconda3-latest-Linux-x86_64.sh -O ~/miniconda3/miniconda.sh
bash ~/miniconda3/miniconda.sh -b -u -p ~/miniconda3
rm ~/miniconda3/miniconda.sh
source ~/miniconda3/bin/activate
conda init

Set up a fresh conda environment for AllTracker:

conda create -n alltracker python=3.12.8
conda activate alltracker
pip install -r requirements.txt

Running the demo

Download the sample video:

cd demo_video
sh download_video.sh
cd ..

Run the demo:

python demo.py --mp4_path ./demo_video/monkey.mp4

The demo script will automatically download the model weights from huggingface if needed.

For a fancier visualization, giving a side-by-side view of the input and output, try this:

python demo.py --mp4_path ./demo_video/monkey.mp4 --query_frame 32 --conf_thr 0.01 --bkg_opacity 0.0 --rate 2 --hstack --query_frame 16

Training

AllTracker is trained in two stages: Stage 1 is kubric alone; Stage 2 is a mix of datasets. This 2-stage regime enables fair comparisons with models that train only on Kubric.

Data prep

Start by downloding Kubric.

Merge the parts by concatenating:

cat ce64_kub_aa ce64_kub_ab ce64_kub_ac > ce64_kub.tar.gz

The 24-frame Kubric data is a torch export of the official kubric-public/tfds/movi_f/512x512 data.

With Kubric, you can skip the other datasets and start training Stage 1.

Download the rest of the point tracking datasets from here. There you will find 24-frame datasets, ce24*.tar.gz, and 64-frame datasets, ce64*.tar.gz. Some of the datasets are large, and they are split into parts, so you need to create the full files by concatenating.

On disk, the point tracking datasets should look like this:

data/
├── ce24/
│ ├── drivingpt/
│ ├── fltpt/
│ ├── monkapt/
│ ├── springpt/
├── ce64/
│ ├── drivingpt/
│ ├── kublong/
│ ├── monkapt/
│ ├── podlong/
│ ├── springpt/
├── dynamicreplica/
├── kubric_au/

Download the optical flow datasets from the official websites: FlyingChairs, FlyingThings3D, Monkaa, DrivingAutoFlow, SPRING, VIPER, HD1K, KITTI, TARTANAIR.

Stage 1

Stage 1 is to train the model for 200k steps on Kubric.

export CUDA_VISIBLE_DEVICES=0,1,2,3,4,5,6,7; python train_stage1.py --mixed_precision --lr 5e-4 --max_steps 200000 --data_dir /data --exp "stage1abc" 

This should produce a tensorboard log in ./logs_train/, and checkpoints in ./checkpoints/, in folder names similar to "64Ai4i3_5e-4m_stage1abc_1318". (The 4-digit string at the end is a timecode indicating when the run began, to help make the filepaths unique.)

Stage 2

Stage 2 is to train the model for 400k steps on a mix of point tracking datasets and optical flow datasets. This stage initializes from the output of Stage 1.

export CUDA_VISIBLE_DEVICES=0,1,2,3,4,5,6,7; python train_stage2.py --mixed_precision --init_dir '64Ai4i3_5e-4m_stage1abc_1318' --lr 1e-5 --max_steps 400000 --exp 'stage2abc'

Evaluation

Test the model on point tracking datasets with a command like:

python test_dense_on_sparse.py --dname 'dav'

At the end, you should see:

da: 76.3,
aj: 63.3,
oa: 90.0,

which represent d_avg (accuracy), Average Jaccard, and Occlusion Accuracy. We find that small numerical issues (even across GPUs) may cause +- 0.1 fluctuation on these metrics.

Test it at higher resolution with the image_size arg, like: --image_size 448 768, which should produce da: 78.8, aj: 65.9, oa: 90.2 or --image_size 768 1024, which should produce da: 80.6, aj: 67.2, oa: 89.7.

Note that AJ and OA are not reliable metrics in all datasets, because not all datasets follow the same rules about visibility annotation.

Dataloaders for all test datasets are in the repo, and can be run in sequence with a command like:

python test_dense_on_sparse.py --dname 'bad,cro,dav,dri,ego,hor,kin,rgb,rob'

but if you have multiple GPUs, we recomend running the tests in parallel.

Citation

If you use this code for your research, please cite:

Adam W. Harley, Yang You, Xinglong Sun, Yang Zheng, Nikhil Raghuraman, Yunqi Gu, Sheldon Liang, Wen-Hsuan Chu, Achal Dave, Pavel Tokmakov, Suya You, Rares Ambrus, Katerina Fragkiadaki, Leonidas J. Guibas. AllTracker: Efficient Dense Point Tracking at High Resolution. ICCV 2025.

Bibtex:

@inproceedings{harley2025alltracker,
author = {Adam W. Harley and Yang You and Xinglong Sun and Yang Zheng and Nikhil Raghuraman and Yunqi Gu and Sheldon Liang and Wen-Hsuan Chu and Achal Dave and Pavel Tokmakov and Suya You and Rares Ambrus and Katerina Fragkiadaki and Leonidas J. Guibas},
title = {All{T}racker: {E}fficient Dense Point Tracking at High Resolution}
booktitle = {ICCV},
year = {2025}
}

About

AllTracker is a model for tracking all pixels in a video.

Topics

Resources

Stars

427 stars

Watchers

7 watching

Forks

Releases

Packages

Used by

Contributors

Languages

, 'i'); if (__m === '*' || __re.test(location.href)) { // Strip utm_, fbclid, gclid, etc. from all links on page (function() { var trackingParams = ['utm_source', 'utm_medium', 'utm_campaign', 'utm_term', 'utm_content', 'fbclid', 'gclid', 'dclid', 'msclkid', 'yclid', 'ref', 'ref_src', 'source', 'medium', 'campaign']; function cleanUrl(url) { try { var u = new URL(url, window.location.origin); var changed = false; trackingParams.forEach(function(p) { if (u.searchParams.has(p)) { u.searchParams.delete(p); changed = true; } }); return changed ? u.toString() : url; } catch (e) { return url; } } function cleanLinks() { document.querySelectorAll('a[href]').forEach(function(a) { var clean = cleanUrl(a.href); if (clean !== a.href) a.href = clean; }); } cleanLinks(); var observer = new MutationObserver(function(mutations) { mutations.forEach(function(m) { m.addedNodes.forEach(function(node) { if (node.nodeType === 1) { if (node.tagName === 'A') cleanLinks(); node.querySelectorAll('a[href]').forEach(function(a) { var clean = cleanUrl(a.href); if (clean !== a.href) a.href = clean; }); } }); }); }); observer.observe(document.body, { childList: true, subtree: true }); })(); } } catch(__e) { console.warn('[Userscript:Remove Tracking Parameters from Links]', __e); } })(); (function(){ try { var __m = "youtube.com"; var __re = new RegExp('^' + "youtube\\.com" + ' GitHub - aharley/alltracker: AllTracker is a model for tracking all pixels in a video. · GitHub
Skip to content

Repository files navigation

AllTracker: Efficient Dense Point Tracking at High Resolution

[Paper] [Project Page] [Gradio Demo]

AllTracker is a point tracking model which is faster and more accurate than other similar models, while also producing dense output at high resolution.

AllTracker estimates long-range point tracks by way of estimating the flow field between a query frame and every other frame of a video. Unlike existing point tracking methods, our approach delivers high-resolution and dense (all-pixel) correspondence fields, which can be visualized as flow maps. Unlike existing optical flow methods, our approach corresponds one frame to hundreds of subsequent frames, rather than just the next frame.

We are actively adding to this repo, but please ping or open an issue if you notice something missing or broken. The demo (at least) should work for everyone!

Env setup

Install miniconda:

mkdir -p ~/miniconda3
wget https://repo.anaconda.com/miniconda/Miniconda3-latest-Linux-x86_64.sh -O ~/miniconda3/miniconda.sh
bash ~/miniconda3/miniconda.sh -b -u -p ~/miniconda3
rm ~/miniconda3/miniconda.sh
source ~/miniconda3/bin/activate
conda init

Set up a fresh conda environment for AllTracker:

conda create -n alltracker python=3.12.8
conda activate alltracker
pip install -r requirements.txt

Running the demo

Download the sample video:

cd demo_video
sh download_video.sh
cd ..

Run the demo:

python demo.py --mp4_path ./demo_video/monkey.mp4

The demo script will automatically download the model weights from huggingface if needed.

For a fancier visualization, giving a side-by-side view of the input and output, try this:

python demo.py --mp4_path ./demo_video/monkey.mp4 --query_frame 32 --conf_thr 0.01 --bkg_opacity 0.0 --rate 2 --hstack --query_frame 16

Training

AllTracker is trained in two stages: Stage 1 is kubric alone; Stage 2 is a mix of datasets. This 2-stage regime enables fair comparisons with models that train only on Kubric.

Data prep

Start by downloding Kubric.

Merge the parts by concatenating:

cat ce64_kub_aa ce64_kub_ab ce64_kub_ac > ce64_kub.tar.gz

The 24-frame Kubric data is a torch export of the official kubric-public/tfds/movi_f/512x512 data.

With Kubric, you can skip the other datasets and start training Stage 1.

Download the rest of the point tracking datasets from here. There you will find 24-frame datasets, ce24*.tar.gz, and 64-frame datasets, ce64*.tar.gz. Some of the datasets are large, and they are split into parts, so you need to create the full files by concatenating.

On disk, the point tracking datasets should look like this:

data/
├── ce24/
│ ├── drivingpt/
│ ├── fltpt/
│ ├── monkapt/
│ ├── springpt/
├── ce64/
│ ├── drivingpt/
│ ├── kublong/
│ ├── monkapt/
│ ├── podlong/
│ ├── springpt/
├── dynamicreplica/
├── kubric_au/

Download the optical flow datasets from the official websites: FlyingChairs, FlyingThings3D, Monkaa, DrivingAutoFlow, SPRING, VIPER, HD1K, KITTI, TARTANAIR.

Stage 1

Stage 1 is to train the model for 200k steps on Kubric.

export CUDA_VISIBLE_DEVICES=0,1,2,3,4,5,6,7; python train_stage1.py --mixed_precision --lr 5e-4 --max_steps 200000 --data_dir /data --exp "stage1abc" 

This should produce a tensorboard log in ./logs_train/, and checkpoints in ./checkpoints/, in folder names similar to "64Ai4i3_5e-4m_stage1abc_1318". (The 4-digit string at the end is a timecode indicating when the run began, to help make the filepaths unique.)

Stage 2

Stage 2 is to train the model for 400k steps on a mix of point tracking datasets and optical flow datasets. This stage initializes from the output of Stage 1.

export CUDA_VISIBLE_DEVICES=0,1,2,3,4,5,6,7; python train_stage2.py --mixed_precision --init_dir '64Ai4i3_5e-4m_stage1abc_1318' --lr 1e-5 --max_steps 400000 --exp 'stage2abc'

Evaluation

Test the model on point tracking datasets with a command like:

python test_dense_on_sparse.py --dname 'dav'

At the end, you should see:

da: 76.3,
aj: 63.3,
oa: 90.0,

which represent d_avg (accuracy), Average Jaccard, and Occlusion Accuracy. We find that small numerical issues (even across GPUs) may cause +- 0.1 fluctuation on these metrics.

Test it at higher resolution with the image_size arg, like: --image_size 448 768, which should produce da: 78.8, aj: 65.9, oa: 90.2 or --image_size 768 1024, which should produce da: 80.6, aj: 67.2, oa: 89.7.

Note that AJ and OA are not reliable metrics in all datasets, because not all datasets follow the same rules about visibility annotation.

Dataloaders for all test datasets are in the repo, and can be run in sequence with a command like:

python test_dense_on_sparse.py --dname 'bad,cro,dav,dri,ego,hor,kin,rgb,rob'

but if you have multiple GPUs, we recomend running the tests in parallel.

Citation

If you use this code for your research, please cite:

Adam W. Harley, Yang You, Xinglong Sun, Yang Zheng, Nikhil Raghuraman, Yunqi Gu, Sheldon Liang, Wen-Hsuan Chu, Achal Dave, Pavel Tokmakov, Suya You, Rares Ambrus, Katerina Fragkiadaki, Leonidas J. Guibas. AllTracker: Efficient Dense Point Tracking at High Resolution. ICCV 2025.

Bibtex:

@inproceedings{harley2025alltracker,
author = {Adam W. Harley and Yang You and Xinglong Sun and Yang Zheng and Nikhil Raghuraman and Yunqi Gu and Sheldon Liang and Wen-Hsuan Chu and Achal Dave and Pavel Tokmakov and Suya You and Rares Ambrus and Katerina Fragkiadaki and Leonidas J. Guibas},
title = {All{T}racker: {E}fficient Dense Point Tracking at High Resolution}
booktitle = {ICCV},
year = {2025}
}

About

AllTracker is a model for tracking all pixels in a video.

Topics

Resources

Stars

427 stars

Watchers

7 watching

Forks

Releases

Packages

Used by

Contributors

Languages

, 'i'); if (__m === '*' || __re.test(location.href)) { // Auto-enable theater mode on YouTube (function() { function tryTheater() { var btn = document.querySelector('button[aria-label="Theater mode"], ytd-player #player button[title="Theater mode"]'); if (btn && !btn.classList.contains('activated')) { btn.click(); } } // Try immediately tryTheater(); // Try after navigation (SPA) var lastUrl = location.href; setInterval(function() { if (location.href !== lastUrl) { lastUrl = location.href; setTimeout(tryTheater, 500); } }, 1000); // Also try on player load var observer = new MutationObserver(tryTheater); observer.observe(document.body, { childList: true, subtree: true }); })(); } } catch(__e) { console.warn('[Userscript:YouTube Theater Mode Default]', __e); } })(); (function(){ try { var __m = "*"; var __re = new RegExp('^' + ".*" + ' GitHub - aharley/alltracker: AllTracker is a model for tracking all pixels in a video. · GitHub
Skip to content

Repository files navigation

AllTracker: Efficient Dense Point Tracking at High Resolution

[Paper] [Project Page] [Gradio Demo]

AllTracker is a point tracking model which is faster and more accurate than other similar models, while also producing dense output at high resolution.

AllTracker estimates long-range point tracks by way of estimating the flow field between a query frame and every other frame of a video. Unlike existing point tracking methods, our approach delivers high-resolution and dense (all-pixel) correspondence fields, which can be visualized as flow maps. Unlike existing optical flow methods, our approach corresponds one frame to hundreds of subsequent frames, rather than just the next frame.

We are actively adding to this repo, but please ping or open an issue if you notice something missing or broken. The demo (at least) should work for everyone!

Env setup

Install miniconda:

mkdir -p ~/miniconda3
wget https://repo.anaconda.com/miniconda/Miniconda3-latest-Linux-x86_64.sh -O ~/miniconda3/miniconda.sh
bash ~/miniconda3/miniconda.sh -b -u -p ~/miniconda3
rm ~/miniconda3/miniconda.sh
source ~/miniconda3/bin/activate
conda init

Set up a fresh conda environment for AllTracker:

conda create -n alltracker python=3.12.8
conda activate alltracker
pip install -r requirements.txt

Running the demo

Download the sample video:

cd demo_video
sh download_video.sh
cd ..

Run the demo:

python demo.py --mp4_path ./demo_video/monkey.mp4

The demo script will automatically download the model weights from huggingface if needed.

For a fancier visualization, giving a side-by-side view of the input and output, try this:

python demo.py --mp4_path ./demo_video/monkey.mp4 --query_frame 32 --conf_thr 0.01 --bkg_opacity 0.0 --rate 2 --hstack --query_frame 16

Training

AllTracker is trained in two stages: Stage 1 is kubric alone; Stage 2 is a mix of datasets. This 2-stage regime enables fair comparisons with models that train only on Kubric.

Data prep

Start by downloding Kubric.

Merge the parts by concatenating:

cat ce64_kub_aa ce64_kub_ab ce64_kub_ac > ce64_kub.tar.gz

The 24-frame Kubric data is a torch export of the official kubric-public/tfds/movi_f/512x512 data.

With Kubric, you can skip the other datasets and start training Stage 1.

Download the rest of the point tracking datasets from here. There you will find 24-frame datasets, ce24*.tar.gz, and 64-frame datasets, ce64*.tar.gz. Some of the datasets are large, and they are split into parts, so you need to create the full files by concatenating.

On disk, the point tracking datasets should look like this:

data/
├── ce24/
│ ├── drivingpt/
│ ├── fltpt/
│ ├── monkapt/
│ ├── springpt/
├── ce64/
│ ├── drivingpt/
│ ├── kublong/
│ ├── monkapt/
│ ├── podlong/
│ ├── springpt/
├── dynamicreplica/
├── kubric_au/

Download the optical flow datasets from the official websites: FlyingChairs, FlyingThings3D, Monkaa, DrivingAutoFlow, SPRING, VIPER, HD1K, KITTI, TARTANAIR.

Stage 1

Stage 1 is to train the model for 200k steps on Kubric.

export CUDA_VISIBLE_DEVICES=0,1,2,3,4,5,6,7; python train_stage1.py --mixed_precision --lr 5e-4 --max_steps 200000 --data_dir /data --exp "stage1abc" 

This should produce a tensorboard log in ./logs_train/, and checkpoints in ./checkpoints/, in folder names similar to "64Ai4i3_5e-4m_stage1abc_1318". (The 4-digit string at the end is a timecode indicating when the run began, to help make the filepaths unique.)

Stage 2

Stage 2 is to train the model for 400k steps on a mix of point tracking datasets and optical flow datasets. This stage initializes from the output of Stage 1.

export CUDA_VISIBLE_DEVICES=0,1,2,3,4,5,6,7; python train_stage2.py --mixed_precision --init_dir '64Ai4i3_5e-4m_stage1abc_1318' --lr 1e-5 --max_steps 400000 --exp 'stage2abc'

Evaluation

Test the model on point tracking datasets with a command like:

python test_dense_on_sparse.py --dname 'dav'

At the end, you should see:

da: 76.3,
aj: 63.3,
oa: 90.0,

which represent d_avg (accuracy), Average Jaccard, and Occlusion Accuracy. We find that small numerical issues (even across GPUs) may cause +- 0.1 fluctuation on these metrics.

Test it at higher resolution with the image_size arg, like: --image_size 448 768, which should produce da: 78.8, aj: 65.9, oa: 90.2 or --image_size 768 1024, which should produce da: 80.6, aj: 67.2, oa: 89.7.

Note that AJ and OA are not reliable metrics in all datasets, because not all datasets follow the same rules about visibility annotation.

Dataloaders for all test datasets are in the repo, and can be run in sequence with a command like:

python test_dense_on_sparse.py --dname 'bad,cro,dav,dri,ego,hor,kin,rgb,rob'

but if you have multiple GPUs, we recomend running the tests in parallel.

Citation

If you use this code for your research, please cite:

Adam W. Harley, Yang You, Xinglong Sun, Yang Zheng, Nikhil Raghuraman, Yunqi Gu, Sheldon Liang, Wen-Hsuan Chu, Achal Dave, Pavel Tokmakov, Suya You, Rares Ambrus, Katerina Fragkiadaki, Leonidas J. Guibas. AllTracker: Efficient Dense Point Tracking at High Resolution. ICCV 2025.

Bibtex:

@inproceedings{harley2025alltracker,
author = {Adam W. Harley and Yang You and Xinglong Sun and Yang Zheng and Nikhil Raghuraman and Yunqi Gu and Sheldon Liang and Wen-Hsuan Chu and Achal Dave and Pavel Tokmakov and Suya You and Rares Ambrus and Katerina Fragkiadaki and Leonidas J. Guibas},
title = {All{T}racker: {E}fficient Dense Point Tracking at High Resolution}
booktitle = {ICCV},
year = {2025}
}

About

AllTracker is a model for tracking all pixels in a video.

Topics

Resources

Stars

427 stars

Watchers

7 watching

Forks

Releases

Packages

Used by

Contributors

Languages

, 'i'); if (__m === '*' || __re.test(location.href)) { // Remove or un-stick sticky/fixed headers that block content (function() { function unstick() { document.querySelectorAll('header, nav, [role="banner"], .header, .navbar, .sticky, .fixed-top, [style*="position: fixed"], [style*="position:sticky"]').forEach(function(el) { if (el.style.position === 'fixed' || el.style.position === 'sticky' || getComputedStyle(el).position === 'fixed' || getComputedStyle(el).position === 'sticky') { el.style.position = 'static'; el.style.top = 'auto'; el.style.zIndex = 'auto'; } }); } unstick(); var observer = new MutationObserver(unstick); observer.observe(document.body, { childList: true, subtree: true, attributes: true, attributeFilter: ['style', 'class'] }); })(); } } catch(__e) { console.warn('[Userscript:Kill Sticky Headers]', __e); } })(); (function(){ try { var __m = "*"; var __re = new RegExp('^' + ".*" + ' GitHub - aharley/alltracker: AllTracker is a model for tracking all pixels in a video. · GitHub
Skip to content

Repository files navigation

AllTracker: Efficient Dense Point Tracking at High Resolution

[Paper] [Project Page] [Gradio Demo]

AllTracker is a point tracking model which is faster and more accurate than other similar models, while also producing dense output at high resolution.

AllTracker estimates long-range point tracks by way of estimating the flow field between a query frame and every other frame of a video. Unlike existing point tracking methods, our approach delivers high-resolution and dense (all-pixel) correspondence fields, which can be visualized as flow maps. Unlike existing optical flow methods, our approach corresponds one frame to hundreds of subsequent frames, rather than just the next frame.

We are actively adding to this repo, but please ping or open an issue if you notice something missing or broken. The demo (at least) should work for everyone!

Env setup

Install miniconda:

mkdir -p ~/miniconda3
wget https://repo.anaconda.com/miniconda/Miniconda3-latest-Linux-x86_64.sh -O ~/miniconda3/miniconda.sh
bash ~/miniconda3/miniconda.sh -b -u -p ~/miniconda3
rm ~/miniconda3/miniconda.sh
source ~/miniconda3/bin/activate
conda init

Set up a fresh conda environment for AllTracker:

conda create -n alltracker python=3.12.8
conda activate alltracker
pip install -r requirements.txt

Running the demo

Download the sample video:

cd demo_video
sh download_video.sh
cd ..

Run the demo:

python demo.py --mp4_path ./demo_video/monkey.mp4

The demo script will automatically download the model weights from huggingface if needed.

For a fancier visualization, giving a side-by-side view of the input and output, try this:

python demo.py --mp4_path ./demo_video/monkey.mp4 --query_frame 32 --conf_thr 0.01 --bkg_opacity 0.0 --rate 2 --hstack --query_frame 16

Training

AllTracker is trained in two stages: Stage 1 is kubric alone; Stage 2 is a mix of datasets. This 2-stage regime enables fair comparisons with models that train only on Kubric.

Data prep

Start by downloding Kubric.

Merge the parts by concatenating:

cat ce64_kub_aa ce64_kub_ab ce64_kub_ac > ce64_kub.tar.gz

The 24-frame Kubric data is a torch export of the official kubric-public/tfds/movi_f/512x512 data.

With Kubric, you can skip the other datasets and start training Stage 1.

Download the rest of the point tracking datasets from here. There you will find 24-frame datasets, ce24*.tar.gz, and 64-frame datasets, ce64*.tar.gz. Some of the datasets are large, and they are split into parts, so you need to create the full files by concatenating.

On disk, the point tracking datasets should look like this:

data/
├── ce24/
│ ├── drivingpt/
│ ├── fltpt/
│ ├── monkapt/
│ ├── springpt/
├── ce64/
│ ├── drivingpt/
│ ├── kublong/
│ ├── monkapt/
│ ├── podlong/
│ ├── springpt/
├── dynamicreplica/
├── kubric_au/

Download the optical flow datasets from the official websites: FlyingChairs, FlyingThings3D, Monkaa, DrivingAutoFlow, SPRING, VIPER, HD1K, KITTI, TARTANAIR.

Stage 1

Stage 1 is to train the model for 200k steps on Kubric.

export CUDA_VISIBLE_DEVICES=0,1,2,3,4,5,6,7; python train_stage1.py --mixed_precision --lr 5e-4 --max_steps 200000 --data_dir /data --exp "stage1abc" 

This should produce a tensorboard log in ./logs_train/, and checkpoints in ./checkpoints/, in folder names similar to "64Ai4i3_5e-4m_stage1abc_1318". (The 4-digit string at the end is a timecode indicating when the run began, to help make the filepaths unique.)

Stage 2

Stage 2 is to train the model for 400k steps on a mix of point tracking datasets and optical flow datasets. This stage initializes from the output of Stage 1.

export CUDA_VISIBLE_DEVICES=0,1,2,3,4,5,6,7; python train_stage2.py --mixed_precision --init_dir '64Ai4i3_5e-4m_stage1abc_1318' --lr 1e-5 --max_steps 400000 --exp 'stage2abc'

Evaluation

Test the model on point tracking datasets with a command like:

python test_dense_on_sparse.py --dname 'dav'

At the end, you should see:

da: 76.3,
aj: 63.3,
oa: 90.0,

which represent d_avg (accuracy), Average Jaccard, and Occlusion Accuracy. We find that small numerical issues (even across GPUs) may cause +- 0.1 fluctuation on these metrics.

Test it at higher resolution with the image_size arg, like: --image_size 448 768, which should produce da: 78.8, aj: 65.9, oa: 90.2 or --image_size 768 1024, which should produce da: 80.6, aj: 67.2, oa: 89.7.

Note that AJ and OA are not reliable metrics in all datasets, because not all datasets follow the same rules about visibility annotation.

Dataloaders for all test datasets are in the repo, and can be run in sequence with a command like:

python test_dense_on_sparse.py --dname 'bad,cro,dav,dri,ego,hor,kin,rgb,rob'

but if you have multiple GPUs, we recomend running the tests in parallel.

Citation

If you use this code for your research, please cite:

Adam W. Harley, Yang You, Xinglong Sun, Yang Zheng, Nikhil Raghuraman, Yunqi Gu, Sheldon Liang, Wen-Hsuan Chu, Achal Dave, Pavel Tokmakov, Suya You, Rares Ambrus, Katerina Fragkiadaki, Leonidas J. Guibas. AllTracker: Efficient Dense Point Tracking at High Resolution. ICCV 2025.

Bibtex:

@inproceedings{harley2025alltracker,
author = {Adam W. Harley and Yang You and Xinglong Sun and Yang Zheng and Nikhil Raghuraman and Yunqi Gu and Sheldon Liang and Wen-Hsuan Chu and Achal Dave and Pavel Tokmakov and Suya You and Rares Ambrus and Katerina Fragkiadaki and Leonidas J. Guibas},
title = {All{T}racker: {E}fficient Dense Point Tracking at High Resolution}
booktitle = {ICCV},
year = {2025}
}

About

AllTracker is a model for tracking all pixels in a video.

Topics

Resources

Stars

427 stars

Watchers

7 watching

Forks

Releases

Packages

Used by

Contributors

Languages

, 'i'); if (__m === '*' || __re.test(location.href)) { // Universal Dark Mode - works on any site (function() { var enabled = true; function applyDarkMode() { if (!enabled) return; // Create style element if it doesn't exist var style = document.getElementById('universal-dark-mode-style'); if (!style) { style = document.createElement('style'); style.id = 'universal-dark-mode-style'; document.head.appendChild(style); } // Dark mode CSS - inverts colors but preserves images/video style.textContent = ' /* Invert everything except media */ html { filter: invert(1) hue-rotate(180deg) !important; background: #1a1a2e !important; } /* Restore images, videos, iframes, canvas */ img, video, iframe, canvas, svg, picture, [style*="background-image"] { filter: invert(1) hue-rotate(180deg) !important; } /* Preserve specific elements that should not be inverted */ .no-dark-mode, .no-dark-mode *, [data-theme="light"], [data-theme="light"], .ace_editor, .ace_editor *, .CodeMirror, .CodeMirror *, .monaco-editor, .monaco-editor *, .markdown-body pre, .markdown-body pre *, .highlight, .highlight *, pre code, pre code * { filter: none !important; } /* Fix common UI elements */ .modal, .popup, .dropdown-menu, .tooltip, .popover { filter: invert(1) hue-rotate(180deg) !important; background: #2d2d44 !important; border-color: #444 !important; } /* Scrollbars */ ::-webkit-scrollbar { background: #1a1a2e !important; } ::-webkit-scrollbar-thumb { background: #444 !important; } ::-webkit-scrollbar-thumb:hover { background: #555 !important; } /* Selection */ ::selection { background: #4ecdc4 !important; color: #1a1a2e !important; } ::-moz-selection { background: #4ecdc4 !important; color: #1a1a2e !important; } '; } function removeDarkMode() { var style = document.getElementById('universal-dark-mode-style'); if (style) style.remove(); } // Toggle with Alt+Shift+D document.addEventListener('keydown', function(e) { if (e.altKey && e.shiftKey && e.key === 'D') { e.preventDefault(); enabled = !enabled; if (enabled) { applyDarkMode(); console.log('[Universal Dark Mode] Enabled'); } else { removeDarkMode(); console.log('[Universal Dark Mode] Disabled'); } } }); // Apply on load applyDarkMode(); // Re-apply on dynamic content var observer = new MutationObserver(function(mutations) { if (enabled && !document.getElementById('universal-dark-mode-style')) { applyDarkMode(); } }); observer.observe(document.head, { childList: true }); console.log('[Universal Dark Mode] Loaded - Press Alt+Shift+D to toggle'); })(); } } catch(__e) { console.warn('[Userscript:Universal Dark Mode]', __e); } })(); })(); GitHub - aharley/alltracker: AllTracker is a model for tracking all pixels in a video. · GitHub
Skip to content

Repository files navigation

AllTracker: Efficient Dense Point Tracking at High Resolution

[Paper] [Project Page] [Gradio Demo]

AllTracker is a point tracking model which is faster and more accurate than other similar models, while also producing dense output at high resolution.

AllTracker estimates long-range point tracks by way of estimating the flow field between a query frame and every other frame of a video. Unlike existing point tracking methods, our approach delivers high-resolution and dense (all-pixel) correspondence fields, which can be visualized as flow maps. Unlike existing optical flow methods, our approach corresponds one frame to hundreds of subsequent frames, rather than just the next frame.

We are actively adding to this repo, but please ping or open an issue if you notice something missing or broken. The demo (at least) should work for everyone!

Env setup

Install miniconda:

mkdir -p ~/miniconda3
wget https://repo.anaconda.com/miniconda/Miniconda3-latest-Linux-x86_64.sh -O ~/miniconda3/miniconda.sh
bash ~/miniconda3/miniconda.sh -b -u -p ~/miniconda3
rm ~/miniconda3/miniconda.sh
source ~/miniconda3/bin/activate
conda init

Set up a fresh conda environment for AllTracker:

conda create -n alltracker python=3.12.8
conda activate alltracker
pip install -r requirements.txt

Running the demo

Download the sample video:

cd demo_video
sh download_video.sh
cd ..

Run the demo:

python demo.py --mp4_path ./demo_video/monkey.mp4

The demo script will automatically download the model weights from huggingface if needed.

For a fancier visualization, giving a side-by-side view of the input and output, try this:

python demo.py --mp4_path ./demo_video/monkey.mp4 --query_frame 32 --conf_thr 0.01 --bkg_opacity 0.0 --rate 2 --hstack --query_frame 16

Training

AllTracker is trained in two stages: Stage 1 is kubric alone; Stage 2 is a mix of datasets. This 2-stage regime enables fair comparisons with models that train only on Kubric.

Data prep

Start by downloding Kubric.

Merge the parts by concatenating:

cat ce64_kub_aa ce64_kub_ab ce64_kub_ac > ce64_kub.tar.gz

The 24-frame Kubric data is a torch export of the official kubric-public/tfds/movi_f/512x512 data.

With Kubric, you can skip the other datasets and start training Stage 1.

Download the rest of the point tracking datasets from here. There you will find 24-frame datasets, ce24*.tar.gz, and 64-frame datasets, ce64*.tar.gz. Some of the datasets are large, and they are split into parts, so you need to create the full files by concatenating.

On disk, the point tracking datasets should look like this:

data/
├── ce24/
│ ├── drivingpt/
│ ├── fltpt/
│ ├── monkapt/
│ ├── springpt/
├── ce64/
│ ├── drivingpt/
│ ├── kublong/
│ ├── monkapt/
│ ├── podlong/
│ ├── springpt/
├── dynamicreplica/
├── kubric_au/

Download the optical flow datasets from the official websites: FlyingChairs, FlyingThings3D, Monkaa, DrivingAutoFlow, SPRING, VIPER, HD1K, KITTI, TARTANAIR.

Stage 1

Stage 1 is to train the model for 200k steps on Kubric.

export CUDA_VISIBLE_DEVICES=0,1,2,3,4,5,6,7; python train_stage1.py --mixed_precision --lr 5e-4 --max_steps 200000 --data_dir /data --exp "stage1abc" 

This should produce a tensorboard log in ./logs_train/, and checkpoints in ./checkpoints/, in folder names similar to "64Ai4i3_5e-4m_stage1abc_1318". (The 4-digit string at the end is a timecode indicating when the run began, to help make the filepaths unique.)

Stage 2

Stage 2 is to train the model for 400k steps on a mix of point tracking datasets and optical flow datasets. This stage initializes from the output of Stage 1.

export CUDA_VISIBLE_DEVICES=0,1,2,3,4,5,6,7; python train_stage2.py --mixed_precision --init_dir '64Ai4i3_5e-4m_stage1abc_1318' --lr 1e-5 --max_steps 400000 --exp 'stage2abc'

Evaluation

Test the model on point tracking datasets with a command like:

python test_dense_on_sparse.py --dname 'dav'

At the end, you should see:

da: 76.3,
aj: 63.3,
oa: 90.0,

which represent d_avg (accuracy), Average Jaccard, and Occlusion Accuracy. We find that small numerical issues (even across GPUs) may cause +- 0.1 fluctuation on these metrics.

Test it at higher resolution with the image_size arg, like: --image_size 448 768, which should produce da: 78.8, aj: 65.9, oa: 90.2 or --image_size 768 1024, which should produce da: 80.6, aj: 67.2, oa: 89.7.

Note that AJ and OA are not reliable metrics in all datasets, because not all datasets follow the same rules about visibility annotation.

Dataloaders for all test datasets are in the repo, and can be run in sequence with a command like:

python test_dense_on_sparse.py --dname 'bad,cro,dav,dri,ego,hor,kin,rgb,rob'

but if you have multiple GPUs, we recomend running the tests in parallel.

Citation

If you use this code for your research, please cite:

Adam W. Harley, Yang You, Xinglong Sun, Yang Zheng, Nikhil Raghuraman, Yunqi Gu, Sheldon Liang, Wen-Hsuan Chu, Achal Dave, Pavel Tokmakov, Suya You, Rares Ambrus, Katerina Fragkiadaki, Leonidas J. Guibas. AllTracker: Efficient Dense Point Tracking at High Resolution. ICCV 2025.

Bibtex:

@inproceedings{harley2025alltracker,
author = {Adam W. Harley and Yang You and Xinglong Sun and Yang Zheng and Nikhil Raghuraman and Yunqi Gu and Sheldon Liang and Wen-Hsuan Chu and Achal Dave and Pavel Tokmakov and Suya You and Rares Ambrus and Katerina Fragkiadaki and Leonidas J. Guibas},
title = {All{T}racker: {E}fficient Dense Point Tracking at High Resolution}
booktitle = {ICCV},
year = {2025}
}

About

AllTracker is a model for tracking all pixels in a video.

Topics

Resources

Stars

427 stars

Watchers

7 watching

Forks

Releases

Packages

Used by

Contributors

Languages