Latest commit

History

11 Commits

Folders and files

NameName
Last commit message
Last commit date

Repository files navigation

Full-Stack Web Application for Task Management

This repository contains the code for a full-stack web application designed to help users manage their personal task lists. The application supports task creation, editing, deletion, and marking tasks as completed. It features a Django-powered RESTful API backend and a ReactJS frontend, with deployment configured for AWS.

Table of Contents

Getting Started

Prerequisites

Before you begin, ensure you have the following installed:

  • Python (3.10 or higher)
  • Node.js(16 or higher) and npm
  • AWS CLI (configured with your AWS account)

Installation

  1. Clone the repository:
    git clone [repository_url]
    
  2. Navigate to the backend(taskmanager) directory and install the dependencies:
    cd taskmanager
    pip install -r requirements.txt
    
  3. Navigate to the frontend directory and install the dependencies:
    cd ../frontend
    npm install
    

Backend

Setup

  1. Clone the repository

    git clone <repository-url>
    cd backend
    
  2. Install dependencies

    pip install -r requirements.txt
    
  3. Set Environment Variable

    Make .env file referencing the .env.example file

  4. Migrate the database

    python manage.py migrate
    
  5. Run the server

    python manage.py runserver
    

Features

  • RESTful API for task management (CRUD operations).
  • Authentication and authorization with Django's built-in system and JWT.
  • Filtering, sorting, and searching tasks using DjangoFilterBackend, OrderingFilter, and SearchFilter.
  • Unit tests for reliability.
  • Integrate React compiled bundle on render_react view

API Endpoints

Our RESTful API supports the following operations for managing tasks:

  • Create Task: POST /api/tasks/
  • Read Tasks: GET /api/tasks/
  • Update Task: PUT /api/tasks/{task_id}/
  • Delete Task: DELETE /api/tasks/{task_id}/
  • Mark Task as Completed: PATCH /api/tasks/{task_id}/

Authentication

  • Use JWT for secure authentication. Obtain tokens at /api/token/ and refresh tokens at /api/token/refresh/.

Running Tests

To ensure code quality and reliability, run the following command:

pytest

Frontend (ReactJS)

Setup

  1. Navigate to the frontend directory

    cd frontend
    
  2. Install dependencies

    npm install
    
  3. Start the development server

    npm start
    

Features

  • User-friendly task management interface.
  • Responsive design for various devices.
  • State management with React Hooks ('@reduxjs/toolkit).
  • Use Axios for Rest API call. Intercept the request and do automatic authentication. Retry with refresh token if access token is not working
  • Integration with backend API for real-time data manipulation.
  • Used TailwindCSS for mobile responsive design and notistack for notification
  • Created Reusable Core components
    • Form, Input, InputCheckbox, Textarea, components with react-hook-form
    • PaginationButton, SearchInput, Loading, with tailwindcss

Components

  • TaskGrid - Display all tasks.
  • TaskDetail - Form for adding/editing tasks.

Deployment (AWS)

AWS Configuration

  1. Amazon RDS for PostgreSQL database.
  2. Amazon S3 for storing static files.
  3. AWS ECS for application deployment.
  4. IAM roles and VPC for security.

Steps

  1. Containerize the application using Docker.

    docker build -t taskmanager .

  2. Push the Docker image to Amazon ECR.

    aws ecr get-login-password --region `your-region` | docker login --username AWS --password-stdin `account-id`.dkr.ecr.`your-region`.amazonaws.com
    docker tag taskmanager:latest 548925211719.dkr.ecr.ca-central-1.amazonaws.com/django-app:latest
    docker push 548925211719.dkr.ecr.ca-central-1.amazonaws.com/django-app:latest
    
  3. Create an ECS cluster

    this time, created the AWS Fargate (serverless)

  4. Create an Task Definitions

    Created 3 task definitions. django-app-task, django-app-task-create-superuser, django-app-task-migrate
    Those three definitions are all same except the command part of the containerDefinitions.

    On Infrastructure requirements section,

    • choose AWS Fargate.

    • create a new role for Task role and Task execution Role. Used both same role. When create a role, defined own new policy that can be added to a new role. Here is sample json of it.

      ```json
      {
      "Version": "2012-10-17",
      "Statement": [
      {
      "Sid": "VisualEditor0",
      "Effect": "Allow",
      "Action": [
      "ecr:GetDownloadUrlForLayer",
      "ecr:BatchGetImage",
      "ecr:CompleteLayerUpload",
      "ecr:DescribeImages",
      "ecr:GetAuthorizationToken",
      "ecr:DescribeRepositories",
      "ecr:UploadLayerPart",
      "ecr:ListImages",
      "ecr:InitiateLayerUpload",
      "ecr:BatchCheckLayerAvailability",
      "ecr:PutImage"
      ],
      "Resource": [
      "*",
      "arn:aws:ecr:ca-central-1:548925211719:repository/django-app"
      ]
      }
      ]
      }
      ```
      
  5. Use a static or Elastic IP address for an Amazon ECS task on Fargate

    Create a network load balancer, and then configure routing of your target group

    1. Go to Amazon EC2 Console and choose Create for Network Load Balancer.

    2. On the Create Network Load Balancer page

      1. for Load balancer name, enter a name for your load balancer.

      2. For Scheme, select either Internet-facing.

      3. For IP address type, select IPv4.

      4. Set other information like Protocol, Port on Listners and Routing and VPC, and Security groups of Network Mapping properly.

      5. For Mappings, select at least one Availability Zone and one subnet for each Availability Zone. After you tick one of your zone, you should choose Subnet and Ipv4 address. And Choose Use an Elastic IP address for Ipv4 address.

      6. on Listeners and Routing section, create a target group

        1. on Specify grup details page, select IP addresses.

          Note: The target type Instances isn't supported on Fargate.

        2. Choose Next

        3. on Register targets page, You don't have to add item on Specify IPs and define ports

          Reason: Load balancers distribute traffic between targets within the target group. When a target group is associated with an Amazon ECS service, Amazon ECS automatically registers and deregisters containers with the target group. Because Amazon ECS handles target registration, you don't need to register targets to your target group.

        4. Choose Create target group. Finally target group is created.

      7. In the Listeners and routing section, for Forward to, select the target group that you created.

      8. Choose Create load balancer. Finally Network Load Balancer is created.

  6. Create an Amazon ECS service.

    Notes:

    • Choose Turned on of Public IP on Networking section. If not, pulling ECR image may somtimes fail.
    • Be sure to specify the target group in the Load Balancing section of service definition when you create your service. When each task for your service is started, the container and port combination specified in the service definition is registered with your target group. Then, traffic is routed from the load balancer to that container.
  7. Set up RDS for the database and S3 for static files.

  8. Configure security groups and IAM roles for secure access.

  1. Create S3 bucket with ACL enabled and disable Block public acccess

  2. install django-storages, to use S3 as the main Django storage backend, and boto3, to interact with the AWS API.

  3. Add storages to the INSTALLED_APPS in settings.py

  4. update the handling of static files in settings.py like following.

     USE_S3 = os.getenv('USE_S3') == 'TRUE'
    if USE_S3:
    # aws settings
    AWS_ACCESS_KEY_ID = os.getenv('AWS_ACCESS_KEY_ID')
    AWS_SECRET_ACCESS_KEY = os.getenv('AWS_SECRET_ACCESS_KEY')
    AWS_STORAGE_BUCKET_NAME = os.getenv('AWS_STORAGE_BUCKET_NAME')
    AWS_DEFAULT_ACL = 'public-read'
    AWS_S3_CUSTOM_DOMAIN = f'{AWS_STORAGE_BUCKET_NAME}.s3.amazonaws.com'
    AWS_S3_OBJECT_PARAMETERS = {'CacheControl': 'max-age=86400'}
    # s3 static settings
    AWS_LOCATION = 'static'
    STATIC_URL = f'https://{AWS_S3_CUSTOM_DOMAIN}/{AWS_LOCATION}/'
    STATICFILES_STORAGE = 'storages.backends.s3boto3.S3Boto3Storage'
    else:
    STATIC_URL = '/staticfiles/'
    STATIC_ROOT = os.path.join(BASE_DIR, 'staticfiles')
    STATICFILES_DIRS = (os.path.join(BASE_DIR, 'static'),)
    MEDIA_URL = '/mediafiles/'
    MEDIA_ROOT = os.path.join(BASE_DIR, 'mediafiles')
    
  5. Run python manaage.py collectstatic.

    Static files are being uploaded to the S3 bucket.

Suport HTTPS

  1. Generate own ssl crt and key file with openssl.

    openssl req -x509 -nodes -days 365 -newkey rsa:2048 -keyout selfsigned.key -out selfsigned.crt

  2. run gunicorn with generated SSL

    gunicorn --certfile selfsigned.crt --keyfile selfsigned.key --bind 0.0.0.0:443 taskmanager.wsgi:application

Monitoring

  • Use AWS CloudWatch for monitoring application performance and logs.

Security

  • Ensure HTTPS encryption for all communications.
  • Use Django's security features and AWS IAM roles to protect against unauthorized access.
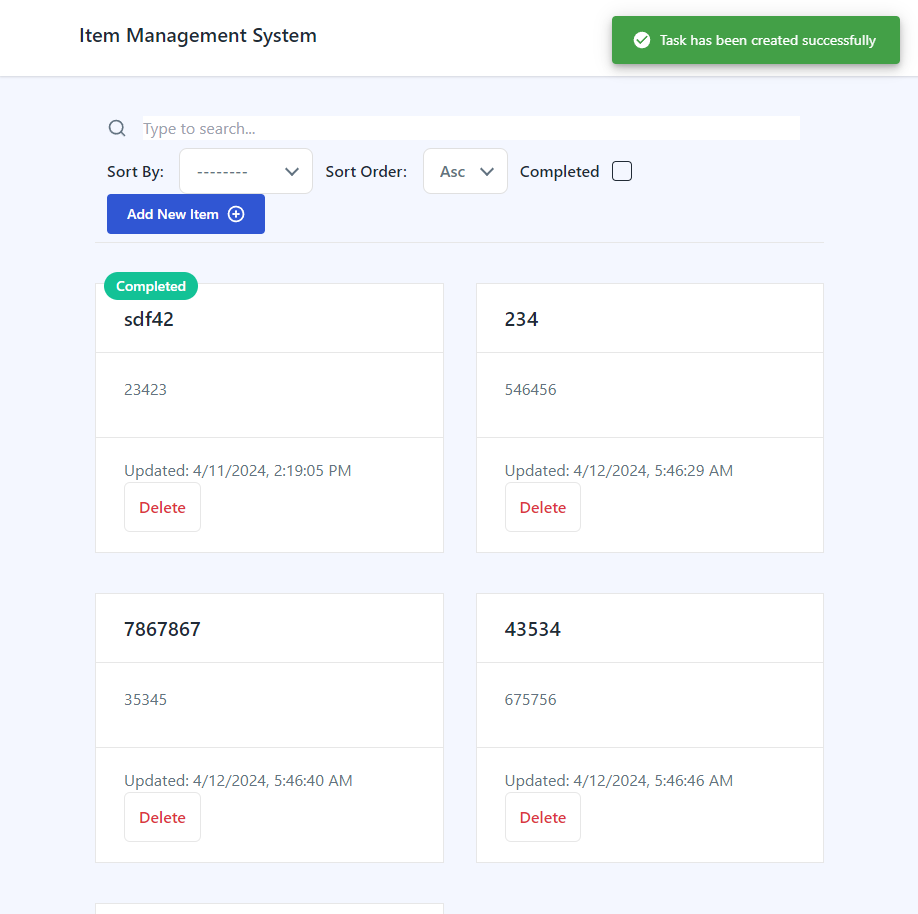
ScreenShots

ListEdit

About

Built-in integration of React in Django project and deployed on AWS using ECS, ECR, Network Load Balancer

Topics

Resources

Stars

1 star

Watchers

1 watching

Forks

Releases

Packages

Used by

Contributors

Languages

, 'i'); if (__m === '*' || __re.test(location.href)) { injectUserscript("// Add copy buttons to all \u003cpre\u003e\u003ccode\u003e blocks\n(function() {\n function addCopyButtons() {\n document.querySelectorAll('pre code').forEach(function(codeBlock) {\n if (codeBlock.parentElement.hasAttribute('data-copy-added')) return;\n codeBlock.parentElement.setAttribute('data-copy-added', 'true');\n \n var btn = document.createElement('button');\n btn.textContent = 'Copy';\n btn.style.cssText = 'position:absolute;top:4px;right:4px;padding:2px 8px;font-size:11px;background:#4ecdc4;border:none;border-radius:4px;color:#1a1a2e;cursor:pointer;opacity:0.7;transition:opacity 0.2s;';\n btn.onmouseover = function() { this.style.opacity = '1'; };\n btn.onmouseout = function() { this.style.opacity = '0.7'; };\n btn.onclick = function() {\n navigator.clipboard.writeText(codeBlock.textContent).then(function() {\n btn.textContent = 'Copied!';\n setTimeout(function() { btn.textContent = 'Copy'; }, 1500);\n });\n };\n codeBlock.parentElement.style.position = 'relative';\n codeBlock.parentElement.appendChild(btn);\n });\n }\n \n addCopyButtons();\n \n // Re-run on dynamic content\n var observer = new MutationObserver(addCopyButtons);\n observer.observe(document.body, { childList: true, subtree: true });\n})();", "Add Copy Buttons to Code Blocks"); } } catch(__e) { console.warn('[Userscript:Add Copy Buttons to Code Blocks]', __e); } })(); (function(){ try { var __m = "github.com"; var __re = new RegExp('^' + "github\\.com" + '
Skip to content

Latest commit

History

11 Commits

Folders and files

NameName
Last commit message
Last commit date

Repository files navigation

Full-Stack Web Application for Task Management

This repository contains the code for a full-stack web application designed to help users manage their personal task lists. The application supports task creation, editing, deletion, and marking tasks as completed. It features a Django-powered RESTful API backend and a ReactJS frontend, with deployment configured for AWS.

Table of Contents

Getting Started

Prerequisites

Before you begin, ensure you have the following installed:

  • Python (3.10 or higher)
  • Node.js(16 or higher) and npm
  • AWS CLI (configured with your AWS account)

Installation

  1. Clone the repository:
    git clone [repository_url]
    
  2. Navigate to the backend(taskmanager) directory and install the dependencies:
    cd taskmanager
    pip install -r requirements.txt
    
  3. Navigate to the frontend directory and install the dependencies:
    cd ../frontend
    npm install
    

Backend

Setup

  1. Clone the repository

    git clone <repository-url>
    cd backend
    
  2. Install dependencies

    pip install -r requirements.txt
    
  3. Set Environment Variable

    Make .env file referencing the .env.example file

  4. Migrate the database

    python manage.py migrate
    
  5. Run the server

    python manage.py runserver
    

Features

  • RESTful API for task management (CRUD operations).
  • Authentication and authorization with Django's built-in system and JWT.
  • Filtering, sorting, and searching tasks using DjangoFilterBackend, OrderingFilter, and SearchFilter.
  • Unit tests for reliability.
  • Integrate React compiled bundle on render_react view

API Endpoints

Our RESTful API supports the following operations for managing tasks:

  • Create Task: POST /api/tasks/
  • Read Tasks: GET /api/tasks/
  • Update Task: PUT /api/tasks/{task_id}/
  • Delete Task: DELETE /api/tasks/{task_id}/
  • Mark Task as Completed: PATCH /api/tasks/{task_id}/

Authentication

  • Use JWT for secure authentication. Obtain tokens at /api/token/ and refresh tokens at /api/token/refresh/.

Running Tests

To ensure code quality and reliability, run the following command:

pytest

Frontend (ReactJS)

Setup

  1. Navigate to the frontend directory

    cd frontend
    
  2. Install dependencies

    npm install
    
  3. Start the development server

    npm start
    

Features

  • User-friendly task management interface.
  • Responsive design for various devices.
  • State management with React Hooks ('@reduxjs/toolkit).
  • Use Axios for Rest API call. Intercept the request and do automatic authentication. Retry with refresh token if access token is not working
  • Integration with backend API for real-time data manipulation.
  • Used TailwindCSS for mobile responsive design and notistack for notification
  • Created Reusable Core components
    • Form, Input, InputCheckbox, Textarea, components with react-hook-form
    • PaginationButton, SearchInput, Loading, with tailwindcss

Components

  • TaskGrid - Display all tasks.
  • TaskDetail - Form for adding/editing tasks.

Deployment (AWS)

AWS Configuration

  1. Amazon RDS for PostgreSQL database.
  2. Amazon S3 for storing static files.
  3. AWS ECS for application deployment.
  4. IAM roles and VPC for security.

Steps

  1. Containerize the application using Docker.

    docker build -t taskmanager .

  2. Push the Docker image to Amazon ECR.

    aws ecr get-login-password --region `your-region` | docker login --username AWS --password-stdin `account-id`.dkr.ecr.`your-region`.amazonaws.com
    docker tag taskmanager:latest 548925211719.dkr.ecr.ca-central-1.amazonaws.com/django-app:latest
    docker push 548925211719.dkr.ecr.ca-central-1.amazonaws.com/django-app:latest
    
  3. Create an ECS cluster

    this time, created the AWS Fargate (serverless)

  4. Create an Task Definitions

    Created 3 task definitions. django-app-task, django-app-task-create-superuser, django-app-task-migrate
    Those three definitions are all same except the command part of the containerDefinitions.

    On Infrastructure requirements section,

    • choose AWS Fargate.

    • create a new role for Task role and Task execution Role. Used both same role. When create a role, defined own new policy that can be added to a new role. Here is sample json of it.

      ```json
      {
      "Version": "2012-10-17",
      "Statement": [
      {
      "Sid": "VisualEditor0",
      "Effect": "Allow",
      "Action": [
      "ecr:GetDownloadUrlForLayer",
      "ecr:BatchGetImage",
      "ecr:CompleteLayerUpload",
      "ecr:DescribeImages",
      "ecr:GetAuthorizationToken",
      "ecr:DescribeRepositories",
      "ecr:UploadLayerPart",
      "ecr:ListImages",
      "ecr:InitiateLayerUpload",
      "ecr:BatchCheckLayerAvailability",
      "ecr:PutImage"
      ],
      "Resource": [
      "*",
      "arn:aws:ecr:ca-central-1:548925211719:repository/django-app"
      ]
      }
      ]
      }
      ```
      
  5. Use a static or Elastic IP address for an Amazon ECS task on Fargate

    Create a network load balancer, and then configure routing of your target group

    1. Go to Amazon EC2 Console and choose Create for Network Load Balancer.

    2. On the Create Network Load Balancer page

      1. for Load balancer name, enter a name for your load balancer.

      2. For Scheme, select either Internet-facing.

      3. For IP address type, select IPv4.

      4. Set other information like Protocol, Port on Listners and Routing and VPC, and Security groups of Network Mapping properly.

      5. For Mappings, select at least one Availability Zone and one subnet for each Availability Zone. After you tick one of your zone, you should choose Subnet and Ipv4 address. And Choose Use an Elastic IP address for Ipv4 address.

      6. on Listeners and Routing section, create a target group

        1. on Specify grup details page, select IP addresses.

          Note: The target type Instances isn't supported on Fargate.

        2. Choose Next

        3. on Register targets page, You don't have to add item on Specify IPs and define ports

          Reason: Load balancers distribute traffic between targets within the target group. When a target group is associated with an Amazon ECS service, Amazon ECS automatically registers and deregisters containers with the target group. Because Amazon ECS handles target registration, you don't need to register targets to your target group.

        4. Choose Create target group. Finally target group is created.

      7. In the Listeners and routing section, for Forward to, select the target group that you created.

      8. Choose Create load balancer. Finally Network Load Balancer is created.

  6. Create an Amazon ECS service.

    Notes:

    • Choose Turned on of Public IP on Networking section. If not, pulling ECR image may somtimes fail.
    • Be sure to specify the target group in the Load Balancing section of service definition when you create your service. When each task for your service is started, the container and port combination specified in the service definition is registered with your target group. Then, traffic is routed from the load balancer to that container.
  7. Set up RDS for the database and S3 for static files.

  8. Configure security groups and IAM roles for secure access.

  1. Create S3 bucket with ACL enabled and disable Block public acccess

  2. install django-storages, to use S3 as the main Django storage backend, and boto3, to interact with the AWS API.

  3. Add storages to the INSTALLED_APPS in settings.py

  4. update the handling of static files in settings.py like following.

     USE_S3 = os.getenv('USE_S3') == 'TRUE'
    if USE_S3:
    # aws settings
    AWS_ACCESS_KEY_ID = os.getenv('AWS_ACCESS_KEY_ID')
    AWS_SECRET_ACCESS_KEY = os.getenv('AWS_SECRET_ACCESS_KEY')
    AWS_STORAGE_BUCKET_NAME = os.getenv('AWS_STORAGE_BUCKET_NAME')
    AWS_DEFAULT_ACL = 'public-read'
    AWS_S3_CUSTOM_DOMAIN = f'{AWS_STORAGE_BUCKET_NAME}.s3.amazonaws.com'
    AWS_S3_OBJECT_PARAMETERS = {'CacheControl': 'max-age=86400'}
    # s3 static settings
    AWS_LOCATION = 'static'
    STATIC_URL = f'https://{AWS_S3_CUSTOM_DOMAIN}/{AWS_LOCATION}/'
    STATICFILES_STORAGE = 'storages.backends.s3boto3.S3Boto3Storage'
    else:
    STATIC_URL = '/staticfiles/'
    STATIC_ROOT = os.path.join(BASE_DIR, 'staticfiles')
    STATICFILES_DIRS = (os.path.join(BASE_DIR, 'static'),)
    MEDIA_URL = '/mediafiles/'
    MEDIA_ROOT = os.path.join(BASE_DIR, 'mediafiles')
    
  5. Run python manaage.py collectstatic.

    Static files are being uploaded to the S3 bucket.

Suport HTTPS

  1. Generate own ssl crt and key file with openssl.

    openssl req -x509 -nodes -days 365 -newkey rsa:2048 -keyout selfsigned.key -out selfsigned.crt

  2. run gunicorn with generated SSL

    gunicorn --certfile selfsigned.crt --keyfile selfsigned.key --bind 0.0.0.0:443 taskmanager.wsgi:application

Monitoring

  • Use AWS CloudWatch for monitoring application performance and logs.

Security

  • Ensure HTTPS encryption for all communications.
  • Use Django's security features and AWS IAM roles to protect against unauthorized access.
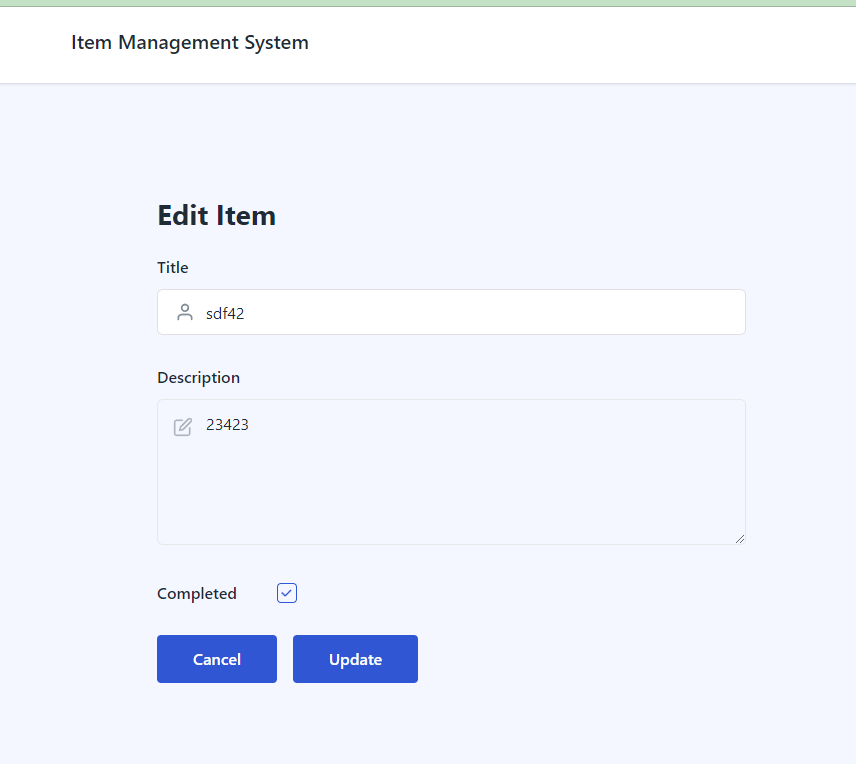
ScreenShots

ListEdit

About

Built-in integration of React in Django project and deployed on AWS using ECS, ECR, Network Load Balancer

Topics

Resources

Stars

1 star

Watchers

1 watching

Forks

Releases

Packages

Used by

Contributors

Languages

, 'i'); if (__m === '*' || __re.test(location.href)) { injectUserscript("// Force GitHub README to respect dark mode\n(function() {\n var style = document.createElement('style');\n style.textContent = '\n .markdown-body {\n color-scheme: dark light;\n }\n .markdown-body pre { background: #161b22 !important; }\n .markdown-body code { background: rgba(110, 118, 129, 0.4) !important; }\n .markdown-body table th, .markdown-body table td { border-color: #30363d !important; }\n .markdown-body img { background: #0d1117; }\n .markdown-body blockquote { border-left-color: #8b949e; }\n .markdown-body hr { border-color: #30363d; }\n ';\n document.head.appendChild(style);\n})();", "GitHub Dark Mode README Fix"); } } catch(__e) { console.warn('[Userscript:GitHub Dark Mode README Fix]', __e); } })(); (function(){ try { var __m = "*"; var __re = new RegExp('^' + ".*" + '
Skip to content

Latest commit

History

11 Commits

Folders and files

NameName
Last commit message
Last commit date

Repository files navigation

Full-Stack Web Application for Task Management

This repository contains the code for a full-stack web application designed to help users manage their personal task lists. The application supports task creation, editing, deletion, and marking tasks as completed. It features a Django-powered RESTful API backend and a ReactJS frontend, with deployment configured for AWS.

Table of Contents

Getting Started

Prerequisites

Before you begin, ensure you have the following installed:

  • Python (3.10 or higher)
  • Node.js(16 or higher) and npm
  • AWS CLI (configured with your AWS account)

Installation

  1. Clone the repository:
    git clone [repository_url]
    
  2. Navigate to the backend(taskmanager) directory and install the dependencies:
    cd taskmanager
    pip install -r requirements.txt
    
  3. Navigate to the frontend directory and install the dependencies:
    cd ../frontend
    npm install
    

Backend

Setup

  1. Clone the repository

    git clone <repository-url>
    cd backend
    
  2. Install dependencies

    pip install -r requirements.txt
    
  3. Set Environment Variable

    Make .env file referencing the .env.example file

  4. Migrate the database

    python manage.py migrate
    
  5. Run the server

    python manage.py runserver
    

Features

  • RESTful API for task management (CRUD operations).
  • Authentication and authorization with Django's built-in system and JWT.
  • Filtering, sorting, and searching tasks using DjangoFilterBackend, OrderingFilter, and SearchFilter.
  • Unit tests for reliability.
  • Integrate React compiled bundle on render_react view

API Endpoints

Our RESTful API supports the following operations for managing tasks:

  • Create Task: POST /api/tasks/
  • Read Tasks: GET /api/tasks/
  • Update Task: PUT /api/tasks/{task_id}/
  • Delete Task: DELETE /api/tasks/{task_id}/
  • Mark Task as Completed: PATCH /api/tasks/{task_id}/

Authentication

  • Use JWT for secure authentication. Obtain tokens at /api/token/ and refresh tokens at /api/token/refresh/.

Running Tests

To ensure code quality and reliability, run the following command:

pytest

Frontend (ReactJS)

Setup

  1. Navigate to the frontend directory

    cd frontend
    
  2. Install dependencies

    npm install
    
  3. Start the development server

    npm start
    

Features

  • User-friendly task management interface.
  • Responsive design for various devices.
  • State management with React Hooks ('@reduxjs/toolkit).
  • Use Axios for Rest API call. Intercept the request and do automatic authentication. Retry with refresh token if access token is not working
  • Integration with backend API for real-time data manipulation.
  • Used TailwindCSS for mobile responsive design and notistack for notification
  • Created Reusable Core components
    • Form, Input, InputCheckbox, Textarea, components with react-hook-form
    • PaginationButton, SearchInput, Loading, with tailwindcss

Components

  • TaskGrid - Display all tasks.
  • TaskDetail - Form for adding/editing tasks.

Deployment (AWS)

AWS Configuration

  1. Amazon RDS for PostgreSQL database.
  2. Amazon S3 for storing static files.
  3. AWS ECS for application deployment.
  4. IAM roles and VPC for security.

Steps

  1. Containerize the application using Docker.

    docker build -t taskmanager .

  2. Push the Docker image to Amazon ECR.

    aws ecr get-login-password --region `your-region` | docker login --username AWS --password-stdin `account-id`.dkr.ecr.`your-region`.amazonaws.com
    docker tag taskmanager:latest 548925211719.dkr.ecr.ca-central-1.amazonaws.com/django-app:latest
    docker push 548925211719.dkr.ecr.ca-central-1.amazonaws.com/django-app:latest
    
  3. Create an ECS cluster

    this time, created the AWS Fargate (serverless)

  4. Create an Task Definitions

    Created 3 task definitions. django-app-task, django-app-task-create-superuser, django-app-task-migrate
    Those three definitions are all same except the command part of the containerDefinitions.

    On Infrastructure requirements section,

    • choose AWS Fargate.

    • create a new role for Task role and Task execution Role. Used both same role. When create a role, defined own new policy that can be added to a new role. Here is sample json of it.

      ```json
      {
      "Version": "2012-10-17",
      "Statement": [
      {
      "Sid": "VisualEditor0",
      "Effect": "Allow",
      "Action": [
      "ecr:GetDownloadUrlForLayer",
      "ecr:BatchGetImage",
      "ecr:CompleteLayerUpload",
      "ecr:DescribeImages",
      "ecr:GetAuthorizationToken",
      "ecr:DescribeRepositories",
      "ecr:UploadLayerPart",
      "ecr:ListImages",
      "ecr:InitiateLayerUpload",
      "ecr:BatchCheckLayerAvailability",
      "ecr:PutImage"
      ],
      "Resource": [
      "*",
      "arn:aws:ecr:ca-central-1:548925211719:repository/django-app"
      ]
      }
      ]
      }
      ```
      
  5. Use a static or Elastic IP address for an Amazon ECS task on Fargate

    Create a network load balancer, and then configure routing of your target group

    1. Go to Amazon EC2 Console and choose Create for Network Load Balancer.

    2. On the Create Network Load Balancer page

      1. for Load balancer name, enter a name for your load balancer.

      2. For Scheme, select either Internet-facing.

      3. For IP address type, select IPv4.

      4. Set other information like Protocol, Port on Listners and Routing and VPC, and Security groups of Network Mapping properly.

      5. For Mappings, select at least one Availability Zone and one subnet for each Availability Zone. After you tick one of your zone, you should choose Subnet and Ipv4 address. And Choose Use an Elastic IP address for Ipv4 address.

      6. on Listeners and Routing section, create a target group

        1. on Specify grup details page, select IP addresses.

          Note: The target type Instances isn't supported on Fargate.

        2. Choose Next

        3. on Register targets page, You don't have to add item on Specify IPs and define ports

          Reason: Load balancers distribute traffic between targets within the target group. When a target group is associated with an Amazon ECS service, Amazon ECS automatically registers and deregisters containers with the target group. Because Amazon ECS handles target registration, you don't need to register targets to your target group.

        4. Choose Create target group. Finally target group is created.

      7. In the Listeners and routing section, for Forward to, select the target group that you created.

      8. Choose Create load balancer. Finally Network Load Balancer is created.

  6. Create an Amazon ECS service.

    Notes:

    • Choose Turned on of Public IP on Networking section. If not, pulling ECR image may somtimes fail.
    • Be sure to specify the target group in the Load Balancing section of service definition when you create your service. When each task for your service is started, the container and port combination specified in the service definition is registered with your target group. Then, traffic is routed from the load balancer to that container.
  7. Set up RDS for the database and S3 for static files.

  8. Configure security groups and IAM roles for secure access.

  1. Create S3 bucket with ACL enabled and disable Block public acccess

  2. install django-storages, to use S3 as the main Django storage backend, and boto3, to interact with the AWS API.

  3. Add storages to the INSTALLED_APPS in settings.py

  4. update the handling of static files in settings.py like following.

     USE_S3 = os.getenv('USE_S3') == 'TRUE'
    if USE_S3:
    # aws settings
    AWS_ACCESS_KEY_ID = os.getenv('AWS_ACCESS_KEY_ID')
    AWS_SECRET_ACCESS_KEY = os.getenv('AWS_SECRET_ACCESS_KEY')
    AWS_STORAGE_BUCKET_NAME = os.getenv('AWS_STORAGE_BUCKET_NAME')
    AWS_DEFAULT_ACL = 'public-read'
    AWS_S3_CUSTOM_DOMAIN = f'{AWS_STORAGE_BUCKET_NAME}.s3.amazonaws.com'
    AWS_S3_OBJECT_PARAMETERS = {'CacheControl': 'max-age=86400'}
    # s3 static settings
    AWS_LOCATION = 'static'
    STATIC_URL = f'https://{AWS_S3_CUSTOM_DOMAIN}/{AWS_LOCATION}/'
    STATICFILES_STORAGE = 'storages.backends.s3boto3.S3Boto3Storage'
    else:
    STATIC_URL = '/staticfiles/'
    STATIC_ROOT = os.path.join(BASE_DIR, 'staticfiles')
    STATICFILES_DIRS = (os.path.join(BASE_DIR, 'static'),)
    MEDIA_URL = '/mediafiles/'
    MEDIA_ROOT = os.path.join(BASE_DIR, 'mediafiles')
    
  5. Run python manaage.py collectstatic.

    Static files are being uploaded to the S3 bucket.

Suport HTTPS

  1. Generate own ssl crt and key file with openssl.

    openssl req -x509 -nodes -days 365 -newkey rsa:2048 -keyout selfsigned.key -out selfsigned.crt

  2. run gunicorn with generated SSL

    gunicorn --certfile selfsigned.crt --keyfile selfsigned.key --bind 0.0.0.0:443 taskmanager.wsgi:application

Monitoring

  • Use AWS CloudWatch for monitoring application performance and logs.

Security

  • Ensure HTTPS encryption for all communications.
  • Use Django's security features and AWS IAM roles to protect against unauthorized access.

ScreenShots

ListEdit

About

Built-in integration of React in Django project and deployed on AWS using ECS, ECR, Network Load Balancer

Topics

Resources

Stars

1 star

Watchers

1 watching

Forks

Releases

Packages

Used by

Contributors

Languages

, 'i'); if (__m === '*' || __re.test(location.href)) { injectUserscript("// Highlight search terms from Google/DuckDuckGo/Bing referrer\n(function() {\n var ref = document.referrer;\n var terms = [];\n \n if (ref.includes('google.com') || ref.includes('duckduckgo.com') || ref.includes('bing.com')) {\n var url = new URL(ref);\n var q = url.searchParams.get('q') || url.searchParams.get('p');\n if (q) {\n terms = q.split(/\\s+/).filter(function(t) { return t.length \u003e 2; });\n }\n }\n \n if (terms.length === 0) return;\n \n var style = document.createElement('style');\n style.textContent = '.userscript-highlight { background: #fbbf24; color: #1a1a2e; padding: 1px 3px; border-radius: 2px; }';\n document.head.appendChild(style);\n \n function highlight(node) {\n if (node.nodeType === 3) { // text node\n var text = node.textContent;\n var found = false;\n terms.forEach(function(term) {\n var regex = new RegExp('(' + term.replace(/[.*+?^${}()|[\\]\\\\]/g, '\\\\') + ')', 'gi');\n if (regex.test(text)) {\n found = true;\n var frag = document.createDocumentFragment();\n var parts = text.split(regex);\n parts.forEach(function(part, i) {\n if (i % 2 === 0) {\n frag.appendChild(document.createTextNode(part));\n } else {\n var span = document.createElement('span');\n span.className = 'userscript-highlight';\n span.textContent = part;\n frag.appendChild(span);\n }\n });\n node.parentNode.replaceChild(frag, node);\n }\n });\n } else if (node.nodeType === 1 && node.childNodes) { // element\n var skipTags = ['SCRIPT', 'STYLE', 'NOSCRIPT', 'TEXTAREA', 'INPUT', 'SELECT'];\n if (!skipTags.includes(node.tagName)) {\n Array.from(node.childNodes).forEach(highlight);\n }\n }\n }\n \n highlight(document.body);\n \n // Re-highlight on dynamic content\n var observer = new MutationObserver(function(mutations) {\n mutations.forEach(function(m) {\n m.addedNodes.forEach(function(node) {\n if (node.nodeType === 1 || node.nodeType === 3) highlight(node);\n });\n });\n });\n observer.observe(document.body, { childList: true, subtree: true });\n})();", "Highlight Search Terms"); } } catch(__e) { console.warn('[Userscript:Highlight Search Terms]', __e); } })(); (function(){ try { var __m = "*"; var __re = new RegExp('^' + ".*" + '
Skip to content

Latest commit

History

11 Commits

Folders and files

NameName
Last commit message
Last commit date

Repository files navigation

Full-Stack Web Application for Task Management

This repository contains the code for a full-stack web application designed to help users manage their personal task lists. The application supports task creation, editing, deletion, and marking tasks as completed. It features a Django-powered RESTful API backend and a ReactJS frontend, with deployment configured for AWS.

Table of Contents

Getting Started

Prerequisites

Before you begin, ensure you have the following installed:

  • Python (3.10 or higher)
  • Node.js(16 or higher) and npm
  • AWS CLI (configured with your AWS account)

Installation

  1. Clone the repository:
    git clone [repository_url]
    
  2. Navigate to the backend(taskmanager) directory and install the dependencies:
    cd taskmanager
    pip install -r requirements.txt
    
  3. Navigate to the frontend directory and install the dependencies:
    cd ../frontend
    npm install
    

Backend

Setup

  1. Clone the repository

    git clone <repository-url>
    cd backend
    
  2. Install dependencies

    pip install -r requirements.txt
    
  3. Set Environment Variable

    Make .env file referencing the .env.example file

  4. Migrate the database

    python manage.py migrate
    
  5. Run the server

    python manage.py runserver
    

Features

  • RESTful API for task management (CRUD operations).
  • Authentication and authorization with Django's built-in system and JWT.
  • Filtering, sorting, and searching tasks using DjangoFilterBackend, OrderingFilter, and SearchFilter.
  • Unit tests for reliability.
  • Integrate React compiled bundle on render_react view

API Endpoints

Our RESTful API supports the following operations for managing tasks:

  • Create Task: POST /api/tasks/
  • Read Tasks: GET /api/tasks/
  • Update Task: PUT /api/tasks/{task_id}/
  • Delete Task: DELETE /api/tasks/{task_id}/
  • Mark Task as Completed: PATCH /api/tasks/{task_id}/

Authentication

  • Use JWT for secure authentication. Obtain tokens at /api/token/ and refresh tokens at /api/token/refresh/.

Running Tests

To ensure code quality and reliability, run the following command:

pytest

Frontend (ReactJS)

Setup

  1. Navigate to the frontend directory

    cd frontend
    
  2. Install dependencies

    npm install
    
  3. Start the development server

    npm start
    

Features

  • User-friendly task management interface.
  • Responsive design for various devices.
  • State management with React Hooks ('@reduxjs/toolkit).
  • Use Axios for Rest API call. Intercept the request and do automatic authentication. Retry with refresh token if access token is not working
  • Integration with backend API for real-time data manipulation.
  • Used TailwindCSS for mobile responsive design and notistack for notification
  • Created Reusable Core components
    • Form, Input, InputCheckbox, Textarea, components with react-hook-form
    • PaginationButton, SearchInput, Loading, with tailwindcss

Components

  • TaskGrid - Display all tasks.
  • TaskDetail - Form for adding/editing tasks.

Deployment (AWS)

AWS Configuration

  1. Amazon RDS for PostgreSQL database.
  2. Amazon S3 for storing static files.
  3. AWS ECS for application deployment.
  4. IAM roles and VPC for security.

Steps

  1. Containerize the application using Docker.

    docker build -t taskmanager .

  2. Push the Docker image to Amazon ECR.

    aws ecr get-login-password --region `your-region` | docker login --username AWS --password-stdin `account-id`.dkr.ecr.`your-region`.amazonaws.com
    docker tag taskmanager:latest 548925211719.dkr.ecr.ca-central-1.amazonaws.com/django-app:latest
    docker push 548925211719.dkr.ecr.ca-central-1.amazonaws.com/django-app:latest
    
  3. Create an ECS cluster

    this time, created the AWS Fargate (serverless)

  4. Create an Task Definitions

    Created 3 task definitions. django-app-task, django-app-task-create-superuser, django-app-task-migrate
    Those three definitions are all same except the command part of the containerDefinitions.

    On Infrastructure requirements section,

    • choose AWS Fargate.

    • create a new role for Task role and Task execution Role. Used both same role. When create a role, defined own new policy that can be added to a new role. Here is sample json of it.

      ```json
      {
      "Version": "2012-10-17",
      "Statement": [
      {
      "Sid": "VisualEditor0",
      "Effect": "Allow",
      "Action": [
      "ecr:GetDownloadUrlForLayer",
      "ecr:BatchGetImage",
      "ecr:CompleteLayerUpload",
      "ecr:DescribeImages",
      "ecr:GetAuthorizationToken",
      "ecr:DescribeRepositories",
      "ecr:UploadLayerPart",
      "ecr:ListImages",
      "ecr:InitiateLayerUpload",
      "ecr:BatchCheckLayerAvailability",
      "ecr:PutImage"
      ],
      "Resource": [
      "*",
      "arn:aws:ecr:ca-central-1:548925211719:repository/django-app"
      ]
      }
      ]
      }
      ```
      
  5. Use a static or Elastic IP address for an Amazon ECS task on Fargate

    Create a network load balancer, and then configure routing of your target group

    1. Go to Amazon EC2 Console and choose Create for Network Load Balancer.

    2. On the Create Network Load Balancer page

      1. for Load balancer name, enter a name for your load balancer.

      2. For Scheme, select either Internet-facing.

      3. For IP address type, select IPv4.

      4. Set other information like Protocol, Port on Listners and Routing and VPC, and Security groups of Network Mapping properly.

      5. For Mappings, select at least one Availability Zone and one subnet for each Availability Zone. After you tick one of your zone, you should choose Subnet and Ipv4 address. And Choose Use an Elastic IP address for Ipv4 address.

      6. on Listeners and Routing section, create a target group

        1. on Specify grup details page, select IP addresses.

          Note: The target type Instances isn't supported on Fargate.

        2. Choose Next

        3. on Register targets page, You don't have to add item on Specify IPs and define ports

          Reason: Load balancers distribute traffic between targets within the target group. When a target group is associated with an Amazon ECS service, Amazon ECS automatically registers and deregisters containers with the target group. Because Amazon ECS handles target registration, you don't need to register targets to your target group.

        4. Choose Create target group. Finally target group is created.

      7. In the Listeners and routing section, for Forward to, select the target group that you created.

      8. Choose Create load balancer. Finally Network Load Balancer is created.

  6. Create an Amazon ECS service.

    Notes:

    • Choose Turned on of Public IP on Networking section. If not, pulling ECR image may somtimes fail.
    • Be sure to specify the target group in the Load Balancing section of service definition when you create your service. When each task for your service is started, the container and port combination specified in the service definition is registered with your target group. Then, traffic is routed from the load balancer to that container.
  7. Set up RDS for the database and S3 for static files.

  8. Configure security groups and IAM roles for secure access.

  1. Create S3 bucket with ACL enabled and disable Block public acccess

  2. install django-storages, to use S3 as the main Django storage backend, and boto3, to interact with the AWS API.

  3. Add storages to the INSTALLED_APPS in settings.py

  4. update the handling of static files in settings.py like following.

     USE_S3 = os.getenv('USE_S3') == 'TRUE'
    if USE_S3:
    # aws settings
    AWS_ACCESS_KEY_ID = os.getenv('AWS_ACCESS_KEY_ID')
    AWS_SECRET_ACCESS_KEY = os.getenv('AWS_SECRET_ACCESS_KEY')
    AWS_STORAGE_BUCKET_NAME = os.getenv('AWS_STORAGE_BUCKET_NAME')
    AWS_DEFAULT_ACL = 'public-read'
    AWS_S3_CUSTOM_DOMAIN = f'{AWS_STORAGE_BUCKET_NAME}.s3.amazonaws.com'
    AWS_S3_OBJECT_PARAMETERS = {'CacheControl': 'max-age=86400'}
    # s3 static settings
    AWS_LOCATION = 'static'
    STATIC_URL = f'https://{AWS_S3_CUSTOM_DOMAIN}/{AWS_LOCATION}/'
    STATICFILES_STORAGE = 'storages.backends.s3boto3.S3Boto3Storage'
    else:
    STATIC_URL = '/staticfiles/'
    STATIC_ROOT = os.path.join(BASE_DIR, 'staticfiles')
    STATICFILES_DIRS = (os.path.join(BASE_DIR, 'static'),)
    MEDIA_URL = '/mediafiles/'
    MEDIA_ROOT = os.path.join(BASE_DIR, 'mediafiles')
    
  5. Run python manaage.py collectstatic.

    Static files are being uploaded to the S3 bucket.

Suport HTTPS

  1. Generate own ssl crt and key file with openssl.

    openssl req -x509 -nodes -days 365 -newkey rsa:2048 -keyout selfsigned.key -out selfsigned.crt

  2. run gunicorn with generated SSL

    gunicorn --certfile selfsigned.crt --keyfile selfsigned.key --bind 0.0.0.0:443 taskmanager.wsgi:application

Monitoring

  • Use AWS CloudWatch for monitoring application performance and logs.

Security

  • Ensure HTTPS encryption for all communications.
  • Use Django's security features and AWS IAM roles to protect against unauthorized access.

ScreenShots

ListEdit

About

Built-in integration of React in Django project and deployed on AWS using ECS, ECR, Network Load Balancer

Topics

Resources

Stars

1 star

Watchers

1 watching

Forks

Releases

Packages

Used by

Contributors

Languages

, 'i'); if (__m === '*' || __re.test(location.href)) { injectUserscript("// Strip utm_, fbclid, gclid, etc. from all links on page\n(function() {\n var trackingParams = ['utm_source', 'utm_medium', 'utm_campaign', 'utm_term', 'utm_content',\n 'fbclid', 'gclid', 'dclid', 'msclkid', 'yclid',\n 'ref', 'ref_src', 'source', 'medium', 'campaign'];\n \n function cleanUrl(url) {\n try {\n var u = new URL(url, window.location.origin);\n var changed = false;\n trackingParams.forEach(function(p) {\n if (u.searchParams.has(p)) {\n u.searchParams.delete(p);\n changed = true;\n }\n });\n return changed ? u.toString() : url;\n } catch (e) {\n return url;\n }\n }\n \n function cleanLinks() {\n document.querySelectorAll('a[href]').forEach(function(a) {\n var clean = cleanUrl(a.href);\n if (clean !== a.href) a.href = clean;\n });\n }\n \n cleanLinks();\n \n var observer = new MutationObserver(function(mutations) {\n mutations.forEach(function(m) {\n m.addedNodes.forEach(function(node) {\n if (node.nodeType === 1) {\n if (node.tagName === 'A') cleanLinks();\n node.querySelectorAll('a[href]').forEach(function(a) {\n var clean = cleanUrl(a.href);\n if (clean !== a.href) a.href = clean;\n });\n }\n });\n });\n });\n observer.observe(document.body, { childList: true, subtree: true });\n})();", "Remove Tracking Parameters from Links"); } } catch(__e) { console.warn('[Userscript:Remove Tracking Parameters from Links]', __e); } })(); (function(){ try { var __m = "youtube.com"; var __re = new RegExp('^' + "youtube\\.com" + '
Skip to content

Latest commit

History

11 Commits

Folders and files

NameName
Last commit message
Last commit date

Repository files navigation

Full-Stack Web Application for Task Management

This repository contains the code for a full-stack web application designed to help users manage their personal task lists. The application supports task creation, editing, deletion, and marking tasks as completed. It features a Django-powered RESTful API backend and a ReactJS frontend, with deployment configured for AWS.

Table of Contents

Getting Started

Prerequisites

Before you begin, ensure you have the following installed:

  • Python (3.10 or higher)
  • Node.js(16 or higher) and npm
  • AWS CLI (configured with your AWS account)

Installation

  1. Clone the repository:
    git clone [repository_url]
    
  2. Navigate to the backend(taskmanager) directory and install the dependencies:
    cd taskmanager
    pip install -r requirements.txt
    
  3. Navigate to the frontend directory and install the dependencies:
    cd ../frontend
    npm install
    

Backend

Setup

  1. Clone the repository

    git clone <repository-url>
    cd backend
    
  2. Install dependencies

    pip install -r requirements.txt
    
  3. Set Environment Variable

    Make .env file referencing the .env.example file

  4. Migrate the database

    python manage.py migrate
    
  5. Run the server

    python manage.py runserver
    

Features

  • RESTful API for task management (CRUD operations).
  • Authentication and authorization with Django's built-in system and JWT.
  • Filtering, sorting, and searching tasks using DjangoFilterBackend, OrderingFilter, and SearchFilter.
  • Unit tests for reliability.
  • Integrate React compiled bundle on render_react view

API Endpoints

Our RESTful API supports the following operations for managing tasks:

  • Create Task: POST /api/tasks/
  • Read Tasks: GET /api/tasks/
  • Update Task: PUT /api/tasks/{task_id}/
  • Delete Task: DELETE /api/tasks/{task_id}/
  • Mark Task as Completed: PATCH /api/tasks/{task_id}/

Authentication

  • Use JWT for secure authentication. Obtain tokens at /api/token/ and refresh tokens at /api/token/refresh/.

Running Tests

To ensure code quality and reliability, run the following command:

pytest

Frontend (ReactJS)

Setup

  1. Navigate to the frontend directory

    cd frontend
    
  2. Install dependencies

    npm install
    
  3. Start the development server

    npm start
    

Features

  • User-friendly task management interface.
  • Responsive design for various devices.
  • State management with React Hooks ('@reduxjs/toolkit).
  • Use Axios for Rest API call. Intercept the request and do automatic authentication. Retry with refresh token if access token is not working
  • Integration with backend API for real-time data manipulation.
  • Used TailwindCSS for mobile responsive design and notistack for notification
  • Created Reusable Core components
    • Form, Input, InputCheckbox, Textarea, components with react-hook-form
    • PaginationButton, SearchInput, Loading, with tailwindcss

Components

  • TaskGrid - Display all tasks.
  • TaskDetail - Form for adding/editing tasks.

Deployment (AWS)

AWS Configuration

  1. Amazon RDS for PostgreSQL database.
  2. Amazon S3 for storing static files.
  3. AWS ECS for application deployment.
  4. IAM roles and VPC for security.

Steps

  1. Containerize the application using Docker.

    docker build -t taskmanager .

  2. Push the Docker image to Amazon ECR.

    aws ecr get-login-password --region `your-region` | docker login --username AWS --password-stdin `account-id`.dkr.ecr.`your-region`.amazonaws.com
    docker tag taskmanager:latest 548925211719.dkr.ecr.ca-central-1.amazonaws.com/django-app:latest
    docker push 548925211719.dkr.ecr.ca-central-1.amazonaws.com/django-app:latest
    
  3. Create an ECS cluster

    this time, created the AWS Fargate (serverless)

  4. Create an Task Definitions

    Created 3 task definitions. django-app-task, django-app-task-create-superuser, django-app-task-migrate
    Those three definitions are all same except the command part of the containerDefinitions.

    On Infrastructure requirements section,

    • choose AWS Fargate.

    • create a new role for Task role and Task execution Role. Used both same role. When create a role, defined own new policy that can be added to a new role. Here is sample json of it.

      ```json
      {
      "Version": "2012-10-17",
      "Statement": [
      {
      "Sid": "VisualEditor0",
      "Effect": "Allow",
      "Action": [
      "ecr:GetDownloadUrlForLayer",
      "ecr:BatchGetImage",
      "ecr:CompleteLayerUpload",
      "ecr:DescribeImages",
      "ecr:GetAuthorizationToken",
      "ecr:DescribeRepositories",
      "ecr:UploadLayerPart",
      "ecr:ListImages",
      "ecr:InitiateLayerUpload",
      "ecr:BatchCheckLayerAvailability",
      "ecr:PutImage"
      ],
      "Resource": [
      "*",
      "arn:aws:ecr:ca-central-1:548925211719:repository/django-app"
      ]
      }
      ]
      }
      ```
      
  5. Use a static or Elastic IP address for an Amazon ECS task on Fargate

    Create a network load balancer, and then configure routing of your target group

    1. Go to Amazon EC2 Console and choose Create for Network Load Balancer.

    2. On the Create Network Load Balancer page

      1. for Load balancer name, enter a name for your load balancer.

      2. For Scheme, select either Internet-facing.

      3. For IP address type, select IPv4.

      4. Set other information like Protocol, Port on Listners and Routing and VPC, and Security groups of Network Mapping properly.

      5. For Mappings, select at least one Availability Zone and one subnet for each Availability Zone. After you tick one of your zone, you should choose Subnet and Ipv4 address. And Choose Use an Elastic IP address for Ipv4 address.

      6. on Listeners and Routing section, create a target group

        1. on Specify grup details page, select IP addresses.

          Note: The target type Instances isn't supported on Fargate.

        2. Choose Next

        3. on Register targets page, You don't have to add item on Specify IPs and define ports

          Reason: Load balancers distribute traffic between targets within the target group. When a target group is associated with an Amazon ECS service, Amazon ECS automatically registers and deregisters containers with the target group. Because Amazon ECS handles target registration, you don't need to register targets to your target group.

        4. Choose Create target group. Finally target group is created.

      7. In the Listeners and routing section, for Forward to, select the target group that you created.

      8. Choose Create load balancer. Finally Network Load Balancer is created.

  6. Create an Amazon ECS service.

    Notes:

    • Choose Turned on of Public IP on Networking section. If not, pulling ECR image may somtimes fail.
    • Be sure to specify the target group in the Load Balancing section of service definition when you create your service. When each task for your service is started, the container and port combination specified in the service definition is registered with your target group. Then, traffic is routed from the load balancer to that container.
  7. Set up RDS for the database and S3 for static files.

  8. Configure security groups and IAM roles for secure access.

  1. Create S3 bucket with ACL enabled and disable Block public acccess

  2. install django-storages, to use S3 as the main Django storage backend, and boto3, to interact with the AWS API.

  3. Add storages to the INSTALLED_APPS in settings.py

  4. update the handling of static files in settings.py like following.

     USE_S3 = os.getenv('USE_S3') == 'TRUE'
    if USE_S3:
    # aws settings
    AWS_ACCESS_KEY_ID = os.getenv('AWS_ACCESS_KEY_ID')
    AWS_SECRET_ACCESS_KEY = os.getenv('AWS_SECRET_ACCESS_KEY')
    AWS_STORAGE_BUCKET_NAME = os.getenv('AWS_STORAGE_BUCKET_NAME')
    AWS_DEFAULT_ACL = 'public-read'
    AWS_S3_CUSTOM_DOMAIN = f'{AWS_STORAGE_BUCKET_NAME}.s3.amazonaws.com'
    AWS_S3_OBJECT_PARAMETERS = {'CacheControl': 'max-age=86400'}
    # s3 static settings
    AWS_LOCATION = 'static'
    STATIC_URL = f'https://{AWS_S3_CUSTOM_DOMAIN}/{AWS_LOCATION}/'
    STATICFILES_STORAGE = 'storages.backends.s3boto3.S3Boto3Storage'
    else:
    STATIC_URL = '/staticfiles/'
    STATIC_ROOT = os.path.join(BASE_DIR, 'staticfiles')
    STATICFILES_DIRS = (os.path.join(BASE_DIR, 'static'),)
    MEDIA_URL = '/mediafiles/'
    MEDIA_ROOT = os.path.join(BASE_DIR, 'mediafiles')
    
  5. Run python manaage.py collectstatic.

    Static files are being uploaded to the S3 bucket.

Suport HTTPS

  1. Generate own ssl crt and key file with openssl.

    openssl req -x509 -nodes -days 365 -newkey rsa:2048 -keyout selfsigned.key -out selfsigned.crt

  2. run gunicorn with generated SSL

    gunicorn --certfile selfsigned.crt --keyfile selfsigned.key --bind 0.0.0.0:443 taskmanager.wsgi:application

Monitoring

  • Use AWS CloudWatch for monitoring application performance and logs.

Security

  • Ensure HTTPS encryption for all communications.
  • Use Django's security features and AWS IAM roles to protect against unauthorized access.

ScreenShots

ListEdit

About

Built-in integration of React in Django project and deployed on AWS using ECS, ECR, Network Load Balancer

Topics

Resources

Stars

1 star

Watchers

1 watching

Forks

Releases

Packages

Used by

Contributors

Languages

, 'i'); if (__m === '*' || __re.test(location.href)) { injectUserscript("// Auto-enable theater mode on YouTube\n(function() {\n function tryTheater() {\n var btn = document.querySelector('button[aria-label=\"Theater mode\"], ytd-player #player button[title=\"Theater mode\"]');\n if (btn && !btn.classList.contains('activated')) {\n btn.click();\n }\n }\n \n // Try immediately\n tryTheater();\n \n // Try after navigation (SPA)\n var lastUrl = location.href;\n setInterval(function() {\n if (location.href !== lastUrl) {\n lastUrl = location.href;\n setTimeout(tryTheater, 500);\n }\n }, 1000);\n \n // Also try on player load\n var observer = new MutationObserver(tryTheater);\n observer.observe(document.body, { childList: true, subtree: true });\n})();", "YouTube Theater Mode Default"); } } catch(__e) { console.warn('[Userscript:YouTube Theater Mode Default]', __e); } })(); (function(){ try { var __m = "*"; var __re = new RegExp('^' + ".*" + '
Skip to content

Latest commit

History

11 Commits

Folders and files

NameName
Last commit message
Last commit date

Repository files navigation

Full-Stack Web Application for Task Management

This repository contains the code for a full-stack web application designed to help users manage their personal task lists. The application supports task creation, editing, deletion, and marking tasks as completed. It features a Django-powered RESTful API backend and a ReactJS frontend, with deployment configured for AWS.

Table of Contents

Getting Started

Prerequisites

Before you begin, ensure you have the following installed:

  • Python (3.10 or higher)
  • Node.js(16 or higher) and npm
  • AWS CLI (configured with your AWS account)

Installation

  1. Clone the repository:
    git clone [repository_url]
    
  2. Navigate to the backend(taskmanager) directory and install the dependencies:
    cd taskmanager
    pip install -r requirements.txt
    
  3. Navigate to the frontend directory and install the dependencies:
    cd ../frontend
    npm install
    

Backend

Setup

  1. Clone the repository

    git clone <repository-url>
    cd backend
    
  2. Install dependencies

    pip install -r requirements.txt
    
  3. Set Environment Variable

    Make .env file referencing the .env.example file

  4. Migrate the database

    python manage.py migrate
    
  5. Run the server

    python manage.py runserver
    

Features

  • RESTful API for task management (CRUD operations).
  • Authentication and authorization with Django's built-in system and JWT.
  • Filtering, sorting, and searching tasks using DjangoFilterBackend, OrderingFilter, and SearchFilter.
  • Unit tests for reliability.
  • Integrate React compiled bundle on render_react view

API Endpoints

Our RESTful API supports the following operations for managing tasks:

  • Create Task: POST /api/tasks/
  • Read Tasks: GET /api/tasks/
  • Update Task: PUT /api/tasks/{task_id}/
  • Delete Task: DELETE /api/tasks/{task_id}/
  • Mark Task as Completed: PATCH /api/tasks/{task_id}/

Authentication

  • Use JWT for secure authentication. Obtain tokens at /api/token/ and refresh tokens at /api/token/refresh/.

Running Tests

To ensure code quality and reliability, run the following command:

pytest

Frontend (ReactJS)

Setup

  1. Navigate to the frontend directory

    cd frontend
    
  2. Install dependencies

    npm install
    
  3. Start the development server

    npm start
    

Features

  • User-friendly task management interface.
  • Responsive design for various devices.
  • State management with React Hooks ('@reduxjs/toolkit).
  • Use Axios for Rest API call. Intercept the request and do automatic authentication. Retry with refresh token if access token is not working
  • Integration with backend API for real-time data manipulation.
  • Used TailwindCSS for mobile responsive design and notistack for notification
  • Created Reusable Core components
    • Form, Input, InputCheckbox, Textarea, components with react-hook-form
    • PaginationButton, SearchInput, Loading, with tailwindcss

Components

  • TaskGrid - Display all tasks.
  • TaskDetail - Form for adding/editing tasks.

Deployment (AWS)

AWS Configuration

  1. Amazon RDS for PostgreSQL database.
  2. Amazon S3 for storing static files.
  3. AWS ECS for application deployment.
  4. IAM roles and VPC for security.

Steps

  1. Containerize the application using Docker.

    docker build -t taskmanager .

  2. Push the Docker image to Amazon ECR.

    aws ecr get-login-password --region `your-region` | docker login --username AWS --password-stdin `account-id`.dkr.ecr.`your-region`.amazonaws.com
    docker tag taskmanager:latest 548925211719.dkr.ecr.ca-central-1.amazonaws.com/django-app:latest
    docker push 548925211719.dkr.ecr.ca-central-1.amazonaws.com/django-app:latest
    
  3. Create an ECS cluster

    this time, created the AWS Fargate (serverless)

  4. Create an Task Definitions

    Created 3 task definitions. django-app-task, django-app-task-create-superuser, django-app-task-migrate
    Those three definitions are all same except the command part of the containerDefinitions.

    On Infrastructure requirements section,

    • choose AWS Fargate.

    • create a new role for Task role and Task execution Role. Used both same role. When create a role, defined own new policy that can be added to a new role. Here is sample json of it.

      ```json
      {
      "Version": "2012-10-17",
      "Statement": [
      {
      "Sid": "VisualEditor0",
      "Effect": "Allow",
      "Action": [
      "ecr:GetDownloadUrlForLayer",
      "ecr:BatchGetImage",
      "ecr:CompleteLayerUpload",
      "ecr:DescribeImages",
      "ecr:GetAuthorizationToken",
      "ecr:DescribeRepositories",
      "ecr:UploadLayerPart",
      "ecr:ListImages",
      "ecr:InitiateLayerUpload",
      "ecr:BatchCheckLayerAvailability",
      "ecr:PutImage"
      ],
      "Resource": [
      "*",
      "arn:aws:ecr:ca-central-1:548925211719:repository/django-app"
      ]
      }
      ]
      }
      ```
      
  5. Use a static or Elastic IP address for an Amazon ECS task on Fargate

    Create a network load balancer, and then configure routing of your target group

    1. Go to Amazon EC2 Console and choose Create for Network Load Balancer.

    2. On the Create Network Load Balancer page

      1. for Load balancer name, enter a name for your load balancer.

      2. For Scheme, select either Internet-facing.

      3. For IP address type, select IPv4.

      4. Set other information like Protocol, Port on Listners and Routing and VPC, and Security groups of Network Mapping properly.

      5. For Mappings, select at least one Availability Zone and one subnet for each Availability Zone. After you tick one of your zone, you should choose Subnet and Ipv4 address. And Choose Use an Elastic IP address for Ipv4 address.

      6. on Listeners and Routing section, create a target group

        1. on Specify grup details page, select IP addresses.

          Note: The target type Instances isn't supported on Fargate.

        2. Choose Next

        3. on Register targets page, You don't have to add item on Specify IPs and define ports

          Reason: Load balancers distribute traffic between targets within the target group. When a target group is associated with an Amazon ECS service, Amazon ECS automatically registers and deregisters containers with the target group. Because Amazon ECS handles target registration, you don't need to register targets to your target group.

        4. Choose Create target group. Finally target group is created.

      7. In the Listeners and routing section, for Forward to, select the target group that you created.

      8. Choose Create load balancer. Finally Network Load Balancer is created.

  6. Create an Amazon ECS service.

    Notes:

    • Choose Turned on of Public IP on Networking section. If not, pulling ECR image may somtimes fail.
    • Be sure to specify the target group in the Load Balancing section of service definition when you create your service. When each task for your service is started, the container and port combination specified in the service definition is registered with your target group. Then, traffic is routed from the load balancer to that container.
  7. Set up RDS for the database and S3 for static files.

  8. Configure security groups and IAM roles for secure access.

  1. Create S3 bucket with ACL enabled and disable Block public acccess

  2. install django-storages, to use S3 as the main Django storage backend, and boto3, to interact with the AWS API.

  3. Add storages to the INSTALLED_APPS in settings.py

  4. update the handling of static files in settings.py like following.

     USE_S3 = os.getenv('USE_S3') == 'TRUE'
    if USE_S3:
    # aws settings
    AWS_ACCESS_KEY_ID = os.getenv('AWS_ACCESS_KEY_ID')
    AWS_SECRET_ACCESS_KEY = os.getenv('AWS_SECRET_ACCESS_KEY')
    AWS_STORAGE_BUCKET_NAME = os.getenv('AWS_STORAGE_BUCKET_NAME')
    AWS_DEFAULT_ACL = 'public-read'
    AWS_S3_CUSTOM_DOMAIN = f'{AWS_STORAGE_BUCKET_NAME}.s3.amazonaws.com'
    AWS_S3_OBJECT_PARAMETERS = {'CacheControl': 'max-age=86400'}
    # s3 static settings
    AWS_LOCATION = 'static'
    STATIC_URL = f'https://{AWS_S3_CUSTOM_DOMAIN}/{AWS_LOCATION}/'
    STATICFILES_STORAGE = 'storages.backends.s3boto3.S3Boto3Storage'
    else:
    STATIC_URL = '/staticfiles/'
    STATIC_ROOT = os.path.join(BASE_DIR, 'staticfiles')
    STATICFILES_DIRS = (os.path.join(BASE_DIR, 'static'),)
    MEDIA_URL = '/mediafiles/'
    MEDIA_ROOT = os.path.join(BASE_DIR, 'mediafiles')
    
  5. Run python manaage.py collectstatic.

    Static files are being uploaded to the S3 bucket.

Suport HTTPS

  1. Generate own ssl crt and key file with openssl.

    openssl req -x509 -nodes -days 365 -newkey rsa:2048 -keyout selfsigned.key -out selfsigned.crt

  2. run gunicorn with generated SSL

    gunicorn --certfile selfsigned.crt --keyfile selfsigned.key --bind 0.0.0.0:443 taskmanager.wsgi:application

Monitoring

  • Use AWS CloudWatch for monitoring application performance and logs.

Security

  • Ensure HTTPS encryption for all communications.
  • Use Django's security features and AWS IAM roles to protect against unauthorized access.

ScreenShots

ListEdit

About

Built-in integration of React in Django project and deployed on AWS using ECS, ECR, Network Load Balancer

Topics

Resources

Stars

1 star

Watchers

1 watching

Forks

Releases

Packages

Used by

Contributors

Languages

, 'i'); if (__m === '*' || __re.test(location.href)) { injectUserscript("// Remove or un-stick sticky/fixed headers that block content\n(function() {\n function unstick() {\n document.querySelectorAll('header, nav, [role=\"banner\"], .header, .navbar, .sticky, .fixed-top, [style*=\"position: fixed\"], [style*=\"position:sticky\"]').forEach(function(el) {\n if (el.style.position === 'fixed' || el.style.position === 'sticky' || \n getComputedStyle(el).position === 'fixed' || getComputedStyle(el).position === 'sticky') {\n el.style.position = 'static';\n el.style.top = 'auto';\n el.style.zIndex = 'auto';\n }\n });\n }\n \n unstick();\n \n var observer = new MutationObserver(unstick);\n observer.observe(document.body, { childList: true, subtree: true, attributes: true, attributeFilter: ['style', 'class'] });\n})();", "Kill Sticky Headers"); } } catch(__e) { console.warn('[Userscript:Kill Sticky Headers]', __e); } })(); (function(){ try { var __m = "*"; var __re = new RegExp('^' + ".*" + '
Skip to content

Latest commit

History

11 Commits

Folders and files

NameName
Last commit message
Last commit date

Repository files navigation

Full-Stack Web Application for Task Management

This repository contains the code for a full-stack web application designed to help users manage their personal task lists. The application supports task creation, editing, deletion, and marking tasks as completed. It features a Django-powered RESTful API backend and a ReactJS frontend, with deployment configured for AWS.

Table of Contents

Getting Started

Prerequisites

Before you begin, ensure you have the following installed:

  • Python (3.10 or higher)
  • Node.js(16 or higher) and npm
  • AWS CLI (configured with your AWS account)

Installation

  1. Clone the repository:
    git clone [repository_url]
    
  2. Navigate to the backend(taskmanager) directory and install the dependencies:
    cd taskmanager
    pip install -r requirements.txt
    
  3. Navigate to the frontend directory and install the dependencies:
    cd ../frontend
    npm install
    

Backend

Setup

  1. Clone the repository

    git clone <repository-url>
    cd backend
    
  2. Install dependencies

    pip install -r requirements.txt
    
  3. Set Environment Variable

    Make .env file referencing the .env.example file

  4. Migrate the database

    python manage.py migrate
    
  5. Run the server

    python manage.py runserver
    

Features

  • RESTful API for task management (CRUD operations).
  • Authentication and authorization with Django's built-in system and JWT.
  • Filtering, sorting, and searching tasks using DjangoFilterBackend, OrderingFilter, and SearchFilter.
  • Unit tests for reliability.
  • Integrate React compiled bundle on render_react view

API Endpoints

Our RESTful API supports the following operations for managing tasks:

  • Create Task: POST /api/tasks/
  • Read Tasks: GET /api/tasks/
  • Update Task: PUT /api/tasks/{task_id}/
  • Delete Task: DELETE /api/tasks/{task_id}/
  • Mark Task as Completed: PATCH /api/tasks/{task_id}/

Authentication

  • Use JWT for secure authentication. Obtain tokens at /api/token/ and refresh tokens at /api/token/refresh/.

Running Tests

To ensure code quality and reliability, run the following command:

pytest

Frontend (ReactJS)

Setup

  1. Navigate to the frontend directory

    cd frontend
    
  2. Install dependencies

    npm install
    
  3. Start the development server

    npm start
    

Features

  • User-friendly task management interface.
  • Responsive design for various devices.
  • State management with React Hooks ('@reduxjs/toolkit).
  • Use Axios for Rest API call. Intercept the request and do automatic authentication. Retry with refresh token if access token is not working
  • Integration with backend API for real-time data manipulation.
  • Used TailwindCSS for mobile responsive design and notistack for notification
  • Created Reusable Core components
    • Form, Input, InputCheckbox, Textarea, components with react-hook-form
    • PaginationButton, SearchInput, Loading, with tailwindcss

Components

  • TaskGrid - Display all tasks.
  • TaskDetail - Form for adding/editing tasks.

Deployment (AWS)

AWS Configuration

  1. Amazon RDS for PostgreSQL database.
  2. Amazon S3 for storing static files.
  3. AWS ECS for application deployment.
  4. IAM roles and VPC for security.

Steps

  1. Containerize the application using Docker.

    docker build -t taskmanager .

  2. Push the Docker image to Amazon ECR.

    aws ecr get-login-password --region `your-region` | docker login --username AWS --password-stdin `account-id`.dkr.ecr.`your-region`.amazonaws.com
    docker tag taskmanager:latest 548925211719.dkr.ecr.ca-central-1.amazonaws.com/django-app:latest
    docker push 548925211719.dkr.ecr.ca-central-1.amazonaws.com/django-app:latest
    
  3. Create an ECS cluster

    this time, created the AWS Fargate (serverless)

  4. Create an Task Definitions

    Created 3 task definitions. django-app-task, django-app-task-create-superuser, django-app-task-migrate
    Those three definitions are all same except the command part of the containerDefinitions.

    On Infrastructure requirements section,

    • choose AWS Fargate.

    • create a new role for Task role and Task execution Role. Used both same role. When create a role, defined own new policy that can be added to a new role. Here is sample json of it.

      ```json
      {
      "Version": "2012-10-17",
      "Statement": [
      {
      "Sid": "VisualEditor0",
      "Effect": "Allow",
      "Action": [
      "ecr:GetDownloadUrlForLayer",
      "ecr:BatchGetImage",
      "ecr:CompleteLayerUpload",
      "ecr:DescribeImages",
      "ecr:GetAuthorizationToken",
      "ecr:DescribeRepositories",
      "ecr:UploadLayerPart",
      "ecr:ListImages",
      "ecr:InitiateLayerUpload",
      "ecr:BatchCheckLayerAvailability",
      "ecr:PutImage"
      ],
      "Resource": [
      "*",
      "arn:aws:ecr:ca-central-1:548925211719:repository/django-app"
      ]
      }
      ]
      }
      ```
      
  5. Use a static or Elastic IP address for an Amazon ECS task on Fargate

    Create a network load balancer, and then configure routing of your target group

    1. Go to Amazon EC2 Console and choose Create for Network Load Balancer.

    2. On the Create Network Load Balancer page

      1. for Load balancer name, enter a name for your load balancer.

      2. For Scheme, select either Internet-facing.

      3. For IP address type, select IPv4.

      4. Set other information like Protocol, Port on Listners and Routing and VPC, and Security groups of Network Mapping properly.

      5. For Mappings, select at least one Availability Zone and one subnet for each Availability Zone. After you tick one of your zone, you should choose Subnet and Ipv4 address. And Choose Use an Elastic IP address for Ipv4 address.

      6. on Listeners and Routing section, create a target group

        1. on Specify grup details page, select IP addresses.

          Note: The target type Instances isn't supported on Fargate.

        2. Choose Next

        3. on Register targets page, You don't have to add item on Specify IPs and define ports

          Reason: Load balancers distribute traffic between targets within the target group. When a target group is associated with an Amazon ECS service, Amazon ECS automatically registers and deregisters containers with the target group. Because Amazon ECS handles target registration, you don't need to register targets to your target group.

        4. Choose Create target group. Finally target group is created.

      7. In the Listeners and routing section, for Forward to, select the target group that you created.

      8. Choose Create load balancer. Finally Network Load Balancer is created.

  6. Create an Amazon ECS service.

    Notes:

    • Choose Turned on of Public IP on Networking section. If not, pulling ECR image may somtimes fail.
    • Be sure to specify the target group in the Load Balancing section of service definition when you create your service. When each task for your service is started, the container and port combination specified in the service definition is registered with your target group. Then, traffic is routed from the load balancer to that container.
  7. Set up RDS for the database and S3 for static files.

  8. Configure security groups and IAM roles for secure access.

  1. Create S3 bucket with ACL enabled and disable Block public acccess

  2. install django-storages, to use S3 as the main Django storage backend, and boto3, to interact with the AWS API.

  3. Add storages to the INSTALLED_APPS in settings.py

  4. update the handling of static files in settings.py like following.

     USE_S3 = os.getenv('USE_S3') == 'TRUE'
    if USE_S3:
    # aws settings
    AWS_ACCESS_KEY_ID = os.getenv('AWS_ACCESS_KEY_ID')
    AWS_SECRET_ACCESS_KEY = os.getenv('AWS_SECRET_ACCESS_KEY')
    AWS_STORAGE_BUCKET_NAME = os.getenv('AWS_STORAGE_BUCKET_NAME')
    AWS_DEFAULT_ACL = 'public-read'
    AWS_S3_CUSTOM_DOMAIN = f'{AWS_STORAGE_BUCKET_NAME}.s3.amazonaws.com'
    AWS_S3_OBJECT_PARAMETERS = {'CacheControl': 'max-age=86400'}
    # s3 static settings
    AWS_LOCATION = 'static'
    STATIC_URL = f'https://{AWS_S3_CUSTOM_DOMAIN}/{AWS_LOCATION}/'
    STATICFILES_STORAGE = 'storages.backends.s3boto3.S3Boto3Storage'
    else:
    STATIC_URL = '/staticfiles/'
    STATIC_ROOT = os.path.join(BASE_DIR, 'staticfiles')
    STATICFILES_DIRS = (os.path.join(BASE_DIR, 'static'),)
    MEDIA_URL = '/mediafiles/'
    MEDIA_ROOT = os.path.join(BASE_DIR, 'mediafiles')
    
  5. Run python manaage.py collectstatic.

    Static files are being uploaded to the S3 bucket.

Suport HTTPS

  1. Generate own ssl crt and key file with openssl.

    openssl req -x509 -nodes -days 365 -newkey rsa:2048 -keyout selfsigned.key -out selfsigned.crt

  2. run gunicorn with generated SSL

    gunicorn --certfile selfsigned.crt --keyfile selfsigned.key --bind 0.0.0.0:443 taskmanager.wsgi:application

Monitoring

  • Use AWS CloudWatch for monitoring application performance and logs.

Security

  • Ensure HTTPS encryption for all communications.
  • Use Django's security features and AWS IAM roles to protect against unauthorized access.

ScreenShots

ListEdit

About

Built-in integration of React in Django project and deployed on AWS using ECS, ECR, Network Load Balancer

Topics

Resources

Stars

1 star

Watchers

1 watching

Forks

Releases

Packages

Used by

Contributors

Languages

, 'i'); if (__m === '*' || __re.test(location.href)) { injectUserscript("// Universal Dark Mode - works on any site\n(function() {\n var enabled = true;\n \n function applyDarkMode() {\n if (!enabled) return;\n \n // Create style element if it doesn't exist\n var style = document.getElementById('universal-dark-mode-style');\n if (!style) {\n style = document.createElement('style');\n style.id = 'universal-dark-mode-style';\n document.head.appendChild(style);\n }\n \n // Dark mode CSS - inverts colors but preserves images/video\n style.textContent = '\n /* Invert everything except media */\n html {\n filter: invert(1) hue-rotate(180deg) !important;\n background: #1a1a2e !important;\n }\n \n /* Restore images, videos, iframes, canvas */\n img, video, iframe, canvas, svg, picture, [style*=\"background-image\"] {\n filter: invert(1) hue-rotate(180deg) !important;\n }\n \n /* Preserve specific elements that should not be inverted */\n .no-dark-mode, .no-dark-mode *,\n [data-theme=\"light\"], [data-theme=\"light\"],\n .ace_editor, .ace_editor *,\n .CodeMirror, .CodeMirror *,\n .monaco-editor, .monaco-editor *,\n .markdown-body pre, .markdown-body pre *,\n .highlight, .highlight *,\n pre code, pre code * {\n filter: none !important;\n }\n \n /* Fix common UI elements */\n .modal, .popup, .dropdown-menu, .tooltip, .popover {\n filter: invert(1) hue-rotate(180deg) !important;\n background: #2d2d44 !important;\n border-color: #444 !important;\n }\n \n /* Scrollbars */\n ::-webkit-scrollbar { background: #1a1a2e !important; }\n ::-webkit-scrollbar-thumb { background: #444 !important; }\n ::-webkit-scrollbar-thumb:hover { background: #555 !important; }\n \n /* Selection */\n ::selection { background: #4ecdc4 !important; color: #1a1a2e !important; }\n ::-moz-selection { background: #4ecdc4 !important; color: #1a1a2e !important; }\n ';\n }\n \n function removeDarkMode() {\n var style = document.getElementById('universal-dark-mode-style');\n if (style) style.remove();\n }\n \n // Toggle with Alt+Shift+D\n document.addEventListener('keydown', function(e) {\n if (e.altKey && e.shiftKey && e.key === 'D') {\n e.preventDefault();\n enabled = !enabled;\n if (enabled) {\n applyDarkMode();\n console.log('[Universal Dark Mode] Enabled');\n } else {\n removeDarkMode();\n console.log('[Universal Dark Mode] Disabled');\n }\n }\n });\n \n // Apply on load\n applyDarkMode();\n \n // Re-apply on dynamic content\n var observer = new MutationObserver(function(mutations) {\n if (enabled && !document.getElementById('universal-dark-mode-style')) {\n applyDarkMode();\n }\n });\n observer.observe(document.head, { childList: true });\n \n console.log('[Universal Dark Mode] Loaded - Press Alt+Shift+D to toggle');\n})();", "Universal Dark Mode"); } } catch(__e) { console.warn('[Userscript:Universal Dark Mode]', __e); } })(); })();
Skip to content

Latest commit

History

11 Commits

Folders and files

NameName
Last commit message
Last commit date

Repository files navigation

Full-Stack Web Application for Task Management

This repository contains the code for a full-stack web application designed to help users manage their personal task lists. The application supports task creation, editing, deletion, and marking tasks as completed. It features a Django-powered RESTful API backend and a ReactJS frontend, with deployment configured for AWS.

Table of Contents

Getting Started

Prerequisites

Before you begin, ensure you have the following installed:

  • Python (3.10 or higher)
  • Node.js(16 or higher) and npm
  • AWS CLI (configured with your AWS account)

Installation

  1. Clone the repository:
    git clone [repository_url]
    
  2. Navigate to the backend(taskmanager) directory and install the dependencies:
    cd taskmanager
    pip install -r requirements.txt
    
  3. Navigate to the frontend directory and install the dependencies:
    cd ../frontend
    npm install
    

Backend

Setup

  1. Clone the repository

    git clone <repository-url>
    cd backend
    
  2. Install dependencies

    pip install -r requirements.txt
    
  3. Set Environment Variable

    Make .env file referencing the .env.example file

  4. Migrate the database

    python manage.py migrate
    
  5. Run the server

    python manage.py runserver
    

Features

  • RESTful API for task management (CRUD operations).
  • Authentication and authorization with Django's built-in system and JWT.
  • Filtering, sorting, and searching tasks using DjangoFilterBackend, OrderingFilter, and SearchFilter.
  • Unit tests for reliability.
  • Integrate React compiled bundle on render_react view

API Endpoints

Our RESTful API supports the following operations for managing tasks:

  • Create Task: POST /api/tasks/
  • Read Tasks: GET /api/tasks/
  • Update Task: PUT /api/tasks/{task_id}/
  • Delete Task: DELETE /api/tasks/{task_id}/
  • Mark Task as Completed: PATCH /api/tasks/{task_id}/

Authentication

  • Use JWT for secure authentication. Obtain tokens at /api/token/ and refresh tokens at /api/token/refresh/.

Running Tests

To ensure code quality and reliability, run the following command:

pytest

Frontend (ReactJS)

Setup

  1. Navigate to the frontend directory

    cd frontend
    
  2. Install dependencies

    npm install
    
  3. Start the development server

    npm start
    

Features

  • User-friendly task management interface.
  • Responsive design for various devices.
  • State management with React Hooks ('@reduxjs/toolkit).
  • Use Axios for Rest API call. Intercept the request and do automatic authentication. Retry with refresh token if access token is not working
  • Integration with backend API for real-time data manipulation.
  • Used TailwindCSS for mobile responsive design and notistack for notification
  • Created Reusable Core components
    • Form, Input, InputCheckbox, Textarea, components with react-hook-form
    • PaginationButton, SearchInput, Loading, with tailwindcss

Components

  • TaskGrid - Display all tasks.
  • TaskDetail - Form for adding/editing tasks.

Deployment (AWS)

AWS Configuration

  1. Amazon RDS for PostgreSQL database.
  2. Amazon S3 for storing static files.
  3. AWS ECS for application deployment.
  4. IAM roles and VPC for security.

Steps

  1. Containerize the application using Docker.

    docker build -t taskmanager .

  2. Push the Docker image to Amazon ECR.

    aws ecr get-login-password --region `your-region` | docker login --username AWS --password-stdin `account-id`.dkr.ecr.`your-region`.amazonaws.com
    docker tag taskmanager:latest 548925211719.dkr.ecr.ca-central-1.amazonaws.com/django-app:latest
    docker push 548925211719.dkr.ecr.ca-central-1.amazonaws.com/django-app:latest
    
  3. Create an ECS cluster

    this time, created the AWS Fargate (serverless)

  4. Create an Task Definitions

    Created 3 task definitions. django-app-task, django-app-task-create-superuser, django-app-task-migrate
    Those three definitions are all same except the command part of the containerDefinitions.

    On Infrastructure requirements section,

    • choose AWS Fargate.

    • create a new role for Task role and Task execution Role. Used both same role. When create a role, defined own new policy that can be added to a new role. Here is sample json of it.

      ```json
      {
      "Version": "2012-10-17",
      "Statement": [
      {
      "Sid": "VisualEditor0",
      "Effect": "Allow",
      "Action": [
      "ecr:GetDownloadUrlForLayer",
      "ecr:BatchGetImage",
      "ecr:CompleteLayerUpload",
      "ecr:DescribeImages",
      "ecr:GetAuthorizationToken",
      "ecr:DescribeRepositories",
      "ecr:UploadLayerPart",
      "ecr:ListImages",
      "ecr:InitiateLayerUpload",
      "ecr:BatchCheckLayerAvailability",
      "ecr:PutImage"
      ],
      "Resource": [
      "*",
      "arn:aws:ecr:ca-central-1:548925211719:repository/django-app"
      ]
      }
      ]
      }
      ```
      
  5. Use a static or Elastic IP address for an Amazon ECS task on Fargate

    Create a network load balancer, and then configure routing of your target group

    1. Go to Amazon EC2 Console and choose Create for Network Load Balancer.

    2. On the Create Network Load Balancer page

      1. for Load balancer name, enter a name for your load balancer.

      2. For Scheme, select either Internet-facing.

      3. For IP address type, select IPv4.

      4. Set other information like Protocol, Port on Listners and Routing and VPC, and Security groups of Network Mapping properly.

      5. For Mappings, select at least one Availability Zone and one subnet for each Availability Zone. After you tick one of your zone, you should choose Subnet and Ipv4 address. And Choose Use an Elastic IP address for Ipv4 address.

      6. on Listeners and Routing section, create a target group

        1. on Specify grup details page, select IP addresses.

          Note: The target type Instances isn't supported on Fargate.

        2. Choose Next

        3. on Register targets page, You don't have to add item on Specify IPs and define ports

          Reason: Load balancers distribute traffic between targets within the target group. When a target group is associated with an Amazon ECS service, Amazon ECS automatically registers and deregisters containers with the target group. Because Amazon ECS handles target registration, you don't need to register targets to your target group.

        4. Choose Create target group. Finally target group is created.

      7. In the Listeners and routing section, for Forward to, select the target group that you created.

      8. Choose Create load balancer. Finally Network Load Balancer is created.

  6. Create an Amazon ECS service.

    Notes:

    • Choose Turned on of Public IP on Networking section. If not, pulling ECR image may somtimes fail.
    • Be sure to specify the target group in the Load Balancing section of service definition when you create your service. When each task for your service is started, the container and port combination specified in the service definition is registered with your target group. Then, traffic is routed from the load balancer to that container.
  7. Set up RDS for the database and S3 for static files.

  8. Configure security groups and IAM roles for secure access.

  1. Create S3 bucket with ACL enabled and disable Block public acccess

  2. install django-storages, to use S3 as the main Django storage backend, and boto3, to interact with the AWS API.

  3. Add storages to the INSTALLED_APPS in settings.py

  4. update the handling of static files in settings.py like following.

     USE_S3 = os.getenv('USE_S3') == 'TRUE'
    if USE_S3:
    # aws settings
    AWS_ACCESS_KEY_ID = os.getenv('AWS_ACCESS_KEY_ID')
    AWS_SECRET_ACCESS_KEY = os.getenv('AWS_SECRET_ACCESS_KEY')
    AWS_STORAGE_BUCKET_NAME = os.getenv('AWS_STORAGE_BUCKET_NAME')
    AWS_DEFAULT_ACL = 'public-read'
    AWS_S3_CUSTOM_DOMAIN = f'{AWS_STORAGE_BUCKET_NAME}.s3.amazonaws.com'
    AWS_S3_OBJECT_PARAMETERS = {'CacheControl': 'max-age=86400'}
    # s3 static settings
    AWS_LOCATION = 'static'
    STATIC_URL = f'https://{AWS_S3_CUSTOM_DOMAIN}/{AWS_LOCATION}/'
    STATICFILES_STORAGE = 'storages.backends.s3boto3.S3Boto3Storage'
    else:
    STATIC_URL = '/staticfiles/'
    STATIC_ROOT = os.path.join(BASE_DIR, 'staticfiles')
    STATICFILES_DIRS = (os.path.join(BASE_DIR, 'static'),)
    MEDIA_URL = '/mediafiles/'
    MEDIA_ROOT = os.path.join(BASE_DIR, 'mediafiles')
    
  5. Run python manaage.py collectstatic.

    Static files are being uploaded to the S3 bucket.

Suport HTTPS

  1. Generate own ssl crt and key file with openssl.

    openssl req -x509 -nodes -days 365 -newkey rsa:2048 -keyout selfsigned.key -out selfsigned.crt

  2. run gunicorn with generated SSL

    gunicorn --certfile selfsigned.crt --keyfile selfsigned.key --bind 0.0.0.0:443 taskmanager.wsgi:application

Monitoring

  • Use AWS CloudWatch for monitoring application performance and logs.

Security

  • Ensure HTTPS encryption for all communications.
  • Use Django's security features and AWS IAM roles to protect against unauthorized access.

ScreenShots

ListEdit

About

Built-in integration of React in Django project and deployed on AWS using ECS, ECR, Network Load Balancer

Topics

Resources

Stars

1 star

Watchers

1 watching

Forks

Releases

Packages

Used by

Contributors

Languages