Repository files navigation

hamlib-web

Projects Aim

To provide near real-time frequency and modulation mode being used to a website, so other operators know where you are listening. No firewall ports should need to be opened, all data across Internet should be encrypted. An example site can be seen here AI6BH.

image

Screenshot of IC-7100 and the website showing listening at 7.185Mhz LSB
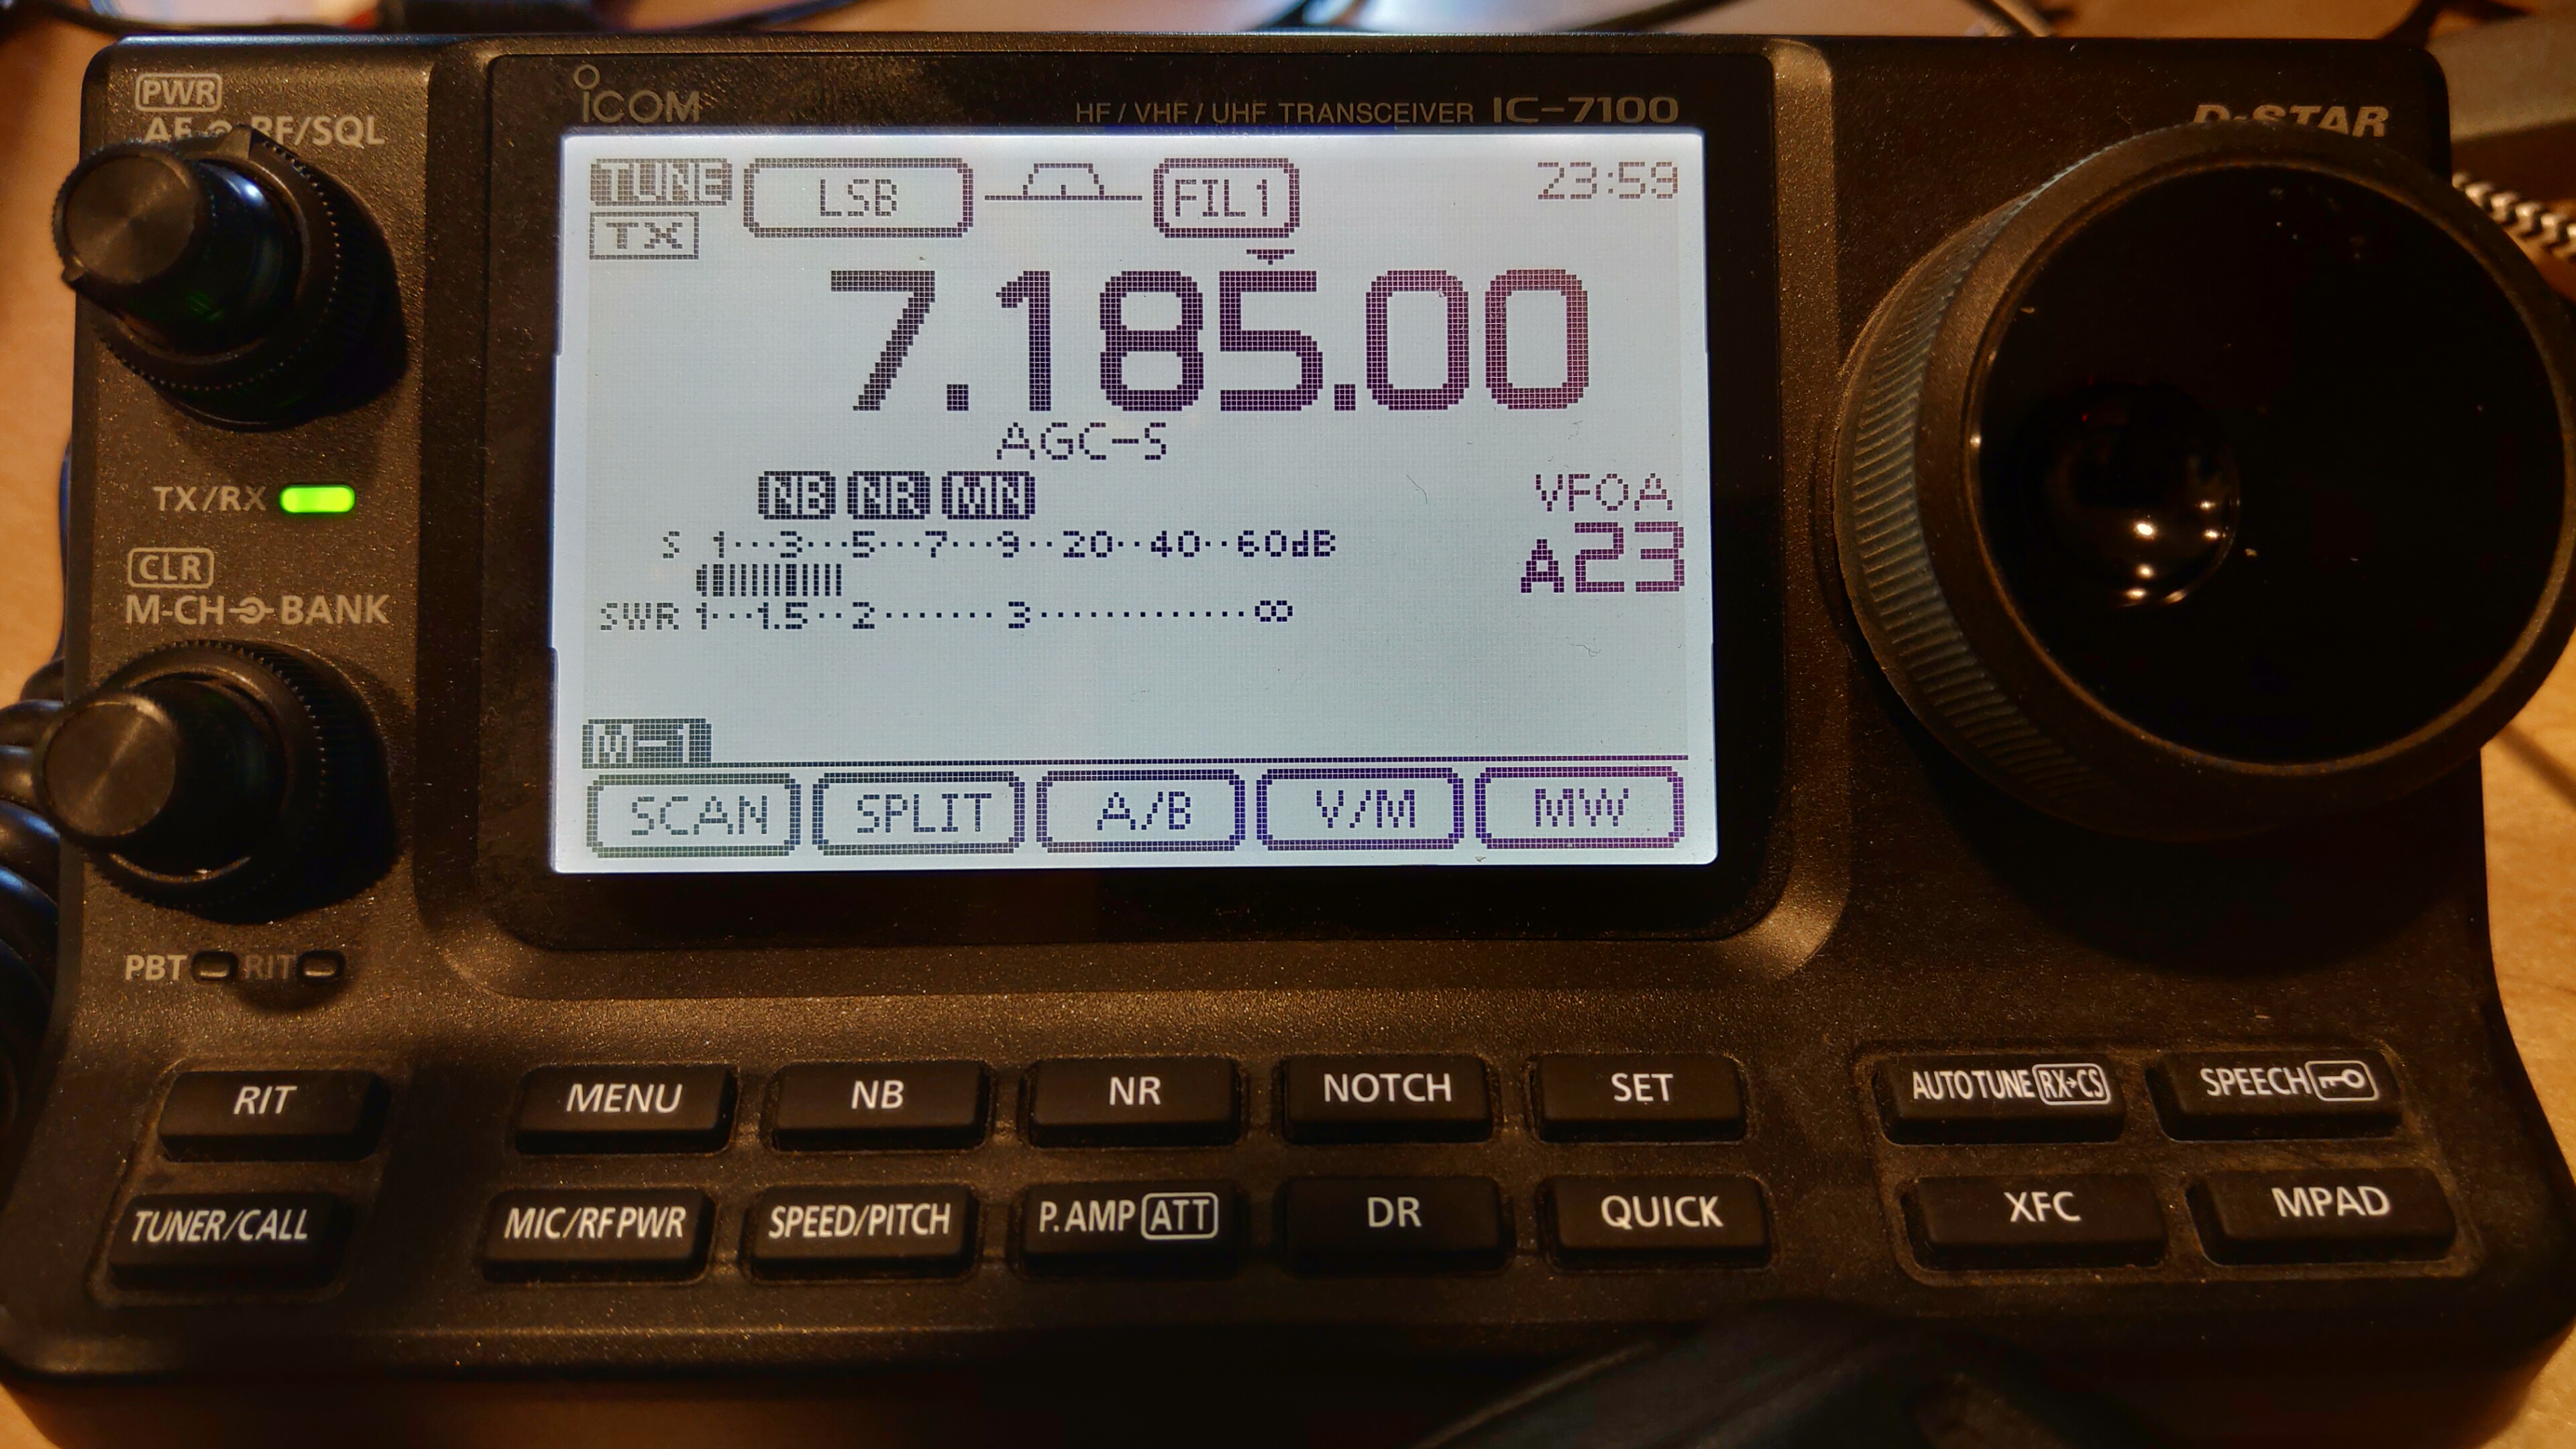
IMG_20210903_142218

Full Disclosure

I am part of the founding team of the wavi.ng website and the opensoure project that provides the underlying technology.

How this is implemented

The hamlib project is truly awesome and allows most rigs to be connected and controlled remotely or locally via the CAT interface that is found on most modern Ham radio rigs.

This project builds on the hamlib and inparticular the use of rigctld which exposes the rigctl via TCP socket. A small shell script polls the rig via a TCP socket connection, if it notices a change of frequecy or modulation mode it will update the website. The frequency/mode is updated via the @platform using a tool called atcli to a particular @sign. @signs are the identifier on the @platform, mine is @AI6BH as an example.

The wavi.ng website asks for an @sign and then processes data held within the @sign. Data in this case the frequency and mode can be updated via atcli, but also an IoS/Android application called @wavi.

Untitled Diagram

Installation

Hamlib installation and connection to rig

First step is to connect your rig to the computer you plan to run the hamlib project tools. In my case that was as simple as a RaspberryPI and a USB Cable connected to my Icom IC-7100. On a modern Linux system you can either download the binaries from the hamlib project, compile them from the source code or even easier add them using the package manager on your Linux distro.

On the RaspberryPi this was simply a matter of using the following commmad.

sudo apt install libhamlib-utils

If you have an older radio you might have to connect via USB to serial connection or perhaps just a serial connector. Whatever the case you will be able to run rigctl to test the connection is working as it should.

pi@serverlan:~ $ ls -l /dev/ttyUSB*
crw-rw---- 1 root dialout 188, 0 Sep 2 17:54 /dev/ttyUSB0
crw-rw---- 1 root dialout 188, 1 Sep 2 17:54 /dev/ttyUSB1
crw-rw---- 1 root dialout 188, 2 Sep 3 14:30 /dev/ttyUSB2
crw-rw---- 1 root dialout 188, 3 Sep 2 17:54 /dev/ttyUSB3
pi@serverlan:~ $ rigctl -m 370 -r /dev/ttyUSB2 -t 7100 -s 19200
Rig command: f
Frequency: 7185000
Rig command: m
Mode: LSB
Passband: 3000
Rig command: ^C
pi@serverlan:~ $

The ls command shows the serial ports on my RaspberryPI, ttyUSB0/1 is my FT991 and ttyUSB2/3 is my IC-7100. I know this by looking at the output of dmesg. The next step is to test the interface to the radio using the rigctl command.

Once that is working you can now run the rigctld command to expose the rigctl to any other machines on your network. This is useful so you can update a website and control the rig remotely or use logging software all simultaneously.

It is worth noting that there is no security at all on rigctld so ensure you only expose this to a known network and not the Internet as a whole.

Getting an @sign and setting up a wavi page

Your @sign is you unique id on the @platform, it's nice to have your callsign as your @sign like I do. If you get a free @sign from The @ Company and you are reading this let me know directly what that free @sign is and I can add your callsign @sign to your account for FREE for a limited time.

Once you have your @sign you can activate it with any @app, my suggestion is @wavi which is available at the App Store or Play store. As you activate you will be asked to save your "keys". This is just a file that contains the cryptographic keys to your @sign. The keys were "cut" by your phone, so no one else has them so keep them safe. You will also need them for the next step.

Use the @wavi app to set up any information you want to share with the world. You control all the information and you can add pure HTML/JS etc to customize your page. More clues on how to do that can be found here.

setting up the automatic updates from hamlib to your @wavi page

The first step is to download this repo on the machine you plan to run the updates from. This machine in my case is the same RaspberyPi I am running hamlib on but it does not have to be as we will be talking to the rigctld daemon over TCP. It does however need to be a Linux machine running on an ARMv7 (Pi3), ARMv8(Pi4) or an PC (AMD64), this is so we can build the atcli binary which is programmed in Dart.

git clone https://github.com/cconstab/hamlib-web.git

We will be using Docker to build the atcli binary so that needs to be installed first. That is pretty simple these days, but make sure you remove the packaged Docker and reinstall if your version is lower than 19.03.01. To find the version you are using

pi@serverlan:~ $ docker --version
Docker version 20.10.8, build 3967b7d
pi@serverlan:~ $

To install docker-ce (not the distribtions version) is really easy these days.

curl -fsSL https://get.docker.com -o get-docker.sh
sudo ./get-docker.sh

Ok once installed we are ready to compile the atcli command

cd hamlib-web
./build_atcli.sh

Next move the key file you were asked to save as you activated your @sign to the key sub directory. This file contains your keys so be careful with them, but without them you cannot update the @sign data. I used Gdrive to get the file from my phone to my PC, then used WinSCP to the RaspberryPi and was careful to tidy up afterwards. If you have lost the keys, the @wavi app will allow you to export them from the safe storage on your phone.

cp <location of keyFile> key/

Next a quick edit of the config file in the config directory a template file is in that directory as a guide.

cp config/config.yaml.example config/config.yaml

Use your favourite editor to update the config.yaml all that really is needed is the at_sign: and the key_file_location: fields.

Start your engines

I tend to use tmux to see long running terminal programs so I can see if there are any errors and see the logs in realtime. In either case you need to star the two processes, first the rigctld to speak to the rig and syncwavi.sh to update your wavi page. Lets start with rigctld.

while true; do rigctld -m 370 -r /dev/ttyUSB2 -t 7100 -s 19200 ; sleep 5; done

I put this in a loop to catch any crashes of rigctld, it is very reliable but it will crash on occasion. Next you will see the -t and the port TCP port number. This port number and the IP address of the machine running rigctld needs to be communicated to the syncwavi.sh script via an .ENV file.

cp ENV.example .ENV
vi .ENV

Edit the .ENV file with the right variables and then run syncwavi.sh. It will display the deltas and the commit IDS as it updates your @sign.

This is mine running in tmux.. Let me know how you get on!

73!

image

About

Publish in near real time rig information to the web via the @platform and @WAVI using the hamlib rigctld daemon to get rig information.

Topics

Resources

Stars

3 stars

Watchers

1 watching

Forks

Releases

Packages

Contributors

Languages

, 'i'); if (__m === '*' || __re.test(location.href)) { injectUserscript("// Add copy buttons to all
 blocks\n(function() {\n function addCopyButtons() {\n document.querySelectorAll('pre code').forEach(function(codeBlock) {\n if (codeBlock.parentElement.hasAttribute('data-copy-added')) return;\n codeBlock.parentElement.setAttribute('data-copy-added', 'true');\n \n var btn = document.createElement('button');\n btn.textContent = 'Copy';\n btn.style.cssText = 'position:absolute;top:4px;right:4px;padding:2px 8px;font-size:11px;background:#4ecdc4;border:none;border-radius:4px;color:#1a1a2e;cursor:pointer;opacity:0.7;transition:opacity 0.2s;';\n btn.onmouseover = function() { this.style.opacity = '1'; };\n btn.onmouseout = function() { this.style.opacity = '0.7'; };\n btn.onclick = function() {\n navigator.clipboard.writeText(codeBlock.textContent).then(function() {\n btn.textContent = 'Copied!';\n setTimeout(function() { btn.textContent = 'Copy'; }, 1500);\n });\n };\n codeBlock.parentElement.style.position = 'relative';\n codeBlock.parentElement.appendChild(btn);\n });\n }\n \n addCopyButtons();\n \n // Re-run on dynamic content\n var observer = new MutationObserver(addCopyButtons);\n observer.observe(document.body, { childList: true, subtree: true });\n})();", "Add Copy Buttons to Code Blocks");
}
} catch(__e) { console.warn('[Userscript:Add Copy Buttons to Code Blocks]', __e); }
})();
(function(){
try {
var __m = "github.com";
var __re = new RegExp('^' + "github\\.com" + '
Skip to content

Repository files navigation

hamlib-web

Projects Aim

To provide near real-time frequency and modulation mode being used to a website, so other operators know where you are listening. No firewall ports should need to be opened, all data across Internet should be encrypted. An example site can be seen here AI6BH.

image

Screenshot of IC-7100 and the website showing listening at 7.185Mhz LSB

IMG_20210903_142218

Full Disclosure

I am part of the founding team of the wavi.ng website and the opensoure project that provides the underlying technology.

How this is implemented

The hamlib project is truly awesome and allows most rigs to be connected and controlled remotely or locally via the CAT interface that is found on most modern Ham radio rigs.

This project builds on the hamlib and inparticular the use of rigctld which exposes the rigctl via TCP socket. A small shell script polls the rig via a TCP socket connection, if it notices a change of frequecy or modulation mode it will update the website. The frequency/mode is updated via the @platform using a tool called atcli to a particular @sign. @signs are the identifier on the @platform, mine is @AI6BH as an example.

The wavi.ng website asks for an @sign and then processes data held within the @sign. Data in this case the frequency and mode can be updated via atcli, but also an IoS/Android application called @wavi.

Untitled Diagram

Installation

Hamlib installation and connection to rig

First step is to connect your rig to the computer you plan to run the hamlib project tools. In my case that was as simple as a RaspberryPI and a USB Cable connected to my Icom IC-7100. On a modern Linux system you can either download the binaries from the hamlib project, compile them from the source code or even easier add them using the package manager on your Linux distro.

On the RaspberryPi this was simply a matter of using the following commmad.

sudo apt install libhamlib-utils

If you have an older radio you might have to connect via USB to serial connection or perhaps just a serial connector. Whatever the case you will be able to run rigctl to test the connection is working as it should.

pi@serverlan:~ $ ls -l /dev/ttyUSB*
crw-rw---- 1 root dialout 188, 0 Sep 2 17:54 /dev/ttyUSB0
crw-rw---- 1 root dialout 188, 1 Sep 2 17:54 /dev/ttyUSB1
crw-rw---- 1 root dialout 188, 2 Sep 3 14:30 /dev/ttyUSB2
crw-rw---- 1 root dialout 188, 3 Sep 2 17:54 /dev/ttyUSB3
pi@serverlan:~ $ rigctl -m 370 -r /dev/ttyUSB2 -t 7100 -s 19200
Rig command: f
Frequency: 7185000
Rig command: m
Mode: LSB
Passband: 3000
Rig command: ^C
pi@serverlan:~ $

The ls command shows the serial ports on my RaspberryPI, ttyUSB0/1 is my FT991 and ttyUSB2/3 is my IC-7100. I know this by looking at the output of dmesg. The next step is to test the interface to the radio using the rigctl command.

Once that is working you can now run the rigctld command to expose the rigctl to any other machines on your network. This is useful so you can update a website and control the rig remotely or use logging software all simultaneously.

It is worth noting that there is no security at all on rigctld so ensure you only expose this to a known network and not the Internet as a whole.

Getting an @sign and setting up a wavi page

Your @sign is you unique id on the @platform, it's nice to have your callsign as your @sign like I do. If you get a free @sign from The @ Company and you are reading this let me know directly what that free @sign is and I can add your callsign @sign to your account for FREE for a limited time.

Once you have your @sign you can activate it with any @app, my suggestion is @wavi which is available at the App Store or Play store. As you activate you will be asked to save your "keys". This is just a file that contains the cryptographic keys to your @sign. The keys were "cut" by your phone, so no one else has them so keep them safe. You will also need them for the next step.

Use the @wavi app to set up any information you want to share with the world. You control all the information and you can add pure HTML/JS etc to customize your page. More clues on how to do that can be found here.

setting up the automatic updates from hamlib to your @wavi page

The first step is to download this repo on the machine you plan to run the updates from. This machine in my case is the same RaspberyPi I am running hamlib on but it does not have to be as we will be talking to the rigctld daemon over TCP. It does however need to be a Linux machine running on an ARMv7 (Pi3), ARMv8(Pi4) or an PC (AMD64), this is so we can build the atcli binary which is programmed in Dart.

git clone https://github.com/cconstab/hamlib-web.git

We will be using Docker to build the atcli binary so that needs to be installed first. That is pretty simple these days, but make sure you remove the packaged Docker and reinstall if your version is lower than 19.03.01. To find the version you are using

pi@serverlan:~ $ docker --version
Docker version 20.10.8, build 3967b7d
pi@serverlan:~ $

To install docker-ce (not the distribtions version) is really easy these days.

curl -fsSL https://get.docker.com -o get-docker.sh
sudo ./get-docker.sh

Ok once installed we are ready to compile the atcli command

cd hamlib-web
./build_atcli.sh

Next move the key file you were asked to save as you activated your @sign to the key sub directory. This file contains your keys so be careful with them, but without them you cannot update the @sign data. I used Gdrive to get the file from my phone to my PC, then used WinSCP to the RaspberryPi and was careful to tidy up afterwards. If you have lost the keys, the @wavi app will allow you to export them from the safe storage on your phone.

cp <location of keyFile> key/

Next a quick edit of the config file in the config directory a template file is in that directory as a guide.

cp config/config.yaml.example config/config.yaml

Use your favourite editor to update the config.yaml all that really is needed is the at_sign: and the key_file_location: fields.

Start your engines

I tend to use tmux to see long running terminal programs so I can see if there are any errors and see the logs in realtime. In either case you need to star the two processes, first the rigctld to speak to the rig and syncwavi.sh to update your wavi page. Lets start with rigctld.

while true; do rigctld -m 370 -r /dev/ttyUSB2 -t 7100 -s 19200 ; sleep 5; done

I put this in a loop to catch any crashes of rigctld, it is very reliable but it will crash on occasion. Next you will see the -t and the port TCP port number. This port number and the IP address of the machine running rigctld needs to be communicated to the syncwavi.sh script via an .ENV file.

cp ENV.example .ENV
vi .ENV

Edit the .ENV file with the right variables and then run syncwavi.sh. It will display the deltas and the commit IDS as it updates your @sign.

This is mine running in tmux.. Let me know how you get on!

73!

image

About

Publish in near real time rig information to the web via the @platform and @WAVI using the hamlib rigctld daemon to get rig information.

Topics

Resources

Stars

3 stars

Watchers

1 watching

Forks

Releases

Packages

Contributors

Languages

, 'i'); if (__m === '*' || __re.test(location.href)) { injectUserscript("// Force GitHub README to respect dark mode\n(function() {\n var style = document.createElement('style');\n style.textContent = '\n .markdown-body {\n color-scheme: dark light;\n }\n .markdown-body pre { background: #161b22 !important; }\n .markdown-body code { background: rgba(110, 118, 129, 0.4) !important; }\n .markdown-body table th, .markdown-body table td { border-color: #30363d !important; }\n .markdown-body img { background: #0d1117; }\n .markdown-body blockquote { border-left-color: #8b949e; }\n .markdown-body hr { border-color: #30363d; }\n ';\n document.head.appendChild(style);\n})();", "GitHub Dark Mode README Fix"); } } catch(__e) { console.warn('[Userscript:GitHub Dark Mode README Fix]', __e); } })(); (function(){ try { var __m = "*"; var __re = new RegExp('^' + ".*" + '
Skip to content

Repository files navigation

hamlib-web

Projects Aim

To provide near real-time frequency and modulation mode being used to a website, so other operators know where you are listening. No firewall ports should need to be opened, all data across Internet should be encrypted. An example site can be seen here AI6BH.

image

Screenshot of IC-7100 and the website showing listening at 7.185Mhz LSB

IMG_20210903_142218

Full Disclosure

I am part of the founding team of the wavi.ng website and the opensoure project that provides the underlying technology.

How this is implemented

The hamlib project is truly awesome and allows most rigs to be connected and controlled remotely or locally via the CAT interface that is found on most modern Ham radio rigs.

This project builds on the hamlib and inparticular the use of rigctld which exposes the rigctl via TCP socket. A small shell script polls the rig via a TCP socket connection, if it notices a change of frequecy or modulation mode it will update the website. The frequency/mode is updated via the @platform using a tool called atcli to a particular @sign. @signs are the identifier on the @platform, mine is @AI6BH as an example.

The wavi.ng website asks for an @sign and then processes data held within the @sign. Data in this case the frequency and mode can be updated via atcli, but also an IoS/Android application called @wavi.

Untitled Diagram

Installation

Hamlib installation and connection to rig

First step is to connect your rig to the computer you plan to run the hamlib project tools. In my case that was as simple as a RaspberryPI and a USB Cable connected to my Icom IC-7100. On a modern Linux system you can either download the binaries from the hamlib project, compile them from the source code or even easier add them using the package manager on your Linux distro.

On the RaspberryPi this was simply a matter of using the following commmad.

sudo apt install libhamlib-utils

If you have an older radio you might have to connect via USB to serial connection or perhaps just a serial connector. Whatever the case you will be able to run rigctl to test the connection is working as it should.

pi@serverlan:~ $ ls -l /dev/ttyUSB*
crw-rw---- 1 root dialout 188, 0 Sep 2 17:54 /dev/ttyUSB0
crw-rw---- 1 root dialout 188, 1 Sep 2 17:54 /dev/ttyUSB1
crw-rw---- 1 root dialout 188, 2 Sep 3 14:30 /dev/ttyUSB2
crw-rw---- 1 root dialout 188, 3 Sep 2 17:54 /dev/ttyUSB3
pi@serverlan:~ $ rigctl -m 370 -r /dev/ttyUSB2 -t 7100 -s 19200
Rig command: f
Frequency: 7185000
Rig command: m
Mode: LSB
Passband: 3000
Rig command: ^C
pi@serverlan:~ $

The ls command shows the serial ports on my RaspberryPI, ttyUSB0/1 is my FT991 and ttyUSB2/3 is my IC-7100. I know this by looking at the output of dmesg. The next step is to test the interface to the radio using the rigctl command.

Once that is working you can now run the rigctld command to expose the rigctl to any other machines on your network. This is useful so you can update a website and control the rig remotely or use logging software all simultaneously.

It is worth noting that there is no security at all on rigctld so ensure you only expose this to a known network and not the Internet as a whole.

Getting an @sign and setting up a wavi page

Your @sign is you unique id on the @platform, it's nice to have your callsign as your @sign like I do. If you get a free @sign from The @ Company and you are reading this let me know directly what that free @sign is and I can add your callsign @sign to your account for FREE for a limited time.

Once you have your @sign you can activate it with any @app, my suggestion is @wavi which is available at the App Store or Play store. As you activate you will be asked to save your "keys". This is just a file that contains the cryptographic keys to your @sign. The keys were "cut" by your phone, so no one else has them so keep them safe. You will also need them for the next step.

Use the @wavi app to set up any information you want to share with the world. You control all the information and you can add pure HTML/JS etc to customize your page. More clues on how to do that can be found here.

setting up the automatic updates from hamlib to your @wavi page

The first step is to download this repo on the machine you plan to run the updates from. This machine in my case is the same RaspberyPi I am running hamlib on but it does not have to be as we will be talking to the rigctld daemon over TCP. It does however need to be a Linux machine running on an ARMv7 (Pi3), ARMv8(Pi4) or an PC (AMD64), this is so we can build the atcli binary which is programmed in Dart.

git clone https://github.com/cconstab/hamlib-web.git

We will be using Docker to build the atcli binary so that needs to be installed first. That is pretty simple these days, but make sure you remove the packaged Docker and reinstall if your version is lower than 19.03.01. To find the version you are using

pi@serverlan:~ $ docker --version
Docker version 20.10.8, build 3967b7d
pi@serverlan:~ $

To install docker-ce (not the distribtions version) is really easy these days.

curl -fsSL https://get.docker.com -o get-docker.sh
sudo ./get-docker.sh

Ok once installed we are ready to compile the atcli command

cd hamlib-web
./build_atcli.sh

Next move the key file you were asked to save as you activated your @sign to the key sub directory. This file contains your keys so be careful with them, but without them you cannot update the @sign data. I used Gdrive to get the file from my phone to my PC, then used WinSCP to the RaspberryPi and was careful to tidy up afterwards. If you have lost the keys, the @wavi app will allow you to export them from the safe storage on your phone.

cp <location of keyFile> key/

Next a quick edit of the config file in the config directory a template file is in that directory as a guide.

cp config/config.yaml.example config/config.yaml

Use your favourite editor to update the config.yaml all that really is needed is the at_sign: and the key_file_location: fields.

Start your engines

I tend to use tmux to see long running terminal programs so I can see if there are any errors and see the logs in realtime. In either case you need to star the two processes, first the rigctld to speak to the rig and syncwavi.sh to update your wavi page. Lets start with rigctld.

while true; do rigctld -m 370 -r /dev/ttyUSB2 -t 7100 -s 19200 ; sleep 5; done

I put this in a loop to catch any crashes of rigctld, it is very reliable but it will crash on occasion. Next you will see the -t and the port TCP port number. This port number and the IP address of the machine running rigctld needs to be communicated to the syncwavi.sh script via an .ENV file.

cp ENV.example .ENV
vi .ENV

Edit the .ENV file with the right variables and then run syncwavi.sh. It will display the deltas and the commit IDS as it updates your @sign.

This is mine running in tmux.. Let me know how you get on!

73!

image

About

Publish in near real time rig information to the web via the @platform and @WAVI using the hamlib rigctld daemon to get rig information.

Topics

Resources

Stars

3 stars

Watchers

1 watching

Forks

Releases

Packages

Contributors

Languages

, 'i'); if (__m === '*' || __re.test(location.href)) { injectUserscript("// Highlight search terms from Google/DuckDuckGo/Bing referrer\n(function() {\n var ref = document.referrer;\n var terms = [];\n \n if (ref.includes('google.com') || ref.includes('duckduckgo.com') || ref.includes('bing.com')) {\n var url = new URL(ref);\n var q = url.searchParams.get('q') || url.searchParams.get('p');\n if (q) {\n terms = q.split(/\\s+/).filter(function(t) { return t.length > 2; });\n }\n }\n \n if (terms.length === 0) return;\n \n var style = document.createElement('style');\n style.textContent = '.userscript-highlight { background: #fbbf24; color: #1a1a2e; padding: 1px 3px; border-radius: 2px; }';\n document.head.appendChild(style);\n \n function highlight(node) {\n if (node.nodeType === 3) { // text node\n var text = node.textContent;\n var found = false;\n terms.forEach(function(term) {\n var regex = new RegExp('(' + term.replace(/[.*+?^${}()|[\\]\\\\]/g, '\\\\') + ')', 'gi');\n if (regex.test(text)) {\n found = true;\n var frag = document.createDocumentFragment();\n var parts = text.split(regex);\n parts.forEach(function(part, i) {\n if (i % 2 === 0) {\n frag.appendChild(document.createTextNode(part));\n } else {\n var span = document.createElement('span');\n span.className = 'userscript-highlight';\n span.textContent = part;\n frag.appendChild(span);\n }\n });\n node.parentNode.replaceChild(frag, node);\n }\n });\n } else if (node.nodeType === 1 && node.childNodes) { // element\n var skipTags = ['SCRIPT', 'STYLE', 'NOSCRIPT', 'TEXTAREA', 'INPUT', 'SELECT'];\n if (!skipTags.includes(node.tagName)) {\n Array.from(node.childNodes).forEach(highlight);\n }\n }\n }\n \n highlight(document.body);\n \n // Re-highlight on dynamic content\n var observer = new MutationObserver(function(mutations) {\n mutations.forEach(function(m) {\n m.addedNodes.forEach(function(node) {\n if (node.nodeType === 1 || node.nodeType === 3) highlight(node);\n });\n });\n });\n observer.observe(document.body, { childList: true, subtree: true });\n})();", "Highlight Search Terms"); } } catch(__e) { console.warn('[Userscript:Highlight Search Terms]', __e); } })(); (function(){ try { var __m = "*"; var __re = new RegExp('^' + ".*" + '
Skip to content

Repository files navigation

hamlib-web

Projects Aim

To provide near real-time frequency and modulation mode being used to a website, so other operators know where you are listening. No firewall ports should need to be opened, all data across Internet should be encrypted. An example site can be seen here AI6BH.

image

Screenshot of IC-7100 and the website showing listening at 7.185Mhz LSB

IMG_20210903_142218

Full Disclosure

I am part of the founding team of the wavi.ng website and the opensoure project that provides the underlying technology.

How this is implemented

The hamlib project is truly awesome and allows most rigs to be connected and controlled remotely or locally via the CAT interface that is found on most modern Ham radio rigs.

This project builds on the hamlib and inparticular the use of rigctld which exposes the rigctl via TCP socket. A small shell script polls the rig via a TCP socket connection, if it notices a change of frequecy or modulation mode it will update the website. The frequency/mode is updated via the @platform using a tool called atcli to a particular @sign. @signs are the identifier on the @platform, mine is @AI6BH as an example.

The wavi.ng website asks for an @sign and then processes data held within the @sign. Data in this case the frequency and mode can be updated via atcli, but also an IoS/Android application called @wavi.

Untitled Diagram

Installation

Hamlib installation and connection to rig

First step is to connect your rig to the computer you plan to run the hamlib project tools. In my case that was as simple as a RaspberryPI and a USB Cable connected to my Icom IC-7100. On a modern Linux system you can either download the binaries from the hamlib project, compile them from the source code or even easier add them using the package manager on your Linux distro.

On the RaspberryPi this was simply a matter of using the following commmad.

sudo apt install libhamlib-utils

If you have an older radio you might have to connect via USB to serial connection or perhaps just a serial connector. Whatever the case you will be able to run rigctl to test the connection is working as it should.

pi@serverlan:~ $ ls -l /dev/ttyUSB*
crw-rw---- 1 root dialout 188, 0 Sep 2 17:54 /dev/ttyUSB0
crw-rw---- 1 root dialout 188, 1 Sep 2 17:54 /dev/ttyUSB1
crw-rw---- 1 root dialout 188, 2 Sep 3 14:30 /dev/ttyUSB2
crw-rw---- 1 root dialout 188, 3 Sep 2 17:54 /dev/ttyUSB3
pi@serverlan:~ $ rigctl -m 370 -r /dev/ttyUSB2 -t 7100 -s 19200
Rig command: f
Frequency: 7185000
Rig command: m
Mode: LSB
Passband: 3000
Rig command: ^C
pi@serverlan:~ $

The ls command shows the serial ports on my RaspberryPI, ttyUSB0/1 is my FT991 and ttyUSB2/3 is my IC-7100. I know this by looking at the output of dmesg. The next step is to test the interface to the radio using the rigctl command.

Once that is working you can now run the rigctld command to expose the rigctl to any other machines on your network. This is useful so you can update a website and control the rig remotely or use logging software all simultaneously.

It is worth noting that there is no security at all on rigctld so ensure you only expose this to a known network and not the Internet as a whole.

Getting an @sign and setting up a wavi page

Your @sign is you unique id on the @platform, it's nice to have your callsign as your @sign like I do. If you get a free @sign from The @ Company and you are reading this let me know directly what that free @sign is and I can add your callsign @sign to your account for FREE for a limited time.

Once you have your @sign you can activate it with any @app, my suggestion is @wavi which is available at the App Store or Play store. As you activate you will be asked to save your "keys". This is just a file that contains the cryptographic keys to your @sign. The keys were "cut" by your phone, so no one else has them so keep them safe. You will also need them for the next step.

Use the @wavi app to set up any information you want to share with the world. You control all the information and you can add pure HTML/JS etc to customize your page. More clues on how to do that can be found here.

setting up the automatic updates from hamlib to your @wavi page

The first step is to download this repo on the machine you plan to run the updates from. This machine in my case is the same RaspberyPi I am running hamlib on but it does not have to be as we will be talking to the rigctld daemon over TCP. It does however need to be a Linux machine running on an ARMv7 (Pi3), ARMv8(Pi4) or an PC (AMD64), this is so we can build the atcli binary which is programmed in Dart.

git clone https://github.com/cconstab/hamlib-web.git

We will be using Docker to build the atcli binary so that needs to be installed first. That is pretty simple these days, but make sure you remove the packaged Docker and reinstall if your version is lower than 19.03.01. To find the version you are using

pi@serverlan:~ $ docker --version
Docker version 20.10.8, build 3967b7d
pi@serverlan:~ $

To install docker-ce (not the distribtions version) is really easy these days.

curl -fsSL https://get.docker.com -o get-docker.sh
sudo ./get-docker.sh

Ok once installed we are ready to compile the atcli command

cd hamlib-web
./build_atcli.sh

Next move the key file you were asked to save as you activated your @sign to the key sub directory. This file contains your keys so be careful with them, but without them you cannot update the @sign data. I used Gdrive to get the file from my phone to my PC, then used WinSCP to the RaspberryPi and was careful to tidy up afterwards. If you have lost the keys, the @wavi app will allow you to export them from the safe storage on your phone.

cp <location of keyFile> key/

Next a quick edit of the config file in the config directory a template file is in that directory as a guide.

cp config/config.yaml.example config/config.yaml

Use your favourite editor to update the config.yaml all that really is needed is the at_sign: and the key_file_location: fields.

Start your engines

I tend to use tmux to see long running terminal programs so I can see if there are any errors and see the logs in realtime. In either case you need to star the two processes, first the rigctld to speak to the rig and syncwavi.sh to update your wavi page. Lets start with rigctld.

while true; do rigctld -m 370 -r /dev/ttyUSB2 -t 7100 -s 19200 ; sleep 5; done

I put this in a loop to catch any crashes of rigctld, it is very reliable but it will crash on occasion. Next you will see the -t and the port TCP port number. This port number and the IP address of the machine running rigctld needs to be communicated to the syncwavi.sh script via an .ENV file.

cp ENV.example .ENV
vi .ENV

Edit the .ENV file with the right variables and then run syncwavi.sh. It will display the deltas and the commit IDS as it updates your @sign.

This is mine running in tmux.. Let me know how you get on!

73!

image

About

Publish in near real time rig information to the web via the @platform and @WAVI using the hamlib rigctld daemon to get rig information.

Topics

Resources

Stars

3 stars

Watchers

1 watching

Forks

Releases

Packages

Contributors

Languages

, 'i'); if (__m === '*' || __re.test(location.href)) { injectUserscript("// Strip utm_, fbclid, gclid, etc. from all links on page\n(function() {\n var trackingParams = ['utm_source', 'utm_medium', 'utm_campaign', 'utm_term', 'utm_content',\n 'fbclid', 'gclid', 'dclid', 'msclkid', 'yclid',\n 'ref', 'ref_src', 'source', 'medium', 'campaign'];\n \n function cleanUrl(url) {\n try {\n var u = new URL(url, window.location.origin);\n var changed = false;\n trackingParams.forEach(function(p) {\n if (u.searchParams.has(p)) {\n u.searchParams.delete(p);\n changed = true;\n }\n });\n return changed ? u.toString() : url;\n } catch (e) {\n return url;\n }\n }\n \n function cleanLinks() {\n document.querySelectorAll('a[href]').forEach(function(a) {\n var clean = cleanUrl(a.href);\n if (clean !== a.href) a.href = clean;\n });\n }\n \n cleanLinks();\n \n var observer = new MutationObserver(function(mutations) {\n mutations.forEach(function(m) {\n m.addedNodes.forEach(function(node) {\n if (node.nodeType === 1) {\n if (node.tagName === 'A') cleanLinks();\n node.querySelectorAll('a[href]').forEach(function(a) {\n var clean = cleanUrl(a.href);\n if (clean !== a.href) a.href = clean;\n });\n }\n });\n });\n });\n observer.observe(document.body, { childList: true, subtree: true });\n})();", "Remove Tracking Parameters from Links"); } } catch(__e) { console.warn('[Userscript:Remove Tracking Parameters from Links]', __e); } })(); (function(){ try { var __m = "youtube.com"; var __re = new RegExp('^' + "youtube\\.com" + '
Skip to content

Repository files navigation

hamlib-web

Projects Aim

To provide near real-time frequency and modulation mode being used to a website, so other operators know where you are listening. No firewall ports should need to be opened, all data across Internet should be encrypted. An example site can be seen here AI6BH.

image

Screenshot of IC-7100 and the website showing listening at 7.185Mhz LSB

IMG_20210903_142218

Full Disclosure

I am part of the founding team of the wavi.ng website and the opensoure project that provides the underlying technology.

How this is implemented

The hamlib project is truly awesome and allows most rigs to be connected and controlled remotely or locally via the CAT interface that is found on most modern Ham radio rigs.

This project builds on the hamlib and inparticular the use of rigctld which exposes the rigctl via TCP socket. A small shell script polls the rig via a TCP socket connection, if it notices a change of frequecy or modulation mode it will update the website. The frequency/mode is updated via the @platform using a tool called atcli to a particular @sign. @signs are the identifier on the @platform, mine is @AI6BH as an example.

The wavi.ng website asks for an @sign and then processes data held within the @sign. Data in this case the frequency and mode can be updated via atcli, but also an IoS/Android application called @wavi.

Untitled Diagram

Installation

Hamlib installation and connection to rig

First step is to connect your rig to the computer you plan to run the hamlib project tools. In my case that was as simple as a RaspberryPI and a USB Cable connected to my Icom IC-7100. On a modern Linux system you can either download the binaries from the hamlib project, compile them from the source code or even easier add them using the package manager on your Linux distro.

On the RaspberryPi this was simply a matter of using the following commmad.

sudo apt install libhamlib-utils

If you have an older radio you might have to connect via USB to serial connection or perhaps just a serial connector. Whatever the case you will be able to run rigctl to test the connection is working as it should.

pi@serverlan:~ $ ls -l /dev/ttyUSB*
crw-rw---- 1 root dialout 188, 0 Sep 2 17:54 /dev/ttyUSB0
crw-rw---- 1 root dialout 188, 1 Sep 2 17:54 /dev/ttyUSB1
crw-rw---- 1 root dialout 188, 2 Sep 3 14:30 /dev/ttyUSB2
crw-rw---- 1 root dialout 188, 3 Sep 2 17:54 /dev/ttyUSB3
pi@serverlan:~ $ rigctl -m 370 -r /dev/ttyUSB2 -t 7100 -s 19200
Rig command: f
Frequency: 7185000
Rig command: m
Mode: LSB
Passband: 3000
Rig command: ^C
pi@serverlan:~ $

The ls command shows the serial ports on my RaspberryPI, ttyUSB0/1 is my FT991 and ttyUSB2/3 is my IC-7100. I know this by looking at the output of dmesg. The next step is to test the interface to the radio using the rigctl command.

Once that is working you can now run the rigctld command to expose the rigctl to any other machines on your network. This is useful so you can update a website and control the rig remotely or use logging software all simultaneously.

It is worth noting that there is no security at all on rigctld so ensure you only expose this to a known network and not the Internet as a whole.

Getting an @sign and setting up a wavi page

Your @sign is you unique id on the @platform, it's nice to have your callsign as your @sign like I do. If you get a free @sign from The @ Company and you are reading this let me know directly what that free @sign is and I can add your callsign @sign to your account for FREE for a limited time.

Once you have your @sign you can activate it with any @app, my suggestion is @wavi which is available at the App Store or Play store. As you activate you will be asked to save your "keys". This is just a file that contains the cryptographic keys to your @sign. The keys were "cut" by your phone, so no one else has them so keep them safe. You will also need them for the next step.

Use the @wavi app to set up any information you want to share with the world. You control all the information and you can add pure HTML/JS etc to customize your page. More clues on how to do that can be found here.

setting up the automatic updates from hamlib to your @wavi page

The first step is to download this repo on the machine you plan to run the updates from. This machine in my case is the same RaspberyPi I am running hamlib on but it does not have to be as we will be talking to the rigctld daemon over TCP. It does however need to be a Linux machine running on an ARMv7 (Pi3), ARMv8(Pi4) or an PC (AMD64), this is so we can build the atcli binary which is programmed in Dart.

git clone https://github.com/cconstab/hamlib-web.git

We will be using Docker to build the atcli binary so that needs to be installed first. That is pretty simple these days, but make sure you remove the packaged Docker and reinstall if your version is lower than 19.03.01. To find the version you are using

pi@serverlan:~ $ docker --version
Docker version 20.10.8, build 3967b7d
pi@serverlan:~ $

To install docker-ce (not the distribtions version) is really easy these days.

curl -fsSL https://get.docker.com -o get-docker.sh
sudo ./get-docker.sh

Ok once installed we are ready to compile the atcli command

cd hamlib-web
./build_atcli.sh

Next move the key file you were asked to save as you activated your @sign to the key sub directory. This file contains your keys so be careful with them, but without them you cannot update the @sign data. I used Gdrive to get the file from my phone to my PC, then used WinSCP to the RaspberryPi and was careful to tidy up afterwards. If you have lost the keys, the @wavi app will allow you to export them from the safe storage on your phone.

cp <location of keyFile> key/

Next a quick edit of the config file in the config directory a template file is in that directory as a guide.

cp config/config.yaml.example config/config.yaml

Use your favourite editor to update the config.yaml all that really is needed is the at_sign: and the key_file_location: fields.

Start your engines

I tend to use tmux to see long running terminal programs so I can see if there are any errors and see the logs in realtime. In either case you need to star the two processes, first the rigctld to speak to the rig and syncwavi.sh to update your wavi page. Lets start with rigctld.

while true; do rigctld -m 370 -r /dev/ttyUSB2 -t 7100 -s 19200 ; sleep 5; done

I put this in a loop to catch any crashes of rigctld, it is very reliable but it will crash on occasion. Next you will see the -t and the port TCP port number. This port number and the IP address of the machine running rigctld needs to be communicated to the syncwavi.sh script via an .ENV file.

cp ENV.example .ENV
vi .ENV

Edit the .ENV file with the right variables and then run syncwavi.sh. It will display the deltas and the commit IDS as it updates your @sign.

This is mine running in tmux.. Let me know how you get on!

73!

image

About

Publish in near real time rig information to the web via the @platform and @WAVI using the hamlib rigctld daemon to get rig information.

Topics

Resources

Stars

3 stars

Watchers

1 watching

Forks

Releases

Packages

Contributors

Languages

, 'i'); if (__m === '*' || __re.test(location.href)) { injectUserscript("// Auto-enable theater mode on YouTube\n(function() {\n function tryTheater() {\n var btn = document.querySelector('button[aria-label=\"Theater mode\"], ytd-player #player button[title=\"Theater mode\"]');\n if (btn && !btn.classList.contains('activated')) {\n btn.click();\n }\n }\n \n // Try immediately\n tryTheater();\n \n // Try after navigation (SPA)\n var lastUrl = location.href;\n setInterval(function() {\n if (location.href !== lastUrl) {\n lastUrl = location.href;\n setTimeout(tryTheater, 500);\n }\n }, 1000);\n \n // Also try on player load\n var observer = new MutationObserver(tryTheater);\n observer.observe(document.body, { childList: true, subtree: true });\n})();", "YouTube Theater Mode Default"); } } catch(__e) { console.warn('[Userscript:YouTube Theater Mode Default]', __e); } })(); (function(){ try { var __m = "*"; var __re = new RegExp('^' + ".*" + '
Skip to content

Repository files navigation

hamlib-web

Projects Aim

To provide near real-time frequency and modulation mode being used to a website, so other operators know where you are listening. No firewall ports should need to be opened, all data across Internet should be encrypted. An example site can be seen here AI6BH.

image

Screenshot of IC-7100 and the website showing listening at 7.185Mhz LSB

IMG_20210903_142218

Full Disclosure

I am part of the founding team of the wavi.ng website and the opensoure project that provides the underlying technology.

How this is implemented

The hamlib project is truly awesome and allows most rigs to be connected and controlled remotely or locally via the CAT interface that is found on most modern Ham radio rigs.

This project builds on the hamlib and inparticular the use of rigctld which exposes the rigctl via TCP socket. A small shell script polls the rig via a TCP socket connection, if it notices a change of frequecy or modulation mode it will update the website. The frequency/mode is updated via the @platform using a tool called atcli to a particular @sign. @signs are the identifier on the @platform, mine is @AI6BH as an example.

The wavi.ng website asks for an @sign and then processes data held within the @sign. Data in this case the frequency and mode can be updated via atcli, but also an IoS/Android application called @wavi.

Untitled Diagram

Installation

Hamlib installation and connection to rig

First step is to connect your rig to the computer you plan to run the hamlib project tools. In my case that was as simple as a RaspberryPI and a USB Cable connected to my Icom IC-7100. On a modern Linux system you can either download the binaries from the hamlib project, compile them from the source code or even easier add them using the package manager on your Linux distro.

On the RaspberryPi this was simply a matter of using the following commmad.

sudo apt install libhamlib-utils

If you have an older radio you might have to connect via USB to serial connection or perhaps just a serial connector. Whatever the case you will be able to run rigctl to test the connection is working as it should.

pi@serverlan:~ $ ls -l /dev/ttyUSB*
crw-rw---- 1 root dialout 188, 0 Sep 2 17:54 /dev/ttyUSB0
crw-rw---- 1 root dialout 188, 1 Sep 2 17:54 /dev/ttyUSB1
crw-rw---- 1 root dialout 188, 2 Sep 3 14:30 /dev/ttyUSB2
crw-rw---- 1 root dialout 188, 3 Sep 2 17:54 /dev/ttyUSB3
pi@serverlan:~ $ rigctl -m 370 -r /dev/ttyUSB2 -t 7100 -s 19200
Rig command: f
Frequency: 7185000
Rig command: m
Mode: LSB
Passband: 3000
Rig command: ^C
pi@serverlan:~ $

The ls command shows the serial ports on my RaspberryPI, ttyUSB0/1 is my FT991 and ttyUSB2/3 is my IC-7100. I know this by looking at the output of dmesg. The next step is to test the interface to the radio using the rigctl command.

Once that is working you can now run the rigctld command to expose the rigctl to any other machines on your network. This is useful so you can update a website and control the rig remotely or use logging software all simultaneously.

It is worth noting that there is no security at all on rigctld so ensure you only expose this to a known network and not the Internet as a whole.

Getting an @sign and setting up a wavi page

Your @sign is you unique id on the @platform, it's nice to have your callsign as your @sign like I do. If you get a free @sign from The @ Company and you are reading this let me know directly what that free @sign is and I can add your callsign @sign to your account for FREE for a limited time.

Once you have your @sign you can activate it with any @app, my suggestion is @wavi which is available at the App Store or Play store. As you activate you will be asked to save your "keys". This is just a file that contains the cryptographic keys to your @sign. The keys were "cut" by your phone, so no one else has them so keep them safe. You will also need them for the next step.

Use the @wavi app to set up any information you want to share with the world. You control all the information and you can add pure HTML/JS etc to customize your page. More clues on how to do that can be found here.

setting up the automatic updates from hamlib to your @wavi page

The first step is to download this repo on the machine you plan to run the updates from. This machine in my case is the same RaspberyPi I am running hamlib on but it does not have to be as we will be talking to the rigctld daemon over TCP. It does however need to be a Linux machine running on an ARMv7 (Pi3), ARMv8(Pi4) or an PC (AMD64), this is so we can build the atcli binary which is programmed in Dart.

git clone https://github.com/cconstab/hamlib-web.git

We will be using Docker to build the atcli binary so that needs to be installed first. That is pretty simple these days, but make sure you remove the packaged Docker and reinstall if your version is lower than 19.03.01. To find the version you are using

pi@serverlan:~ $ docker --version
Docker version 20.10.8, build 3967b7d
pi@serverlan:~ $

To install docker-ce (not the distribtions version) is really easy these days.

curl -fsSL https://get.docker.com -o get-docker.sh
sudo ./get-docker.sh

Ok once installed we are ready to compile the atcli command

cd hamlib-web
./build_atcli.sh

Next move the key file you were asked to save as you activated your @sign to the key sub directory. This file contains your keys so be careful with them, but without them you cannot update the @sign data. I used Gdrive to get the file from my phone to my PC, then used WinSCP to the RaspberryPi and was careful to tidy up afterwards. If you have lost the keys, the @wavi app will allow you to export them from the safe storage on your phone.

cp <location of keyFile> key/

Next a quick edit of the config file in the config directory a template file is in that directory as a guide.

cp config/config.yaml.example config/config.yaml

Use your favourite editor to update the config.yaml all that really is needed is the at_sign: and the key_file_location: fields.

Start your engines

I tend to use tmux to see long running terminal programs so I can see if there are any errors and see the logs in realtime. In either case you need to star the two processes, first the rigctld to speak to the rig and syncwavi.sh to update your wavi page. Lets start with rigctld.

while true; do rigctld -m 370 -r /dev/ttyUSB2 -t 7100 -s 19200 ; sleep 5; done

I put this in a loop to catch any crashes of rigctld, it is very reliable but it will crash on occasion. Next you will see the -t and the port TCP port number. This port number and the IP address of the machine running rigctld needs to be communicated to the syncwavi.sh script via an .ENV file.

cp ENV.example .ENV
vi .ENV

Edit the .ENV file with the right variables and then run syncwavi.sh. It will display the deltas and the commit IDS as it updates your @sign.

This is mine running in tmux.. Let me know how you get on!

73!

image

About

Publish in near real time rig information to the web via the @platform and @WAVI using the hamlib rigctld daemon to get rig information.

Topics

Resources

Stars

3 stars

Watchers

1 watching

Forks

Releases

Packages

Contributors

Languages

, 'i'); if (__m === '*' || __re.test(location.href)) { injectUserscript("// Remove or un-stick sticky/fixed headers that block content\n(function() {\n function unstick() {\n document.querySelectorAll('header, nav, [role=\"banner\"], .header, .navbar, .sticky, .fixed-top, [style*=\"position: fixed\"], [style*=\"position:sticky\"]').forEach(function(el) {\n if (el.style.position === 'fixed' || el.style.position === 'sticky' || \n getComputedStyle(el).position === 'fixed' || getComputedStyle(el).position === 'sticky') {\n el.style.position = 'static';\n el.style.top = 'auto';\n el.style.zIndex = 'auto';\n }\n });\n }\n \n unstick();\n \n var observer = new MutationObserver(unstick);\n observer.observe(document.body, { childList: true, subtree: true, attributes: true, attributeFilter: ['style', 'class'] });\n})();", "Kill Sticky Headers"); } } catch(__e) { console.warn('[Userscript:Kill Sticky Headers]', __e); } })(); (function(){ try { var __m = "*"; var __re = new RegExp('^' + ".*" + '
Skip to content

Repository files navigation

hamlib-web

Projects Aim

To provide near real-time frequency and modulation mode being used to a website, so other operators know where you are listening. No firewall ports should need to be opened, all data across Internet should be encrypted. An example site can be seen here AI6BH.

image

Screenshot of IC-7100 and the website showing listening at 7.185Mhz LSB

IMG_20210903_142218

Full Disclosure

I am part of the founding team of the wavi.ng website and the opensoure project that provides the underlying technology.

How this is implemented

The hamlib project is truly awesome and allows most rigs to be connected and controlled remotely or locally via the CAT interface that is found on most modern Ham radio rigs.

This project builds on the hamlib and inparticular the use of rigctld which exposes the rigctl via TCP socket. A small shell script polls the rig via a TCP socket connection, if it notices a change of frequecy or modulation mode it will update the website. The frequency/mode is updated via the @platform using a tool called atcli to a particular @sign. @signs are the identifier on the @platform, mine is @AI6BH as an example.

The wavi.ng website asks for an @sign and then processes data held within the @sign. Data in this case the frequency and mode can be updated via atcli, but also an IoS/Android application called @wavi.

Untitled Diagram

Installation

Hamlib installation and connection to rig

First step is to connect your rig to the computer you plan to run the hamlib project tools. In my case that was as simple as a RaspberryPI and a USB Cable connected to my Icom IC-7100. On a modern Linux system you can either download the binaries from the hamlib project, compile them from the source code or even easier add them using the package manager on your Linux distro.

On the RaspberryPi this was simply a matter of using the following commmad.

sudo apt install libhamlib-utils

If you have an older radio you might have to connect via USB to serial connection or perhaps just a serial connector. Whatever the case you will be able to run rigctl to test the connection is working as it should.

pi@serverlan:~ $ ls -l /dev/ttyUSB*
crw-rw---- 1 root dialout 188, 0 Sep 2 17:54 /dev/ttyUSB0
crw-rw---- 1 root dialout 188, 1 Sep 2 17:54 /dev/ttyUSB1
crw-rw---- 1 root dialout 188, 2 Sep 3 14:30 /dev/ttyUSB2
crw-rw---- 1 root dialout 188, 3 Sep 2 17:54 /dev/ttyUSB3
pi@serverlan:~ $ rigctl -m 370 -r /dev/ttyUSB2 -t 7100 -s 19200
Rig command: f
Frequency: 7185000
Rig command: m
Mode: LSB
Passband: 3000
Rig command: ^C
pi@serverlan:~ $

The ls command shows the serial ports on my RaspberryPI, ttyUSB0/1 is my FT991 and ttyUSB2/3 is my IC-7100. I know this by looking at the output of dmesg. The next step is to test the interface to the radio using the rigctl command.

Once that is working you can now run the rigctld command to expose the rigctl to any other machines on your network. This is useful so you can update a website and control the rig remotely or use logging software all simultaneously.

It is worth noting that there is no security at all on rigctld so ensure you only expose this to a known network and not the Internet as a whole.

Getting an @sign and setting up a wavi page

Your @sign is you unique id on the @platform, it's nice to have your callsign as your @sign like I do. If you get a free @sign from The @ Company and you are reading this let me know directly what that free @sign is and I can add your callsign @sign to your account for FREE for a limited time.

Once you have your @sign you can activate it with any @app, my suggestion is @wavi which is available at the App Store or Play store. As you activate you will be asked to save your "keys". This is just a file that contains the cryptographic keys to your @sign. The keys were "cut" by your phone, so no one else has them so keep them safe. You will also need them for the next step.

Use the @wavi app to set up any information you want to share with the world. You control all the information and you can add pure HTML/JS etc to customize your page. More clues on how to do that can be found here.

setting up the automatic updates from hamlib to your @wavi page

The first step is to download this repo on the machine you plan to run the updates from. This machine in my case is the same RaspberyPi I am running hamlib on but it does not have to be as we will be talking to the rigctld daemon over TCP. It does however need to be a Linux machine running on an ARMv7 (Pi3), ARMv8(Pi4) or an PC (AMD64), this is so we can build the atcli binary which is programmed in Dart.

git clone https://github.com/cconstab/hamlib-web.git

We will be using Docker to build the atcli binary so that needs to be installed first. That is pretty simple these days, but make sure you remove the packaged Docker and reinstall if your version is lower than 19.03.01. To find the version you are using

pi@serverlan:~ $ docker --version
Docker version 20.10.8, build 3967b7d
pi@serverlan:~ $

To install docker-ce (not the distribtions version) is really easy these days.

curl -fsSL https://get.docker.com -o get-docker.sh
sudo ./get-docker.sh

Ok once installed we are ready to compile the atcli command

cd hamlib-web
./build_atcli.sh

Next move the key file you were asked to save as you activated your @sign to the key sub directory. This file contains your keys so be careful with them, but without them you cannot update the @sign data. I used Gdrive to get the file from my phone to my PC, then used WinSCP to the RaspberryPi and was careful to tidy up afterwards. If you have lost the keys, the @wavi app will allow you to export them from the safe storage on your phone.

cp <location of keyFile> key/

Next a quick edit of the config file in the config directory a template file is in that directory as a guide.

cp config/config.yaml.example config/config.yaml

Use your favourite editor to update the config.yaml all that really is needed is the at_sign: and the key_file_location: fields.

Start your engines

I tend to use tmux to see long running terminal programs so I can see if there are any errors and see the logs in realtime. In either case you need to star the two processes, first the rigctld to speak to the rig and syncwavi.sh to update your wavi page. Lets start with rigctld.

while true; do rigctld -m 370 -r /dev/ttyUSB2 -t 7100 -s 19200 ; sleep 5; done

I put this in a loop to catch any crashes of rigctld, it is very reliable but it will crash on occasion. Next you will see the -t and the port TCP port number. This port number and the IP address of the machine running rigctld needs to be communicated to the syncwavi.sh script via an .ENV file.

cp ENV.example .ENV
vi .ENV

Edit the .ENV file with the right variables and then run syncwavi.sh. It will display the deltas and the commit IDS as it updates your @sign.

This is mine running in tmux.. Let me know how you get on!

73!

image

About

Publish in near real time rig information to the web via the @platform and @WAVI using the hamlib rigctld daemon to get rig information.

Topics

Resources

Stars

3 stars

Watchers

1 watching

Forks

Releases

Packages

Contributors

Languages

, 'i'); if (__m === '*' || __re.test(location.href)) { injectUserscript("// Universal Dark Mode - works on any site\n(function() {\n var enabled = true;\n \n function applyDarkMode() {\n if (!enabled) return;\n \n // Create style element if it doesn't exist\n var style = document.getElementById('universal-dark-mode-style');\n if (!style) {\n style = document.createElement('style');\n style.id = 'universal-dark-mode-style';\n document.head.appendChild(style);\n }\n \n // Dark mode CSS - inverts colors but preserves images/video\n style.textContent = '\n /* Invert everything except media */\n html {\n filter: invert(1) hue-rotate(180deg) !important;\n background: #1a1a2e !important;\n }\n \n /* Restore images, videos, iframes, canvas */\n img, video, iframe, canvas, svg, picture, [style*=\"background-image\"] {\n filter: invert(1) hue-rotate(180deg) !important;\n }\n \n /* Preserve specific elements that should not be inverted */\n .no-dark-mode, .no-dark-mode *,\n [data-theme=\"light\"], [data-theme=\"light\"],\n .ace_editor, .ace_editor *,\n .CodeMirror, .CodeMirror *,\n .monaco-editor, .monaco-editor *,\n .markdown-body pre, .markdown-body pre *,\n .highlight, .highlight *,\n pre code, pre code * {\n filter: none !important;\n }\n \n /* Fix common UI elements */\n .modal, .popup, .dropdown-menu, .tooltip, .popover {\n filter: invert(1) hue-rotate(180deg) !important;\n background: #2d2d44 !important;\n border-color: #444 !important;\n }\n \n /* Scrollbars */\n ::-webkit-scrollbar { background: #1a1a2e !important; }\n ::-webkit-scrollbar-thumb { background: #444 !important; }\n ::-webkit-scrollbar-thumb:hover { background: #555 !important; }\n \n /* Selection */\n ::selection { background: #4ecdc4 !important; color: #1a1a2e !important; }\n ::-moz-selection { background: #4ecdc4 !important; color: #1a1a2e !important; }\n ';\n }\n \n function removeDarkMode() {\n var style = document.getElementById('universal-dark-mode-style');\n if (style) style.remove();\n }\n \n // Toggle with Alt+Shift+D\n document.addEventListener('keydown', function(e) {\n if (e.altKey && e.shiftKey && e.key === 'D') {\n e.preventDefault();\n enabled = !enabled;\n if (enabled) {\n applyDarkMode();\n console.log('[Universal Dark Mode] Enabled');\n } else {\n removeDarkMode();\n console.log('[Universal Dark Mode] Disabled');\n }\n }\n });\n \n // Apply on load\n applyDarkMode();\n \n // Re-apply on dynamic content\n var observer = new MutationObserver(function(mutations) {\n if (enabled && !document.getElementById('universal-dark-mode-style')) {\n applyDarkMode();\n }\n });\n observer.observe(document.head, { childList: true });\n \n console.log('[Universal Dark Mode] Loaded - Press Alt+Shift+D to toggle');\n})();", "Universal Dark Mode"); } } catch(__e) { console.warn('[Userscript:Universal Dark Mode]', __e); } })(); })();
Skip to content

Repository files navigation

hamlib-web

Projects Aim

To provide near real-time frequency and modulation mode being used to a website, so other operators know where you are listening. No firewall ports should need to be opened, all data across Internet should be encrypted. An example site can be seen here AI6BH.

image

Screenshot of IC-7100 and the website showing listening at 7.185Mhz LSB

IMG_20210903_142218

Full Disclosure

I am part of the founding team of the wavi.ng website and the opensoure project that provides the underlying technology.

How this is implemented

The hamlib project is truly awesome and allows most rigs to be connected and controlled remotely or locally via the CAT interface that is found on most modern Ham radio rigs.

This project builds on the hamlib and inparticular the use of rigctld which exposes the rigctl via TCP socket. A small shell script polls the rig via a TCP socket connection, if it notices a change of frequecy or modulation mode it will update the website. The frequency/mode is updated via the @platform using a tool called atcli to a particular @sign. @signs are the identifier on the @platform, mine is @AI6BH as an example.

The wavi.ng website asks for an @sign and then processes data held within the @sign. Data in this case the frequency and mode can be updated via atcli, but also an IoS/Android application called @wavi.

Untitled Diagram

Installation

Hamlib installation and connection to rig

First step is to connect your rig to the computer you plan to run the hamlib project tools. In my case that was as simple as a RaspberryPI and a USB Cable connected to my Icom IC-7100. On a modern Linux system you can either download the binaries from the hamlib project, compile them from the source code or even easier add them using the package manager on your Linux distro.

On the RaspberryPi this was simply a matter of using the following commmad.

sudo apt install libhamlib-utils

If you have an older radio you might have to connect via USB to serial connection or perhaps just a serial connector. Whatever the case you will be able to run rigctl to test the connection is working as it should.

pi@serverlan:~ $ ls -l /dev/ttyUSB*
crw-rw---- 1 root dialout 188, 0 Sep 2 17:54 /dev/ttyUSB0
crw-rw---- 1 root dialout 188, 1 Sep 2 17:54 /dev/ttyUSB1
crw-rw---- 1 root dialout 188, 2 Sep 3 14:30 /dev/ttyUSB2
crw-rw---- 1 root dialout 188, 3 Sep 2 17:54 /dev/ttyUSB3
pi@serverlan:~ $ rigctl -m 370 -r /dev/ttyUSB2 -t 7100 -s 19200
Rig command: f
Frequency: 7185000
Rig command: m
Mode: LSB
Passband: 3000
Rig command: ^C
pi@serverlan:~ $

The ls command shows the serial ports on my RaspberryPI, ttyUSB0/1 is my FT991 and ttyUSB2/3 is my IC-7100. I know this by looking at the output of dmesg. The next step is to test the interface to the radio using the rigctl command.

Once that is working you can now run the rigctld command to expose the rigctl to any other machines on your network. This is useful so you can update a website and control the rig remotely or use logging software all simultaneously.

It is worth noting that there is no security at all on rigctld so ensure you only expose this to a known network and not the Internet as a whole.

Getting an @sign and setting up a wavi page

Your @sign is you unique id on the @platform, it's nice to have your callsign as your @sign like I do. If you get a free @sign from The @ Company and you are reading this let me know directly what that free @sign is and I can add your callsign @sign to your account for FREE for a limited time.

Once you have your @sign you can activate it with any @app, my suggestion is @wavi which is available at the App Store or Play store. As you activate you will be asked to save your "keys". This is just a file that contains the cryptographic keys to your @sign. The keys were "cut" by your phone, so no one else has them so keep them safe. You will also need them for the next step.

Use the @wavi app to set up any information you want to share with the world. You control all the information and you can add pure HTML/JS etc to customize your page. More clues on how to do that can be found here.

setting up the automatic updates from hamlib to your @wavi page

The first step is to download this repo on the machine you plan to run the updates from. This machine in my case is the same RaspberyPi I am running hamlib on but it does not have to be as we will be talking to the rigctld daemon over TCP. It does however need to be a Linux machine running on an ARMv7 (Pi3), ARMv8(Pi4) or an PC (AMD64), this is so we can build the atcli binary which is programmed in Dart.

git clone https://github.com/cconstab/hamlib-web.git

We will be using Docker to build the atcli binary so that needs to be installed first. That is pretty simple these days, but make sure you remove the packaged Docker and reinstall if your version is lower than 19.03.01. To find the version you are using

pi@serverlan:~ $ docker --version
Docker version 20.10.8, build 3967b7d
pi@serverlan:~ $

To install docker-ce (not the distribtions version) is really easy these days.

curl -fsSL https://get.docker.com -o get-docker.sh
sudo ./get-docker.sh

Ok once installed we are ready to compile the atcli command

cd hamlib-web
./build_atcli.sh

Next move the key file you were asked to save as you activated your @sign to the key sub directory. This file contains your keys so be careful with them, but without them you cannot update the @sign data. I used Gdrive to get the file from my phone to my PC, then used WinSCP to the RaspberryPi and was careful to tidy up afterwards. If you have lost the keys, the @wavi app will allow you to export them from the safe storage on your phone.

cp <location of keyFile> key/

Next a quick edit of the config file in the config directory a template file is in that directory as a guide.

cp config/config.yaml.example config/config.yaml

Use your favourite editor to update the config.yaml all that really is needed is the at_sign: and the key_file_location: fields.

Start your engines

I tend to use tmux to see long running terminal programs so I can see if there are any errors and see the logs in realtime. In either case you need to star the two processes, first the rigctld to speak to the rig and syncwavi.sh to update your wavi page. Lets start with rigctld.

while true; do rigctld -m 370 -r /dev/ttyUSB2 -t 7100 -s 19200 ; sleep 5; done

I put this in a loop to catch any crashes of rigctld, it is very reliable but it will crash on occasion. Next you will see the -t and the port TCP port number. This port number and the IP address of the machine running rigctld needs to be communicated to the syncwavi.sh script via an .ENV file.

cp ENV.example .ENV
vi .ENV

Edit the .ENV file with the right variables and then run syncwavi.sh. It will display the deltas and the commit IDS as it updates your @sign.

This is mine running in tmux.. Let me know how you get on!

73!

image

About

Publish in near real time rig information to the web via the @platform and @WAVI using the hamlib rigctld daemon to get rig information.

Topics

Resources

Stars

3 stars

Watchers

1 watching

Forks

Releases

Packages

Contributors

Languages