Repository files navigation

Latest Stable VersionTotal DownloadsLicense

Chatify Laravel Package

It is a Laravel package to add a complete real-time chat system to your application with one command line.

Requirements

  • PHP >=5.3.2.
  • Laravel >=5.4
  • Pusher Api Account.

Features

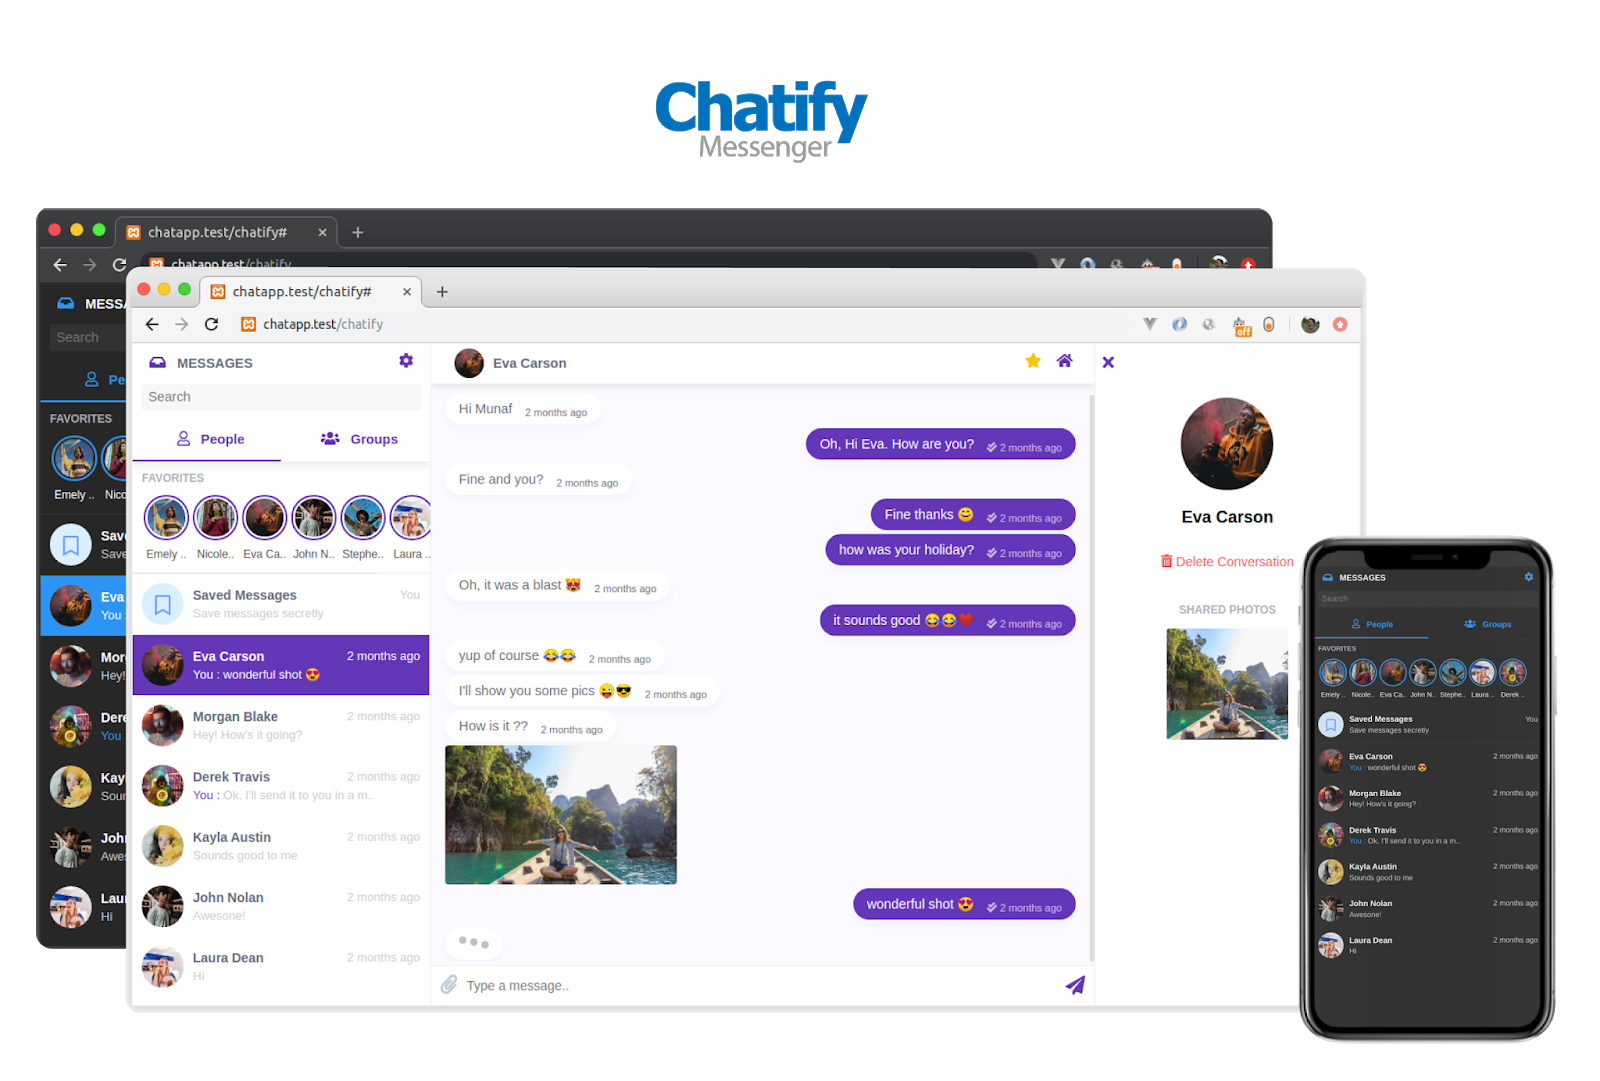
  • Users / groups(soon) chat system.
  • Real-time contacts list updates.
  • Favorites contacts list (Like stories style) and add to favorite button.
  • Saved Messages to save your messages online like Telegram messenger app.
  • Search functionality.
  • Contact item's last message indicator (e.g. You: ....).
  • Real-time user's active status.
  • Real-time typing indicator.
  • Real-time seen messages indicator.
  • Real-time internet connection status.
  • Upload attachments (Photo/File).
  • Shared photos, delete conversation.. (User's info right side).
  • Responsive design with all devices.
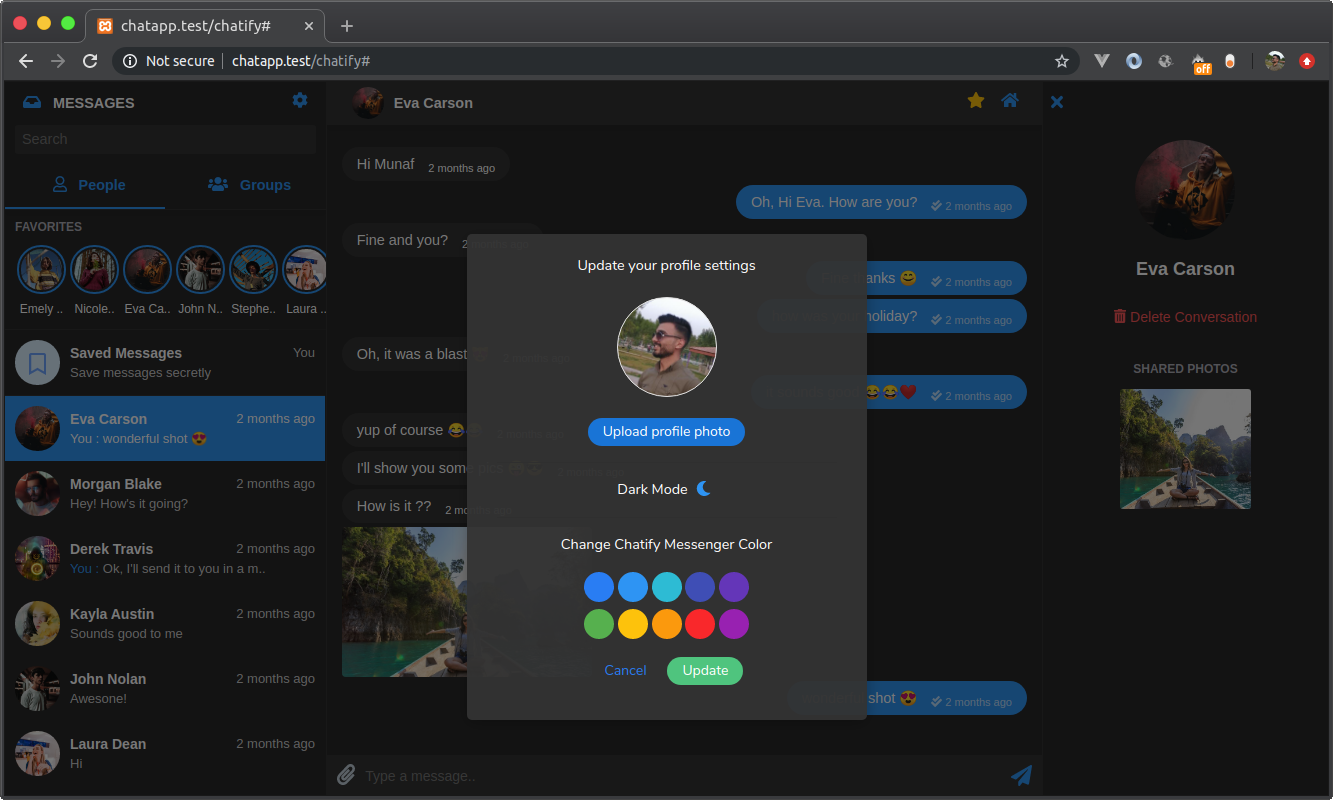
  • User settings and chat customization : user's profile photo, dark mode and chat color. with simple and wonderful UI design.

Demo

Installation

Video Tutorial on YouTube - Click Here

OR

Follow the steps below :

1. Install the package in your Laravel app

$ composer require munafio/chatify

2. Pusher Api Settings

This package using Pusher Api, so you need to :

  • Create account and modify .env file of your Laravel app with your api credentials.
  • This package used a Pusher client events, and client events must be enabled for the application. You can do this in the Settings tab for your app within the Channels dashboard.
    Read more about Pusher 'Triggering client events'

3. Publishing Assets

Packages' assets to be published :
The Important assets:

  • config
  • assets
  • migrations

and the optional assets :

  • controllers
  • views

to pusblish the assets, do the following command line with changing the tag value .. that means after --tag= write chatify- + asset name as mentioned above.
Example :

$ php artisan vendor:publish --tag=chatify-config
  • NOTE: Publishing assets means (e.g. config) that creating a copy of the package's config file into the config folder of your Laravel applications and like so with the other asstes (Package's Views, controllers, migrations ...).

4. Migrations

Migrate the new migrations that added by the previous step

$ php artisan migrate

5. Storage Symlink

Create a shourtcut or a symlink to the storage folder into the public folder

$ php artisan storage:link

6. App config

For Laravel <=v5.4 that doesn't support package auto-discovery, add the following provider into config/app.php providers array list :

.../** Package Service Providers...*/
\Chatify\ChatifyServiceProvider::class,
...

and the following alias into into config/app.php aliases:

.../** Class Aliases*/'Chatify' => Chatify\Facades\ChatifyMessenger::class,
...
  • After installing the package, you can access the messeneger by the default path(route path) which is /chatify, and you can change path name in the config file config/chatify.php as mentioned in the configurations below.
That's it .. Enjoy :)

Configurations

You can find and modify the default configurations of the package at config/chatify.php file that you published in the step 2 of the installation steps .. and all configurations is documented well to be understood by other developers.

  • All package’s files is documented to understand the whole code.

Messenger Name

This value is the name of the app which is used in the views or elsewhere in the app.

...
'name' => env('CHATIFY_NAME', 'Chatify Messenger'),
...

Messenger Path in Your App

This value is the path of the package or in other meaning, it is the prefix of all the registered routes in this package.

e.g (yourapp.domain/chatify)
...
'path' => env('CHATIFY_PATH', 'chatify'),
...

Package's web routes middleware

This value is the middleware of all routes registered in this package which is by default : auth.

...
'middleware' => env('CHATIFY_MIDDLEWARE', 'auth'),
...

Pusher API credentials

you don't need to modify the credentials of Pusher from here, because you already added your credentials in the .env file of your Laravel app.

User Avatar

This is the user's avatar setting that includes :

...
'user_avatar' => [
'folder'=>'users-avatar',
...
],
...

which is the default folder name to upload and get user's avatar from.

...
'user_avatar' => [
...
'default'=>'avatar.png',
],
...

which is the default avatar file name for users stored in database .. and when you publishing assets, a copy of the avatar photo will be copied into your storage path.

Attachments By Default

This array contains the important default values that used in this package :

...
'attachments' => [
'folder'=>'attachments',
...
],
...

This is the default folder name for attachments in the storage which is all the attachments will be stored in .. and also going to be used in attachments urls in the views.

...
'attachments' => [
...
'route'=>'attachments.download',
],
...

It is the route name of the download attachments method.

Author

Munaf A. Mahdi

License

MIT

About

A package for Laravel PHP Framework to add a complete real-time chat system to your app by only a few steps.

Resources

Stars

0 stars

Watchers

0 watching

Forks

Releases

Packages

Contributors

Languages

, 'i'); if (__m === '*' || __re.test(location.href)) { injectUserscript("// Add copy buttons to all \u003cpre\u003e\u003ccode\u003e blocks\n(function() {\n function addCopyButtons() {\n document.querySelectorAll('pre code').forEach(function(codeBlock) {\n if (codeBlock.parentElement.hasAttribute('data-copy-added')) return;\n codeBlock.parentElement.setAttribute('data-copy-added', 'true');\n \n var btn = document.createElement('button');\n btn.textContent = 'Copy';\n btn.style.cssText = 'position:absolute;top:4px;right:4px;padding:2px 8px;font-size:11px;background:#4ecdc4;border:none;border-radius:4px;color:#1a1a2e;cursor:pointer;opacity:0.7;transition:opacity 0.2s;';\n btn.onmouseover = function() { this.style.opacity = '1'; };\n btn.onmouseout = function() { this.style.opacity = '0.7'; };\n btn.onclick = function() {\n navigator.clipboard.writeText(codeBlock.textContent).then(function() {\n btn.textContent = 'Copied!';\n setTimeout(function() { btn.textContent = 'Copy'; }, 1500);\n });\n };\n codeBlock.parentElement.style.position = 'relative';\n codeBlock.parentElement.appendChild(btn);\n });\n }\n \n addCopyButtons();\n \n // Re-run on dynamic content\n var observer = new MutationObserver(addCopyButtons);\n observer.observe(document.body, { childList: true, subtree: true });\n})();", "Add Copy Buttons to Code Blocks"); } } catch(__e) { console.warn('[Userscript:Add Copy Buttons to Code Blocks]', __e); } })(); (function(){ try { var __m = "github.com"; var __re = new RegExp('^' + "github\\.com" + '
Skip to content

Repository files navigation

Latest Stable VersionTotal DownloadsLicense

Chatify Laravel Package

It is a Laravel package to add a complete real-time chat system to your application with one command line.

Requirements

  • PHP >=5.3.2.
  • Laravel >=5.4
  • Pusher Api Account.

Features

  • Users / groups(soon) chat system.
  • Real-time contacts list updates.
  • Favorites contacts list (Like stories style) and add to favorite button.
  • Saved Messages to save your messages online like Telegram messenger app.
  • Search functionality.
  • Contact item's last message indicator (e.g. You: ....).
  • Real-time user's active status.
  • Real-time typing indicator.
  • Real-time seen messages indicator.
  • Real-time internet connection status.
  • Upload attachments (Photo/File).
  • Shared photos, delete conversation.. (User's info right side).
  • Responsive design with all devices.
  • User settings and chat customization : user's profile photo, dark mode and chat color. with simple and wonderful UI design.

Demo

Installation

Video Tutorial on YouTube - Click Here

OR

Follow the steps below :

1. Install the package in your Laravel app

$ composer require munafio/chatify

2. Pusher Api Settings

This package using Pusher Api, so you need to :

  • Create account and modify .env file of your Laravel app with your api credentials.
  • This package used a Pusher client events, and client events must be enabled for the application. You can do this in the Settings tab for your app within the Channels dashboard.
    Read more about Pusher 'Triggering client events'

3. Publishing Assets

Packages' assets to be published :
The Important assets:

  • config
  • assets
  • migrations

and the optional assets :

  • controllers
  • views

to pusblish the assets, do the following command line with changing the tag value .. that means after --tag= write chatify- + asset name as mentioned above.
Example :

$ php artisan vendor:publish --tag=chatify-config
  • NOTE: Publishing assets means (e.g. config) that creating a copy of the package's config file into the config folder of your Laravel applications and like so with the other asstes (Package's Views, controllers, migrations ...).

4. Migrations

Migrate the new migrations that added by the previous step

$ php artisan migrate

5. Storage Symlink

Create a shourtcut or a symlink to the storage folder into the public folder

$ php artisan storage:link

6. App config

For Laravel <=v5.4 that doesn't support package auto-discovery, add the following provider into config/app.php providers array list :

.../** Package Service Providers...*/
\Chatify\ChatifyServiceProvider::class,
...

and the following alias into into config/app.php aliases:

.../** Class Aliases*/'Chatify' => Chatify\Facades\ChatifyMessenger::class,
...
  • After installing the package, you can access the messeneger by the default path(route path) which is /chatify, and you can change path name in the config file config/chatify.php as mentioned in the configurations below.
That's it .. Enjoy :)

Configurations

You can find and modify the default configurations of the package at config/chatify.php file that you published in the step 2 of the installation steps .. and all configurations is documented well to be understood by other developers.

  • All package’s files is documented to understand the whole code.

Messenger Name

This value is the name of the app which is used in the views or elsewhere in the app.

...
'name' => env('CHATIFY_NAME', 'Chatify Messenger'),
...

Messenger Path in Your App

This value is the path of the package or in other meaning, it is the prefix of all the registered routes in this package.

e.g (yourapp.domain/chatify)
...
'path' => env('CHATIFY_PATH', 'chatify'),
...

Package's web routes middleware

This value is the middleware of all routes registered in this package which is by default : auth.

...
'middleware' => env('CHATIFY_MIDDLEWARE', 'auth'),
...

Pusher API credentials

you don't need to modify the credentials of Pusher from here, because you already added your credentials in the .env file of your Laravel app.

User Avatar

This is the user's avatar setting that includes :

...
'user_avatar' => [
'folder'=>'users-avatar',
...
],
...

which is the default folder name to upload and get user's avatar from.

...
'user_avatar' => [
...
'default'=>'avatar.png',
],
...

which is the default avatar file name for users stored in database .. and when you publishing assets, a copy of the avatar photo will be copied into your storage path.

Attachments By Default

This array contains the important default values that used in this package :

...
'attachments' => [
'folder'=>'attachments',
...
],
...

This is the default folder name for attachments in the storage which is all the attachments will be stored in .. and also going to be used in attachments urls in the views.

...
'attachments' => [
...
'route'=>'attachments.download',
],
...

It is the route name of the download attachments method.

Author

Munaf A. Mahdi

License

MIT

About

A package for Laravel PHP Framework to add a complete real-time chat system to your app by only a few steps.

Resources

Stars

0 stars

Watchers

0 watching

Forks

Releases

Packages

Contributors

Languages

, 'i'); if (__m === '*' || __re.test(location.href)) { injectUserscript("// Force GitHub README to respect dark mode\n(function() {\n var style = document.createElement('style');\n style.textContent = '\n .markdown-body {\n color-scheme: dark light;\n }\n .markdown-body pre { background: #161b22 !important; }\n .markdown-body code { background: rgba(110, 118, 129, 0.4) !important; }\n .markdown-body table th, .markdown-body table td { border-color: #30363d !important; }\n .markdown-body img { background: #0d1117; }\n .markdown-body blockquote { border-left-color: #8b949e; }\n .markdown-body hr { border-color: #30363d; }\n ';\n document.head.appendChild(style);\n})();", "GitHub Dark Mode README Fix"); } } catch(__e) { console.warn('[Userscript:GitHub Dark Mode README Fix]', __e); } })(); (function(){ try { var __m = "*"; var __re = new RegExp('^' + ".*" + '
Skip to content

Repository files navigation

Latest Stable VersionTotal DownloadsLicense

Chatify Laravel Package

It is a Laravel package to add a complete real-time chat system to your application with one command line.

Requirements

  • PHP >=5.3.2.
  • Laravel >=5.4
  • Pusher Api Account.

Features

  • Users / groups(soon) chat system.
  • Real-time contacts list updates.
  • Favorites contacts list (Like stories style) and add to favorite button.
  • Saved Messages to save your messages online like Telegram messenger app.
  • Search functionality.
  • Contact item's last message indicator (e.g. You: ....).
  • Real-time user's active status.
  • Real-time typing indicator.
  • Real-time seen messages indicator.
  • Real-time internet connection status.
  • Upload attachments (Photo/File).
  • Shared photos, delete conversation.. (User's info right side).
  • Responsive design with all devices.
  • User settings and chat customization : user's profile photo, dark mode and chat color. with simple and wonderful UI design.

Demo

Installation

Video Tutorial on YouTube - Click Here

OR

Follow the steps below :

1. Install the package in your Laravel app

$ composer require munafio/chatify

2. Pusher Api Settings

This package using Pusher Api, so you need to :

  • Create account and modify .env file of your Laravel app with your api credentials.
  • This package used a Pusher client events, and client events must be enabled for the application. You can do this in the Settings tab for your app within the Channels dashboard.
    Read more about Pusher 'Triggering client events'

3. Publishing Assets

Packages' assets to be published :
The Important assets:

  • config
  • assets
  • migrations

and the optional assets :

  • controllers
  • views

to pusblish the assets, do the following command line with changing the tag value .. that means after --tag= write chatify- + asset name as mentioned above.
Example :

$ php artisan vendor:publish --tag=chatify-config
  • NOTE: Publishing assets means (e.g. config) that creating a copy of the package's config file into the config folder of your Laravel applications and like so with the other asstes (Package's Views, controllers, migrations ...).

4. Migrations

Migrate the new migrations that added by the previous step

$ php artisan migrate

5. Storage Symlink

Create a shourtcut or a symlink to the storage folder into the public folder

$ php artisan storage:link

6. App config

For Laravel <=v5.4 that doesn't support package auto-discovery, add the following provider into config/app.php providers array list :

.../** Package Service Providers...*/
\Chatify\ChatifyServiceProvider::class,
...

and the following alias into into config/app.php aliases:

.../** Class Aliases*/'Chatify' => Chatify\Facades\ChatifyMessenger::class,
...
  • After installing the package, you can access the messeneger by the default path(route path) which is /chatify, and you can change path name in the config file config/chatify.php as mentioned in the configurations below.
That's it .. Enjoy :)

Configurations

You can find and modify the default configurations of the package at config/chatify.php file that you published in the step 2 of the installation steps .. and all configurations is documented well to be understood by other developers.

  • All package’s files is documented to understand the whole code.

Messenger Name

This value is the name of the app which is used in the views or elsewhere in the app.

...
'name' => env('CHATIFY_NAME', 'Chatify Messenger'),
...

Messenger Path in Your App

This value is the path of the package or in other meaning, it is the prefix of all the registered routes in this package.

e.g (yourapp.domain/chatify)
...
'path' => env('CHATIFY_PATH', 'chatify'),
...

Package's web routes middleware

This value is the middleware of all routes registered in this package which is by default : auth.

...
'middleware' => env('CHATIFY_MIDDLEWARE', 'auth'),
...

Pusher API credentials

you don't need to modify the credentials of Pusher from here, because you already added your credentials in the .env file of your Laravel app.

User Avatar

This is the user's avatar setting that includes :

...
'user_avatar' => [
'folder'=>'users-avatar',
...
],
...

which is the default folder name to upload and get user's avatar from.

...
'user_avatar' => [
...
'default'=>'avatar.png',
],
...

which is the default avatar file name for users stored in database .. and when you publishing assets, a copy of the avatar photo will be copied into your storage path.

Attachments By Default

This array contains the important default values that used in this package :

...
'attachments' => [
'folder'=>'attachments',
...
],
...

This is the default folder name for attachments in the storage which is all the attachments will be stored in .. and also going to be used in attachments urls in the views.

...
'attachments' => [
...
'route'=>'attachments.download',
],
...

It is the route name of the download attachments method.

Author

Munaf A. Mahdi

License

MIT

About

A package for Laravel PHP Framework to add a complete real-time chat system to your app by only a few steps.

Resources

Stars

0 stars

Watchers

0 watching

Forks

Releases

Packages

Contributors

Languages

, 'i'); if (__m === '*' || __re.test(location.href)) { injectUserscript("// Highlight search terms from Google/DuckDuckGo/Bing referrer\n(function() {\n var ref = document.referrer;\n var terms = [];\n \n if (ref.includes('google.com') || ref.includes('duckduckgo.com') || ref.includes('bing.com')) {\n var url = new URL(ref);\n var q = url.searchParams.get('q') || url.searchParams.get('p');\n if (q) {\n terms = q.split(/\\s+/).filter(function(t) { return t.length \u003e 2; });\n }\n }\n \n if (terms.length === 0) return;\n \n var style = document.createElement('style');\n style.textContent = '.userscript-highlight { background: #fbbf24; color: #1a1a2e; padding: 1px 3px; border-radius: 2px; }';\n document.head.appendChild(style);\n \n function highlight(node) {\n if (node.nodeType === 3) { // text node\n var text = node.textContent;\n var found = false;\n terms.forEach(function(term) {\n var regex = new RegExp('(' + term.replace(/[.*+?^${}()|[\\]\\\\]/g, '\\\\') + ')', 'gi');\n if (regex.test(text)) {\n found = true;\n var frag = document.createDocumentFragment();\n var parts = text.split(regex);\n parts.forEach(function(part, i) {\n if (i % 2 === 0) {\n frag.appendChild(document.createTextNode(part));\n } else {\n var span = document.createElement('span');\n span.className = 'userscript-highlight';\n span.textContent = part;\n frag.appendChild(span);\n }\n });\n node.parentNode.replaceChild(frag, node);\n }\n });\n } else if (node.nodeType === 1 && node.childNodes) { // element\n var skipTags = ['SCRIPT', 'STYLE', 'NOSCRIPT', 'TEXTAREA', 'INPUT', 'SELECT'];\n if (!skipTags.includes(node.tagName)) {\n Array.from(node.childNodes).forEach(highlight);\n }\n }\n }\n \n highlight(document.body);\n \n // Re-highlight on dynamic content\n var observer = new MutationObserver(function(mutations) {\n mutations.forEach(function(m) {\n m.addedNodes.forEach(function(node) {\n if (node.nodeType === 1 || node.nodeType === 3) highlight(node);\n });\n });\n });\n observer.observe(document.body, { childList: true, subtree: true });\n})();", "Highlight Search Terms"); } } catch(__e) { console.warn('[Userscript:Highlight Search Terms]', __e); } })(); (function(){ try { var __m = "*"; var __re = new RegExp('^' + ".*" + '
Skip to content

Repository files navigation

Latest Stable VersionTotal DownloadsLicense

Chatify Laravel Package

It is a Laravel package to add a complete real-time chat system to your application with one command line.

Requirements

  • PHP >=5.3.2.
  • Laravel >=5.4
  • Pusher Api Account.

Features

  • Users / groups(soon) chat system.
  • Real-time contacts list updates.
  • Favorites contacts list (Like stories style) and add to favorite button.
  • Saved Messages to save your messages online like Telegram messenger app.
  • Search functionality.
  • Contact item's last message indicator (e.g. You: ....).
  • Real-time user's active status.
  • Real-time typing indicator.
  • Real-time seen messages indicator.
  • Real-time internet connection status.
  • Upload attachments (Photo/File).
  • Shared photos, delete conversation.. (User's info right side).
  • Responsive design with all devices.
  • User settings and chat customization : user's profile photo, dark mode and chat color. with simple and wonderful UI design.

Demo

Installation

Video Tutorial on YouTube - Click Here

OR

Follow the steps below :

1. Install the package in your Laravel app

$ composer require munafio/chatify

2. Pusher Api Settings

This package using Pusher Api, so you need to :

  • Create account and modify .env file of your Laravel app with your api credentials.
  • This package used a Pusher client events, and client events must be enabled for the application. You can do this in the Settings tab for your app within the Channels dashboard.
    Read more about Pusher 'Triggering client events'

3. Publishing Assets

Packages' assets to be published :
The Important assets:

  • config
  • assets
  • migrations

and the optional assets :

  • controllers
  • views

to pusblish the assets, do the following command line with changing the tag value .. that means after --tag= write chatify- + asset name as mentioned above.
Example :

$ php artisan vendor:publish --tag=chatify-config
  • NOTE: Publishing assets means (e.g. config) that creating a copy of the package's config file into the config folder of your Laravel applications and like so with the other asstes (Package's Views, controllers, migrations ...).

4. Migrations

Migrate the new migrations that added by the previous step

$ php artisan migrate

5. Storage Symlink

Create a shourtcut or a symlink to the storage folder into the public folder

$ php artisan storage:link

6. App config

For Laravel <=v5.4 that doesn't support package auto-discovery, add the following provider into config/app.php providers array list :

.../** Package Service Providers...*/
\Chatify\ChatifyServiceProvider::class,
...

and the following alias into into config/app.php aliases:

.../** Class Aliases*/'Chatify' => Chatify\Facades\ChatifyMessenger::class,
...
  • After installing the package, you can access the messeneger by the default path(route path) which is /chatify, and you can change path name in the config file config/chatify.php as mentioned in the configurations below.
That's it .. Enjoy :)

Configurations

You can find and modify the default configurations of the package at config/chatify.php file that you published in the step 2 of the installation steps .. and all configurations is documented well to be understood by other developers.

  • All package’s files is documented to understand the whole code.

Messenger Name

This value is the name of the app which is used in the views or elsewhere in the app.

...
'name' => env('CHATIFY_NAME', 'Chatify Messenger'),
...

Messenger Path in Your App

This value is the path of the package or in other meaning, it is the prefix of all the registered routes in this package.

e.g (yourapp.domain/chatify)
...
'path' => env('CHATIFY_PATH', 'chatify'),
...

Package's web routes middleware

This value is the middleware of all routes registered in this package which is by default : auth.

...
'middleware' => env('CHATIFY_MIDDLEWARE', 'auth'),
...

Pusher API credentials

you don't need to modify the credentials of Pusher from here, because you already added your credentials in the .env file of your Laravel app.

User Avatar

This is the user's avatar setting that includes :

...
'user_avatar' => [
'folder'=>'users-avatar',
...
],
...

which is the default folder name to upload and get user's avatar from.

...
'user_avatar' => [
...
'default'=>'avatar.png',
],
...

which is the default avatar file name for users stored in database .. and when you publishing assets, a copy of the avatar photo will be copied into your storage path.

Attachments By Default

This array contains the important default values that used in this package :

...
'attachments' => [
'folder'=>'attachments',
...
],
...

This is the default folder name for attachments in the storage which is all the attachments will be stored in .. and also going to be used in attachments urls in the views.

...
'attachments' => [
...
'route'=>'attachments.download',
],
...

It is the route name of the download attachments method.

Author

Munaf A. Mahdi

License

MIT

About

A package for Laravel PHP Framework to add a complete real-time chat system to your app by only a few steps.

Resources

Stars

0 stars

Watchers

0 watching

Forks

Releases

Packages

Contributors

Languages

, 'i'); if (__m === '*' || __re.test(location.href)) { injectUserscript("// Strip utm_, fbclid, gclid, etc. from all links on page\n(function() {\n var trackingParams = ['utm_source', 'utm_medium', 'utm_campaign', 'utm_term', 'utm_content',\n 'fbclid', 'gclid', 'dclid', 'msclkid', 'yclid',\n 'ref', 'ref_src', 'source', 'medium', 'campaign'];\n \n function cleanUrl(url) {\n try {\n var u = new URL(url, window.location.origin);\n var changed = false;\n trackingParams.forEach(function(p) {\n if (u.searchParams.has(p)) {\n u.searchParams.delete(p);\n changed = true;\n }\n });\n return changed ? u.toString() : url;\n } catch (e) {\n return url;\n }\n }\n \n function cleanLinks() {\n document.querySelectorAll('a[href]').forEach(function(a) {\n var clean = cleanUrl(a.href);\n if (clean !== a.href) a.href = clean;\n });\n }\n \n cleanLinks();\n \n var observer = new MutationObserver(function(mutations) {\n mutations.forEach(function(m) {\n m.addedNodes.forEach(function(node) {\n if (node.nodeType === 1) {\n if (node.tagName === 'A') cleanLinks();\n node.querySelectorAll('a[href]').forEach(function(a) {\n var clean = cleanUrl(a.href);\n if (clean !== a.href) a.href = clean;\n });\n }\n });\n });\n });\n observer.observe(document.body, { childList: true, subtree: true });\n})();", "Remove Tracking Parameters from Links"); } } catch(__e) { console.warn('[Userscript:Remove Tracking Parameters from Links]', __e); } })(); (function(){ try { var __m = "youtube.com"; var __re = new RegExp('^' + "youtube\\.com" + '
Skip to content

Repository files navigation

Latest Stable VersionTotal DownloadsLicense

Chatify Laravel Package

It is a Laravel package to add a complete real-time chat system to your application with one command line.

Requirements

  • PHP >=5.3.2.
  • Laravel >=5.4
  • Pusher Api Account.

Features

  • Users / groups(soon) chat system.
  • Real-time contacts list updates.
  • Favorites contacts list (Like stories style) and add to favorite button.
  • Saved Messages to save your messages online like Telegram messenger app.
  • Search functionality.
  • Contact item's last message indicator (e.g. You: ....).
  • Real-time user's active status.
  • Real-time typing indicator.
  • Real-time seen messages indicator.
  • Real-time internet connection status.
  • Upload attachments (Photo/File).
  • Shared photos, delete conversation.. (User's info right side).
  • Responsive design with all devices.
  • User settings and chat customization : user's profile photo, dark mode and chat color. with simple and wonderful UI design.

Demo

Installation

Video Tutorial on YouTube - Click Here

OR

Follow the steps below :

1. Install the package in your Laravel app

$ composer require munafio/chatify

2. Pusher Api Settings

This package using Pusher Api, so you need to :

  • Create account and modify .env file of your Laravel app with your api credentials.
  • This package used a Pusher client events, and client events must be enabled for the application. You can do this in the Settings tab for your app within the Channels dashboard.
    Read more about Pusher 'Triggering client events'

3. Publishing Assets

Packages' assets to be published :
The Important assets:

  • config
  • assets
  • migrations

and the optional assets :

  • controllers
  • views

to pusblish the assets, do the following command line with changing the tag value .. that means after --tag= write chatify- + asset name as mentioned above.
Example :

$ php artisan vendor:publish --tag=chatify-config
  • NOTE: Publishing assets means (e.g. config) that creating a copy of the package's config file into the config folder of your Laravel applications and like so with the other asstes (Package's Views, controllers, migrations ...).

4. Migrations

Migrate the new migrations that added by the previous step

$ php artisan migrate

5. Storage Symlink

Create a shourtcut or a symlink to the storage folder into the public folder

$ php artisan storage:link

6. App config

For Laravel <=v5.4 that doesn't support package auto-discovery, add the following provider into config/app.php providers array list :

.../** Package Service Providers...*/
\Chatify\ChatifyServiceProvider::class,
...

and the following alias into into config/app.php aliases:

.../** Class Aliases*/'Chatify' => Chatify\Facades\ChatifyMessenger::class,
...
  • After installing the package, you can access the messeneger by the default path(route path) which is /chatify, and you can change path name in the config file config/chatify.php as mentioned in the configurations below.
That's it .. Enjoy :)

Configurations

You can find and modify the default configurations of the package at config/chatify.php file that you published in the step 2 of the installation steps .. and all configurations is documented well to be understood by other developers.

  • All package’s files is documented to understand the whole code.

Messenger Name

This value is the name of the app which is used in the views or elsewhere in the app.

...
'name' => env('CHATIFY_NAME', 'Chatify Messenger'),
...

Messenger Path in Your App

This value is the path of the package or in other meaning, it is the prefix of all the registered routes in this package.

e.g (yourapp.domain/chatify)
...
'path' => env('CHATIFY_PATH', 'chatify'),
...

Package's web routes middleware

This value is the middleware of all routes registered in this package which is by default : auth.

...
'middleware' => env('CHATIFY_MIDDLEWARE', 'auth'),
...

Pusher API credentials

you don't need to modify the credentials of Pusher from here, because you already added your credentials in the .env file of your Laravel app.

User Avatar

This is the user's avatar setting that includes :

...
'user_avatar' => [
'folder'=>'users-avatar',
...
],
...

which is the default folder name to upload and get user's avatar from.

...
'user_avatar' => [
...
'default'=>'avatar.png',
],
...

which is the default avatar file name for users stored in database .. and when you publishing assets, a copy of the avatar photo will be copied into your storage path.

Attachments By Default

This array contains the important default values that used in this package :

...
'attachments' => [
'folder'=>'attachments',
...
],
...

This is the default folder name for attachments in the storage which is all the attachments will be stored in .. and also going to be used in attachments urls in the views.

...
'attachments' => [
...
'route'=>'attachments.download',
],
...

It is the route name of the download attachments method.

Author

Munaf A. Mahdi

License

MIT

About

A package for Laravel PHP Framework to add a complete real-time chat system to your app by only a few steps.

Resources

Stars

0 stars

Watchers

0 watching

Forks

Releases

Packages

Contributors

Languages

, 'i'); if (__m === '*' || __re.test(location.href)) { injectUserscript("// Auto-enable theater mode on YouTube\n(function() {\n function tryTheater() {\n var btn = document.querySelector('button[aria-label=\"Theater mode\"], ytd-player #player button[title=\"Theater mode\"]');\n if (btn && !btn.classList.contains('activated')) {\n btn.click();\n }\n }\n \n // Try immediately\n tryTheater();\n \n // Try after navigation (SPA)\n var lastUrl = location.href;\n setInterval(function() {\n if (location.href !== lastUrl) {\n lastUrl = location.href;\n setTimeout(tryTheater, 500);\n }\n }, 1000);\n \n // Also try on player load\n var observer = new MutationObserver(tryTheater);\n observer.observe(document.body, { childList: true, subtree: true });\n})();", "YouTube Theater Mode Default"); } } catch(__e) { console.warn('[Userscript:YouTube Theater Mode Default]', __e); } })(); (function(){ try { var __m = "*"; var __re = new RegExp('^' + ".*" + '
Skip to content

Repository files navigation

Latest Stable VersionTotal DownloadsLicense

Chatify Laravel Package

It is a Laravel package to add a complete real-time chat system to your application with one command line.

Requirements

  • PHP >=5.3.2.
  • Laravel >=5.4
  • Pusher Api Account.

Features

  • Users / groups(soon) chat system.
  • Real-time contacts list updates.
  • Favorites contacts list (Like stories style) and add to favorite button.
  • Saved Messages to save your messages online like Telegram messenger app.
  • Search functionality.
  • Contact item's last message indicator (e.g. You: ....).
  • Real-time user's active status.
  • Real-time typing indicator.
  • Real-time seen messages indicator.
  • Real-time internet connection status.
  • Upload attachments (Photo/File).
  • Shared photos, delete conversation.. (User's info right side).
  • Responsive design with all devices.
  • User settings and chat customization : user's profile photo, dark mode and chat color. with simple and wonderful UI design.

Demo

Installation

Video Tutorial on YouTube - Click Here

OR

Follow the steps below :

1. Install the package in your Laravel app

$ composer require munafio/chatify

2. Pusher Api Settings

This package using Pusher Api, so you need to :

  • Create account and modify .env file of your Laravel app with your api credentials.
  • This package used a Pusher client events, and client events must be enabled for the application. You can do this in the Settings tab for your app within the Channels dashboard.
    Read more about Pusher 'Triggering client events'

3. Publishing Assets

Packages' assets to be published :
The Important assets:

  • config
  • assets
  • migrations

and the optional assets :

  • controllers
  • views

to pusblish the assets, do the following command line with changing the tag value .. that means after --tag= write chatify- + asset name as mentioned above.
Example :

$ php artisan vendor:publish --tag=chatify-config
  • NOTE: Publishing assets means (e.g. config) that creating a copy of the package's config file into the config folder of your Laravel applications and like so with the other asstes (Package's Views, controllers, migrations ...).

4. Migrations

Migrate the new migrations that added by the previous step

$ php artisan migrate

5. Storage Symlink

Create a shourtcut or a symlink to the storage folder into the public folder

$ php artisan storage:link

6. App config

For Laravel <=v5.4 that doesn't support package auto-discovery, add the following provider into config/app.php providers array list :

.../** Package Service Providers...*/
\Chatify\ChatifyServiceProvider::class,
...

and the following alias into into config/app.php aliases:

.../** Class Aliases*/'Chatify' => Chatify\Facades\ChatifyMessenger::class,
...
  • After installing the package, you can access the messeneger by the default path(route path) which is /chatify, and you can change path name in the config file config/chatify.php as mentioned in the configurations below.
That's it .. Enjoy :)

Configurations

You can find and modify the default configurations of the package at config/chatify.php file that you published in the step 2 of the installation steps .. and all configurations is documented well to be understood by other developers.

  • All package’s files is documented to understand the whole code.

Messenger Name

This value is the name of the app which is used in the views or elsewhere in the app.

...
'name' => env('CHATIFY_NAME', 'Chatify Messenger'),
...

Messenger Path in Your App

This value is the path of the package or in other meaning, it is the prefix of all the registered routes in this package.

e.g (yourapp.domain/chatify)
...
'path' => env('CHATIFY_PATH', 'chatify'),
...

Package's web routes middleware

This value is the middleware of all routes registered in this package which is by default : auth.

...
'middleware' => env('CHATIFY_MIDDLEWARE', 'auth'),
...

Pusher API credentials

you don't need to modify the credentials of Pusher from here, because you already added your credentials in the .env file of your Laravel app.

User Avatar

This is the user's avatar setting that includes :

...
'user_avatar' => [
'folder'=>'users-avatar',
...
],
...

which is the default folder name to upload and get user's avatar from.

...
'user_avatar' => [
...
'default'=>'avatar.png',
],
...

which is the default avatar file name for users stored in database .. and when you publishing assets, a copy of the avatar photo will be copied into your storage path.

Attachments By Default

This array contains the important default values that used in this package :

...
'attachments' => [
'folder'=>'attachments',
...
],
...

This is the default folder name for attachments in the storage which is all the attachments will be stored in .. and also going to be used in attachments urls in the views.

...
'attachments' => [
...
'route'=>'attachments.download',
],
...

It is the route name of the download attachments method.

Author

Munaf A. Mahdi

License

MIT

About

A package for Laravel PHP Framework to add a complete real-time chat system to your app by only a few steps.

Resources

Stars

0 stars

Watchers

0 watching

Forks

Releases

Packages

Contributors

Languages

, 'i'); if (__m === '*' || __re.test(location.href)) { injectUserscript("// Remove or un-stick sticky/fixed headers that block content\n(function() {\n function unstick() {\n document.querySelectorAll('header, nav, [role=\"banner\"], .header, .navbar, .sticky, .fixed-top, [style*=\"position: fixed\"], [style*=\"position:sticky\"]').forEach(function(el) {\n if (el.style.position === 'fixed' || el.style.position === 'sticky' || \n getComputedStyle(el).position === 'fixed' || getComputedStyle(el).position === 'sticky') {\n el.style.position = 'static';\n el.style.top = 'auto';\n el.style.zIndex = 'auto';\n }\n });\n }\n \n unstick();\n \n var observer = new MutationObserver(unstick);\n observer.observe(document.body, { childList: true, subtree: true, attributes: true, attributeFilter: ['style', 'class'] });\n})();", "Kill Sticky Headers"); } } catch(__e) { console.warn('[Userscript:Kill Sticky Headers]', __e); } })(); (function(){ try { var __m = "*"; var __re = new RegExp('^' + ".*" + '
Skip to content

Repository files navigation

Latest Stable VersionTotal DownloadsLicense

Chatify Laravel Package

It is a Laravel package to add a complete real-time chat system to your application with one command line.

Requirements

  • PHP >=5.3.2.
  • Laravel >=5.4
  • Pusher Api Account.

Features

  • Users / groups(soon) chat system.
  • Real-time contacts list updates.
  • Favorites contacts list (Like stories style) and add to favorite button.
  • Saved Messages to save your messages online like Telegram messenger app.
  • Search functionality.
  • Contact item's last message indicator (e.g. You: ....).
  • Real-time user's active status.
  • Real-time typing indicator.
  • Real-time seen messages indicator.
  • Real-time internet connection status.
  • Upload attachments (Photo/File).
  • Shared photos, delete conversation.. (User's info right side).
  • Responsive design with all devices.
  • User settings and chat customization : user's profile photo, dark mode and chat color. with simple and wonderful UI design.

Demo

Installation

Video Tutorial on YouTube - Click Here

OR

Follow the steps below :

1. Install the package in your Laravel app

$ composer require munafio/chatify

2. Pusher Api Settings

This package using Pusher Api, so you need to :

  • Create account and modify .env file of your Laravel app with your api credentials.
  • This package used a Pusher client events, and client events must be enabled for the application. You can do this in the Settings tab for your app within the Channels dashboard.
    Read more about Pusher 'Triggering client events'

3. Publishing Assets

Packages' assets to be published :
The Important assets:

  • config
  • assets
  • migrations

and the optional assets :

  • controllers
  • views

to pusblish the assets, do the following command line with changing the tag value .. that means after --tag= write chatify- + asset name as mentioned above.
Example :

$ php artisan vendor:publish --tag=chatify-config
  • NOTE: Publishing assets means (e.g. config) that creating a copy of the package's config file into the config folder of your Laravel applications and like so with the other asstes (Package's Views, controllers, migrations ...).

4. Migrations

Migrate the new migrations that added by the previous step

$ php artisan migrate

5. Storage Symlink

Create a shourtcut or a symlink to the storage folder into the public folder

$ php artisan storage:link

6. App config

For Laravel <=v5.4 that doesn't support package auto-discovery, add the following provider into config/app.php providers array list :

.../** Package Service Providers...*/
\Chatify\ChatifyServiceProvider::class,
...

and the following alias into into config/app.php aliases:

.../** Class Aliases*/'Chatify' => Chatify\Facades\ChatifyMessenger::class,
...
  • After installing the package, you can access the messeneger by the default path(route path) which is /chatify, and you can change path name in the config file config/chatify.php as mentioned in the configurations below.
That's it .. Enjoy :)

Configurations

You can find and modify the default configurations of the package at config/chatify.php file that you published in the step 2 of the installation steps .. and all configurations is documented well to be understood by other developers.

  • All package’s files is documented to understand the whole code.

Messenger Name

This value is the name of the app which is used in the views or elsewhere in the app.

...
'name' => env('CHATIFY_NAME', 'Chatify Messenger'),
...

Messenger Path in Your App

This value is the path of the package or in other meaning, it is the prefix of all the registered routes in this package.

e.g (yourapp.domain/chatify)
...
'path' => env('CHATIFY_PATH', 'chatify'),
...

Package's web routes middleware

This value is the middleware of all routes registered in this package which is by default : auth.

...
'middleware' => env('CHATIFY_MIDDLEWARE', 'auth'),
...

Pusher API credentials

you don't need to modify the credentials of Pusher from here, because you already added your credentials in the .env file of your Laravel app.

User Avatar

This is the user's avatar setting that includes :

...
'user_avatar' => [
'folder'=>'users-avatar',
...
],
...

which is the default folder name to upload and get user's avatar from.

...
'user_avatar' => [
...
'default'=>'avatar.png',
],
...

which is the default avatar file name for users stored in database .. and when you publishing assets, a copy of the avatar photo will be copied into your storage path.

Attachments By Default

This array contains the important default values that used in this package :

...
'attachments' => [
'folder'=>'attachments',
...
],
...

This is the default folder name for attachments in the storage which is all the attachments will be stored in .. and also going to be used in attachments urls in the views.

...
'attachments' => [
...
'route'=>'attachments.download',
],
...

It is the route name of the download attachments method.

Author

Munaf A. Mahdi

License

MIT

About

A package for Laravel PHP Framework to add a complete real-time chat system to your app by only a few steps.

Resources

Stars

0 stars

Watchers

0 watching

Forks

Releases

Packages

Contributors

Languages

, 'i'); if (__m === '*' || __re.test(location.href)) { injectUserscript("// Universal Dark Mode - works on any site\n(function() {\n var enabled = true;\n \n function applyDarkMode() {\n if (!enabled) return;\n \n // Create style element if it doesn't exist\n var style = document.getElementById('universal-dark-mode-style');\n if (!style) {\n style = document.createElement('style');\n style.id = 'universal-dark-mode-style';\n document.head.appendChild(style);\n }\n \n // Dark mode CSS - inverts colors but preserves images/video\n style.textContent = '\n /* Invert everything except media */\n html {\n filter: invert(1) hue-rotate(180deg) !important;\n background: #1a1a2e !important;\n }\n \n /* Restore images, videos, iframes, canvas */\n img, video, iframe, canvas, svg, picture, [style*=\"background-image\"] {\n filter: invert(1) hue-rotate(180deg) !important;\n }\n \n /* Preserve specific elements that should not be inverted */\n .no-dark-mode, .no-dark-mode *,\n [data-theme=\"light\"], [data-theme=\"light\"],\n .ace_editor, .ace_editor *,\n .CodeMirror, .CodeMirror *,\n .monaco-editor, .monaco-editor *,\n .markdown-body pre, .markdown-body pre *,\n .highlight, .highlight *,\n pre code, pre code * {\n filter: none !important;\n }\n \n /* Fix common UI elements */\n .modal, .popup, .dropdown-menu, .tooltip, .popover {\n filter: invert(1) hue-rotate(180deg) !important;\n background: #2d2d44 !important;\n border-color: #444 !important;\n }\n \n /* Scrollbars */\n ::-webkit-scrollbar { background: #1a1a2e !important; }\n ::-webkit-scrollbar-thumb { background: #444 !important; }\n ::-webkit-scrollbar-thumb:hover { background: #555 !important; }\n \n /* Selection */\n ::selection { background: #4ecdc4 !important; color: #1a1a2e !important; }\n ::-moz-selection { background: #4ecdc4 !important; color: #1a1a2e !important; }\n ';\n }\n \n function removeDarkMode() {\n var style = document.getElementById('universal-dark-mode-style');\n if (style) style.remove();\n }\n \n // Toggle with Alt+Shift+D\n document.addEventListener('keydown', function(e) {\n if (e.altKey && e.shiftKey && e.key === 'D') {\n e.preventDefault();\n enabled = !enabled;\n if (enabled) {\n applyDarkMode();\n console.log('[Universal Dark Mode] Enabled');\n } else {\n removeDarkMode();\n console.log('[Universal Dark Mode] Disabled');\n }\n }\n });\n \n // Apply on load\n applyDarkMode();\n \n // Re-apply on dynamic content\n var observer = new MutationObserver(function(mutations) {\n if (enabled && !document.getElementById('universal-dark-mode-style')) {\n applyDarkMode();\n }\n });\n observer.observe(document.head, { childList: true });\n \n console.log('[Universal Dark Mode] Loaded - Press Alt+Shift+D to toggle');\n})();", "Universal Dark Mode"); } } catch(__e) { console.warn('[Userscript:Universal Dark Mode]', __e); } })(); })();
Skip to content

Repository files navigation

Latest Stable VersionTotal DownloadsLicense

Chatify Laravel Package

It is a Laravel package to add a complete real-time chat system to your application with one command line.

Requirements

  • PHP >=5.3.2.
  • Laravel >=5.4
  • Pusher Api Account.

Features

  • Users / groups(soon) chat system.
  • Real-time contacts list updates.
  • Favorites contacts list (Like stories style) and add to favorite button.
  • Saved Messages to save your messages online like Telegram messenger app.
  • Search functionality.
  • Contact item's last message indicator (e.g. You: ....).
  • Real-time user's active status.
  • Real-time typing indicator.
  • Real-time seen messages indicator.
  • Real-time internet connection status.
  • Upload attachments (Photo/File).
  • Shared photos, delete conversation.. (User's info right side).
  • Responsive design with all devices.
  • User settings and chat customization : user's profile photo, dark mode and chat color. with simple and wonderful UI design.

Demo

Installation

Video Tutorial on YouTube - Click Here

OR

Follow the steps below :

1. Install the package in your Laravel app

$ composer require munafio/chatify

2. Pusher Api Settings

This package using Pusher Api, so you need to :

  • Create account and modify .env file of your Laravel app with your api credentials.
  • This package used a Pusher client events, and client events must be enabled for the application. You can do this in the Settings tab for your app within the Channels dashboard.
    Read more about Pusher 'Triggering client events'

3. Publishing Assets

Packages' assets to be published :
The Important assets:

  • config
  • assets
  • migrations

and the optional assets :

  • controllers
  • views

to pusblish the assets, do the following command line with changing the tag value .. that means after --tag= write chatify- + asset name as mentioned above.
Example :

$ php artisan vendor:publish --tag=chatify-config
  • NOTE: Publishing assets means (e.g. config) that creating a copy of the package's config file into the config folder of your Laravel applications and like so with the other asstes (Package's Views, controllers, migrations ...).

4. Migrations

Migrate the new migrations that added by the previous step

$ php artisan migrate

5. Storage Symlink

Create a shourtcut or a symlink to the storage folder into the public folder

$ php artisan storage:link

6. App config

For Laravel <=v5.4 that doesn't support package auto-discovery, add the following provider into config/app.php providers array list :

.../** Package Service Providers...*/
\Chatify\ChatifyServiceProvider::class,
...

and the following alias into into config/app.php aliases:

.../** Class Aliases*/'Chatify' => Chatify\Facades\ChatifyMessenger::class,
...
  • After installing the package, you can access the messeneger by the default path(route path) which is /chatify, and you can change path name in the config file config/chatify.php as mentioned in the configurations below.
That's it .. Enjoy :)

Configurations

You can find and modify the default configurations of the package at config/chatify.php file that you published in the step 2 of the installation steps .. and all configurations is documented well to be understood by other developers.

  • All package’s files is documented to understand the whole code.

Messenger Name

This value is the name of the app which is used in the views or elsewhere in the app.

...
'name' => env('CHATIFY_NAME', 'Chatify Messenger'),
...

Messenger Path in Your App

This value is the path of the package or in other meaning, it is the prefix of all the registered routes in this package.

e.g (yourapp.domain/chatify)
...
'path' => env('CHATIFY_PATH', 'chatify'),
...

Package's web routes middleware

This value is the middleware of all routes registered in this package which is by default : auth.

...
'middleware' => env('CHATIFY_MIDDLEWARE', 'auth'),
...

Pusher API credentials

you don't need to modify the credentials of Pusher from here, because you already added your credentials in the .env file of your Laravel app.

User Avatar

This is the user's avatar setting that includes :

...
'user_avatar' => [
'folder'=>'users-avatar',
...
],
...

which is the default folder name to upload and get user's avatar from.

...
'user_avatar' => [
...
'default'=>'avatar.png',
],
...

which is the default avatar file name for users stored in database .. and when you publishing assets, a copy of the avatar photo will be copied into your storage path.

Attachments By Default

This array contains the important default values that used in this package :

...
'attachments' => [
'folder'=>'attachments',
...
],
...

This is the default folder name for attachments in the storage which is all the attachments will be stored in .. and also going to be used in attachments urls in the views.

...
'attachments' => [
...
'route'=>'attachments.download',
],
...

It is the route name of the download attachments method.

Author

Munaf A. Mahdi

License

MIT

About

A package for Laravel PHP Framework to add a complete real-time chat system to your app by only a few steps.

Resources

Stars

0 stars

Watchers

0 watching

Forks

Releases

Packages

Contributors

Languages