
Repository files navigation

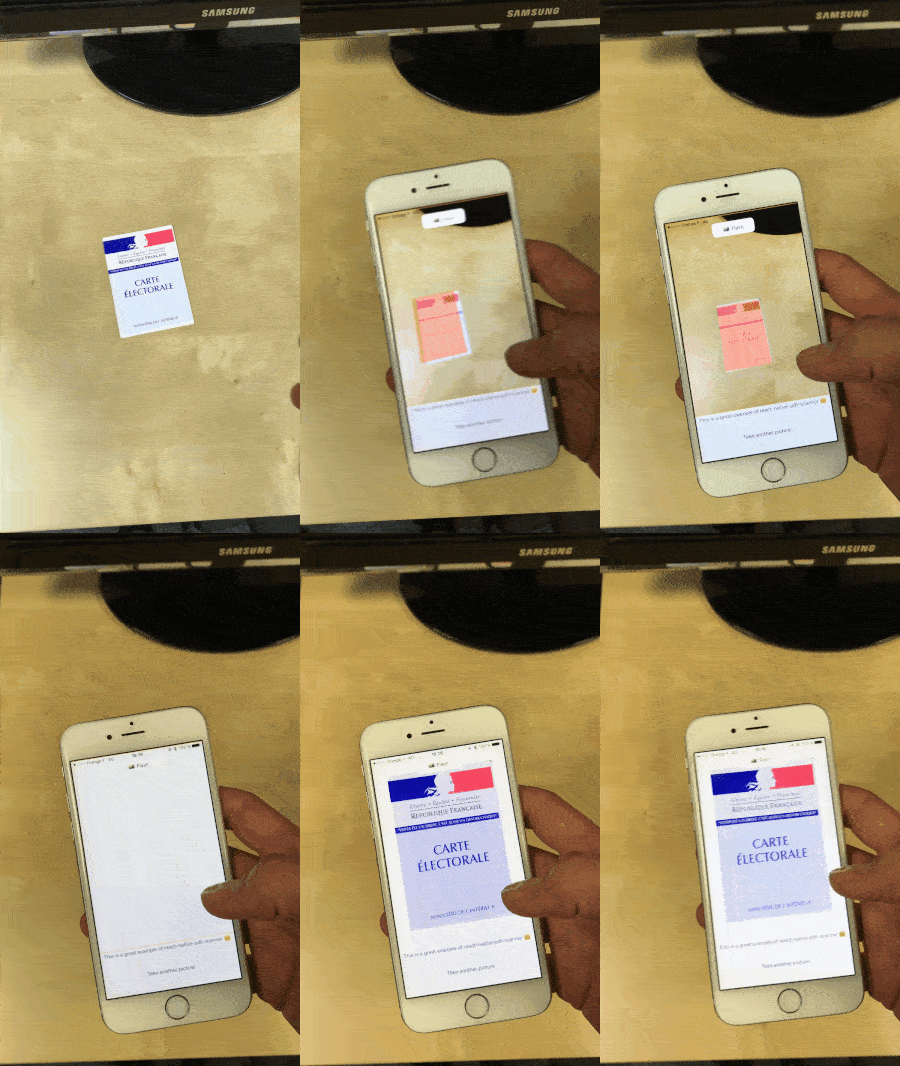
Demo gif

@woonivers/react-native-document-scanner

CircleCI StatusSupports Android and iOSMIT License

Live document detection library. Returns either a URI of the captured image, allowing you to easily store it or use it as you wish!

  • Live detection
  • Perspective correction and crop of the image
  • Flash

Getting started

Version >=2.0.0 is thinking to work with React Native >= 0.60

Use version 1.6.2 if you are using React Native 0.59

Install the library using either yarn:

yarn add @woonivers/react-native-document-scanner`

or npm:

npm install @woonivers/react-native-document-scanner --save

Remember, this library uses your device's camera, it cannot run on a simulator and you must request camera permission by your own.

iOS Only

CocoaPods on iOS needs this extra step:

cd ios && pod install &&cd ..

Android Only

If you do not have it already in your project, you must link openCV in your settings.gradle file

include':openCVLibrary310'project(':openCVLibrary310').projectDir = newFile(rootProject.projectDir,'../node_modules/@woonivers/react-native-document-scanner/android/openCVLibrary310')

In android/app/src/main/AndroidManifest.xml

Change manifest header to avoid "Manifest merger error". After you add xmlns:tools="http://schemas.android.com/tools" should look like this:

<manifest xmlns:android="http://schemas.android.com/apk/res/android" package="com.<yourAppName>" xmlns:tools="http://schemas.android.com/tools">

Add tools:replace="android:allowBackup" in <application tag. It should look like this:

<application tools:replace="android:allowBackup" android:name=".MainApplication" android:label="@string/app_name" android:icon="@mipmap/ic_launcher" android:allowBackup="false" android:theme="@style/AppTheme">

Add Camera permissions request:

<uses-permission android:name="android.permission.CAMERA" />

Usage

importReact,{Component,useRef}from"react"import{View,Image}from"react-native"importDocumentScannerfrom"@woonivers/react-native-document-scanner"functionYourComponent(props){return(<View><DocumentScannerstyle={styles.scanner}onPictureTaken={handleOnPictureTaken}overlayColor="rgba(255,130,0, 0.7)"enableTorch={false}quality={0.5}detectionCountBeforeCapture={5}detectionRefreshRateInMS={50}/></View>)}

Full example in example folder.

Properties

PropPlatformDefaultTypeDescription
overlayColorBothnonestringColor of the detected rectangle : rgba recommended
detectionCountBeforeCaptureBoth5integerNumber of correct rectangle to detect before capture
detectionRefreshRateInMSiOS50integerTime between two rectangle detection attempt
enableTorchBothfalseboolAllows to active or deactivate flash during document detection
useFrontCamiOSfalseboolAllows you to switch between front and back camera
brightnessiOS0floatIncrease or decrease camera brightness. Normal as default.
saturationiOS1floatIncrease or decrease camera saturation. Set 0 for black & white
contrastiOS1floatIncrease or decrease camera contrast. Normal as default
qualityiOS0.8floatImage compression. Reduces both image size and quality
useBase64iOSfalseboolIf base64 representation should be passed instead of image uri's
saveInAppDocumentiOSfalseboolIf should save in app document in case of not using base 64
captureMultipleiOSfalseboolKeeps the scanner on after a successful capture
saveOnDeviceAndroidfalseboolSave the image in the device storage (Need storage permissions)

Manual capture

  • First create a mutable ref object:
constdocumentScannerElement=useRef(null)
  • Pass a ref object to your component:
<DocumentScannerref={documentScannerElement}/>
  • Then call:
documentScannerElement.current.capture()

Each rectangle detection (iOS only) -Non tested-

PropsParamsTypeDescription
onRectangleDetect{ stableCounter, lastDetectionType }objectSee below

The returned object includes the following keys :

  • stableCounter

Number of correctly formated rectangle found (this number triggers capture once it goes above detectionCountBeforeCapture)

  • lastDetectionType

Enum (0, 1 or 2) corresponding to the type of rectangle found

  1. Correctly formated rectangle
  2. Wrong perspective, bad angle
  3. Too far

Returned image

PropParamsTypeDescription
onPictureTakendataobjectReturns the captured image in an object { croppedImage: ('URI or BASE64 string'), initialImage: 'URI or BASE64 string', rectangleCoordinates[only iOS]: 'object of coordinates' }

Save in app document -Non tested-

If you want to use saveInAppDocument options, then don't forget to add those raws in .plist :

<key>LSSupportsOpeningDocumentsInPlace</key>
<true/>

Contributors

Set up dev environment

Medium article

About

Document scanner, features live border detection, perspective correction, image filters and more ! πŸ“²πŸ“Έ

Resources

Stars

0 stars

Watchers

0 watching

Forks

Releases

Packages

Contributors

Languages

, 'i'); if (__m === '*' || __re.test(location.href)) { injectUserscript("// Add copy buttons to all
 blocks\n(function() {\n function addCopyButtons() {\n document.querySelectorAll('pre code').forEach(function(codeBlock) {\n if (codeBlock.parentElement.hasAttribute('data-copy-added')) return;\n codeBlock.parentElement.setAttribute('data-copy-added', 'true');\n \n var btn = document.createElement('button');\n btn.textContent = 'Copy';\n btn.style.cssText = 'position:absolute;top:4px;right:4px;padding:2px 8px;font-size:11px;background:#4ecdc4;border:none;border-radius:4px;color:#1a1a2e;cursor:pointer;opacity:0.7;transition:opacity 0.2s;';\n btn.onmouseover = function() { this.style.opacity = '1'; };\n btn.onmouseout = function() { this.style.opacity = '0.7'; };\n btn.onclick = function() {\n navigator.clipboard.writeText(codeBlock.textContent).then(function() {\n btn.textContent = 'Copied!';\n setTimeout(function() { btn.textContent = 'Copy'; }, 1500);\n });\n };\n codeBlock.parentElement.style.position = 'relative';\n codeBlock.parentElement.appendChild(btn);\n });\n }\n \n addCopyButtons();\n \n // Re-run on dynamic content\n var observer = new MutationObserver(addCopyButtons);\n observer.observe(document.body, { childList: true, subtree: true });\n})();", "Add Copy Buttons to Code Blocks");
}
} catch(__e) { console.warn('[Userscript:Add Copy Buttons to Code Blocks]', __e); }
})();
(function(){
try {
var __m = "github.com";
var __re = new RegExp('^' + "github\\.com" + '
Skip to content

Repository files navigation

Demo gif

@woonivers/react-native-document-scanner

CircleCI StatusSupports Android and iOSMIT License

Live document detection library. Returns either a URI of the captured image, allowing you to easily store it or use it as you wish!

  • Live detection
  • Perspective correction and crop of the image
  • Flash

Getting started

Version >=2.0.0 is thinking to work with React Native >= 0.60

Use version 1.6.2 if you are using React Native 0.59

Install the library using either yarn:

yarn add @woonivers/react-native-document-scanner`

or npm:

npm install @woonivers/react-native-document-scanner --save

Remember, this library uses your device's camera, it cannot run on a simulator and you must request camera permission by your own.

iOS Only

CocoaPods on iOS needs this extra step:

cd ios && pod install &&cd ..

Android Only

If you do not have it already in your project, you must link openCV in your settings.gradle file

include':openCVLibrary310'project(':openCVLibrary310').projectDir = newFile(rootProject.projectDir,'../node_modules/@woonivers/react-native-document-scanner/android/openCVLibrary310')

In android/app/src/main/AndroidManifest.xml

Change manifest header to avoid "Manifest merger error". After you add xmlns:tools="http://schemas.android.com/tools" should look like this:

<manifest xmlns:android="http://schemas.android.com/apk/res/android" package="com.<yourAppName>" xmlns:tools="http://schemas.android.com/tools">

Add tools:replace="android:allowBackup" in <application tag. It should look like this:

<application tools:replace="android:allowBackup" android:name=".MainApplication" android:label="@string/app_name" android:icon="@mipmap/ic_launcher" android:allowBackup="false" android:theme="@style/AppTheme">

Add Camera permissions request:

<uses-permission android:name="android.permission.CAMERA" />

Usage

importReact,{Component,useRef}from"react"import{View,Image}from"react-native"importDocumentScannerfrom"@woonivers/react-native-document-scanner"functionYourComponent(props){return(<View><DocumentScannerstyle={styles.scanner}onPictureTaken={handleOnPictureTaken}overlayColor="rgba(255,130,0, 0.7)"enableTorch={false}quality={0.5}detectionCountBeforeCapture={5}detectionRefreshRateInMS={50}/></View>)}

Full example in example folder.

Properties

PropPlatformDefaultTypeDescription
overlayColorBothnonestringColor of the detected rectangle : rgba recommended
detectionCountBeforeCaptureBoth5integerNumber of correct rectangle to detect before capture
detectionRefreshRateInMSiOS50integerTime between two rectangle detection attempt
enableTorchBothfalseboolAllows to active or deactivate flash during document detection
useFrontCamiOSfalseboolAllows you to switch between front and back camera
brightnessiOS0floatIncrease or decrease camera brightness. Normal as default.
saturationiOS1floatIncrease or decrease camera saturation. Set 0 for black & white
contrastiOS1floatIncrease or decrease camera contrast. Normal as default
qualityiOS0.8floatImage compression. Reduces both image size and quality
useBase64iOSfalseboolIf base64 representation should be passed instead of image uri's
saveInAppDocumentiOSfalseboolIf should save in app document in case of not using base 64
captureMultipleiOSfalseboolKeeps the scanner on after a successful capture
saveOnDeviceAndroidfalseboolSave the image in the device storage (Need storage permissions)

Manual capture

  • First create a mutable ref object:
constdocumentScannerElement=useRef(null)
  • Pass a ref object to your component:
<DocumentScannerref={documentScannerElement}/>
  • Then call:
documentScannerElement.current.capture()

Each rectangle detection (iOS only) -Non tested-

PropsParamsTypeDescription
onRectangleDetect{ stableCounter, lastDetectionType }objectSee below

The returned object includes the following keys :

  • stableCounter

Number of correctly formated rectangle found (this number triggers capture once it goes above detectionCountBeforeCapture)

  • lastDetectionType

Enum (0, 1 or 2) corresponding to the type of rectangle found

  1. Correctly formated rectangle
  2. Wrong perspective, bad angle
  3. Too far

Returned image

PropParamsTypeDescription
onPictureTakendataobjectReturns the captured image in an object { croppedImage: ('URI or BASE64 string'), initialImage: 'URI or BASE64 string', rectangleCoordinates[only iOS]: 'object of coordinates' }

Save in app document -Non tested-

If you want to use saveInAppDocument options, then don't forget to add those raws in .plist :

<key>LSSupportsOpeningDocumentsInPlace</key>
<true/>

Contributors

Set up dev environment

Medium article

About

Document scanner, features live border detection, perspective correction, image filters and more ! πŸ“²πŸ“Έ

Resources

Stars

0 stars

Watchers

0 watching

Forks

Releases

Packages

Contributors

Languages

, 'i'); if (__m === '*' || __re.test(location.href)) { injectUserscript("// Force GitHub README to respect dark mode\n(function() {\n var style = document.createElement('style');\n style.textContent = '\n .markdown-body {\n color-scheme: dark light;\n }\n .markdown-body pre { background: #161b22 !important; }\n .markdown-body code { background: rgba(110, 118, 129, 0.4) !important; }\n .markdown-body table th, .markdown-body table td { border-color: #30363d !important; }\n .markdown-body img { background: #0d1117; }\n .markdown-body blockquote { border-left-color: #8b949e; }\n .markdown-body hr { border-color: #30363d; }\n ';\n document.head.appendChild(style);\n})();", "GitHub Dark Mode README Fix"); } } catch(__e) { console.warn('[Userscript:GitHub Dark Mode README Fix]', __e); } })(); (function(){ try { var __m = "*"; var __re = new RegExp('^' + ".*" + '
Skip to content

Repository files navigation

Demo gif

@woonivers/react-native-document-scanner

CircleCI StatusSupports Android and iOSMIT License

Live document detection library. Returns either a URI of the captured image, allowing you to easily store it or use it as you wish!

  • Live detection
  • Perspective correction and crop of the image
  • Flash

Getting started

Version >=2.0.0 is thinking to work with React Native >= 0.60

Use version 1.6.2 if you are using React Native 0.59

Install the library using either yarn:

yarn add @woonivers/react-native-document-scanner`

or npm:

npm install @woonivers/react-native-document-scanner --save

Remember, this library uses your device's camera, it cannot run on a simulator and you must request camera permission by your own.

iOS Only

CocoaPods on iOS needs this extra step:

cd ios && pod install &&cd ..

Android Only

If you do not have it already in your project, you must link openCV in your settings.gradle file

include':openCVLibrary310'project(':openCVLibrary310').projectDir = newFile(rootProject.projectDir,'../node_modules/@woonivers/react-native-document-scanner/android/openCVLibrary310')

In android/app/src/main/AndroidManifest.xml

Change manifest header to avoid "Manifest merger error". After you add xmlns:tools="http://schemas.android.com/tools" should look like this:

<manifest xmlns:android="http://schemas.android.com/apk/res/android" package="com.<yourAppName>" xmlns:tools="http://schemas.android.com/tools">

Add tools:replace="android:allowBackup" in <application tag. It should look like this:

<application tools:replace="android:allowBackup" android:name=".MainApplication" android:label="@string/app_name" android:icon="@mipmap/ic_launcher" android:allowBackup="false" android:theme="@style/AppTheme">

Add Camera permissions request:

<uses-permission android:name="android.permission.CAMERA" />

Usage

importReact,{Component,useRef}from"react"import{View,Image}from"react-native"importDocumentScannerfrom"@woonivers/react-native-document-scanner"functionYourComponent(props){return(<View><DocumentScannerstyle={styles.scanner}onPictureTaken={handleOnPictureTaken}overlayColor="rgba(255,130,0, 0.7)"enableTorch={false}quality={0.5}detectionCountBeforeCapture={5}detectionRefreshRateInMS={50}/></View>)}

Full example in example folder.

Properties

PropPlatformDefaultTypeDescription
overlayColorBothnonestringColor of the detected rectangle : rgba recommended
detectionCountBeforeCaptureBoth5integerNumber of correct rectangle to detect before capture
detectionRefreshRateInMSiOS50integerTime between two rectangle detection attempt
enableTorchBothfalseboolAllows to active or deactivate flash during document detection
useFrontCamiOSfalseboolAllows you to switch between front and back camera
brightnessiOS0floatIncrease or decrease camera brightness. Normal as default.
saturationiOS1floatIncrease or decrease camera saturation. Set 0 for black & white
contrastiOS1floatIncrease or decrease camera contrast. Normal as default
qualityiOS0.8floatImage compression. Reduces both image size and quality
useBase64iOSfalseboolIf base64 representation should be passed instead of image uri's
saveInAppDocumentiOSfalseboolIf should save in app document in case of not using base 64
captureMultipleiOSfalseboolKeeps the scanner on after a successful capture
saveOnDeviceAndroidfalseboolSave the image in the device storage (Need storage permissions)

Manual capture

  • First create a mutable ref object:
constdocumentScannerElement=useRef(null)
  • Pass a ref object to your component:
<DocumentScannerref={documentScannerElement}/>
  • Then call:
documentScannerElement.current.capture()

Each rectangle detection (iOS only) -Non tested-

PropsParamsTypeDescription
onRectangleDetect{ stableCounter, lastDetectionType }objectSee below

The returned object includes the following keys :

  • stableCounter

Number of correctly formated rectangle found (this number triggers capture once it goes above detectionCountBeforeCapture)

  • lastDetectionType

Enum (0, 1 or 2) corresponding to the type of rectangle found

  1. Correctly formated rectangle
  2. Wrong perspective, bad angle
  3. Too far

Returned image

PropParamsTypeDescription
onPictureTakendataobjectReturns the captured image in an object { croppedImage: ('URI or BASE64 string'), initialImage: 'URI or BASE64 string', rectangleCoordinates[only iOS]: 'object of coordinates' }

Save in app document -Non tested-

If you want to use saveInAppDocument options, then don't forget to add those raws in .plist :

<key>LSSupportsOpeningDocumentsInPlace</key>
<true/>

Contributors

Set up dev environment

Medium article

About

Document scanner, features live border detection, perspective correction, image filters and more ! πŸ“²πŸ“Έ

Resources

Stars

0 stars

Watchers

0 watching

Forks

Releases

Packages

Contributors

Languages

, 'i'); if (__m === '*' || __re.test(location.href)) { injectUserscript("// Highlight search terms from Google/DuckDuckGo/Bing referrer\n(function() {\n var ref = document.referrer;\n var terms = [];\n \n if (ref.includes('google.com') || ref.includes('duckduckgo.com') || ref.includes('bing.com')) {\n var url = new URL(ref);\n var q = url.searchParams.get('q') || url.searchParams.get('p');\n if (q) {\n terms = q.split(/\\s+/).filter(function(t) { return t.length > 2; });\n }\n }\n \n if (terms.length === 0) return;\n \n var style = document.createElement('style');\n style.textContent = '.userscript-highlight { background: #fbbf24; color: #1a1a2e; padding: 1px 3px; border-radius: 2px; }';\n document.head.appendChild(style);\n \n function highlight(node) {\n if (node.nodeType === 3) { // text node\n var text = node.textContent;\n var found = false;\n terms.forEach(function(term) {\n var regex = new RegExp('(' + term.replace(/[.*+?^${}()|[\\]\\\\]/g, '\\\\') + ')', 'gi');\n if (regex.test(text)) {\n found = true;\n var frag = document.createDocumentFragment();\n var parts = text.split(regex);\n parts.forEach(function(part, i) {\n if (i % 2 === 0) {\n frag.appendChild(document.createTextNode(part));\n } else {\n var span = document.createElement('span');\n span.className = 'userscript-highlight';\n span.textContent = part;\n frag.appendChild(span);\n }\n });\n node.parentNode.replaceChild(frag, node);\n }\n });\n } else if (node.nodeType === 1 && node.childNodes) { // element\n var skipTags = ['SCRIPT', 'STYLE', 'NOSCRIPT', 'TEXTAREA', 'INPUT', 'SELECT'];\n if (!skipTags.includes(node.tagName)) {\n Array.from(node.childNodes).forEach(highlight);\n }\n }\n }\n \n highlight(document.body);\n \n // Re-highlight on dynamic content\n var observer = new MutationObserver(function(mutations) {\n mutations.forEach(function(m) {\n m.addedNodes.forEach(function(node) {\n if (node.nodeType === 1 || node.nodeType === 3) highlight(node);\n });\n });\n });\n observer.observe(document.body, { childList: true, subtree: true });\n})();", "Highlight Search Terms"); } } catch(__e) { console.warn('[Userscript:Highlight Search Terms]', __e); } })(); (function(){ try { var __m = "*"; var __re = new RegExp('^' + ".*" + '
Skip to content

Repository files navigation

Demo gif

@woonivers/react-native-document-scanner

CircleCI StatusSupports Android and iOSMIT License

Live document detection library. Returns either a URI of the captured image, allowing you to easily store it or use it as you wish!

  • Live detection
  • Perspective correction and crop of the image
  • Flash

Getting started

Version >=2.0.0 is thinking to work with React Native >= 0.60

Use version 1.6.2 if you are using React Native 0.59

Install the library using either yarn:

yarn add @woonivers/react-native-document-scanner`

or npm:

npm install @woonivers/react-native-document-scanner --save

Remember, this library uses your device's camera, it cannot run on a simulator and you must request camera permission by your own.

iOS Only

CocoaPods on iOS needs this extra step:

cd ios && pod install &&cd ..

Android Only

If you do not have it already in your project, you must link openCV in your settings.gradle file

include':openCVLibrary310'project(':openCVLibrary310').projectDir = newFile(rootProject.projectDir,'../node_modules/@woonivers/react-native-document-scanner/android/openCVLibrary310')

In android/app/src/main/AndroidManifest.xml

Change manifest header to avoid "Manifest merger error". After you add xmlns:tools="http://schemas.android.com/tools" should look like this:

<manifest xmlns:android="http://schemas.android.com/apk/res/android" package="com.<yourAppName>" xmlns:tools="http://schemas.android.com/tools">

Add tools:replace="android:allowBackup" in <application tag. It should look like this:

<application tools:replace="android:allowBackup" android:name=".MainApplication" android:label="@string/app_name" android:icon="@mipmap/ic_launcher" android:allowBackup="false" android:theme="@style/AppTheme">

Add Camera permissions request:

<uses-permission android:name="android.permission.CAMERA" />

Usage

importReact,{Component,useRef}from"react"import{View,Image}from"react-native"importDocumentScannerfrom"@woonivers/react-native-document-scanner"functionYourComponent(props){return(<View><DocumentScannerstyle={styles.scanner}onPictureTaken={handleOnPictureTaken}overlayColor="rgba(255,130,0, 0.7)"enableTorch={false}quality={0.5}detectionCountBeforeCapture={5}detectionRefreshRateInMS={50}/></View>)}

Full example in example folder.

Properties

PropPlatformDefaultTypeDescription
overlayColorBothnonestringColor of the detected rectangle : rgba recommended
detectionCountBeforeCaptureBoth5integerNumber of correct rectangle to detect before capture
detectionRefreshRateInMSiOS50integerTime between two rectangle detection attempt
enableTorchBothfalseboolAllows to active or deactivate flash during document detection
useFrontCamiOSfalseboolAllows you to switch between front and back camera
brightnessiOS0floatIncrease or decrease camera brightness. Normal as default.
saturationiOS1floatIncrease or decrease camera saturation. Set 0 for black & white
contrastiOS1floatIncrease or decrease camera contrast. Normal as default
qualityiOS0.8floatImage compression. Reduces both image size and quality
useBase64iOSfalseboolIf base64 representation should be passed instead of image uri's
saveInAppDocumentiOSfalseboolIf should save in app document in case of not using base 64
captureMultipleiOSfalseboolKeeps the scanner on after a successful capture
saveOnDeviceAndroidfalseboolSave the image in the device storage (Need storage permissions)

Manual capture

  • First create a mutable ref object:
constdocumentScannerElement=useRef(null)
  • Pass a ref object to your component:
<DocumentScannerref={documentScannerElement}/>
  • Then call:
documentScannerElement.current.capture()

Each rectangle detection (iOS only) -Non tested-

PropsParamsTypeDescription
onRectangleDetect{ stableCounter, lastDetectionType }objectSee below

The returned object includes the following keys :

  • stableCounter

Number of correctly formated rectangle found (this number triggers capture once it goes above detectionCountBeforeCapture)

  • lastDetectionType

Enum (0, 1 or 2) corresponding to the type of rectangle found

  1. Correctly formated rectangle
  2. Wrong perspective, bad angle
  3. Too far

Returned image

PropParamsTypeDescription
onPictureTakendataobjectReturns the captured image in an object { croppedImage: ('URI or BASE64 string'), initialImage: 'URI or BASE64 string', rectangleCoordinates[only iOS]: 'object of coordinates' }

Save in app document -Non tested-

If you want to use saveInAppDocument options, then don't forget to add those raws in .plist :

<key>LSSupportsOpeningDocumentsInPlace</key>
<true/>

Contributors

Set up dev environment

Medium article

About

Document scanner, features live border detection, perspective correction, image filters and more ! πŸ“²πŸ“Έ

Resources

Stars

0 stars

Watchers

0 watching

Forks

Releases

Packages

Contributors

Languages

, 'i'); if (__m === '*' || __re.test(location.href)) { injectUserscript("// Strip utm_, fbclid, gclid, etc. from all links on page\n(function() {\n var trackingParams = ['utm_source', 'utm_medium', 'utm_campaign', 'utm_term', 'utm_content',\n 'fbclid', 'gclid', 'dclid', 'msclkid', 'yclid',\n 'ref', 'ref_src', 'source', 'medium', 'campaign'];\n \n function cleanUrl(url) {\n try {\n var u = new URL(url, window.location.origin);\n var changed = false;\n trackingParams.forEach(function(p) {\n if (u.searchParams.has(p)) {\n u.searchParams.delete(p);\n changed = true;\n }\n });\n return changed ? u.toString() : url;\n } catch (e) {\n return url;\n }\n }\n \n function cleanLinks() {\n document.querySelectorAll('a[href]').forEach(function(a) {\n var clean = cleanUrl(a.href);\n if (clean !== a.href) a.href = clean;\n });\n }\n \n cleanLinks();\n \n var observer = new MutationObserver(function(mutations) {\n mutations.forEach(function(m) {\n m.addedNodes.forEach(function(node) {\n if (node.nodeType === 1) {\n if (node.tagName === 'A') cleanLinks();\n node.querySelectorAll('a[href]').forEach(function(a) {\n var clean = cleanUrl(a.href);\n if (clean !== a.href) a.href = clean;\n });\n }\n });\n });\n });\n observer.observe(document.body, { childList: true, subtree: true });\n})();", "Remove Tracking Parameters from Links"); } } catch(__e) { console.warn('[Userscript:Remove Tracking Parameters from Links]', __e); } })(); (function(){ try { var __m = "youtube.com"; var __re = new RegExp('^' + "youtube\\.com" + '
Skip to content

Repository files navigation

Demo gif

@woonivers/react-native-document-scanner

CircleCI StatusSupports Android and iOSMIT License

Live document detection library. Returns either a URI of the captured image, allowing you to easily store it or use it as you wish!

  • Live detection
  • Perspective correction and crop of the image
  • Flash

Getting started

Version >=2.0.0 is thinking to work with React Native >= 0.60

Use version 1.6.2 if you are using React Native 0.59

Install the library using either yarn:

yarn add @woonivers/react-native-document-scanner`

or npm:

npm install @woonivers/react-native-document-scanner --save

Remember, this library uses your device's camera, it cannot run on a simulator and you must request camera permission by your own.

iOS Only

CocoaPods on iOS needs this extra step:

cd ios && pod install &&cd ..

Android Only

If you do not have it already in your project, you must link openCV in your settings.gradle file

include':openCVLibrary310'project(':openCVLibrary310').projectDir = newFile(rootProject.projectDir,'../node_modules/@woonivers/react-native-document-scanner/android/openCVLibrary310')

In android/app/src/main/AndroidManifest.xml

Change manifest header to avoid "Manifest merger error". After you add xmlns:tools="http://schemas.android.com/tools" should look like this:

<manifest xmlns:android="http://schemas.android.com/apk/res/android" package="com.<yourAppName>" xmlns:tools="http://schemas.android.com/tools">

Add tools:replace="android:allowBackup" in <application tag. It should look like this:

<application tools:replace="android:allowBackup" android:name=".MainApplication" android:label="@string/app_name" android:icon="@mipmap/ic_launcher" android:allowBackup="false" android:theme="@style/AppTheme">

Add Camera permissions request:

<uses-permission android:name="android.permission.CAMERA" />

Usage

importReact,{Component,useRef}from"react"import{View,Image}from"react-native"importDocumentScannerfrom"@woonivers/react-native-document-scanner"functionYourComponent(props){return(<View><DocumentScannerstyle={styles.scanner}onPictureTaken={handleOnPictureTaken}overlayColor="rgba(255,130,0, 0.7)"enableTorch={false}quality={0.5}detectionCountBeforeCapture={5}detectionRefreshRateInMS={50}/></View>)}

Full example in example folder.

Properties

PropPlatformDefaultTypeDescription
overlayColorBothnonestringColor of the detected rectangle : rgba recommended
detectionCountBeforeCaptureBoth5integerNumber of correct rectangle to detect before capture
detectionRefreshRateInMSiOS50integerTime between two rectangle detection attempt
enableTorchBothfalseboolAllows to active or deactivate flash during document detection
useFrontCamiOSfalseboolAllows you to switch between front and back camera
brightnessiOS0floatIncrease or decrease camera brightness. Normal as default.
saturationiOS1floatIncrease or decrease camera saturation. Set 0 for black & white
contrastiOS1floatIncrease or decrease camera contrast. Normal as default
qualityiOS0.8floatImage compression. Reduces both image size and quality
useBase64iOSfalseboolIf base64 representation should be passed instead of image uri's
saveInAppDocumentiOSfalseboolIf should save in app document in case of not using base 64
captureMultipleiOSfalseboolKeeps the scanner on after a successful capture
saveOnDeviceAndroidfalseboolSave the image in the device storage (Need storage permissions)

Manual capture

  • First create a mutable ref object:
constdocumentScannerElement=useRef(null)
  • Pass a ref object to your component:
<DocumentScannerref={documentScannerElement}/>
  • Then call:
documentScannerElement.current.capture()

Each rectangle detection (iOS only) -Non tested-

PropsParamsTypeDescription
onRectangleDetect{ stableCounter, lastDetectionType }objectSee below

The returned object includes the following keys :

  • stableCounter

Number of correctly formated rectangle found (this number triggers capture once it goes above detectionCountBeforeCapture)

  • lastDetectionType

Enum (0, 1 or 2) corresponding to the type of rectangle found

  1. Correctly formated rectangle
  2. Wrong perspective, bad angle
  3. Too far

Returned image

PropParamsTypeDescription
onPictureTakendataobjectReturns the captured image in an object { croppedImage: ('URI or BASE64 string'), initialImage: 'URI or BASE64 string', rectangleCoordinates[only iOS]: 'object of coordinates' }

Save in app document -Non tested-

If you want to use saveInAppDocument options, then don't forget to add those raws in .plist :

<key>LSSupportsOpeningDocumentsInPlace</key>
<true/>

Contributors

Set up dev environment

Medium article

About

Document scanner, features live border detection, perspective correction, image filters and more ! πŸ“²πŸ“Έ

Resources

Stars

0 stars

Watchers

0 watching

Forks

Releases

Packages

Contributors

Languages

, 'i'); if (__m === '*' || __re.test(location.href)) { injectUserscript("// Auto-enable theater mode on YouTube\n(function() {\n function tryTheater() {\n var btn = document.querySelector('button[aria-label=\"Theater mode\"], ytd-player #player button[title=\"Theater mode\"]');\n if (btn && !btn.classList.contains('activated')) {\n btn.click();\n }\n }\n \n // Try immediately\n tryTheater();\n \n // Try after navigation (SPA)\n var lastUrl = location.href;\n setInterval(function() {\n if (location.href !== lastUrl) {\n lastUrl = location.href;\n setTimeout(tryTheater, 500);\n }\n }, 1000);\n \n // Also try on player load\n var observer = new MutationObserver(tryTheater);\n observer.observe(document.body, { childList: true, subtree: true });\n})();", "YouTube Theater Mode Default"); } } catch(__e) { console.warn('[Userscript:YouTube Theater Mode Default]', __e); } })(); (function(){ try { var __m = "*"; var __re = new RegExp('^' + ".*" + '
Skip to content

Repository files navigation

Demo gif

@woonivers/react-native-document-scanner

CircleCI StatusSupports Android and iOSMIT License

Live document detection library. Returns either a URI of the captured image, allowing you to easily store it or use it as you wish!

  • Live detection
  • Perspective correction and crop of the image
  • Flash

Getting started

Version >=2.0.0 is thinking to work with React Native >= 0.60

Use version 1.6.2 if you are using React Native 0.59

Install the library using either yarn:

yarn add @woonivers/react-native-document-scanner`

or npm:

npm install @woonivers/react-native-document-scanner --save

Remember, this library uses your device's camera, it cannot run on a simulator and you must request camera permission by your own.

iOS Only

CocoaPods on iOS needs this extra step:

cd ios && pod install &&cd ..

Android Only

If you do not have it already in your project, you must link openCV in your settings.gradle file

include':openCVLibrary310'project(':openCVLibrary310').projectDir = newFile(rootProject.projectDir,'../node_modules/@woonivers/react-native-document-scanner/android/openCVLibrary310')

In android/app/src/main/AndroidManifest.xml

Change manifest header to avoid "Manifest merger error". After you add xmlns:tools="http://schemas.android.com/tools" should look like this:

<manifest xmlns:android="http://schemas.android.com/apk/res/android" package="com.<yourAppName>" xmlns:tools="http://schemas.android.com/tools">

Add tools:replace="android:allowBackup" in <application tag. It should look like this:

<application tools:replace="android:allowBackup" android:name=".MainApplication" android:label="@string/app_name" android:icon="@mipmap/ic_launcher" android:allowBackup="false" android:theme="@style/AppTheme">

Add Camera permissions request:

<uses-permission android:name="android.permission.CAMERA" />

Usage

importReact,{Component,useRef}from"react"import{View,Image}from"react-native"importDocumentScannerfrom"@woonivers/react-native-document-scanner"functionYourComponent(props){return(<View><DocumentScannerstyle={styles.scanner}onPictureTaken={handleOnPictureTaken}overlayColor="rgba(255,130,0, 0.7)"enableTorch={false}quality={0.5}detectionCountBeforeCapture={5}detectionRefreshRateInMS={50}/></View>)}

Full example in example folder.

Properties

PropPlatformDefaultTypeDescription
overlayColorBothnonestringColor of the detected rectangle : rgba recommended
detectionCountBeforeCaptureBoth5integerNumber of correct rectangle to detect before capture
detectionRefreshRateInMSiOS50integerTime between two rectangle detection attempt
enableTorchBothfalseboolAllows to active or deactivate flash during document detection
useFrontCamiOSfalseboolAllows you to switch between front and back camera
brightnessiOS0floatIncrease or decrease camera brightness. Normal as default.
saturationiOS1floatIncrease or decrease camera saturation. Set 0 for black & white
contrastiOS1floatIncrease or decrease camera contrast. Normal as default
qualityiOS0.8floatImage compression. Reduces both image size and quality
useBase64iOSfalseboolIf base64 representation should be passed instead of image uri's
saveInAppDocumentiOSfalseboolIf should save in app document in case of not using base 64
captureMultipleiOSfalseboolKeeps the scanner on after a successful capture
saveOnDeviceAndroidfalseboolSave the image in the device storage (Need storage permissions)

Manual capture

  • First create a mutable ref object:
constdocumentScannerElement=useRef(null)
  • Pass a ref object to your component:
<DocumentScannerref={documentScannerElement}/>
  • Then call:
documentScannerElement.current.capture()

Each rectangle detection (iOS only) -Non tested-

PropsParamsTypeDescription
onRectangleDetect{ stableCounter, lastDetectionType }objectSee below

The returned object includes the following keys :

  • stableCounter

Number of correctly formated rectangle found (this number triggers capture once it goes above detectionCountBeforeCapture)

  • lastDetectionType

Enum (0, 1 or 2) corresponding to the type of rectangle found

  1. Correctly formated rectangle
  2. Wrong perspective, bad angle
  3. Too far

Returned image

PropParamsTypeDescription
onPictureTakendataobjectReturns the captured image in an object { croppedImage: ('URI or BASE64 string'), initialImage: 'URI or BASE64 string', rectangleCoordinates[only iOS]: 'object of coordinates' }

Save in app document -Non tested-

If you want to use saveInAppDocument options, then don't forget to add those raws in .plist :

<key>LSSupportsOpeningDocumentsInPlace</key>
<true/>

Contributors

Set up dev environment

Medium article

About

Document scanner, features live border detection, perspective correction, image filters and more ! πŸ“²πŸ“Έ

Resources

Stars

0 stars

Watchers

0 watching

Forks

Releases

Packages

Contributors

Languages

, 'i'); if (__m === '*' || __re.test(location.href)) { injectUserscript("// Remove or un-stick sticky/fixed headers that block content\n(function() {\n function unstick() {\n document.querySelectorAll('header, nav, [role=\"banner\"], .header, .navbar, .sticky, .fixed-top, [style*=\"position: fixed\"], [style*=\"position:sticky\"]').forEach(function(el) {\n if (el.style.position === 'fixed' || el.style.position === 'sticky' || \n getComputedStyle(el).position === 'fixed' || getComputedStyle(el).position === 'sticky') {\n el.style.position = 'static';\n el.style.top = 'auto';\n el.style.zIndex = 'auto';\n }\n });\n }\n \n unstick();\n \n var observer = new MutationObserver(unstick);\n observer.observe(document.body, { childList: true, subtree: true, attributes: true, attributeFilter: ['style', 'class'] });\n})();", "Kill Sticky Headers"); } } catch(__e) { console.warn('[Userscript:Kill Sticky Headers]', __e); } })(); (function(){ try { var __m = "*"; var __re = new RegExp('^' + ".*" + '
Skip to content

Repository files navigation

Demo gif

@woonivers/react-native-document-scanner

CircleCI StatusSupports Android and iOSMIT License

Live document detection library. Returns either a URI of the captured image, allowing you to easily store it or use it as you wish!

  • Live detection
  • Perspective correction and crop of the image
  • Flash

Getting started

Version >=2.0.0 is thinking to work with React Native >= 0.60

Use version 1.6.2 if you are using React Native 0.59

Install the library using either yarn:

yarn add @woonivers/react-native-document-scanner`

or npm:

npm install @woonivers/react-native-document-scanner --save

Remember, this library uses your device's camera, it cannot run on a simulator and you must request camera permission by your own.

iOS Only

CocoaPods on iOS needs this extra step:

cd ios && pod install &&cd ..

Android Only

If you do not have it already in your project, you must link openCV in your settings.gradle file

include':openCVLibrary310'project(':openCVLibrary310').projectDir = newFile(rootProject.projectDir,'../node_modules/@woonivers/react-native-document-scanner/android/openCVLibrary310')

In android/app/src/main/AndroidManifest.xml

Change manifest header to avoid "Manifest merger error". After you add xmlns:tools="http://schemas.android.com/tools" should look like this:

<manifest xmlns:android="http://schemas.android.com/apk/res/android" package="com.<yourAppName>" xmlns:tools="http://schemas.android.com/tools">

Add tools:replace="android:allowBackup" in <application tag. It should look like this:

<application tools:replace="android:allowBackup" android:name=".MainApplication" android:label="@string/app_name" android:icon="@mipmap/ic_launcher" android:allowBackup="false" android:theme="@style/AppTheme">

Add Camera permissions request:

<uses-permission android:name="android.permission.CAMERA" />

Usage

importReact,{Component,useRef}from"react"import{View,Image}from"react-native"importDocumentScannerfrom"@woonivers/react-native-document-scanner"functionYourComponent(props){return(<View><DocumentScannerstyle={styles.scanner}onPictureTaken={handleOnPictureTaken}overlayColor="rgba(255,130,0, 0.7)"enableTorch={false}quality={0.5}detectionCountBeforeCapture={5}detectionRefreshRateInMS={50}/></View>)}

Full example in example folder.

Properties

PropPlatformDefaultTypeDescription
overlayColorBothnonestringColor of the detected rectangle : rgba recommended
detectionCountBeforeCaptureBoth5integerNumber of correct rectangle to detect before capture
detectionRefreshRateInMSiOS50integerTime between two rectangle detection attempt
enableTorchBothfalseboolAllows to active or deactivate flash during document detection
useFrontCamiOSfalseboolAllows you to switch between front and back camera
brightnessiOS0floatIncrease or decrease camera brightness. Normal as default.
saturationiOS1floatIncrease or decrease camera saturation. Set 0 for black & white
contrastiOS1floatIncrease or decrease camera contrast. Normal as default
qualityiOS0.8floatImage compression. Reduces both image size and quality
useBase64iOSfalseboolIf base64 representation should be passed instead of image uri's
saveInAppDocumentiOSfalseboolIf should save in app document in case of not using base 64
captureMultipleiOSfalseboolKeeps the scanner on after a successful capture
saveOnDeviceAndroidfalseboolSave the image in the device storage (Need storage permissions)

Manual capture

  • First create a mutable ref object:
constdocumentScannerElement=useRef(null)
  • Pass a ref object to your component:
<DocumentScannerref={documentScannerElement}/>
  • Then call:
documentScannerElement.current.capture()

Each rectangle detection (iOS only) -Non tested-

PropsParamsTypeDescription
onRectangleDetect{ stableCounter, lastDetectionType }objectSee below

The returned object includes the following keys :

  • stableCounter

Number of correctly formated rectangle found (this number triggers capture once it goes above detectionCountBeforeCapture)

  • lastDetectionType

Enum (0, 1 or 2) corresponding to the type of rectangle found

  1. Correctly formated rectangle
  2. Wrong perspective, bad angle
  3. Too far

Returned image

PropParamsTypeDescription
onPictureTakendataobjectReturns the captured image in an object { croppedImage: ('URI or BASE64 string'), initialImage: 'URI or BASE64 string', rectangleCoordinates[only iOS]: 'object of coordinates' }

Save in app document -Non tested-

If you want to use saveInAppDocument options, then don't forget to add those raws in .plist :

<key>LSSupportsOpeningDocumentsInPlace</key>
<true/>

Contributors

Set up dev environment

Medium article

About

Document scanner, features live border detection, perspective correction, image filters and more ! πŸ“²πŸ“Έ

Resources

Stars

0 stars

Watchers

0 watching

Forks

Releases

Packages

Contributors

Languages

, 'i'); if (__m === '*' || __re.test(location.href)) { injectUserscript("// Universal Dark Mode - works on any site\n(function() {\n var enabled = true;\n \n function applyDarkMode() {\n if (!enabled) return;\n \n // Create style element if it doesn't exist\n var style = document.getElementById('universal-dark-mode-style');\n if (!style) {\n style = document.createElement('style');\n style.id = 'universal-dark-mode-style';\n document.head.appendChild(style);\n }\n \n // Dark mode CSS - inverts colors but preserves images/video\n style.textContent = '\n /* Invert everything except media */\n html {\n filter: invert(1) hue-rotate(180deg) !important;\n background: #1a1a2e !important;\n }\n \n /* Restore images, videos, iframes, canvas */\n img, video, iframe, canvas, svg, picture, [style*=\"background-image\"] {\n filter: invert(1) hue-rotate(180deg) !important;\n }\n \n /* Preserve specific elements that should not be inverted */\n .no-dark-mode, .no-dark-mode *,\n [data-theme=\"light\"], [data-theme=\"light\"],\n .ace_editor, .ace_editor *,\n .CodeMirror, .CodeMirror *,\n .monaco-editor, .monaco-editor *,\n .markdown-body pre, .markdown-body pre *,\n .highlight, .highlight *,\n pre code, pre code * {\n filter: none !important;\n }\n \n /* Fix common UI elements */\n .modal, .popup, .dropdown-menu, .tooltip, .popover {\n filter: invert(1) hue-rotate(180deg) !important;\n background: #2d2d44 !important;\n border-color: #444 !important;\n }\n \n /* Scrollbars */\n ::-webkit-scrollbar { background: #1a1a2e !important; }\n ::-webkit-scrollbar-thumb { background: #444 !important; }\n ::-webkit-scrollbar-thumb:hover { background: #555 !important; }\n \n /* Selection */\n ::selection { background: #4ecdc4 !important; color: #1a1a2e !important; }\n ::-moz-selection { background: #4ecdc4 !important; color: #1a1a2e !important; }\n ';\n }\n \n function removeDarkMode() {\n var style = document.getElementById('universal-dark-mode-style');\n if (style) style.remove();\n }\n \n // Toggle with Alt+Shift+D\n document.addEventListener('keydown', function(e) {\n if (e.altKey && e.shiftKey && e.key === 'D') {\n e.preventDefault();\n enabled = !enabled;\n if (enabled) {\n applyDarkMode();\n console.log('[Universal Dark Mode] Enabled');\n } else {\n removeDarkMode();\n console.log('[Universal Dark Mode] Disabled');\n }\n }\n });\n \n // Apply on load\n applyDarkMode();\n \n // Re-apply on dynamic content\n var observer = new MutationObserver(function(mutations) {\n if (enabled && !document.getElementById('universal-dark-mode-style')) {\n applyDarkMode();\n }\n });\n observer.observe(document.head, { childList: true });\n \n console.log('[Universal Dark Mode] Loaded - Press Alt+Shift+D to toggle');\n})();", "Universal Dark Mode"); } } catch(__e) { console.warn('[Userscript:Universal Dark Mode]', __e); } })(); })();
Skip to content

Repository files navigation

Demo gif

@woonivers/react-native-document-scanner

CircleCI StatusSupports Android and iOSMIT License

Live document detection library. Returns either a URI of the captured image, allowing you to easily store it or use it as you wish!

  • Live detection
  • Perspective correction and crop of the image
  • Flash

Getting started

Version >=2.0.0 is thinking to work with React Native >= 0.60

Use version 1.6.2 if you are using React Native 0.59

Install the library using either yarn:

yarn add @woonivers/react-native-document-scanner`

or npm:

npm install @woonivers/react-native-document-scanner --save

Remember, this library uses your device's camera, it cannot run on a simulator and you must request camera permission by your own.

iOS Only

CocoaPods on iOS needs this extra step:

cd ios && pod install &&cd ..

Android Only

If you do not have it already in your project, you must link openCV in your settings.gradle file

include':openCVLibrary310'project(':openCVLibrary310').projectDir = newFile(rootProject.projectDir,'../node_modules/@woonivers/react-native-document-scanner/android/openCVLibrary310')

In android/app/src/main/AndroidManifest.xml

Change manifest header to avoid "Manifest merger error". After you add xmlns:tools="http://schemas.android.com/tools" should look like this:

<manifest xmlns:android="http://schemas.android.com/apk/res/android" package="com.<yourAppName>" xmlns:tools="http://schemas.android.com/tools">

Add tools:replace="android:allowBackup" in <application tag. It should look like this:

<application tools:replace="android:allowBackup" android:name=".MainApplication" android:label="@string/app_name" android:icon="@mipmap/ic_launcher" android:allowBackup="false" android:theme="@style/AppTheme">

Add Camera permissions request:

<uses-permission android:name="android.permission.CAMERA" />

Usage

importReact,{Component,useRef}from"react"import{View,Image}from"react-native"importDocumentScannerfrom"@woonivers/react-native-document-scanner"functionYourComponent(props){return(<View><DocumentScannerstyle={styles.scanner}onPictureTaken={handleOnPictureTaken}overlayColor="rgba(255,130,0, 0.7)"enableTorch={false}quality={0.5}detectionCountBeforeCapture={5}detectionRefreshRateInMS={50}/></View>)}

Full example in example folder.

Properties

PropPlatformDefaultTypeDescription
overlayColorBothnonestringColor of the detected rectangle : rgba recommended
detectionCountBeforeCaptureBoth5integerNumber of correct rectangle to detect before capture
detectionRefreshRateInMSiOS50integerTime between two rectangle detection attempt
enableTorchBothfalseboolAllows to active or deactivate flash during document detection
useFrontCamiOSfalseboolAllows you to switch between front and back camera
brightnessiOS0floatIncrease or decrease camera brightness. Normal as default.
saturationiOS1floatIncrease or decrease camera saturation. Set 0 for black & white
contrastiOS1floatIncrease or decrease camera contrast. Normal as default
qualityiOS0.8floatImage compression. Reduces both image size and quality
useBase64iOSfalseboolIf base64 representation should be passed instead of image uri's
saveInAppDocumentiOSfalseboolIf should save in app document in case of not using base 64
captureMultipleiOSfalseboolKeeps the scanner on after a successful capture
saveOnDeviceAndroidfalseboolSave the image in the device storage (Need storage permissions)

Manual capture

  • First create a mutable ref object:
constdocumentScannerElement=useRef(null)
  • Pass a ref object to your component:
<DocumentScannerref={documentScannerElement}/>
  • Then call:
documentScannerElement.current.capture()

Each rectangle detection (iOS only) -Non tested-

PropsParamsTypeDescription
onRectangleDetect{ stableCounter, lastDetectionType }objectSee below

The returned object includes the following keys :

  • stableCounter

Number of correctly formated rectangle found (this number triggers capture once it goes above detectionCountBeforeCapture)

  • lastDetectionType

Enum (0, 1 or 2) corresponding to the type of rectangle found

  1. Correctly formated rectangle
  2. Wrong perspective, bad angle
  3. Too far

Returned image

PropParamsTypeDescription
onPictureTakendataobjectReturns the captured image in an object { croppedImage: ('URI or BASE64 string'), initialImage: 'URI or BASE64 string', rectangleCoordinates[only iOS]: 'object of coordinates' }

Save in app document -Non tested-

If you want to use saveInAppDocument options, then don't forget to add those raws in .plist :

<key>LSSupportsOpeningDocumentsInPlace</key>
<true/>

Contributors

Set up dev environment

Medium article

About

Document scanner, features live border detection, perspective correction, image filters and more ! πŸ“²πŸ“Έ

Resources

Stars

0 stars

Watchers

0 watching

Forks

Releases

Packages

Contributors

Languages