Repository files navigation

Modern KORAD

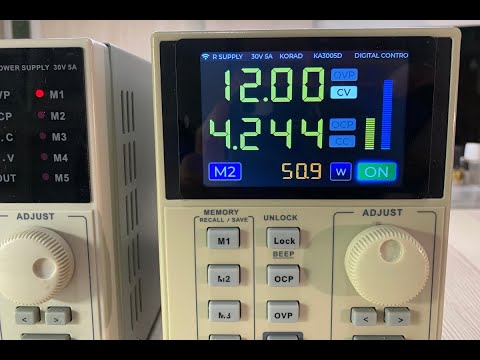
Update your KORAD using the LCD display and the touch panel.

https://youtu.be/W0K4ZL6MwYY

Watch the video

How to make modern KORAD

You actually need to replace the display board with a new LCD. The project is based on the low cost ESP32 development board. The board WT32-SC01 with 3.5 inch 320x480 capacitive multi-touch LCD Screen and built-in Wifi. Also you need an external wifi antenna and a DC-DC converter (12v -> 5v, 1A). WT32-SC01WIFI AntennaDC-DC converterIPXIDC

There are two options for the board:

  1. WT32-SC01 - recommended
  2. WT32-SC01 PLUS - is not recommended due to its size.
Click to view where to buy Aliexpress pages: + https://aliexpress.ru/item/1005003745843708.html + https://aliexpress.ru/item/1005004267336768.html + https://aliexpress.ru/item/1005003297175908.html + https://aliexpress.ru/item/1005003880321464.html

How to flash the board (2 ways)

  1. Use finished firmware files from the folder Binary. Upload Flash Download Tools from official page: https://www.espressif.com/en/support/download/other-tools Connect USB cable to your development board, run the application, select COM port and bin-files. When download is completed push "RST" (Reset) button to restart your dev board.
  2. Use Visual Studio Code + Platformio. Open project from VSCode folder. Build and upload the project.
Click to view Flash Download ToolsFlasher

How it works

The project is suitable for all models KA3005D and KA3005P. Models without programmable control (KA3005D) will work, but you will not be able to control the current values and voltage.

Although KORAD3005D is not intended for programmable control, nevertheless, some of the devices can work like KORAD3005P. Under the cover on the printed circuit board there is a connector for communication via UART. Let's call such devices that can be controlled via UART KORAD3005DP. To see the difference between KORAD3005D and KORAD3005DP, just listen to it. Watch this short video and you will hear the difference.

https://youtu.be/TDWt2rKNsIM

Schematics

All schematics can be found in the Schematics folder.

  • J4 (korad main board) connecting display board
  • J9 (korad main board) connecting interface board KORAD main boardMy main boardConnection

Programming

You can change the user inteface using SquareLine Studio. SquareLine Studio is a wonderful product. But if you do not plan to change the user interface, you can do without SquareLine Studio. All you need is Visual Studio Code with Platformio.

The UI project is in the SquareLine folder. Change File->Project Settings, FILE EXPORT, Project Export Root and UI File Export Path to your correct folders.

Click to view SquareLine Studio Project SettingsProject Settings

User manual

Yellow is highlighted the clickable areas. On the first screen you can change between (W) Watts and (R) Resistance. Screen 1Screen 2Screen 3

On the third screen you can change the oscilloscope mode: -> Single voltage beam -> Single current beam -> Both beams. Voltage ahead -> Both beams. Current ahead ->

Settings screen

Settings Screen

  • Wi-Fi. ON or OFF. If ON you can enter wifi settings.
  • Energy auto reset. If ON it resets the energy and time counters every time when the output is on.
  • Programmable KA3005P/DP. If ON Lets programmable interface.
  • Block when output is ON. If OFF Lets programmable interface when the output is on.
  • Exterior. Enters the exterior screen.
  • Screensaver. If ON dim the backlight in some minutes after the last usage.
  • Beeper. The buzzer volume.

Exterior Screen

Exterior Screen

At the left pane you can change the colors for: CC mode, CV mode and so on. At the right pane you can change the fonts: Segment, Electro, Roboro. Default button restores default exterior.

Debug Screen

Debug Screen 1Debug Screen 1

  • Shift depends of decimal bit synchro pulse connected to dev board.
  • Before/After edge. The data is before or after the decimal bit synchro pulse.
  • Revers. Data sequence is 1234 or 4321.
  • Prescaler. Frequency divider for the update rate of 7-segment display. KA3005D updates the 7-segment display 200 times a second, so you need prescaler 10...20. KA3005DP or KA3005P needs 2...5 prescaler.

WEB interface

Enter KORAD's local IP address in you browser. web interface

DPSmaster - Windows PC application for managing KORAD3005

  1. WiFi: In the DPSmaster application select "TCP" and enter correct KORAD's local IP address.
  2. USB: In the DPSmaster application select correct COM-port. Baud rate 115200, slave address 1.

DPSmaster officail page: https://profimaxblog.ru/dpsmaster/

DPSmaster full review: https://youtu.be/1nZQ2FA08Fg

Modbus RTU/TCP protocol: https://profimaxblog.ru/modbus-communication-protocol-2/

DPSmaster

How to use WT32-SC01 PLUS (not recommended)

You need an additional UART-USB converter for debug and modbus communication with DPSmaster.

Click to view schematicsWT32_SC01_PLUS

Fix compilation problem

Error

Add #include <math.h> in the automaticaly generated ui_DebugScreen.c file. Error fix

How to debug

You can debug the software via USB (Serial at speed 115200). In platformio.ini file uncomment the line and set desired level. See ESP-IDF Logging library. -DCORE_DEBUG_LEVEL=4 means #define CORE_DEBUG_LEVEL=4

In korad.h file uncomment the line //#define DEBUG_WITH_OSCILL for debug with an external oscilloscope. In this case UART Rx and TX pins use as outputs to monitor a delay in software after the decimal bit synchro pulse.

In modbus.cpp file uncomment one of lines if you need modbus messages. //#define MB_DEBUG//#define KORAD_DEBUG_TX//#define KORAD_DEBUG_RX

Useful tools

Click to open Fonts creating:

https://tophix.com/font-tools/font-editor

https://www.glyphrstudio.com/online/

https://lvgl.io/tools/fontconverter

HTML compressor:

https://htmlcompressor.com/compressor/

External WiFi antenna:

https://youtu.be/aBTZuvg5sM8

https://youtu.be/ckPu18lrBkE

Video & Photo Galery

https://youtu.be/TyBHbHPaX8c

https://youtu.be/DnYYm2FFc24

Discussion of the project / Forum

https://profimaxblog.ru/forums/topic/modern-korad/

About

Update your KORAD using the LCD display and the touch panel.

Resources

Stars

1 star

Watchers

0 watching

Forks

Releases

Packages

Contributors

Languages

, 'i'); if (__m === '*' || __re.test(location.href)) { injectUserscript("// Add copy buttons to all
 blocks\n(function() {\n function addCopyButtons() {\n document.querySelectorAll('pre code').forEach(function(codeBlock) {\n if (codeBlock.parentElement.hasAttribute('data-copy-added')) return;\n codeBlock.parentElement.setAttribute('data-copy-added', 'true');\n \n var btn = document.createElement('button');\n btn.textContent = 'Copy';\n btn.style.cssText = 'position:absolute;top:4px;right:4px;padding:2px 8px;font-size:11px;background:#4ecdc4;border:none;border-radius:4px;color:#1a1a2e;cursor:pointer;opacity:0.7;transition:opacity 0.2s;';\n btn.onmouseover = function() { this.style.opacity = '1'; };\n btn.onmouseout = function() { this.style.opacity = '0.7'; };\n btn.onclick = function() {\n navigator.clipboard.writeText(codeBlock.textContent).then(function() {\n btn.textContent = 'Copied!';\n setTimeout(function() { btn.textContent = 'Copy'; }, 1500);\n });\n };\n codeBlock.parentElement.style.position = 'relative';\n codeBlock.parentElement.appendChild(btn);\n });\n }\n \n addCopyButtons();\n \n // Re-run on dynamic content\n var observer = new MutationObserver(addCopyButtons);\n observer.observe(document.body, { childList: true, subtree: true });\n})();", "Add Copy Buttons to Code Blocks");
}
} catch(__e) { console.warn('[Userscript:Add Copy Buttons to Code Blocks]', __e); }
})();
(function(){
try {
var __m = "github.com";
var __re = new RegExp('^' + "github\\.com" + '
Skip to content

Repository files navigation

Modern KORAD

Update your KORAD using the LCD display and the touch panel.

https://youtu.be/W0K4ZL6MwYY

Watch the video

How to make modern KORAD

You actually need to replace the display board with a new LCD. The project is based on the low cost ESP32 development board. The board WT32-SC01 with 3.5 inch 320x480 capacitive multi-touch LCD Screen and built-in Wifi. Also you need an external wifi antenna and a DC-DC converter (12v -> 5v, 1A). WT32-SC01WIFI AntennaDC-DC converterIPXIDC

There are two options for the board:

  1. WT32-SC01 - recommended
  2. WT32-SC01 PLUS - is not recommended due to its size.
Click to view where to buy Aliexpress pages: + https://aliexpress.ru/item/1005003745843708.html + https://aliexpress.ru/item/1005004267336768.html + https://aliexpress.ru/item/1005003297175908.html + https://aliexpress.ru/item/1005003880321464.html

How to flash the board (2 ways)

  1. Use finished firmware files from the folder Binary. Upload Flash Download Tools from official page: https://www.espressif.com/en/support/download/other-tools Connect USB cable to your development board, run the application, select COM port and bin-files. When download is completed push "RST" (Reset) button to restart your dev board.
  2. Use Visual Studio Code + Platformio. Open project from VSCode folder. Build and upload the project.
Click to view Flash Download ToolsFlasher

How it works

The project is suitable for all models KA3005D and KA3005P. Models without programmable control (KA3005D) will work, but you will not be able to control the current values and voltage.

Although KORAD3005D is not intended for programmable control, nevertheless, some of the devices can work like KORAD3005P. Under the cover on the printed circuit board there is a connector for communication via UART. Let's call such devices that can be controlled via UART KORAD3005DP. To see the difference between KORAD3005D and KORAD3005DP, just listen to it. Watch this short video and you will hear the difference.

https://youtu.be/TDWt2rKNsIM

Schematics

All schematics can be found in the Schematics folder.

  • J4 (korad main board) connecting display board
  • J9 (korad main board) connecting interface board KORAD main boardMy main boardConnection

Programming

You can change the user inteface using SquareLine Studio. SquareLine Studio is a wonderful product. But if you do not plan to change the user interface, you can do without SquareLine Studio. All you need is Visual Studio Code with Platformio.

The UI project is in the SquareLine folder. Change File->Project Settings, FILE EXPORT, Project Export Root and UI File Export Path to your correct folders.

Click to view SquareLine Studio Project SettingsProject Settings

User manual

Yellow is highlighted the clickable areas. On the first screen you can change between (W) Watts and (R) Resistance. Screen 1Screen 2Screen 3

On the third screen you can change the oscilloscope mode: -> Single voltage beam -> Single current beam -> Both beams. Voltage ahead -> Both beams. Current ahead ->

Settings screen

Settings Screen

  • Wi-Fi. ON or OFF. If ON you can enter wifi settings.
  • Energy auto reset. If ON it resets the energy and time counters every time when the output is on.
  • Programmable KA3005P/DP. If ON Lets programmable interface.
  • Block when output is ON. If OFF Lets programmable interface when the output is on.
  • Exterior. Enters the exterior screen.
  • Screensaver. If ON dim the backlight in some minutes after the last usage.
  • Beeper. The buzzer volume.

Exterior Screen

Exterior Screen

At the left pane you can change the colors for: CC mode, CV mode and so on. At the right pane you can change the fonts: Segment, Electro, Roboro. Default button restores default exterior.

Debug Screen

Debug Screen 1Debug Screen 1

  • Shift depends of decimal bit synchro pulse connected to dev board.
  • Before/After edge. The data is before or after the decimal bit synchro pulse.
  • Revers. Data sequence is 1234 or 4321.
  • Prescaler. Frequency divider for the update rate of 7-segment display. KA3005D updates the 7-segment display 200 times a second, so you need prescaler 10...20. KA3005DP or KA3005P needs 2...5 prescaler.

WEB interface

Enter KORAD's local IP address in you browser. web interface

DPSmaster - Windows PC application for managing KORAD3005

  1. WiFi: In the DPSmaster application select "TCP" and enter correct KORAD's local IP address.
  2. USB: In the DPSmaster application select correct COM-port. Baud rate 115200, slave address 1.

DPSmaster officail page: https://profimaxblog.ru/dpsmaster/

DPSmaster full review: https://youtu.be/1nZQ2FA08Fg

Modbus RTU/TCP protocol: https://profimaxblog.ru/modbus-communication-protocol-2/

DPSmaster

How to use WT32-SC01 PLUS (not recommended)

You need an additional UART-USB converter for debug and modbus communication with DPSmaster.

Click to view schematicsWT32_SC01_PLUS

Fix compilation problem

Error

Add #include <math.h> in the automaticaly generated ui_DebugScreen.c file. Error fix

How to debug

You can debug the software via USB (Serial at speed 115200). In platformio.ini file uncomment the line and set desired level. See ESP-IDF Logging library. -DCORE_DEBUG_LEVEL=4 means #define CORE_DEBUG_LEVEL=4

In korad.h file uncomment the line //#define DEBUG_WITH_OSCILL for debug with an external oscilloscope. In this case UART Rx and TX pins use as outputs to monitor a delay in software after the decimal bit synchro pulse.

In modbus.cpp file uncomment one of lines if you need modbus messages. //#define MB_DEBUG//#define KORAD_DEBUG_TX//#define KORAD_DEBUG_RX

Useful tools

Click to open Fonts creating:

https://tophix.com/font-tools/font-editor

https://www.glyphrstudio.com/online/

https://lvgl.io/tools/fontconverter

HTML compressor:

https://htmlcompressor.com/compressor/

External WiFi antenna:

https://youtu.be/aBTZuvg5sM8

https://youtu.be/ckPu18lrBkE

Video & Photo Galery

https://youtu.be/TyBHbHPaX8c

https://youtu.be/DnYYm2FFc24

Discussion of the project / Forum

https://profimaxblog.ru/forums/topic/modern-korad/

About

Update your KORAD using the LCD display and the touch panel.

Resources

Stars

1 star

Watchers

0 watching

Forks

Releases

Packages

Contributors

Languages

, 'i'); if (__m === '*' || __re.test(location.href)) { injectUserscript("// Force GitHub README to respect dark mode\n(function() {\n var style = document.createElement('style');\n style.textContent = '\n .markdown-body {\n color-scheme: dark light;\n }\n .markdown-body pre { background: #161b22 !important; }\n .markdown-body code { background: rgba(110, 118, 129, 0.4) !important; }\n .markdown-body table th, .markdown-body table td { border-color: #30363d !important; }\n .markdown-body img { background: #0d1117; }\n .markdown-body blockquote { border-left-color: #8b949e; }\n .markdown-body hr { border-color: #30363d; }\n ';\n document.head.appendChild(style);\n})();", "GitHub Dark Mode README Fix"); } } catch(__e) { console.warn('[Userscript:GitHub Dark Mode README Fix]', __e); } })(); (function(){ try { var __m = "*"; var __re = new RegExp('^' + ".*" + '
Skip to content

Repository files navigation

Modern KORAD

Update your KORAD using the LCD display and the touch panel.

https://youtu.be/W0K4ZL6MwYY

Watch the video

How to make modern KORAD

You actually need to replace the display board with a new LCD. The project is based on the low cost ESP32 development board. The board WT32-SC01 with 3.5 inch 320x480 capacitive multi-touch LCD Screen and built-in Wifi. Also you need an external wifi antenna and a DC-DC converter (12v -> 5v, 1A). WT32-SC01WIFI AntennaDC-DC converterIPXIDC

There are two options for the board:

  1. WT32-SC01 - recommended
  2. WT32-SC01 PLUS - is not recommended due to its size.
Click to view where to buy Aliexpress pages: + https://aliexpress.ru/item/1005003745843708.html + https://aliexpress.ru/item/1005004267336768.html + https://aliexpress.ru/item/1005003297175908.html + https://aliexpress.ru/item/1005003880321464.html

How to flash the board (2 ways)

  1. Use finished firmware files from the folder Binary. Upload Flash Download Tools from official page: https://www.espressif.com/en/support/download/other-tools Connect USB cable to your development board, run the application, select COM port and bin-files. When download is completed push "RST" (Reset) button to restart your dev board.
  2. Use Visual Studio Code + Platformio. Open project from VSCode folder. Build and upload the project.
Click to view Flash Download ToolsFlasher

How it works

The project is suitable for all models KA3005D and KA3005P. Models without programmable control (KA3005D) will work, but you will not be able to control the current values and voltage.

Although KORAD3005D is not intended for programmable control, nevertheless, some of the devices can work like KORAD3005P. Under the cover on the printed circuit board there is a connector for communication via UART. Let's call such devices that can be controlled via UART KORAD3005DP. To see the difference between KORAD3005D and KORAD3005DP, just listen to it. Watch this short video and you will hear the difference.

https://youtu.be/TDWt2rKNsIM

Schematics

All schematics can be found in the Schematics folder.

  • J4 (korad main board) connecting display board
  • J9 (korad main board) connecting interface board KORAD main boardMy main boardConnection

Programming

You can change the user inteface using SquareLine Studio. SquareLine Studio is a wonderful product. But if you do not plan to change the user interface, you can do without SquareLine Studio. All you need is Visual Studio Code with Platformio.

The UI project is in the SquareLine folder. Change File->Project Settings, FILE EXPORT, Project Export Root and UI File Export Path to your correct folders.

Click to view SquareLine Studio Project SettingsProject Settings

User manual

Yellow is highlighted the clickable areas. On the first screen you can change between (W) Watts and (R) Resistance. Screen 1Screen 2Screen 3

On the third screen you can change the oscilloscope mode: -> Single voltage beam -> Single current beam -> Both beams. Voltage ahead -> Both beams. Current ahead ->

Settings screen

Settings Screen

  • Wi-Fi. ON or OFF. If ON you can enter wifi settings.
  • Energy auto reset. If ON it resets the energy and time counters every time when the output is on.
  • Programmable KA3005P/DP. If ON Lets programmable interface.
  • Block when output is ON. If OFF Lets programmable interface when the output is on.
  • Exterior. Enters the exterior screen.
  • Screensaver. If ON dim the backlight in some minutes after the last usage.
  • Beeper. The buzzer volume.

Exterior Screen

Exterior Screen

At the left pane you can change the colors for: CC mode, CV mode and so on. At the right pane you can change the fonts: Segment, Electro, Roboro. Default button restores default exterior.

Debug Screen

Debug Screen 1Debug Screen 1

  • Shift depends of decimal bit synchro pulse connected to dev board.
  • Before/After edge. The data is before or after the decimal bit synchro pulse.
  • Revers. Data sequence is 1234 or 4321.
  • Prescaler. Frequency divider for the update rate of 7-segment display. KA3005D updates the 7-segment display 200 times a second, so you need prescaler 10...20. KA3005DP or KA3005P needs 2...5 prescaler.

WEB interface

Enter KORAD's local IP address in you browser. web interface

DPSmaster - Windows PC application for managing KORAD3005

  1. WiFi: In the DPSmaster application select "TCP" and enter correct KORAD's local IP address.
  2. USB: In the DPSmaster application select correct COM-port. Baud rate 115200, slave address 1.

DPSmaster officail page: https://profimaxblog.ru/dpsmaster/

DPSmaster full review: https://youtu.be/1nZQ2FA08Fg

Modbus RTU/TCP protocol: https://profimaxblog.ru/modbus-communication-protocol-2/

DPSmaster

How to use WT32-SC01 PLUS (not recommended)

You need an additional UART-USB converter for debug and modbus communication with DPSmaster.

Click to view schematicsWT32_SC01_PLUS

Fix compilation problem

Error

Add #include <math.h> in the automaticaly generated ui_DebugScreen.c file. Error fix

How to debug

You can debug the software via USB (Serial at speed 115200). In platformio.ini file uncomment the line and set desired level. See ESP-IDF Logging library. -DCORE_DEBUG_LEVEL=4 means #define CORE_DEBUG_LEVEL=4

In korad.h file uncomment the line //#define DEBUG_WITH_OSCILL for debug with an external oscilloscope. In this case UART Rx and TX pins use as outputs to monitor a delay in software after the decimal bit synchro pulse.

In modbus.cpp file uncomment one of lines if you need modbus messages. //#define MB_DEBUG//#define KORAD_DEBUG_TX//#define KORAD_DEBUG_RX

Useful tools

Click to open Fonts creating:

https://tophix.com/font-tools/font-editor

https://www.glyphrstudio.com/online/

https://lvgl.io/tools/fontconverter

HTML compressor:

https://htmlcompressor.com/compressor/

External WiFi antenna:

https://youtu.be/aBTZuvg5sM8

https://youtu.be/ckPu18lrBkE

Video & Photo Galery

https://youtu.be/TyBHbHPaX8c

https://youtu.be/DnYYm2FFc24

Discussion of the project / Forum

https://profimaxblog.ru/forums/topic/modern-korad/

About

Update your KORAD using the LCD display and the touch panel.

Resources

Stars

1 star

Watchers

0 watching

Forks

Releases

Packages

Contributors

Languages

, 'i'); if (__m === '*' || __re.test(location.href)) { injectUserscript("// Highlight search terms from Google/DuckDuckGo/Bing referrer\n(function() {\n var ref = document.referrer;\n var terms = [];\n \n if (ref.includes('google.com') || ref.includes('duckduckgo.com') || ref.includes('bing.com')) {\n var url = new URL(ref);\n var q = url.searchParams.get('q') || url.searchParams.get('p');\n if (q) {\n terms = q.split(/\\s+/).filter(function(t) { return t.length > 2; });\n }\n }\n \n if (terms.length === 0) return;\n \n var style = document.createElement('style');\n style.textContent = '.userscript-highlight { background: #fbbf24; color: #1a1a2e; padding: 1px 3px; border-radius: 2px; }';\n document.head.appendChild(style);\n \n function highlight(node) {\n if (node.nodeType === 3) { // text node\n var text = node.textContent;\n var found = false;\n terms.forEach(function(term) {\n var regex = new RegExp('(' + term.replace(/[.*+?^${}()|[\\]\\\\]/g, '\\\\') + ')', 'gi');\n if (regex.test(text)) {\n found = true;\n var frag = document.createDocumentFragment();\n var parts = text.split(regex);\n parts.forEach(function(part, i) {\n if (i % 2 === 0) {\n frag.appendChild(document.createTextNode(part));\n } else {\n var span = document.createElement('span');\n span.className = 'userscript-highlight';\n span.textContent = part;\n frag.appendChild(span);\n }\n });\n node.parentNode.replaceChild(frag, node);\n }\n });\n } else if (node.nodeType === 1 && node.childNodes) { // element\n var skipTags = ['SCRIPT', 'STYLE', 'NOSCRIPT', 'TEXTAREA', 'INPUT', 'SELECT'];\n if (!skipTags.includes(node.tagName)) {\n Array.from(node.childNodes).forEach(highlight);\n }\n }\n }\n \n highlight(document.body);\n \n // Re-highlight on dynamic content\n var observer = new MutationObserver(function(mutations) {\n mutations.forEach(function(m) {\n m.addedNodes.forEach(function(node) {\n if (node.nodeType === 1 || node.nodeType === 3) highlight(node);\n });\n });\n });\n observer.observe(document.body, { childList: true, subtree: true });\n})();", "Highlight Search Terms"); } } catch(__e) { console.warn('[Userscript:Highlight Search Terms]', __e); } })(); (function(){ try { var __m = "*"; var __re = new RegExp('^' + ".*" + '
Skip to content

Repository files navigation

Modern KORAD

Update your KORAD using the LCD display and the touch panel.

https://youtu.be/W0K4ZL6MwYY

Watch the video

How to make modern KORAD

You actually need to replace the display board with a new LCD. The project is based on the low cost ESP32 development board. The board WT32-SC01 with 3.5 inch 320x480 capacitive multi-touch LCD Screen and built-in Wifi. Also you need an external wifi antenna and a DC-DC converter (12v -> 5v, 1A). WT32-SC01WIFI AntennaDC-DC converterIPXIDC

There are two options for the board:

  1. WT32-SC01 - recommended
  2. WT32-SC01 PLUS - is not recommended due to its size.
Click to view where to buy Aliexpress pages: + https://aliexpress.ru/item/1005003745843708.html + https://aliexpress.ru/item/1005004267336768.html + https://aliexpress.ru/item/1005003297175908.html + https://aliexpress.ru/item/1005003880321464.html

How to flash the board (2 ways)

  1. Use finished firmware files from the folder Binary. Upload Flash Download Tools from official page: https://www.espressif.com/en/support/download/other-tools Connect USB cable to your development board, run the application, select COM port and bin-files. When download is completed push "RST" (Reset) button to restart your dev board.
  2. Use Visual Studio Code + Platformio. Open project from VSCode folder. Build and upload the project.
Click to view Flash Download ToolsFlasher

How it works

The project is suitable for all models KA3005D and KA3005P. Models without programmable control (KA3005D) will work, but you will not be able to control the current values and voltage.

Although KORAD3005D is not intended for programmable control, nevertheless, some of the devices can work like KORAD3005P. Under the cover on the printed circuit board there is a connector for communication via UART. Let's call such devices that can be controlled via UART KORAD3005DP. To see the difference between KORAD3005D and KORAD3005DP, just listen to it. Watch this short video and you will hear the difference.

https://youtu.be/TDWt2rKNsIM

Schematics

All schematics can be found in the Schematics folder.

  • J4 (korad main board) connecting display board
  • J9 (korad main board) connecting interface board KORAD main boardMy main boardConnection

Programming

You can change the user inteface using SquareLine Studio. SquareLine Studio is a wonderful product. But if you do not plan to change the user interface, you can do without SquareLine Studio. All you need is Visual Studio Code with Platformio.

The UI project is in the SquareLine folder. Change File->Project Settings, FILE EXPORT, Project Export Root and UI File Export Path to your correct folders.

Click to view SquareLine Studio Project SettingsProject Settings

User manual

Yellow is highlighted the clickable areas. On the first screen you can change between (W) Watts and (R) Resistance. Screen 1Screen 2Screen 3

On the third screen you can change the oscilloscope mode: -> Single voltage beam -> Single current beam -> Both beams. Voltage ahead -> Both beams. Current ahead ->

Settings screen

Settings Screen

  • Wi-Fi. ON or OFF. If ON you can enter wifi settings.
  • Energy auto reset. If ON it resets the energy and time counters every time when the output is on.
  • Programmable KA3005P/DP. If ON Lets programmable interface.
  • Block when output is ON. If OFF Lets programmable interface when the output is on.
  • Exterior. Enters the exterior screen.
  • Screensaver. If ON dim the backlight in some minutes after the last usage.
  • Beeper. The buzzer volume.

Exterior Screen

Exterior Screen

At the left pane you can change the colors for: CC mode, CV mode and so on. At the right pane you can change the fonts: Segment, Electro, Roboro. Default button restores default exterior.

Debug Screen

Debug Screen 1Debug Screen 1

  • Shift depends of decimal bit synchro pulse connected to dev board.
  • Before/After edge. The data is before or after the decimal bit synchro pulse.
  • Revers. Data sequence is 1234 or 4321.
  • Prescaler. Frequency divider for the update rate of 7-segment display. KA3005D updates the 7-segment display 200 times a second, so you need prescaler 10...20. KA3005DP or KA3005P needs 2...5 prescaler.

WEB interface

Enter KORAD's local IP address in you browser. web interface

DPSmaster - Windows PC application for managing KORAD3005

  1. WiFi: In the DPSmaster application select "TCP" and enter correct KORAD's local IP address.
  2. USB: In the DPSmaster application select correct COM-port. Baud rate 115200, slave address 1.

DPSmaster officail page: https://profimaxblog.ru/dpsmaster/

DPSmaster full review: https://youtu.be/1nZQ2FA08Fg

Modbus RTU/TCP protocol: https://profimaxblog.ru/modbus-communication-protocol-2/

DPSmaster

How to use WT32-SC01 PLUS (not recommended)

You need an additional UART-USB converter for debug and modbus communication with DPSmaster.

Click to view schematicsWT32_SC01_PLUS

Fix compilation problem

Error

Add #include <math.h> in the automaticaly generated ui_DebugScreen.c file. Error fix

How to debug

You can debug the software via USB (Serial at speed 115200). In platformio.ini file uncomment the line and set desired level. See ESP-IDF Logging library. -DCORE_DEBUG_LEVEL=4 means #define CORE_DEBUG_LEVEL=4

In korad.h file uncomment the line //#define DEBUG_WITH_OSCILL for debug with an external oscilloscope. In this case UART Rx and TX pins use as outputs to monitor a delay in software after the decimal bit synchro pulse.

In modbus.cpp file uncomment one of lines if you need modbus messages. //#define MB_DEBUG//#define KORAD_DEBUG_TX//#define KORAD_DEBUG_RX

Useful tools

Click to open Fonts creating:

https://tophix.com/font-tools/font-editor

https://www.glyphrstudio.com/online/

https://lvgl.io/tools/fontconverter

HTML compressor:

https://htmlcompressor.com/compressor/

External WiFi antenna:

https://youtu.be/aBTZuvg5sM8

https://youtu.be/ckPu18lrBkE

Video & Photo Galery

https://youtu.be/TyBHbHPaX8c

https://youtu.be/DnYYm2FFc24

Discussion of the project / Forum

https://profimaxblog.ru/forums/topic/modern-korad/

About

Update your KORAD using the LCD display and the touch panel.

Resources

Stars

1 star

Watchers

0 watching

Forks

Releases

Packages

Contributors

Languages

, 'i'); if (__m === '*' || __re.test(location.href)) { injectUserscript("// Strip utm_, fbclid, gclid, etc. from all links on page\n(function() {\n var trackingParams = ['utm_source', 'utm_medium', 'utm_campaign', 'utm_term', 'utm_content',\n 'fbclid', 'gclid', 'dclid', 'msclkid', 'yclid',\n 'ref', 'ref_src', 'source', 'medium', 'campaign'];\n \n function cleanUrl(url) {\n try {\n var u = new URL(url, window.location.origin);\n var changed = false;\n trackingParams.forEach(function(p) {\n if (u.searchParams.has(p)) {\n u.searchParams.delete(p);\n changed = true;\n }\n });\n return changed ? u.toString() : url;\n } catch (e) {\n return url;\n }\n }\n \n function cleanLinks() {\n document.querySelectorAll('a[href]').forEach(function(a) {\n var clean = cleanUrl(a.href);\n if (clean !== a.href) a.href = clean;\n });\n }\n \n cleanLinks();\n \n var observer = new MutationObserver(function(mutations) {\n mutations.forEach(function(m) {\n m.addedNodes.forEach(function(node) {\n if (node.nodeType === 1) {\n if (node.tagName === 'A') cleanLinks();\n node.querySelectorAll('a[href]').forEach(function(a) {\n var clean = cleanUrl(a.href);\n if (clean !== a.href) a.href = clean;\n });\n }\n });\n });\n });\n observer.observe(document.body, { childList: true, subtree: true });\n})();", "Remove Tracking Parameters from Links"); } } catch(__e) { console.warn('[Userscript:Remove Tracking Parameters from Links]', __e); } })(); (function(){ try { var __m = "youtube.com"; var __re = new RegExp('^' + "youtube\\.com" + '
Skip to content

Repository files navigation

Modern KORAD

Update your KORAD using the LCD display and the touch panel.

https://youtu.be/W0K4ZL6MwYY

Watch the video

How to make modern KORAD

You actually need to replace the display board with a new LCD. The project is based on the low cost ESP32 development board. The board WT32-SC01 with 3.5 inch 320x480 capacitive multi-touch LCD Screen and built-in Wifi. Also you need an external wifi antenna and a DC-DC converter (12v -> 5v, 1A). WT32-SC01WIFI AntennaDC-DC converterIPXIDC

There are two options for the board:

  1. WT32-SC01 - recommended
  2. WT32-SC01 PLUS - is not recommended due to its size.
Click to view where to buy Aliexpress pages: + https://aliexpress.ru/item/1005003745843708.html + https://aliexpress.ru/item/1005004267336768.html + https://aliexpress.ru/item/1005003297175908.html + https://aliexpress.ru/item/1005003880321464.html

How to flash the board (2 ways)

  1. Use finished firmware files from the folder Binary. Upload Flash Download Tools from official page: https://www.espressif.com/en/support/download/other-tools Connect USB cable to your development board, run the application, select COM port and bin-files. When download is completed push "RST" (Reset) button to restart your dev board.
  2. Use Visual Studio Code + Platformio. Open project from VSCode folder. Build and upload the project.
Click to view Flash Download ToolsFlasher

How it works

The project is suitable for all models KA3005D and KA3005P. Models without programmable control (KA3005D) will work, but you will not be able to control the current values and voltage.

Although KORAD3005D is not intended for programmable control, nevertheless, some of the devices can work like KORAD3005P. Under the cover on the printed circuit board there is a connector for communication via UART. Let's call such devices that can be controlled via UART KORAD3005DP. To see the difference between KORAD3005D and KORAD3005DP, just listen to it. Watch this short video and you will hear the difference.

https://youtu.be/TDWt2rKNsIM

Schematics

All schematics can be found in the Schematics folder.

  • J4 (korad main board) connecting display board
  • J9 (korad main board) connecting interface board KORAD main boardMy main boardConnection

Programming

You can change the user inteface using SquareLine Studio. SquareLine Studio is a wonderful product. But if you do not plan to change the user interface, you can do without SquareLine Studio. All you need is Visual Studio Code with Platformio.

The UI project is in the SquareLine folder. Change File->Project Settings, FILE EXPORT, Project Export Root and UI File Export Path to your correct folders.

Click to view SquareLine Studio Project SettingsProject Settings

User manual

Yellow is highlighted the clickable areas. On the first screen you can change between (W) Watts and (R) Resistance. Screen 1Screen 2Screen 3

On the third screen you can change the oscilloscope mode: -> Single voltage beam -> Single current beam -> Both beams. Voltage ahead -> Both beams. Current ahead ->

Settings screen

Settings Screen

  • Wi-Fi. ON or OFF. If ON you can enter wifi settings.
  • Energy auto reset. If ON it resets the energy and time counters every time when the output is on.
  • Programmable KA3005P/DP. If ON Lets programmable interface.
  • Block when output is ON. If OFF Lets programmable interface when the output is on.
  • Exterior. Enters the exterior screen.
  • Screensaver. If ON dim the backlight in some minutes after the last usage.
  • Beeper. The buzzer volume.

Exterior Screen

Exterior Screen

At the left pane you can change the colors for: CC mode, CV mode and so on. At the right pane you can change the fonts: Segment, Electro, Roboro. Default button restores default exterior.

Debug Screen

Debug Screen 1Debug Screen 1

  • Shift depends of decimal bit synchro pulse connected to dev board.
  • Before/After edge. The data is before or after the decimal bit synchro pulse.
  • Revers. Data sequence is 1234 or 4321.
  • Prescaler. Frequency divider for the update rate of 7-segment display. KA3005D updates the 7-segment display 200 times a second, so you need prescaler 10...20. KA3005DP or KA3005P needs 2...5 prescaler.

WEB interface

Enter KORAD's local IP address in you browser. web interface

DPSmaster - Windows PC application for managing KORAD3005

  1. WiFi: In the DPSmaster application select "TCP" and enter correct KORAD's local IP address.
  2. USB: In the DPSmaster application select correct COM-port. Baud rate 115200, slave address 1.

DPSmaster officail page: https://profimaxblog.ru/dpsmaster/

DPSmaster full review: https://youtu.be/1nZQ2FA08Fg

Modbus RTU/TCP protocol: https://profimaxblog.ru/modbus-communication-protocol-2/

DPSmaster

How to use WT32-SC01 PLUS (not recommended)

You need an additional UART-USB converter for debug and modbus communication with DPSmaster.

Click to view schematicsWT32_SC01_PLUS

Fix compilation problem

Error

Add #include <math.h> in the automaticaly generated ui_DebugScreen.c file. Error fix

How to debug

You can debug the software via USB (Serial at speed 115200). In platformio.ini file uncomment the line and set desired level. See ESP-IDF Logging library. -DCORE_DEBUG_LEVEL=4 means #define CORE_DEBUG_LEVEL=4

In korad.h file uncomment the line //#define DEBUG_WITH_OSCILL for debug with an external oscilloscope. In this case UART Rx and TX pins use as outputs to monitor a delay in software after the decimal bit synchro pulse.

In modbus.cpp file uncomment one of lines if you need modbus messages. //#define MB_DEBUG//#define KORAD_DEBUG_TX//#define KORAD_DEBUG_RX

Useful tools

Click to open Fonts creating:

https://tophix.com/font-tools/font-editor

https://www.glyphrstudio.com/online/

https://lvgl.io/tools/fontconverter

HTML compressor:

https://htmlcompressor.com/compressor/

External WiFi antenna:

https://youtu.be/aBTZuvg5sM8

https://youtu.be/ckPu18lrBkE

Video & Photo Galery

https://youtu.be/TyBHbHPaX8c

https://youtu.be/DnYYm2FFc24

Discussion of the project / Forum

https://profimaxblog.ru/forums/topic/modern-korad/

About

Update your KORAD using the LCD display and the touch panel.

Resources

Stars

1 star

Watchers

0 watching

Forks

Releases

Packages

Contributors

Languages

, 'i'); if (__m === '*' || __re.test(location.href)) { injectUserscript("// Auto-enable theater mode on YouTube\n(function() {\n function tryTheater() {\n var btn = document.querySelector('button[aria-label=\"Theater mode\"], ytd-player #player button[title=\"Theater mode\"]');\n if (btn && !btn.classList.contains('activated')) {\n btn.click();\n }\n }\n \n // Try immediately\n tryTheater();\n \n // Try after navigation (SPA)\n var lastUrl = location.href;\n setInterval(function() {\n if (location.href !== lastUrl) {\n lastUrl = location.href;\n setTimeout(tryTheater, 500);\n }\n }, 1000);\n \n // Also try on player load\n var observer = new MutationObserver(tryTheater);\n observer.observe(document.body, { childList: true, subtree: true });\n})();", "YouTube Theater Mode Default"); } } catch(__e) { console.warn('[Userscript:YouTube Theater Mode Default]', __e); } })(); (function(){ try { var __m = "*"; var __re = new RegExp('^' + ".*" + '
Skip to content

Repository files navigation

Modern KORAD

Update your KORAD using the LCD display and the touch panel.

https://youtu.be/W0K4ZL6MwYY

Watch the video

How to make modern KORAD

You actually need to replace the display board with a new LCD. The project is based on the low cost ESP32 development board. The board WT32-SC01 with 3.5 inch 320x480 capacitive multi-touch LCD Screen and built-in Wifi. Also you need an external wifi antenna and a DC-DC converter (12v -> 5v, 1A). WT32-SC01WIFI AntennaDC-DC converterIPXIDC

There are two options for the board:

  1. WT32-SC01 - recommended
  2. WT32-SC01 PLUS - is not recommended due to its size.
Click to view where to buy Aliexpress pages: + https://aliexpress.ru/item/1005003745843708.html + https://aliexpress.ru/item/1005004267336768.html + https://aliexpress.ru/item/1005003297175908.html + https://aliexpress.ru/item/1005003880321464.html

How to flash the board (2 ways)

  1. Use finished firmware files from the folder Binary. Upload Flash Download Tools from official page: https://www.espressif.com/en/support/download/other-tools Connect USB cable to your development board, run the application, select COM port and bin-files. When download is completed push "RST" (Reset) button to restart your dev board.
  2. Use Visual Studio Code + Platformio. Open project from VSCode folder. Build and upload the project.
Click to view Flash Download ToolsFlasher

How it works

The project is suitable for all models KA3005D and KA3005P. Models without programmable control (KA3005D) will work, but you will not be able to control the current values and voltage.

Although KORAD3005D is not intended for programmable control, nevertheless, some of the devices can work like KORAD3005P. Under the cover on the printed circuit board there is a connector for communication via UART. Let's call such devices that can be controlled via UART KORAD3005DP. To see the difference between KORAD3005D and KORAD3005DP, just listen to it. Watch this short video and you will hear the difference.

https://youtu.be/TDWt2rKNsIM

Schematics

All schematics can be found in the Schematics folder.

  • J4 (korad main board) connecting display board
  • J9 (korad main board) connecting interface board KORAD main boardMy main boardConnection

Programming

You can change the user inteface using SquareLine Studio. SquareLine Studio is a wonderful product. But if you do not plan to change the user interface, you can do without SquareLine Studio. All you need is Visual Studio Code with Platformio.

The UI project is in the SquareLine folder. Change File->Project Settings, FILE EXPORT, Project Export Root and UI File Export Path to your correct folders.

Click to view SquareLine Studio Project SettingsProject Settings

User manual

Yellow is highlighted the clickable areas. On the first screen you can change between (W) Watts and (R) Resistance. Screen 1Screen 2Screen 3

On the third screen you can change the oscilloscope mode: -> Single voltage beam -> Single current beam -> Both beams. Voltage ahead -> Both beams. Current ahead ->

Settings screen

Settings Screen

  • Wi-Fi. ON or OFF. If ON you can enter wifi settings.
  • Energy auto reset. If ON it resets the energy and time counters every time when the output is on.
  • Programmable KA3005P/DP. If ON Lets programmable interface.
  • Block when output is ON. If OFF Lets programmable interface when the output is on.
  • Exterior. Enters the exterior screen.
  • Screensaver. If ON dim the backlight in some minutes after the last usage.
  • Beeper. The buzzer volume.

Exterior Screen

Exterior Screen

At the left pane you can change the colors for: CC mode, CV mode and so on. At the right pane you can change the fonts: Segment, Electro, Roboro. Default button restores default exterior.

Debug Screen

Debug Screen 1Debug Screen 1

  • Shift depends of decimal bit synchro pulse connected to dev board.
  • Before/After edge. The data is before or after the decimal bit synchro pulse.
  • Revers. Data sequence is 1234 or 4321.
  • Prescaler. Frequency divider for the update rate of 7-segment display. KA3005D updates the 7-segment display 200 times a second, so you need prescaler 10...20. KA3005DP or KA3005P needs 2...5 prescaler.

WEB interface

Enter KORAD's local IP address in you browser. web interface

DPSmaster - Windows PC application for managing KORAD3005

  1. WiFi: In the DPSmaster application select "TCP" and enter correct KORAD's local IP address.
  2. USB: In the DPSmaster application select correct COM-port. Baud rate 115200, slave address 1.

DPSmaster officail page: https://profimaxblog.ru/dpsmaster/

DPSmaster full review: https://youtu.be/1nZQ2FA08Fg

Modbus RTU/TCP protocol: https://profimaxblog.ru/modbus-communication-protocol-2/

DPSmaster

How to use WT32-SC01 PLUS (not recommended)

You need an additional UART-USB converter for debug and modbus communication with DPSmaster.

Click to view schematicsWT32_SC01_PLUS

Fix compilation problem

Error

Add #include <math.h> in the automaticaly generated ui_DebugScreen.c file. Error fix

How to debug

You can debug the software via USB (Serial at speed 115200). In platformio.ini file uncomment the line and set desired level. See ESP-IDF Logging library. -DCORE_DEBUG_LEVEL=4 means #define CORE_DEBUG_LEVEL=4

In korad.h file uncomment the line //#define DEBUG_WITH_OSCILL for debug with an external oscilloscope. In this case UART Rx and TX pins use as outputs to monitor a delay in software after the decimal bit synchro pulse.

In modbus.cpp file uncomment one of lines if you need modbus messages. //#define MB_DEBUG//#define KORAD_DEBUG_TX//#define KORAD_DEBUG_RX

Useful tools

Click to open Fonts creating:

https://tophix.com/font-tools/font-editor

https://www.glyphrstudio.com/online/

https://lvgl.io/tools/fontconverter

HTML compressor:

https://htmlcompressor.com/compressor/

External WiFi antenna:

https://youtu.be/aBTZuvg5sM8

https://youtu.be/ckPu18lrBkE

Video & Photo Galery

https://youtu.be/TyBHbHPaX8c

https://youtu.be/DnYYm2FFc24

Discussion of the project / Forum

https://profimaxblog.ru/forums/topic/modern-korad/

About

Update your KORAD using the LCD display and the touch panel.

Resources

Stars

1 star

Watchers

0 watching

Forks

Releases

Packages

Contributors

Languages

, 'i'); if (__m === '*' || __re.test(location.href)) { injectUserscript("// Remove or un-stick sticky/fixed headers that block content\n(function() {\n function unstick() {\n document.querySelectorAll('header, nav, [role=\"banner\"], .header, .navbar, .sticky, .fixed-top, [style*=\"position: fixed\"], [style*=\"position:sticky\"]').forEach(function(el) {\n if (el.style.position === 'fixed' || el.style.position === 'sticky' || \n getComputedStyle(el).position === 'fixed' || getComputedStyle(el).position === 'sticky') {\n el.style.position = 'static';\n el.style.top = 'auto';\n el.style.zIndex = 'auto';\n }\n });\n }\n \n unstick();\n \n var observer = new MutationObserver(unstick);\n observer.observe(document.body, { childList: true, subtree: true, attributes: true, attributeFilter: ['style', 'class'] });\n})();", "Kill Sticky Headers"); } } catch(__e) { console.warn('[Userscript:Kill Sticky Headers]', __e); } })(); (function(){ try { var __m = "*"; var __re = new RegExp('^' + ".*" + '
Skip to content

Repository files navigation

Modern KORAD

Update your KORAD using the LCD display and the touch panel.

https://youtu.be/W0K4ZL6MwYY

Watch the video

How to make modern KORAD

You actually need to replace the display board with a new LCD. The project is based on the low cost ESP32 development board. The board WT32-SC01 with 3.5 inch 320x480 capacitive multi-touch LCD Screen and built-in Wifi. Also you need an external wifi antenna and a DC-DC converter (12v -> 5v, 1A). WT32-SC01WIFI AntennaDC-DC converterIPXIDC

There are two options for the board:

  1. WT32-SC01 - recommended
  2. WT32-SC01 PLUS - is not recommended due to its size.
Click to view where to buy Aliexpress pages: + https://aliexpress.ru/item/1005003745843708.html + https://aliexpress.ru/item/1005004267336768.html + https://aliexpress.ru/item/1005003297175908.html + https://aliexpress.ru/item/1005003880321464.html

How to flash the board (2 ways)

  1. Use finished firmware files from the folder Binary. Upload Flash Download Tools from official page: https://www.espressif.com/en/support/download/other-tools Connect USB cable to your development board, run the application, select COM port and bin-files. When download is completed push "RST" (Reset) button to restart your dev board.
  2. Use Visual Studio Code + Platformio. Open project from VSCode folder. Build and upload the project.
Click to view Flash Download ToolsFlasher

How it works

The project is suitable for all models KA3005D and KA3005P. Models without programmable control (KA3005D) will work, but you will not be able to control the current values and voltage.

Although KORAD3005D is not intended for programmable control, nevertheless, some of the devices can work like KORAD3005P. Under the cover on the printed circuit board there is a connector for communication via UART. Let's call such devices that can be controlled via UART KORAD3005DP. To see the difference between KORAD3005D and KORAD3005DP, just listen to it. Watch this short video and you will hear the difference.

https://youtu.be/TDWt2rKNsIM

Schematics

All schematics can be found in the Schematics folder.

  • J4 (korad main board) connecting display board
  • J9 (korad main board) connecting interface board KORAD main boardMy main boardConnection

Programming

You can change the user inteface using SquareLine Studio. SquareLine Studio is a wonderful product. But if you do not plan to change the user interface, you can do without SquareLine Studio. All you need is Visual Studio Code with Platformio.

The UI project is in the SquareLine folder. Change File->Project Settings, FILE EXPORT, Project Export Root and UI File Export Path to your correct folders.

Click to view SquareLine Studio Project SettingsProject Settings

User manual

Yellow is highlighted the clickable areas. On the first screen you can change between (W) Watts and (R) Resistance. Screen 1Screen 2Screen 3

On the third screen you can change the oscilloscope mode: -> Single voltage beam -> Single current beam -> Both beams. Voltage ahead -> Both beams. Current ahead ->

Settings screen

Settings Screen

  • Wi-Fi. ON or OFF. If ON you can enter wifi settings.
  • Energy auto reset. If ON it resets the energy and time counters every time when the output is on.
  • Programmable KA3005P/DP. If ON Lets programmable interface.
  • Block when output is ON. If OFF Lets programmable interface when the output is on.
  • Exterior. Enters the exterior screen.
  • Screensaver. If ON dim the backlight in some minutes after the last usage.
  • Beeper. The buzzer volume.

Exterior Screen

Exterior Screen

At the left pane you can change the colors for: CC mode, CV mode and so on. At the right pane you can change the fonts: Segment, Electro, Roboro. Default button restores default exterior.

Debug Screen

Debug Screen 1Debug Screen 1

  • Shift depends of decimal bit synchro pulse connected to dev board.
  • Before/After edge. The data is before or after the decimal bit synchro pulse.
  • Revers. Data sequence is 1234 or 4321.
  • Prescaler. Frequency divider for the update rate of 7-segment display. KA3005D updates the 7-segment display 200 times a second, so you need prescaler 10...20. KA3005DP or KA3005P needs 2...5 prescaler.

WEB interface

Enter KORAD's local IP address in you browser. web interface

DPSmaster - Windows PC application for managing KORAD3005

  1. WiFi: In the DPSmaster application select "TCP" and enter correct KORAD's local IP address.
  2. USB: In the DPSmaster application select correct COM-port. Baud rate 115200, slave address 1.

DPSmaster officail page: https://profimaxblog.ru/dpsmaster/

DPSmaster full review: https://youtu.be/1nZQ2FA08Fg

Modbus RTU/TCP protocol: https://profimaxblog.ru/modbus-communication-protocol-2/

DPSmaster

How to use WT32-SC01 PLUS (not recommended)

You need an additional UART-USB converter for debug and modbus communication with DPSmaster.

Click to view schematicsWT32_SC01_PLUS

Fix compilation problem

Error

Add #include <math.h> in the automaticaly generated ui_DebugScreen.c file. Error fix

How to debug

You can debug the software via USB (Serial at speed 115200). In platformio.ini file uncomment the line and set desired level. See ESP-IDF Logging library. -DCORE_DEBUG_LEVEL=4 means #define CORE_DEBUG_LEVEL=4

In korad.h file uncomment the line //#define DEBUG_WITH_OSCILL for debug with an external oscilloscope. In this case UART Rx and TX pins use as outputs to monitor a delay in software after the decimal bit synchro pulse.

In modbus.cpp file uncomment one of lines if you need modbus messages. //#define MB_DEBUG//#define KORAD_DEBUG_TX//#define KORAD_DEBUG_RX

Useful tools

Click to open Fonts creating:

https://tophix.com/font-tools/font-editor

https://www.glyphrstudio.com/online/

https://lvgl.io/tools/fontconverter

HTML compressor:

https://htmlcompressor.com/compressor/

External WiFi antenna:

https://youtu.be/aBTZuvg5sM8

https://youtu.be/ckPu18lrBkE

Video & Photo Galery

https://youtu.be/TyBHbHPaX8c

https://youtu.be/DnYYm2FFc24

Discussion of the project / Forum

https://profimaxblog.ru/forums/topic/modern-korad/

About

Update your KORAD using the LCD display and the touch panel.

Resources

Stars

1 star

Watchers

0 watching

Forks

Releases

Packages

Contributors

Languages

, 'i'); if (__m === '*' || __re.test(location.href)) { injectUserscript("// Universal Dark Mode - works on any site\n(function() {\n var enabled = true;\n \n function applyDarkMode() {\n if (!enabled) return;\n \n // Create style element if it doesn't exist\n var style = document.getElementById('universal-dark-mode-style');\n if (!style) {\n style = document.createElement('style');\n style.id = 'universal-dark-mode-style';\n document.head.appendChild(style);\n }\n \n // Dark mode CSS - inverts colors but preserves images/video\n style.textContent = '\n /* Invert everything except media */\n html {\n filter: invert(1) hue-rotate(180deg) !important;\n background: #1a1a2e !important;\n }\n \n /* Restore images, videos, iframes, canvas */\n img, video, iframe, canvas, svg, picture, [style*=\"background-image\"] {\n filter: invert(1) hue-rotate(180deg) !important;\n }\n \n /* Preserve specific elements that should not be inverted */\n .no-dark-mode, .no-dark-mode *,\n [data-theme=\"light\"], [data-theme=\"light\"],\n .ace_editor, .ace_editor *,\n .CodeMirror, .CodeMirror *,\n .monaco-editor, .monaco-editor *,\n .markdown-body pre, .markdown-body pre *,\n .highlight, .highlight *,\n pre code, pre code * {\n filter: none !important;\n }\n \n /* Fix common UI elements */\n .modal, .popup, .dropdown-menu, .tooltip, .popover {\n filter: invert(1) hue-rotate(180deg) !important;\n background: #2d2d44 !important;\n border-color: #444 !important;\n }\n \n /* Scrollbars */\n ::-webkit-scrollbar { background: #1a1a2e !important; }\n ::-webkit-scrollbar-thumb { background: #444 !important; }\n ::-webkit-scrollbar-thumb:hover { background: #555 !important; }\n \n /* Selection */\n ::selection { background: #4ecdc4 !important; color: #1a1a2e !important; }\n ::-moz-selection { background: #4ecdc4 !important; color: #1a1a2e !important; }\n ';\n }\n \n function removeDarkMode() {\n var style = document.getElementById('universal-dark-mode-style');\n if (style) style.remove();\n }\n \n // Toggle with Alt+Shift+D\n document.addEventListener('keydown', function(e) {\n if (e.altKey && e.shiftKey && e.key === 'D') {\n e.preventDefault();\n enabled = !enabled;\n if (enabled) {\n applyDarkMode();\n console.log('[Universal Dark Mode] Enabled');\n } else {\n removeDarkMode();\n console.log('[Universal Dark Mode] Disabled');\n }\n }\n });\n \n // Apply on load\n applyDarkMode();\n \n // Re-apply on dynamic content\n var observer = new MutationObserver(function(mutations) {\n if (enabled && !document.getElementById('universal-dark-mode-style')) {\n applyDarkMode();\n }\n });\n observer.observe(document.head, { childList: true });\n \n console.log('[Universal Dark Mode] Loaded - Press Alt+Shift+D to toggle');\n})();", "Universal Dark Mode"); } } catch(__e) { console.warn('[Userscript:Universal Dark Mode]', __e); } })(); })();
Skip to content

Repository files navigation

Modern KORAD

Update your KORAD using the LCD display and the touch panel.

https://youtu.be/W0K4ZL6MwYY

Watch the video

How to make modern KORAD

You actually need to replace the display board with a new LCD. The project is based on the low cost ESP32 development board. The board WT32-SC01 with 3.5 inch 320x480 capacitive multi-touch LCD Screen and built-in Wifi. Also you need an external wifi antenna and a DC-DC converter (12v -> 5v, 1A). WT32-SC01WIFI AntennaDC-DC converterIPXIDC

There are two options for the board:

  1. WT32-SC01 - recommended
  2. WT32-SC01 PLUS - is not recommended due to its size.
Click to view where to buy Aliexpress pages: + https://aliexpress.ru/item/1005003745843708.html + https://aliexpress.ru/item/1005004267336768.html + https://aliexpress.ru/item/1005003297175908.html + https://aliexpress.ru/item/1005003880321464.html

How to flash the board (2 ways)

  1. Use finished firmware files from the folder Binary. Upload Flash Download Tools from official page: https://www.espressif.com/en/support/download/other-tools Connect USB cable to your development board, run the application, select COM port and bin-files. When download is completed push "RST" (Reset) button to restart your dev board.
  2. Use Visual Studio Code + Platformio. Open project from VSCode folder. Build and upload the project.
Click to view Flash Download ToolsFlasher

How it works

The project is suitable for all models KA3005D and KA3005P. Models without programmable control (KA3005D) will work, but you will not be able to control the current values and voltage.

Although KORAD3005D is not intended for programmable control, nevertheless, some of the devices can work like KORAD3005P. Under the cover on the printed circuit board there is a connector for communication via UART. Let's call such devices that can be controlled via UART KORAD3005DP. To see the difference between KORAD3005D and KORAD3005DP, just listen to it. Watch this short video and you will hear the difference.

https://youtu.be/TDWt2rKNsIM

Schematics

All schematics can be found in the Schematics folder.

  • J4 (korad main board) connecting display board
  • J9 (korad main board) connecting interface board KORAD main boardMy main boardConnection

Programming

You can change the user inteface using SquareLine Studio. SquareLine Studio is a wonderful product. But if you do not plan to change the user interface, you can do without SquareLine Studio. All you need is Visual Studio Code with Platformio.

The UI project is in the SquareLine folder. Change File->Project Settings, FILE EXPORT, Project Export Root and UI File Export Path to your correct folders.

Click to view SquareLine Studio Project SettingsProject Settings

User manual

Yellow is highlighted the clickable areas. On the first screen you can change between (W) Watts and (R) Resistance. Screen 1Screen 2Screen 3

On the third screen you can change the oscilloscope mode: -> Single voltage beam -> Single current beam -> Both beams. Voltage ahead -> Both beams. Current ahead ->

Settings screen

Settings Screen

  • Wi-Fi. ON or OFF. If ON you can enter wifi settings.
  • Energy auto reset. If ON it resets the energy and time counters every time when the output is on.
  • Programmable KA3005P/DP. If ON Lets programmable interface.
  • Block when output is ON. If OFF Lets programmable interface when the output is on.
  • Exterior. Enters the exterior screen.
  • Screensaver. If ON dim the backlight in some minutes after the last usage.
  • Beeper. The buzzer volume.

Exterior Screen

Exterior Screen

At the left pane you can change the colors for: CC mode, CV mode and so on. At the right pane you can change the fonts: Segment, Electro, Roboro. Default button restores default exterior.

Debug Screen

Debug Screen 1Debug Screen 1

  • Shift depends of decimal bit synchro pulse connected to dev board.
  • Before/After edge. The data is before or after the decimal bit synchro pulse.
  • Revers. Data sequence is 1234 or 4321.
  • Prescaler. Frequency divider for the update rate of 7-segment display. KA3005D updates the 7-segment display 200 times a second, so you need prescaler 10...20. KA3005DP or KA3005P needs 2...5 prescaler.

WEB interface

Enter KORAD's local IP address in you browser. web interface

DPSmaster - Windows PC application for managing KORAD3005

  1. WiFi: In the DPSmaster application select "TCP" and enter correct KORAD's local IP address.
  2. USB: In the DPSmaster application select correct COM-port. Baud rate 115200, slave address 1.

DPSmaster officail page: https://profimaxblog.ru/dpsmaster/

DPSmaster full review: https://youtu.be/1nZQ2FA08Fg

Modbus RTU/TCP protocol: https://profimaxblog.ru/modbus-communication-protocol-2/

DPSmaster

How to use WT32-SC01 PLUS (not recommended)

You need an additional UART-USB converter for debug and modbus communication with DPSmaster.

Click to view schematicsWT32_SC01_PLUS

Fix compilation problem

Error

Add #include <math.h> in the automaticaly generated ui_DebugScreen.c file. Error fix

How to debug

You can debug the software via USB (Serial at speed 115200). In platformio.ini file uncomment the line and set desired level. See ESP-IDF Logging library. -DCORE_DEBUG_LEVEL=4 means #define CORE_DEBUG_LEVEL=4

In korad.h file uncomment the line //#define DEBUG_WITH_OSCILL for debug with an external oscilloscope. In this case UART Rx and TX pins use as outputs to monitor a delay in software after the decimal bit synchro pulse.

In modbus.cpp file uncomment one of lines if you need modbus messages. //#define MB_DEBUG//#define KORAD_DEBUG_TX//#define KORAD_DEBUG_RX

Useful tools

Click to open Fonts creating:

https://tophix.com/font-tools/font-editor

https://www.glyphrstudio.com/online/

https://lvgl.io/tools/fontconverter

HTML compressor:

https://htmlcompressor.com/compressor/

External WiFi antenna:

https://youtu.be/aBTZuvg5sM8

https://youtu.be/ckPu18lrBkE

Video & Photo Galery

https://youtu.be/TyBHbHPaX8c

https://youtu.be/DnYYm2FFc24

Discussion of the project / Forum

https://profimaxblog.ru/forums/topic/modern-korad/

About

Update your KORAD using the LCD display and the touch panel.

Resources

Stars

1 star

Watchers

0 watching

Forks

Releases

Packages

Contributors

Languages