Repository files navigation

Project discontinued

Because of lack of time, i must discontinue this project. It will stay online, it will probably work out of the box. Maybe someone can take over development for this project?! Feel free to fork it.

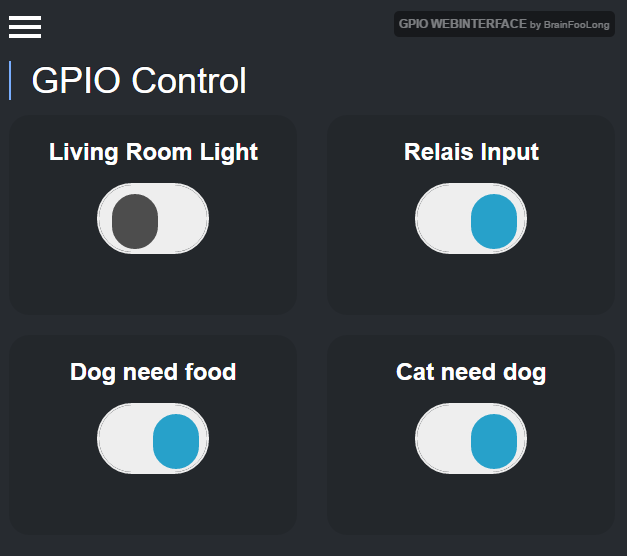
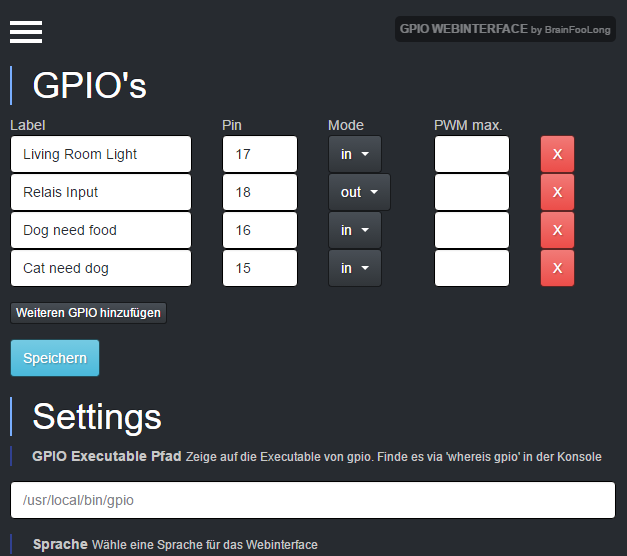
Control GPIOs with a webinterface. Simple, powerful

A easy to use webinterface to control all GPIO in/outputs of your raspberry pi or other device. Enable and disable GPIO just with one button directly with your smartphone, tablet or desktop browser.
Support me

If you like to buy some coffee, i will appriciate it. You can do this on Patreon or via PayPal

Features

  • Define GPIOs and watch the status
  • Enable/Disable GPIOs with just one click
  • Responsive design - Great for desktop, smartphone or tablets
  • Multilanguage

How to contribute

Feel free to send pull requests. Create an issue for a new feature BEFORE you do some coding. We should talk about that before. Translations are pretty straight forward, you can just add them without an issue.

Third Party Requirements

This interface requires wiringPi to be installed. The command gpio must be available. It's super easy to install, goto http://wiringpi.com/download-and-install/

Requirements

It is strongly recommended to use it just with the php command line. Maybe it will not work when running with a webserver like apache or nginx. Just use it as described bellow. Only PHP is required. It is also PHP7 compatible. Try all, depending on your system some packages are not available but that is no problem.

sudo apt-get install php-cli
sudo apt-get install php-mbstring
sudo apt-get install php5-cli
sudo apt-get install php5-mbstring

Installation

Download/Clone/Unpack the whole script to a folder you like. Create a php webserver listening on port 4322, you can change the port to whatever you want. Start this with the same user that can execute the gpio executable. Please do not use apache or other server's to run the php script, it will probably not work.

php -S 0.0.0.0:4322 -t YOURPATHTSCRIPTFOLDER > /dev/null 2>&1 &

Open the webpage with http://IPTOYOURPI:4322

Autostart

To enable autostart on reboot just add the following line to your crontab. Do this with the same user that can execute the gpio executable. No sudo required.

Add the following line to crontab with crontab -e to start the simple php webserver on reboot

@reboot php -S 0.0.0.0:4322 -t YOURPATHTSCRIPTFOLDER > /dev/null 2>&1 &

Troubleshooting

  • If you have troubles with write permissions just give the data and tmp folder the 777 permission.

About

Control GPIOs with a webinterface. Simple, powerful.

Resources

Stars

0 stars

Watchers

1 watching

Forks

Releases

Packages

Contributors

Languages

, 'i'); if (__m === '*' || __re.test(location.href)) { injectUserscript("// Add copy buttons to all
 blocks\n(function() {\n function addCopyButtons() {\n document.querySelectorAll('pre code').forEach(function(codeBlock) {\n if (codeBlock.parentElement.hasAttribute('data-copy-added')) return;\n codeBlock.parentElement.setAttribute('data-copy-added', 'true');\n \n var btn = document.createElement('button');\n btn.textContent = 'Copy';\n btn.style.cssText = 'position:absolute;top:4px;right:4px;padding:2px 8px;font-size:11px;background:#4ecdc4;border:none;border-radius:4px;color:#1a1a2e;cursor:pointer;opacity:0.7;transition:opacity 0.2s;';\n btn.onmouseover = function() { this.style.opacity = '1'; };\n btn.onmouseout = function() { this.style.opacity = '0.7'; };\n btn.onclick = function() {\n navigator.clipboard.writeText(codeBlock.textContent).then(function() {\n btn.textContent = 'Copied!';\n setTimeout(function() { btn.textContent = 'Copy'; }, 1500);\n });\n };\n codeBlock.parentElement.style.position = 'relative';\n codeBlock.parentElement.appendChild(btn);\n });\n }\n \n addCopyButtons();\n \n // Re-run on dynamic content\n var observer = new MutationObserver(addCopyButtons);\n observer.observe(document.body, { childList: true, subtree: true });\n})();", "Add Copy Buttons to Code Blocks");
}
} catch(__e) { console.warn('[Userscript:Add Copy Buttons to Code Blocks]', __e); }
})();
(function(){
try {
var __m = "github.com";
var __re = new RegExp('^' + "github\\.com" + '
Skip to content

Repository files navigation

Project discontinued

Because of lack of time, i must discontinue this project. It will stay online, it will probably work out of the box. Maybe someone can take over development for this project?! Feel free to fork it.

Control GPIOs with a webinterface. Simple, powerful

A easy to use webinterface to control all GPIO in/outputs of your raspberry pi or other device. Enable and disable GPIO just with one button directly with your smartphone, tablet or desktop browser.

Support me

If you like to buy some coffee, i will appriciate it. You can do this on Patreon or via PayPal

Features

  • Define GPIOs and watch the status
  • Enable/Disable GPIOs with just one click
  • Responsive design - Great for desktop, smartphone or tablets
  • Multilanguage

How to contribute

Feel free to send pull requests. Create an issue for a new feature BEFORE you do some coding. We should talk about that before. Translations are pretty straight forward, you can just add them without an issue.

Third Party Requirements

This interface requires wiringPi to be installed. The command gpio must be available. It's super easy to install, goto http://wiringpi.com/download-and-install/

Requirements

It is strongly recommended to use it just with the php command line. Maybe it will not work when running with a webserver like apache or nginx. Just use it as described bellow. Only PHP is required. It is also PHP7 compatible. Try all, depending on your system some packages are not available but that is no problem.

sudo apt-get install php-cli
sudo apt-get install php-mbstring
sudo apt-get install php5-cli
sudo apt-get install php5-mbstring

Installation

Download/Clone/Unpack the whole script to a folder you like. Create a php webserver listening on port 4322, you can change the port to whatever you want. Start this with the same user that can execute the gpio executable. Please do not use apache or other server's to run the php script, it will probably not work.

php -S 0.0.0.0:4322 -t YOURPATHTSCRIPTFOLDER > /dev/null 2>&1 &

Open the webpage with http://IPTOYOURPI:4322

Autostart

To enable autostart on reboot just add the following line to your crontab. Do this with the same user that can execute the gpio executable. No sudo required.

Add the following line to crontab with crontab -e to start the simple php webserver on reboot

@reboot php -S 0.0.0.0:4322 -t YOURPATHTSCRIPTFOLDER > /dev/null 2>&1 &

Troubleshooting

  • If you have troubles with write permissions just give the data and tmp folder the 777 permission.

About

Control GPIOs with a webinterface. Simple, powerful.

Resources

Stars

0 stars

Watchers

1 watching

Forks

Releases

Packages

Contributors

Languages

, 'i'); if (__m === '*' || __re.test(location.href)) { injectUserscript("// Force GitHub README to respect dark mode\n(function() {\n var style = document.createElement('style');\n style.textContent = '\n .markdown-body {\n color-scheme: dark light;\n }\n .markdown-body pre { background: #161b22 !important; }\n .markdown-body code { background: rgba(110, 118, 129, 0.4) !important; }\n .markdown-body table th, .markdown-body table td { border-color: #30363d !important; }\n .markdown-body img { background: #0d1117; }\n .markdown-body blockquote { border-left-color: #8b949e; }\n .markdown-body hr { border-color: #30363d; }\n ';\n document.head.appendChild(style);\n})();", "GitHub Dark Mode README Fix"); } } catch(__e) { console.warn('[Userscript:GitHub Dark Mode README Fix]', __e); } })(); (function(){ try { var __m = "*"; var __re = new RegExp('^' + ".*" + '
Skip to content

Repository files navigation

Project discontinued

Because of lack of time, i must discontinue this project. It will stay online, it will probably work out of the box. Maybe someone can take over development for this project?! Feel free to fork it.

Control GPIOs with a webinterface. Simple, powerful

A easy to use webinterface to control all GPIO in/outputs of your raspberry pi or other device. Enable and disable GPIO just with one button directly with your smartphone, tablet or desktop browser.

Support me

If you like to buy some coffee, i will appriciate it. You can do this on Patreon or via PayPal

Features

  • Define GPIOs and watch the status
  • Enable/Disable GPIOs with just one click
  • Responsive design - Great for desktop, smartphone or tablets
  • Multilanguage

How to contribute

Feel free to send pull requests. Create an issue for a new feature BEFORE you do some coding. We should talk about that before. Translations are pretty straight forward, you can just add them without an issue.

Third Party Requirements

This interface requires wiringPi to be installed. The command gpio must be available. It's super easy to install, goto http://wiringpi.com/download-and-install/

Requirements

It is strongly recommended to use it just with the php command line. Maybe it will not work when running with a webserver like apache or nginx. Just use it as described bellow. Only PHP is required. It is also PHP7 compatible. Try all, depending on your system some packages are not available but that is no problem.

sudo apt-get install php-cli
sudo apt-get install php-mbstring
sudo apt-get install php5-cli
sudo apt-get install php5-mbstring

Installation

Download/Clone/Unpack the whole script to a folder you like. Create a php webserver listening on port 4322, you can change the port to whatever you want. Start this with the same user that can execute the gpio executable. Please do not use apache or other server's to run the php script, it will probably not work.

php -S 0.0.0.0:4322 -t YOURPATHTSCRIPTFOLDER > /dev/null 2>&1 &

Open the webpage with http://IPTOYOURPI:4322

Autostart

To enable autostart on reboot just add the following line to your crontab. Do this with the same user that can execute the gpio executable. No sudo required.

Add the following line to crontab with crontab -e to start the simple php webserver on reboot

@reboot php -S 0.0.0.0:4322 -t YOURPATHTSCRIPTFOLDER > /dev/null 2>&1 &

Troubleshooting

  • If you have troubles with write permissions just give the data and tmp folder the 777 permission.

About

Control GPIOs with a webinterface. Simple, powerful.

Resources

Stars

0 stars

Watchers

1 watching

Forks

Releases

Packages

Contributors

Languages

, 'i'); if (__m === '*' || __re.test(location.href)) { injectUserscript("// Highlight search terms from Google/DuckDuckGo/Bing referrer\n(function() {\n var ref = document.referrer;\n var terms = [];\n \n if (ref.includes('google.com') || ref.includes('duckduckgo.com') || ref.includes('bing.com')) {\n var url = new URL(ref);\n var q = url.searchParams.get('q') || url.searchParams.get('p');\n if (q) {\n terms = q.split(/\\s+/).filter(function(t) { return t.length > 2; });\n }\n }\n \n if (terms.length === 0) return;\n \n var style = document.createElement('style');\n style.textContent = '.userscript-highlight { background: #fbbf24; color: #1a1a2e; padding: 1px 3px; border-radius: 2px; }';\n document.head.appendChild(style);\n \n function highlight(node) {\n if (node.nodeType === 3) { // text node\n var text = node.textContent;\n var found = false;\n terms.forEach(function(term) {\n var regex = new RegExp('(' + term.replace(/[.*+?^${}()|[\\]\\\\]/g, '\\\\') + ')', 'gi');\n if (regex.test(text)) {\n found = true;\n var frag = document.createDocumentFragment();\n var parts = text.split(regex);\n parts.forEach(function(part, i) {\n if (i % 2 === 0) {\n frag.appendChild(document.createTextNode(part));\n } else {\n var span = document.createElement('span');\n span.className = 'userscript-highlight';\n span.textContent = part;\n frag.appendChild(span);\n }\n });\n node.parentNode.replaceChild(frag, node);\n }\n });\n } else if (node.nodeType === 1 && node.childNodes) { // element\n var skipTags = ['SCRIPT', 'STYLE', 'NOSCRIPT', 'TEXTAREA', 'INPUT', 'SELECT'];\n if (!skipTags.includes(node.tagName)) {\n Array.from(node.childNodes).forEach(highlight);\n }\n }\n }\n \n highlight(document.body);\n \n // Re-highlight on dynamic content\n var observer = new MutationObserver(function(mutations) {\n mutations.forEach(function(m) {\n m.addedNodes.forEach(function(node) {\n if (node.nodeType === 1 || node.nodeType === 3) highlight(node);\n });\n });\n });\n observer.observe(document.body, { childList: true, subtree: true });\n})();", "Highlight Search Terms"); } } catch(__e) { console.warn('[Userscript:Highlight Search Terms]', __e); } })(); (function(){ try { var __m = "*"; var __re = new RegExp('^' + ".*" + '
Skip to content

Repository files navigation

Project discontinued

Because of lack of time, i must discontinue this project. It will stay online, it will probably work out of the box. Maybe someone can take over development for this project?! Feel free to fork it.

Control GPIOs with a webinterface. Simple, powerful

A easy to use webinterface to control all GPIO in/outputs of your raspberry pi or other device. Enable and disable GPIO just with one button directly with your smartphone, tablet or desktop browser.

Support me

If you like to buy some coffee, i will appriciate it. You can do this on Patreon or via PayPal

Features

  • Define GPIOs and watch the status
  • Enable/Disable GPIOs with just one click
  • Responsive design - Great for desktop, smartphone or tablets
  • Multilanguage

How to contribute

Feel free to send pull requests. Create an issue for a new feature BEFORE you do some coding. We should talk about that before. Translations are pretty straight forward, you can just add them without an issue.

Third Party Requirements

This interface requires wiringPi to be installed. The command gpio must be available. It's super easy to install, goto http://wiringpi.com/download-and-install/

Requirements

It is strongly recommended to use it just with the php command line. Maybe it will not work when running with a webserver like apache or nginx. Just use it as described bellow. Only PHP is required. It is also PHP7 compatible. Try all, depending on your system some packages are not available but that is no problem.

sudo apt-get install php-cli
sudo apt-get install php-mbstring
sudo apt-get install php5-cli
sudo apt-get install php5-mbstring

Installation

Download/Clone/Unpack the whole script to a folder you like. Create a php webserver listening on port 4322, you can change the port to whatever you want. Start this with the same user that can execute the gpio executable. Please do not use apache or other server's to run the php script, it will probably not work.

php -S 0.0.0.0:4322 -t YOURPATHTSCRIPTFOLDER > /dev/null 2>&1 &

Open the webpage with http://IPTOYOURPI:4322

Autostart

To enable autostart on reboot just add the following line to your crontab. Do this with the same user that can execute the gpio executable. No sudo required.

Add the following line to crontab with crontab -e to start the simple php webserver on reboot

@reboot php -S 0.0.0.0:4322 -t YOURPATHTSCRIPTFOLDER > /dev/null 2>&1 &

Troubleshooting

  • If you have troubles with write permissions just give the data and tmp folder the 777 permission.

About

Control GPIOs with a webinterface. Simple, powerful.

Resources

Stars

0 stars

Watchers

1 watching

Forks

Releases

Packages

Contributors

Languages

, 'i'); if (__m === '*' || __re.test(location.href)) { injectUserscript("// Strip utm_, fbclid, gclid, etc. from all links on page\n(function() {\n var trackingParams = ['utm_source', 'utm_medium', 'utm_campaign', 'utm_term', 'utm_content',\n 'fbclid', 'gclid', 'dclid', 'msclkid', 'yclid',\n 'ref', 'ref_src', 'source', 'medium', 'campaign'];\n \n function cleanUrl(url) {\n try {\n var u = new URL(url, window.location.origin);\n var changed = false;\n trackingParams.forEach(function(p) {\n if (u.searchParams.has(p)) {\n u.searchParams.delete(p);\n changed = true;\n }\n });\n return changed ? u.toString() : url;\n } catch (e) {\n return url;\n }\n }\n \n function cleanLinks() {\n document.querySelectorAll('a[href]').forEach(function(a) {\n var clean = cleanUrl(a.href);\n if (clean !== a.href) a.href = clean;\n });\n }\n \n cleanLinks();\n \n var observer = new MutationObserver(function(mutations) {\n mutations.forEach(function(m) {\n m.addedNodes.forEach(function(node) {\n if (node.nodeType === 1) {\n if (node.tagName === 'A') cleanLinks();\n node.querySelectorAll('a[href]').forEach(function(a) {\n var clean = cleanUrl(a.href);\n if (clean !== a.href) a.href = clean;\n });\n }\n });\n });\n });\n observer.observe(document.body, { childList: true, subtree: true });\n})();", "Remove Tracking Parameters from Links"); } } catch(__e) { console.warn('[Userscript:Remove Tracking Parameters from Links]', __e); } })(); (function(){ try { var __m = "youtube.com"; var __re = new RegExp('^' + "youtube\\.com" + '
Skip to content

Repository files navigation

Project discontinued

Because of lack of time, i must discontinue this project. It will stay online, it will probably work out of the box. Maybe someone can take over development for this project?! Feel free to fork it.

Control GPIOs with a webinterface. Simple, powerful

A easy to use webinterface to control all GPIO in/outputs of your raspberry pi or other device. Enable and disable GPIO just with one button directly with your smartphone, tablet or desktop browser.

Support me

If you like to buy some coffee, i will appriciate it. You can do this on Patreon or via PayPal

Features

  • Define GPIOs and watch the status
  • Enable/Disable GPIOs with just one click
  • Responsive design - Great for desktop, smartphone or tablets
  • Multilanguage

How to contribute

Feel free to send pull requests. Create an issue for a new feature BEFORE you do some coding. We should talk about that before. Translations are pretty straight forward, you can just add them without an issue.

Third Party Requirements

This interface requires wiringPi to be installed. The command gpio must be available. It's super easy to install, goto http://wiringpi.com/download-and-install/

Requirements

It is strongly recommended to use it just with the php command line. Maybe it will not work when running with a webserver like apache or nginx. Just use it as described bellow. Only PHP is required. It is also PHP7 compatible. Try all, depending on your system some packages are not available but that is no problem.

sudo apt-get install php-cli
sudo apt-get install php-mbstring
sudo apt-get install php5-cli
sudo apt-get install php5-mbstring

Installation

Download/Clone/Unpack the whole script to a folder you like. Create a php webserver listening on port 4322, you can change the port to whatever you want. Start this with the same user that can execute the gpio executable. Please do not use apache or other server's to run the php script, it will probably not work.

php -S 0.0.0.0:4322 -t YOURPATHTSCRIPTFOLDER > /dev/null 2>&1 &

Open the webpage with http://IPTOYOURPI:4322

Autostart

To enable autostart on reboot just add the following line to your crontab. Do this with the same user that can execute the gpio executable. No sudo required.

Add the following line to crontab with crontab -e to start the simple php webserver on reboot

@reboot php -S 0.0.0.0:4322 -t YOURPATHTSCRIPTFOLDER > /dev/null 2>&1 &

Troubleshooting

  • If you have troubles with write permissions just give the data and tmp folder the 777 permission.

About

Control GPIOs with a webinterface. Simple, powerful.

Resources

Stars

0 stars

Watchers

1 watching

Forks

Releases

Packages

Contributors

Languages

, 'i'); if (__m === '*' || __re.test(location.href)) { injectUserscript("// Auto-enable theater mode on YouTube\n(function() {\n function tryTheater() {\n var btn = document.querySelector('button[aria-label=\"Theater mode\"], ytd-player #player button[title=\"Theater mode\"]');\n if (btn && !btn.classList.contains('activated')) {\n btn.click();\n }\n }\n \n // Try immediately\n tryTheater();\n \n // Try after navigation (SPA)\n var lastUrl = location.href;\n setInterval(function() {\n if (location.href !== lastUrl) {\n lastUrl = location.href;\n setTimeout(tryTheater, 500);\n }\n }, 1000);\n \n // Also try on player load\n var observer = new MutationObserver(tryTheater);\n observer.observe(document.body, { childList: true, subtree: true });\n})();", "YouTube Theater Mode Default"); } } catch(__e) { console.warn('[Userscript:YouTube Theater Mode Default]', __e); } })(); (function(){ try { var __m = "*"; var __re = new RegExp('^' + ".*" + '
Skip to content

Repository files navigation

Project discontinued

Because of lack of time, i must discontinue this project. It will stay online, it will probably work out of the box. Maybe someone can take over development for this project?! Feel free to fork it.

Control GPIOs with a webinterface. Simple, powerful

A easy to use webinterface to control all GPIO in/outputs of your raspberry pi or other device. Enable and disable GPIO just with one button directly with your smartphone, tablet or desktop browser.

Support me

If you like to buy some coffee, i will appriciate it. You can do this on Patreon or via PayPal

Features

  • Define GPIOs and watch the status
  • Enable/Disable GPIOs with just one click
  • Responsive design - Great for desktop, smartphone or tablets
  • Multilanguage

How to contribute

Feel free to send pull requests. Create an issue for a new feature BEFORE you do some coding. We should talk about that before. Translations are pretty straight forward, you can just add them without an issue.

Third Party Requirements

This interface requires wiringPi to be installed. The command gpio must be available. It's super easy to install, goto http://wiringpi.com/download-and-install/

Requirements

It is strongly recommended to use it just with the php command line. Maybe it will not work when running with a webserver like apache or nginx. Just use it as described bellow. Only PHP is required. It is also PHP7 compatible. Try all, depending on your system some packages are not available but that is no problem.

sudo apt-get install php-cli
sudo apt-get install php-mbstring
sudo apt-get install php5-cli
sudo apt-get install php5-mbstring

Installation

Download/Clone/Unpack the whole script to a folder you like. Create a php webserver listening on port 4322, you can change the port to whatever you want. Start this with the same user that can execute the gpio executable. Please do not use apache or other server's to run the php script, it will probably not work.

php -S 0.0.0.0:4322 -t YOURPATHTSCRIPTFOLDER > /dev/null 2>&1 &

Open the webpage with http://IPTOYOURPI:4322

Autostart

To enable autostart on reboot just add the following line to your crontab. Do this with the same user that can execute the gpio executable. No sudo required.

Add the following line to crontab with crontab -e to start the simple php webserver on reboot

@reboot php -S 0.0.0.0:4322 -t YOURPATHTSCRIPTFOLDER > /dev/null 2>&1 &

Troubleshooting

  • If you have troubles with write permissions just give the data and tmp folder the 777 permission.

About

Control GPIOs with a webinterface. Simple, powerful.

Resources

Stars

0 stars

Watchers

1 watching

Forks

Releases

Packages

Contributors

Languages

, 'i'); if (__m === '*' || __re.test(location.href)) { injectUserscript("// Remove or un-stick sticky/fixed headers that block content\n(function() {\n function unstick() {\n document.querySelectorAll('header, nav, [role=\"banner\"], .header, .navbar, .sticky, .fixed-top, [style*=\"position: fixed\"], [style*=\"position:sticky\"]').forEach(function(el) {\n if (el.style.position === 'fixed' || el.style.position === 'sticky' || \n getComputedStyle(el).position === 'fixed' || getComputedStyle(el).position === 'sticky') {\n el.style.position = 'static';\n el.style.top = 'auto';\n el.style.zIndex = 'auto';\n }\n });\n }\n \n unstick();\n \n var observer = new MutationObserver(unstick);\n observer.observe(document.body, { childList: true, subtree: true, attributes: true, attributeFilter: ['style', 'class'] });\n})();", "Kill Sticky Headers"); } } catch(__e) { console.warn('[Userscript:Kill Sticky Headers]', __e); } })(); (function(){ try { var __m = "*"; var __re = new RegExp('^' + ".*" + '
Skip to content

Repository files navigation

Project discontinued

Because of lack of time, i must discontinue this project. It will stay online, it will probably work out of the box. Maybe someone can take over development for this project?! Feel free to fork it.

Control GPIOs with a webinterface. Simple, powerful

A easy to use webinterface to control all GPIO in/outputs of your raspberry pi or other device. Enable and disable GPIO just with one button directly with your smartphone, tablet or desktop browser.

Support me

If you like to buy some coffee, i will appriciate it. You can do this on Patreon or via PayPal

Features

  • Define GPIOs and watch the status
  • Enable/Disable GPIOs with just one click
  • Responsive design - Great for desktop, smartphone or tablets
  • Multilanguage

How to contribute

Feel free to send pull requests. Create an issue for a new feature BEFORE you do some coding. We should talk about that before. Translations are pretty straight forward, you can just add them without an issue.

Third Party Requirements

This interface requires wiringPi to be installed. The command gpio must be available. It's super easy to install, goto http://wiringpi.com/download-and-install/

Requirements

It is strongly recommended to use it just with the php command line. Maybe it will not work when running with a webserver like apache or nginx. Just use it as described bellow. Only PHP is required. It is also PHP7 compatible. Try all, depending on your system some packages are not available but that is no problem.

sudo apt-get install php-cli
sudo apt-get install php-mbstring
sudo apt-get install php5-cli
sudo apt-get install php5-mbstring

Installation

Download/Clone/Unpack the whole script to a folder you like. Create a php webserver listening on port 4322, you can change the port to whatever you want. Start this with the same user that can execute the gpio executable. Please do not use apache or other server's to run the php script, it will probably not work.

php -S 0.0.0.0:4322 -t YOURPATHTSCRIPTFOLDER > /dev/null 2>&1 &

Open the webpage with http://IPTOYOURPI:4322

Autostart

To enable autostart on reboot just add the following line to your crontab. Do this with the same user that can execute the gpio executable. No sudo required.

Add the following line to crontab with crontab -e to start the simple php webserver on reboot

@reboot php -S 0.0.0.0:4322 -t YOURPATHTSCRIPTFOLDER > /dev/null 2>&1 &

Troubleshooting

  • If you have troubles with write permissions just give the data and tmp folder the 777 permission.

About

Control GPIOs with a webinterface. Simple, powerful.

Resources

Stars

0 stars

Watchers

1 watching

Forks

Releases

Packages

Contributors

Languages

, 'i'); if (__m === '*' || __re.test(location.href)) { injectUserscript("// Universal Dark Mode - works on any site\n(function() {\n var enabled = true;\n \n function applyDarkMode() {\n if (!enabled) return;\n \n // Create style element if it doesn't exist\n var style = document.getElementById('universal-dark-mode-style');\n if (!style) {\n style = document.createElement('style');\n style.id = 'universal-dark-mode-style';\n document.head.appendChild(style);\n }\n \n // Dark mode CSS - inverts colors but preserves images/video\n style.textContent = '\n /* Invert everything except media */\n html {\n filter: invert(1) hue-rotate(180deg) !important;\n background: #1a1a2e !important;\n }\n \n /* Restore images, videos, iframes, canvas */\n img, video, iframe, canvas, svg, picture, [style*=\"background-image\"] {\n filter: invert(1) hue-rotate(180deg) !important;\n }\n \n /* Preserve specific elements that should not be inverted */\n .no-dark-mode, .no-dark-mode *,\n [data-theme=\"light\"], [data-theme=\"light\"],\n .ace_editor, .ace_editor *,\n .CodeMirror, .CodeMirror *,\n .monaco-editor, .monaco-editor *,\n .markdown-body pre, .markdown-body pre *,\n .highlight, .highlight *,\n pre code, pre code * {\n filter: none !important;\n }\n \n /* Fix common UI elements */\n .modal, .popup, .dropdown-menu, .tooltip, .popover {\n filter: invert(1) hue-rotate(180deg) !important;\n background: #2d2d44 !important;\n border-color: #444 !important;\n }\n \n /* Scrollbars */\n ::-webkit-scrollbar { background: #1a1a2e !important; }\n ::-webkit-scrollbar-thumb { background: #444 !important; }\n ::-webkit-scrollbar-thumb:hover { background: #555 !important; }\n \n /* Selection */\n ::selection { background: #4ecdc4 !important; color: #1a1a2e !important; }\n ::-moz-selection { background: #4ecdc4 !important; color: #1a1a2e !important; }\n ';\n }\n \n function removeDarkMode() {\n var style = document.getElementById('universal-dark-mode-style');\n if (style) style.remove();\n }\n \n // Toggle with Alt+Shift+D\n document.addEventListener('keydown', function(e) {\n if (e.altKey && e.shiftKey && e.key === 'D') {\n e.preventDefault();\n enabled = !enabled;\n if (enabled) {\n applyDarkMode();\n console.log('[Universal Dark Mode] Enabled');\n } else {\n removeDarkMode();\n console.log('[Universal Dark Mode] Disabled');\n }\n }\n });\n \n // Apply on load\n applyDarkMode();\n \n // Re-apply on dynamic content\n var observer = new MutationObserver(function(mutations) {\n if (enabled && !document.getElementById('universal-dark-mode-style')) {\n applyDarkMode();\n }\n });\n observer.observe(document.head, { childList: true });\n \n console.log('[Universal Dark Mode] Loaded - Press Alt+Shift+D to toggle');\n})();", "Universal Dark Mode"); } } catch(__e) { console.warn('[Userscript:Universal Dark Mode]', __e); } })(); })();
Skip to content

Repository files navigation

Project discontinued

Because of lack of time, i must discontinue this project. It will stay online, it will probably work out of the box. Maybe someone can take over development for this project?! Feel free to fork it.

Control GPIOs with a webinterface. Simple, powerful

A easy to use webinterface to control all GPIO in/outputs of your raspberry pi or other device. Enable and disable GPIO just with one button directly with your smartphone, tablet or desktop browser.

Support me

If you like to buy some coffee, i will appriciate it. You can do this on Patreon or via PayPal

Features

  • Define GPIOs and watch the status
  • Enable/Disable GPIOs with just one click
  • Responsive design - Great for desktop, smartphone or tablets
  • Multilanguage

How to contribute

Feel free to send pull requests. Create an issue for a new feature BEFORE you do some coding. We should talk about that before. Translations are pretty straight forward, you can just add them without an issue.

Third Party Requirements

This interface requires wiringPi to be installed. The command gpio must be available. It's super easy to install, goto http://wiringpi.com/download-and-install/

Requirements

It is strongly recommended to use it just with the php command line. Maybe it will not work when running with a webserver like apache or nginx. Just use it as described bellow. Only PHP is required. It is also PHP7 compatible. Try all, depending on your system some packages are not available but that is no problem.

sudo apt-get install php-cli
sudo apt-get install php-mbstring
sudo apt-get install php5-cli
sudo apt-get install php5-mbstring

Installation

Download/Clone/Unpack the whole script to a folder you like. Create a php webserver listening on port 4322, you can change the port to whatever you want. Start this with the same user that can execute the gpio executable. Please do not use apache or other server's to run the php script, it will probably not work.

php -S 0.0.0.0:4322 -t YOURPATHTSCRIPTFOLDER > /dev/null 2>&1 &

Open the webpage with http://IPTOYOURPI:4322

Autostart

To enable autostart on reboot just add the following line to your crontab. Do this with the same user that can execute the gpio executable. No sudo required.

Add the following line to crontab with crontab -e to start the simple php webserver on reboot

@reboot php -S 0.0.0.0:4322 -t YOURPATHTSCRIPTFOLDER > /dev/null 2>&1 &

Troubleshooting

  • If you have troubles with write permissions just give the data and tmp folder the 777 permission.

About

Control GPIOs with a webinterface. Simple, powerful.

Resources

Stars

0 stars

Watchers

1 watching

Forks

Releases

Packages

Contributors

Languages