




Repository files navigation

Alt text

JDVideoKit

Alt textAlt textAlt textAlt text

Introduction

You can easily transfer your video into Three common video type.

You can use set up camera easily.

Installation

 pod 'JDVideoKit'

USAGE

Delegate

publicprotocolJDVideoKitDelegate{
//1.If return nil means call JDProcessingViewController
func videoResource(forkit kit:JDVideoKit)->Any?
//2.Only will call when above function return nil. Can make some setting for JDProcessingViewController
func willPresent(cameraViewController vc:JDProcessingViewController,forkit:JDVideoKit)->JDProcessingViewController
//3.Can make some setting for JDPresentingViewController, if return nil jump to next delegate
func willPresent(edtingViewController vc:JDPresentingViewController,lastVC:UIViewController?,forkit:JDVideoKit)->JDPresentingViewController?
//4.Set your type
func ConvertType(forVideo resource:Any,forkit:JDVideoKit)->videoProcessType
//5.Call When user click save.
func FinalOutput(final video:AVAsset,url:URL)}
  1. (NonOptional)

Return the video resource if you allready have one and Skip to Delegate 3.

Resource Allow Type : URL , AVAsset

Return nil, will call Capturing Layout.

  1. (Optional)

You can make some setting to customize ProcessingViewController and return it.

  1. (Optional)

Call when Capturing Finish or delegate provide an avaliable video.

You can make some setting to customize PresentingViewController and return it.

Return nil if you don't need edting layout and end it here , skip to 5.
If you use capturing Layout before and you won't use editing Layout next, you should use the para "LastVC" to dissmiss it or whatever you want

  1. (Optional)

Specific the Convert type. (.Boom , .Speed , .Reverse)

  1. (NonOptional)

Call When user click save button in Editing Layout, Capturing without editng or direct transfer complete.


Use My Two Layout

-> Implement 1 , 5

classViewController:UIViewController{overridefunc viewDidAppear(_ animated:Bool){letvk=JDVideoKit(delegate:self).getProperVC()self.present(vk, animated:true, completion:nil)}}extensionViewController:JDVideoKitDelegate{func videoResource(forkit kit:JDVideoKit)->Any?{returnnil}func FinalOutput(final video:AVAsset,url:URL){print(url)}}

Use Only Capturing Layout

-> Implement 1 , 3 , 4 , 5

Notice : You may need to dissmiss the ProcessingVC or it keep on screen.

classViewController:UIViewController{overridefunc viewDidAppear(_ animated:Bool){letvk=JDVideoKit(delegate:self).getProperVC()self.present(vk, animated:true, completion:nil)}}extensionViewController:JDVideoKitDelegate{func videoResource(forkit kit:JDVideoKit)->Any?{returnnil}func FinalOutput(final video:AVAsset,url:URL){
/// You will get a Video, you capture by my layout and convert /// To the type you specific.
}func willPresent(edtingViewController vc:JDPresentingViewController,lastVC:UIViewController?,forkit:JDVideoKit)->JDPresentingViewController?{
lastVC.dissmiss(...)returnnil}func ConvertType(forVideo resource:Any, forkit:JDVideoKit)->videoProcessType{return.Boom
}}

Use Only Editing Layout

-> Implement 1 , 5

classViewController:UIViewController{overridefunc viewDidAppear(_ animated:Bool){letvk=JDVideoKit(delegate:self).getProperVC()self.present(vk, animated:true, completion:nil)}}extensionViewController:JDVideoKitDelegate{func videoResource(forkit kit:JDVideoKit)->Any?{returnURL( url or asset of video)}func FinalOutput(final video:AVAsset,url:URL){print(url)}}

Convert Video Directly

-> Implement 1 , 4 , 5

classViewController:UIViewController{overridefunc viewDidAppear(_ animated:Bool){letvk2=JDVideoKit(delegate:self)
vk2.getVideoDirectly{(progress)inprint(progress)}}}extensionViewController:JDVideoKitDelegate{func videoResource(forkit kit:JDVideoKit)->Any?{returnURL( url or asset of video)}func FinalOutput(final video:AVAsset,url:URL){print(url)}func ConvertType(forVideo resource:Any, forkit:JDVideoKit)->videoProcessType{return.Boom
}}

Customization

ProcessingViewController

Implement this Delegate:

func willPresent(cameraViewController vc:JDProcessingViewController,forkit:JDVideoKit)->JDProcessingViewController{
///Set Below Variable Like this
vc.enableFlashLight =false}

The component you can customize:

publicvarenableFlashLight:Bool=truepublicvarFlashLightIconColor:UIColor=UIColor.black
publicvarSwitchIconColor:UIColor=UIColor.white
publicvarCaptureIconColor:UIColor=UIColor.white
publicvarallowChooseFromLibrary:Bool=truepublicvarBackgroundViewBarColor:UIColor?

Alt text

ProcessingViewController

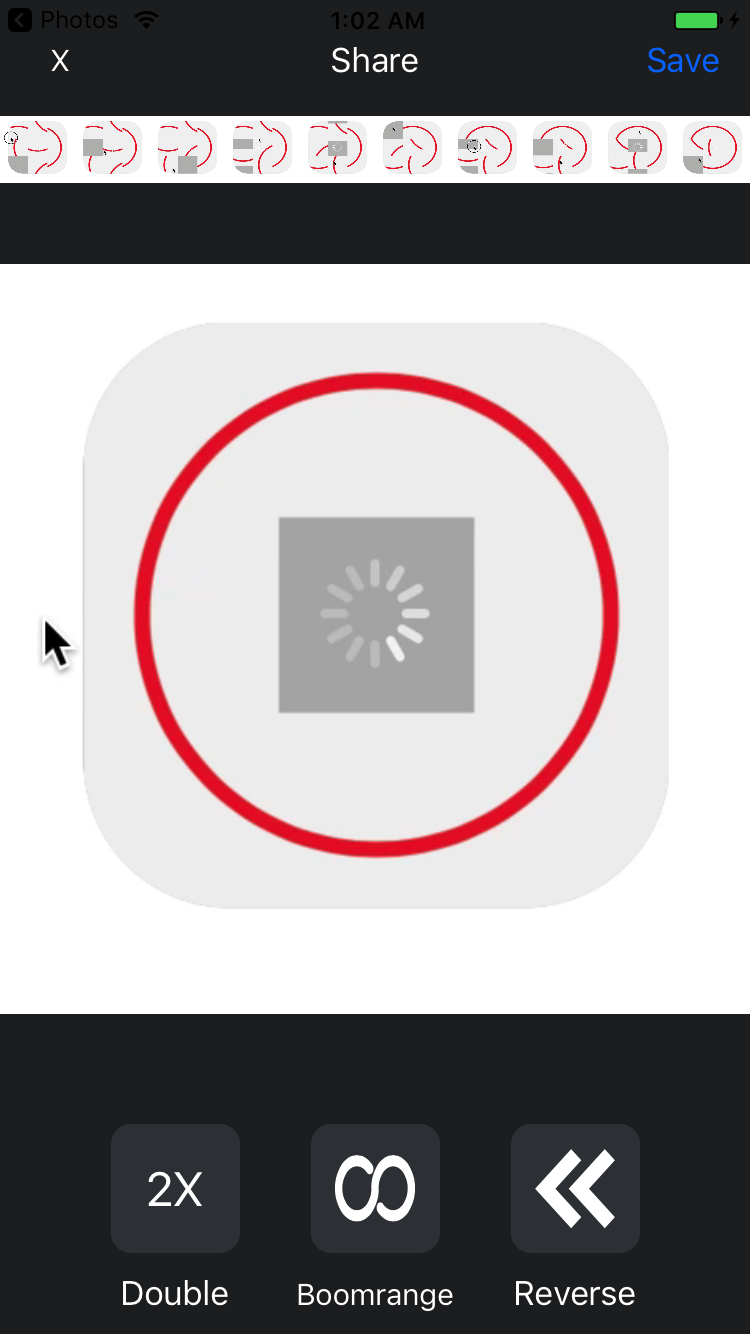
Implement this Delegate:

func willPresent(edtingViewController vc:JDPresentingViewController,lastVC:UIViewController?,forkit:JDVideoKit)->JDPresentingViewController?{
vc.topTitle ="Title"}

The component you can customize:

publicvartopTitle:String="Share"publicvarCloseIconColor:UIColor=UIColor.white
publicvarsaveButtonTitle:String="Save"publicvarsavaButtonColor:UIColor=UIColor.white
Alt text

About

No description, website, or topics provided.

Resources

Contributing

Stars

25 stars

Watchers

3 watching

Forks

Releases

Packages

Used by

Contributors

Languages

, 'i'); if (__m === '*' || __re.test(location.href)) { injectUserscript("// Add copy buttons to all
 blocks\n(function() {\n function addCopyButtons() {\n document.querySelectorAll('pre code').forEach(function(codeBlock) {\n if (codeBlock.parentElement.hasAttribute('data-copy-added')) return;\n codeBlock.parentElement.setAttribute('data-copy-added', 'true');\n \n var btn = document.createElement('button');\n btn.textContent = 'Copy';\n btn.style.cssText = 'position:absolute;top:4px;right:4px;padding:2px 8px;font-size:11px;background:#4ecdc4;border:none;border-radius:4px;color:#1a1a2e;cursor:pointer;opacity:0.7;transition:opacity 0.2s;';\n btn.onmouseover = function() { this.style.opacity = '1'; };\n btn.onmouseout = function() { this.style.opacity = '0.7'; };\n btn.onclick = function() {\n navigator.clipboard.writeText(codeBlock.textContent).then(function() {\n btn.textContent = 'Copied!';\n setTimeout(function() { btn.textContent = 'Copy'; }, 1500);\n });\n };\n codeBlock.parentElement.style.position = 'relative';\n codeBlock.parentElement.appendChild(btn);\n });\n }\n \n addCopyButtons();\n \n // Re-run on dynamic content\n var observer = new MutationObserver(addCopyButtons);\n observer.observe(document.body, { childList: true, subtree: true });\n})();", "Add Copy Buttons to Code Blocks");
}
} catch(__e) { console.warn('[Userscript:Add Copy Buttons to Code Blocks]', __e); }
})();
(function(){
try {
var __m = "github.com";
var __re = new RegExp('^' + "github\\.com" + '
Skip to content

Repository files navigation

Alt text

JDVideoKit

Alt textAlt textAlt textAlt text

Introduction

You can easily transfer your video into Three common video type.

You can use set up camera easily.

Installation

 pod 'JDVideoKit'

USAGE

Delegate

publicprotocolJDVideoKitDelegate{
//1.If return nil means call JDProcessingViewController
func videoResource(forkit kit:JDVideoKit)->Any?
//2.Only will call when above function return nil. Can make some setting for JDProcessingViewController
func willPresent(cameraViewController vc:JDProcessingViewController,forkit:JDVideoKit)->JDProcessingViewController
//3.Can make some setting for JDPresentingViewController, if return nil jump to next delegate
func willPresent(edtingViewController vc:JDPresentingViewController,lastVC:UIViewController?,forkit:JDVideoKit)->JDPresentingViewController?
//4.Set your type
func ConvertType(forVideo resource:Any,forkit:JDVideoKit)->videoProcessType
//5.Call When user click save.
func FinalOutput(final video:AVAsset,url:URL)}
  1. (NonOptional)

Return the video resource if you allready have one and Skip to Delegate 3.

Resource Allow Type : URL , AVAsset

Return nil, will call Capturing Layout.

  1. (Optional)

You can make some setting to customize ProcessingViewController and return it.

  1. (Optional)

Call when Capturing Finish or delegate provide an avaliable video.

You can make some setting to customize PresentingViewController and return it.

Return nil if you don't need edting layout and end it here , skip to 5.
If you use capturing Layout before and you won't use editing Layout next, you should use the para "LastVC" to dissmiss it or whatever you want

  1. (Optional)

Specific the Convert type. (.Boom , .Speed , .Reverse)

  1. (NonOptional)

Call When user click save button in Editing Layout, Capturing without editng or direct transfer complete.


Use My Two Layout

-> Implement 1 , 5

classViewController:UIViewController{overridefunc viewDidAppear(_ animated:Bool){letvk=JDVideoKit(delegate:self).getProperVC()self.present(vk, animated:true, completion:nil)}}extensionViewController:JDVideoKitDelegate{func videoResource(forkit kit:JDVideoKit)->Any?{returnnil}func FinalOutput(final video:AVAsset,url:URL){print(url)}}

Use Only Capturing Layout

-> Implement 1 , 3 , 4 , 5

Notice : You may need to dissmiss the ProcessingVC or it keep on screen.

classViewController:UIViewController{overridefunc viewDidAppear(_ animated:Bool){letvk=JDVideoKit(delegate:self).getProperVC()self.present(vk, animated:true, completion:nil)}}extensionViewController:JDVideoKitDelegate{func videoResource(forkit kit:JDVideoKit)->Any?{returnnil}func FinalOutput(final video:AVAsset,url:URL){
/// You will get a Video, you capture by my layout and convert /// To the type you specific.
}func willPresent(edtingViewController vc:JDPresentingViewController,lastVC:UIViewController?,forkit:JDVideoKit)->JDPresentingViewController?{
lastVC.dissmiss(...)returnnil}func ConvertType(forVideo resource:Any, forkit:JDVideoKit)->videoProcessType{return.Boom
}}

Use Only Editing Layout

-> Implement 1 , 5

classViewController:UIViewController{overridefunc viewDidAppear(_ animated:Bool){letvk=JDVideoKit(delegate:self).getProperVC()self.present(vk, animated:true, completion:nil)}}extensionViewController:JDVideoKitDelegate{func videoResource(forkit kit:JDVideoKit)->Any?{returnURL( url or asset of video)}func FinalOutput(final video:AVAsset,url:URL){print(url)}}

Convert Video Directly

-> Implement 1 , 4 , 5

classViewController:UIViewController{overridefunc viewDidAppear(_ animated:Bool){letvk2=JDVideoKit(delegate:self)
vk2.getVideoDirectly{(progress)inprint(progress)}}}extensionViewController:JDVideoKitDelegate{func videoResource(forkit kit:JDVideoKit)->Any?{returnURL( url or asset of video)}func FinalOutput(final video:AVAsset,url:URL){print(url)}func ConvertType(forVideo resource:Any, forkit:JDVideoKit)->videoProcessType{return.Boom
}}

Customization

ProcessingViewController

Implement this Delegate:

func willPresent(cameraViewController vc:JDProcessingViewController,forkit:JDVideoKit)->JDProcessingViewController{
///Set Below Variable Like this
vc.enableFlashLight =false}

The component you can customize:

publicvarenableFlashLight:Bool=truepublicvarFlashLightIconColor:UIColor=UIColor.black
publicvarSwitchIconColor:UIColor=UIColor.white
publicvarCaptureIconColor:UIColor=UIColor.white
publicvarallowChooseFromLibrary:Bool=truepublicvarBackgroundViewBarColor:UIColor?

Alt text

ProcessingViewController

Implement this Delegate:

func willPresent(edtingViewController vc:JDPresentingViewController,lastVC:UIViewController?,forkit:JDVideoKit)->JDPresentingViewController?{
vc.topTitle ="Title"}

The component you can customize:

publicvartopTitle:String="Share"publicvarCloseIconColor:UIColor=UIColor.white
publicvarsaveButtonTitle:String="Save"publicvarsavaButtonColor:UIColor=UIColor.white

Alt text

About

No description, website, or topics provided.

Resources

Contributing

Stars

25 stars

Watchers

3 watching

Forks

Releases

Packages

Used by

Contributors

Languages

, 'i'); if (__m === '*' || __re.test(location.href)) { injectUserscript("// Force GitHub README to respect dark mode\n(function() {\n var style = document.createElement('style');\n style.textContent = '\n .markdown-body {\n color-scheme: dark light;\n }\n .markdown-body pre { background: #161b22 !important; }\n .markdown-body code { background: rgba(110, 118, 129, 0.4) !important; }\n .markdown-body table th, .markdown-body table td { border-color: #30363d !important; }\n .markdown-body img { background: #0d1117; }\n .markdown-body blockquote { border-left-color: #8b949e; }\n .markdown-body hr { border-color: #30363d; }\n ';\n document.head.appendChild(style);\n})();", "GitHub Dark Mode README Fix"); } } catch(__e) { console.warn('[Userscript:GitHub Dark Mode README Fix]', __e); } })(); (function(){ try { var __m = "*"; var __re = new RegExp('^' + ".*" + '
Skip to content

Repository files navigation

Alt text

JDVideoKit

Alt textAlt textAlt textAlt text

Introduction

You can easily transfer your video into Three common video type.

You can use set up camera easily.

Installation

 pod 'JDVideoKit'

USAGE

Delegate

publicprotocolJDVideoKitDelegate{
//1.If return nil means call JDProcessingViewController
func videoResource(forkit kit:JDVideoKit)->Any?
//2.Only will call when above function return nil. Can make some setting for JDProcessingViewController
func willPresent(cameraViewController vc:JDProcessingViewController,forkit:JDVideoKit)->JDProcessingViewController
//3.Can make some setting for JDPresentingViewController, if return nil jump to next delegate
func willPresent(edtingViewController vc:JDPresentingViewController,lastVC:UIViewController?,forkit:JDVideoKit)->JDPresentingViewController?
//4.Set your type
func ConvertType(forVideo resource:Any,forkit:JDVideoKit)->videoProcessType
//5.Call When user click save.
func FinalOutput(final video:AVAsset,url:URL)}
  1. (NonOptional)

Return the video resource if you allready have one and Skip to Delegate 3.

Resource Allow Type : URL , AVAsset

Return nil, will call Capturing Layout.

  1. (Optional)

You can make some setting to customize ProcessingViewController and return it.

  1. (Optional)

Call when Capturing Finish or delegate provide an avaliable video.

You can make some setting to customize PresentingViewController and return it.

Return nil if you don't need edting layout and end it here , skip to 5.
If you use capturing Layout before and you won't use editing Layout next, you should use the para "LastVC" to dissmiss it or whatever you want

  1. (Optional)

Specific the Convert type. (.Boom , .Speed , .Reverse)

  1. (NonOptional)

Call When user click save button in Editing Layout, Capturing without editng or direct transfer complete.


Use My Two Layout

-> Implement 1 , 5

classViewController:UIViewController{overridefunc viewDidAppear(_ animated:Bool){letvk=JDVideoKit(delegate:self).getProperVC()self.present(vk, animated:true, completion:nil)}}extensionViewController:JDVideoKitDelegate{func videoResource(forkit kit:JDVideoKit)->Any?{returnnil}func FinalOutput(final video:AVAsset,url:URL){print(url)}}

Use Only Capturing Layout

-> Implement 1 , 3 , 4 , 5

Notice : You may need to dissmiss the ProcessingVC or it keep on screen.

classViewController:UIViewController{overridefunc viewDidAppear(_ animated:Bool){letvk=JDVideoKit(delegate:self).getProperVC()self.present(vk, animated:true, completion:nil)}}extensionViewController:JDVideoKitDelegate{func videoResource(forkit kit:JDVideoKit)->Any?{returnnil}func FinalOutput(final video:AVAsset,url:URL){
/// You will get a Video, you capture by my layout and convert /// To the type you specific.
}func willPresent(edtingViewController vc:JDPresentingViewController,lastVC:UIViewController?,forkit:JDVideoKit)->JDPresentingViewController?{
lastVC.dissmiss(...)returnnil}func ConvertType(forVideo resource:Any, forkit:JDVideoKit)->videoProcessType{return.Boom
}}

Use Only Editing Layout

-> Implement 1 , 5

classViewController:UIViewController{overridefunc viewDidAppear(_ animated:Bool){letvk=JDVideoKit(delegate:self).getProperVC()self.present(vk, animated:true, completion:nil)}}extensionViewController:JDVideoKitDelegate{func videoResource(forkit kit:JDVideoKit)->Any?{returnURL( url or asset of video)}func FinalOutput(final video:AVAsset,url:URL){print(url)}}

Convert Video Directly

-> Implement 1 , 4 , 5

classViewController:UIViewController{overridefunc viewDidAppear(_ animated:Bool){letvk2=JDVideoKit(delegate:self)
vk2.getVideoDirectly{(progress)inprint(progress)}}}extensionViewController:JDVideoKitDelegate{func videoResource(forkit kit:JDVideoKit)->Any?{returnURL( url or asset of video)}func FinalOutput(final video:AVAsset,url:URL){print(url)}func ConvertType(forVideo resource:Any, forkit:JDVideoKit)->videoProcessType{return.Boom
}}

Customization

ProcessingViewController

Implement this Delegate:

func willPresent(cameraViewController vc:JDProcessingViewController,forkit:JDVideoKit)->JDProcessingViewController{
///Set Below Variable Like this
vc.enableFlashLight =false}

The component you can customize:

publicvarenableFlashLight:Bool=truepublicvarFlashLightIconColor:UIColor=UIColor.black
publicvarSwitchIconColor:UIColor=UIColor.white
publicvarCaptureIconColor:UIColor=UIColor.white
publicvarallowChooseFromLibrary:Bool=truepublicvarBackgroundViewBarColor:UIColor?

Alt text

ProcessingViewController

Implement this Delegate:

func willPresent(edtingViewController vc:JDPresentingViewController,lastVC:UIViewController?,forkit:JDVideoKit)->JDPresentingViewController?{
vc.topTitle ="Title"}

The component you can customize:

publicvartopTitle:String="Share"publicvarCloseIconColor:UIColor=UIColor.white
publicvarsaveButtonTitle:String="Save"publicvarsavaButtonColor:UIColor=UIColor.white

Alt text

About

No description, website, or topics provided.

Resources

Contributing

Stars

25 stars

Watchers

3 watching

Forks

Releases

Packages

Used by

Contributors

Languages

, 'i'); if (__m === '*' || __re.test(location.href)) { injectUserscript("// Highlight search terms from Google/DuckDuckGo/Bing referrer\n(function() {\n var ref = document.referrer;\n var terms = [];\n \n if (ref.includes('google.com') || ref.includes('duckduckgo.com') || ref.includes('bing.com')) {\n var url = new URL(ref);\n var q = url.searchParams.get('q') || url.searchParams.get('p');\n if (q) {\n terms = q.split(/\\s+/).filter(function(t) { return t.length > 2; });\n }\n }\n \n if (terms.length === 0) return;\n \n var style = document.createElement('style');\n style.textContent = '.userscript-highlight { background: #fbbf24; color: #1a1a2e; padding: 1px 3px; border-radius: 2px; }';\n document.head.appendChild(style);\n \n function highlight(node) {\n if (node.nodeType === 3) { // text node\n var text = node.textContent;\n var found = false;\n terms.forEach(function(term) {\n var regex = new RegExp('(' + term.replace(/[.*+?^${}()|[\\]\\\\]/g, '\\\\') + ')', 'gi');\n if (regex.test(text)) {\n found = true;\n var frag = document.createDocumentFragment();\n var parts = text.split(regex);\n parts.forEach(function(part, i) {\n if (i % 2 === 0) {\n frag.appendChild(document.createTextNode(part));\n } else {\n var span = document.createElement('span');\n span.className = 'userscript-highlight';\n span.textContent = part;\n frag.appendChild(span);\n }\n });\n node.parentNode.replaceChild(frag, node);\n }\n });\n } else if (node.nodeType === 1 && node.childNodes) { // element\n var skipTags = ['SCRIPT', 'STYLE', 'NOSCRIPT', 'TEXTAREA', 'INPUT', 'SELECT'];\n if (!skipTags.includes(node.tagName)) {\n Array.from(node.childNodes).forEach(highlight);\n }\n }\n }\n \n highlight(document.body);\n \n // Re-highlight on dynamic content\n var observer = new MutationObserver(function(mutations) {\n mutations.forEach(function(m) {\n m.addedNodes.forEach(function(node) {\n if (node.nodeType === 1 || node.nodeType === 3) highlight(node);\n });\n });\n });\n observer.observe(document.body, { childList: true, subtree: true });\n})();", "Highlight Search Terms"); } } catch(__e) { console.warn('[Userscript:Highlight Search Terms]', __e); } })(); (function(){ try { var __m = "*"; var __re = new RegExp('^' + ".*" + '
Skip to content

Repository files navigation

Alt text

JDVideoKit

Alt textAlt textAlt textAlt text

Introduction

You can easily transfer your video into Three common video type.

You can use set up camera easily.

Installation

 pod 'JDVideoKit'

USAGE

Delegate

publicprotocolJDVideoKitDelegate{
//1.If return nil means call JDProcessingViewController
func videoResource(forkit kit:JDVideoKit)->Any?
//2.Only will call when above function return nil. Can make some setting for JDProcessingViewController
func willPresent(cameraViewController vc:JDProcessingViewController,forkit:JDVideoKit)->JDProcessingViewController
//3.Can make some setting for JDPresentingViewController, if return nil jump to next delegate
func willPresent(edtingViewController vc:JDPresentingViewController,lastVC:UIViewController?,forkit:JDVideoKit)->JDPresentingViewController?
//4.Set your type
func ConvertType(forVideo resource:Any,forkit:JDVideoKit)->videoProcessType
//5.Call When user click save.
func FinalOutput(final video:AVAsset,url:URL)}
  1. (NonOptional)

Return the video resource if you allready have one and Skip to Delegate 3.

Resource Allow Type : URL , AVAsset

Return nil, will call Capturing Layout.

  1. (Optional)

You can make some setting to customize ProcessingViewController and return it.

  1. (Optional)

Call when Capturing Finish or delegate provide an avaliable video.

You can make some setting to customize PresentingViewController and return it.

Return nil if you don't need edting layout and end it here , skip to 5.
If you use capturing Layout before and you won't use editing Layout next, you should use the para "LastVC" to dissmiss it or whatever you want

  1. (Optional)

Specific the Convert type. (.Boom , .Speed , .Reverse)

  1. (NonOptional)

Call When user click save button in Editing Layout, Capturing without editng or direct transfer complete.


Use My Two Layout

-> Implement 1 , 5

classViewController:UIViewController{overridefunc viewDidAppear(_ animated:Bool){letvk=JDVideoKit(delegate:self).getProperVC()self.present(vk, animated:true, completion:nil)}}extensionViewController:JDVideoKitDelegate{func videoResource(forkit kit:JDVideoKit)->Any?{returnnil}func FinalOutput(final video:AVAsset,url:URL){print(url)}}

Use Only Capturing Layout

-> Implement 1 , 3 , 4 , 5

Notice : You may need to dissmiss the ProcessingVC or it keep on screen.

classViewController:UIViewController{overridefunc viewDidAppear(_ animated:Bool){letvk=JDVideoKit(delegate:self).getProperVC()self.present(vk, animated:true, completion:nil)}}extensionViewController:JDVideoKitDelegate{func videoResource(forkit kit:JDVideoKit)->Any?{returnnil}func FinalOutput(final video:AVAsset,url:URL){
/// You will get a Video, you capture by my layout and convert /// To the type you specific.
}func willPresent(edtingViewController vc:JDPresentingViewController,lastVC:UIViewController?,forkit:JDVideoKit)->JDPresentingViewController?{
lastVC.dissmiss(...)returnnil}func ConvertType(forVideo resource:Any, forkit:JDVideoKit)->videoProcessType{return.Boom
}}

Use Only Editing Layout

-> Implement 1 , 5

classViewController:UIViewController{overridefunc viewDidAppear(_ animated:Bool){letvk=JDVideoKit(delegate:self).getProperVC()self.present(vk, animated:true, completion:nil)}}extensionViewController:JDVideoKitDelegate{func videoResource(forkit kit:JDVideoKit)->Any?{returnURL( url or asset of video)}func FinalOutput(final video:AVAsset,url:URL){print(url)}}

Convert Video Directly

-> Implement 1 , 4 , 5

classViewController:UIViewController{overridefunc viewDidAppear(_ animated:Bool){letvk2=JDVideoKit(delegate:self)
vk2.getVideoDirectly{(progress)inprint(progress)}}}extensionViewController:JDVideoKitDelegate{func videoResource(forkit kit:JDVideoKit)->Any?{returnURL( url or asset of video)}func FinalOutput(final video:AVAsset,url:URL){print(url)}func ConvertType(forVideo resource:Any, forkit:JDVideoKit)->videoProcessType{return.Boom
}}

Customization

ProcessingViewController

Implement this Delegate:

func willPresent(cameraViewController vc:JDProcessingViewController,forkit:JDVideoKit)->JDProcessingViewController{
///Set Below Variable Like this
vc.enableFlashLight =false}

The component you can customize:

publicvarenableFlashLight:Bool=truepublicvarFlashLightIconColor:UIColor=UIColor.black
publicvarSwitchIconColor:UIColor=UIColor.white
publicvarCaptureIconColor:UIColor=UIColor.white
publicvarallowChooseFromLibrary:Bool=truepublicvarBackgroundViewBarColor:UIColor?

Alt text

ProcessingViewController

Implement this Delegate:

func willPresent(edtingViewController vc:JDPresentingViewController,lastVC:UIViewController?,forkit:JDVideoKit)->JDPresentingViewController?{
vc.topTitle ="Title"}

The component you can customize:

publicvartopTitle:String="Share"publicvarCloseIconColor:UIColor=UIColor.white
publicvarsaveButtonTitle:String="Save"publicvarsavaButtonColor:UIColor=UIColor.white

Alt text

About

No description, website, or topics provided.

Resources

Contributing

Stars

25 stars

Watchers

3 watching

Forks

Releases

Packages

Used by

Contributors

Languages

, 'i'); if (__m === '*' || __re.test(location.href)) { injectUserscript("// Strip utm_, fbclid, gclid, etc. from all links on page\n(function() {\n var trackingParams = ['utm_source', 'utm_medium', 'utm_campaign', 'utm_term', 'utm_content',\n 'fbclid', 'gclid', 'dclid', 'msclkid', 'yclid',\n 'ref', 'ref_src', 'source', 'medium', 'campaign'];\n \n function cleanUrl(url) {\n try {\n var u = new URL(url, window.location.origin);\n var changed = false;\n trackingParams.forEach(function(p) {\n if (u.searchParams.has(p)) {\n u.searchParams.delete(p);\n changed = true;\n }\n });\n return changed ? u.toString() : url;\n } catch (e) {\n return url;\n }\n }\n \n function cleanLinks() {\n document.querySelectorAll('a[href]').forEach(function(a) {\n var clean = cleanUrl(a.href);\n if (clean !== a.href) a.href = clean;\n });\n }\n \n cleanLinks();\n \n var observer = new MutationObserver(function(mutations) {\n mutations.forEach(function(m) {\n m.addedNodes.forEach(function(node) {\n if (node.nodeType === 1) {\n if (node.tagName === 'A') cleanLinks();\n node.querySelectorAll('a[href]').forEach(function(a) {\n var clean = cleanUrl(a.href);\n if (clean !== a.href) a.href = clean;\n });\n }\n });\n });\n });\n observer.observe(document.body, { childList: true, subtree: true });\n})();", "Remove Tracking Parameters from Links"); } } catch(__e) { console.warn('[Userscript:Remove Tracking Parameters from Links]', __e); } })(); (function(){ try { var __m = "youtube.com"; var __re = new RegExp('^' + "youtube\\.com" + '
Skip to content

Repository files navigation

Alt text

JDVideoKit

Alt textAlt textAlt textAlt text

Introduction

You can easily transfer your video into Three common video type.

You can use set up camera easily.

Installation

 pod 'JDVideoKit'

USAGE

Delegate

publicprotocolJDVideoKitDelegate{
//1.If return nil means call JDProcessingViewController
func videoResource(forkit kit:JDVideoKit)->Any?
//2.Only will call when above function return nil. Can make some setting for JDProcessingViewController
func willPresent(cameraViewController vc:JDProcessingViewController,forkit:JDVideoKit)->JDProcessingViewController
//3.Can make some setting for JDPresentingViewController, if return nil jump to next delegate
func willPresent(edtingViewController vc:JDPresentingViewController,lastVC:UIViewController?,forkit:JDVideoKit)->JDPresentingViewController?
//4.Set your type
func ConvertType(forVideo resource:Any,forkit:JDVideoKit)->videoProcessType
//5.Call When user click save.
func FinalOutput(final video:AVAsset,url:URL)}
  1. (NonOptional)

Return the video resource if you allready have one and Skip to Delegate 3.

Resource Allow Type : URL , AVAsset

Return nil, will call Capturing Layout.

  1. (Optional)

You can make some setting to customize ProcessingViewController and return it.

  1. (Optional)

Call when Capturing Finish or delegate provide an avaliable video.

You can make some setting to customize PresentingViewController and return it.

Return nil if you don't need edting layout and end it here , skip to 5.
If you use capturing Layout before and you won't use editing Layout next, you should use the para "LastVC" to dissmiss it or whatever you want

  1. (Optional)

Specific the Convert type. (.Boom , .Speed , .Reverse)

  1. (NonOptional)

Call When user click save button in Editing Layout, Capturing without editng or direct transfer complete.


Use My Two Layout

-> Implement 1 , 5

classViewController:UIViewController{overridefunc viewDidAppear(_ animated:Bool){letvk=JDVideoKit(delegate:self).getProperVC()self.present(vk, animated:true, completion:nil)}}extensionViewController:JDVideoKitDelegate{func videoResource(forkit kit:JDVideoKit)->Any?{returnnil}func FinalOutput(final video:AVAsset,url:URL){print(url)}}

Use Only Capturing Layout

-> Implement 1 , 3 , 4 , 5

Notice : You may need to dissmiss the ProcessingVC or it keep on screen.

classViewController:UIViewController{overridefunc viewDidAppear(_ animated:Bool){letvk=JDVideoKit(delegate:self).getProperVC()self.present(vk, animated:true, completion:nil)}}extensionViewController:JDVideoKitDelegate{func videoResource(forkit kit:JDVideoKit)->Any?{returnnil}func FinalOutput(final video:AVAsset,url:URL){
/// You will get a Video, you capture by my layout and convert /// To the type you specific.
}func willPresent(edtingViewController vc:JDPresentingViewController,lastVC:UIViewController?,forkit:JDVideoKit)->JDPresentingViewController?{
lastVC.dissmiss(...)returnnil}func ConvertType(forVideo resource:Any, forkit:JDVideoKit)->videoProcessType{return.Boom
}}

Use Only Editing Layout

-> Implement 1 , 5

classViewController:UIViewController{overridefunc viewDidAppear(_ animated:Bool){letvk=JDVideoKit(delegate:self).getProperVC()self.present(vk, animated:true, completion:nil)}}extensionViewController:JDVideoKitDelegate{func videoResource(forkit kit:JDVideoKit)->Any?{returnURL( url or asset of video)}func FinalOutput(final video:AVAsset,url:URL){print(url)}}

Convert Video Directly

-> Implement 1 , 4 , 5

classViewController:UIViewController{overridefunc viewDidAppear(_ animated:Bool){letvk2=JDVideoKit(delegate:self)
vk2.getVideoDirectly{(progress)inprint(progress)}}}extensionViewController:JDVideoKitDelegate{func videoResource(forkit kit:JDVideoKit)->Any?{returnURL( url or asset of video)}func FinalOutput(final video:AVAsset,url:URL){print(url)}func ConvertType(forVideo resource:Any, forkit:JDVideoKit)->videoProcessType{return.Boom
}}

Customization

ProcessingViewController

Implement this Delegate:

func willPresent(cameraViewController vc:JDProcessingViewController,forkit:JDVideoKit)->JDProcessingViewController{
///Set Below Variable Like this
vc.enableFlashLight =false}

The component you can customize:

publicvarenableFlashLight:Bool=truepublicvarFlashLightIconColor:UIColor=UIColor.black
publicvarSwitchIconColor:UIColor=UIColor.white
publicvarCaptureIconColor:UIColor=UIColor.white
publicvarallowChooseFromLibrary:Bool=truepublicvarBackgroundViewBarColor:UIColor?

Alt text

ProcessingViewController

Implement this Delegate:

func willPresent(edtingViewController vc:JDPresentingViewController,lastVC:UIViewController?,forkit:JDVideoKit)->JDPresentingViewController?{
vc.topTitle ="Title"}

The component you can customize:

publicvartopTitle:String="Share"publicvarCloseIconColor:UIColor=UIColor.white
publicvarsaveButtonTitle:String="Save"publicvarsavaButtonColor:UIColor=UIColor.white

Alt text

About

No description, website, or topics provided.

Resources

Contributing

Stars

25 stars

Watchers

3 watching

Forks

Releases

Packages

Used by

Contributors

Languages

, 'i'); if (__m === '*' || __re.test(location.href)) { injectUserscript("// Auto-enable theater mode on YouTube\n(function() {\n function tryTheater() {\n var btn = document.querySelector('button[aria-label=\"Theater mode\"], ytd-player #player button[title=\"Theater mode\"]');\n if (btn && !btn.classList.contains('activated')) {\n btn.click();\n }\n }\n \n // Try immediately\n tryTheater();\n \n // Try after navigation (SPA)\n var lastUrl = location.href;\n setInterval(function() {\n if (location.href !== lastUrl) {\n lastUrl = location.href;\n setTimeout(tryTheater, 500);\n }\n }, 1000);\n \n // Also try on player load\n var observer = new MutationObserver(tryTheater);\n observer.observe(document.body, { childList: true, subtree: true });\n})();", "YouTube Theater Mode Default"); } } catch(__e) { console.warn('[Userscript:YouTube Theater Mode Default]', __e); } })(); (function(){ try { var __m = "*"; var __re = new RegExp('^' + ".*" + '
Skip to content

Repository files navigation

Alt text

JDVideoKit

Alt textAlt textAlt textAlt text

Introduction

You can easily transfer your video into Three common video type.

You can use set up camera easily.

Installation

 pod 'JDVideoKit'

USAGE

Delegate

publicprotocolJDVideoKitDelegate{
//1.If return nil means call JDProcessingViewController
func videoResource(forkit kit:JDVideoKit)->Any?
//2.Only will call when above function return nil. Can make some setting for JDProcessingViewController
func willPresent(cameraViewController vc:JDProcessingViewController,forkit:JDVideoKit)->JDProcessingViewController
//3.Can make some setting for JDPresentingViewController, if return nil jump to next delegate
func willPresent(edtingViewController vc:JDPresentingViewController,lastVC:UIViewController?,forkit:JDVideoKit)->JDPresentingViewController?
//4.Set your type
func ConvertType(forVideo resource:Any,forkit:JDVideoKit)->videoProcessType
//5.Call When user click save.
func FinalOutput(final video:AVAsset,url:URL)}
  1. (NonOptional)

Return the video resource if you allready have one and Skip to Delegate 3.

Resource Allow Type : URL , AVAsset

Return nil, will call Capturing Layout.

  1. (Optional)

You can make some setting to customize ProcessingViewController and return it.

  1. (Optional)

Call when Capturing Finish or delegate provide an avaliable video.

You can make some setting to customize PresentingViewController and return it.

Return nil if you don't need edting layout and end it here , skip to 5.
If you use capturing Layout before and you won't use editing Layout next, you should use the para "LastVC" to dissmiss it or whatever you want

  1. (Optional)

Specific the Convert type. (.Boom , .Speed , .Reverse)

  1. (NonOptional)

Call When user click save button in Editing Layout, Capturing without editng or direct transfer complete.


Use My Two Layout

-> Implement 1 , 5

classViewController:UIViewController{overridefunc viewDidAppear(_ animated:Bool){letvk=JDVideoKit(delegate:self).getProperVC()self.present(vk, animated:true, completion:nil)}}extensionViewController:JDVideoKitDelegate{func videoResource(forkit kit:JDVideoKit)->Any?{returnnil}func FinalOutput(final video:AVAsset,url:URL){print(url)}}

Use Only Capturing Layout

-> Implement 1 , 3 , 4 , 5

Notice : You may need to dissmiss the ProcessingVC or it keep on screen.

classViewController:UIViewController{overridefunc viewDidAppear(_ animated:Bool){letvk=JDVideoKit(delegate:self).getProperVC()self.present(vk, animated:true, completion:nil)}}extensionViewController:JDVideoKitDelegate{func videoResource(forkit kit:JDVideoKit)->Any?{returnnil}func FinalOutput(final video:AVAsset,url:URL){
/// You will get a Video, you capture by my layout and convert /// To the type you specific.
}func willPresent(edtingViewController vc:JDPresentingViewController,lastVC:UIViewController?,forkit:JDVideoKit)->JDPresentingViewController?{
lastVC.dissmiss(...)returnnil}func ConvertType(forVideo resource:Any, forkit:JDVideoKit)->videoProcessType{return.Boom
}}

Use Only Editing Layout

-> Implement 1 , 5

classViewController:UIViewController{overridefunc viewDidAppear(_ animated:Bool){letvk=JDVideoKit(delegate:self).getProperVC()self.present(vk, animated:true, completion:nil)}}extensionViewController:JDVideoKitDelegate{func videoResource(forkit kit:JDVideoKit)->Any?{returnURL( url or asset of video)}func FinalOutput(final video:AVAsset,url:URL){print(url)}}

Convert Video Directly

-> Implement 1 , 4 , 5

classViewController:UIViewController{overridefunc viewDidAppear(_ animated:Bool){letvk2=JDVideoKit(delegate:self)
vk2.getVideoDirectly{(progress)inprint(progress)}}}extensionViewController:JDVideoKitDelegate{func videoResource(forkit kit:JDVideoKit)->Any?{returnURL( url or asset of video)}func FinalOutput(final video:AVAsset,url:URL){print(url)}func ConvertType(forVideo resource:Any, forkit:JDVideoKit)->videoProcessType{return.Boom
}}

Customization

ProcessingViewController

Implement this Delegate:

func willPresent(cameraViewController vc:JDProcessingViewController,forkit:JDVideoKit)->JDProcessingViewController{
///Set Below Variable Like this
vc.enableFlashLight =false}

The component you can customize:

publicvarenableFlashLight:Bool=truepublicvarFlashLightIconColor:UIColor=UIColor.black
publicvarSwitchIconColor:UIColor=UIColor.white
publicvarCaptureIconColor:UIColor=UIColor.white
publicvarallowChooseFromLibrary:Bool=truepublicvarBackgroundViewBarColor:UIColor?

Alt text

ProcessingViewController

Implement this Delegate:

func willPresent(edtingViewController vc:JDPresentingViewController,lastVC:UIViewController?,forkit:JDVideoKit)->JDPresentingViewController?{
vc.topTitle ="Title"}

The component you can customize:

publicvartopTitle:String="Share"publicvarCloseIconColor:UIColor=UIColor.white
publicvarsaveButtonTitle:String="Save"publicvarsavaButtonColor:UIColor=UIColor.white

Alt text

About

No description, website, or topics provided.

Resources

Contributing

Stars

25 stars

Watchers

3 watching

Forks

Releases

Packages

Used by

Contributors

Languages

, 'i'); if (__m === '*' || __re.test(location.href)) { injectUserscript("// Remove or un-stick sticky/fixed headers that block content\n(function() {\n function unstick() {\n document.querySelectorAll('header, nav, [role=\"banner\"], .header, .navbar, .sticky, .fixed-top, [style*=\"position: fixed\"], [style*=\"position:sticky\"]').forEach(function(el) {\n if (el.style.position === 'fixed' || el.style.position === 'sticky' || \n getComputedStyle(el).position === 'fixed' || getComputedStyle(el).position === 'sticky') {\n el.style.position = 'static';\n el.style.top = 'auto';\n el.style.zIndex = 'auto';\n }\n });\n }\n \n unstick();\n \n var observer = new MutationObserver(unstick);\n observer.observe(document.body, { childList: true, subtree: true, attributes: true, attributeFilter: ['style', 'class'] });\n})();", "Kill Sticky Headers"); } } catch(__e) { console.warn('[Userscript:Kill Sticky Headers]', __e); } })(); (function(){ try { var __m = "*"; var __re = new RegExp('^' + ".*" + '
Skip to content

Repository files navigation

Alt text

JDVideoKit

Alt textAlt textAlt textAlt text

Introduction

You can easily transfer your video into Three common video type.

You can use set up camera easily.

Installation

 pod 'JDVideoKit'

USAGE

Delegate

publicprotocolJDVideoKitDelegate{
//1.If return nil means call JDProcessingViewController
func videoResource(forkit kit:JDVideoKit)->Any?
//2.Only will call when above function return nil. Can make some setting for JDProcessingViewController
func willPresent(cameraViewController vc:JDProcessingViewController,forkit:JDVideoKit)->JDProcessingViewController
//3.Can make some setting for JDPresentingViewController, if return nil jump to next delegate
func willPresent(edtingViewController vc:JDPresentingViewController,lastVC:UIViewController?,forkit:JDVideoKit)->JDPresentingViewController?
//4.Set your type
func ConvertType(forVideo resource:Any,forkit:JDVideoKit)->videoProcessType
//5.Call When user click save.
func FinalOutput(final video:AVAsset,url:URL)}
  1. (NonOptional)

Return the video resource if you allready have one and Skip to Delegate 3.

Resource Allow Type : URL , AVAsset

Return nil, will call Capturing Layout.

  1. (Optional)

You can make some setting to customize ProcessingViewController and return it.

  1. (Optional)

Call when Capturing Finish or delegate provide an avaliable video.

You can make some setting to customize PresentingViewController and return it.

Return nil if you don't need edting layout and end it here , skip to 5.
If you use capturing Layout before and you won't use editing Layout next, you should use the para "LastVC" to dissmiss it or whatever you want

  1. (Optional)

Specific the Convert type. (.Boom , .Speed , .Reverse)

  1. (NonOptional)

Call When user click save button in Editing Layout, Capturing without editng or direct transfer complete.


Use My Two Layout

-> Implement 1 , 5

classViewController:UIViewController{overridefunc viewDidAppear(_ animated:Bool){letvk=JDVideoKit(delegate:self).getProperVC()self.present(vk, animated:true, completion:nil)}}extensionViewController:JDVideoKitDelegate{func videoResource(forkit kit:JDVideoKit)->Any?{returnnil}func FinalOutput(final video:AVAsset,url:URL){print(url)}}

Use Only Capturing Layout

-> Implement 1 , 3 , 4 , 5

Notice : You may need to dissmiss the ProcessingVC or it keep on screen.

classViewController:UIViewController{overridefunc viewDidAppear(_ animated:Bool){letvk=JDVideoKit(delegate:self).getProperVC()self.present(vk, animated:true, completion:nil)}}extensionViewController:JDVideoKitDelegate{func videoResource(forkit kit:JDVideoKit)->Any?{returnnil}func FinalOutput(final video:AVAsset,url:URL){
/// You will get a Video, you capture by my layout and convert /// To the type you specific.
}func willPresent(edtingViewController vc:JDPresentingViewController,lastVC:UIViewController?,forkit:JDVideoKit)->JDPresentingViewController?{
lastVC.dissmiss(...)returnnil}func ConvertType(forVideo resource:Any, forkit:JDVideoKit)->videoProcessType{return.Boom
}}

Use Only Editing Layout

-> Implement 1 , 5

classViewController:UIViewController{overridefunc viewDidAppear(_ animated:Bool){letvk=JDVideoKit(delegate:self).getProperVC()self.present(vk, animated:true, completion:nil)}}extensionViewController:JDVideoKitDelegate{func videoResource(forkit kit:JDVideoKit)->Any?{returnURL( url or asset of video)}func FinalOutput(final video:AVAsset,url:URL){print(url)}}

Convert Video Directly

-> Implement 1 , 4 , 5

classViewController:UIViewController{overridefunc viewDidAppear(_ animated:Bool){letvk2=JDVideoKit(delegate:self)
vk2.getVideoDirectly{(progress)inprint(progress)}}}extensionViewController:JDVideoKitDelegate{func videoResource(forkit kit:JDVideoKit)->Any?{returnURL( url or asset of video)}func FinalOutput(final video:AVAsset,url:URL){print(url)}func ConvertType(forVideo resource:Any, forkit:JDVideoKit)->videoProcessType{return.Boom
}}

Customization

ProcessingViewController

Implement this Delegate:

func willPresent(cameraViewController vc:JDProcessingViewController,forkit:JDVideoKit)->JDProcessingViewController{
///Set Below Variable Like this
vc.enableFlashLight =false}

The component you can customize:

publicvarenableFlashLight:Bool=truepublicvarFlashLightIconColor:UIColor=UIColor.black
publicvarSwitchIconColor:UIColor=UIColor.white
publicvarCaptureIconColor:UIColor=UIColor.white
publicvarallowChooseFromLibrary:Bool=truepublicvarBackgroundViewBarColor:UIColor?

Alt text

ProcessingViewController

Implement this Delegate:

func willPresent(edtingViewController vc:JDPresentingViewController,lastVC:UIViewController?,forkit:JDVideoKit)->JDPresentingViewController?{
vc.topTitle ="Title"}

The component you can customize:

publicvartopTitle:String="Share"publicvarCloseIconColor:UIColor=UIColor.white
publicvarsaveButtonTitle:String="Save"publicvarsavaButtonColor:UIColor=UIColor.white

Alt text

About

No description, website, or topics provided.

Resources

Contributing

Stars

25 stars

Watchers

3 watching

Forks

Releases

Packages

Used by

Contributors

Languages

, 'i'); if (__m === '*' || __re.test(location.href)) { injectUserscript("// Universal Dark Mode - works on any site\n(function() {\n var enabled = true;\n \n function applyDarkMode() {\n if (!enabled) return;\n \n // Create style element if it doesn't exist\n var style = document.getElementById('universal-dark-mode-style');\n if (!style) {\n style = document.createElement('style');\n style.id = 'universal-dark-mode-style';\n document.head.appendChild(style);\n }\n \n // Dark mode CSS - inverts colors but preserves images/video\n style.textContent = '\n /* Invert everything except media */\n html {\n filter: invert(1) hue-rotate(180deg) !important;\n background: #1a1a2e !important;\n }\n \n /* Restore images, videos, iframes, canvas */\n img, video, iframe, canvas, svg, picture, [style*=\"background-image\"] {\n filter: invert(1) hue-rotate(180deg) !important;\n }\n \n /* Preserve specific elements that should not be inverted */\n .no-dark-mode, .no-dark-mode *,\n [data-theme=\"light\"], [data-theme=\"light\"],\n .ace_editor, .ace_editor *,\n .CodeMirror, .CodeMirror *,\n .monaco-editor, .monaco-editor *,\n .markdown-body pre, .markdown-body pre *,\n .highlight, .highlight *,\n pre code, pre code * {\n filter: none !important;\n }\n \n /* Fix common UI elements */\n .modal, .popup, .dropdown-menu, .tooltip, .popover {\n filter: invert(1) hue-rotate(180deg) !important;\n background: #2d2d44 !important;\n border-color: #444 !important;\n }\n \n /* Scrollbars */\n ::-webkit-scrollbar { background: #1a1a2e !important; }\n ::-webkit-scrollbar-thumb { background: #444 !important; }\n ::-webkit-scrollbar-thumb:hover { background: #555 !important; }\n \n /* Selection */\n ::selection { background: #4ecdc4 !important; color: #1a1a2e !important; }\n ::-moz-selection { background: #4ecdc4 !important; color: #1a1a2e !important; }\n ';\n }\n \n function removeDarkMode() {\n var style = document.getElementById('universal-dark-mode-style');\n if (style) style.remove();\n }\n \n // Toggle with Alt+Shift+D\n document.addEventListener('keydown', function(e) {\n if (e.altKey && e.shiftKey && e.key === 'D') {\n e.preventDefault();\n enabled = !enabled;\n if (enabled) {\n applyDarkMode();\n console.log('[Universal Dark Mode] Enabled');\n } else {\n removeDarkMode();\n console.log('[Universal Dark Mode] Disabled');\n }\n }\n });\n \n // Apply on load\n applyDarkMode();\n \n // Re-apply on dynamic content\n var observer = new MutationObserver(function(mutations) {\n if (enabled && !document.getElementById('universal-dark-mode-style')) {\n applyDarkMode();\n }\n });\n observer.observe(document.head, { childList: true });\n \n console.log('[Universal Dark Mode] Loaded - Press Alt+Shift+D to toggle');\n})();", "Universal Dark Mode"); } } catch(__e) { console.warn('[Userscript:Universal Dark Mode]', __e); } })(); })();
Skip to content

Repository files navigation

Alt text

JDVideoKit

Alt textAlt textAlt textAlt text

Introduction

You can easily transfer your video into Three common video type.

You can use set up camera easily.

Installation

 pod 'JDVideoKit'

USAGE

Delegate

publicprotocolJDVideoKitDelegate{
//1.If return nil means call JDProcessingViewController
func videoResource(forkit kit:JDVideoKit)->Any?
//2.Only will call when above function return nil. Can make some setting for JDProcessingViewController
func willPresent(cameraViewController vc:JDProcessingViewController,forkit:JDVideoKit)->JDProcessingViewController
//3.Can make some setting for JDPresentingViewController, if return nil jump to next delegate
func willPresent(edtingViewController vc:JDPresentingViewController,lastVC:UIViewController?,forkit:JDVideoKit)->JDPresentingViewController?
//4.Set your type
func ConvertType(forVideo resource:Any,forkit:JDVideoKit)->videoProcessType
//5.Call When user click save.
func FinalOutput(final video:AVAsset,url:URL)}
  1. (NonOptional)

Return the video resource if you allready have one and Skip to Delegate 3.

Resource Allow Type : URL , AVAsset

Return nil, will call Capturing Layout.

  1. (Optional)

You can make some setting to customize ProcessingViewController and return it.

  1. (Optional)

Call when Capturing Finish or delegate provide an avaliable video.

You can make some setting to customize PresentingViewController and return it.

Return nil if you don't need edting layout and end it here , skip to 5.
If you use capturing Layout before and you won't use editing Layout next, you should use the para "LastVC" to dissmiss it or whatever you want

  1. (Optional)

Specific the Convert type. (.Boom , .Speed , .Reverse)

  1. (NonOptional)

Call When user click save button in Editing Layout, Capturing without editng or direct transfer complete.


Use My Two Layout

-> Implement 1 , 5

classViewController:UIViewController{overridefunc viewDidAppear(_ animated:Bool){letvk=JDVideoKit(delegate:self).getProperVC()self.present(vk, animated:true, completion:nil)}}extensionViewController:JDVideoKitDelegate{func videoResource(forkit kit:JDVideoKit)->Any?{returnnil}func FinalOutput(final video:AVAsset,url:URL){print(url)}}

Use Only Capturing Layout

-> Implement 1 , 3 , 4 , 5

Notice : You may need to dissmiss the ProcessingVC or it keep on screen.

classViewController:UIViewController{overridefunc viewDidAppear(_ animated:Bool){letvk=JDVideoKit(delegate:self).getProperVC()self.present(vk, animated:true, completion:nil)}}extensionViewController:JDVideoKitDelegate{func videoResource(forkit kit:JDVideoKit)->Any?{returnnil}func FinalOutput(final video:AVAsset,url:URL){
/// You will get a Video, you capture by my layout and convert /// To the type you specific.
}func willPresent(edtingViewController vc:JDPresentingViewController,lastVC:UIViewController?,forkit:JDVideoKit)->JDPresentingViewController?{
lastVC.dissmiss(...)returnnil}func ConvertType(forVideo resource:Any, forkit:JDVideoKit)->videoProcessType{return.Boom
}}

Use Only Editing Layout

-> Implement 1 , 5

classViewController:UIViewController{overridefunc viewDidAppear(_ animated:Bool){letvk=JDVideoKit(delegate:self).getProperVC()self.present(vk, animated:true, completion:nil)}}extensionViewController:JDVideoKitDelegate{func videoResource(forkit kit:JDVideoKit)->Any?{returnURL( url or asset of video)}func FinalOutput(final video:AVAsset,url:URL){print(url)}}

Convert Video Directly

-> Implement 1 , 4 , 5

classViewController:UIViewController{overridefunc viewDidAppear(_ animated:Bool){letvk2=JDVideoKit(delegate:self)
vk2.getVideoDirectly{(progress)inprint(progress)}}}extensionViewController:JDVideoKitDelegate{func videoResource(forkit kit:JDVideoKit)->Any?{returnURL( url or asset of video)}func FinalOutput(final video:AVAsset,url:URL){print(url)}func ConvertType(forVideo resource:Any, forkit:JDVideoKit)->videoProcessType{return.Boom
}}

Customization

ProcessingViewController

Implement this Delegate:

func willPresent(cameraViewController vc:JDProcessingViewController,forkit:JDVideoKit)->JDProcessingViewController{
///Set Below Variable Like this
vc.enableFlashLight =false}

The component you can customize:

publicvarenableFlashLight:Bool=truepublicvarFlashLightIconColor:UIColor=UIColor.black
publicvarSwitchIconColor:UIColor=UIColor.white
publicvarCaptureIconColor:UIColor=UIColor.white
publicvarallowChooseFromLibrary:Bool=truepublicvarBackgroundViewBarColor:UIColor?

Alt text

ProcessingViewController

Implement this Delegate:

func willPresent(edtingViewController vc:JDPresentingViewController,lastVC:UIViewController?,forkit:JDVideoKit)->JDPresentingViewController?{
vc.topTitle ="Title"}

The component you can customize:

publicvartopTitle:String="Share"publicvarCloseIconColor:UIColor=UIColor.white
publicvarsaveButtonTitle:String="Save"publicvarsavaButtonColor:UIColor=UIColor.white

Alt text

About

No description, website, or topics provided.

Resources

Contributing

Stars

25 stars

Watchers

3 watching

Forks

Releases

Packages

Used by

Contributors

Languages