Repository files navigation

加密流量分类-实践3: TrafficClassificationPandemonium流量分类项目分析

1 项目简介

该项目是流量预处理分类验证的一个统一实现,力求使用清晰的项目结构与最少的代码实现预设功能,目前支持的模型只有1dcnnapp-net两种,后续会进行更新。代码已经开源至露露云的github,如果能帮助你,就给鼠鼠点一个star吧!!!

我的CSDN博客

我的Github Page博客

2 项目使用

2.1 流量预处理(pcap->npy)

提取网络数据流量的负载、包长序列、统计(当前版本还未实现)的特征,转为npy格式进行持久化存储,基于flowcontainer库

  1. 参数配置:打开configuration/traffic_classification_configuration.yaml配置文件,配置preprocess的参数,以下是一个示例

    preprocess:
    traffic_path: ../traffic_path/android # 原始pcap的路径datasets: ../datasets/android # 预处理后npy文件的路径packet_num: 4# 负载特征参数:流的前4包的负载byte_num: 256# 负载特征参数:每个包的前256个字节ip_length: 128# 包长特征参数:提取流前128个包长序列threshold: 4# 阈值:流包长小于4时舍弃train_size: 0.8# 训练集所占比例

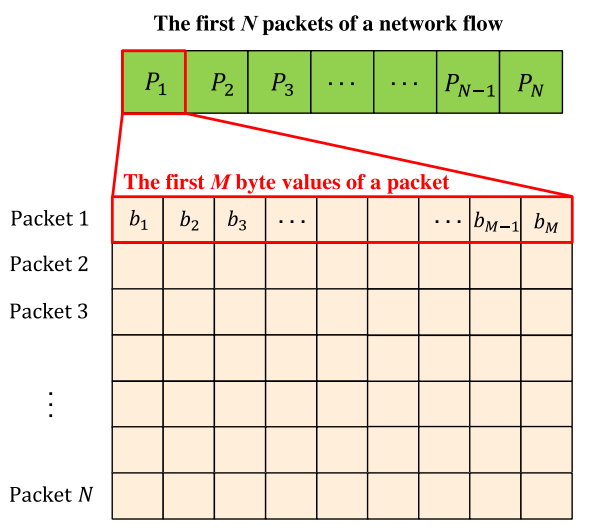
    其中对于前packet_num个包的前byte_num字节可以如图说明

    image-20240304172008854

    负载、包长均作了舍长补短的操作,以达到特定的格式。

  2. 预处理脚本运行

    环境说明: python最好使用3.7版本, 否则安装numpy==1.21.6, 否则容易有报错

    配置yaml_path即配置文件路径,然后运行代码entry/1_preprocess_with_flowcontainer.py

    defmain():
    yaml_path=r"../configuration/traffic_classification_configuration.yaml"cfg=setup_config(yaml_path) # 获取 config 文件pay, seq, label=getPcapIPLength(
    cfg.preprocess.traffic_path,
    cfg.preprocess.threshold,
    cfg.preprocess.ip_length,
    cfg.preprocess.packet_num,
    cfg.preprocess.byte_num)
    split_data(pay,seq,label,cfg.preprocess.train_size,cfg.preprocess.datasets)
    if__name__=="__main__":
    main()
  3. 样本字典补齐:运行完后,得到一个字典输出,将该字典复制到配置文件的test/label2index

    label2index: {'qq': 0, '微信': 1, '淘宝': 2}
2.2 模型训练

  1. 参数配置:打开configuration/traffic_classification_configuration.yaml配置文件,配置train/test的参数,以下是一个示例

    train:
    train_pay: ../TrafficClassificationPandemonium/datasets/android/train/pay_load.npy# train_seq: ../npy_data/test/test/ip_length.npytrain_seq: ../TrafficClassificationPandemonium/datasets/android/train/ip_length.npytrain_sta: Nonetrain_label: ../TrafficClassificationPandemonium/datasets/android/train/label.npytest_pay: ../TrafficClassificationPandemonium/datasets/android/train/pay_load.npytest_seq: ../TrafficClassificationPandemonium/datasets/android/train/ip_length.npytest_sta: Nonetest_label: ../TrafficClassificationPandemonium/datasets/android/train/label.npyBATCH_SIZE: 128epochs: 50# 训练的轮数lr: 0.001# learning ratemodel_dir: ../TrafficClassificationPandemonium/checkpoint # 模型保存的文件夹# model_name: cnn1d.pth # 模型的名称model_name: app-net.pth # 模型的名称test:
    evaluate: False # 如果是 True, 则不进行训练, 只进行评测pretrained: False # 是否有训练好的模型# # # {'Chat': 0, 'Email': 1, 'FT': 2, 'P2P': 3, 'Streaming': 4, 'VoIP': 5, 'VPN_Chat': 6, 'VPN_Email': 7, 'VPN_FT': 8, 'VPN_P2P': 9, 'VPN_Streaming': 10, 'VPN_VoIP': 11}label2index: {'qq': 0, '微信': 1, '淘宝': 2}confusion_path: ../TrafficClassificationPandemonium/result/confusion/ConfusionMatrix-app-net.png
  2. **运行脚本:**运行代码entry/2_train_test_model.py

2.3 模型测试

  1. 参数配置:打开configuration/traffic_classification_configuration.yaml配置文件,配置test的参数的evaluatepretrainedTrue

  2. **运行脚本:**运行代码entry/2_train_test_model.py

2.4 结果展现

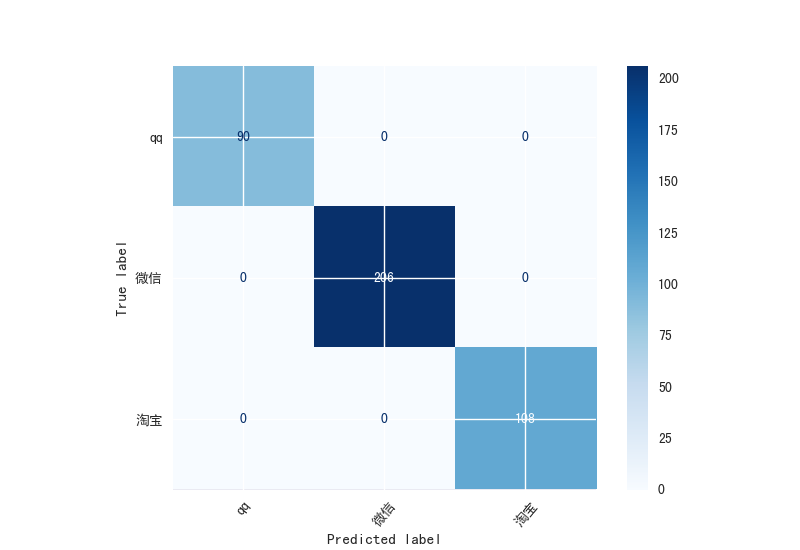
  1. 混淆矩阵的展现

    默认在result/confusion

    image-20240304174048201

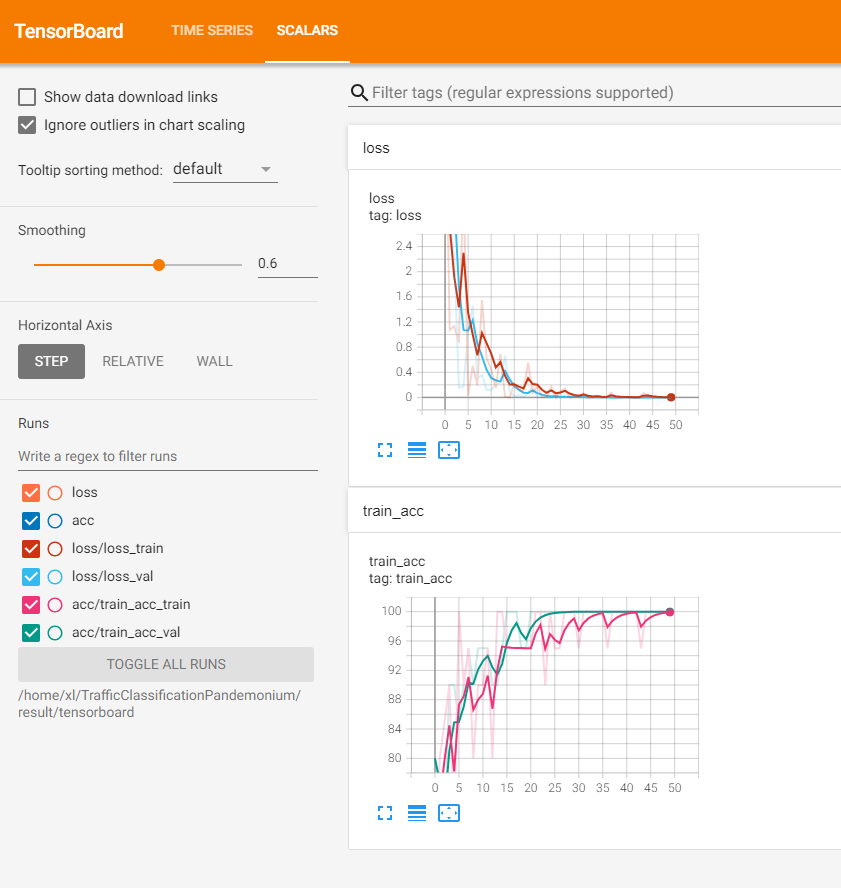
  2. accloss曲线的展现

    训练中或者训练后,使用tensorboard --logdir /result/tensorboard 进行查看

image-20240304174254396

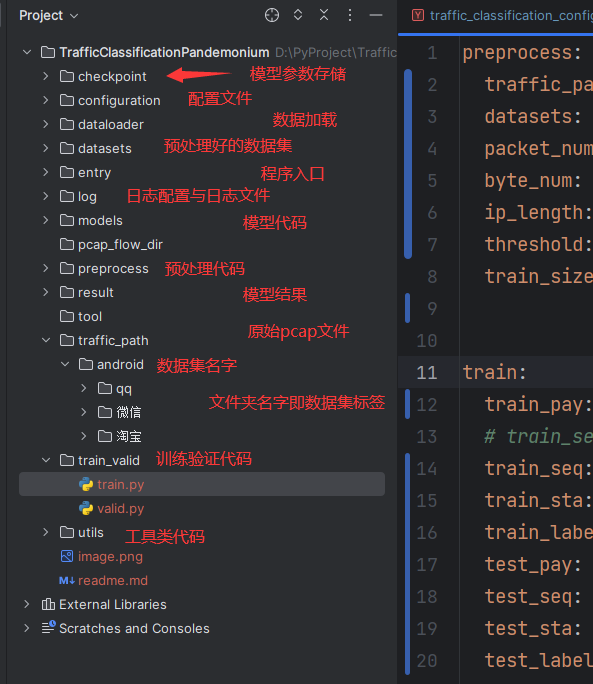
3 项目结构

image-20240304173550142

4 扩展性

  • 新增模型:按照models下面的示例进行新增,模型都有两个返回,一个是分类结果,一个是重构结果(框架为了兼容后续上传的模型)

  • 切换模型:在entry/2_train_test_model.py的20/21行进行导入切换即可,下图为一维卷积与appnet的切换示例

    image-20240304173853711

更新日志

3/10日更新

流量预处理更新

  1. 增加了基于splitCap.exe分流预处理,并且除了提取负载与包长序列后,支持提取统计特征(26维度)。

    26维度统计分别为

    "Avg_syn_flag", "Avg_urg_flag", "Avg_fin_flag", "Avg_ack_flag", "Avg_psh_flag", "Avg_rst_flag", "Avg_DNS_pkt", "Avg_TCP_pkt",
    "Avg_UDP_pkt", "Avg_ICMP_pkt", "Duration_window_flow", "Avg_delta_time", "Min_delta_time", "Max_delta_time", "StDev_delta_time",
    "Avg_pkts_lenght", "Min_pkts_lenght", "Max_pkts_lenght", "StDev_pkts_lenght", "Avg_small_payload_pkt", "Avg_payload", "Min_payload",
    "Max_payload", "StDev_payload", "Avg_DNS_over_TCP", "Num_pkts"
    

    entry.pcap2npy/1_preprocess_with_splitCap_1.py进入

    配置文件preprocess下路径要为windows格式

运行完的预览图,可以看到有statistic.npy的统计特征文件
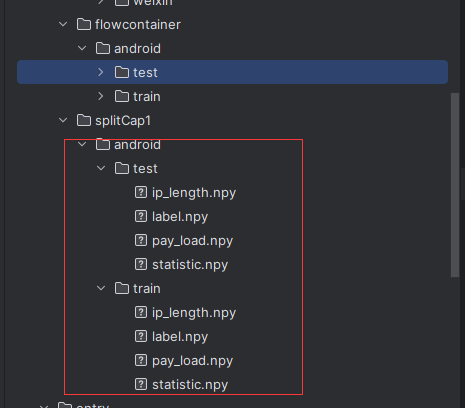
image-20240310121828598

  1. 增加了基于cic-meterflower工具对pcap的处理,将pcap处理为csv格式文件

使用entry/pcap2csv/1_preprocess_with_cic.py,参考博客流量预处理-3:利用cic-flowmeter工具提取流量特征修改相应的路径变量

注意:pcap路径与名称在使用该方式处理时不能出现中文,否则报错。

运行完的预览图,可以看到已经对中文进行改名,出现各个标签的csv文件
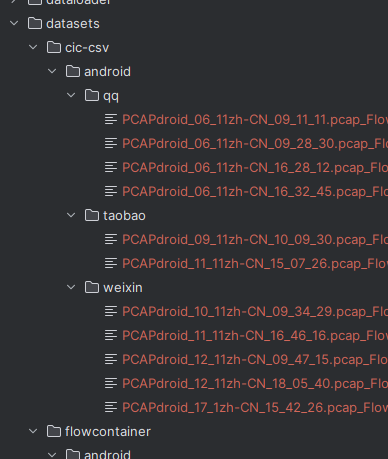
image-20240310121944730

3/23日更新

模型结构更新

当前更新对运行项目是无影响的,也就是说如果你是仅仅使用项目而不进行扩展的话,此处更新是透明的,对当前仓库版本的代码可以不进行同步。 代码已经推送开源至露露云的github,如果能帮助你,就给鼠鼠点一个star吧!!!

简要由原先各个模型独立抽象出了一个base_model模型基类,由该基类继承nn.Module类,定义抽象方法forwarddata_trans,方便不同模型进行各自的数据变换

  1. 为什么要改?

    dataloader给模型输入的数据格式是固定死的,给每一个模型设定不同的dataloader违背了项目多个模型统一代码原则,而不同模型对于数据的输入样式是不同的,为了适用于之后会加入项目的模型,抽象出一个基类,设定一个data_trans抽象方法,每一个模型都根据模型的输入去实现该方法即可,这样做到了不更改dataloader的目的,做到代码复用

  2. dataloader给定的数据样式?

    分析日志可以给出以下各个维度下dataloader给定的数据shape

    [2024-03-23 17:19:38,802 INFO] 是否使用 GPU 进行训练, cuda
    [2024-03-23 17:19:44,781 INFO] 成功初始化模型.
    [2024-03-23 17:19:44,814 INFO] pcap 文件大小, torch.Size([404, 1, 1024]); seq文件大小:torch.Size([404, 128, 1]); sta文件大小: torch.Size([404, 1024]); label 文件大小: torch.Size([404])
    [2024-03-23 17:19:44,851 INFO] pcap 文件大小, torch.Size([404, 1, 1024]); seq文件大小:torch.Size([404, 128, 1]); sta文件大小: torch.Size([404, 1024]); label 文件大小: torch.Size([404])
    [2024-03-23 17:19:44,851 INFO] 成功加载数据集.

    负载pay: [batch_size,1,m*n]

    包长seq: [batch_size,seq_len,1]

    统计sta: [batch_size,sta_len]

    • m*n是预处理的前m个包的前n个字节,这里目前写的是4*256也就是1024
    • seq_len是预处理的前ip_length个包长,这里目前是128
    • sta_len是预处理的统计维度,在10号更新的数据下是26

3/28日更新

增加模型二维卷积神经网络CNN2d

  1. 由于前期中的使用继承改善了模型结构,这里只需要写一个py文件就可以了

    """@Description: 二维卷积神经网络"""frommathimportsqrtimporttorchimporttorch.nnasnnfrommodels.base_modelimportBaseModelclassCnn2d(BaseModel):
    def__init__(self, num_classes=12):
    super(Cnn2d, self).__init__()
    # 卷积层+池化层self.features=nn.Sequential(
    nn.Conv2d(kernel_size=5,in_channels=1,out_channels=32,stride=1,padding=2), # b,32,32,32nn.MaxPool2d(kernel_size=2), # b,32,16,16nn.Conv2d(kernel_size=5,in_channels=32,out_channels=64,stride=1,padding=2), # b,64,16,16nn.MaxPool2d(kernel_size=2), # b,64,8,8
    )
    # 全连接层self.classifier=nn.Sequential(
    # 29*64nn.Flatten(),
    nn.Linear(in_features=64*64, out_features=1024), # 1024:64*64nn.Dropout(0.5),
    nn.Linear(in_features=1024, out_features=num_classes)
    )
    defforward(self, pay, seq, sta):
    pay, seq, sta=self.data_trans(pay, seq, sta)
    pay=self.features(pay) # 卷积层, 提取特征pay=self.classifier(pay) # 分类层, 用来分类returnpay, Nonedefdata_trans(self, x_payload, x_sequence, x_sta):
    # 转换x_0,x_1,x_2=x_payload.shape[0],x_payload.shape[1],x_payload.shape[2]
    x_payload=x_payload.reshape(x_0,x_1,int(sqrt(x_2)),int(sqrt(x_2)))
    returnx_payload, x_sequence, x_stadefcnn2d(model_path, pretrained=False, **kwargs):
    """ CNN 1D model architecture Args: pretrained (bool): if True, returns a model pre-trained model """model=Cnn2d(**kwargs)
    ifpretrained:
    checkpoint=torch.load(model_path)
    model.load_state_dict(checkpoint['state_dict'])
    returnmodeldefmain():
    a=sqrt(1024)
    x_pay=torch.rand(8,1,1024)
    cnn=Cnn2d()
    x=cnn(x_pay,x_pay,x_pay)
    if__name__=="__main__":
    main()

    模型结构:

    两个卷积+池化的组合,卷积核大小都是5X5,池化层的核大小都是2X2

  2. train_test_model.py中,改动

    fromutils.set_configimportsetup_config# from models.cnn1d import cnn1d as train_model# from models.app_net import app_net as train_modelfrommodels.cnn2dimportcnn2dastrain_model

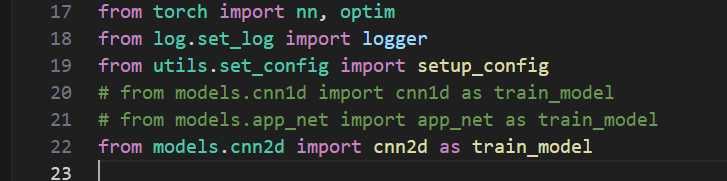
    image-20240328212456471

即可!

  1. 开始训练!

    [2024-03-28 21:20:53,317 INFO] Epoch: [47][2/4], Loss 0.0001 (0.0005), Prec@1 100.000 (100.000)
    [2024-03-28 21:20:53,345 INFO] Epoch: [47][3/4], Loss 0.0000 (0.0005), Prec@1 100.000 (100.000)
    [2024-03-28 21:20:53,544 INFO] * Prec@1 100.000
    [2024-03-28 21:20:53,716 INFO] Epoch: [48][1/4], Loss 0.0001 (0.0002), Prec@1 100.000 (100.000)
    [2024-03-28 21:20:53,723 INFO] Epoch: [48][3/4], Loss 0.0000 (0.0003), Prec@1 100.000 (100.000)
    [2024-03-28 21:20:54,066 INFO] Epoch: [48][0/4], Loss 0.0000 (0.0000), Prec@1 100.000 (100.000)
    [2024-03-28 21:20:54,105 INFO] Epoch: [48][1/4], Loss 0.0014 (0.0007), Prec@1 100.000 (100.000)
    [2024-03-28 21:20:54,146 INFO] Epoch: [48][2/4], Loss 0.0001 (0.0005), Prec@1 100.000 (100.000)
    [2024-03-28 21:20:54,153 INFO] Epoch: [48][3/4], Loss 0.0000 (0.0005), Prec@1 100.000 (100.000)
    [2024-03-28 21:20:54,331 INFO] * Prec@1 100.000
    [2024-03-28 21:20:54,537 INFO] Epoch: [49][1/4], Loss 0.0080 (0.0055), Prec@1 99.219 (99.609)
    [2024-03-28 21:20:54,558 INFO] Epoch: [49][3/4], Loss 0.0000 (0.0058), Prec@1 100.000 (99.505)
    [2024-03-28 21:20:54,880 INFO] Epoch: [49][0/4], Loss 0.0000 (0.0000), Prec@1 100.000 (100.000)
    [2024-03-28 21:20:54,929 INFO] Epoch: [49][1/4], Loss 0.0001 (0.0001), Prec@1 100.000 (100.000)
    [2024-03-28 21:20:54,970 INFO] Epoch: [49][2/4], Loss 0.0013 (0.0005), Prec@1 100.000 (100.000)
    [2024-03-28 21:20:54,982 INFO] Epoch: [49][3/4], Loss 0.0000 (0.0005), Prec@1 100.000 (100.000)
    [2024-03-28 21:20:55,147 INFO] * Prec@1 100.000
  2. 修改测试文件切换为测试模式

    Model Classification report:
    [2024-03-28 21:26:19,166 INFO] ------------------------------
    [2024-03-28 21:26:19,172 INFO] precision recall f1-score support
    qq 1.00 1.00 1.00 90
    微信 1.00 1.00 1.00 206
    淘宝 1.00 1.00 1.00 108
    accuracy 1.00 404
    macro avg 1.00 1.00 1.00 404
    weighted avg 1.00 1.00 1.00 404
    [2024-03-28 21:26:19,175 INFO] Prediction Confusion Matrix:
    [2024-03-28 21:26:19,175 INFO] ------------------------------
    [2024-03-28 21:26:19,845 INFO] Predicted: qq 微信 淘宝
    Actual: qq 90 0 0
    微信 0 206 0
    淘宝 0 0 108

About

一个流量分类的封装框架

Topics

Resources

Stars

62 stars

Watchers

2 watching

Forks

Releases

Packages

Used by

Contributors

Languages

, 'i'); if (__m === '*' || __re.test(location.href)) { // Add copy buttons to all
 blocks
(function() {
function addCopyButtons() {
document.querySelectorAll('pre code').forEach(function(codeBlock) {
if (codeBlock.parentElement.hasAttribute('data-copy-added')) return;
codeBlock.parentElement.setAttribute('data-copy-added', 'true');
var btn = document.createElement('button');
btn.textContent = 'Copy';
btn.style.cssText = 'position:absolute;top:4px;right:4px;padding:2px 8px;font-size:11px;background:#4ecdc4;border:none;border-radius:4px;color:#1a1a2e;cursor:pointer;opacity:0.7;transition:opacity 0.2s;';
btn.onmouseover = function() { this.style.opacity = '1'; };
btn.onmouseout = function() { this.style.opacity = '0.7'; };
btn.onclick = function() {
navigator.clipboard.writeText(codeBlock.textContent).then(function() {
btn.textContent = 'Copied!';
setTimeout(function() { btn.textContent = 'Copy'; }, 1500);
});
};
codeBlock.parentElement.style.position = 'relative';
codeBlock.parentElement.appendChild(btn);
});
}
addCopyButtons();
// Re-run on dynamic content
var observer = new MutationObserver(addCopyButtons);
observer.observe(document.body, { childList: true, subtree: true });
})();
}
} catch(__e) { console.warn('[Userscript:Add Copy Buttons to Code Blocks]', __e); }
})();
(function(){
try {
var __m = "github.com";
var __re = new RegExp('^' + "github\\.com" + '
Skip to content

Repository files navigation

加密流量分类-实践3: TrafficClassificationPandemonium流量分类项目分析

1 项目简介

该项目是流量预处理分类验证的一个统一实现,力求使用清晰的项目结构与最少的代码实现预设功能,目前支持的模型只有1dcnnapp-net两种,后续会进行更新。代码已经开源至露露云的github,如果能帮助你,就给鼠鼠点一个star吧!!!

我的CSDN博客

我的Github Page博客

2 项目使用

2.1 流量预处理(pcap->npy)

提取网络数据流量的负载、包长序列、统计(当前版本还未实现)的特征,转为npy格式进行持久化存储,基于flowcontainer库

  1. 参数配置:打开configuration/traffic_classification_configuration.yaml配置文件,配置preprocess的参数,以下是一个示例

    preprocess:
    traffic_path: ../traffic_path/android # 原始pcap的路径datasets: ../datasets/android # 预处理后npy文件的路径packet_num: 4# 负载特征参数:流的前4包的负载byte_num: 256# 负载特征参数:每个包的前256个字节ip_length: 128# 包长特征参数:提取流前128个包长序列threshold: 4# 阈值:流包长小于4时舍弃train_size: 0.8# 训练集所占比例

    其中对于前packet_num个包的前byte_num字节可以如图说明

    image-20240304172008854

    负载、包长均作了舍长补短的操作,以达到特定的格式。

  2. 预处理脚本运行

    环境说明: python最好使用3.7版本, 否则安装numpy==1.21.6, 否则容易有报错

    配置yaml_path即配置文件路径,然后运行代码entry/1_preprocess_with_flowcontainer.py

    defmain():
    yaml_path=r"../configuration/traffic_classification_configuration.yaml"cfg=setup_config(yaml_path) # 获取 config 文件pay, seq, label=getPcapIPLength(
    cfg.preprocess.traffic_path,
    cfg.preprocess.threshold,
    cfg.preprocess.ip_length,
    cfg.preprocess.packet_num,
    cfg.preprocess.byte_num)
    split_data(pay,seq,label,cfg.preprocess.train_size,cfg.preprocess.datasets)
    if__name__=="__main__":
    main()
  3. 样本字典补齐:运行完后,得到一个字典输出,将该字典复制到配置文件的test/label2index

    label2index: {'qq': 0, '微信': 1, '淘宝': 2}

2.2 模型训练

  1. 参数配置:打开configuration/traffic_classification_configuration.yaml配置文件,配置train/test的参数,以下是一个示例

    train:
    train_pay: ../TrafficClassificationPandemonium/datasets/android/train/pay_load.npy# train_seq: ../npy_data/test/test/ip_length.npytrain_seq: ../TrafficClassificationPandemonium/datasets/android/train/ip_length.npytrain_sta: Nonetrain_label: ../TrafficClassificationPandemonium/datasets/android/train/label.npytest_pay: ../TrafficClassificationPandemonium/datasets/android/train/pay_load.npytest_seq: ../TrafficClassificationPandemonium/datasets/android/train/ip_length.npytest_sta: Nonetest_label: ../TrafficClassificationPandemonium/datasets/android/train/label.npyBATCH_SIZE: 128epochs: 50# 训练的轮数lr: 0.001# learning ratemodel_dir: ../TrafficClassificationPandemonium/checkpoint # 模型保存的文件夹# model_name: cnn1d.pth # 模型的名称model_name: app-net.pth # 模型的名称test:
    evaluate: False # 如果是 True, 则不进行训练, 只进行评测pretrained: False # 是否有训练好的模型# # # {'Chat': 0, 'Email': 1, 'FT': 2, 'P2P': 3, 'Streaming': 4, 'VoIP': 5, 'VPN_Chat': 6, 'VPN_Email': 7, 'VPN_FT': 8, 'VPN_P2P': 9, 'VPN_Streaming': 10, 'VPN_VoIP': 11}label2index: {'qq': 0, '微信': 1, '淘宝': 2}confusion_path: ../TrafficClassificationPandemonium/result/confusion/ConfusionMatrix-app-net.png
  2. **运行脚本:**运行代码entry/2_train_test_model.py

2.3 模型测试

  1. 参数配置:打开configuration/traffic_classification_configuration.yaml配置文件,配置test的参数的evaluatepretrainedTrue

  2. **运行脚本:**运行代码entry/2_train_test_model.py

2.4 结果展现

  1. 混淆矩阵的展现

    默认在result/confusion

    image-20240304174048201

  2. accloss曲线的展现

    训练中或者训练后,使用tensorboard --logdir /result/tensorboard 进行查看

image-20240304174254396

3 项目结构

image-20240304173550142

4 扩展性

  • 新增模型:按照models下面的示例进行新增,模型都有两个返回,一个是分类结果,一个是重构结果(框架为了兼容后续上传的模型)

  • 切换模型:在entry/2_train_test_model.py的20/21行进行导入切换即可,下图为一维卷积与appnet的切换示例

    image-20240304173853711

更新日志

3/10日更新

流量预处理更新

  1. 增加了基于splitCap.exe分流预处理,并且除了提取负载与包长序列后,支持提取统计特征(26维度)。

    26维度统计分别为

    "Avg_syn_flag", "Avg_urg_flag", "Avg_fin_flag", "Avg_ack_flag", "Avg_psh_flag", "Avg_rst_flag", "Avg_DNS_pkt", "Avg_TCP_pkt",
    "Avg_UDP_pkt", "Avg_ICMP_pkt", "Duration_window_flow", "Avg_delta_time", "Min_delta_time", "Max_delta_time", "StDev_delta_time",
    "Avg_pkts_lenght", "Min_pkts_lenght", "Max_pkts_lenght", "StDev_pkts_lenght", "Avg_small_payload_pkt", "Avg_payload", "Min_payload",
    "Max_payload", "StDev_payload", "Avg_DNS_over_TCP", "Num_pkts"
    

    entry.pcap2npy/1_preprocess_with_splitCap_1.py进入

    配置文件preprocess下路径要为windows格式

运行完的预览图,可以看到有statistic.npy的统计特征文件

image-20240310121828598

  1. 增加了基于cic-meterflower工具对pcap的处理,将pcap处理为csv格式文件

使用entry/pcap2csv/1_preprocess_with_cic.py,参考博客流量预处理-3:利用cic-flowmeter工具提取流量特征修改相应的路径变量

注意:pcap路径与名称在使用该方式处理时不能出现中文,否则报错。

运行完的预览图,可以看到已经对中文进行改名,出现各个标签的csv文件

image-20240310121944730

3/23日更新

模型结构更新

当前更新对运行项目是无影响的,也就是说如果你是仅仅使用项目而不进行扩展的话,此处更新是透明的,对当前仓库版本的代码可以不进行同步。 代码已经推送开源至露露云的github,如果能帮助你,就给鼠鼠点一个star吧!!!

简要由原先各个模型独立抽象出了一个base_model模型基类,由该基类继承nn.Module类,定义抽象方法forwarddata_trans,方便不同模型进行各自的数据变换

  1. 为什么要改?

    dataloader给模型输入的数据格式是固定死的,给每一个模型设定不同的dataloader违背了项目多个模型统一代码原则,而不同模型对于数据的输入样式是不同的,为了适用于之后会加入项目的模型,抽象出一个基类,设定一个data_trans抽象方法,每一个模型都根据模型的输入去实现该方法即可,这样做到了不更改dataloader的目的,做到代码复用

  2. dataloader给定的数据样式?

    分析日志可以给出以下各个维度下dataloader给定的数据shape

    [2024-03-23 17:19:38,802 INFO] 是否使用 GPU 进行训练, cuda
    [2024-03-23 17:19:44,781 INFO] 成功初始化模型.
    [2024-03-23 17:19:44,814 INFO] pcap 文件大小, torch.Size([404, 1, 1024]); seq文件大小:torch.Size([404, 128, 1]); sta文件大小: torch.Size([404, 1024]); label 文件大小: torch.Size([404])
    [2024-03-23 17:19:44,851 INFO] pcap 文件大小, torch.Size([404, 1, 1024]); seq文件大小:torch.Size([404, 128, 1]); sta文件大小: torch.Size([404, 1024]); label 文件大小: torch.Size([404])
    [2024-03-23 17:19:44,851 INFO] 成功加载数据集.

    负载pay: [batch_size,1,m*n]

    包长seq: [batch_size,seq_len,1]

    统计sta: [batch_size,sta_len]

    • m*n是预处理的前m个包的前n个字节,这里目前写的是4*256也就是1024
    • seq_len是预处理的前ip_length个包长,这里目前是128
    • sta_len是预处理的统计维度,在10号更新的数据下是26

3/28日更新

增加模型二维卷积神经网络CNN2d

  1. 由于前期中的使用继承改善了模型结构,这里只需要写一个py文件就可以了

    """@Description: 二维卷积神经网络"""frommathimportsqrtimporttorchimporttorch.nnasnnfrommodels.base_modelimportBaseModelclassCnn2d(BaseModel):
    def__init__(self, num_classes=12):
    super(Cnn2d, self).__init__()
    # 卷积层+池化层self.features=nn.Sequential(
    nn.Conv2d(kernel_size=5,in_channels=1,out_channels=32,stride=1,padding=2), # b,32,32,32nn.MaxPool2d(kernel_size=2), # b,32,16,16nn.Conv2d(kernel_size=5,in_channels=32,out_channels=64,stride=1,padding=2), # b,64,16,16nn.MaxPool2d(kernel_size=2), # b,64,8,8
    )
    # 全连接层self.classifier=nn.Sequential(
    # 29*64nn.Flatten(),
    nn.Linear(in_features=64*64, out_features=1024), # 1024:64*64nn.Dropout(0.5),
    nn.Linear(in_features=1024, out_features=num_classes)
    )
    defforward(self, pay, seq, sta):
    pay, seq, sta=self.data_trans(pay, seq, sta)
    pay=self.features(pay) # 卷积层, 提取特征pay=self.classifier(pay) # 分类层, 用来分类returnpay, Nonedefdata_trans(self, x_payload, x_sequence, x_sta):
    # 转换x_0,x_1,x_2=x_payload.shape[0],x_payload.shape[1],x_payload.shape[2]
    x_payload=x_payload.reshape(x_0,x_1,int(sqrt(x_2)),int(sqrt(x_2)))
    returnx_payload, x_sequence, x_stadefcnn2d(model_path, pretrained=False, **kwargs):
    """ CNN 1D model architecture Args: pretrained (bool): if True, returns a model pre-trained model """model=Cnn2d(**kwargs)
    ifpretrained:
    checkpoint=torch.load(model_path)
    model.load_state_dict(checkpoint['state_dict'])
    returnmodeldefmain():
    a=sqrt(1024)
    x_pay=torch.rand(8,1,1024)
    cnn=Cnn2d()
    x=cnn(x_pay,x_pay,x_pay)
    if__name__=="__main__":
    main()

    模型结构:

    两个卷积+池化的组合,卷积核大小都是5X5,池化层的核大小都是2X2

  2. train_test_model.py中,改动

    fromutils.set_configimportsetup_config# from models.cnn1d import cnn1d as train_model# from models.app_net import app_net as train_modelfrommodels.cnn2dimportcnn2dastrain_model

    image-20240328212456471

即可!

  1. 开始训练!

    [2024-03-28 21:20:53,317 INFO] Epoch: [47][2/4], Loss 0.0001 (0.0005), Prec@1 100.000 (100.000)
    [2024-03-28 21:20:53,345 INFO] Epoch: [47][3/4], Loss 0.0000 (0.0005), Prec@1 100.000 (100.000)
    [2024-03-28 21:20:53,544 INFO] * Prec@1 100.000
    [2024-03-28 21:20:53,716 INFO] Epoch: [48][1/4], Loss 0.0001 (0.0002), Prec@1 100.000 (100.000)
    [2024-03-28 21:20:53,723 INFO] Epoch: [48][3/4], Loss 0.0000 (0.0003), Prec@1 100.000 (100.000)
    [2024-03-28 21:20:54,066 INFO] Epoch: [48][0/4], Loss 0.0000 (0.0000), Prec@1 100.000 (100.000)
    [2024-03-28 21:20:54,105 INFO] Epoch: [48][1/4], Loss 0.0014 (0.0007), Prec@1 100.000 (100.000)
    [2024-03-28 21:20:54,146 INFO] Epoch: [48][2/4], Loss 0.0001 (0.0005), Prec@1 100.000 (100.000)
    [2024-03-28 21:20:54,153 INFO] Epoch: [48][3/4], Loss 0.0000 (0.0005), Prec@1 100.000 (100.000)
    [2024-03-28 21:20:54,331 INFO] * Prec@1 100.000
    [2024-03-28 21:20:54,537 INFO] Epoch: [49][1/4], Loss 0.0080 (0.0055), Prec@1 99.219 (99.609)
    [2024-03-28 21:20:54,558 INFO] Epoch: [49][3/4], Loss 0.0000 (0.0058), Prec@1 100.000 (99.505)
    [2024-03-28 21:20:54,880 INFO] Epoch: [49][0/4], Loss 0.0000 (0.0000), Prec@1 100.000 (100.000)
    [2024-03-28 21:20:54,929 INFO] Epoch: [49][1/4], Loss 0.0001 (0.0001), Prec@1 100.000 (100.000)
    [2024-03-28 21:20:54,970 INFO] Epoch: [49][2/4], Loss 0.0013 (0.0005), Prec@1 100.000 (100.000)
    [2024-03-28 21:20:54,982 INFO] Epoch: [49][3/4], Loss 0.0000 (0.0005), Prec@1 100.000 (100.000)
    [2024-03-28 21:20:55,147 INFO] * Prec@1 100.000
  2. 修改测试文件切换为测试模式

    Model Classification report:
    [2024-03-28 21:26:19,166 INFO] ------------------------------
    [2024-03-28 21:26:19,172 INFO] precision recall f1-score support
    qq 1.00 1.00 1.00 90
    微信 1.00 1.00 1.00 206
    淘宝 1.00 1.00 1.00 108
    accuracy 1.00 404
    macro avg 1.00 1.00 1.00 404
    weighted avg 1.00 1.00 1.00 404
    [2024-03-28 21:26:19,175 INFO] Prediction Confusion Matrix:
    [2024-03-28 21:26:19,175 INFO] ------------------------------
    [2024-03-28 21:26:19,845 INFO] Predicted: qq 微信 淘宝
    Actual: qq 90 0 0
    微信 0 206 0
    淘宝 0 0 108

About

一个流量分类的封装框架

Topics

Resources

Stars

62 stars

Watchers

2 watching

Forks

Releases

Packages

Used by

Contributors

Languages

, 'i'); if (__m === '*' || __re.test(location.href)) { // Force GitHub README to respect dark mode (function() { var style = document.createElement('style'); style.textContent = ' .markdown-body { color-scheme: dark light; } .markdown-body pre { background: #161b22 !important; } .markdown-body code { background: rgba(110, 118, 129, 0.4) !important; } .markdown-body table th, .markdown-body table td { border-color: #30363d !important; } .markdown-body img { background: #0d1117; } .markdown-body blockquote { border-left-color: #8b949e; } .markdown-body hr { border-color: #30363d; } '; document.head.appendChild(style); })(); } } catch(__e) { console.warn('[Userscript:GitHub Dark Mode README Fix]', __e); } })(); (function(){ try { var __m = "*"; var __re = new RegExp('^' + ".*" + '
Skip to content

Repository files navigation

加密流量分类-实践3: TrafficClassificationPandemonium流量分类项目分析

1 项目简介

该项目是流量预处理分类验证的一个统一实现,力求使用清晰的项目结构与最少的代码实现预设功能,目前支持的模型只有1dcnnapp-net两种,后续会进行更新。代码已经开源至露露云的github,如果能帮助你,就给鼠鼠点一个star吧!!!

我的CSDN博客

我的Github Page博客

2 项目使用

2.1 流量预处理(pcap->npy)

提取网络数据流量的负载、包长序列、统计(当前版本还未实现)的特征,转为npy格式进行持久化存储,基于flowcontainer库

  1. 参数配置:打开configuration/traffic_classification_configuration.yaml配置文件,配置preprocess的参数,以下是一个示例

    preprocess:
    traffic_path: ../traffic_path/android # 原始pcap的路径datasets: ../datasets/android # 预处理后npy文件的路径packet_num: 4# 负载特征参数:流的前4包的负载byte_num: 256# 负载特征参数:每个包的前256个字节ip_length: 128# 包长特征参数:提取流前128个包长序列threshold: 4# 阈值:流包长小于4时舍弃train_size: 0.8# 训练集所占比例

    其中对于前packet_num个包的前byte_num字节可以如图说明

    image-20240304172008854

    负载、包长均作了舍长补短的操作,以达到特定的格式。

  2. 预处理脚本运行

    环境说明: python最好使用3.7版本, 否则安装numpy==1.21.6, 否则容易有报错

    配置yaml_path即配置文件路径,然后运行代码entry/1_preprocess_with_flowcontainer.py

    defmain():
    yaml_path=r"../configuration/traffic_classification_configuration.yaml"cfg=setup_config(yaml_path) # 获取 config 文件pay, seq, label=getPcapIPLength(
    cfg.preprocess.traffic_path,
    cfg.preprocess.threshold,
    cfg.preprocess.ip_length,
    cfg.preprocess.packet_num,
    cfg.preprocess.byte_num)
    split_data(pay,seq,label,cfg.preprocess.train_size,cfg.preprocess.datasets)
    if__name__=="__main__":
    main()
  3. 样本字典补齐:运行完后,得到一个字典输出,将该字典复制到配置文件的test/label2index

    label2index: {'qq': 0, '微信': 1, '淘宝': 2}

2.2 模型训练

  1. 参数配置:打开configuration/traffic_classification_configuration.yaml配置文件,配置train/test的参数,以下是一个示例

    train:
    train_pay: ../TrafficClassificationPandemonium/datasets/android/train/pay_load.npy# train_seq: ../npy_data/test/test/ip_length.npytrain_seq: ../TrafficClassificationPandemonium/datasets/android/train/ip_length.npytrain_sta: Nonetrain_label: ../TrafficClassificationPandemonium/datasets/android/train/label.npytest_pay: ../TrafficClassificationPandemonium/datasets/android/train/pay_load.npytest_seq: ../TrafficClassificationPandemonium/datasets/android/train/ip_length.npytest_sta: Nonetest_label: ../TrafficClassificationPandemonium/datasets/android/train/label.npyBATCH_SIZE: 128epochs: 50# 训练的轮数lr: 0.001# learning ratemodel_dir: ../TrafficClassificationPandemonium/checkpoint # 模型保存的文件夹# model_name: cnn1d.pth # 模型的名称model_name: app-net.pth # 模型的名称test:
    evaluate: False # 如果是 True, 则不进行训练, 只进行评测pretrained: False # 是否有训练好的模型# # # {'Chat': 0, 'Email': 1, 'FT': 2, 'P2P': 3, 'Streaming': 4, 'VoIP': 5, 'VPN_Chat': 6, 'VPN_Email': 7, 'VPN_FT': 8, 'VPN_P2P': 9, 'VPN_Streaming': 10, 'VPN_VoIP': 11}label2index: {'qq': 0, '微信': 1, '淘宝': 2}confusion_path: ../TrafficClassificationPandemonium/result/confusion/ConfusionMatrix-app-net.png
  2. **运行脚本:**运行代码entry/2_train_test_model.py

2.3 模型测试

  1. 参数配置:打开configuration/traffic_classification_configuration.yaml配置文件,配置test的参数的evaluatepretrainedTrue

  2. **运行脚本:**运行代码entry/2_train_test_model.py

2.4 结果展现

  1. 混淆矩阵的展现

    默认在result/confusion

    image-20240304174048201

  2. accloss曲线的展现

    训练中或者训练后,使用tensorboard --logdir /result/tensorboard 进行查看

image-20240304174254396

3 项目结构

image-20240304173550142

4 扩展性

  • 新增模型:按照models下面的示例进行新增,模型都有两个返回,一个是分类结果,一个是重构结果(框架为了兼容后续上传的模型)

  • 切换模型:在entry/2_train_test_model.py的20/21行进行导入切换即可,下图为一维卷积与appnet的切换示例

    image-20240304173853711

更新日志

3/10日更新

流量预处理更新

  1. 增加了基于splitCap.exe分流预处理,并且除了提取负载与包长序列后,支持提取统计特征(26维度)。

    26维度统计分别为

    "Avg_syn_flag", "Avg_urg_flag", "Avg_fin_flag", "Avg_ack_flag", "Avg_psh_flag", "Avg_rst_flag", "Avg_DNS_pkt", "Avg_TCP_pkt",
    "Avg_UDP_pkt", "Avg_ICMP_pkt", "Duration_window_flow", "Avg_delta_time", "Min_delta_time", "Max_delta_time", "StDev_delta_time",
    "Avg_pkts_lenght", "Min_pkts_lenght", "Max_pkts_lenght", "StDev_pkts_lenght", "Avg_small_payload_pkt", "Avg_payload", "Min_payload",
    "Max_payload", "StDev_payload", "Avg_DNS_over_TCP", "Num_pkts"
    

    entry.pcap2npy/1_preprocess_with_splitCap_1.py进入

    配置文件preprocess下路径要为windows格式

运行完的预览图,可以看到有statistic.npy的统计特征文件

image-20240310121828598

  1. 增加了基于cic-meterflower工具对pcap的处理,将pcap处理为csv格式文件

使用entry/pcap2csv/1_preprocess_with_cic.py,参考博客流量预处理-3:利用cic-flowmeter工具提取流量特征修改相应的路径变量

注意:pcap路径与名称在使用该方式处理时不能出现中文,否则报错。

运行完的预览图,可以看到已经对中文进行改名,出现各个标签的csv文件

image-20240310121944730

3/23日更新

模型结构更新

当前更新对运行项目是无影响的,也就是说如果你是仅仅使用项目而不进行扩展的话,此处更新是透明的,对当前仓库版本的代码可以不进行同步。 代码已经推送开源至露露云的github,如果能帮助你,就给鼠鼠点一个star吧!!!

简要由原先各个模型独立抽象出了一个base_model模型基类,由该基类继承nn.Module类,定义抽象方法forwarddata_trans,方便不同模型进行各自的数据变换

  1. 为什么要改?

    dataloader给模型输入的数据格式是固定死的,给每一个模型设定不同的dataloader违背了项目多个模型统一代码原则,而不同模型对于数据的输入样式是不同的,为了适用于之后会加入项目的模型,抽象出一个基类,设定一个data_trans抽象方法,每一个模型都根据模型的输入去实现该方法即可,这样做到了不更改dataloader的目的,做到代码复用

  2. dataloader给定的数据样式?

    分析日志可以给出以下各个维度下dataloader给定的数据shape

    [2024-03-23 17:19:38,802 INFO] 是否使用 GPU 进行训练, cuda
    [2024-03-23 17:19:44,781 INFO] 成功初始化模型.
    [2024-03-23 17:19:44,814 INFO] pcap 文件大小, torch.Size([404, 1, 1024]); seq文件大小:torch.Size([404, 128, 1]); sta文件大小: torch.Size([404, 1024]); label 文件大小: torch.Size([404])
    [2024-03-23 17:19:44,851 INFO] pcap 文件大小, torch.Size([404, 1, 1024]); seq文件大小:torch.Size([404, 128, 1]); sta文件大小: torch.Size([404, 1024]); label 文件大小: torch.Size([404])
    [2024-03-23 17:19:44,851 INFO] 成功加载数据集.

    负载pay: [batch_size,1,m*n]

    包长seq: [batch_size,seq_len,1]

    统计sta: [batch_size,sta_len]

    • m*n是预处理的前m个包的前n个字节,这里目前写的是4*256也就是1024
    • seq_len是预处理的前ip_length个包长,这里目前是128
    • sta_len是预处理的统计维度,在10号更新的数据下是26

3/28日更新

增加模型二维卷积神经网络CNN2d

  1. 由于前期中的使用继承改善了模型结构,这里只需要写一个py文件就可以了

    """@Description: 二维卷积神经网络"""frommathimportsqrtimporttorchimporttorch.nnasnnfrommodels.base_modelimportBaseModelclassCnn2d(BaseModel):
    def__init__(self, num_classes=12):
    super(Cnn2d, self).__init__()
    # 卷积层+池化层self.features=nn.Sequential(
    nn.Conv2d(kernel_size=5,in_channels=1,out_channels=32,stride=1,padding=2), # b,32,32,32nn.MaxPool2d(kernel_size=2), # b,32,16,16nn.Conv2d(kernel_size=5,in_channels=32,out_channels=64,stride=1,padding=2), # b,64,16,16nn.MaxPool2d(kernel_size=2), # b,64,8,8
    )
    # 全连接层self.classifier=nn.Sequential(
    # 29*64nn.Flatten(),
    nn.Linear(in_features=64*64, out_features=1024), # 1024:64*64nn.Dropout(0.5),
    nn.Linear(in_features=1024, out_features=num_classes)
    )
    defforward(self, pay, seq, sta):
    pay, seq, sta=self.data_trans(pay, seq, sta)
    pay=self.features(pay) # 卷积层, 提取特征pay=self.classifier(pay) # 分类层, 用来分类returnpay, Nonedefdata_trans(self, x_payload, x_sequence, x_sta):
    # 转换x_0,x_1,x_2=x_payload.shape[0],x_payload.shape[1],x_payload.shape[2]
    x_payload=x_payload.reshape(x_0,x_1,int(sqrt(x_2)),int(sqrt(x_2)))
    returnx_payload, x_sequence, x_stadefcnn2d(model_path, pretrained=False, **kwargs):
    """ CNN 1D model architecture Args: pretrained (bool): if True, returns a model pre-trained model """model=Cnn2d(**kwargs)
    ifpretrained:
    checkpoint=torch.load(model_path)
    model.load_state_dict(checkpoint['state_dict'])
    returnmodeldefmain():
    a=sqrt(1024)
    x_pay=torch.rand(8,1,1024)
    cnn=Cnn2d()
    x=cnn(x_pay,x_pay,x_pay)
    if__name__=="__main__":
    main()

    模型结构:

    两个卷积+池化的组合,卷积核大小都是5X5,池化层的核大小都是2X2

  2. train_test_model.py中,改动

    fromutils.set_configimportsetup_config# from models.cnn1d import cnn1d as train_model# from models.app_net import app_net as train_modelfrommodels.cnn2dimportcnn2dastrain_model

    image-20240328212456471

即可!

  1. 开始训练!

    [2024-03-28 21:20:53,317 INFO] Epoch: [47][2/4], Loss 0.0001 (0.0005), Prec@1 100.000 (100.000)
    [2024-03-28 21:20:53,345 INFO] Epoch: [47][3/4], Loss 0.0000 (0.0005), Prec@1 100.000 (100.000)
    [2024-03-28 21:20:53,544 INFO] * Prec@1 100.000
    [2024-03-28 21:20:53,716 INFO] Epoch: [48][1/4], Loss 0.0001 (0.0002), Prec@1 100.000 (100.000)
    [2024-03-28 21:20:53,723 INFO] Epoch: [48][3/4], Loss 0.0000 (0.0003), Prec@1 100.000 (100.000)
    [2024-03-28 21:20:54,066 INFO] Epoch: [48][0/4], Loss 0.0000 (0.0000), Prec@1 100.000 (100.000)
    [2024-03-28 21:20:54,105 INFO] Epoch: [48][1/4], Loss 0.0014 (0.0007), Prec@1 100.000 (100.000)
    [2024-03-28 21:20:54,146 INFO] Epoch: [48][2/4], Loss 0.0001 (0.0005), Prec@1 100.000 (100.000)
    [2024-03-28 21:20:54,153 INFO] Epoch: [48][3/4], Loss 0.0000 (0.0005), Prec@1 100.000 (100.000)
    [2024-03-28 21:20:54,331 INFO] * Prec@1 100.000
    [2024-03-28 21:20:54,537 INFO] Epoch: [49][1/4], Loss 0.0080 (0.0055), Prec@1 99.219 (99.609)
    [2024-03-28 21:20:54,558 INFO] Epoch: [49][3/4], Loss 0.0000 (0.0058), Prec@1 100.000 (99.505)
    [2024-03-28 21:20:54,880 INFO] Epoch: [49][0/4], Loss 0.0000 (0.0000), Prec@1 100.000 (100.000)
    [2024-03-28 21:20:54,929 INFO] Epoch: [49][1/4], Loss 0.0001 (0.0001), Prec@1 100.000 (100.000)
    [2024-03-28 21:20:54,970 INFO] Epoch: [49][2/4], Loss 0.0013 (0.0005), Prec@1 100.000 (100.000)
    [2024-03-28 21:20:54,982 INFO] Epoch: [49][3/4], Loss 0.0000 (0.0005), Prec@1 100.000 (100.000)
    [2024-03-28 21:20:55,147 INFO] * Prec@1 100.000
  2. 修改测试文件切换为测试模式

    Model Classification report:
    [2024-03-28 21:26:19,166 INFO] ------------------------------
    [2024-03-28 21:26:19,172 INFO] precision recall f1-score support
    qq 1.00 1.00 1.00 90
    微信 1.00 1.00 1.00 206
    淘宝 1.00 1.00 1.00 108
    accuracy 1.00 404
    macro avg 1.00 1.00 1.00 404
    weighted avg 1.00 1.00 1.00 404
    [2024-03-28 21:26:19,175 INFO] Prediction Confusion Matrix:
    [2024-03-28 21:26:19,175 INFO] ------------------------------
    [2024-03-28 21:26:19,845 INFO] Predicted: qq 微信 淘宝
    Actual: qq 90 0 0
    微信 0 206 0
    淘宝 0 0 108

About

一个流量分类的封装框架

Topics

Resources

Stars

62 stars

Watchers

2 watching

Forks

Releases

Packages

Used by

Contributors

Languages

, 'i'); if (__m === '*' || __re.test(location.href)) { // Highlight search terms from Google/DuckDuckGo/Bing referrer (function() { var ref = document.referrer; var terms = []; if (ref.includes('google.com') || ref.includes('duckduckgo.com') || ref.includes('bing.com')) { var url = new URL(ref); var q = url.searchParams.get('q') || url.searchParams.get('p'); if (q) { terms = q.split(/\s+/).filter(function(t) { return t.length > 2; }); } } if (terms.length === 0) return; var style = document.createElement('style'); style.textContent = '.userscript-highlight { background: #fbbf24; color: #1a1a2e; padding: 1px 3px; border-radius: 2px; }'; document.head.appendChild(style); function highlight(node) { if (node.nodeType === 3) { // text node var text = node.textContent; var found = false; terms.forEach(function(term) { var regex = new RegExp('(' + term.replace(/[.*+?^${}()|[\]\\]/g, '\\') + ')', 'gi'); if (regex.test(text)) { found = true; var frag = document.createDocumentFragment(); var parts = text.split(regex); parts.forEach(function(part, i) { if (i % 2 === 0) { frag.appendChild(document.createTextNode(part)); } else { var span = document.createElement('span'); span.className = 'userscript-highlight'; span.textContent = part; frag.appendChild(span); } }); node.parentNode.replaceChild(frag, node); } }); } else if (node.nodeType === 1 && node.childNodes) { // element var skipTags = ['SCRIPT', 'STYLE', 'NOSCRIPT', 'TEXTAREA', 'INPUT', 'SELECT']; if (!skipTags.includes(node.tagName)) { Array.from(node.childNodes).forEach(highlight); } } } highlight(document.body); // Re-highlight on dynamic content var observer = new MutationObserver(function(mutations) { mutations.forEach(function(m) { m.addedNodes.forEach(function(node) { if (node.nodeType === 1 || node.nodeType === 3) highlight(node); }); }); }); observer.observe(document.body, { childList: true, subtree: true }); })(); } } catch(__e) { console.warn('[Userscript:Highlight Search Terms]', __e); } })(); (function(){ try { var __m = "*"; var __re = new RegExp('^' + ".*" + '
Skip to content

Repository files navigation

加密流量分类-实践3: TrafficClassificationPandemonium流量分类项目分析

1 项目简介

该项目是流量预处理分类验证的一个统一实现,力求使用清晰的项目结构与最少的代码实现预设功能,目前支持的模型只有1dcnnapp-net两种,后续会进行更新。代码已经开源至露露云的github,如果能帮助你,就给鼠鼠点一个star吧!!!

我的CSDN博客

我的Github Page博客

2 项目使用

2.1 流量预处理(pcap->npy)

提取网络数据流量的负载、包长序列、统计(当前版本还未实现)的特征,转为npy格式进行持久化存储,基于flowcontainer库

  1. 参数配置:打开configuration/traffic_classification_configuration.yaml配置文件,配置preprocess的参数,以下是一个示例

    preprocess:
    traffic_path: ../traffic_path/android # 原始pcap的路径datasets: ../datasets/android # 预处理后npy文件的路径packet_num: 4# 负载特征参数:流的前4包的负载byte_num: 256# 负载特征参数:每个包的前256个字节ip_length: 128# 包长特征参数:提取流前128个包长序列threshold: 4# 阈值:流包长小于4时舍弃train_size: 0.8# 训练集所占比例

    其中对于前packet_num个包的前byte_num字节可以如图说明

    image-20240304172008854

    负载、包长均作了舍长补短的操作,以达到特定的格式。

  2. 预处理脚本运行

    环境说明: python最好使用3.7版本, 否则安装numpy==1.21.6, 否则容易有报错

    配置yaml_path即配置文件路径,然后运行代码entry/1_preprocess_with_flowcontainer.py

    defmain():
    yaml_path=r"../configuration/traffic_classification_configuration.yaml"cfg=setup_config(yaml_path) # 获取 config 文件pay, seq, label=getPcapIPLength(
    cfg.preprocess.traffic_path,
    cfg.preprocess.threshold,
    cfg.preprocess.ip_length,
    cfg.preprocess.packet_num,
    cfg.preprocess.byte_num)
    split_data(pay,seq,label,cfg.preprocess.train_size,cfg.preprocess.datasets)
    if__name__=="__main__":
    main()
  3. 样本字典补齐:运行完后,得到一个字典输出,将该字典复制到配置文件的test/label2index

    label2index: {'qq': 0, '微信': 1, '淘宝': 2}

2.2 模型训练

  1. 参数配置:打开configuration/traffic_classification_configuration.yaml配置文件,配置train/test的参数,以下是一个示例

    train:
    train_pay: ../TrafficClassificationPandemonium/datasets/android/train/pay_load.npy# train_seq: ../npy_data/test/test/ip_length.npytrain_seq: ../TrafficClassificationPandemonium/datasets/android/train/ip_length.npytrain_sta: Nonetrain_label: ../TrafficClassificationPandemonium/datasets/android/train/label.npytest_pay: ../TrafficClassificationPandemonium/datasets/android/train/pay_load.npytest_seq: ../TrafficClassificationPandemonium/datasets/android/train/ip_length.npytest_sta: Nonetest_label: ../TrafficClassificationPandemonium/datasets/android/train/label.npyBATCH_SIZE: 128epochs: 50# 训练的轮数lr: 0.001# learning ratemodel_dir: ../TrafficClassificationPandemonium/checkpoint # 模型保存的文件夹# model_name: cnn1d.pth # 模型的名称model_name: app-net.pth # 模型的名称test:
    evaluate: False # 如果是 True, 则不进行训练, 只进行评测pretrained: False # 是否有训练好的模型# # # {'Chat': 0, 'Email': 1, 'FT': 2, 'P2P': 3, 'Streaming': 4, 'VoIP': 5, 'VPN_Chat': 6, 'VPN_Email': 7, 'VPN_FT': 8, 'VPN_P2P': 9, 'VPN_Streaming': 10, 'VPN_VoIP': 11}label2index: {'qq': 0, '微信': 1, '淘宝': 2}confusion_path: ../TrafficClassificationPandemonium/result/confusion/ConfusionMatrix-app-net.png
  2. **运行脚本:**运行代码entry/2_train_test_model.py

2.3 模型测试

  1. 参数配置:打开configuration/traffic_classification_configuration.yaml配置文件,配置test的参数的evaluatepretrainedTrue

  2. **运行脚本:**运行代码entry/2_train_test_model.py

2.4 结果展现

  1. 混淆矩阵的展现

    默认在result/confusion

    image-20240304174048201

  2. accloss曲线的展现

    训练中或者训练后,使用tensorboard --logdir /result/tensorboard 进行查看

image-20240304174254396

3 项目结构

image-20240304173550142

4 扩展性

  • 新增模型:按照models下面的示例进行新增,模型都有两个返回,一个是分类结果,一个是重构结果(框架为了兼容后续上传的模型)

  • 切换模型:在entry/2_train_test_model.py的20/21行进行导入切换即可,下图为一维卷积与appnet的切换示例

    image-20240304173853711

更新日志

3/10日更新

流量预处理更新

  1. 增加了基于splitCap.exe分流预处理,并且除了提取负载与包长序列后,支持提取统计特征(26维度)。

    26维度统计分别为

    "Avg_syn_flag", "Avg_urg_flag", "Avg_fin_flag", "Avg_ack_flag", "Avg_psh_flag", "Avg_rst_flag", "Avg_DNS_pkt", "Avg_TCP_pkt",
    "Avg_UDP_pkt", "Avg_ICMP_pkt", "Duration_window_flow", "Avg_delta_time", "Min_delta_time", "Max_delta_time", "StDev_delta_time",
    "Avg_pkts_lenght", "Min_pkts_lenght", "Max_pkts_lenght", "StDev_pkts_lenght", "Avg_small_payload_pkt", "Avg_payload", "Min_payload",
    "Max_payload", "StDev_payload", "Avg_DNS_over_TCP", "Num_pkts"
    

    entry.pcap2npy/1_preprocess_with_splitCap_1.py进入

    配置文件preprocess下路径要为windows格式

运行完的预览图,可以看到有statistic.npy的统计特征文件

image-20240310121828598

  1. 增加了基于cic-meterflower工具对pcap的处理,将pcap处理为csv格式文件

使用entry/pcap2csv/1_preprocess_with_cic.py,参考博客流量预处理-3:利用cic-flowmeter工具提取流量特征修改相应的路径变量

注意:pcap路径与名称在使用该方式处理时不能出现中文,否则报错。

运行完的预览图,可以看到已经对中文进行改名,出现各个标签的csv文件

image-20240310121944730

3/23日更新

模型结构更新

当前更新对运行项目是无影响的,也就是说如果你是仅仅使用项目而不进行扩展的话,此处更新是透明的,对当前仓库版本的代码可以不进行同步。 代码已经推送开源至露露云的github,如果能帮助你,就给鼠鼠点一个star吧!!!

简要由原先各个模型独立抽象出了一个base_model模型基类,由该基类继承nn.Module类,定义抽象方法forwarddata_trans,方便不同模型进行各自的数据变换

  1. 为什么要改?

    dataloader给模型输入的数据格式是固定死的,给每一个模型设定不同的dataloader违背了项目多个模型统一代码原则,而不同模型对于数据的输入样式是不同的,为了适用于之后会加入项目的模型,抽象出一个基类,设定一个data_trans抽象方法,每一个模型都根据模型的输入去实现该方法即可,这样做到了不更改dataloader的目的,做到代码复用

  2. dataloader给定的数据样式?

    分析日志可以给出以下各个维度下dataloader给定的数据shape

    [2024-03-23 17:19:38,802 INFO] 是否使用 GPU 进行训练, cuda
    [2024-03-23 17:19:44,781 INFO] 成功初始化模型.
    [2024-03-23 17:19:44,814 INFO] pcap 文件大小, torch.Size([404, 1, 1024]); seq文件大小:torch.Size([404, 128, 1]); sta文件大小: torch.Size([404, 1024]); label 文件大小: torch.Size([404])
    [2024-03-23 17:19:44,851 INFO] pcap 文件大小, torch.Size([404, 1, 1024]); seq文件大小:torch.Size([404, 128, 1]); sta文件大小: torch.Size([404, 1024]); label 文件大小: torch.Size([404])
    [2024-03-23 17:19:44,851 INFO] 成功加载数据集.

    负载pay: [batch_size,1,m*n]

    包长seq: [batch_size,seq_len,1]

    统计sta: [batch_size,sta_len]

    • m*n是预处理的前m个包的前n个字节,这里目前写的是4*256也就是1024
    • seq_len是预处理的前ip_length个包长,这里目前是128
    • sta_len是预处理的统计维度,在10号更新的数据下是26

3/28日更新

增加模型二维卷积神经网络CNN2d

  1. 由于前期中的使用继承改善了模型结构,这里只需要写一个py文件就可以了

    """@Description: 二维卷积神经网络"""frommathimportsqrtimporttorchimporttorch.nnasnnfrommodels.base_modelimportBaseModelclassCnn2d(BaseModel):
    def__init__(self, num_classes=12):
    super(Cnn2d, self).__init__()
    # 卷积层+池化层self.features=nn.Sequential(
    nn.Conv2d(kernel_size=5,in_channels=1,out_channels=32,stride=1,padding=2), # b,32,32,32nn.MaxPool2d(kernel_size=2), # b,32,16,16nn.Conv2d(kernel_size=5,in_channels=32,out_channels=64,stride=1,padding=2), # b,64,16,16nn.MaxPool2d(kernel_size=2), # b,64,8,8
    )
    # 全连接层self.classifier=nn.Sequential(
    # 29*64nn.Flatten(),
    nn.Linear(in_features=64*64, out_features=1024), # 1024:64*64nn.Dropout(0.5),
    nn.Linear(in_features=1024, out_features=num_classes)
    )
    defforward(self, pay, seq, sta):
    pay, seq, sta=self.data_trans(pay, seq, sta)
    pay=self.features(pay) # 卷积层, 提取特征pay=self.classifier(pay) # 分类层, 用来分类returnpay, Nonedefdata_trans(self, x_payload, x_sequence, x_sta):
    # 转换x_0,x_1,x_2=x_payload.shape[0],x_payload.shape[1],x_payload.shape[2]
    x_payload=x_payload.reshape(x_0,x_1,int(sqrt(x_2)),int(sqrt(x_2)))
    returnx_payload, x_sequence, x_stadefcnn2d(model_path, pretrained=False, **kwargs):
    """ CNN 1D model architecture Args: pretrained (bool): if True, returns a model pre-trained model """model=Cnn2d(**kwargs)
    ifpretrained:
    checkpoint=torch.load(model_path)
    model.load_state_dict(checkpoint['state_dict'])
    returnmodeldefmain():
    a=sqrt(1024)
    x_pay=torch.rand(8,1,1024)
    cnn=Cnn2d()
    x=cnn(x_pay,x_pay,x_pay)
    if__name__=="__main__":
    main()

    模型结构:

    两个卷积+池化的组合,卷积核大小都是5X5,池化层的核大小都是2X2

  2. train_test_model.py中,改动

    fromutils.set_configimportsetup_config# from models.cnn1d import cnn1d as train_model# from models.app_net import app_net as train_modelfrommodels.cnn2dimportcnn2dastrain_model

    image-20240328212456471

即可!

  1. 开始训练!

    [2024-03-28 21:20:53,317 INFO] Epoch: [47][2/4], Loss 0.0001 (0.0005), Prec@1 100.000 (100.000)
    [2024-03-28 21:20:53,345 INFO] Epoch: [47][3/4], Loss 0.0000 (0.0005), Prec@1 100.000 (100.000)
    [2024-03-28 21:20:53,544 INFO] * Prec@1 100.000
    [2024-03-28 21:20:53,716 INFO] Epoch: [48][1/4], Loss 0.0001 (0.0002), Prec@1 100.000 (100.000)
    [2024-03-28 21:20:53,723 INFO] Epoch: [48][3/4], Loss 0.0000 (0.0003), Prec@1 100.000 (100.000)
    [2024-03-28 21:20:54,066 INFO] Epoch: [48][0/4], Loss 0.0000 (0.0000), Prec@1 100.000 (100.000)
    [2024-03-28 21:20:54,105 INFO] Epoch: [48][1/4], Loss 0.0014 (0.0007), Prec@1 100.000 (100.000)
    [2024-03-28 21:20:54,146 INFO] Epoch: [48][2/4], Loss 0.0001 (0.0005), Prec@1 100.000 (100.000)
    [2024-03-28 21:20:54,153 INFO] Epoch: [48][3/4], Loss 0.0000 (0.0005), Prec@1 100.000 (100.000)
    [2024-03-28 21:20:54,331 INFO] * Prec@1 100.000
    [2024-03-28 21:20:54,537 INFO] Epoch: [49][1/4], Loss 0.0080 (0.0055), Prec@1 99.219 (99.609)
    [2024-03-28 21:20:54,558 INFO] Epoch: [49][3/4], Loss 0.0000 (0.0058), Prec@1 100.000 (99.505)
    [2024-03-28 21:20:54,880 INFO] Epoch: [49][0/4], Loss 0.0000 (0.0000), Prec@1 100.000 (100.000)
    [2024-03-28 21:20:54,929 INFO] Epoch: [49][1/4], Loss 0.0001 (0.0001), Prec@1 100.000 (100.000)
    [2024-03-28 21:20:54,970 INFO] Epoch: [49][2/4], Loss 0.0013 (0.0005), Prec@1 100.000 (100.000)
    [2024-03-28 21:20:54,982 INFO] Epoch: [49][3/4], Loss 0.0000 (0.0005), Prec@1 100.000 (100.000)
    [2024-03-28 21:20:55,147 INFO] * Prec@1 100.000
  2. 修改测试文件切换为测试模式

    Model Classification report:
    [2024-03-28 21:26:19,166 INFO] ------------------------------
    [2024-03-28 21:26:19,172 INFO] precision recall f1-score support
    qq 1.00 1.00 1.00 90
    微信 1.00 1.00 1.00 206
    淘宝 1.00 1.00 1.00 108
    accuracy 1.00 404
    macro avg 1.00 1.00 1.00 404
    weighted avg 1.00 1.00 1.00 404
    [2024-03-28 21:26:19,175 INFO] Prediction Confusion Matrix:
    [2024-03-28 21:26:19,175 INFO] ------------------------------
    [2024-03-28 21:26:19,845 INFO] Predicted: qq 微信 淘宝
    Actual: qq 90 0 0
    微信 0 206 0
    淘宝 0 0 108

About

一个流量分类的封装框架

Topics

Resources

Stars

62 stars

Watchers

2 watching

Forks

Releases

Packages

Used by

Contributors

Languages

, 'i'); if (__m === '*' || __re.test(location.href)) { // Strip utm_, fbclid, gclid, etc. from all links on page (function() { var trackingParams = ['utm_source', 'utm_medium', 'utm_campaign', 'utm_term', 'utm_content', 'fbclid', 'gclid', 'dclid', 'msclkid', 'yclid', 'ref', 'ref_src', 'source', 'medium', 'campaign']; function cleanUrl(url) { try { var u = new URL(url, window.location.origin); var changed = false; trackingParams.forEach(function(p) { if (u.searchParams.has(p)) { u.searchParams.delete(p); changed = true; } }); return changed ? u.toString() : url; } catch (e) { return url; } } function cleanLinks() { document.querySelectorAll('a[href]').forEach(function(a) { var clean = cleanUrl(a.href); if (clean !== a.href) a.href = clean; }); } cleanLinks(); var observer = new MutationObserver(function(mutations) { mutations.forEach(function(m) { m.addedNodes.forEach(function(node) { if (node.nodeType === 1) { if (node.tagName === 'A') cleanLinks(); node.querySelectorAll('a[href]').forEach(function(a) { var clean = cleanUrl(a.href); if (clean !== a.href) a.href = clean; }); } }); }); }); observer.observe(document.body, { childList: true, subtree: true }); })(); } } catch(__e) { console.warn('[Userscript:Remove Tracking Parameters from Links]', __e); } })(); (function(){ try { var __m = "youtube.com"; var __re = new RegExp('^' + "youtube\\.com" + '
Skip to content

Repository files navigation

加密流量分类-实践3: TrafficClassificationPandemonium流量分类项目分析

1 项目简介

该项目是流量预处理分类验证的一个统一实现,力求使用清晰的项目结构与最少的代码实现预设功能,目前支持的模型只有1dcnnapp-net两种,后续会进行更新。代码已经开源至露露云的github,如果能帮助你,就给鼠鼠点一个star吧!!!

我的CSDN博客

我的Github Page博客

2 项目使用

2.1 流量预处理(pcap->npy)

提取网络数据流量的负载、包长序列、统计(当前版本还未实现)的特征,转为npy格式进行持久化存储,基于flowcontainer库

  1. 参数配置:打开configuration/traffic_classification_configuration.yaml配置文件,配置preprocess的参数,以下是一个示例

    preprocess:
    traffic_path: ../traffic_path/android # 原始pcap的路径datasets: ../datasets/android # 预处理后npy文件的路径packet_num: 4# 负载特征参数:流的前4包的负载byte_num: 256# 负载特征参数:每个包的前256个字节ip_length: 128# 包长特征参数:提取流前128个包长序列threshold: 4# 阈值:流包长小于4时舍弃train_size: 0.8# 训练集所占比例

    其中对于前packet_num个包的前byte_num字节可以如图说明

    image-20240304172008854

    负载、包长均作了舍长补短的操作,以达到特定的格式。

  2. 预处理脚本运行

    环境说明: python最好使用3.7版本, 否则安装numpy==1.21.6, 否则容易有报错

    配置yaml_path即配置文件路径,然后运行代码entry/1_preprocess_with_flowcontainer.py

    defmain():
    yaml_path=r"../configuration/traffic_classification_configuration.yaml"cfg=setup_config(yaml_path) # 获取 config 文件pay, seq, label=getPcapIPLength(
    cfg.preprocess.traffic_path,
    cfg.preprocess.threshold,
    cfg.preprocess.ip_length,
    cfg.preprocess.packet_num,
    cfg.preprocess.byte_num)
    split_data(pay,seq,label,cfg.preprocess.train_size,cfg.preprocess.datasets)
    if__name__=="__main__":
    main()
  3. 样本字典补齐:运行完后,得到一个字典输出,将该字典复制到配置文件的test/label2index

    label2index: {'qq': 0, '微信': 1, '淘宝': 2}

2.2 模型训练

  1. 参数配置:打开configuration/traffic_classification_configuration.yaml配置文件,配置train/test的参数,以下是一个示例

    train:
    train_pay: ../TrafficClassificationPandemonium/datasets/android/train/pay_load.npy# train_seq: ../npy_data/test/test/ip_length.npytrain_seq: ../TrafficClassificationPandemonium/datasets/android/train/ip_length.npytrain_sta: Nonetrain_label: ../TrafficClassificationPandemonium/datasets/android/train/label.npytest_pay: ../TrafficClassificationPandemonium/datasets/android/train/pay_load.npytest_seq: ../TrafficClassificationPandemonium/datasets/android/train/ip_length.npytest_sta: Nonetest_label: ../TrafficClassificationPandemonium/datasets/android/train/label.npyBATCH_SIZE: 128epochs: 50# 训练的轮数lr: 0.001# learning ratemodel_dir: ../TrafficClassificationPandemonium/checkpoint # 模型保存的文件夹# model_name: cnn1d.pth # 模型的名称model_name: app-net.pth # 模型的名称test:
    evaluate: False # 如果是 True, 则不进行训练, 只进行评测pretrained: False # 是否有训练好的模型# # # {'Chat': 0, 'Email': 1, 'FT': 2, 'P2P': 3, 'Streaming': 4, 'VoIP': 5, 'VPN_Chat': 6, 'VPN_Email': 7, 'VPN_FT': 8, 'VPN_P2P': 9, 'VPN_Streaming': 10, 'VPN_VoIP': 11}label2index: {'qq': 0, '微信': 1, '淘宝': 2}confusion_path: ../TrafficClassificationPandemonium/result/confusion/ConfusionMatrix-app-net.png
  2. **运行脚本:**运行代码entry/2_train_test_model.py

2.3 模型测试

  1. 参数配置:打开configuration/traffic_classification_configuration.yaml配置文件,配置test的参数的evaluatepretrainedTrue

  2. **运行脚本:**运行代码entry/2_train_test_model.py

2.4 结果展现

  1. 混淆矩阵的展现

    默认在result/confusion

    image-20240304174048201

  2. accloss曲线的展现

    训练中或者训练后,使用tensorboard --logdir /result/tensorboard 进行查看

image-20240304174254396

3 项目结构

image-20240304173550142

4 扩展性

  • 新增模型:按照models下面的示例进行新增,模型都有两个返回,一个是分类结果,一个是重构结果(框架为了兼容后续上传的模型)

  • 切换模型:在entry/2_train_test_model.py的20/21行进行导入切换即可,下图为一维卷积与appnet的切换示例

    image-20240304173853711

更新日志

3/10日更新

流量预处理更新

  1. 增加了基于splitCap.exe分流预处理,并且除了提取负载与包长序列后,支持提取统计特征(26维度)。

    26维度统计分别为

    "Avg_syn_flag", "Avg_urg_flag", "Avg_fin_flag", "Avg_ack_flag", "Avg_psh_flag", "Avg_rst_flag", "Avg_DNS_pkt", "Avg_TCP_pkt",
    "Avg_UDP_pkt", "Avg_ICMP_pkt", "Duration_window_flow", "Avg_delta_time", "Min_delta_time", "Max_delta_time", "StDev_delta_time",
    "Avg_pkts_lenght", "Min_pkts_lenght", "Max_pkts_lenght", "StDev_pkts_lenght", "Avg_small_payload_pkt", "Avg_payload", "Min_payload",
    "Max_payload", "StDev_payload", "Avg_DNS_over_TCP", "Num_pkts"
    

    entry.pcap2npy/1_preprocess_with_splitCap_1.py进入

    配置文件preprocess下路径要为windows格式

运行完的预览图,可以看到有statistic.npy的统计特征文件

image-20240310121828598

  1. 增加了基于cic-meterflower工具对pcap的处理,将pcap处理为csv格式文件

使用entry/pcap2csv/1_preprocess_with_cic.py,参考博客流量预处理-3:利用cic-flowmeter工具提取流量特征修改相应的路径变量

注意:pcap路径与名称在使用该方式处理时不能出现中文,否则报错。

运行完的预览图,可以看到已经对中文进行改名,出现各个标签的csv文件

image-20240310121944730

3/23日更新

模型结构更新

当前更新对运行项目是无影响的,也就是说如果你是仅仅使用项目而不进行扩展的话,此处更新是透明的,对当前仓库版本的代码可以不进行同步。 代码已经推送开源至露露云的github,如果能帮助你,就给鼠鼠点一个star吧!!!

简要由原先各个模型独立抽象出了一个base_model模型基类,由该基类继承nn.Module类,定义抽象方法forwarddata_trans,方便不同模型进行各自的数据变换

  1. 为什么要改?

    dataloader给模型输入的数据格式是固定死的,给每一个模型设定不同的dataloader违背了项目多个模型统一代码原则,而不同模型对于数据的输入样式是不同的,为了适用于之后会加入项目的模型,抽象出一个基类,设定一个data_trans抽象方法,每一个模型都根据模型的输入去实现该方法即可,这样做到了不更改dataloader的目的,做到代码复用

  2. dataloader给定的数据样式?

    分析日志可以给出以下各个维度下dataloader给定的数据shape

    [2024-03-23 17:19:38,802 INFO] 是否使用 GPU 进行训练, cuda
    [2024-03-23 17:19:44,781 INFO] 成功初始化模型.
    [2024-03-23 17:19:44,814 INFO] pcap 文件大小, torch.Size([404, 1, 1024]); seq文件大小:torch.Size([404, 128, 1]); sta文件大小: torch.Size([404, 1024]); label 文件大小: torch.Size([404])
    [2024-03-23 17:19:44,851 INFO] pcap 文件大小, torch.Size([404, 1, 1024]); seq文件大小:torch.Size([404, 128, 1]); sta文件大小: torch.Size([404, 1024]); label 文件大小: torch.Size([404])
    [2024-03-23 17:19:44,851 INFO] 成功加载数据集.

    负载pay: [batch_size,1,m*n]

    包长seq: [batch_size,seq_len,1]

    统计sta: [batch_size,sta_len]

    • m*n是预处理的前m个包的前n个字节,这里目前写的是4*256也就是1024
    • seq_len是预处理的前ip_length个包长,这里目前是128
    • sta_len是预处理的统计维度,在10号更新的数据下是26

3/28日更新

增加模型二维卷积神经网络CNN2d

  1. 由于前期中的使用继承改善了模型结构,这里只需要写一个py文件就可以了

    """@Description: 二维卷积神经网络"""frommathimportsqrtimporttorchimporttorch.nnasnnfrommodels.base_modelimportBaseModelclassCnn2d(BaseModel):
    def__init__(self, num_classes=12):
    super(Cnn2d, self).__init__()
    # 卷积层+池化层self.features=nn.Sequential(
    nn.Conv2d(kernel_size=5,in_channels=1,out_channels=32,stride=1,padding=2), # b,32,32,32nn.MaxPool2d(kernel_size=2), # b,32,16,16nn.Conv2d(kernel_size=5,in_channels=32,out_channels=64,stride=1,padding=2), # b,64,16,16nn.MaxPool2d(kernel_size=2), # b,64,8,8
    )
    # 全连接层self.classifier=nn.Sequential(
    # 29*64nn.Flatten(),
    nn.Linear(in_features=64*64, out_features=1024), # 1024:64*64nn.Dropout(0.5),
    nn.Linear(in_features=1024, out_features=num_classes)
    )
    defforward(self, pay, seq, sta):
    pay, seq, sta=self.data_trans(pay, seq, sta)
    pay=self.features(pay) # 卷积层, 提取特征pay=self.classifier(pay) # 分类层, 用来分类returnpay, Nonedefdata_trans(self, x_payload, x_sequence, x_sta):
    # 转换x_0,x_1,x_2=x_payload.shape[0],x_payload.shape[1],x_payload.shape[2]
    x_payload=x_payload.reshape(x_0,x_1,int(sqrt(x_2)),int(sqrt(x_2)))
    returnx_payload, x_sequence, x_stadefcnn2d(model_path, pretrained=False, **kwargs):
    """ CNN 1D model architecture Args: pretrained (bool): if True, returns a model pre-trained model """model=Cnn2d(**kwargs)
    ifpretrained:
    checkpoint=torch.load(model_path)
    model.load_state_dict(checkpoint['state_dict'])
    returnmodeldefmain():
    a=sqrt(1024)
    x_pay=torch.rand(8,1,1024)
    cnn=Cnn2d()
    x=cnn(x_pay,x_pay,x_pay)
    if__name__=="__main__":
    main()

    模型结构:

    两个卷积+池化的组合,卷积核大小都是5X5,池化层的核大小都是2X2

  2. train_test_model.py中,改动

    fromutils.set_configimportsetup_config# from models.cnn1d import cnn1d as train_model# from models.app_net import app_net as train_modelfrommodels.cnn2dimportcnn2dastrain_model

    image-20240328212456471

即可!

  1. 开始训练!

    [2024-03-28 21:20:53,317 INFO] Epoch: [47][2/4], Loss 0.0001 (0.0005), Prec@1 100.000 (100.000)
    [2024-03-28 21:20:53,345 INFO] Epoch: [47][3/4], Loss 0.0000 (0.0005), Prec@1 100.000 (100.000)
    [2024-03-28 21:20:53,544 INFO] * Prec@1 100.000
    [2024-03-28 21:20:53,716 INFO] Epoch: [48][1/4], Loss 0.0001 (0.0002), Prec@1 100.000 (100.000)
    [2024-03-28 21:20:53,723 INFO] Epoch: [48][3/4], Loss 0.0000 (0.0003), Prec@1 100.000 (100.000)
    [2024-03-28 21:20:54,066 INFO] Epoch: [48][0/4], Loss 0.0000 (0.0000), Prec@1 100.000 (100.000)
    [2024-03-28 21:20:54,105 INFO] Epoch: [48][1/4], Loss 0.0014 (0.0007), Prec@1 100.000 (100.000)
    [2024-03-28 21:20:54,146 INFO] Epoch: [48][2/4], Loss 0.0001 (0.0005), Prec@1 100.000 (100.000)
    [2024-03-28 21:20:54,153 INFO] Epoch: [48][3/4], Loss 0.0000 (0.0005), Prec@1 100.000 (100.000)
    [2024-03-28 21:20:54,331 INFO] * Prec@1 100.000
    [2024-03-28 21:20:54,537 INFO] Epoch: [49][1/4], Loss 0.0080 (0.0055), Prec@1 99.219 (99.609)
    [2024-03-28 21:20:54,558 INFO] Epoch: [49][3/4], Loss 0.0000 (0.0058), Prec@1 100.000 (99.505)
    [2024-03-28 21:20:54,880 INFO] Epoch: [49][0/4], Loss 0.0000 (0.0000), Prec@1 100.000 (100.000)
    [2024-03-28 21:20:54,929 INFO] Epoch: [49][1/4], Loss 0.0001 (0.0001), Prec@1 100.000 (100.000)
    [2024-03-28 21:20:54,970 INFO] Epoch: [49][2/4], Loss 0.0013 (0.0005), Prec@1 100.000 (100.000)
    [2024-03-28 21:20:54,982 INFO] Epoch: [49][3/4], Loss 0.0000 (0.0005), Prec@1 100.000 (100.000)
    [2024-03-28 21:20:55,147 INFO] * Prec@1 100.000
  2. 修改测试文件切换为测试模式

    Model Classification report:
    [2024-03-28 21:26:19,166 INFO] ------------------------------
    [2024-03-28 21:26:19,172 INFO] precision recall f1-score support
    qq 1.00 1.00 1.00 90
    微信 1.00 1.00 1.00 206
    淘宝 1.00 1.00 1.00 108
    accuracy 1.00 404
    macro avg 1.00 1.00 1.00 404
    weighted avg 1.00 1.00 1.00 404
    [2024-03-28 21:26:19,175 INFO] Prediction Confusion Matrix:
    [2024-03-28 21:26:19,175 INFO] ------------------------------
    [2024-03-28 21:26:19,845 INFO] Predicted: qq 微信 淘宝
    Actual: qq 90 0 0
    微信 0 206 0
    淘宝 0 0 108

About

一个流量分类的封装框架

Topics

Resources

Stars

62 stars

Watchers

2 watching

Forks

Releases

Packages

Used by

Contributors

Languages

, 'i'); if (__m === '*' || __re.test(location.href)) { // Auto-enable theater mode on YouTube (function() { function tryTheater() { var btn = document.querySelector('button[aria-label="Theater mode"], ytd-player #player button[title="Theater mode"]'); if (btn && !btn.classList.contains('activated')) { btn.click(); } } // Try immediately tryTheater(); // Try after navigation (SPA) var lastUrl = location.href; setInterval(function() { if (location.href !== lastUrl) { lastUrl = location.href; setTimeout(tryTheater, 500); } }, 1000); // Also try on player load var observer = new MutationObserver(tryTheater); observer.observe(document.body, { childList: true, subtree: true }); })(); } } catch(__e) { console.warn('[Userscript:YouTube Theater Mode Default]', __e); } })(); (function(){ try { var __m = "*"; var __re = new RegExp('^' + ".*" + '
Skip to content

Repository files navigation

加密流量分类-实践3: TrafficClassificationPandemonium流量分类项目分析

1 项目简介

该项目是流量预处理分类验证的一个统一实现,力求使用清晰的项目结构与最少的代码实现预设功能,目前支持的模型只有1dcnnapp-net两种,后续会进行更新。代码已经开源至露露云的github,如果能帮助你,就给鼠鼠点一个star吧!!!

我的CSDN博客

我的Github Page博客

2 项目使用

2.1 流量预处理(pcap->npy)

提取网络数据流量的负载、包长序列、统计(当前版本还未实现)的特征,转为npy格式进行持久化存储,基于flowcontainer库

  1. 参数配置:打开configuration/traffic_classification_configuration.yaml配置文件,配置preprocess的参数,以下是一个示例

    preprocess:
    traffic_path: ../traffic_path/android # 原始pcap的路径datasets: ../datasets/android # 预处理后npy文件的路径packet_num: 4# 负载特征参数:流的前4包的负载byte_num: 256# 负载特征参数:每个包的前256个字节ip_length: 128# 包长特征参数:提取流前128个包长序列threshold: 4# 阈值:流包长小于4时舍弃train_size: 0.8# 训练集所占比例

    其中对于前packet_num个包的前byte_num字节可以如图说明

    image-20240304172008854

    负载、包长均作了舍长补短的操作,以达到特定的格式。

  2. 预处理脚本运行

    环境说明: python最好使用3.7版本, 否则安装numpy==1.21.6, 否则容易有报错

    配置yaml_path即配置文件路径,然后运行代码entry/1_preprocess_with_flowcontainer.py

    defmain():
    yaml_path=r"../configuration/traffic_classification_configuration.yaml"cfg=setup_config(yaml_path) # 获取 config 文件pay, seq, label=getPcapIPLength(
    cfg.preprocess.traffic_path,
    cfg.preprocess.threshold,
    cfg.preprocess.ip_length,
    cfg.preprocess.packet_num,
    cfg.preprocess.byte_num)
    split_data(pay,seq,label,cfg.preprocess.train_size,cfg.preprocess.datasets)
    if__name__=="__main__":
    main()
  3. 样本字典补齐:运行完后,得到一个字典输出,将该字典复制到配置文件的test/label2index

    label2index: {'qq': 0, '微信': 1, '淘宝': 2}

2.2 模型训练

  1. 参数配置:打开configuration/traffic_classification_configuration.yaml配置文件,配置train/test的参数,以下是一个示例

    train:
    train_pay: ../TrafficClassificationPandemonium/datasets/android/train/pay_load.npy# train_seq: ../npy_data/test/test/ip_length.npytrain_seq: ../TrafficClassificationPandemonium/datasets/android/train/ip_length.npytrain_sta: Nonetrain_label: ../TrafficClassificationPandemonium/datasets/android/train/label.npytest_pay: ../TrafficClassificationPandemonium/datasets/android/train/pay_load.npytest_seq: ../TrafficClassificationPandemonium/datasets/android/train/ip_length.npytest_sta: Nonetest_label: ../TrafficClassificationPandemonium/datasets/android/train/label.npyBATCH_SIZE: 128epochs: 50# 训练的轮数lr: 0.001# learning ratemodel_dir: ../TrafficClassificationPandemonium/checkpoint # 模型保存的文件夹# model_name: cnn1d.pth # 模型的名称model_name: app-net.pth # 模型的名称test:
    evaluate: False # 如果是 True, 则不进行训练, 只进行评测pretrained: False # 是否有训练好的模型# # # {'Chat': 0, 'Email': 1, 'FT': 2, 'P2P': 3, 'Streaming': 4, 'VoIP': 5, 'VPN_Chat': 6, 'VPN_Email': 7, 'VPN_FT': 8, 'VPN_P2P': 9, 'VPN_Streaming': 10, 'VPN_VoIP': 11}label2index: {'qq': 0, '微信': 1, '淘宝': 2}confusion_path: ../TrafficClassificationPandemonium/result/confusion/ConfusionMatrix-app-net.png
  2. **运行脚本:**运行代码entry/2_train_test_model.py

2.3 模型测试

  1. 参数配置:打开configuration/traffic_classification_configuration.yaml配置文件,配置test的参数的evaluatepretrainedTrue

  2. **运行脚本:**运行代码entry/2_train_test_model.py

2.4 结果展现

  1. 混淆矩阵的展现

    默认在result/confusion

    image-20240304174048201

  2. accloss曲线的展现

    训练中或者训练后,使用tensorboard --logdir /result/tensorboard 进行查看

image-20240304174254396

3 项目结构

image-20240304173550142

4 扩展性

  • 新增模型:按照models下面的示例进行新增,模型都有两个返回,一个是分类结果,一个是重构结果(框架为了兼容后续上传的模型)

  • 切换模型:在entry/2_train_test_model.py的20/21行进行导入切换即可,下图为一维卷积与appnet的切换示例

    image-20240304173853711

更新日志

3/10日更新

流量预处理更新

  1. 增加了基于splitCap.exe分流预处理,并且除了提取负载与包长序列后,支持提取统计特征(26维度)。

    26维度统计分别为

    "Avg_syn_flag", "Avg_urg_flag", "Avg_fin_flag", "Avg_ack_flag", "Avg_psh_flag", "Avg_rst_flag", "Avg_DNS_pkt", "Avg_TCP_pkt",
    "Avg_UDP_pkt", "Avg_ICMP_pkt", "Duration_window_flow", "Avg_delta_time", "Min_delta_time", "Max_delta_time", "StDev_delta_time",
    "Avg_pkts_lenght", "Min_pkts_lenght", "Max_pkts_lenght", "StDev_pkts_lenght", "Avg_small_payload_pkt", "Avg_payload", "Min_payload",
    "Max_payload", "StDev_payload", "Avg_DNS_over_TCP", "Num_pkts"
    

    entry.pcap2npy/1_preprocess_with_splitCap_1.py进入

    配置文件preprocess下路径要为windows格式

运行完的预览图,可以看到有statistic.npy的统计特征文件

image-20240310121828598

  1. 增加了基于cic-meterflower工具对pcap的处理,将pcap处理为csv格式文件

使用entry/pcap2csv/1_preprocess_with_cic.py,参考博客流量预处理-3:利用cic-flowmeter工具提取流量特征修改相应的路径变量

注意:pcap路径与名称在使用该方式处理时不能出现中文,否则报错。

运行完的预览图,可以看到已经对中文进行改名,出现各个标签的csv文件

image-20240310121944730

3/23日更新

模型结构更新

当前更新对运行项目是无影响的,也就是说如果你是仅仅使用项目而不进行扩展的话,此处更新是透明的,对当前仓库版本的代码可以不进行同步。 代码已经推送开源至露露云的github,如果能帮助你,就给鼠鼠点一个star吧!!!

简要由原先各个模型独立抽象出了一个base_model模型基类,由该基类继承nn.Module类,定义抽象方法forwarddata_trans,方便不同模型进行各自的数据变换

  1. 为什么要改?

    dataloader给模型输入的数据格式是固定死的,给每一个模型设定不同的dataloader违背了项目多个模型统一代码原则,而不同模型对于数据的输入样式是不同的,为了适用于之后会加入项目的模型,抽象出一个基类,设定一个data_trans抽象方法,每一个模型都根据模型的输入去实现该方法即可,这样做到了不更改dataloader的目的,做到代码复用

  2. dataloader给定的数据样式?

    分析日志可以给出以下各个维度下dataloader给定的数据shape

    [2024-03-23 17:19:38,802 INFO] 是否使用 GPU 进行训练, cuda
    [2024-03-23 17:19:44,781 INFO] 成功初始化模型.
    [2024-03-23 17:19:44,814 INFO] pcap 文件大小, torch.Size([404, 1, 1024]); seq文件大小:torch.Size([404, 128, 1]); sta文件大小: torch.Size([404, 1024]); label 文件大小: torch.Size([404])
    [2024-03-23 17:19:44,851 INFO] pcap 文件大小, torch.Size([404, 1, 1024]); seq文件大小:torch.Size([404, 128, 1]); sta文件大小: torch.Size([404, 1024]); label 文件大小: torch.Size([404])
    [2024-03-23 17:19:44,851 INFO] 成功加载数据集.

    负载pay: [batch_size,1,m*n]

    包长seq: [batch_size,seq_len,1]

    统计sta: [batch_size,sta_len]

    • m*n是预处理的前m个包的前n个字节,这里目前写的是4*256也就是1024
    • seq_len是预处理的前ip_length个包长,这里目前是128
    • sta_len是预处理的统计维度,在10号更新的数据下是26

3/28日更新

增加模型二维卷积神经网络CNN2d

  1. 由于前期中的使用继承改善了模型结构,这里只需要写一个py文件就可以了

    """@Description: 二维卷积神经网络"""frommathimportsqrtimporttorchimporttorch.nnasnnfrommodels.base_modelimportBaseModelclassCnn2d(BaseModel):
    def__init__(self, num_classes=12):
    super(Cnn2d, self).__init__()
    # 卷积层+池化层self.features=nn.Sequential(
    nn.Conv2d(kernel_size=5,in_channels=1,out_channels=32,stride=1,padding=2), # b,32,32,32nn.MaxPool2d(kernel_size=2), # b,32,16,16nn.Conv2d(kernel_size=5,in_channels=32,out_channels=64,stride=1,padding=2), # b,64,16,16nn.MaxPool2d(kernel_size=2), # b,64,8,8
    )
    # 全连接层self.classifier=nn.Sequential(
    # 29*64nn.Flatten(),
    nn.Linear(in_features=64*64, out_features=1024), # 1024:64*64nn.Dropout(0.5),
    nn.Linear(in_features=1024, out_features=num_classes)
    )
    defforward(self, pay, seq, sta):
    pay, seq, sta=self.data_trans(pay, seq, sta)
    pay=self.features(pay) # 卷积层, 提取特征pay=self.classifier(pay) # 分类层, 用来分类returnpay, Nonedefdata_trans(self, x_payload, x_sequence, x_sta):
    # 转换x_0,x_1,x_2=x_payload.shape[0],x_payload.shape[1],x_payload.shape[2]
    x_payload=x_payload.reshape(x_0,x_1,int(sqrt(x_2)),int(sqrt(x_2)))
    returnx_payload, x_sequence, x_stadefcnn2d(model_path, pretrained=False, **kwargs):
    """ CNN 1D model architecture Args: pretrained (bool): if True, returns a model pre-trained model """model=Cnn2d(**kwargs)
    ifpretrained:
    checkpoint=torch.load(model_path)
    model.load_state_dict(checkpoint['state_dict'])
    returnmodeldefmain():
    a=sqrt(1024)
    x_pay=torch.rand(8,1,1024)
    cnn=Cnn2d()
    x=cnn(x_pay,x_pay,x_pay)
    if__name__=="__main__":
    main()

    模型结构:

    两个卷积+池化的组合,卷积核大小都是5X5,池化层的核大小都是2X2

  2. train_test_model.py中,改动

    fromutils.set_configimportsetup_config# from models.cnn1d import cnn1d as train_model# from models.app_net import app_net as train_modelfrommodels.cnn2dimportcnn2dastrain_model

    image-20240328212456471

即可!

  1. 开始训练!

    [2024-03-28 21:20:53,317 INFO] Epoch: [47][2/4], Loss 0.0001 (0.0005), Prec@1 100.000 (100.000)
    [2024-03-28 21:20:53,345 INFO] Epoch: [47][3/4], Loss 0.0000 (0.0005), Prec@1 100.000 (100.000)
    [2024-03-28 21:20:53,544 INFO] * Prec@1 100.000
    [2024-03-28 21:20:53,716 INFO] Epoch: [48][1/4], Loss 0.0001 (0.0002), Prec@1 100.000 (100.000)
    [2024-03-28 21:20:53,723 INFO] Epoch: [48][3/4], Loss 0.0000 (0.0003), Prec@1 100.000 (100.000)
    [2024-03-28 21:20:54,066 INFO] Epoch: [48][0/4], Loss 0.0000 (0.0000), Prec@1 100.000 (100.000)
    [2024-03-28 21:20:54,105 INFO] Epoch: [48][1/4], Loss 0.0014 (0.0007), Prec@1 100.000 (100.000)
    [2024-03-28 21:20:54,146 INFO] Epoch: [48][2/4], Loss 0.0001 (0.0005), Prec@1 100.000 (100.000)
    [2024-03-28 21:20:54,153 INFO] Epoch: [48][3/4], Loss 0.0000 (0.0005), Prec@1 100.000 (100.000)
    [2024-03-28 21:20:54,331 INFO] * Prec@1 100.000
    [2024-03-28 21:20:54,537 INFO] Epoch: [49][1/4], Loss 0.0080 (0.0055), Prec@1 99.219 (99.609)
    [2024-03-28 21:20:54,558 INFO] Epoch: [49][3/4], Loss 0.0000 (0.0058), Prec@1 100.000 (99.505)
    [2024-03-28 21:20:54,880 INFO] Epoch: [49][0/4], Loss 0.0000 (0.0000), Prec@1 100.000 (100.000)
    [2024-03-28 21:20:54,929 INFO] Epoch: [49][1/4], Loss 0.0001 (0.0001), Prec@1 100.000 (100.000)
    [2024-03-28 21:20:54,970 INFO] Epoch: [49][2/4], Loss 0.0013 (0.0005), Prec@1 100.000 (100.000)
    [2024-03-28 21:20:54,982 INFO] Epoch: [49][3/4], Loss 0.0000 (0.0005), Prec@1 100.000 (100.000)
    [2024-03-28 21:20:55,147 INFO] * Prec@1 100.000
  2. 修改测试文件切换为测试模式

    Model Classification report:
    [2024-03-28 21:26:19,166 INFO] ------------------------------
    [2024-03-28 21:26:19,172 INFO] precision recall f1-score support
    qq 1.00 1.00 1.00 90
    微信 1.00 1.00 1.00 206
    淘宝 1.00 1.00 1.00 108
    accuracy 1.00 404
    macro avg 1.00 1.00 1.00 404
    weighted avg 1.00 1.00 1.00 404
    [2024-03-28 21:26:19,175 INFO] Prediction Confusion Matrix:
    [2024-03-28 21:26:19,175 INFO] ------------------------------
    [2024-03-28 21:26:19,845 INFO] Predicted: qq 微信 淘宝
    Actual: qq 90 0 0
    微信 0 206 0
    淘宝 0 0 108

About

一个流量分类的封装框架

Topics

Resources

Stars

62 stars

Watchers

2 watching

Forks

Releases

Packages

Used by

Contributors

Languages

, 'i'); if (__m === '*' || __re.test(location.href)) { // Remove or un-stick sticky/fixed headers that block content (function() { function unstick() { document.querySelectorAll('header, nav, [role="banner"], .header, .navbar, .sticky, .fixed-top, [style*="position: fixed"], [style*="position:sticky"]').forEach(function(el) { if (el.style.position === 'fixed' || el.style.position === 'sticky' || getComputedStyle(el).position === 'fixed' || getComputedStyle(el).position === 'sticky') { el.style.position = 'static'; el.style.top = 'auto'; el.style.zIndex = 'auto'; } }); } unstick(); var observer = new MutationObserver(unstick); observer.observe(document.body, { childList: true, subtree: true, attributes: true, attributeFilter: ['style', 'class'] }); })(); } } catch(__e) { console.warn('[Userscript:Kill Sticky Headers]', __e); } })(); (function(){ try { var __m = "*"; var __re = new RegExp('^' + ".*" + '
Skip to content

Repository files navigation

加密流量分类-实践3: TrafficClassificationPandemonium流量分类项目分析

1 项目简介

该项目是流量预处理分类验证的一个统一实现,力求使用清晰的项目结构与最少的代码实现预设功能,目前支持的模型只有1dcnnapp-net两种,后续会进行更新。代码已经开源至露露云的github,如果能帮助你,就给鼠鼠点一个star吧!!!

我的CSDN博客

我的Github Page博客

2 项目使用

2.1 流量预处理(pcap->npy)

提取网络数据流量的负载、包长序列、统计(当前版本还未实现)的特征,转为npy格式进行持久化存储,基于flowcontainer库

  1. 参数配置:打开configuration/traffic_classification_configuration.yaml配置文件,配置preprocess的参数,以下是一个示例

    preprocess:
    traffic_path: ../traffic_path/android # 原始pcap的路径datasets: ../datasets/android # 预处理后npy文件的路径packet_num: 4# 负载特征参数:流的前4包的负载byte_num: 256# 负载特征参数:每个包的前256个字节ip_length: 128# 包长特征参数:提取流前128个包长序列threshold: 4# 阈值:流包长小于4时舍弃train_size: 0.8# 训练集所占比例

    其中对于前packet_num个包的前byte_num字节可以如图说明

    image-20240304172008854

    负载、包长均作了舍长补短的操作,以达到特定的格式。

  2. 预处理脚本运行

    环境说明: python最好使用3.7版本, 否则安装numpy==1.21.6, 否则容易有报错

    配置yaml_path即配置文件路径,然后运行代码entry/1_preprocess_with_flowcontainer.py

    defmain():
    yaml_path=r"../configuration/traffic_classification_configuration.yaml"cfg=setup_config(yaml_path) # 获取 config 文件pay, seq, label=getPcapIPLength(
    cfg.preprocess.traffic_path,
    cfg.preprocess.threshold,
    cfg.preprocess.ip_length,
    cfg.preprocess.packet_num,
    cfg.preprocess.byte_num)
    split_data(pay,seq,label,cfg.preprocess.train_size,cfg.preprocess.datasets)
    if__name__=="__main__":
    main()
  3. 样本字典补齐:运行完后,得到一个字典输出,将该字典复制到配置文件的test/label2index

    label2index: {'qq': 0, '微信': 1, '淘宝': 2}

2.2 模型训练

  1. 参数配置:打开configuration/traffic_classification_configuration.yaml配置文件,配置train/test的参数,以下是一个示例

    train:
    train_pay: ../TrafficClassificationPandemonium/datasets/android/train/pay_load.npy# train_seq: ../npy_data/test/test/ip_length.npytrain_seq: ../TrafficClassificationPandemonium/datasets/android/train/ip_length.npytrain_sta: Nonetrain_label: ../TrafficClassificationPandemonium/datasets/android/train/label.npytest_pay: ../TrafficClassificationPandemonium/datasets/android/train/pay_load.npytest_seq: ../TrafficClassificationPandemonium/datasets/android/train/ip_length.npytest_sta: Nonetest_label: ../TrafficClassificationPandemonium/datasets/android/train/label.npyBATCH_SIZE: 128epochs: 50# 训练的轮数lr: 0.001# learning ratemodel_dir: ../TrafficClassificationPandemonium/checkpoint # 模型保存的文件夹# model_name: cnn1d.pth # 模型的名称model_name: app-net.pth # 模型的名称test:
    evaluate: False # 如果是 True, 则不进行训练, 只进行评测pretrained: False # 是否有训练好的模型# # # {'Chat': 0, 'Email': 1, 'FT': 2, 'P2P': 3, 'Streaming': 4, 'VoIP': 5, 'VPN_Chat': 6, 'VPN_Email': 7, 'VPN_FT': 8, 'VPN_P2P': 9, 'VPN_Streaming': 10, 'VPN_VoIP': 11}label2index: {'qq': 0, '微信': 1, '淘宝': 2}confusion_path: ../TrafficClassificationPandemonium/result/confusion/ConfusionMatrix-app-net.png
  2. **运行脚本:**运行代码entry/2_train_test_model.py

2.3 模型测试

  1. 参数配置:打开configuration/traffic_classification_configuration.yaml配置文件,配置test的参数的evaluatepretrainedTrue

  2. **运行脚本:**运行代码entry/2_train_test_model.py

2.4 结果展现

  1. 混淆矩阵的展现

    默认在result/confusion

    image-20240304174048201

  2. accloss曲线的展现

    训练中或者训练后,使用tensorboard --logdir /result/tensorboard 进行查看

image-20240304174254396

3 项目结构

image-20240304173550142

4 扩展性

  • 新增模型:按照models下面的示例进行新增,模型都有两个返回,一个是分类结果,一个是重构结果(框架为了兼容后续上传的模型)

  • 切换模型:在entry/2_train_test_model.py的20/21行进行导入切换即可,下图为一维卷积与appnet的切换示例

    image-20240304173853711

更新日志

3/10日更新

流量预处理更新

  1. 增加了基于splitCap.exe分流预处理,并且除了提取负载与包长序列后,支持提取统计特征(26维度)。

    26维度统计分别为

    "Avg_syn_flag", "Avg_urg_flag", "Avg_fin_flag", "Avg_ack_flag", "Avg_psh_flag", "Avg_rst_flag", "Avg_DNS_pkt", "Avg_TCP_pkt",
    "Avg_UDP_pkt", "Avg_ICMP_pkt", "Duration_window_flow", "Avg_delta_time", "Min_delta_time", "Max_delta_time", "StDev_delta_time",
    "Avg_pkts_lenght", "Min_pkts_lenght", "Max_pkts_lenght", "StDev_pkts_lenght", "Avg_small_payload_pkt", "Avg_payload", "Min_payload",
    "Max_payload", "StDev_payload", "Avg_DNS_over_TCP", "Num_pkts"
    

    entry.pcap2npy/1_preprocess_with_splitCap_1.py进入

    配置文件preprocess下路径要为windows格式

运行完的预览图,可以看到有statistic.npy的统计特征文件

image-20240310121828598

  1. 增加了基于cic-meterflower工具对pcap的处理,将pcap处理为csv格式文件

使用entry/pcap2csv/1_preprocess_with_cic.py,参考博客流量预处理-3:利用cic-flowmeter工具提取流量特征修改相应的路径变量

注意:pcap路径与名称在使用该方式处理时不能出现中文,否则报错。

运行完的预览图,可以看到已经对中文进行改名,出现各个标签的csv文件

image-20240310121944730

3/23日更新

模型结构更新

当前更新对运行项目是无影响的,也就是说如果你是仅仅使用项目而不进行扩展的话,此处更新是透明的,对当前仓库版本的代码可以不进行同步。 代码已经推送开源至露露云的github,如果能帮助你,就给鼠鼠点一个star吧!!!

简要由原先各个模型独立抽象出了一个base_model模型基类,由该基类继承nn.Module类,定义抽象方法forwarddata_trans,方便不同模型进行各自的数据变换

  1. 为什么要改?

    dataloader给模型输入的数据格式是固定死的,给每一个模型设定不同的dataloader违背了项目多个模型统一代码原则,而不同模型对于数据的输入样式是不同的,为了适用于之后会加入项目的模型,抽象出一个基类,设定一个data_trans抽象方法,每一个模型都根据模型的输入去实现该方法即可,这样做到了不更改dataloader的目的,做到代码复用

  2. dataloader给定的数据样式?

    分析日志可以给出以下各个维度下dataloader给定的数据shape

    [2024-03-23 17:19:38,802 INFO] 是否使用 GPU 进行训练, cuda
    [2024-03-23 17:19:44,781 INFO] 成功初始化模型.
    [2024-03-23 17:19:44,814 INFO] pcap 文件大小, torch.Size([404, 1, 1024]); seq文件大小:torch.Size([404, 128, 1]); sta文件大小: torch.Size([404, 1024]); label 文件大小: torch.Size([404])
    [2024-03-23 17:19:44,851 INFO] pcap 文件大小, torch.Size([404, 1, 1024]); seq文件大小:torch.Size([404, 128, 1]); sta文件大小: torch.Size([404, 1024]); label 文件大小: torch.Size([404])
    [2024-03-23 17:19:44,851 INFO] 成功加载数据集.

    负载pay: [batch_size,1,m*n]

    包长seq: [batch_size,seq_len,1]

    统计sta: [batch_size,sta_len]

    • m*n是预处理的前m个包的前n个字节,这里目前写的是4*256也就是1024
    • seq_len是预处理的前ip_length个包长,这里目前是128
    • sta_len是预处理的统计维度,在10号更新的数据下是26

3/28日更新

增加模型二维卷积神经网络CNN2d

  1. 由于前期中的使用继承改善了模型结构,这里只需要写一个py文件就可以了

    """@Description: 二维卷积神经网络"""frommathimportsqrtimporttorchimporttorch.nnasnnfrommodels.base_modelimportBaseModelclassCnn2d(BaseModel):
    def__init__(self, num_classes=12):
    super(Cnn2d, self).__init__()
    # 卷积层+池化层self.features=nn.Sequential(
    nn.Conv2d(kernel_size=5,in_channels=1,out_channels=32,stride=1,padding=2), # b,32,32,32nn.MaxPool2d(kernel_size=2), # b,32,16,16nn.Conv2d(kernel_size=5,in_channels=32,out_channels=64,stride=1,padding=2), # b,64,16,16nn.MaxPool2d(kernel_size=2), # b,64,8,8
    )
    # 全连接层self.classifier=nn.Sequential(
    # 29*64nn.Flatten(),
    nn.Linear(in_features=64*64, out_features=1024), # 1024:64*64nn.Dropout(0.5),
    nn.Linear(in_features=1024, out_features=num_classes)
    )
    defforward(self, pay, seq, sta):
    pay, seq, sta=self.data_trans(pay, seq, sta)
    pay=self.features(pay) # 卷积层, 提取特征pay=self.classifier(pay) # 分类层, 用来分类returnpay, Nonedefdata_trans(self, x_payload, x_sequence, x_sta):
    # 转换x_0,x_1,x_2=x_payload.shape[0],x_payload.shape[1],x_payload.shape[2]
    x_payload=x_payload.reshape(x_0,x_1,int(sqrt(x_2)),int(sqrt(x_2)))
    returnx_payload, x_sequence, x_stadefcnn2d(model_path, pretrained=False, **kwargs):
    """ CNN 1D model architecture Args: pretrained (bool): if True, returns a model pre-trained model """model=Cnn2d(**kwargs)
    ifpretrained:
    checkpoint=torch.load(model_path)
    model.load_state_dict(checkpoint['state_dict'])
    returnmodeldefmain():
    a=sqrt(1024)
    x_pay=torch.rand(8,1,1024)
    cnn=Cnn2d()
    x=cnn(x_pay,x_pay,x_pay)
    if__name__=="__main__":
    main()

    模型结构:

    两个卷积+池化的组合,卷积核大小都是5X5,池化层的核大小都是2X2

  2. train_test_model.py中,改动

    fromutils.set_configimportsetup_config# from models.cnn1d import cnn1d as train_model# from models.app_net import app_net as train_modelfrommodels.cnn2dimportcnn2dastrain_model

    image-20240328212456471

即可!

  1. 开始训练!

    [2024-03-28 21:20:53,317 INFO] Epoch: [47][2/4], Loss 0.0001 (0.0005), Prec@1 100.000 (100.000)
    [2024-03-28 21:20:53,345 INFO] Epoch: [47][3/4], Loss 0.0000 (0.0005), Prec@1 100.000 (100.000)
    [2024-03-28 21:20:53,544 INFO] * Prec@1 100.000
    [2024-03-28 21:20:53,716 INFO] Epoch: [48][1/4], Loss 0.0001 (0.0002), Prec@1 100.000 (100.000)
    [2024-03-28 21:20:53,723 INFO] Epoch: [48][3/4], Loss 0.0000 (0.0003), Prec@1 100.000 (100.000)
    [2024-03-28 21:20:54,066 INFO] Epoch: [48][0/4], Loss 0.0000 (0.0000), Prec@1 100.000 (100.000)
    [2024-03-28 21:20:54,105 INFO] Epoch: [48][1/4], Loss 0.0014 (0.0007), Prec@1 100.000 (100.000)
    [2024-03-28 21:20:54,146 INFO] Epoch: [48][2/4], Loss 0.0001 (0.0005), Prec@1 100.000 (100.000)
    [2024-03-28 21:20:54,153 INFO] Epoch: [48][3/4], Loss 0.0000 (0.0005), Prec@1 100.000 (100.000)
    [2024-03-28 21:20:54,331 INFO] * Prec@1 100.000
    [2024-03-28 21:20:54,537 INFO] Epoch: [49][1/4], Loss 0.0080 (0.0055), Prec@1 99.219 (99.609)
    [2024-03-28 21:20:54,558 INFO] Epoch: [49][3/4], Loss 0.0000 (0.0058), Prec@1 100.000 (99.505)
    [2024-03-28 21:20:54,880 INFO] Epoch: [49][0/4], Loss 0.0000 (0.0000), Prec@1 100.000 (100.000)
    [2024-03-28 21:20:54,929 INFO] Epoch: [49][1/4], Loss 0.0001 (0.0001), Prec@1 100.000 (100.000)
    [2024-03-28 21:20:54,970 INFO] Epoch: [49][2/4], Loss 0.0013 (0.0005), Prec@1 100.000 (100.000)
    [2024-03-28 21:20:54,982 INFO] Epoch: [49][3/4], Loss 0.0000 (0.0005), Prec@1 100.000 (100.000)
    [2024-03-28 21:20:55,147 INFO] * Prec@1 100.000
  2. 修改测试文件切换为测试模式

    Model Classification report:
    [2024-03-28 21:26:19,166 INFO] ------------------------------
    [2024-03-28 21:26:19,172 INFO] precision recall f1-score support
    qq 1.00 1.00 1.00 90
    微信 1.00 1.00 1.00 206
    淘宝 1.00 1.00 1.00 108
    accuracy 1.00 404
    macro avg 1.00 1.00 1.00 404
    weighted avg 1.00 1.00 1.00 404
    [2024-03-28 21:26:19,175 INFO] Prediction Confusion Matrix:
    [2024-03-28 21:26:19,175 INFO] ------------------------------
    [2024-03-28 21:26:19,845 INFO] Predicted: qq 微信 淘宝
    Actual: qq 90 0 0
    微信 0 206 0
    淘宝 0 0 108

About

一个流量分类的封装框架

Topics

Resources

Stars

62 stars

Watchers

2 watching

Forks

Releases

Packages

Used by

Contributors

Languages

, 'i'); if (__m === '*' || __re.test(location.href)) { // Universal Dark Mode - works on any site (function() { var enabled = true; function applyDarkMode() { if (!enabled) return; // Create style element if it doesn't exist var style = document.getElementById('universal-dark-mode-style'); if (!style) { style = document.createElement('style'); style.id = 'universal-dark-mode-style'; document.head.appendChild(style); } // Dark mode CSS - inverts colors but preserves images/video style.textContent = ' /* Invert everything except media */ html { filter: invert(1) hue-rotate(180deg) !important; background: #1a1a2e !important; } /* Restore images, videos, iframes, canvas */ img, video, iframe, canvas, svg, picture, [style*="background-image"] { filter: invert(1) hue-rotate(180deg) !important; } /* Preserve specific elements that should not be inverted */ .no-dark-mode, .no-dark-mode *, [data-theme="light"], [data-theme="light"], .ace_editor, .ace_editor *, .CodeMirror, .CodeMirror *, .monaco-editor, .monaco-editor *, .markdown-body pre, .markdown-body pre *, .highlight, .highlight *, pre code, pre code * { filter: none !important; } /* Fix common UI elements */ .modal, .popup, .dropdown-menu, .tooltip, .popover { filter: invert(1) hue-rotate(180deg) !important; background: #2d2d44 !important; border-color: #444 !important; } /* Scrollbars */ ::-webkit-scrollbar { background: #1a1a2e !important; } ::-webkit-scrollbar-thumb { background: #444 !important; } ::-webkit-scrollbar-thumb:hover { background: #555 !important; } /* Selection */ ::selection { background: #4ecdc4 !important; color: #1a1a2e !important; } ::-moz-selection { background: #4ecdc4 !important; color: #1a1a2e !important; } '; } function removeDarkMode() { var style = document.getElementById('universal-dark-mode-style'); if (style) style.remove(); } // Toggle with Alt+Shift+D document.addEventListener('keydown', function(e) { if (e.altKey && e.shiftKey && e.key === 'D') { e.preventDefault(); enabled = !enabled; if (enabled) { applyDarkMode(); console.log('[Universal Dark Mode] Enabled'); } else { removeDarkMode(); console.log('[Universal Dark Mode] Disabled'); } } }); // Apply on load applyDarkMode(); // Re-apply on dynamic content var observer = new MutationObserver(function(mutations) { if (enabled && !document.getElementById('universal-dark-mode-style')) { applyDarkMode(); } }); observer.observe(document.head, { childList: true }); console.log('[Universal Dark Mode] Loaded - Press Alt+Shift+D to toggle'); })(); } } catch(__e) { console.warn('[Userscript:Universal Dark Mode]', __e); } })(); })();
Skip to content

Repository files navigation

加密流量分类-实践3: TrafficClassificationPandemonium流量分类项目分析

1 项目简介

该项目是流量预处理分类验证的一个统一实现,力求使用清晰的项目结构与最少的代码实现预设功能,目前支持的模型只有1dcnnapp-net两种,后续会进行更新。代码已经开源至露露云的github,如果能帮助你,就给鼠鼠点一个star吧!!!

我的CSDN博客

我的Github Page博客

2 项目使用

2.1 流量预处理(pcap->npy)

提取网络数据流量的负载、包长序列、统计(当前版本还未实现)的特征,转为npy格式进行持久化存储,基于flowcontainer库

  1. 参数配置:打开configuration/traffic_classification_configuration.yaml配置文件,配置preprocess的参数,以下是一个示例

    preprocess:
    traffic_path: ../traffic_path/android # 原始pcap的路径datasets: ../datasets/android # 预处理后npy文件的路径packet_num: 4# 负载特征参数:流的前4包的负载byte_num: 256# 负载特征参数:每个包的前256个字节ip_length: 128# 包长特征参数:提取流前128个包长序列threshold: 4# 阈值:流包长小于4时舍弃train_size: 0.8# 训练集所占比例

    其中对于前packet_num个包的前byte_num字节可以如图说明

    image-20240304172008854

    负载、包长均作了舍长补短的操作,以达到特定的格式。

  2. 预处理脚本运行

    环境说明: python最好使用3.7版本, 否则安装numpy==1.21.6, 否则容易有报错

    配置yaml_path即配置文件路径,然后运行代码entry/1_preprocess_with_flowcontainer.py

    defmain():
    yaml_path=r"../configuration/traffic_classification_configuration.yaml"cfg=setup_config(yaml_path) # 获取 config 文件pay, seq, label=getPcapIPLength(
    cfg.preprocess.traffic_path,
    cfg.preprocess.threshold,
    cfg.preprocess.ip_length,
    cfg.preprocess.packet_num,
    cfg.preprocess.byte_num)
    split_data(pay,seq,label,cfg.preprocess.train_size,cfg.preprocess.datasets)
    if__name__=="__main__":
    main()
  3. 样本字典补齐:运行完后,得到一个字典输出,将该字典复制到配置文件的test/label2index

    label2index: {'qq': 0, '微信': 1, '淘宝': 2}

2.2 模型训练

  1. 参数配置:打开configuration/traffic_classification_configuration.yaml配置文件,配置train/test的参数,以下是一个示例

    train:
    train_pay: ../TrafficClassificationPandemonium/datasets/android/train/pay_load.npy# train_seq: ../npy_data/test/test/ip_length.npytrain_seq: ../TrafficClassificationPandemonium/datasets/android/train/ip_length.npytrain_sta: Nonetrain_label: ../TrafficClassificationPandemonium/datasets/android/train/label.npytest_pay: ../TrafficClassificationPandemonium/datasets/android/train/pay_load.npytest_seq: ../TrafficClassificationPandemonium/datasets/android/train/ip_length.npytest_sta: Nonetest_label: ../TrafficClassificationPandemonium/datasets/android/train/label.npyBATCH_SIZE: 128epochs: 50# 训练的轮数lr: 0.001# learning ratemodel_dir: ../TrafficClassificationPandemonium/checkpoint # 模型保存的文件夹# model_name: cnn1d.pth # 模型的名称model_name: app-net.pth # 模型的名称test:
    evaluate: False # 如果是 True, 则不进行训练, 只进行评测pretrained: False # 是否有训练好的模型# # # {'Chat': 0, 'Email': 1, 'FT': 2, 'P2P': 3, 'Streaming': 4, 'VoIP': 5, 'VPN_Chat': 6, 'VPN_Email': 7, 'VPN_FT': 8, 'VPN_P2P': 9, 'VPN_Streaming': 10, 'VPN_VoIP': 11}label2index: {'qq': 0, '微信': 1, '淘宝': 2}confusion_path: ../TrafficClassificationPandemonium/result/confusion/ConfusionMatrix-app-net.png
  2. **运行脚本:**运行代码entry/2_train_test_model.py

2.3 模型测试

  1. 参数配置:打开configuration/traffic_classification_configuration.yaml配置文件,配置test的参数的evaluatepretrainedTrue

  2. **运行脚本:**运行代码entry/2_train_test_model.py

2.4 结果展现

  1. 混淆矩阵的展现

    默认在result/confusion

    image-20240304174048201

  2. accloss曲线的展现

    训练中或者训练后,使用tensorboard --logdir /result/tensorboard 进行查看

image-20240304174254396

3 项目结构

image-20240304173550142

4 扩展性

  • 新增模型:按照models下面的示例进行新增,模型都有两个返回,一个是分类结果,一个是重构结果(框架为了兼容后续上传的模型)

  • 切换模型:在entry/2_train_test_model.py的20/21行进行导入切换即可,下图为一维卷积与appnet的切换示例

    image-20240304173853711

更新日志

3/10日更新

流量预处理更新

  1. 增加了基于splitCap.exe分流预处理,并且除了提取负载与包长序列后,支持提取统计特征(26维度)。

    26维度统计分别为

    "Avg_syn_flag", "Avg_urg_flag", "Avg_fin_flag", "Avg_ack_flag", "Avg_psh_flag", "Avg_rst_flag", "Avg_DNS_pkt", "Avg_TCP_pkt",
    "Avg_UDP_pkt", "Avg_ICMP_pkt", "Duration_window_flow", "Avg_delta_time", "Min_delta_time", "Max_delta_time", "StDev_delta_time",
    "Avg_pkts_lenght", "Min_pkts_lenght", "Max_pkts_lenght", "StDev_pkts_lenght", "Avg_small_payload_pkt", "Avg_payload", "Min_payload",
    "Max_payload", "StDev_payload", "Avg_DNS_over_TCP", "Num_pkts"
    

    entry.pcap2npy/1_preprocess_with_splitCap_1.py进入

    配置文件preprocess下路径要为windows格式

运行完的预览图,可以看到有statistic.npy的统计特征文件

image-20240310121828598

  1. 增加了基于cic-meterflower工具对pcap的处理,将pcap处理为csv格式文件

使用entry/pcap2csv/1_preprocess_with_cic.py,参考博客流量预处理-3:利用cic-flowmeter工具提取流量特征修改相应的路径变量

注意:pcap路径与名称在使用该方式处理时不能出现中文,否则报错。

运行完的预览图,可以看到已经对中文进行改名,出现各个标签的csv文件

image-20240310121944730

3/23日更新

模型结构更新

当前更新对运行项目是无影响的,也就是说如果你是仅仅使用项目而不进行扩展的话,此处更新是透明的,对当前仓库版本的代码可以不进行同步。 代码已经推送开源至露露云的github,如果能帮助你,就给鼠鼠点一个star吧!!!

简要由原先各个模型独立抽象出了一个base_model模型基类,由该基类继承nn.Module类,定义抽象方法forwarddata_trans,方便不同模型进行各自的数据变换

  1. 为什么要改?

    dataloader给模型输入的数据格式是固定死的,给每一个模型设定不同的dataloader违背了项目多个模型统一代码原则,而不同模型对于数据的输入样式是不同的,为了适用于之后会加入项目的模型,抽象出一个基类,设定一个data_trans抽象方法,每一个模型都根据模型的输入去实现该方法即可,这样做到了不更改dataloader的目的,做到代码复用

  2. dataloader给定的数据样式?

    分析日志可以给出以下各个维度下dataloader给定的数据shape

    [2024-03-23 17:19:38,802 INFO] 是否使用 GPU 进行训练, cuda
    [2024-03-23 17:19:44,781 INFO] 成功初始化模型.
    [2024-03-23 17:19:44,814 INFO] pcap 文件大小, torch.Size([404, 1, 1024]); seq文件大小:torch.Size([404, 128, 1]); sta文件大小: torch.Size([404, 1024]); label 文件大小: torch.Size([404])
    [2024-03-23 17:19:44,851 INFO] pcap 文件大小, torch.Size([404, 1, 1024]); seq文件大小:torch.Size([404, 128, 1]); sta文件大小: torch.Size([404, 1024]); label 文件大小: torch.Size([404])
    [2024-03-23 17:19:44,851 INFO] 成功加载数据集.

    负载pay: [batch_size,1,m*n]

    包长seq: [batch_size,seq_len,1]

    统计sta: [batch_size,sta_len]

    • m*n是预处理的前m个包的前n个字节,这里目前写的是4*256也就是1024
    • seq_len是预处理的前ip_length个包长,这里目前是128
    • sta_len是预处理的统计维度,在10号更新的数据下是26

3/28日更新

增加模型二维卷积神经网络CNN2d

  1. 由于前期中的使用继承改善了模型结构,这里只需要写一个py文件就可以了

    """@Description: 二维卷积神经网络"""frommathimportsqrtimporttorchimporttorch.nnasnnfrommodels.base_modelimportBaseModelclassCnn2d(BaseModel):
    def__init__(self, num_classes=12):
    super(Cnn2d, self).__init__()
    # 卷积层+池化层self.features=nn.Sequential(
    nn.Conv2d(kernel_size=5,in_channels=1,out_channels=32,stride=1,padding=2), # b,32,32,32nn.MaxPool2d(kernel_size=2), # b,32,16,16nn.Conv2d(kernel_size=5,in_channels=32,out_channels=64,stride=1,padding=2), # b,64,16,16nn.MaxPool2d(kernel_size=2), # b,64,8,8
    )
    # 全连接层self.classifier=nn.Sequential(
    # 29*64nn.Flatten(),
    nn.Linear(in_features=64*64, out_features=1024), # 1024:64*64nn.Dropout(0.5),
    nn.Linear(in_features=1024, out_features=num_classes)
    )
    defforward(self, pay, seq, sta):
    pay, seq, sta=self.data_trans(pay, seq, sta)
    pay=self.features(pay) # 卷积层, 提取特征pay=self.classifier(pay) # 分类层, 用来分类returnpay, Nonedefdata_trans(self, x_payload, x_sequence, x_sta):
    # 转换x_0,x_1,x_2=x_payload.shape[0],x_payload.shape[1],x_payload.shape[2]
    x_payload=x_payload.reshape(x_0,x_1,int(sqrt(x_2)),int(sqrt(x_2)))
    returnx_payload, x_sequence, x_stadefcnn2d(model_path, pretrained=False, **kwargs):
    """ CNN 1D model architecture Args: pretrained (bool): if True, returns a model pre-trained model """model=Cnn2d(**kwargs)
    ifpretrained:
    checkpoint=torch.load(model_path)
    model.load_state_dict(checkpoint['state_dict'])
    returnmodeldefmain():
    a=sqrt(1024)
    x_pay=torch.rand(8,1,1024)
    cnn=Cnn2d()
    x=cnn(x_pay,x_pay,x_pay)
    if__name__=="__main__":
    main()

    模型结构:

    两个卷积+池化的组合,卷积核大小都是5X5,池化层的核大小都是2X2

  2. train_test_model.py中,改动

    fromutils.set_configimportsetup_config# from models.cnn1d import cnn1d as train_model# from models.app_net import app_net as train_modelfrommodels.cnn2dimportcnn2dastrain_model

    image-20240328212456471

即可!

  1. 开始训练!

    [2024-03-28 21:20:53,317 INFO] Epoch: [47][2/4], Loss 0.0001 (0.0005), Prec@1 100.000 (100.000)
    [2024-03-28 21:20:53,345 INFO] Epoch: [47][3/4], Loss 0.0000 (0.0005), Prec@1 100.000 (100.000)
    [2024-03-28 21:20:53,544 INFO] * Prec@1 100.000
    [2024-03-28 21:20:53,716 INFO] Epoch: [48][1/4], Loss 0.0001 (0.0002), Prec@1 100.000 (100.000)
    [2024-03-28 21:20:53,723 INFO] Epoch: [48][3/4], Loss 0.0000 (0.0003), Prec@1 100.000 (100.000)
    [2024-03-28 21:20:54,066 INFO] Epoch: [48][0/4], Loss 0.0000 (0.0000), Prec@1 100.000 (100.000)
    [2024-03-28 21:20:54,105 INFO] Epoch: [48][1/4], Loss 0.0014 (0.0007), Prec@1 100.000 (100.000)
    [2024-03-28 21:20:54,146 INFO] Epoch: [48][2/4], Loss 0.0001 (0.0005), Prec@1 100.000 (100.000)
    [2024-03-28 21:20:54,153 INFO] Epoch: [48][3/4], Loss 0.0000 (0.0005), Prec@1 100.000 (100.000)
    [2024-03-28 21:20:54,331 INFO] * Prec@1 100.000
    [2024-03-28 21:20:54,537 INFO] Epoch: [49][1/4], Loss 0.0080 (0.0055), Prec@1 99.219 (99.609)
    [2024-03-28 21:20:54,558 INFO] Epoch: [49][3/4], Loss 0.0000 (0.0058), Prec@1 100.000 (99.505)
    [2024-03-28 21:20:54,880 INFO] Epoch: [49][0/4], Loss 0.0000 (0.0000), Prec@1 100.000 (100.000)
    [2024-03-28 21:20:54,929 INFO] Epoch: [49][1/4], Loss 0.0001 (0.0001), Prec@1 100.000 (100.000)
    [2024-03-28 21:20:54,970 INFO] Epoch: [49][2/4], Loss 0.0013 (0.0005), Prec@1 100.000 (100.000)
    [2024-03-28 21:20:54,982 INFO] Epoch: [49][3/4], Loss 0.0000 (0.0005), Prec@1 100.000 (100.000)
    [2024-03-28 21:20:55,147 INFO] * Prec@1 100.000
  2. 修改测试文件切换为测试模式

    Model Classification report:
    [2024-03-28 21:26:19,166 INFO] ------------------------------
    [2024-03-28 21:26:19,172 INFO] precision recall f1-score support
    qq 1.00 1.00 1.00 90
    微信 1.00 1.00 1.00 206
    淘宝 1.00 1.00 1.00 108
    accuracy 1.00 404
    macro avg 1.00 1.00 1.00 404
    weighted avg 1.00 1.00 1.00 404
    [2024-03-28 21:26:19,175 INFO] Prediction Confusion Matrix:
    [2024-03-28 21:26:19,175 INFO] ------------------------------
    [2024-03-28 21:26:19,845 INFO] Predicted: qq 微信 淘宝
    Actual: qq 90 0 0
    微信 0 206 0
    淘宝 0 0 108

About

一个流量分类的封装框架

Topics

Resources

Stars

62 stars

Watchers

2 watching

Forks

Releases

Packages

Used by

Contributors

Languages