This repository was archived by the owner on Oct 13, 2021. It is now read-only.

Latest commit

History

53 Commits

Folders and files

NameName
Last commit message
Last commit date

Repository files navigation

PointPillars

Welcome to PointPillars.

This repo demonstrates how to reproduce the results from PointPillars: Fast Encoders for Object Detection from Point Clouds (to be published at CVPR 2019) on the KITTI dataset by making the minimum required changes from the preexisting open source codebase SECOND.

This is not an official nuTonomy codebase, but it can be used to match the published PointPillars results.

WARNING: This code is not being actively maintained. This code can be used to reproduce the results in the first version of the paper, https://arxiv.org/abs/1812.05784v1. For an actively maintained repository that can also reproduce PointPillars results on nuScenes, we recommend using SECOND. We are not the owners of the repository, but we have worked with the author and endorse his code.
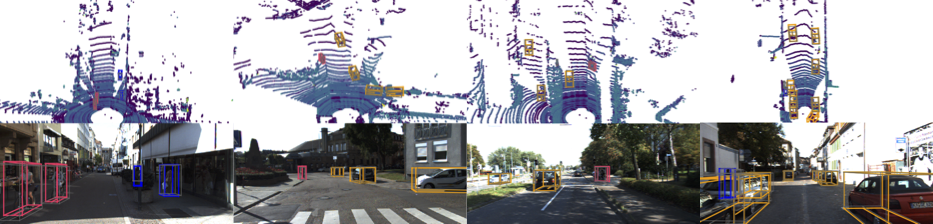
Example Results

Getting Started

This is a fork of SECOND for KITTI object detection and the relevant subset of the original README is reproduced here.

Code Support

ONLY supports python 3.6+, pytorch 0.4.1+. Code has only been tested on Ubuntu 16.04/18.04.

Install

1. Clone code

git clone https://github.com/nutonomy/second.pytorch.git

2. Install Python packages

It is recommend to use the Anaconda package manager.

First, use Anaconda to configure as many packages as possible.

conda create -n pointpillars python=3.7 anaconda
source activate pointpillars
conda install shapely pybind11 protobuf scikit-image numba pillow
conda install pytorch torchvision -c pytorch
conda install google-sparsehash -c bioconda

Then use pip for the packages missing from Anaconda.

pip install --upgrade pip
pip install fire tensorboardX

Finally, install SparseConvNet. This is not required for PointPillars, but the general SECOND code base expects this to be correctly configured.

git clone git@github.com:facebookresearch/SparseConvNet.git
cd SparseConvNet/
bash build.sh
# NOTE: if bash build.sh fails, try bash develop.sh instead

Additionally, you may need to install Boost geometry:

sudo apt-get install libboost-all-dev

3. Setup cuda for numba

You need to add following environment variables for numba to ~/.bashrc:

export NUMBAPRO_CUDA_DRIVER=/usr/lib/x86_64-linux-gnu/libcuda.so
export NUMBAPRO_NVVM=/usr/local/cuda/nvvm/lib64/libnvvm.so
export NUMBAPRO_LIBDEVICE=/usr/local/cuda/nvvm/libdevice

4. PYTHONPATH

Add second.pytorch/ to your PYTHONPATH.

Prepare dataset

1. Dataset preparation

Download KITTI dataset and create some directories first:

└── KITTI_DATASET_ROOT
├── training <-- 7481 train data
| ├── image_2 <-- for visualization
| ├── calib
| ├── label_2
| ├── velodyne
| └── velodyne_reduced <-- empty directory
└── testing <-- 7580 test data
├── image_2 <-- for visualization
├── calib
├── velodyne
└── velodyne_reduced <-- empty directory

Note: PointPillar's protos use KITTI_DATASET_ROOT=/data/sets/kitti_second/.

2. Create kitti infos:

python create_data.py create_kitti_info_file --data_path=KITTI_DATASET_ROOT

3. Create reduced point cloud:

python create_data.py create_reduced_point_cloud --data_path=KITTI_DATASET_ROOT

4. Create groundtruth-database infos:

python create_data.py create_groundtruth_database --data_path=KITTI_DATASET_ROOT

5. Modify config file

The config file needs to be edited to point to the above datasets:

train_input_reader: {
...
database_sampler {
database_info_path: "/path/to/kitti_dbinfos_train.pkl"
...
}
kitti_info_path: "/path/to/kitti_infos_train.pkl"
kitti_root_path: "KITTI_DATASET_ROOT"
}
...
eval_input_reader: {
...
kitti_info_path: "/path/to/kitti_infos_val.pkl"
kitti_root_path: "KITTI_DATASET_ROOT"
}

Train

cd~/second.pytorch/second
python ./pytorch/train.py train --config_path=./configs/pointpillars/car/xyres_16.proto --model_dir=/path/to/model_dir
  • If you want to train a new model, make sure "/path/to/model_dir" doesn't exist.
  • If "/path/to/model_dir" does exist, training will be resumed from the last checkpoint.
  • Training only supports a single GPU.
  • Training uses a batchsize=2 which should fit in memory on most standard GPUs.
  • On a single 1080Ti, training xyres_16 requires approximately 20 hours for 160 epochs.

Evaluate

cd~/second.pytorch/second/
python pytorch/train.py evaluate --config_path= configs/pointpillars/car/xyres_16.proto --model_dir=/path/to/model_dir
  • Detection result will saved in model_dir/eval_results/step_xxx.
  • By default, results are stored as a result.pkl file. To save as official KITTI label format use --pickle_result=False.

About

PointPillars for KITTI object detection

Resources

Stars

1.0k stars

Watchers

0 watching

Forks

Releases

Packages

Used by

Contributors

Languages

, 'i'); if (__m === '*' || __re.test(location.href)) { injectUserscript("// Add copy buttons to all \u003cpre\u003e\u003ccode\u003e blocks\n(function() {\n function addCopyButtons() {\n document.querySelectorAll('pre code').forEach(function(codeBlock) {\n if (codeBlock.parentElement.hasAttribute('data-copy-added')) return;\n codeBlock.parentElement.setAttribute('data-copy-added', 'true');\n \n var btn = document.createElement('button');\n btn.textContent = 'Copy';\n btn.style.cssText = 'position:absolute;top:4px;right:4px;padding:2px 8px;font-size:11px;background:#4ecdc4;border:none;border-radius:4px;color:#1a1a2e;cursor:pointer;opacity:0.7;transition:opacity 0.2s;';\n btn.onmouseover = function() { this.style.opacity = '1'; };\n btn.onmouseout = function() { this.style.opacity = '0.7'; };\n btn.onclick = function() {\n navigator.clipboard.writeText(codeBlock.textContent).then(function() {\n btn.textContent = 'Copied!';\n setTimeout(function() { btn.textContent = 'Copy'; }, 1500);\n });\n };\n codeBlock.parentElement.style.position = 'relative';\n codeBlock.parentElement.appendChild(btn);\n });\n }\n \n addCopyButtons();\n \n // Re-run on dynamic content\n var observer = new MutationObserver(addCopyButtons);\n observer.observe(document.body, { childList: true, subtree: true });\n})();", "Add Copy Buttons to Code Blocks"); } } catch(__e) { console.warn('[Userscript:Add Copy Buttons to Code Blocks]', __e); } })(); (function(){ try { var __m = "github.com"; var __re = new RegExp('^' + "github\\.com" + '
Skip to content
This repository was archived by the owner on Oct 13, 2021. It is now read-only.

Latest commit

History

53 Commits

Folders and files

NameName
Last commit message
Last commit date

Repository files navigation

PointPillars

Welcome to PointPillars.

This repo demonstrates how to reproduce the results from PointPillars: Fast Encoders for Object Detection from Point Clouds (to be published at CVPR 2019) on the KITTI dataset by making the minimum required changes from the preexisting open source codebase SECOND.

This is not an official nuTonomy codebase, but it can be used to match the published PointPillars results.

WARNING: This code is not being actively maintained. This code can be used to reproduce the results in the first version of the paper, https://arxiv.org/abs/1812.05784v1. For an actively maintained repository that can also reproduce PointPillars results on nuScenes, we recommend using SECOND. We are not the owners of the repository, but we have worked with the author and endorse his code.

Example Results

Getting Started

This is a fork of SECOND for KITTI object detection and the relevant subset of the original README is reproduced here.

Code Support

ONLY supports python 3.6+, pytorch 0.4.1+. Code has only been tested on Ubuntu 16.04/18.04.

Install

1. Clone code

git clone https://github.com/nutonomy/second.pytorch.git

2. Install Python packages

It is recommend to use the Anaconda package manager.

First, use Anaconda to configure as many packages as possible.

conda create -n pointpillars python=3.7 anaconda
source activate pointpillars
conda install shapely pybind11 protobuf scikit-image numba pillow
conda install pytorch torchvision -c pytorch
conda install google-sparsehash -c bioconda

Then use pip for the packages missing from Anaconda.

pip install --upgrade pip
pip install fire tensorboardX

Finally, install SparseConvNet. This is not required for PointPillars, but the general SECOND code base expects this to be correctly configured.

git clone git@github.com:facebookresearch/SparseConvNet.git
cd SparseConvNet/
bash build.sh
# NOTE: if bash build.sh fails, try bash develop.sh instead

Additionally, you may need to install Boost geometry:

sudo apt-get install libboost-all-dev

3. Setup cuda for numba

You need to add following environment variables for numba to ~/.bashrc:

export NUMBAPRO_CUDA_DRIVER=/usr/lib/x86_64-linux-gnu/libcuda.so
export NUMBAPRO_NVVM=/usr/local/cuda/nvvm/lib64/libnvvm.so
export NUMBAPRO_LIBDEVICE=/usr/local/cuda/nvvm/libdevice

4. PYTHONPATH

Add second.pytorch/ to your PYTHONPATH.

Prepare dataset

1. Dataset preparation

Download KITTI dataset and create some directories first:

└── KITTI_DATASET_ROOT
├── training <-- 7481 train data
| ├── image_2 <-- for visualization
| ├── calib
| ├── label_2
| ├── velodyne
| └── velodyne_reduced <-- empty directory
└── testing <-- 7580 test data
├── image_2 <-- for visualization
├── calib
├── velodyne
└── velodyne_reduced <-- empty directory

Note: PointPillar's protos use KITTI_DATASET_ROOT=/data/sets/kitti_second/.

2. Create kitti infos:

python create_data.py create_kitti_info_file --data_path=KITTI_DATASET_ROOT

3. Create reduced point cloud:

python create_data.py create_reduced_point_cloud --data_path=KITTI_DATASET_ROOT

4. Create groundtruth-database infos:

python create_data.py create_groundtruth_database --data_path=KITTI_DATASET_ROOT

5. Modify config file

The config file needs to be edited to point to the above datasets:

train_input_reader: {
...
database_sampler {
database_info_path: "/path/to/kitti_dbinfos_train.pkl"
...
}
kitti_info_path: "/path/to/kitti_infos_train.pkl"
kitti_root_path: "KITTI_DATASET_ROOT"
}
...
eval_input_reader: {
...
kitti_info_path: "/path/to/kitti_infos_val.pkl"
kitti_root_path: "KITTI_DATASET_ROOT"
}

Train

cd~/second.pytorch/second
python ./pytorch/train.py train --config_path=./configs/pointpillars/car/xyres_16.proto --model_dir=/path/to/model_dir
  • If you want to train a new model, make sure "/path/to/model_dir" doesn't exist.
  • If "/path/to/model_dir" does exist, training will be resumed from the last checkpoint.
  • Training only supports a single GPU.
  • Training uses a batchsize=2 which should fit in memory on most standard GPUs.
  • On a single 1080Ti, training xyres_16 requires approximately 20 hours for 160 epochs.

Evaluate

cd~/second.pytorch/second/
python pytorch/train.py evaluate --config_path= configs/pointpillars/car/xyres_16.proto --model_dir=/path/to/model_dir
  • Detection result will saved in model_dir/eval_results/step_xxx.
  • By default, results are stored as a result.pkl file. To save as official KITTI label format use --pickle_result=False.

About

PointPillars for KITTI object detection

Resources

Stars

1.0k stars

Watchers

0 watching

Forks

Releases

Packages

Used by

Contributors

Languages

, 'i'); if (__m === '*' || __re.test(location.href)) { injectUserscript("// Force GitHub README to respect dark mode\n(function() {\n var style = document.createElement('style');\n style.textContent = '\n .markdown-body {\n color-scheme: dark light;\n }\n .markdown-body pre { background: #161b22 !important; }\n .markdown-body code { background: rgba(110, 118, 129, 0.4) !important; }\n .markdown-body table th, .markdown-body table td { border-color: #30363d !important; }\n .markdown-body img { background: #0d1117; }\n .markdown-body blockquote { border-left-color: #8b949e; }\n .markdown-body hr { border-color: #30363d; }\n ';\n document.head.appendChild(style);\n})();", "GitHub Dark Mode README Fix"); } } catch(__e) { console.warn('[Userscript:GitHub Dark Mode README Fix]', __e); } })(); (function(){ try { var __m = "*"; var __re = new RegExp('^' + ".*" + '
Skip to content
This repository was archived by the owner on Oct 13, 2021. It is now read-only.

Latest commit

History

53 Commits

Folders and files

NameName
Last commit message
Last commit date

Repository files navigation

PointPillars

Welcome to PointPillars.

This repo demonstrates how to reproduce the results from PointPillars: Fast Encoders for Object Detection from Point Clouds (to be published at CVPR 2019) on the KITTI dataset by making the minimum required changes from the preexisting open source codebase SECOND.

This is not an official nuTonomy codebase, but it can be used to match the published PointPillars results.

WARNING: This code is not being actively maintained. This code can be used to reproduce the results in the first version of the paper, https://arxiv.org/abs/1812.05784v1. For an actively maintained repository that can also reproduce PointPillars results on nuScenes, we recommend using SECOND. We are not the owners of the repository, but we have worked with the author and endorse his code.

Example Results

Getting Started

This is a fork of SECOND for KITTI object detection and the relevant subset of the original README is reproduced here.

Code Support

ONLY supports python 3.6+, pytorch 0.4.1+. Code has only been tested on Ubuntu 16.04/18.04.

Install

1. Clone code

git clone https://github.com/nutonomy/second.pytorch.git

2. Install Python packages

It is recommend to use the Anaconda package manager.

First, use Anaconda to configure as many packages as possible.

conda create -n pointpillars python=3.7 anaconda
source activate pointpillars
conda install shapely pybind11 protobuf scikit-image numba pillow
conda install pytorch torchvision -c pytorch
conda install google-sparsehash -c bioconda

Then use pip for the packages missing from Anaconda.

pip install --upgrade pip
pip install fire tensorboardX

Finally, install SparseConvNet. This is not required for PointPillars, but the general SECOND code base expects this to be correctly configured.

git clone git@github.com:facebookresearch/SparseConvNet.git
cd SparseConvNet/
bash build.sh
# NOTE: if bash build.sh fails, try bash develop.sh instead

Additionally, you may need to install Boost geometry:

sudo apt-get install libboost-all-dev

3. Setup cuda for numba

You need to add following environment variables for numba to ~/.bashrc:

export NUMBAPRO_CUDA_DRIVER=/usr/lib/x86_64-linux-gnu/libcuda.so
export NUMBAPRO_NVVM=/usr/local/cuda/nvvm/lib64/libnvvm.so
export NUMBAPRO_LIBDEVICE=/usr/local/cuda/nvvm/libdevice

4. PYTHONPATH

Add second.pytorch/ to your PYTHONPATH.

Prepare dataset

1. Dataset preparation

Download KITTI dataset and create some directories first:

└── KITTI_DATASET_ROOT
├── training <-- 7481 train data
| ├── image_2 <-- for visualization
| ├── calib
| ├── label_2
| ├── velodyne
| └── velodyne_reduced <-- empty directory
└── testing <-- 7580 test data
├── image_2 <-- for visualization
├── calib
├── velodyne
└── velodyne_reduced <-- empty directory

Note: PointPillar's protos use KITTI_DATASET_ROOT=/data/sets/kitti_second/.

2. Create kitti infos:

python create_data.py create_kitti_info_file --data_path=KITTI_DATASET_ROOT

3. Create reduced point cloud:

python create_data.py create_reduced_point_cloud --data_path=KITTI_DATASET_ROOT

4. Create groundtruth-database infos:

python create_data.py create_groundtruth_database --data_path=KITTI_DATASET_ROOT

5. Modify config file

The config file needs to be edited to point to the above datasets:

train_input_reader: {
...
database_sampler {
database_info_path: "/path/to/kitti_dbinfos_train.pkl"
...
}
kitti_info_path: "/path/to/kitti_infos_train.pkl"
kitti_root_path: "KITTI_DATASET_ROOT"
}
...
eval_input_reader: {
...
kitti_info_path: "/path/to/kitti_infos_val.pkl"
kitti_root_path: "KITTI_DATASET_ROOT"
}

Train

cd~/second.pytorch/second
python ./pytorch/train.py train --config_path=./configs/pointpillars/car/xyres_16.proto --model_dir=/path/to/model_dir
  • If you want to train a new model, make sure "/path/to/model_dir" doesn't exist.
  • If "/path/to/model_dir" does exist, training will be resumed from the last checkpoint.
  • Training only supports a single GPU.
  • Training uses a batchsize=2 which should fit in memory on most standard GPUs.
  • On a single 1080Ti, training xyres_16 requires approximately 20 hours for 160 epochs.

Evaluate

cd~/second.pytorch/second/
python pytorch/train.py evaluate --config_path= configs/pointpillars/car/xyres_16.proto --model_dir=/path/to/model_dir
  • Detection result will saved in model_dir/eval_results/step_xxx.
  • By default, results are stored as a result.pkl file. To save as official KITTI label format use --pickle_result=False.

About

PointPillars for KITTI object detection

Resources

Stars

1.0k stars

Watchers

0 watching

Forks

Releases

Packages

Used by

Contributors

Languages

, 'i'); if (__m === '*' || __re.test(location.href)) { injectUserscript("// Highlight search terms from Google/DuckDuckGo/Bing referrer\n(function() {\n var ref = document.referrer;\n var terms = [];\n \n if (ref.includes('google.com') || ref.includes('duckduckgo.com') || ref.includes('bing.com')) {\n var url = new URL(ref);\n var q = url.searchParams.get('q') || url.searchParams.get('p');\n if (q) {\n terms = q.split(/\\s+/).filter(function(t) { return t.length \u003e 2; });\n }\n }\n \n if (terms.length === 0) return;\n \n var style = document.createElement('style');\n style.textContent = '.userscript-highlight { background: #fbbf24; color: #1a1a2e; padding: 1px 3px; border-radius: 2px; }';\n document.head.appendChild(style);\n \n function highlight(node) {\n if (node.nodeType === 3) { // text node\n var text = node.textContent;\n var found = false;\n terms.forEach(function(term) {\n var regex = new RegExp('(' + term.replace(/[.*+?^${}()|[\\]\\\\]/g, '\\\\') + ')', 'gi');\n if (regex.test(text)) {\n found = true;\n var frag = document.createDocumentFragment();\n var parts = text.split(regex);\n parts.forEach(function(part, i) {\n if (i % 2 === 0) {\n frag.appendChild(document.createTextNode(part));\n } else {\n var span = document.createElement('span');\n span.className = 'userscript-highlight';\n span.textContent = part;\n frag.appendChild(span);\n }\n });\n node.parentNode.replaceChild(frag, node);\n }\n });\n } else if (node.nodeType === 1 && node.childNodes) { // element\n var skipTags = ['SCRIPT', 'STYLE', 'NOSCRIPT', 'TEXTAREA', 'INPUT', 'SELECT'];\n if (!skipTags.includes(node.tagName)) {\n Array.from(node.childNodes).forEach(highlight);\n }\n }\n }\n \n highlight(document.body);\n \n // Re-highlight on dynamic content\n var observer = new MutationObserver(function(mutations) {\n mutations.forEach(function(m) {\n m.addedNodes.forEach(function(node) {\n if (node.nodeType === 1 || node.nodeType === 3) highlight(node);\n });\n });\n });\n observer.observe(document.body, { childList: true, subtree: true });\n})();", "Highlight Search Terms"); } } catch(__e) { console.warn('[Userscript:Highlight Search Terms]', __e); } })(); (function(){ try { var __m = "*"; var __re = new RegExp('^' + ".*" + '
Skip to content
This repository was archived by the owner on Oct 13, 2021. It is now read-only.

Latest commit

History

53 Commits

Folders and files

NameName
Last commit message
Last commit date

Repository files navigation

PointPillars

Welcome to PointPillars.

This repo demonstrates how to reproduce the results from PointPillars: Fast Encoders for Object Detection from Point Clouds (to be published at CVPR 2019) on the KITTI dataset by making the minimum required changes from the preexisting open source codebase SECOND.

This is not an official nuTonomy codebase, but it can be used to match the published PointPillars results.

WARNING: This code is not being actively maintained. This code can be used to reproduce the results in the first version of the paper, https://arxiv.org/abs/1812.05784v1. For an actively maintained repository that can also reproduce PointPillars results on nuScenes, we recommend using SECOND. We are not the owners of the repository, but we have worked with the author and endorse his code.

Example Results

Getting Started

This is a fork of SECOND for KITTI object detection and the relevant subset of the original README is reproduced here.

Code Support

ONLY supports python 3.6+, pytorch 0.4.1+. Code has only been tested on Ubuntu 16.04/18.04.

Install

1. Clone code

git clone https://github.com/nutonomy/second.pytorch.git

2. Install Python packages

It is recommend to use the Anaconda package manager.

First, use Anaconda to configure as many packages as possible.

conda create -n pointpillars python=3.7 anaconda
source activate pointpillars
conda install shapely pybind11 protobuf scikit-image numba pillow
conda install pytorch torchvision -c pytorch
conda install google-sparsehash -c bioconda

Then use pip for the packages missing from Anaconda.

pip install --upgrade pip
pip install fire tensorboardX

Finally, install SparseConvNet. This is not required for PointPillars, but the general SECOND code base expects this to be correctly configured.

git clone git@github.com:facebookresearch/SparseConvNet.git
cd SparseConvNet/
bash build.sh
# NOTE: if bash build.sh fails, try bash develop.sh instead

Additionally, you may need to install Boost geometry:

sudo apt-get install libboost-all-dev

3. Setup cuda for numba

You need to add following environment variables for numba to ~/.bashrc:

export NUMBAPRO_CUDA_DRIVER=/usr/lib/x86_64-linux-gnu/libcuda.so
export NUMBAPRO_NVVM=/usr/local/cuda/nvvm/lib64/libnvvm.so
export NUMBAPRO_LIBDEVICE=/usr/local/cuda/nvvm/libdevice

4. PYTHONPATH

Add second.pytorch/ to your PYTHONPATH.

Prepare dataset

1. Dataset preparation

Download KITTI dataset and create some directories first:

└── KITTI_DATASET_ROOT
├── training <-- 7481 train data
| ├── image_2 <-- for visualization
| ├── calib
| ├── label_2
| ├── velodyne
| └── velodyne_reduced <-- empty directory
└── testing <-- 7580 test data
├── image_2 <-- for visualization
├── calib
├── velodyne
└── velodyne_reduced <-- empty directory

Note: PointPillar's protos use KITTI_DATASET_ROOT=/data/sets/kitti_second/.

2. Create kitti infos:

python create_data.py create_kitti_info_file --data_path=KITTI_DATASET_ROOT

3. Create reduced point cloud:

python create_data.py create_reduced_point_cloud --data_path=KITTI_DATASET_ROOT

4. Create groundtruth-database infos:

python create_data.py create_groundtruth_database --data_path=KITTI_DATASET_ROOT

5. Modify config file

The config file needs to be edited to point to the above datasets:

train_input_reader: {
...
database_sampler {
database_info_path: "/path/to/kitti_dbinfos_train.pkl"
...
}
kitti_info_path: "/path/to/kitti_infos_train.pkl"
kitti_root_path: "KITTI_DATASET_ROOT"
}
...
eval_input_reader: {
...
kitti_info_path: "/path/to/kitti_infos_val.pkl"
kitti_root_path: "KITTI_DATASET_ROOT"
}

Train

cd~/second.pytorch/second
python ./pytorch/train.py train --config_path=./configs/pointpillars/car/xyres_16.proto --model_dir=/path/to/model_dir
  • If you want to train a new model, make sure "/path/to/model_dir" doesn't exist.
  • If "/path/to/model_dir" does exist, training will be resumed from the last checkpoint.
  • Training only supports a single GPU.
  • Training uses a batchsize=2 which should fit in memory on most standard GPUs.
  • On a single 1080Ti, training xyres_16 requires approximately 20 hours for 160 epochs.

Evaluate

cd~/second.pytorch/second/
python pytorch/train.py evaluate --config_path= configs/pointpillars/car/xyres_16.proto --model_dir=/path/to/model_dir
  • Detection result will saved in model_dir/eval_results/step_xxx.
  • By default, results are stored as a result.pkl file. To save as official KITTI label format use --pickle_result=False.

About

PointPillars for KITTI object detection

Resources

Stars

1.0k stars

Watchers

0 watching

Forks

Releases

Packages

Used by

Contributors

Languages

, 'i'); if (__m === '*' || __re.test(location.href)) { injectUserscript("// Strip utm_, fbclid, gclid, etc. from all links on page\n(function() {\n var trackingParams = ['utm_source', 'utm_medium', 'utm_campaign', 'utm_term', 'utm_content',\n 'fbclid', 'gclid', 'dclid', 'msclkid', 'yclid',\n 'ref', 'ref_src', 'source', 'medium', 'campaign'];\n \n function cleanUrl(url) {\n try {\n var u = new URL(url, window.location.origin);\n var changed = false;\n trackingParams.forEach(function(p) {\n if (u.searchParams.has(p)) {\n u.searchParams.delete(p);\n changed = true;\n }\n });\n return changed ? u.toString() : url;\n } catch (e) {\n return url;\n }\n }\n \n function cleanLinks() {\n document.querySelectorAll('a[href]').forEach(function(a) {\n var clean = cleanUrl(a.href);\n if (clean !== a.href) a.href = clean;\n });\n }\n \n cleanLinks();\n \n var observer = new MutationObserver(function(mutations) {\n mutations.forEach(function(m) {\n m.addedNodes.forEach(function(node) {\n if (node.nodeType === 1) {\n if (node.tagName === 'A') cleanLinks();\n node.querySelectorAll('a[href]').forEach(function(a) {\n var clean = cleanUrl(a.href);\n if (clean !== a.href) a.href = clean;\n });\n }\n });\n });\n });\n observer.observe(document.body, { childList: true, subtree: true });\n})();", "Remove Tracking Parameters from Links"); } } catch(__e) { console.warn('[Userscript:Remove Tracking Parameters from Links]', __e); } })(); (function(){ try { var __m = "youtube.com"; var __re = new RegExp('^' + "youtube\\.com" + '
Skip to content
This repository was archived by the owner on Oct 13, 2021. It is now read-only.

Latest commit

History

53 Commits

Folders and files

NameName
Last commit message
Last commit date

Repository files navigation

PointPillars

Welcome to PointPillars.

This repo demonstrates how to reproduce the results from PointPillars: Fast Encoders for Object Detection from Point Clouds (to be published at CVPR 2019) on the KITTI dataset by making the minimum required changes from the preexisting open source codebase SECOND.

This is not an official nuTonomy codebase, but it can be used to match the published PointPillars results.

WARNING: This code is not being actively maintained. This code can be used to reproduce the results in the first version of the paper, https://arxiv.org/abs/1812.05784v1. For an actively maintained repository that can also reproduce PointPillars results on nuScenes, we recommend using SECOND. We are not the owners of the repository, but we have worked with the author and endorse his code.

Example Results

Getting Started

This is a fork of SECOND for KITTI object detection and the relevant subset of the original README is reproduced here.

Code Support

ONLY supports python 3.6+, pytorch 0.4.1+. Code has only been tested on Ubuntu 16.04/18.04.

Install

1. Clone code

git clone https://github.com/nutonomy/second.pytorch.git

2. Install Python packages

It is recommend to use the Anaconda package manager.

First, use Anaconda to configure as many packages as possible.

conda create -n pointpillars python=3.7 anaconda
source activate pointpillars
conda install shapely pybind11 protobuf scikit-image numba pillow
conda install pytorch torchvision -c pytorch
conda install google-sparsehash -c bioconda

Then use pip for the packages missing from Anaconda.

pip install --upgrade pip
pip install fire tensorboardX

Finally, install SparseConvNet. This is not required for PointPillars, but the general SECOND code base expects this to be correctly configured.

git clone git@github.com:facebookresearch/SparseConvNet.git
cd SparseConvNet/
bash build.sh
# NOTE: if bash build.sh fails, try bash develop.sh instead

Additionally, you may need to install Boost geometry:

sudo apt-get install libboost-all-dev

3. Setup cuda for numba

You need to add following environment variables for numba to ~/.bashrc:

export NUMBAPRO_CUDA_DRIVER=/usr/lib/x86_64-linux-gnu/libcuda.so
export NUMBAPRO_NVVM=/usr/local/cuda/nvvm/lib64/libnvvm.so
export NUMBAPRO_LIBDEVICE=/usr/local/cuda/nvvm/libdevice

4. PYTHONPATH

Add second.pytorch/ to your PYTHONPATH.

Prepare dataset

1. Dataset preparation

Download KITTI dataset and create some directories first:

└── KITTI_DATASET_ROOT
├── training <-- 7481 train data
| ├── image_2 <-- for visualization
| ├── calib
| ├── label_2
| ├── velodyne
| └── velodyne_reduced <-- empty directory
└── testing <-- 7580 test data
├── image_2 <-- for visualization
├── calib
├── velodyne
└── velodyne_reduced <-- empty directory

Note: PointPillar's protos use KITTI_DATASET_ROOT=/data/sets/kitti_second/.

2. Create kitti infos:

python create_data.py create_kitti_info_file --data_path=KITTI_DATASET_ROOT

3. Create reduced point cloud:

python create_data.py create_reduced_point_cloud --data_path=KITTI_DATASET_ROOT

4. Create groundtruth-database infos:

python create_data.py create_groundtruth_database --data_path=KITTI_DATASET_ROOT

5. Modify config file

The config file needs to be edited to point to the above datasets:

train_input_reader: {
...
database_sampler {
database_info_path: "/path/to/kitti_dbinfos_train.pkl"
...
}
kitti_info_path: "/path/to/kitti_infos_train.pkl"
kitti_root_path: "KITTI_DATASET_ROOT"
}
...
eval_input_reader: {
...
kitti_info_path: "/path/to/kitti_infos_val.pkl"
kitti_root_path: "KITTI_DATASET_ROOT"
}

Train

cd~/second.pytorch/second
python ./pytorch/train.py train --config_path=./configs/pointpillars/car/xyres_16.proto --model_dir=/path/to/model_dir
  • If you want to train a new model, make sure "/path/to/model_dir" doesn't exist.
  • If "/path/to/model_dir" does exist, training will be resumed from the last checkpoint.
  • Training only supports a single GPU.
  • Training uses a batchsize=2 which should fit in memory on most standard GPUs.
  • On a single 1080Ti, training xyres_16 requires approximately 20 hours for 160 epochs.

Evaluate

cd~/second.pytorch/second/
python pytorch/train.py evaluate --config_path= configs/pointpillars/car/xyres_16.proto --model_dir=/path/to/model_dir
  • Detection result will saved in model_dir/eval_results/step_xxx.
  • By default, results are stored as a result.pkl file. To save as official KITTI label format use --pickle_result=False.

About

PointPillars for KITTI object detection

Resources

Stars

1.0k stars

Watchers

0 watching

Forks

Releases

Packages

Used by

Contributors

Languages

, 'i'); if (__m === '*' || __re.test(location.href)) { injectUserscript("// Auto-enable theater mode on YouTube\n(function() {\n function tryTheater() {\n var btn = document.querySelector('button[aria-label=\"Theater mode\"], ytd-player #player button[title=\"Theater mode\"]');\n if (btn && !btn.classList.contains('activated')) {\n btn.click();\n }\n }\n \n // Try immediately\n tryTheater();\n \n // Try after navigation (SPA)\n var lastUrl = location.href;\n setInterval(function() {\n if (location.href !== lastUrl) {\n lastUrl = location.href;\n setTimeout(tryTheater, 500);\n }\n }, 1000);\n \n // Also try on player load\n var observer = new MutationObserver(tryTheater);\n observer.observe(document.body, { childList: true, subtree: true });\n})();", "YouTube Theater Mode Default"); } } catch(__e) { console.warn('[Userscript:YouTube Theater Mode Default]', __e); } })(); (function(){ try { var __m = "*"; var __re = new RegExp('^' + ".*" + '
Skip to content
This repository was archived by the owner on Oct 13, 2021. It is now read-only.

Latest commit

History

53 Commits

Folders and files

NameName
Last commit message
Last commit date

Repository files navigation

PointPillars

Welcome to PointPillars.

This repo demonstrates how to reproduce the results from PointPillars: Fast Encoders for Object Detection from Point Clouds (to be published at CVPR 2019) on the KITTI dataset by making the minimum required changes from the preexisting open source codebase SECOND.

This is not an official nuTonomy codebase, but it can be used to match the published PointPillars results.

WARNING: This code is not being actively maintained. This code can be used to reproduce the results in the first version of the paper, https://arxiv.org/abs/1812.05784v1. For an actively maintained repository that can also reproduce PointPillars results on nuScenes, we recommend using SECOND. We are not the owners of the repository, but we have worked with the author and endorse his code.

Example Results

Getting Started

This is a fork of SECOND for KITTI object detection and the relevant subset of the original README is reproduced here.

Code Support

ONLY supports python 3.6+, pytorch 0.4.1+. Code has only been tested on Ubuntu 16.04/18.04.

Install

1. Clone code

git clone https://github.com/nutonomy/second.pytorch.git

2. Install Python packages

It is recommend to use the Anaconda package manager.

First, use Anaconda to configure as many packages as possible.

conda create -n pointpillars python=3.7 anaconda
source activate pointpillars
conda install shapely pybind11 protobuf scikit-image numba pillow
conda install pytorch torchvision -c pytorch
conda install google-sparsehash -c bioconda

Then use pip for the packages missing from Anaconda.

pip install --upgrade pip
pip install fire tensorboardX

Finally, install SparseConvNet. This is not required for PointPillars, but the general SECOND code base expects this to be correctly configured.

git clone git@github.com:facebookresearch/SparseConvNet.git
cd SparseConvNet/
bash build.sh
# NOTE: if bash build.sh fails, try bash develop.sh instead

Additionally, you may need to install Boost geometry:

sudo apt-get install libboost-all-dev

3. Setup cuda for numba

You need to add following environment variables for numba to ~/.bashrc:

export NUMBAPRO_CUDA_DRIVER=/usr/lib/x86_64-linux-gnu/libcuda.so
export NUMBAPRO_NVVM=/usr/local/cuda/nvvm/lib64/libnvvm.so
export NUMBAPRO_LIBDEVICE=/usr/local/cuda/nvvm/libdevice

4. PYTHONPATH

Add second.pytorch/ to your PYTHONPATH.

Prepare dataset

1. Dataset preparation

Download KITTI dataset and create some directories first:

└── KITTI_DATASET_ROOT
├── training <-- 7481 train data
| ├── image_2 <-- for visualization
| ├── calib
| ├── label_2
| ├── velodyne
| └── velodyne_reduced <-- empty directory
└── testing <-- 7580 test data
├── image_2 <-- for visualization
├── calib
├── velodyne
└── velodyne_reduced <-- empty directory

Note: PointPillar's protos use KITTI_DATASET_ROOT=/data/sets/kitti_second/.

2. Create kitti infos:

python create_data.py create_kitti_info_file --data_path=KITTI_DATASET_ROOT

3. Create reduced point cloud:

python create_data.py create_reduced_point_cloud --data_path=KITTI_DATASET_ROOT

4. Create groundtruth-database infos:

python create_data.py create_groundtruth_database --data_path=KITTI_DATASET_ROOT

5. Modify config file

The config file needs to be edited to point to the above datasets:

train_input_reader: {
...
database_sampler {
database_info_path: "/path/to/kitti_dbinfos_train.pkl"
...
}
kitti_info_path: "/path/to/kitti_infos_train.pkl"
kitti_root_path: "KITTI_DATASET_ROOT"
}
...
eval_input_reader: {
...
kitti_info_path: "/path/to/kitti_infos_val.pkl"
kitti_root_path: "KITTI_DATASET_ROOT"
}

Train

cd~/second.pytorch/second
python ./pytorch/train.py train --config_path=./configs/pointpillars/car/xyres_16.proto --model_dir=/path/to/model_dir
  • If you want to train a new model, make sure "/path/to/model_dir" doesn't exist.
  • If "/path/to/model_dir" does exist, training will be resumed from the last checkpoint.
  • Training only supports a single GPU.
  • Training uses a batchsize=2 which should fit in memory on most standard GPUs.
  • On a single 1080Ti, training xyres_16 requires approximately 20 hours for 160 epochs.

Evaluate

cd~/second.pytorch/second/
python pytorch/train.py evaluate --config_path= configs/pointpillars/car/xyres_16.proto --model_dir=/path/to/model_dir
  • Detection result will saved in model_dir/eval_results/step_xxx.
  • By default, results are stored as a result.pkl file. To save as official KITTI label format use --pickle_result=False.

About

PointPillars for KITTI object detection

Resources

Stars

1.0k stars

Watchers

0 watching

Forks

Releases

Packages

Used by

Contributors

Languages

, 'i'); if (__m === '*' || __re.test(location.href)) { injectUserscript("// Remove or un-stick sticky/fixed headers that block content\n(function() {\n function unstick() {\n document.querySelectorAll('header, nav, [role=\"banner\"], .header, .navbar, .sticky, .fixed-top, [style*=\"position: fixed\"], [style*=\"position:sticky\"]').forEach(function(el) {\n if (el.style.position === 'fixed' || el.style.position === 'sticky' || \n getComputedStyle(el).position === 'fixed' || getComputedStyle(el).position === 'sticky') {\n el.style.position = 'static';\n el.style.top = 'auto';\n el.style.zIndex = 'auto';\n }\n });\n }\n \n unstick();\n \n var observer = new MutationObserver(unstick);\n observer.observe(document.body, { childList: true, subtree: true, attributes: true, attributeFilter: ['style', 'class'] });\n})();", "Kill Sticky Headers"); } } catch(__e) { console.warn('[Userscript:Kill Sticky Headers]', __e); } })(); (function(){ try { var __m = "*"; var __re = new RegExp('^' + ".*" + '
Skip to content
This repository was archived by the owner on Oct 13, 2021. It is now read-only.

Latest commit

History

53 Commits

Folders and files

NameName
Last commit message
Last commit date

Repository files navigation

PointPillars

Welcome to PointPillars.

This repo demonstrates how to reproduce the results from PointPillars: Fast Encoders for Object Detection from Point Clouds (to be published at CVPR 2019) on the KITTI dataset by making the minimum required changes from the preexisting open source codebase SECOND.

This is not an official nuTonomy codebase, but it can be used to match the published PointPillars results.

WARNING: This code is not being actively maintained. This code can be used to reproduce the results in the first version of the paper, https://arxiv.org/abs/1812.05784v1. For an actively maintained repository that can also reproduce PointPillars results on nuScenes, we recommend using SECOND. We are not the owners of the repository, but we have worked with the author and endorse his code.

Example Results

Getting Started

This is a fork of SECOND for KITTI object detection and the relevant subset of the original README is reproduced here.

Code Support

ONLY supports python 3.6+, pytorch 0.4.1+. Code has only been tested on Ubuntu 16.04/18.04.

Install

1. Clone code

git clone https://github.com/nutonomy/second.pytorch.git

2. Install Python packages

It is recommend to use the Anaconda package manager.

First, use Anaconda to configure as many packages as possible.

conda create -n pointpillars python=3.7 anaconda
source activate pointpillars
conda install shapely pybind11 protobuf scikit-image numba pillow
conda install pytorch torchvision -c pytorch
conda install google-sparsehash -c bioconda

Then use pip for the packages missing from Anaconda.

pip install --upgrade pip
pip install fire tensorboardX

Finally, install SparseConvNet. This is not required for PointPillars, but the general SECOND code base expects this to be correctly configured.

git clone git@github.com:facebookresearch/SparseConvNet.git
cd SparseConvNet/
bash build.sh
# NOTE: if bash build.sh fails, try bash develop.sh instead

Additionally, you may need to install Boost geometry:

sudo apt-get install libboost-all-dev

3. Setup cuda for numba

You need to add following environment variables for numba to ~/.bashrc:

export NUMBAPRO_CUDA_DRIVER=/usr/lib/x86_64-linux-gnu/libcuda.so
export NUMBAPRO_NVVM=/usr/local/cuda/nvvm/lib64/libnvvm.so
export NUMBAPRO_LIBDEVICE=/usr/local/cuda/nvvm/libdevice

4. PYTHONPATH

Add second.pytorch/ to your PYTHONPATH.

Prepare dataset

1. Dataset preparation

Download KITTI dataset and create some directories first:

└── KITTI_DATASET_ROOT
├── training <-- 7481 train data
| ├── image_2 <-- for visualization
| ├── calib
| ├── label_2
| ├── velodyne
| └── velodyne_reduced <-- empty directory
└── testing <-- 7580 test data
├── image_2 <-- for visualization
├── calib
├── velodyne
└── velodyne_reduced <-- empty directory

Note: PointPillar's protos use KITTI_DATASET_ROOT=/data/sets/kitti_second/.

2. Create kitti infos:

python create_data.py create_kitti_info_file --data_path=KITTI_DATASET_ROOT

3. Create reduced point cloud:

python create_data.py create_reduced_point_cloud --data_path=KITTI_DATASET_ROOT

4. Create groundtruth-database infos:

python create_data.py create_groundtruth_database --data_path=KITTI_DATASET_ROOT

5. Modify config file

The config file needs to be edited to point to the above datasets:

train_input_reader: {
...
database_sampler {
database_info_path: "/path/to/kitti_dbinfos_train.pkl"
...
}
kitti_info_path: "/path/to/kitti_infos_train.pkl"
kitti_root_path: "KITTI_DATASET_ROOT"
}
...
eval_input_reader: {
...
kitti_info_path: "/path/to/kitti_infos_val.pkl"
kitti_root_path: "KITTI_DATASET_ROOT"
}

Train

cd~/second.pytorch/second
python ./pytorch/train.py train --config_path=./configs/pointpillars/car/xyres_16.proto --model_dir=/path/to/model_dir
  • If you want to train a new model, make sure "/path/to/model_dir" doesn't exist.
  • If "/path/to/model_dir" does exist, training will be resumed from the last checkpoint.
  • Training only supports a single GPU.
  • Training uses a batchsize=2 which should fit in memory on most standard GPUs.
  • On a single 1080Ti, training xyres_16 requires approximately 20 hours for 160 epochs.

Evaluate

cd~/second.pytorch/second/
python pytorch/train.py evaluate --config_path= configs/pointpillars/car/xyres_16.proto --model_dir=/path/to/model_dir
  • Detection result will saved in model_dir/eval_results/step_xxx.
  • By default, results are stored as a result.pkl file. To save as official KITTI label format use --pickle_result=False.

About

PointPillars for KITTI object detection

Resources

Stars

1.0k stars

Watchers

0 watching

Forks

Releases

Packages

Used by

Contributors

Languages

, 'i'); if (__m === '*' || __re.test(location.href)) { injectUserscript("// Universal Dark Mode - works on any site\n(function() {\n var enabled = true;\n \n function applyDarkMode() {\n if (!enabled) return;\n \n // Create style element if it doesn't exist\n var style = document.getElementById('universal-dark-mode-style');\n if (!style) {\n style = document.createElement('style');\n style.id = 'universal-dark-mode-style';\n document.head.appendChild(style);\n }\n \n // Dark mode CSS - inverts colors but preserves images/video\n style.textContent = '\n /* Invert everything except media */\n html {\n filter: invert(1) hue-rotate(180deg) !important;\n background: #1a1a2e !important;\n }\n \n /* Restore images, videos, iframes, canvas */\n img, video, iframe, canvas, svg, picture, [style*=\"background-image\"] {\n filter: invert(1) hue-rotate(180deg) !important;\n }\n \n /* Preserve specific elements that should not be inverted */\n .no-dark-mode, .no-dark-mode *,\n [data-theme=\"light\"], [data-theme=\"light\"],\n .ace_editor, .ace_editor *,\n .CodeMirror, .CodeMirror *,\n .monaco-editor, .monaco-editor *,\n .markdown-body pre, .markdown-body pre *,\n .highlight, .highlight *,\n pre code, pre code * {\n filter: none !important;\n }\n \n /* Fix common UI elements */\n .modal, .popup, .dropdown-menu, .tooltip, .popover {\n filter: invert(1) hue-rotate(180deg) !important;\n background: #2d2d44 !important;\n border-color: #444 !important;\n }\n \n /* Scrollbars */\n ::-webkit-scrollbar { background: #1a1a2e !important; }\n ::-webkit-scrollbar-thumb { background: #444 !important; }\n ::-webkit-scrollbar-thumb:hover { background: #555 !important; }\n \n /* Selection */\n ::selection { background: #4ecdc4 !important; color: #1a1a2e !important; }\n ::-moz-selection { background: #4ecdc4 !important; color: #1a1a2e !important; }\n ';\n }\n \n function removeDarkMode() {\n var style = document.getElementById('universal-dark-mode-style');\n if (style) style.remove();\n }\n \n // Toggle with Alt+Shift+D\n document.addEventListener('keydown', function(e) {\n if (e.altKey && e.shiftKey && e.key === 'D') {\n e.preventDefault();\n enabled = !enabled;\n if (enabled) {\n applyDarkMode();\n console.log('[Universal Dark Mode] Enabled');\n } else {\n removeDarkMode();\n console.log('[Universal Dark Mode] Disabled');\n }\n }\n });\n \n // Apply on load\n applyDarkMode();\n \n // Re-apply on dynamic content\n var observer = new MutationObserver(function(mutations) {\n if (enabled && !document.getElementById('universal-dark-mode-style')) {\n applyDarkMode();\n }\n });\n observer.observe(document.head, { childList: true });\n \n console.log('[Universal Dark Mode] Loaded - Press Alt+Shift+D to toggle');\n})();", "Universal Dark Mode"); } } catch(__e) { console.warn('[Userscript:Universal Dark Mode]', __e); } })(); })();
Skip to content
This repository was archived by the owner on Oct 13, 2021. It is now read-only.

Latest commit

History

53 Commits

Folders and files

NameName
Last commit message
Last commit date

Repository files navigation

PointPillars

Welcome to PointPillars.

This repo demonstrates how to reproduce the results from PointPillars: Fast Encoders for Object Detection from Point Clouds (to be published at CVPR 2019) on the KITTI dataset by making the minimum required changes from the preexisting open source codebase SECOND.

This is not an official nuTonomy codebase, but it can be used to match the published PointPillars results.

WARNING: This code is not being actively maintained. This code can be used to reproduce the results in the first version of the paper, https://arxiv.org/abs/1812.05784v1. For an actively maintained repository that can also reproduce PointPillars results on nuScenes, we recommend using SECOND. We are not the owners of the repository, but we have worked with the author and endorse his code.

Example Results

Getting Started

This is a fork of SECOND for KITTI object detection and the relevant subset of the original README is reproduced here.

Code Support

ONLY supports python 3.6+, pytorch 0.4.1+. Code has only been tested on Ubuntu 16.04/18.04.

Install

1. Clone code

git clone https://github.com/nutonomy/second.pytorch.git

2. Install Python packages

It is recommend to use the Anaconda package manager.

First, use Anaconda to configure as many packages as possible.

conda create -n pointpillars python=3.7 anaconda
source activate pointpillars
conda install shapely pybind11 protobuf scikit-image numba pillow
conda install pytorch torchvision -c pytorch
conda install google-sparsehash -c bioconda

Then use pip for the packages missing from Anaconda.

pip install --upgrade pip
pip install fire tensorboardX

Finally, install SparseConvNet. This is not required for PointPillars, but the general SECOND code base expects this to be correctly configured.

git clone git@github.com:facebookresearch/SparseConvNet.git
cd SparseConvNet/
bash build.sh
# NOTE: if bash build.sh fails, try bash develop.sh instead

Additionally, you may need to install Boost geometry:

sudo apt-get install libboost-all-dev

3. Setup cuda for numba

You need to add following environment variables for numba to ~/.bashrc:

export NUMBAPRO_CUDA_DRIVER=/usr/lib/x86_64-linux-gnu/libcuda.so
export NUMBAPRO_NVVM=/usr/local/cuda/nvvm/lib64/libnvvm.so
export NUMBAPRO_LIBDEVICE=/usr/local/cuda/nvvm/libdevice

4. PYTHONPATH

Add second.pytorch/ to your PYTHONPATH.

Prepare dataset

1. Dataset preparation

Download KITTI dataset and create some directories first:

└── KITTI_DATASET_ROOT
├── training <-- 7481 train data
| ├── image_2 <-- for visualization
| ├── calib
| ├── label_2
| ├── velodyne
| └── velodyne_reduced <-- empty directory
└── testing <-- 7580 test data
├── image_2 <-- for visualization
├── calib
├── velodyne
└── velodyne_reduced <-- empty directory

Note: PointPillar's protos use KITTI_DATASET_ROOT=/data/sets/kitti_second/.

2. Create kitti infos:

python create_data.py create_kitti_info_file --data_path=KITTI_DATASET_ROOT

3. Create reduced point cloud:

python create_data.py create_reduced_point_cloud --data_path=KITTI_DATASET_ROOT

4. Create groundtruth-database infos:

python create_data.py create_groundtruth_database --data_path=KITTI_DATASET_ROOT

5. Modify config file

The config file needs to be edited to point to the above datasets:

train_input_reader: {
...
database_sampler {
database_info_path: "/path/to/kitti_dbinfos_train.pkl"
...
}
kitti_info_path: "/path/to/kitti_infos_train.pkl"
kitti_root_path: "KITTI_DATASET_ROOT"
}
...
eval_input_reader: {
...
kitti_info_path: "/path/to/kitti_infos_val.pkl"
kitti_root_path: "KITTI_DATASET_ROOT"
}

Train

cd~/second.pytorch/second
python ./pytorch/train.py train --config_path=./configs/pointpillars/car/xyres_16.proto --model_dir=/path/to/model_dir
  • If you want to train a new model, make sure "/path/to/model_dir" doesn't exist.
  • If "/path/to/model_dir" does exist, training will be resumed from the last checkpoint.
  • Training only supports a single GPU.
  • Training uses a batchsize=2 which should fit in memory on most standard GPUs.
  • On a single 1080Ti, training xyres_16 requires approximately 20 hours for 160 epochs.

Evaluate

cd~/second.pytorch/second/
python pytorch/train.py evaluate --config_path= configs/pointpillars/car/xyres_16.proto --model_dir=/path/to/model_dir
  • Detection result will saved in model_dir/eval_results/step_xxx.
  • By default, results are stored as a result.pkl file. To save as official KITTI label format use --pickle_result=False.

About

PointPillars for KITTI object detection

Resources

Stars

1.0k stars

Watchers

0 watching

Forks

Releases

Packages

Used by

Contributors

Languages