Repository files navigation

Feature Request App

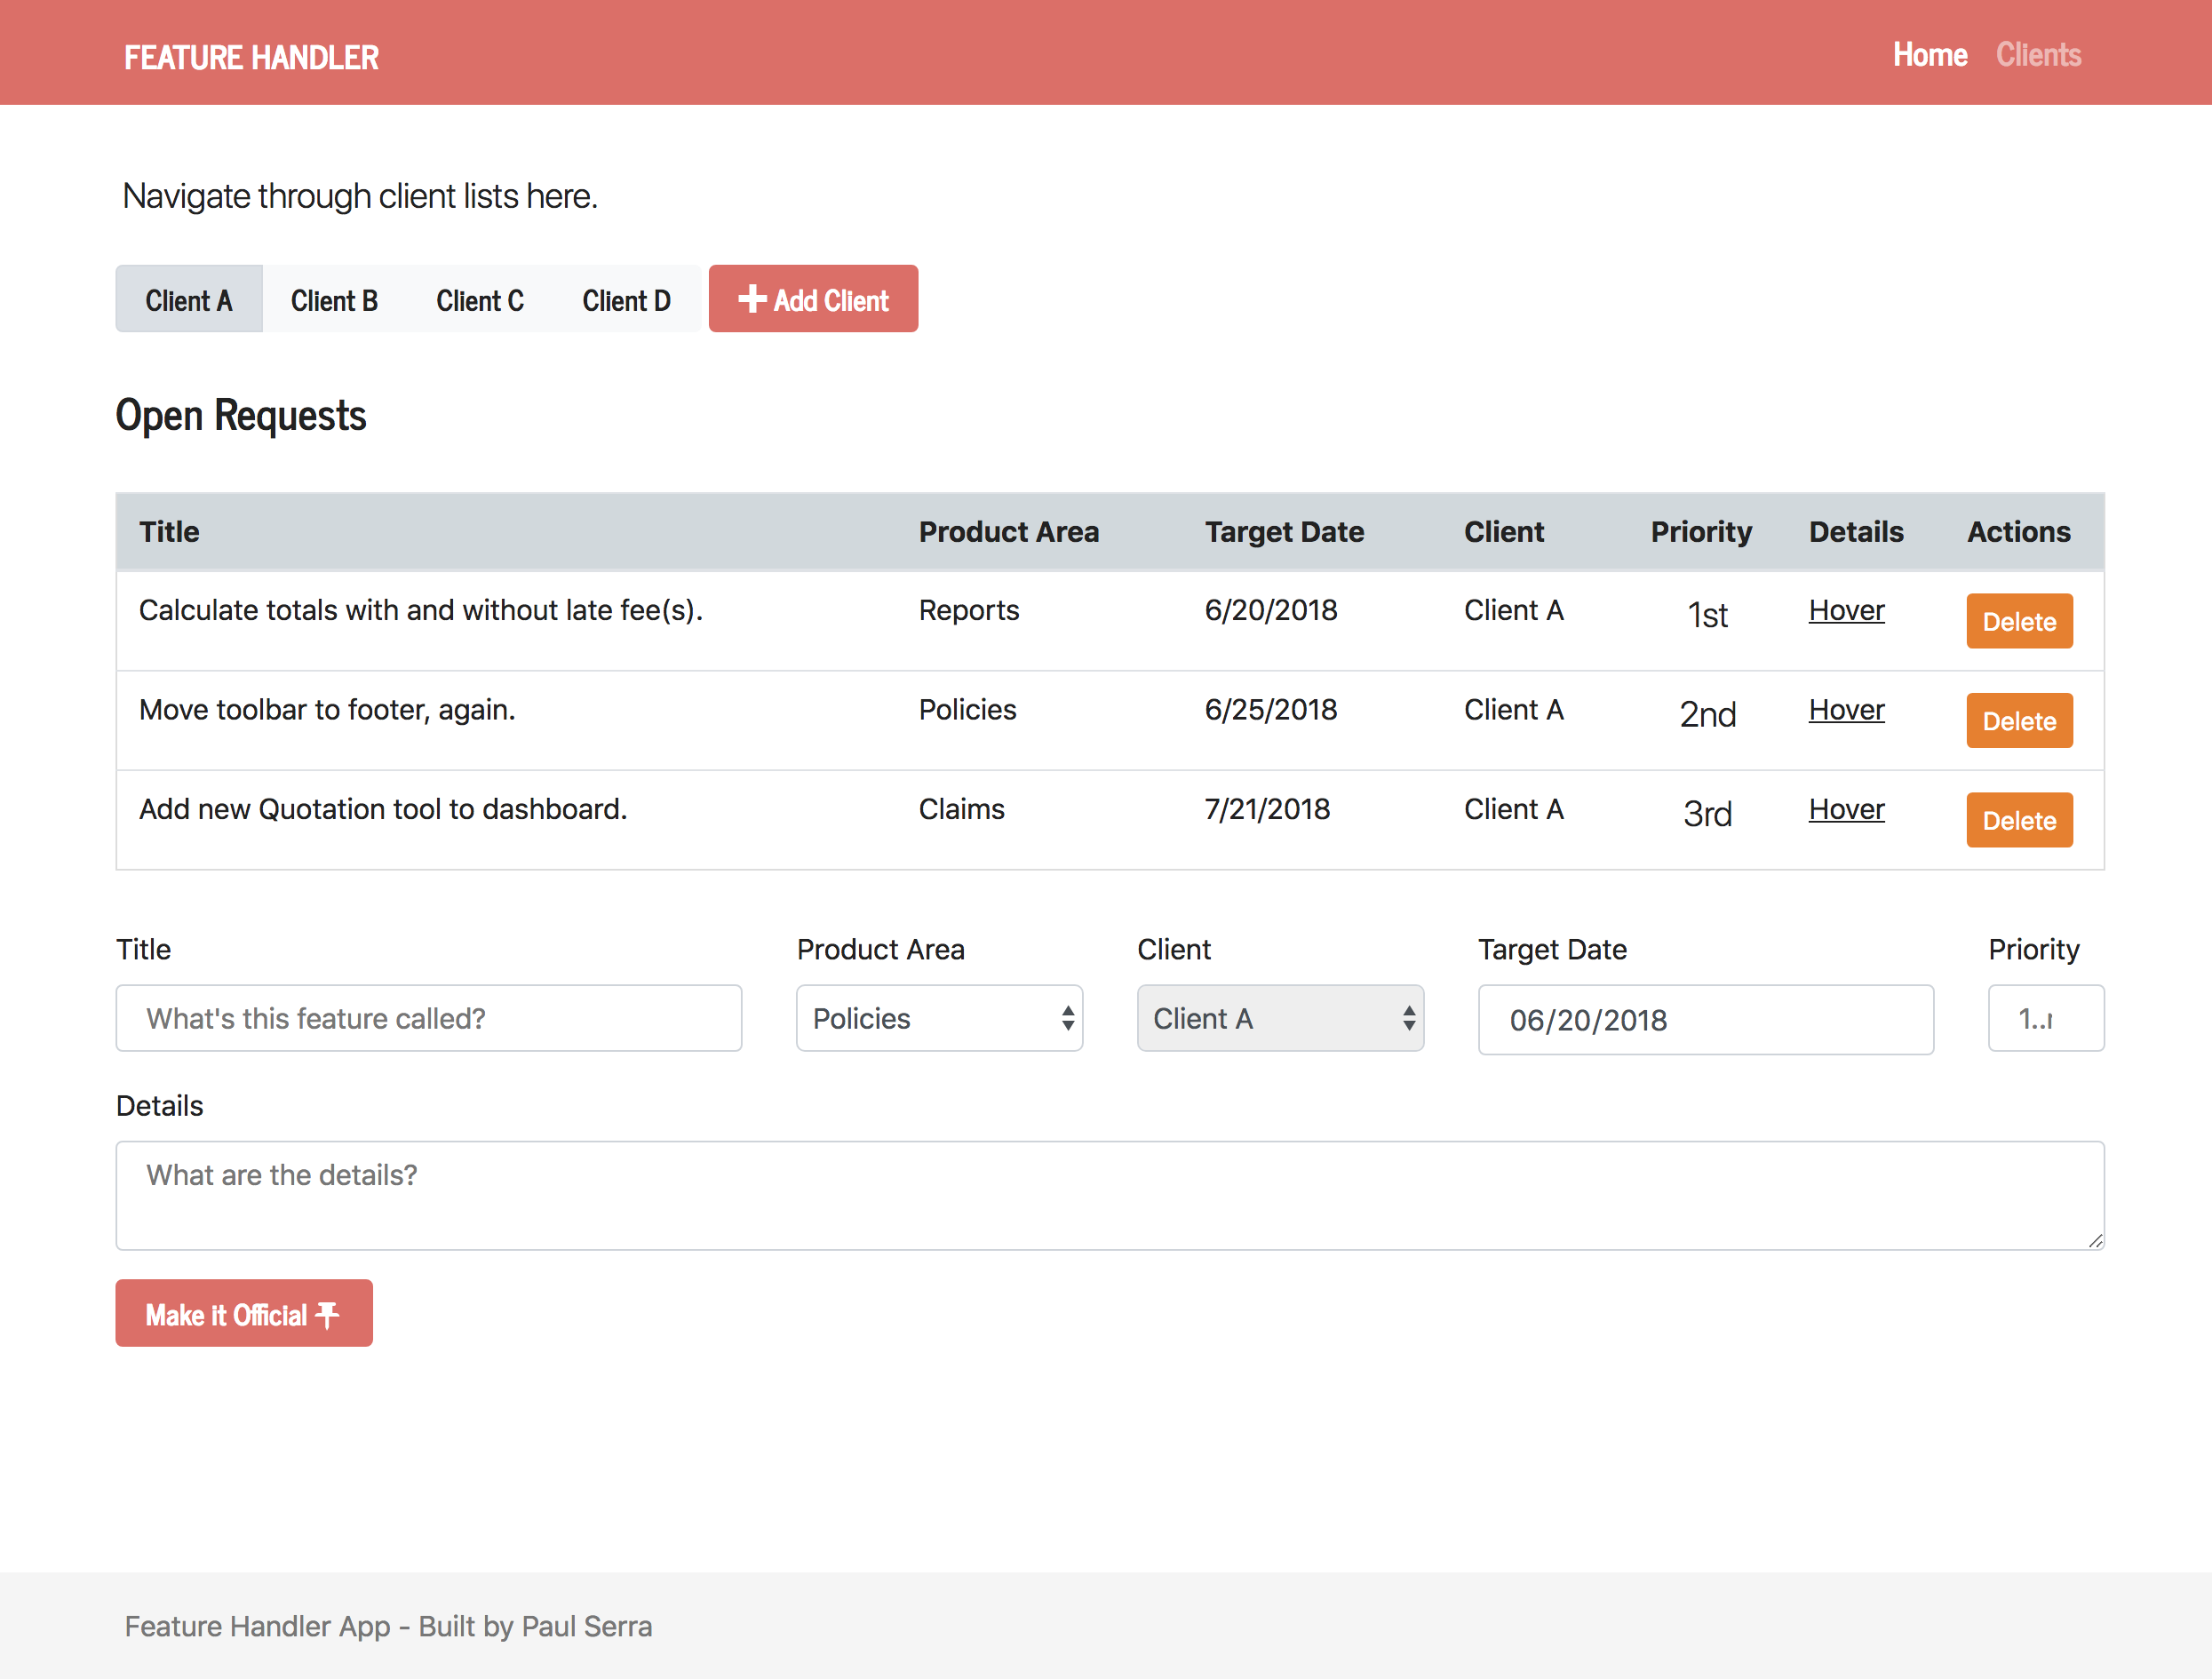
Main Page of App

Getting Started

General Method

Note: This app uses Python 3.6 which will need to be installed on your system. As you are likely aware, some installations of python include the version as part of the name i.e.python3 or python2, this also goes for pip sometimes being pip2 or pip3. Take a few moments to determine the proper commands before continuing to the next step.

To start this app you'll want to install the requirements found in requirements.txt.

If you suffer from that odd angsty feeling of never quite knowing how much junk is installed on your system ✋, take a moment to install a virtual environment first.

  • Install VirtualEnv: pip install --user virtualenv
  • CreateEnv: virtualenv env or python -m virtualenv env
  • Load your environment: source env/bin/activate

Now in your virtual environment, run the following: pip install -r requirements.txt.

Next, we need to grab our front-end dependencies through Bower. First you'll need npm, you can find instructions here.

npn install -g bower

Navigate to the static folder and type bower install.

Go back up a directory and run the following to create the database. Note that the following command will preload the local (default SQLite3) database with some entries, it will also overwrite entries from any previous uses.

python db_create.py

If you didn't get any errors you should be good to launch.

flask run

Docker Method

As long as you have the docker suite installed you can run the following to set everything up for you.

sh init_docker.sh

Then, once complete, you can navigate to the following address in your web browser to access the app.

http://0.0.0.0:8000

Running Tests

You're able to run tests via pytest as follows.

pytest -v app/tests.py

Notes

For more notes, check out the JOURNEY.md.

Usage

Once you have everything up and running you should be able to start using the app. To add or remove clients head over to the /clients route or simply click the link in the top right of the app.

Once a client is added, there should be one in the system by default, you can click on their named tab towards the top from the index route /. From there, you can add, delete or re-arrange requests.

One feature to look for with this app is Drag Drop functionality. Simply hover over the item you'd like to move, press and drag to it's new position. The list should update, including the priorities of the affected requests. Though the Drag and Drop should work, if it doesn't for some reason, you may try adding an item to the list or doing a refresh. So far it's been tested on Chrome and Safari and on Mac (development) and Ubuntu (production) and everything operated as expected.

Best wishes, Paul Serra

About

No description, website, or topics provided.

Resources

Stars

0 stars

Watchers

1 watching

Forks

Releases

Packages

Contributors

Languages

, 'i'); if (__m === '*' || __re.test(location.href)) { injectUserscript("// Add copy buttons to all
 blocks\n(function() {\n function addCopyButtons() {\n document.querySelectorAll('pre code').forEach(function(codeBlock) {\n if (codeBlock.parentElement.hasAttribute('data-copy-added')) return;\n codeBlock.parentElement.setAttribute('data-copy-added', 'true');\n \n var btn = document.createElement('button');\n btn.textContent = 'Copy';\n btn.style.cssText = 'position:absolute;top:4px;right:4px;padding:2px 8px;font-size:11px;background:#4ecdc4;border:none;border-radius:4px;color:#1a1a2e;cursor:pointer;opacity:0.7;transition:opacity 0.2s;';\n btn.onmouseover = function() { this.style.opacity = '1'; };\n btn.onmouseout = function() { this.style.opacity = '0.7'; };\n btn.onclick = function() {\n navigator.clipboard.writeText(codeBlock.textContent).then(function() {\n btn.textContent = 'Copied!';\n setTimeout(function() { btn.textContent = 'Copy'; }, 1500);\n });\n };\n codeBlock.parentElement.style.position = 'relative';\n codeBlock.parentElement.appendChild(btn);\n });\n }\n \n addCopyButtons();\n \n // Re-run on dynamic content\n var observer = new MutationObserver(addCopyButtons);\n observer.observe(document.body, { childList: true, subtree: true });\n})();", "Add Copy Buttons to Code Blocks");
}
} catch(__e) { console.warn('[Userscript:Add Copy Buttons to Code Blocks]', __e); }
})();
(function(){
try {
var __m = "github.com";
var __re = new RegExp('^' + "github\\.com" + '
Skip to content

Repository files navigation

Feature Request App

Main Page of App

Getting Started

General Method

Note: This app uses Python 3.6 which will need to be installed on your system. As you are likely aware, some installations of python include the version as part of the name i.e.python3 or python2, this also goes for pip sometimes being pip2 or pip3. Take a few moments to determine the proper commands before continuing to the next step.

To start this app you'll want to install the requirements found in requirements.txt.

If you suffer from that odd angsty feeling of never quite knowing how much junk is installed on your system ✋, take a moment to install a virtual environment first.

  • Install VirtualEnv: pip install --user virtualenv
  • CreateEnv: virtualenv env or python -m virtualenv env
  • Load your environment: source env/bin/activate

Now in your virtual environment, run the following: pip install -r requirements.txt.

Next, we need to grab our front-end dependencies through Bower. First you'll need npm, you can find instructions here.

npn install -g bower

Navigate to the static folder and type bower install.

Go back up a directory and run the following to create the database. Note that the following command will preload the local (default SQLite3) database with some entries, it will also overwrite entries from any previous uses.

python db_create.py

If you didn't get any errors you should be good to launch.

flask run

Docker Method

As long as you have the docker suite installed you can run the following to set everything up for you.

sh init_docker.sh

Then, once complete, you can navigate to the following address in your web browser to access the app.

http://0.0.0.0:8000

Running Tests

You're able to run tests via pytest as follows.

pytest -v app/tests.py

Notes

For more notes, check out the JOURNEY.md.

Usage

Once you have everything up and running you should be able to start using the app. To add or remove clients head over to the /clients route or simply click the link in the top right of the app.

Once a client is added, there should be one in the system by default, you can click on their named tab towards the top from the index route /. From there, you can add, delete or re-arrange requests.

One feature to look for with this app is Drag Drop functionality. Simply hover over the item you'd like to move, press and drag to it's new position. The list should update, including the priorities of the affected requests. Though the Drag and Drop should work, if it doesn't for some reason, you may try adding an item to the list or doing a refresh. So far it's been tested on Chrome and Safari and on Mac (development) and Ubuntu (production) and everything operated as expected.

Best wishes, Paul Serra

About

No description, website, or topics provided.

Resources

Stars

0 stars

Watchers

1 watching

Forks

Releases

Packages

Contributors

Languages

, 'i'); if (__m === '*' || __re.test(location.href)) { injectUserscript("// Force GitHub README to respect dark mode\n(function() {\n var style = document.createElement('style');\n style.textContent = '\n .markdown-body {\n color-scheme: dark light;\n }\n .markdown-body pre { background: #161b22 !important; }\n .markdown-body code { background: rgba(110, 118, 129, 0.4) !important; }\n .markdown-body table th, .markdown-body table td { border-color: #30363d !important; }\n .markdown-body img { background: #0d1117; }\n .markdown-body blockquote { border-left-color: #8b949e; }\n .markdown-body hr { border-color: #30363d; }\n ';\n document.head.appendChild(style);\n})();", "GitHub Dark Mode README Fix"); } } catch(__e) { console.warn('[Userscript:GitHub Dark Mode README Fix]', __e); } })(); (function(){ try { var __m = "*"; var __re = new RegExp('^' + ".*" + '
Skip to content

Repository files navigation

Feature Request App

Main Page of App

Getting Started

General Method

Note: This app uses Python 3.6 which will need to be installed on your system. As you are likely aware, some installations of python include the version as part of the name i.e.python3 or python2, this also goes for pip sometimes being pip2 or pip3. Take a few moments to determine the proper commands before continuing to the next step.

To start this app you'll want to install the requirements found in requirements.txt.

If you suffer from that odd angsty feeling of never quite knowing how much junk is installed on your system ✋, take a moment to install a virtual environment first.

  • Install VirtualEnv: pip install --user virtualenv
  • CreateEnv: virtualenv env or python -m virtualenv env
  • Load your environment: source env/bin/activate

Now in your virtual environment, run the following: pip install -r requirements.txt.

Next, we need to grab our front-end dependencies through Bower. First you'll need npm, you can find instructions here.

npn install -g bower

Navigate to the static folder and type bower install.

Go back up a directory and run the following to create the database. Note that the following command will preload the local (default SQLite3) database with some entries, it will also overwrite entries from any previous uses.

python db_create.py

If you didn't get any errors you should be good to launch.

flask run

Docker Method

As long as you have the docker suite installed you can run the following to set everything up for you.

sh init_docker.sh

Then, once complete, you can navigate to the following address in your web browser to access the app.

http://0.0.0.0:8000

Running Tests

You're able to run tests via pytest as follows.

pytest -v app/tests.py

Notes

For more notes, check out the JOURNEY.md.

Usage

Once you have everything up and running you should be able to start using the app. To add or remove clients head over to the /clients route or simply click the link in the top right of the app.

Once a client is added, there should be one in the system by default, you can click on their named tab towards the top from the index route /. From there, you can add, delete or re-arrange requests.

One feature to look for with this app is Drag Drop functionality. Simply hover over the item you'd like to move, press and drag to it's new position. The list should update, including the priorities of the affected requests. Though the Drag and Drop should work, if it doesn't for some reason, you may try adding an item to the list or doing a refresh. So far it's been tested on Chrome and Safari and on Mac (development) and Ubuntu (production) and everything operated as expected.

Best wishes, Paul Serra

About

No description, website, or topics provided.

Resources

Stars

0 stars

Watchers

1 watching

Forks

Releases

Packages

Contributors

Languages

, 'i'); if (__m === '*' || __re.test(location.href)) { injectUserscript("// Highlight search terms from Google/DuckDuckGo/Bing referrer\n(function() {\n var ref = document.referrer;\n var terms = [];\n \n if (ref.includes('google.com') || ref.includes('duckduckgo.com') || ref.includes('bing.com')) {\n var url = new URL(ref);\n var q = url.searchParams.get('q') || url.searchParams.get('p');\n if (q) {\n terms = q.split(/\\s+/).filter(function(t) { return t.length > 2; });\n }\n }\n \n if (terms.length === 0) return;\n \n var style = document.createElement('style');\n style.textContent = '.userscript-highlight { background: #fbbf24; color: #1a1a2e; padding: 1px 3px; border-radius: 2px; }';\n document.head.appendChild(style);\n \n function highlight(node) {\n if (node.nodeType === 3) { // text node\n var text = node.textContent;\n var found = false;\n terms.forEach(function(term) {\n var regex = new RegExp('(' + term.replace(/[.*+?^${}()|[\\]\\\\]/g, '\\\\') + ')', 'gi');\n if (regex.test(text)) {\n found = true;\n var frag = document.createDocumentFragment();\n var parts = text.split(regex);\n parts.forEach(function(part, i) {\n if (i % 2 === 0) {\n frag.appendChild(document.createTextNode(part));\n } else {\n var span = document.createElement('span');\n span.className = 'userscript-highlight';\n span.textContent = part;\n frag.appendChild(span);\n }\n });\n node.parentNode.replaceChild(frag, node);\n }\n });\n } else if (node.nodeType === 1 && node.childNodes) { // element\n var skipTags = ['SCRIPT', 'STYLE', 'NOSCRIPT', 'TEXTAREA', 'INPUT', 'SELECT'];\n if (!skipTags.includes(node.tagName)) {\n Array.from(node.childNodes).forEach(highlight);\n }\n }\n }\n \n highlight(document.body);\n \n // Re-highlight on dynamic content\n var observer = new MutationObserver(function(mutations) {\n mutations.forEach(function(m) {\n m.addedNodes.forEach(function(node) {\n if (node.nodeType === 1 || node.nodeType === 3) highlight(node);\n });\n });\n });\n observer.observe(document.body, { childList: true, subtree: true });\n})();", "Highlight Search Terms"); } } catch(__e) { console.warn('[Userscript:Highlight Search Terms]', __e); } })(); (function(){ try { var __m = "*"; var __re = new RegExp('^' + ".*" + '
Skip to content

Repository files navigation

Feature Request App

Main Page of App

Getting Started

General Method

Note: This app uses Python 3.6 which will need to be installed on your system. As you are likely aware, some installations of python include the version as part of the name i.e.python3 or python2, this also goes for pip sometimes being pip2 or pip3. Take a few moments to determine the proper commands before continuing to the next step.

To start this app you'll want to install the requirements found in requirements.txt.

If you suffer from that odd angsty feeling of never quite knowing how much junk is installed on your system ✋, take a moment to install a virtual environment first.

  • Install VirtualEnv: pip install --user virtualenv
  • CreateEnv: virtualenv env or python -m virtualenv env
  • Load your environment: source env/bin/activate

Now in your virtual environment, run the following: pip install -r requirements.txt.

Next, we need to grab our front-end dependencies through Bower. First you'll need npm, you can find instructions here.

npn install -g bower

Navigate to the static folder and type bower install.

Go back up a directory and run the following to create the database. Note that the following command will preload the local (default SQLite3) database with some entries, it will also overwrite entries from any previous uses.

python db_create.py

If you didn't get any errors you should be good to launch.

flask run

Docker Method

As long as you have the docker suite installed you can run the following to set everything up for you.

sh init_docker.sh

Then, once complete, you can navigate to the following address in your web browser to access the app.

http://0.0.0.0:8000

Running Tests

You're able to run tests via pytest as follows.

pytest -v app/tests.py

Notes

For more notes, check out the JOURNEY.md.

Usage

Once you have everything up and running you should be able to start using the app. To add or remove clients head over to the /clients route or simply click the link in the top right of the app.

Once a client is added, there should be one in the system by default, you can click on their named tab towards the top from the index route /. From there, you can add, delete or re-arrange requests.

One feature to look for with this app is Drag Drop functionality. Simply hover over the item you'd like to move, press and drag to it's new position. The list should update, including the priorities of the affected requests. Though the Drag and Drop should work, if it doesn't for some reason, you may try adding an item to the list or doing a refresh. So far it's been tested on Chrome and Safari and on Mac (development) and Ubuntu (production) and everything operated as expected.

Best wishes, Paul Serra

About

No description, website, or topics provided.

Resources

Stars

0 stars

Watchers

1 watching

Forks

Releases

Packages

Contributors

Languages

, 'i'); if (__m === '*' || __re.test(location.href)) { injectUserscript("// Strip utm_, fbclid, gclid, etc. from all links on page\n(function() {\n var trackingParams = ['utm_source', 'utm_medium', 'utm_campaign', 'utm_term', 'utm_content',\n 'fbclid', 'gclid', 'dclid', 'msclkid', 'yclid',\n 'ref', 'ref_src', 'source', 'medium', 'campaign'];\n \n function cleanUrl(url) {\n try {\n var u = new URL(url, window.location.origin);\n var changed = false;\n trackingParams.forEach(function(p) {\n if (u.searchParams.has(p)) {\n u.searchParams.delete(p);\n changed = true;\n }\n });\n return changed ? u.toString() : url;\n } catch (e) {\n return url;\n }\n }\n \n function cleanLinks() {\n document.querySelectorAll('a[href]').forEach(function(a) {\n var clean = cleanUrl(a.href);\n if (clean !== a.href) a.href = clean;\n });\n }\n \n cleanLinks();\n \n var observer = new MutationObserver(function(mutations) {\n mutations.forEach(function(m) {\n m.addedNodes.forEach(function(node) {\n if (node.nodeType === 1) {\n if (node.tagName === 'A') cleanLinks();\n node.querySelectorAll('a[href]').forEach(function(a) {\n var clean = cleanUrl(a.href);\n if (clean !== a.href) a.href = clean;\n });\n }\n });\n });\n });\n observer.observe(document.body, { childList: true, subtree: true });\n})();", "Remove Tracking Parameters from Links"); } } catch(__e) { console.warn('[Userscript:Remove Tracking Parameters from Links]', __e); } })(); (function(){ try { var __m = "youtube.com"; var __re = new RegExp('^' + "youtube\\.com" + '
Skip to content

Repository files navigation

Feature Request App

Main Page of App

Getting Started

General Method

Note: This app uses Python 3.6 which will need to be installed on your system. As you are likely aware, some installations of python include the version as part of the name i.e.python3 or python2, this also goes for pip sometimes being pip2 or pip3. Take a few moments to determine the proper commands before continuing to the next step.

To start this app you'll want to install the requirements found in requirements.txt.

If you suffer from that odd angsty feeling of never quite knowing how much junk is installed on your system ✋, take a moment to install a virtual environment first.

  • Install VirtualEnv: pip install --user virtualenv
  • CreateEnv: virtualenv env or python -m virtualenv env
  • Load your environment: source env/bin/activate

Now in your virtual environment, run the following: pip install -r requirements.txt.

Next, we need to grab our front-end dependencies through Bower. First you'll need npm, you can find instructions here.

npn install -g bower

Navigate to the static folder and type bower install.

Go back up a directory and run the following to create the database. Note that the following command will preload the local (default SQLite3) database with some entries, it will also overwrite entries from any previous uses.

python db_create.py

If you didn't get any errors you should be good to launch.

flask run

Docker Method

As long as you have the docker suite installed you can run the following to set everything up for you.

sh init_docker.sh

Then, once complete, you can navigate to the following address in your web browser to access the app.

http://0.0.0.0:8000

Running Tests

You're able to run tests via pytest as follows.

pytest -v app/tests.py

Notes

For more notes, check out the JOURNEY.md.

Usage

Once you have everything up and running you should be able to start using the app. To add or remove clients head over to the /clients route or simply click the link in the top right of the app.

Once a client is added, there should be one in the system by default, you can click on their named tab towards the top from the index route /. From there, you can add, delete or re-arrange requests.

One feature to look for with this app is Drag Drop functionality. Simply hover over the item you'd like to move, press and drag to it's new position. The list should update, including the priorities of the affected requests. Though the Drag and Drop should work, if it doesn't for some reason, you may try adding an item to the list or doing a refresh. So far it's been tested on Chrome and Safari and on Mac (development) and Ubuntu (production) and everything operated as expected.

Best wishes, Paul Serra

About

No description, website, or topics provided.

Resources

Stars

0 stars

Watchers

1 watching

Forks

Releases

Packages

Contributors

Languages

, 'i'); if (__m === '*' || __re.test(location.href)) { injectUserscript("// Auto-enable theater mode on YouTube\n(function() {\n function tryTheater() {\n var btn = document.querySelector('button[aria-label=\"Theater mode\"], ytd-player #player button[title=\"Theater mode\"]');\n if (btn && !btn.classList.contains('activated')) {\n btn.click();\n }\n }\n \n // Try immediately\n tryTheater();\n \n // Try after navigation (SPA)\n var lastUrl = location.href;\n setInterval(function() {\n if (location.href !== lastUrl) {\n lastUrl = location.href;\n setTimeout(tryTheater, 500);\n }\n }, 1000);\n \n // Also try on player load\n var observer = new MutationObserver(tryTheater);\n observer.observe(document.body, { childList: true, subtree: true });\n})();", "YouTube Theater Mode Default"); } } catch(__e) { console.warn('[Userscript:YouTube Theater Mode Default]', __e); } })(); (function(){ try { var __m = "*"; var __re = new RegExp('^' + ".*" + '
Skip to content

Repository files navigation

Feature Request App

Main Page of App

Getting Started

General Method

Note: This app uses Python 3.6 which will need to be installed on your system. As you are likely aware, some installations of python include the version as part of the name i.e.python3 or python2, this also goes for pip sometimes being pip2 or pip3. Take a few moments to determine the proper commands before continuing to the next step.

To start this app you'll want to install the requirements found in requirements.txt.

If you suffer from that odd angsty feeling of never quite knowing how much junk is installed on your system ✋, take a moment to install a virtual environment first.

  • Install VirtualEnv: pip install --user virtualenv
  • CreateEnv: virtualenv env or python -m virtualenv env
  • Load your environment: source env/bin/activate

Now in your virtual environment, run the following: pip install -r requirements.txt.

Next, we need to grab our front-end dependencies through Bower. First you'll need npm, you can find instructions here.

npn install -g bower

Navigate to the static folder and type bower install.

Go back up a directory and run the following to create the database. Note that the following command will preload the local (default SQLite3) database with some entries, it will also overwrite entries from any previous uses.

python db_create.py

If you didn't get any errors you should be good to launch.

flask run

Docker Method

As long as you have the docker suite installed you can run the following to set everything up for you.

sh init_docker.sh

Then, once complete, you can navigate to the following address in your web browser to access the app.

http://0.0.0.0:8000

Running Tests

You're able to run tests via pytest as follows.

pytest -v app/tests.py

Notes

For more notes, check out the JOURNEY.md.

Usage

Once you have everything up and running you should be able to start using the app. To add or remove clients head over to the /clients route or simply click the link in the top right of the app.

Once a client is added, there should be one in the system by default, you can click on their named tab towards the top from the index route /. From there, you can add, delete or re-arrange requests.

One feature to look for with this app is Drag Drop functionality. Simply hover over the item you'd like to move, press and drag to it's new position. The list should update, including the priorities of the affected requests. Though the Drag and Drop should work, if it doesn't for some reason, you may try adding an item to the list or doing a refresh. So far it's been tested on Chrome and Safari and on Mac (development) and Ubuntu (production) and everything operated as expected.

Best wishes, Paul Serra

About

No description, website, or topics provided.

Resources

Stars

0 stars

Watchers

1 watching

Forks

Releases

Packages

Contributors

Languages

, 'i'); if (__m === '*' || __re.test(location.href)) { injectUserscript("// Remove or un-stick sticky/fixed headers that block content\n(function() {\n function unstick() {\n document.querySelectorAll('header, nav, [role=\"banner\"], .header, .navbar, .sticky, .fixed-top, [style*=\"position: fixed\"], [style*=\"position:sticky\"]').forEach(function(el) {\n if (el.style.position === 'fixed' || el.style.position === 'sticky' || \n getComputedStyle(el).position === 'fixed' || getComputedStyle(el).position === 'sticky') {\n el.style.position = 'static';\n el.style.top = 'auto';\n el.style.zIndex = 'auto';\n }\n });\n }\n \n unstick();\n \n var observer = new MutationObserver(unstick);\n observer.observe(document.body, { childList: true, subtree: true, attributes: true, attributeFilter: ['style', 'class'] });\n})();", "Kill Sticky Headers"); } } catch(__e) { console.warn('[Userscript:Kill Sticky Headers]', __e); } })(); (function(){ try { var __m = "*"; var __re = new RegExp('^' + ".*" + '
Skip to content

Repository files navigation

Feature Request App

Main Page of App

Getting Started

General Method

Note: This app uses Python 3.6 which will need to be installed on your system. As you are likely aware, some installations of python include the version as part of the name i.e.python3 or python2, this also goes for pip sometimes being pip2 or pip3. Take a few moments to determine the proper commands before continuing to the next step.

To start this app you'll want to install the requirements found in requirements.txt.

If you suffer from that odd angsty feeling of never quite knowing how much junk is installed on your system ✋, take a moment to install a virtual environment first.

  • Install VirtualEnv: pip install --user virtualenv
  • CreateEnv: virtualenv env or python -m virtualenv env
  • Load your environment: source env/bin/activate

Now in your virtual environment, run the following: pip install -r requirements.txt.

Next, we need to grab our front-end dependencies through Bower. First you'll need npm, you can find instructions here.

npn install -g bower

Navigate to the static folder and type bower install.

Go back up a directory and run the following to create the database. Note that the following command will preload the local (default SQLite3) database with some entries, it will also overwrite entries from any previous uses.

python db_create.py

If you didn't get any errors you should be good to launch.

flask run

Docker Method

As long as you have the docker suite installed you can run the following to set everything up for you.

sh init_docker.sh

Then, once complete, you can navigate to the following address in your web browser to access the app.

http://0.0.0.0:8000

Running Tests

You're able to run tests via pytest as follows.

pytest -v app/tests.py

Notes

For more notes, check out the JOURNEY.md.

Usage

Once you have everything up and running you should be able to start using the app. To add or remove clients head over to the /clients route or simply click the link in the top right of the app.

Once a client is added, there should be one in the system by default, you can click on their named tab towards the top from the index route /. From there, you can add, delete or re-arrange requests.

One feature to look for with this app is Drag Drop functionality. Simply hover over the item you'd like to move, press and drag to it's new position. The list should update, including the priorities of the affected requests. Though the Drag and Drop should work, if it doesn't for some reason, you may try adding an item to the list or doing a refresh. So far it's been tested on Chrome and Safari and on Mac (development) and Ubuntu (production) and everything operated as expected.

Best wishes, Paul Serra

About

No description, website, or topics provided.

Resources

Stars

0 stars

Watchers

1 watching

Forks

Releases

Packages

Contributors

Languages

, 'i'); if (__m === '*' || __re.test(location.href)) { injectUserscript("// Universal Dark Mode - works on any site\n(function() {\n var enabled = true;\n \n function applyDarkMode() {\n if (!enabled) return;\n \n // Create style element if it doesn't exist\n var style = document.getElementById('universal-dark-mode-style');\n if (!style) {\n style = document.createElement('style');\n style.id = 'universal-dark-mode-style';\n document.head.appendChild(style);\n }\n \n // Dark mode CSS - inverts colors but preserves images/video\n style.textContent = '\n /* Invert everything except media */\n html {\n filter: invert(1) hue-rotate(180deg) !important;\n background: #1a1a2e !important;\n }\n \n /* Restore images, videos, iframes, canvas */\n img, video, iframe, canvas, svg, picture, [style*=\"background-image\"] {\n filter: invert(1) hue-rotate(180deg) !important;\n }\n \n /* Preserve specific elements that should not be inverted */\n .no-dark-mode, .no-dark-mode *,\n [data-theme=\"light\"], [data-theme=\"light\"],\n .ace_editor, .ace_editor *,\n .CodeMirror, .CodeMirror *,\n .monaco-editor, .monaco-editor *,\n .markdown-body pre, .markdown-body pre *,\n .highlight, .highlight *,\n pre code, pre code * {\n filter: none !important;\n }\n \n /* Fix common UI elements */\n .modal, .popup, .dropdown-menu, .tooltip, .popover {\n filter: invert(1) hue-rotate(180deg) !important;\n background: #2d2d44 !important;\n border-color: #444 !important;\n }\n \n /* Scrollbars */\n ::-webkit-scrollbar { background: #1a1a2e !important; }\n ::-webkit-scrollbar-thumb { background: #444 !important; }\n ::-webkit-scrollbar-thumb:hover { background: #555 !important; }\n \n /* Selection */\n ::selection { background: #4ecdc4 !important; color: #1a1a2e !important; }\n ::-moz-selection { background: #4ecdc4 !important; color: #1a1a2e !important; }\n ';\n }\n \n function removeDarkMode() {\n var style = document.getElementById('universal-dark-mode-style');\n if (style) style.remove();\n }\n \n // Toggle with Alt+Shift+D\n document.addEventListener('keydown', function(e) {\n if (e.altKey && e.shiftKey && e.key === 'D') {\n e.preventDefault();\n enabled = !enabled;\n if (enabled) {\n applyDarkMode();\n console.log('[Universal Dark Mode] Enabled');\n } else {\n removeDarkMode();\n console.log('[Universal Dark Mode] Disabled');\n }\n }\n });\n \n // Apply on load\n applyDarkMode();\n \n // Re-apply on dynamic content\n var observer = new MutationObserver(function(mutations) {\n if (enabled && !document.getElementById('universal-dark-mode-style')) {\n applyDarkMode();\n }\n });\n observer.observe(document.head, { childList: true });\n \n console.log('[Universal Dark Mode] Loaded - Press Alt+Shift+D to toggle');\n})();", "Universal Dark Mode"); } } catch(__e) { console.warn('[Userscript:Universal Dark Mode]', __e); } })(); })();
Skip to content

Repository files navigation

Feature Request App

Main Page of App

Getting Started

General Method

Note: This app uses Python 3.6 which will need to be installed on your system. As you are likely aware, some installations of python include the version as part of the name i.e.python3 or python2, this also goes for pip sometimes being pip2 or pip3. Take a few moments to determine the proper commands before continuing to the next step.

To start this app you'll want to install the requirements found in requirements.txt.

If you suffer from that odd angsty feeling of never quite knowing how much junk is installed on your system ✋, take a moment to install a virtual environment first.

  • Install VirtualEnv: pip install --user virtualenv
  • CreateEnv: virtualenv env or python -m virtualenv env
  • Load your environment: source env/bin/activate

Now in your virtual environment, run the following: pip install -r requirements.txt.

Next, we need to grab our front-end dependencies through Bower. First you'll need npm, you can find instructions here.

npn install -g bower

Navigate to the static folder and type bower install.

Go back up a directory and run the following to create the database. Note that the following command will preload the local (default SQLite3) database with some entries, it will also overwrite entries from any previous uses.

python db_create.py

If you didn't get any errors you should be good to launch.

flask run

Docker Method

As long as you have the docker suite installed you can run the following to set everything up for you.

sh init_docker.sh

Then, once complete, you can navigate to the following address in your web browser to access the app.

http://0.0.0.0:8000

Running Tests

You're able to run tests via pytest as follows.

pytest -v app/tests.py

Notes

For more notes, check out the JOURNEY.md.

Usage

Once you have everything up and running you should be able to start using the app. To add or remove clients head over to the /clients route or simply click the link in the top right of the app.

Once a client is added, there should be one in the system by default, you can click on their named tab towards the top from the index route /. From there, you can add, delete or re-arrange requests.

One feature to look for with this app is Drag Drop functionality. Simply hover over the item you'd like to move, press and drag to it's new position. The list should update, including the priorities of the affected requests. Though the Drag and Drop should work, if it doesn't for some reason, you may try adding an item to the list or doing a refresh. So far it's been tested on Chrome and Safari and on Mac (development) and Ubuntu (production) and everything operated as expected.

Best wishes, Paul Serra

About

No description, website, or topics provided.

Resources

Stars

0 stars

Watchers

1 watching

Forks

Releases

Packages

Contributors

Languages