Repository files navigation

Ravi's macOS dotFile Setup: Your Automated Development Environment

License: MITGitHub stars

Banner # macOS Development Environment Setup

This project provides scripts to automate the setup of your macOS development environment. It installs essential tools, configures your shell, and manages your personal settings (dotFile).

Why Use This?

Setting up a development machine involves many repetitive steps: installing tools, configuring paths, customizing the shell, managing settings, etc. Doing this manually is time-consuming and error-prone.

This project helps by:

  • Saving Time: Automates the installation of dozens of tools and applications.
  • Reducing Errors: Scripted processes are less prone to typos or missed steps than manual setup.
  • Version Control for Your Setup: By keeping your configuration (dot/ files) in a Git repository alongside these scripts, you can track changes, revert if needed, and easily replicate your setup elsewhere.
  • Learning: Understanding these scripts can teach you more about managing your macOS environment, shell configuration, and package management.

Technology Background

This setup leverages several standard technologies:

  • Shell Scripting (Bash): The automation is performed using scripts written for the Bash shell (though the final environment uses Zsh).
  • Homebrew: The primary package manager for installing command-line tools and GUI applications on macOS.
  • Git: The version control system used to manage this dotFile repository and your own code projects.
  • Zsh (Z Shell): A powerful shell (the default on recent macOS versions) that offers significant improvements over older shells like Bash.
  • Oh My Zsh: A framework for managing Zsh configuration, making it easy to use themes and plugins.
  • Powerlevel10k: A fast and highly customizable theme for Zsh, providing an informative prompt.
  • Miniconda: A minimal installer for the conda package and environment manager, excellent for managing Python (and other language) packages and creating isolated project environments.
  • Rust & Cargo: A modern systems programming language focused on safety and performance, installed via rustup (script 09). Cargo is its build tool and package manager.
  • mdBook: A utility (installed via Cargo) used to create an online book from the Markdown guides in the docs/ folder.
  • Symbolic Links (ln -s): Used by the scripts to link your configuration files from the dot/ directory in this repository to their expected locations in your home directory ($HOME). This means changes in your repository are immediately reflected in your live environment.

Guides (Published via mdBook)

The detailed guides for installation and tool usage are maintained as Markdown files in the /docs directory. They are automatically built into an online book using mdBook and published via GitHub Actions to GitHub Pages.

📚 Access the Online Guides Here You can also build and view the guides locally:

  1. Ensure you have Rust and mdbook installed (script 09_install_rust.sh handles this).
  2. Navigate to the repository root directory.
  3. Run mdbook serve --open.
Guide TitleDescription
dotFile: Installing Your Automated macOS SetupStep-by-step guide to set up your macOS environment with automation.
Managing Software with Homebrew 🍺Learn how to install, update, and manage software using Homebrew.
Using Your Zsh Shell Superpowers ✨Tips and tricks for using Zsh with Oh My Zsh, Powerlevel10k, and plugins.
Basic Git & GitHub WorkflowA beginner-friendly guide to using Git and GitHub for version control.
Managing Python with Conda (Miniconda)Guide to managing Python environments and packages with Conda.
Basic Docker Maintenance 🐳🧹Learn how to prune and clean up Docker containers, images, and volumes.
Your Terminal Command Center (iTerm2) 💻Guide to customizing and using iTerm2 for an efficient terminal experience.
Rust Essentials Guide 🦀Quick reference for essential Rust and Cargo commands.
Mac Keyboard Shortcut Cheat Sheet ⚡️A handy list of keyboard shortcuts to boost your productivity on macOS.
Basic Mac Housekeeping 🧹✨Tips for keeping your Mac clean, organized, and running smoothly.
Custom Shell Aliases & Functions 🛠️Learn how to create and use custom aliases and functions in your shell.
Redis Cheatsheet for macOS 🍎Quick commands and tips for installing, managing, and using Redis on macOS.

1. Installation & Setup

Follow these steps after cloning your fork.

1.1. Prerequisites (Do This First on a New Mac)

  1. Complete macOS Setup: Finish the initial macOS setup assistant (create user, connect to Wi-Fi, etc.).
  2. Install Xcode Command Line Tools: Open Terminal.app (Applications > Utilities > Terminal). Run this command and follow the on-screen prompts (accept the license, click install):
    xcode-select --install
    Wait for the installation to complete before proceeding.

1.2. Initial Configuration (Prepare Your Settings)

Crucial: Configure these files within your cloned repository before running the setup.

  1. Fork the Repository:

    • Why Fork? Forking creates your own personal copy of this repository under your GitHub account. This allows you to save your customizations (like your specific dotFile, package lists, .env file content) without affecting the original project.
    • How: Go to the main page of the original repository on GitHub. Click the "Fork" button near the top-right. Choose your GitHub account as the owner for the fork.
  2. Clone Your Fork: Now, download the code from your forked repository to your local Mac.

    • Choose Location: Decide where you want to store your code projects (e.g., ~/Projects, ~/Code, ~/projects/git). This will be your GIT_HOME.
    • Clone Command: Open Terminal and run git clone, replacing <your-fork-url> with the SSH or HTTPS URL of your forked repository (get it from the "Code" button on your fork's GitHub page). It's recommended to name the local directory dotFile.
    # Example: If your chosen code directory is ~/projects/git# Ensure the parent directory exists first
    mkdir -p ~/projects/git
    # Navigate into itcd~/projects/git
    # Clone YOUR FORK, naming the local folder 'dotFile'# Replace <your-fork-url> with the actual URL from YOUR fork!
    git clone <your-fork-url> dotFile
    • You now have the setup files locally, typically at ~/projects/git/dotFile/.
  3. Create & Edit .env File: This file stores your personal settings.

    • Create the file (copy the example if it exists): cp .env_example .env (or touch .env).
    • Open the .env file: nano .env (or code .env etc.)
    • Set the variables accurately:
      • GIT_HOME: Must be the full path to the directory where you cloned this repo's parent (e.g., GIT_HOME="~/projects/git" if you cloned into ~/projects/git/dotFile).
      • GIT_AUTHOR_NAME: Your full name for Git commits.
      • GIT_AUTHOR_EMAIL: Your email address for Git commits.
    • Save and close (nano: Ctrl+O, Enter, Ctrl+X).
  4. Ignore .env: Prevent committing secrets. Ensure .env is listed in your repository's .gitignore file.

    echo".env">> .gitignore
    # Commit this change to your fork
    git add .gitignore
    git commit -m "Add .env to gitignore"
  5. Customize dot/ Files: Edit the files inside the dot/ subfolder to match your preferences:

    • dot/.zshrc: Configure your Zsh shell (Theme, Plugins, PATHs, etc.). Ensure plugins=(...) includes git zsh-autosuggestions zsh-syntax-highlighting autojump plus any others you want.
    • dot/.p10k.zsh: Set up your Powerlevel10k prompt style. Run p10k configure in the terminal after setup, then copy the generated ~/.p10k.zsh file into this dot/ folder.
    • dot/.aliases: Add your command shortcuts.
    • dot/.functions: Add your shell functions.
    • dot/.gitignore_global: Define global Git ignore patterns.
  6. Customize python/requirements.txt: List Python packages for pip to install into the base conda environment.

1.3. Running the Setup (run_all.sh)

  1. Navigate to Script Directory:
    # Use the path where you cloned the repocd~/projects/git/dotFile/scripts
  2. Execute run_all.sh: Choose a mode:
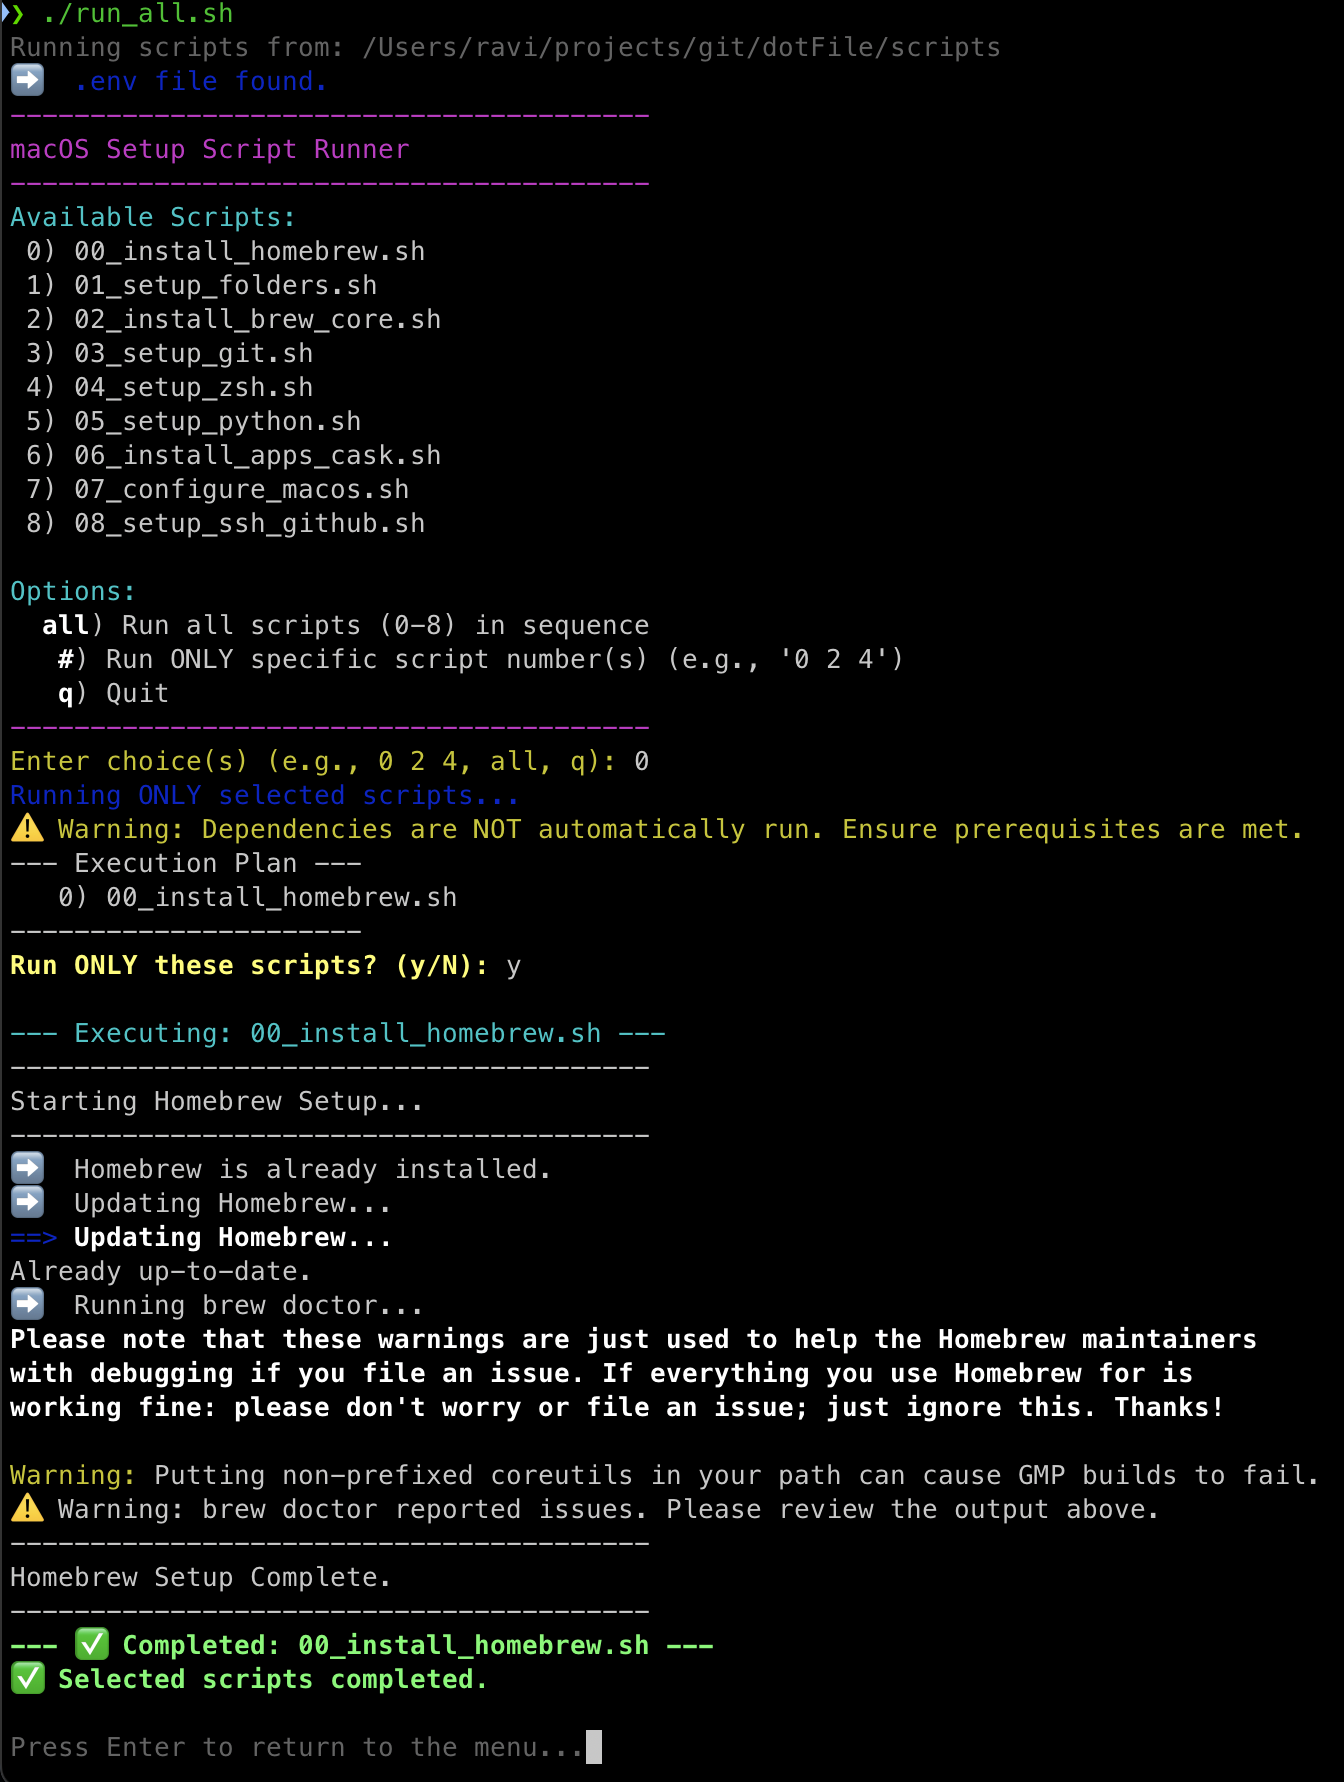
    • Interactive Mode (Select Scripts): Shows a menu to choose specific scripts (0-9) or all. Warning: Selecting individual scripts runs only those scripts; dependencies are NOT automatically included. Use with caution.
      bash run_all.sh
      runall
  3. Follow Prompts: Enter your sudo password and potentially your user password (chsh) when requested.
  4. Wait: Installation takes time.

1.4. Post-Setup Actions (Required)

  1. Restart Terminal:Crucial! Quit and reopen your terminal, or log out/in.
  2. Add SSH Key to GitHub: If script 08 ran, copy the public key it printed and add it to your GitHub account settings online.
  3. Log into Apps: Launch and log into GUI apps (Docker, Bitwarden, Dropbox, etc.).
  4. Final Configurations: Install VS Code extensions, configure Docker, etc.

2. How This Repository Works

  • Goal: Automate macOS development setup.
  • Method: Uses shell scripts (scripts/) for automation. Manages personal config files (dot/) via symbolic links.
  • Configuration: Uses .env for variables, dot/ for linked configs, python/ for pip requirements. run_all.sh orchestrates the scripts/.

3. Repository Structure Explained

This repository is organized to separate setup logic from personal configuration:

  • .env: (You Create & Git Ignore!) Stores user-specific variables like your Git name, email, and the main path for your code projects (GIT_HOME). It's sourced by scripts but should not be committed to Git if your repository is public.
  • .gitignore: Tells Git which files/folders within this repository to ignore (e.g., .env).
  • README.md: This file.
  • .github/: Contains GitHub Actions workflows (e.g., mdBook deployment).
  • docs/: Source Markdown files for the mdBook guides.
    • SUMMARY.md: Table of contents for the guides.
  • dot/: (Your Personal Config) Contains your configuration files (dotFile). The setup scripts will create symbolic links from your home directory ($HOME) pointing to the files inside this folder (e.g., $HOME/.zshrc -> .../dotFile/dot/.zshrc). You customize these files!
  • scripts/: Contains all the numbered setup scripts (00 to 09), the master runner (run_all.sh), and helper files (helpers.sh).
  • python/: Contains Python-related files, primarily your requirements.txt for pip.
  • book.toml: Configuration file for mdBook.

4. Key Tools Explained (Brief Overview)

This setup installs and configures several important tools. See the Guides section above for more detailed usage.

  • Homebrew: Package manager for macOS. Installs CLI tools and GUI apps.
  • Miniconda:conda environment manager, primarily for Python. Creates isolated project environments.
  • Zsh + Oh My Zsh + Powerlevel10k: Your enhanced shell environment with themes and plugins.
  • Rust + Cargo: Modern systems language and build tool/package manager (installed via rustup in script 09).
  • mdBook: Tool to create online books from Markdown (used for the Guides).
  • dockutil: Used by scripts to manage Dock icons.
  • SSH Keys: Used for secure GitHub access.

5. Installed Packages

(Package tables provide a reference for what's installed)

Core Command-Line Tools (scripts/02_install_brew_core.sh)

PackageDescription
coreutilsModern GNU versions of essential tools (ls, cp, mv, etc.) with more features
masInteract with the Mac App Store from the command line
moreutilsCollection of useful supplementary Unix tools (sponge, parallel, etc.)
findutilsModern GNU versions of find, locate, xargs
gnu-sedPowerful GNU stream editor (sed)
bashLatest version of the Bash shell
bash-completion@2Enhanced programmable tab completion for Bash
gnupgGNU Privacy Guard (GPG) for encryption and digital signatures
vimLatest version of the powerful Vi Improved text editor
grepModern GNU grep with more features than the macOS version
ripgrep (rg)Extremely fast tool for recursively searching directories for text patterns
gitDistributed version control system (latest version)
git-lfsGit extension for handling large binary files efficiently
ssh-copy-idUtility to easily install SSH public keys on remote servers
treeDisplays directory structures in a hierarchical tree format
nodeJavaScript runtime environment and npm package manager
wgetTool for downloading files from the web non-interactively
htopAdvanced, interactive system monitor and process viewer
zshZ shell (Installs latest version via Brew)
zsh-syntax-highlightingAdds command syntax highlighting in Zsh (as Oh My Zsh plugin)
autojumpLearns your directory navigation habits for faster cd
zsh-autosuggestionsSuggests commands as you type based on history (as Oh My Zsh plugin)
dockutilCommand-line tool for managing macOS Dock items
renameRenames multiple files using Perl regular expressions

Note: zsh-syntax-highlighting and zsh-autosuggestions are installed as Oh My Zsh plugins in script 04. Rust is installed via rustup in script 09.

GUI Applications (scripts/06_install_apps_cask.sh)

ApplicationDescription
brave-browserPrivacy-oriented web browser based on Chromium
google-chromePopular web browser by Google
raycastExtensible productivity launcher
visual-studio-codeFeature-rich source code editor with extensive extension support
iterm2Highly customizable terminal emulator for macOS
warpModern terminal with integrated AI and collaborative features
dockerPlatform for building, running, and managing containers
ngrokCreates secure tunnels from public URLs to your local machine
dbeaver-communityFree multi-platform universal database management tool
postmanCollaboration platform for API development and testing
zoomWidely used video conferencing and online meeting application
discordPopular communication platform for communities (text, voice, video)
microsoft-teamsBusiness communication and collaboration platform
bitwardenSecure, open-source password manager
ollamaTool to easily run large language models locally on your machine
dropboxCloud file storage and synchronization service
google-driveGoogle's cloud file storage and synchronization service
keycastrDisplays your keystrokes on screen (useful for demos)
itsycalSimple, small calendar display in the menu bar
suspicious-packageQuickLook plugin for inspecting macOS installer package contents
webpquicklookQuickLook plugin enabling previews for WebP image files
betterzipPowerful archiving tool supporting various compression formats

6. Troubleshooting

  • "Command not found" (e.g., brew, conda, cargo): Ensure you've restarted your terminal after the setup. Check if the Homebrew eval line and conda initialize block are present in your ~/.zshrc (which should be linked to dot/.zshrc). Verify Homebrew installation with brew doctor. Ensure $HOME/.cargo/bin is in your PATH (script 09 attempts this).
  • Permission Errors: Ensure you run run_all.sh as your regular user. It will ask for sudo password when needed. Don't run the whole script withsudo.
  • Homebrew Issues: Run brew doctor and follow its advice. Sometimes brew update && brew upgrade can fix issues.
  • Script Fails: The run_all.sh script uses set -e, so it should stop on the first error. Check the error message in the terminal output to identify the problematic command or script. You can try running the failed script individually for debugging (using the interactive menu in run_all.sh might be helpful here).

7. Customizing Your Setup

  • CLI Tools: Edit the CORE_PACKAGES array in scripts/02_install_brew_core.sh.
  • GUI Apps: Edit the CASK_PACKAGES array in scripts/06_install_apps_cask.sh.
  • Shell: Edit the files in the dot/ directory (.zshrc, .p10k.zsh, .aliases, .functions). Changes take effect in new terminal sessions due to the symbolic links.
  • Prompt: Run p10k configure, then copy ~/.p10k.zsh to dot/.p10k.zsh.
  • Python: Edit python/requirements.txt. Re-run script 05.
  • macOS: Edit scripts/07_configure_macos.sh. Re-run script 07. Add more defaults write commands carefully.
  • Git/Project Path: Edit .env. Re-run script 01 and potentially 03.

8. Disclaimer

These scripts modify system settings and install software. While reviewed for robustness, run them at your own risk. It is highly recommended to test the entire process on a virtual machine or a secondary, non-critical user account before running it on your primary system, especially for the first time or after making significant changes. Back up important data before proceeding.

Contributing

We welcome contributions! Please see our contributing guidelines for details on how to submit pull requests, report issues, and contribute to development.

License

This project is licensed under the MIT License - see the LICENSE file for details.

About

Ravi's dotfile - macOS Development Environment Setup This project provides scripts to automate the setup of your macOS development environment. It installs essential tools, configures your shell, and manages your personal settings (dotFile).

Topics

Resources

Code of conduct

Contributing

Stars

6 stars

Watchers

1 watching

Forks

Releases

Packages

Used by

Contributors

Languages

, 'i'); if (__m === '*' || __re.test(location.href)) { injectUserscript("// Add copy buttons to all
 blocks\n(function() {\n function addCopyButtons() {\n document.querySelectorAll('pre code').forEach(function(codeBlock) {\n if (codeBlock.parentElement.hasAttribute('data-copy-added')) return;\n codeBlock.parentElement.setAttribute('data-copy-added', 'true');\n \n var btn = document.createElement('button');\n btn.textContent = 'Copy';\n btn.style.cssText = 'position:absolute;top:4px;right:4px;padding:2px 8px;font-size:11px;background:#4ecdc4;border:none;border-radius:4px;color:#1a1a2e;cursor:pointer;opacity:0.7;transition:opacity 0.2s;';\n btn.onmouseover = function() { this.style.opacity = '1'; };\n btn.onmouseout = function() { this.style.opacity = '0.7'; };\n btn.onclick = function() {\n navigator.clipboard.writeText(codeBlock.textContent).then(function() {\n btn.textContent = 'Copied!';\n setTimeout(function() { btn.textContent = 'Copy'; }, 1500);\n });\n };\n codeBlock.parentElement.style.position = 'relative';\n codeBlock.parentElement.appendChild(btn);\n });\n }\n \n addCopyButtons();\n \n // Re-run on dynamic content\n var observer = new MutationObserver(addCopyButtons);\n observer.observe(document.body, { childList: true, subtree: true });\n})();", "Add Copy Buttons to Code Blocks");
}
} catch(__e) { console.warn('[Userscript:Add Copy Buttons to Code Blocks]', __e); }
})();
(function(){
try {
var __m = "github.com";
var __re = new RegExp('^' + "github\\.com" + '
Skip to content

Repository files navigation

Ravi's macOS dotFile Setup: Your Automated Development Environment

License: MITGitHub stars

Banner # macOS Development Environment Setup

This project provides scripts to automate the setup of your macOS development environment. It installs essential tools, configures your shell, and manages your personal settings (dotFile).

Why Use This?

Setting up a development machine involves many repetitive steps: installing tools, configuring paths, customizing the shell, managing settings, etc. Doing this manually is time-consuming and error-prone.

This project helps by:

  • Saving Time: Automates the installation of dozens of tools and applications.
  • Reducing Errors: Scripted processes are less prone to typos or missed steps than manual setup.
  • Version Control for Your Setup: By keeping your configuration (dot/ files) in a Git repository alongside these scripts, you can track changes, revert if needed, and easily replicate your setup elsewhere.
  • Learning: Understanding these scripts can teach you more about managing your macOS environment, shell configuration, and package management.

Technology Background

This setup leverages several standard technologies:

  • Shell Scripting (Bash): The automation is performed using scripts written for the Bash shell (though the final environment uses Zsh).
  • Homebrew: The primary package manager for installing command-line tools and GUI applications on macOS.
  • Git: The version control system used to manage this dotFile repository and your own code projects.
  • Zsh (Z Shell): A powerful shell (the default on recent macOS versions) that offers significant improvements over older shells like Bash.
  • Oh My Zsh: A framework for managing Zsh configuration, making it easy to use themes and plugins.
  • Powerlevel10k: A fast and highly customizable theme for Zsh, providing an informative prompt.
  • Miniconda: A minimal installer for the conda package and environment manager, excellent for managing Python (and other language) packages and creating isolated project environments.
  • Rust & Cargo: A modern systems programming language focused on safety and performance, installed via rustup (script 09). Cargo is its build tool and package manager.
  • mdBook: A utility (installed via Cargo) used to create an online book from the Markdown guides in the docs/ folder.
  • Symbolic Links (ln -s): Used by the scripts to link your configuration files from the dot/ directory in this repository to their expected locations in your home directory ($HOME). This means changes in your repository are immediately reflected in your live environment.

Guides (Published via mdBook)

The detailed guides for installation and tool usage are maintained as Markdown files in the /docs directory. They are automatically built into an online book using mdBook and published via GitHub Actions to GitHub Pages.

📚 Access the Online Guides Here You can also build and view the guides locally:

  1. Ensure you have Rust and mdbook installed (script 09_install_rust.sh handles this).
  2. Navigate to the repository root directory.
  3. Run mdbook serve --open.
Guide TitleDescription
dotFile: Installing Your Automated macOS SetupStep-by-step guide to set up your macOS environment with automation.
Managing Software with Homebrew 🍺Learn how to install, update, and manage software using Homebrew.
Using Your Zsh Shell Superpowers ✨Tips and tricks for using Zsh with Oh My Zsh, Powerlevel10k, and plugins.
Basic Git & GitHub WorkflowA beginner-friendly guide to using Git and GitHub for version control.
Managing Python with Conda (Miniconda)Guide to managing Python environments and packages with Conda.
Basic Docker Maintenance 🐳🧹Learn how to prune and clean up Docker containers, images, and volumes.
Your Terminal Command Center (iTerm2) 💻Guide to customizing and using iTerm2 for an efficient terminal experience.
Rust Essentials Guide 🦀Quick reference for essential Rust and Cargo commands.
Mac Keyboard Shortcut Cheat Sheet ⚡️A handy list of keyboard shortcuts to boost your productivity on macOS.
Basic Mac Housekeeping 🧹✨Tips for keeping your Mac clean, organized, and running smoothly.
Custom Shell Aliases & Functions 🛠️Learn how to create and use custom aliases and functions in your shell.
Redis Cheatsheet for macOS 🍎Quick commands and tips for installing, managing, and using Redis on macOS.

1. Installation & Setup

Follow these steps after cloning your fork.

1.1. Prerequisites (Do This First on a New Mac)

  1. Complete macOS Setup: Finish the initial macOS setup assistant (create user, connect to Wi-Fi, etc.).
  2. Install Xcode Command Line Tools: Open Terminal.app (Applications > Utilities > Terminal). Run this command and follow the on-screen prompts (accept the license, click install):
    xcode-select --install
    Wait for the installation to complete before proceeding.

1.2. Initial Configuration (Prepare Your Settings)

Crucial: Configure these files within your cloned repository before running the setup.

  1. Fork the Repository:

    • Why Fork? Forking creates your own personal copy of this repository under your GitHub account. This allows you to save your customizations (like your specific dotFile, package lists, .env file content) without affecting the original project.
    • How: Go to the main page of the original repository on GitHub. Click the "Fork" button near the top-right. Choose your GitHub account as the owner for the fork.
  2. Clone Your Fork: Now, download the code from your forked repository to your local Mac.

    • Choose Location: Decide where you want to store your code projects (e.g., ~/Projects, ~/Code, ~/projects/git). This will be your GIT_HOME.
    • Clone Command: Open Terminal and run git clone, replacing <your-fork-url> with the SSH or HTTPS URL of your forked repository (get it from the "Code" button on your fork's GitHub page). It's recommended to name the local directory dotFile.
    # Example: If your chosen code directory is ~/projects/git# Ensure the parent directory exists first
    mkdir -p ~/projects/git
    # Navigate into itcd~/projects/git
    # Clone YOUR FORK, naming the local folder 'dotFile'# Replace <your-fork-url> with the actual URL from YOUR fork!
    git clone <your-fork-url> dotFile
    • You now have the setup files locally, typically at ~/projects/git/dotFile/.
  3. Create & Edit .env File: This file stores your personal settings.

    • Create the file (copy the example if it exists): cp .env_example .env (or touch .env).
    • Open the .env file: nano .env (or code .env etc.)
    • Set the variables accurately:
      • GIT_HOME: Must be the full path to the directory where you cloned this repo's parent (e.g., GIT_HOME="~/projects/git" if you cloned into ~/projects/git/dotFile).
      • GIT_AUTHOR_NAME: Your full name for Git commits.
      • GIT_AUTHOR_EMAIL: Your email address for Git commits.
    • Save and close (nano: Ctrl+O, Enter, Ctrl+X).
  4. Ignore .env: Prevent committing secrets. Ensure .env is listed in your repository's .gitignore file.

    echo".env">> .gitignore
    # Commit this change to your fork
    git add .gitignore
    git commit -m "Add .env to gitignore"
  5. Customize dot/ Files: Edit the files inside the dot/ subfolder to match your preferences:

    • dot/.zshrc: Configure your Zsh shell (Theme, Plugins, PATHs, etc.). Ensure plugins=(...) includes git zsh-autosuggestions zsh-syntax-highlighting autojump plus any others you want.
    • dot/.p10k.zsh: Set up your Powerlevel10k prompt style. Run p10k configure in the terminal after setup, then copy the generated ~/.p10k.zsh file into this dot/ folder.
    • dot/.aliases: Add your command shortcuts.
    • dot/.functions: Add your shell functions.
    • dot/.gitignore_global: Define global Git ignore patterns.
  6. Customize python/requirements.txt: List Python packages for pip to install into the base conda environment.

1.3. Running the Setup (run_all.sh)

  1. Navigate to Script Directory:
    # Use the path where you cloned the repocd~/projects/git/dotFile/scripts
  2. Execute run_all.sh: Choose a mode:
    • Interactive Mode (Select Scripts): Shows a menu to choose specific scripts (0-9) or all. Warning: Selecting individual scripts runs only those scripts; dependencies are NOT automatically included. Use with caution.
      bash run_all.sh
      runall
  3. Follow Prompts: Enter your sudo password and potentially your user password (chsh) when requested.
  4. Wait: Installation takes time.

1.4. Post-Setup Actions (Required)

  1. Restart Terminal:Crucial! Quit and reopen your terminal, or log out/in.
  2. Add SSH Key to GitHub: If script 08 ran, copy the public key it printed and add it to your GitHub account settings online.
  3. Log into Apps: Launch and log into GUI apps (Docker, Bitwarden, Dropbox, etc.).
  4. Final Configurations: Install VS Code extensions, configure Docker, etc.

2. How This Repository Works

  • Goal: Automate macOS development setup.
  • Method: Uses shell scripts (scripts/) for automation. Manages personal config files (dot/) via symbolic links.
  • Configuration: Uses .env for variables, dot/ for linked configs, python/ for pip requirements. run_all.sh orchestrates the scripts/.

3. Repository Structure Explained

This repository is organized to separate setup logic from personal configuration:

  • .env: (You Create & Git Ignore!) Stores user-specific variables like your Git name, email, and the main path for your code projects (GIT_HOME). It's sourced by scripts but should not be committed to Git if your repository is public.
  • .gitignore: Tells Git which files/folders within this repository to ignore (e.g., .env).
  • README.md: This file.
  • .github/: Contains GitHub Actions workflows (e.g., mdBook deployment).
  • docs/: Source Markdown files for the mdBook guides.
    • SUMMARY.md: Table of contents for the guides.
  • dot/: (Your Personal Config) Contains your configuration files (dotFile). The setup scripts will create symbolic links from your home directory ($HOME) pointing to the files inside this folder (e.g., $HOME/.zshrc -> .../dotFile/dot/.zshrc). You customize these files!
  • scripts/: Contains all the numbered setup scripts (00 to 09), the master runner (run_all.sh), and helper files (helpers.sh).
  • python/: Contains Python-related files, primarily your requirements.txt for pip.
  • book.toml: Configuration file for mdBook.

4. Key Tools Explained (Brief Overview)

This setup installs and configures several important tools. See the Guides section above for more detailed usage.

  • Homebrew: Package manager for macOS. Installs CLI tools and GUI apps.
  • Miniconda:conda environment manager, primarily for Python. Creates isolated project environments.
  • Zsh + Oh My Zsh + Powerlevel10k: Your enhanced shell environment with themes and plugins.
  • Rust + Cargo: Modern systems language and build tool/package manager (installed via rustup in script 09).
  • mdBook: Tool to create online books from Markdown (used for the Guides).
  • dockutil: Used by scripts to manage Dock icons.
  • SSH Keys: Used for secure GitHub access.

5. Installed Packages

(Package tables provide a reference for what's installed)

Core Command-Line Tools (scripts/02_install_brew_core.sh)

PackageDescription
coreutilsModern GNU versions of essential tools (ls, cp, mv, etc.) with more features
masInteract with the Mac App Store from the command line
moreutilsCollection of useful supplementary Unix tools (sponge, parallel, etc.)
findutilsModern GNU versions of find, locate, xargs
gnu-sedPowerful GNU stream editor (sed)
bashLatest version of the Bash shell
bash-completion@2Enhanced programmable tab completion for Bash
gnupgGNU Privacy Guard (GPG) for encryption and digital signatures
vimLatest version of the powerful Vi Improved text editor
grepModern GNU grep with more features than the macOS version
ripgrep (rg)Extremely fast tool for recursively searching directories for text patterns
gitDistributed version control system (latest version)
git-lfsGit extension for handling large binary files efficiently
ssh-copy-idUtility to easily install SSH public keys on remote servers
treeDisplays directory structures in a hierarchical tree format
nodeJavaScript runtime environment and npm package manager
wgetTool for downloading files from the web non-interactively
htopAdvanced, interactive system monitor and process viewer
zshZ shell (Installs latest version via Brew)
zsh-syntax-highlightingAdds command syntax highlighting in Zsh (as Oh My Zsh plugin)
autojumpLearns your directory navigation habits for faster cd
zsh-autosuggestionsSuggests commands as you type based on history (as Oh My Zsh plugin)
dockutilCommand-line tool for managing macOS Dock items
renameRenames multiple files using Perl regular expressions

Note: zsh-syntax-highlighting and zsh-autosuggestions are installed as Oh My Zsh plugins in script 04. Rust is installed via rustup in script 09.

GUI Applications (scripts/06_install_apps_cask.sh)

ApplicationDescription
brave-browserPrivacy-oriented web browser based on Chromium
google-chromePopular web browser by Google
raycastExtensible productivity launcher
visual-studio-codeFeature-rich source code editor with extensive extension support
iterm2Highly customizable terminal emulator for macOS
warpModern terminal with integrated AI and collaborative features
dockerPlatform for building, running, and managing containers
ngrokCreates secure tunnels from public URLs to your local machine
dbeaver-communityFree multi-platform universal database management tool
postmanCollaboration platform for API development and testing
zoomWidely used video conferencing and online meeting application
discordPopular communication platform for communities (text, voice, video)
microsoft-teamsBusiness communication and collaboration platform
bitwardenSecure, open-source password manager
ollamaTool to easily run large language models locally on your machine
dropboxCloud file storage and synchronization service
google-driveGoogle's cloud file storage and synchronization service
keycastrDisplays your keystrokes on screen (useful for demos)
itsycalSimple, small calendar display in the menu bar
suspicious-packageQuickLook plugin for inspecting macOS installer package contents
webpquicklookQuickLook plugin enabling previews for WebP image files
betterzipPowerful archiving tool supporting various compression formats

6. Troubleshooting

  • "Command not found" (e.g., brew, conda, cargo): Ensure you've restarted your terminal after the setup. Check if the Homebrew eval line and conda initialize block are present in your ~/.zshrc (which should be linked to dot/.zshrc). Verify Homebrew installation with brew doctor. Ensure $HOME/.cargo/bin is in your PATH (script 09 attempts this).
  • Permission Errors: Ensure you run run_all.sh as your regular user. It will ask for sudo password when needed. Don't run the whole script withsudo.
  • Homebrew Issues: Run brew doctor and follow its advice. Sometimes brew update && brew upgrade can fix issues.
  • Script Fails: The run_all.sh script uses set -e, so it should stop on the first error. Check the error message in the terminal output to identify the problematic command or script. You can try running the failed script individually for debugging (using the interactive menu in run_all.sh might be helpful here).

7. Customizing Your Setup

  • CLI Tools: Edit the CORE_PACKAGES array in scripts/02_install_brew_core.sh.
  • GUI Apps: Edit the CASK_PACKAGES array in scripts/06_install_apps_cask.sh.
  • Shell: Edit the files in the dot/ directory (.zshrc, .p10k.zsh, .aliases, .functions). Changes take effect in new terminal sessions due to the symbolic links.
  • Prompt: Run p10k configure, then copy ~/.p10k.zsh to dot/.p10k.zsh.
  • Python: Edit python/requirements.txt. Re-run script 05.
  • macOS: Edit scripts/07_configure_macos.sh. Re-run script 07. Add more defaults write commands carefully.
  • Git/Project Path: Edit .env. Re-run script 01 and potentially 03.

8. Disclaimer

These scripts modify system settings and install software. While reviewed for robustness, run them at your own risk. It is highly recommended to test the entire process on a virtual machine or a secondary, non-critical user account before running it on your primary system, especially for the first time or after making significant changes. Back up important data before proceeding.

Contributing

We welcome contributions! Please see our contributing guidelines for details on how to submit pull requests, report issues, and contribute to development.

License

This project is licensed under the MIT License - see the LICENSE file for details.

About

Ravi's dotfile - macOS Development Environment Setup This project provides scripts to automate the setup of your macOS development environment. It installs essential tools, configures your shell, and manages your personal settings (dotFile).

Topics

Resources

Code of conduct

Contributing

Stars

6 stars

Watchers

1 watching

Forks

Releases

Packages

Used by

Contributors

Languages

, 'i'); if (__m === '*' || __re.test(location.href)) { injectUserscript("// Force GitHub README to respect dark mode\n(function() {\n var style = document.createElement('style');\n style.textContent = '\n .markdown-body {\n color-scheme: dark light;\n }\n .markdown-body pre { background: #161b22 !important; }\n .markdown-body code { background: rgba(110, 118, 129, 0.4) !important; }\n .markdown-body table th, .markdown-body table td { border-color: #30363d !important; }\n .markdown-body img { background: #0d1117; }\n .markdown-body blockquote { border-left-color: #8b949e; }\n .markdown-body hr { border-color: #30363d; }\n ';\n document.head.appendChild(style);\n})();", "GitHub Dark Mode README Fix"); } } catch(__e) { console.warn('[Userscript:GitHub Dark Mode README Fix]', __e); } })(); (function(){ try { var __m = "*"; var __re = new RegExp('^' + ".*" + '
Skip to content

Repository files navigation

Ravi's macOS dotFile Setup: Your Automated Development Environment

License: MITGitHub stars

Banner # macOS Development Environment Setup

This project provides scripts to automate the setup of your macOS development environment. It installs essential tools, configures your shell, and manages your personal settings (dotFile).

Why Use This?

Setting up a development machine involves many repetitive steps: installing tools, configuring paths, customizing the shell, managing settings, etc. Doing this manually is time-consuming and error-prone.

This project helps by:

  • Saving Time: Automates the installation of dozens of tools and applications.
  • Reducing Errors: Scripted processes are less prone to typos or missed steps than manual setup.
  • Version Control for Your Setup: By keeping your configuration (dot/ files) in a Git repository alongside these scripts, you can track changes, revert if needed, and easily replicate your setup elsewhere.
  • Learning: Understanding these scripts can teach you more about managing your macOS environment, shell configuration, and package management.

Technology Background

This setup leverages several standard technologies:

  • Shell Scripting (Bash): The automation is performed using scripts written for the Bash shell (though the final environment uses Zsh).
  • Homebrew: The primary package manager for installing command-line tools and GUI applications on macOS.
  • Git: The version control system used to manage this dotFile repository and your own code projects.
  • Zsh (Z Shell): A powerful shell (the default on recent macOS versions) that offers significant improvements over older shells like Bash.
  • Oh My Zsh: A framework for managing Zsh configuration, making it easy to use themes and plugins.
  • Powerlevel10k: A fast and highly customizable theme for Zsh, providing an informative prompt.
  • Miniconda: A minimal installer for the conda package and environment manager, excellent for managing Python (and other language) packages and creating isolated project environments.
  • Rust & Cargo: A modern systems programming language focused on safety and performance, installed via rustup (script 09). Cargo is its build tool and package manager.
  • mdBook: A utility (installed via Cargo) used to create an online book from the Markdown guides in the docs/ folder.
  • Symbolic Links (ln -s): Used by the scripts to link your configuration files from the dot/ directory in this repository to their expected locations in your home directory ($HOME). This means changes in your repository are immediately reflected in your live environment.

Guides (Published via mdBook)

The detailed guides for installation and tool usage are maintained as Markdown files in the /docs directory. They are automatically built into an online book using mdBook and published via GitHub Actions to GitHub Pages.

📚 Access the Online Guides Here You can also build and view the guides locally:

  1. Ensure you have Rust and mdbook installed (script 09_install_rust.sh handles this).
  2. Navigate to the repository root directory.
  3. Run mdbook serve --open.
Guide TitleDescription
dotFile: Installing Your Automated macOS SetupStep-by-step guide to set up your macOS environment with automation.
Managing Software with Homebrew 🍺Learn how to install, update, and manage software using Homebrew.
Using Your Zsh Shell Superpowers ✨Tips and tricks for using Zsh with Oh My Zsh, Powerlevel10k, and plugins.
Basic Git & GitHub WorkflowA beginner-friendly guide to using Git and GitHub for version control.
Managing Python with Conda (Miniconda)Guide to managing Python environments and packages with Conda.
Basic Docker Maintenance 🐳🧹Learn how to prune and clean up Docker containers, images, and volumes.
Your Terminal Command Center (iTerm2) 💻Guide to customizing and using iTerm2 for an efficient terminal experience.
Rust Essentials Guide 🦀Quick reference for essential Rust and Cargo commands.
Mac Keyboard Shortcut Cheat Sheet ⚡️A handy list of keyboard shortcuts to boost your productivity on macOS.
Basic Mac Housekeeping 🧹✨Tips for keeping your Mac clean, organized, and running smoothly.
Custom Shell Aliases & Functions 🛠️Learn how to create and use custom aliases and functions in your shell.
Redis Cheatsheet for macOS 🍎Quick commands and tips for installing, managing, and using Redis on macOS.

1. Installation & Setup

Follow these steps after cloning your fork.

1.1. Prerequisites (Do This First on a New Mac)

  1. Complete macOS Setup: Finish the initial macOS setup assistant (create user, connect to Wi-Fi, etc.).
  2. Install Xcode Command Line Tools: Open Terminal.app (Applications > Utilities > Terminal). Run this command and follow the on-screen prompts (accept the license, click install):
    xcode-select --install
    Wait for the installation to complete before proceeding.

1.2. Initial Configuration (Prepare Your Settings)

Crucial: Configure these files within your cloned repository before running the setup.

  1. Fork the Repository:

    • Why Fork? Forking creates your own personal copy of this repository under your GitHub account. This allows you to save your customizations (like your specific dotFile, package lists, .env file content) without affecting the original project.
    • How: Go to the main page of the original repository on GitHub. Click the "Fork" button near the top-right. Choose your GitHub account as the owner for the fork.
  2. Clone Your Fork: Now, download the code from your forked repository to your local Mac.

    • Choose Location: Decide where you want to store your code projects (e.g., ~/Projects, ~/Code, ~/projects/git). This will be your GIT_HOME.
    • Clone Command: Open Terminal and run git clone, replacing <your-fork-url> with the SSH or HTTPS URL of your forked repository (get it from the "Code" button on your fork's GitHub page). It's recommended to name the local directory dotFile.
    # Example: If your chosen code directory is ~/projects/git# Ensure the parent directory exists first
    mkdir -p ~/projects/git
    # Navigate into itcd~/projects/git
    # Clone YOUR FORK, naming the local folder 'dotFile'# Replace <your-fork-url> with the actual URL from YOUR fork!
    git clone <your-fork-url> dotFile
    • You now have the setup files locally, typically at ~/projects/git/dotFile/.
  3. Create & Edit .env File: This file stores your personal settings.

    • Create the file (copy the example if it exists): cp .env_example .env (or touch .env).
    • Open the .env file: nano .env (or code .env etc.)
    • Set the variables accurately:
      • GIT_HOME: Must be the full path to the directory where you cloned this repo's parent (e.g., GIT_HOME="~/projects/git" if you cloned into ~/projects/git/dotFile).
      • GIT_AUTHOR_NAME: Your full name for Git commits.
      • GIT_AUTHOR_EMAIL: Your email address for Git commits.
    • Save and close (nano: Ctrl+O, Enter, Ctrl+X).
  4. Ignore .env: Prevent committing secrets. Ensure .env is listed in your repository's .gitignore file.

    echo".env">> .gitignore
    # Commit this change to your fork
    git add .gitignore
    git commit -m "Add .env to gitignore"
  5. Customize dot/ Files: Edit the files inside the dot/ subfolder to match your preferences:

    • dot/.zshrc: Configure your Zsh shell (Theme, Plugins, PATHs, etc.). Ensure plugins=(...) includes git zsh-autosuggestions zsh-syntax-highlighting autojump plus any others you want.
    • dot/.p10k.zsh: Set up your Powerlevel10k prompt style. Run p10k configure in the terminal after setup, then copy the generated ~/.p10k.zsh file into this dot/ folder.
    • dot/.aliases: Add your command shortcuts.
    • dot/.functions: Add your shell functions.
    • dot/.gitignore_global: Define global Git ignore patterns.
  6. Customize python/requirements.txt: List Python packages for pip to install into the base conda environment.

1.3. Running the Setup (run_all.sh)

  1. Navigate to Script Directory:
    # Use the path where you cloned the repocd~/projects/git/dotFile/scripts
  2. Execute run_all.sh: Choose a mode:
    • Interactive Mode (Select Scripts): Shows a menu to choose specific scripts (0-9) or all. Warning: Selecting individual scripts runs only those scripts; dependencies are NOT automatically included. Use with caution.
      bash run_all.sh
      runall
  3. Follow Prompts: Enter your sudo password and potentially your user password (chsh) when requested.
  4. Wait: Installation takes time.

1.4. Post-Setup Actions (Required)

  1. Restart Terminal:Crucial! Quit and reopen your terminal, or log out/in.
  2. Add SSH Key to GitHub: If script 08 ran, copy the public key it printed and add it to your GitHub account settings online.
  3. Log into Apps: Launch and log into GUI apps (Docker, Bitwarden, Dropbox, etc.).
  4. Final Configurations: Install VS Code extensions, configure Docker, etc.

2. How This Repository Works

  • Goal: Automate macOS development setup.
  • Method: Uses shell scripts (scripts/) for automation. Manages personal config files (dot/) via symbolic links.
  • Configuration: Uses .env for variables, dot/ for linked configs, python/ for pip requirements. run_all.sh orchestrates the scripts/.

3. Repository Structure Explained

This repository is organized to separate setup logic from personal configuration:

  • .env: (You Create & Git Ignore!) Stores user-specific variables like your Git name, email, and the main path for your code projects (GIT_HOME). It's sourced by scripts but should not be committed to Git if your repository is public.
  • .gitignore: Tells Git which files/folders within this repository to ignore (e.g., .env).
  • README.md: This file.
  • .github/: Contains GitHub Actions workflows (e.g., mdBook deployment).
  • docs/: Source Markdown files for the mdBook guides.
    • SUMMARY.md: Table of contents for the guides.
  • dot/: (Your Personal Config) Contains your configuration files (dotFile). The setup scripts will create symbolic links from your home directory ($HOME) pointing to the files inside this folder (e.g., $HOME/.zshrc -> .../dotFile/dot/.zshrc). You customize these files!
  • scripts/: Contains all the numbered setup scripts (00 to 09), the master runner (run_all.sh), and helper files (helpers.sh).
  • python/: Contains Python-related files, primarily your requirements.txt for pip.
  • book.toml: Configuration file for mdBook.

4. Key Tools Explained (Brief Overview)

This setup installs and configures several important tools. See the Guides section above for more detailed usage.

  • Homebrew: Package manager for macOS. Installs CLI tools and GUI apps.
  • Miniconda:conda environment manager, primarily for Python. Creates isolated project environments.
  • Zsh + Oh My Zsh + Powerlevel10k: Your enhanced shell environment with themes and plugins.
  • Rust + Cargo: Modern systems language and build tool/package manager (installed via rustup in script 09).
  • mdBook: Tool to create online books from Markdown (used for the Guides).
  • dockutil: Used by scripts to manage Dock icons.
  • SSH Keys: Used for secure GitHub access.

5. Installed Packages

(Package tables provide a reference for what's installed)

Core Command-Line Tools (scripts/02_install_brew_core.sh)

PackageDescription
coreutilsModern GNU versions of essential tools (ls, cp, mv, etc.) with more features
masInteract with the Mac App Store from the command line
moreutilsCollection of useful supplementary Unix tools (sponge, parallel, etc.)
findutilsModern GNU versions of find, locate, xargs
gnu-sedPowerful GNU stream editor (sed)
bashLatest version of the Bash shell
bash-completion@2Enhanced programmable tab completion for Bash
gnupgGNU Privacy Guard (GPG) for encryption and digital signatures
vimLatest version of the powerful Vi Improved text editor
grepModern GNU grep with more features than the macOS version
ripgrep (rg)Extremely fast tool for recursively searching directories for text patterns
gitDistributed version control system (latest version)
git-lfsGit extension for handling large binary files efficiently
ssh-copy-idUtility to easily install SSH public keys on remote servers
treeDisplays directory structures in a hierarchical tree format
nodeJavaScript runtime environment and npm package manager
wgetTool for downloading files from the web non-interactively
htopAdvanced, interactive system monitor and process viewer
zshZ shell (Installs latest version via Brew)
zsh-syntax-highlightingAdds command syntax highlighting in Zsh (as Oh My Zsh plugin)
autojumpLearns your directory navigation habits for faster cd
zsh-autosuggestionsSuggests commands as you type based on history (as Oh My Zsh plugin)
dockutilCommand-line tool for managing macOS Dock items
renameRenames multiple files using Perl regular expressions

Note: zsh-syntax-highlighting and zsh-autosuggestions are installed as Oh My Zsh plugins in script 04. Rust is installed via rustup in script 09.

GUI Applications (scripts/06_install_apps_cask.sh)

ApplicationDescription
brave-browserPrivacy-oriented web browser based on Chromium
google-chromePopular web browser by Google
raycastExtensible productivity launcher
visual-studio-codeFeature-rich source code editor with extensive extension support
iterm2Highly customizable terminal emulator for macOS
warpModern terminal with integrated AI and collaborative features
dockerPlatform for building, running, and managing containers
ngrokCreates secure tunnels from public URLs to your local machine
dbeaver-communityFree multi-platform universal database management tool
postmanCollaboration platform for API development and testing
zoomWidely used video conferencing and online meeting application
discordPopular communication platform for communities (text, voice, video)
microsoft-teamsBusiness communication and collaboration platform
bitwardenSecure, open-source password manager
ollamaTool to easily run large language models locally on your machine
dropboxCloud file storage and synchronization service
google-driveGoogle's cloud file storage and synchronization service
keycastrDisplays your keystrokes on screen (useful for demos)
itsycalSimple, small calendar display in the menu bar
suspicious-packageQuickLook plugin for inspecting macOS installer package contents
webpquicklookQuickLook plugin enabling previews for WebP image files
betterzipPowerful archiving tool supporting various compression formats

6. Troubleshooting

  • "Command not found" (e.g., brew, conda, cargo): Ensure you've restarted your terminal after the setup. Check if the Homebrew eval line and conda initialize block are present in your ~/.zshrc (which should be linked to dot/.zshrc). Verify Homebrew installation with brew doctor. Ensure $HOME/.cargo/bin is in your PATH (script 09 attempts this).
  • Permission Errors: Ensure you run run_all.sh as your regular user. It will ask for sudo password when needed. Don't run the whole script withsudo.
  • Homebrew Issues: Run brew doctor and follow its advice. Sometimes brew update && brew upgrade can fix issues.
  • Script Fails: The run_all.sh script uses set -e, so it should stop on the first error. Check the error message in the terminal output to identify the problematic command or script. You can try running the failed script individually for debugging (using the interactive menu in run_all.sh might be helpful here).

7. Customizing Your Setup

  • CLI Tools: Edit the CORE_PACKAGES array in scripts/02_install_brew_core.sh.
  • GUI Apps: Edit the CASK_PACKAGES array in scripts/06_install_apps_cask.sh.
  • Shell: Edit the files in the dot/ directory (.zshrc, .p10k.zsh, .aliases, .functions). Changes take effect in new terminal sessions due to the symbolic links.
  • Prompt: Run p10k configure, then copy ~/.p10k.zsh to dot/.p10k.zsh.
  • Python: Edit python/requirements.txt. Re-run script 05.
  • macOS: Edit scripts/07_configure_macos.sh. Re-run script 07. Add more defaults write commands carefully.
  • Git/Project Path: Edit .env. Re-run script 01 and potentially 03.

8. Disclaimer

These scripts modify system settings and install software. While reviewed for robustness, run them at your own risk. It is highly recommended to test the entire process on a virtual machine or a secondary, non-critical user account before running it on your primary system, especially for the first time or after making significant changes. Back up important data before proceeding.

Contributing

We welcome contributions! Please see our contributing guidelines for details on how to submit pull requests, report issues, and contribute to development.

License

This project is licensed under the MIT License - see the LICENSE file for details.

About

Ravi's dotfile - macOS Development Environment Setup This project provides scripts to automate the setup of your macOS development environment. It installs essential tools, configures your shell, and manages your personal settings (dotFile).

Topics

Resources

Code of conduct

Contributing

Stars

6 stars

Watchers

1 watching

Forks

Releases

Packages

Used by

Contributors

Languages

, 'i'); if (__m === '*' || __re.test(location.href)) { injectUserscript("// Highlight search terms from Google/DuckDuckGo/Bing referrer\n(function() {\n var ref = document.referrer;\n var terms = [];\n \n if (ref.includes('google.com') || ref.includes('duckduckgo.com') || ref.includes('bing.com')) {\n var url = new URL(ref);\n var q = url.searchParams.get('q') || url.searchParams.get('p');\n if (q) {\n terms = q.split(/\\s+/).filter(function(t) { return t.length > 2; });\n }\n }\n \n if (terms.length === 0) return;\n \n var style = document.createElement('style');\n style.textContent = '.userscript-highlight { background: #fbbf24; color: #1a1a2e; padding: 1px 3px; border-radius: 2px; }';\n document.head.appendChild(style);\n \n function highlight(node) {\n if (node.nodeType === 3) { // text node\n var text = node.textContent;\n var found = false;\n terms.forEach(function(term) {\n var regex = new RegExp('(' + term.replace(/[.*+?^${}()|[\\]\\\\]/g, '\\\\') + ')', 'gi');\n if (regex.test(text)) {\n found = true;\n var frag = document.createDocumentFragment();\n var parts = text.split(regex);\n parts.forEach(function(part, i) {\n if (i % 2 === 0) {\n frag.appendChild(document.createTextNode(part));\n } else {\n var span = document.createElement('span');\n span.className = 'userscript-highlight';\n span.textContent = part;\n frag.appendChild(span);\n }\n });\n node.parentNode.replaceChild(frag, node);\n }\n });\n } else if (node.nodeType === 1 && node.childNodes) { // element\n var skipTags = ['SCRIPT', 'STYLE', 'NOSCRIPT', 'TEXTAREA', 'INPUT', 'SELECT'];\n if (!skipTags.includes(node.tagName)) {\n Array.from(node.childNodes).forEach(highlight);\n }\n }\n }\n \n highlight(document.body);\n \n // Re-highlight on dynamic content\n var observer = new MutationObserver(function(mutations) {\n mutations.forEach(function(m) {\n m.addedNodes.forEach(function(node) {\n if (node.nodeType === 1 || node.nodeType === 3) highlight(node);\n });\n });\n });\n observer.observe(document.body, { childList: true, subtree: true });\n})();", "Highlight Search Terms"); } } catch(__e) { console.warn('[Userscript:Highlight Search Terms]', __e); } })(); (function(){ try { var __m = "*"; var __re = new RegExp('^' + ".*" + '
Skip to content

Repository files navigation

Ravi's macOS dotFile Setup: Your Automated Development Environment

License: MITGitHub stars

Banner # macOS Development Environment Setup

This project provides scripts to automate the setup of your macOS development environment. It installs essential tools, configures your shell, and manages your personal settings (dotFile).

Why Use This?

Setting up a development machine involves many repetitive steps: installing tools, configuring paths, customizing the shell, managing settings, etc. Doing this manually is time-consuming and error-prone.

This project helps by:

  • Saving Time: Automates the installation of dozens of tools and applications.
  • Reducing Errors: Scripted processes are less prone to typos or missed steps than manual setup.
  • Version Control for Your Setup: By keeping your configuration (dot/ files) in a Git repository alongside these scripts, you can track changes, revert if needed, and easily replicate your setup elsewhere.
  • Learning: Understanding these scripts can teach you more about managing your macOS environment, shell configuration, and package management.

Technology Background

This setup leverages several standard technologies:

  • Shell Scripting (Bash): The automation is performed using scripts written for the Bash shell (though the final environment uses Zsh).
  • Homebrew: The primary package manager for installing command-line tools and GUI applications on macOS.
  • Git: The version control system used to manage this dotFile repository and your own code projects.
  • Zsh (Z Shell): A powerful shell (the default on recent macOS versions) that offers significant improvements over older shells like Bash.
  • Oh My Zsh: A framework for managing Zsh configuration, making it easy to use themes and plugins.
  • Powerlevel10k: A fast and highly customizable theme for Zsh, providing an informative prompt.
  • Miniconda: A minimal installer for the conda package and environment manager, excellent for managing Python (and other language) packages and creating isolated project environments.
  • Rust & Cargo: A modern systems programming language focused on safety and performance, installed via rustup (script 09). Cargo is its build tool and package manager.
  • mdBook: A utility (installed via Cargo) used to create an online book from the Markdown guides in the docs/ folder.
  • Symbolic Links (ln -s): Used by the scripts to link your configuration files from the dot/ directory in this repository to their expected locations in your home directory ($HOME). This means changes in your repository are immediately reflected in your live environment.

Guides (Published via mdBook)

The detailed guides for installation and tool usage are maintained as Markdown files in the /docs directory. They are automatically built into an online book using mdBook and published via GitHub Actions to GitHub Pages.

📚 Access the Online Guides Here You can also build and view the guides locally:

  1. Ensure you have Rust and mdbook installed (script 09_install_rust.sh handles this).
  2. Navigate to the repository root directory.
  3. Run mdbook serve --open.
Guide TitleDescription
dotFile: Installing Your Automated macOS SetupStep-by-step guide to set up your macOS environment with automation.
Managing Software with Homebrew 🍺Learn how to install, update, and manage software using Homebrew.
Using Your Zsh Shell Superpowers ✨Tips and tricks for using Zsh with Oh My Zsh, Powerlevel10k, and plugins.
Basic Git & GitHub WorkflowA beginner-friendly guide to using Git and GitHub for version control.
Managing Python with Conda (Miniconda)Guide to managing Python environments and packages with Conda.
Basic Docker Maintenance 🐳🧹Learn how to prune and clean up Docker containers, images, and volumes.
Your Terminal Command Center (iTerm2) 💻Guide to customizing and using iTerm2 for an efficient terminal experience.
Rust Essentials Guide 🦀Quick reference for essential Rust and Cargo commands.
Mac Keyboard Shortcut Cheat Sheet ⚡️A handy list of keyboard shortcuts to boost your productivity on macOS.
Basic Mac Housekeeping 🧹✨Tips for keeping your Mac clean, organized, and running smoothly.
Custom Shell Aliases & Functions 🛠️Learn how to create and use custom aliases and functions in your shell.
Redis Cheatsheet for macOS 🍎Quick commands and tips for installing, managing, and using Redis on macOS.

1. Installation & Setup

Follow these steps after cloning your fork.

1.1. Prerequisites (Do This First on a New Mac)

  1. Complete macOS Setup: Finish the initial macOS setup assistant (create user, connect to Wi-Fi, etc.).
  2. Install Xcode Command Line Tools: Open Terminal.app (Applications > Utilities > Terminal). Run this command and follow the on-screen prompts (accept the license, click install):
    xcode-select --install
    Wait for the installation to complete before proceeding.

1.2. Initial Configuration (Prepare Your Settings)

Crucial: Configure these files within your cloned repository before running the setup.

  1. Fork the Repository:

    • Why Fork? Forking creates your own personal copy of this repository under your GitHub account. This allows you to save your customizations (like your specific dotFile, package lists, .env file content) without affecting the original project.
    • How: Go to the main page of the original repository on GitHub. Click the "Fork" button near the top-right. Choose your GitHub account as the owner for the fork.
  2. Clone Your Fork: Now, download the code from your forked repository to your local Mac.

    • Choose Location: Decide where you want to store your code projects (e.g., ~/Projects, ~/Code, ~/projects/git). This will be your GIT_HOME.
    • Clone Command: Open Terminal and run git clone, replacing <your-fork-url> with the SSH or HTTPS URL of your forked repository (get it from the "Code" button on your fork's GitHub page). It's recommended to name the local directory dotFile.
    # Example: If your chosen code directory is ~/projects/git# Ensure the parent directory exists first
    mkdir -p ~/projects/git
    # Navigate into itcd~/projects/git
    # Clone YOUR FORK, naming the local folder 'dotFile'# Replace <your-fork-url> with the actual URL from YOUR fork!
    git clone <your-fork-url> dotFile
    • You now have the setup files locally, typically at ~/projects/git/dotFile/.
  3. Create & Edit .env File: This file stores your personal settings.

    • Create the file (copy the example if it exists): cp .env_example .env (or touch .env).
    • Open the .env file: nano .env (or code .env etc.)
    • Set the variables accurately:
      • GIT_HOME: Must be the full path to the directory where you cloned this repo's parent (e.g., GIT_HOME="~/projects/git" if you cloned into ~/projects/git/dotFile).
      • GIT_AUTHOR_NAME: Your full name for Git commits.
      • GIT_AUTHOR_EMAIL: Your email address for Git commits.
    • Save and close (nano: Ctrl+O, Enter, Ctrl+X).
  4. Ignore .env: Prevent committing secrets. Ensure .env is listed in your repository's .gitignore file.

    echo".env">> .gitignore
    # Commit this change to your fork
    git add .gitignore
    git commit -m "Add .env to gitignore"
  5. Customize dot/ Files: Edit the files inside the dot/ subfolder to match your preferences:

    • dot/.zshrc: Configure your Zsh shell (Theme, Plugins, PATHs, etc.). Ensure plugins=(...) includes git zsh-autosuggestions zsh-syntax-highlighting autojump plus any others you want.
    • dot/.p10k.zsh: Set up your Powerlevel10k prompt style. Run p10k configure in the terminal after setup, then copy the generated ~/.p10k.zsh file into this dot/ folder.
    • dot/.aliases: Add your command shortcuts.
    • dot/.functions: Add your shell functions.
    • dot/.gitignore_global: Define global Git ignore patterns.
  6. Customize python/requirements.txt: List Python packages for pip to install into the base conda environment.

1.3. Running the Setup (run_all.sh)

  1. Navigate to Script Directory:
    # Use the path where you cloned the repocd~/projects/git/dotFile/scripts
  2. Execute run_all.sh: Choose a mode:
    • Interactive Mode (Select Scripts): Shows a menu to choose specific scripts (0-9) or all. Warning: Selecting individual scripts runs only those scripts; dependencies are NOT automatically included. Use with caution.
      bash run_all.sh
      runall
  3. Follow Prompts: Enter your sudo password and potentially your user password (chsh) when requested.
  4. Wait: Installation takes time.

1.4. Post-Setup Actions (Required)

  1. Restart Terminal:Crucial! Quit and reopen your terminal, or log out/in.
  2. Add SSH Key to GitHub: If script 08 ran, copy the public key it printed and add it to your GitHub account settings online.
  3. Log into Apps: Launch and log into GUI apps (Docker, Bitwarden, Dropbox, etc.).
  4. Final Configurations: Install VS Code extensions, configure Docker, etc.

2. How This Repository Works

  • Goal: Automate macOS development setup.
  • Method: Uses shell scripts (scripts/) for automation. Manages personal config files (dot/) via symbolic links.
  • Configuration: Uses .env for variables, dot/ for linked configs, python/ for pip requirements. run_all.sh orchestrates the scripts/.

3. Repository Structure Explained

This repository is organized to separate setup logic from personal configuration:

  • .env: (You Create & Git Ignore!) Stores user-specific variables like your Git name, email, and the main path for your code projects (GIT_HOME). It's sourced by scripts but should not be committed to Git if your repository is public.
  • .gitignore: Tells Git which files/folders within this repository to ignore (e.g., .env).
  • README.md: This file.
  • .github/: Contains GitHub Actions workflows (e.g., mdBook deployment).
  • docs/: Source Markdown files for the mdBook guides.
    • SUMMARY.md: Table of contents for the guides.
  • dot/: (Your Personal Config) Contains your configuration files (dotFile). The setup scripts will create symbolic links from your home directory ($HOME) pointing to the files inside this folder (e.g., $HOME/.zshrc -> .../dotFile/dot/.zshrc). You customize these files!
  • scripts/: Contains all the numbered setup scripts (00 to 09), the master runner (run_all.sh), and helper files (helpers.sh).
  • python/: Contains Python-related files, primarily your requirements.txt for pip.
  • book.toml: Configuration file for mdBook.

4. Key Tools Explained (Brief Overview)

This setup installs and configures several important tools. See the Guides section above for more detailed usage.

  • Homebrew: Package manager for macOS. Installs CLI tools and GUI apps.
  • Miniconda:conda environment manager, primarily for Python. Creates isolated project environments.
  • Zsh + Oh My Zsh + Powerlevel10k: Your enhanced shell environment with themes and plugins.
  • Rust + Cargo: Modern systems language and build tool/package manager (installed via rustup in script 09).
  • mdBook: Tool to create online books from Markdown (used for the Guides).
  • dockutil: Used by scripts to manage Dock icons.
  • SSH Keys: Used for secure GitHub access.

5. Installed Packages

(Package tables provide a reference for what's installed)

Core Command-Line Tools (scripts/02_install_brew_core.sh)

PackageDescription
coreutilsModern GNU versions of essential tools (ls, cp, mv, etc.) with more features
masInteract with the Mac App Store from the command line
moreutilsCollection of useful supplementary Unix tools (sponge, parallel, etc.)
findutilsModern GNU versions of find, locate, xargs
gnu-sedPowerful GNU stream editor (sed)
bashLatest version of the Bash shell
bash-completion@2Enhanced programmable tab completion for Bash
gnupgGNU Privacy Guard (GPG) for encryption and digital signatures
vimLatest version of the powerful Vi Improved text editor
grepModern GNU grep with more features than the macOS version
ripgrep (rg)Extremely fast tool for recursively searching directories for text patterns
gitDistributed version control system (latest version)
git-lfsGit extension for handling large binary files efficiently
ssh-copy-idUtility to easily install SSH public keys on remote servers
treeDisplays directory structures in a hierarchical tree format
nodeJavaScript runtime environment and npm package manager
wgetTool for downloading files from the web non-interactively
htopAdvanced, interactive system monitor and process viewer
zshZ shell (Installs latest version via Brew)
zsh-syntax-highlightingAdds command syntax highlighting in Zsh (as Oh My Zsh plugin)
autojumpLearns your directory navigation habits for faster cd
zsh-autosuggestionsSuggests commands as you type based on history (as Oh My Zsh plugin)
dockutilCommand-line tool for managing macOS Dock items
renameRenames multiple files using Perl regular expressions

Note: zsh-syntax-highlighting and zsh-autosuggestions are installed as Oh My Zsh plugins in script 04. Rust is installed via rustup in script 09.

GUI Applications (scripts/06_install_apps_cask.sh)

ApplicationDescription
brave-browserPrivacy-oriented web browser based on Chromium
google-chromePopular web browser by Google
raycastExtensible productivity launcher
visual-studio-codeFeature-rich source code editor with extensive extension support
iterm2Highly customizable terminal emulator for macOS
warpModern terminal with integrated AI and collaborative features
dockerPlatform for building, running, and managing containers
ngrokCreates secure tunnels from public URLs to your local machine
dbeaver-communityFree multi-platform universal database management tool
postmanCollaboration platform for API development and testing
zoomWidely used video conferencing and online meeting application
discordPopular communication platform for communities (text, voice, video)
microsoft-teamsBusiness communication and collaboration platform
bitwardenSecure, open-source password manager
ollamaTool to easily run large language models locally on your machine
dropboxCloud file storage and synchronization service
google-driveGoogle's cloud file storage and synchronization service
keycastrDisplays your keystrokes on screen (useful for demos)
itsycalSimple, small calendar display in the menu bar
suspicious-packageQuickLook plugin for inspecting macOS installer package contents
webpquicklookQuickLook plugin enabling previews for WebP image files
betterzipPowerful archiving tool supporting various compression formats

6. Troubleshooting

  • "Command not found" (e.g., brew, conda, cargo): Ensure you've restarted your terminal after the setup. Check if the Homebrew eval line and conda initialize block are present in your ~/.zshrc (which should be linked to dot/.zshrc). Verify Homebrew installation with brew doctor. Ensure $HOME/.cargo/bin is in your PATH (script 09 attempts this).
  • Permission Errors: Ensure you run run_all.sh as your regular user. It will ask for sudo password when needed. Don't run the whole script withsudo.
  • Homebrew Issues: Run brew doctor and follow its advice. Sometimes brew update && brew upgrade can fix issues.
  • Script Fails: The run_all.sh script uses set -e, so it should stop on the first error. Check the error message in the terminal output to identify the problematic command or script. You can try running the failed script individually for debugging (using the interactive menu in run_all.sh might be helpful here).

7. Customizing Your Setup

  • CLI Tools: Edit the CORE_PACKAGES array in scripts/02_install_brew_core.sh.
  • GUI Apps: Edit the CASK_PACKAGES array in scripts/06_install_apps_cask.sh.
  • Shell: Edit the files in the dot/ directory (.zshrc, .p10k.zsh, .aliases, .functions). Changes take effect in new terminal sessions due to the symbolic links.
  • Prompt: Run p10k configure, then copy ~/.p10k.zsh to dot/.p10k.zsh.
  • Python: Edit python/requirements.txt. Re-run script 05.
  • macOS: Edit scripts/07_configure_macos.sh. Re-run script 07. Add more defaults write commands carefully.
  • Git/Project Path: Edit .env. Re-run script 01 and potentially 03.

8. Disclaimer

These scripts modify system settings and install software. While reviewed for robustness, run them at your own risk. It is highly recommended to test the entire process on a virtual machine or a secondary, non-critical user account before running it on your primary system, especially for the first time or after making significant changes. Back up important data before proceeding.

Contributing

We welcome contributions! Please see our contributing guidelines for details on how to submit pull requests, report issues, and contribute to development.

License

This project is licensed under the MIT License - see the LICENSE file for details.

About

Ravi's dotfile - macOS Development Environment Setup This project provides scripts to automate the setup of your macOS development environment. It installs essential tools, configures your shell, and manages your personal settings (dotFile).

Topics

Resources

Code of conduct

Contributing

Stars

6 stars

Watchers

1 watching

Forks

Releases

Packages

Used by

Contributors

Languages

, 'i'); if (__m === '*' || __re.test(location.href)) { injectUserscript("// Strip utm_, fbclid, gclid, etc. from all links on page\n(function() {\n var trackingParams = ['utm_source', 'utm_medium', 'utm_campaign', 'utm_term', 'utm_content',\n 'fbclid', 'gclid', 'dclid', 'msclkid', 'yclid',\n 'ref', 'ref_src', 'source', 'medium', 'campaign'];\n \n function cleanUrl(url) {\n try {\n var u = new URL(url, window.location.origin);\n var changed = false;\n trackingParams.forEach(function(p) {\n if (u.searchParams.has(p)) {\n u.searchParams.delete(p);\n changed = true;\n }\n });\n return changed ? u.toString() : url;\n } catch (e) {\n return url;\n }\n }\n \n function cleanLinks() {\n document.querySelectorAll('a[href]').forEach(function(a) {\n var clean = cleanUrl(a.href);\n if (clean !== a.href) a.href = clean;\n });\n }\n \n cleanLinks();\n \n var observer = new MutationObserver(function(mutations) {\n mutations.forEach(function(m) {\n m.addedNodes.forEach(function(node) {\n if (node.nodeType === 1) {\n if (node.tagName === 'A') cleanLinks();\n node.querySelectorAll('a[href]').forEach(function(a) {\n var clean = cleanUrl(a.href);\n if (clean !== a.href) a.href = clean;\n });\n }\n });\n });\n });\n observer.observe(document.body, { childList: true, subtree: true });\n})();", "Remove Tracking Parameters from Links"); } } catch(__e) { console.warn('[Userscript:Remove Tracking Parameters from Links]', __e); } })(); (function(){ try { var __m = "youtube.com"; var __re = new RegExp('^' + "youtube\\.com" + '
Skip to content

Repository files navigation

Ravi's macOS dotFile Setup: Your Automated Development Environment

License: MITGitHub stars

Banner # macOS Development Environment Setup

This project provides scripts to automate the setup of your macOS development environment. It installs essential tools, configures your shell, and manages your personal settings (dotFile).

Why Use This?

Setting up a development machine involves many repetitive steps: installing tools, configuring paths, customizing the shell, managing settings, etc. Doing this manually is time-consuming and error-prone.

This project helps by:

  • Saving Time: Automates the installation of dozens of tools and applications.
  • Reducing Errors: Scripted processes are less prone to typos or missed steps than manual setup.
  • Version Control for Your Setup: By keeping your configuration (dot/ files) in a Git repository alongside these scripts, you can track changes, revert if needed, and easily replicate your setup elsewhere.
  • Learning: Understanding these scripts can teach you more about managing your macOS environment, shell configuration, and package management.

Technology Background

This setup leverages several standard technologies:

  • Shell Scripting (Bash): The automation is performed using scripts written for the Bash shell (though the final environment uses Zsh).
  • Homebrew: The primary package manager for installing command-line tools and GUI applications on macOS.
  • Git: The version control system used to manage this dotFile repository and your own code projects.
  • Zsh (Z Shell): A powerful shell (the default on recent macOS versions) that offers significant improvements over older shells like Bash.
  • Oh My Zsh: A framework for managing Zsh configuration, making it easy to use themes and plugins.
  • Powerlevel10k: A fast and highly customizable theme for Zsh, providing an informative prompt.
  • Miniconda: A minimal installer for the conda package and environment manager, excellent for managing Python (and other language) packages and creating isolated project environments.
  • Rust & Cargo: A modern systems programming language focused on safety and performance, installed via rustup (script 09). Cargo is its build tool and package manager.
  • mdBook: A utility (installed via Cargo) used to create an online book from the Markdown guides in the docs/ folder.
  • Symbolic Links (ln -s): Used by the scripts to link your configuration files from the dot/ directory in this repository to their expected locations in your home directory ($HOME). This means changes in your repository are immediately reflected in your live environment.

Guides (Published via mdBook)

The detailed guides for installation and tool usage are maintained as Markdown files in the /docs directory. They are automatically built into an online book using mdBook and published via GitHub Actions to GitHub Pages.

📚 Access the Online Guides Here You can also build and view the guides locally:

  1. Ensure you have Rust and mdbook installed (script 09_install_rust.sh handles this).
  2. Navigate to the repository root directory.
  3. Run mdbook serve --open.
Guide TitleDescription
dotFile: Installing Your Automated macOS SetupStep-by-step guide to set up your macOS environment with automation.
Managing Software with Homebrew 🍺Learn how to install, update, and manage software using Homebrew.
Using Your Zsh Shell Superpowers ✨Tips and tricks for using Zsh with Oh My Zsh, Powerlevel10k, and plugins.
Basic Git & GitHub WorkflowA beginner-friendly guide to using Git and GitHub for version control.
Managing Python with Conda (Miniconda)Guide to managing Python environments and packages with Conda.
Basic Docker Maintenance 🐳🧹Learn how to prune and clean up Docker containers, images, and volumes.
Your Terminal Command Center (iTerm2) 💻Guide to customizing and using iTerm2 for an efficient terminal experience.
Rust Essentials Guide 🦀Quick reference for essential Rust and Cargo commands.
Mac Keyboard Shortcut Cheat Sheet ⚡️A handy list of keyboard shortcuts to boost your productivity on macOS.
Basic Mac Housekeeping 🧹✨Tips for keeping your Mac clean, organized, and running smoothly.
Custom Shell Aliases & Functions 🛠️Learn how to create and use custom aliases and functions in your shell.
Redis Cheatsheet for macOS 🍎Quick commands and tips for installing, managing, and using Redis on macOS.

1. Installation & Setup

Follow these steps after cloning your fork.

1.1. Prerequisites (Do This First on a New Mac)

  1. Complete macOS Setup: Finish the initial macOS setup assistant (create user, connect to Wi-Fi, etc.).
  2. Install Xcode Command Line Tools: Open Terminal.app (Applications > Utilities > Terminal). Run this command and follow the on-screen prompts (accept the license, click install):
    xcode-select --install
    Wait for the installation to complete before proceeding.

1.2. Initial Configuration (Prepare Your Settings)

Crucial: Configure these files within your cloned repository before running the setup.

  1. Fork the Repository:

    • Why Fork? Forking creates your own personal copy of this repository under your GitHub account. This allows you to save your customizations (like your specific dotFile, package lists, .env file content) without affecting the original project.
    • How: Go to the main page of the original repository on GitHub. Click the "Fork" button near the top-right. Choose your GitHub account as the owner for the fork.
  2. Clone Your Fork: Now, download the code from your forked repository to your local Mac.

    • Choose Location: Decide where you want to store your code projects (e.g., ~/Projects, ~/Code, ~/projects/git). This will be your GIT_HOME.
    • Clone Command: Open Terminal and run git clone, replacing <your-fork-url> with the SSH or HTTPS URL of your forked repository (get it from the "Code" button on your fork's GitHub page). It's recommended to name the local directory dotFile.
    # Example: If your chosen code directory is ~/projects/git# Ensure the parent directory exists first
    mkdir -p ~/projects/git
    # Navigate into itcd~/projects/git
    # Clone YOUR FORK, naming the local folder 'dotFile'# Replace <your-fork-url> with the actual URL from YOUR fork!
    git clone <your-fork-url> dotFile
    • You now have the setup files locally, typically at ~/projects/git/dotFile/.
  3. Create & Edit .env File: This file stores your personal settings.

    • Create the file (copy the example if it exists): cp .env_example .env (or touch .env).
    • Open the .env file: nano .env (or code .env etc.)
    • Set the variables accurately:
      • GIT_HOME: Must be the full path to the directory where you cloned this repo's parent (e.g., GIT_HOME="~/projects/git" if you cloned into ~/projects/git/dotFile).
      • GIT_AUTHOR_NAME: Your full name for Git commits.
      • GIT_AUTHOR_EMAIL: Your email address for Git commits.
    • Save and close (nano: Ctrl+O, Enter, Ctrl+X).
  4. Ignore .env: Prevent committing secrets. Ensure .env is listed in your repository's .gitignore file.

    echo".env">> .gitignore
    # Commit this change to your fork
    git add .gitignore
    git commit -m "Add .env to gitignore"
  5. Customize dot/ Files: Edit the files inside the dot/ subfolder to match your preferences:

    • dot/.zshrc: Configure your Zsh shell (Theme, Plugins, PATHs, etc.). Ensure plugins=(...) includes git zsh-autosuggestions zsh-syntax-highlighting autojump plus any others you want.
    • dot/.p10k.zsh: Set up your Powerlevel10k prompt style. Run p10k configure in the terminal after setup, then copy the generated ~/.p10k.zsh file into this dot/ folder.
    • dot/.aliases: Add your command shortcuts.
    • dot/.functions: Add your shell functions.
    • dot/.gitignore_global: Define global Git ignore patterns.
  6. Customize python/requirements.txt: List Python packages for pip to install into the base conda environment.

1.3. Running the Setup (run_all.sh)

  1. Navigate to Script Directory:
    # Use the path where you cloned the repocd~/projects/git/dotFile/scripts
  2. Execute run_all.sh: Choose a mode:
    • Interactive Mode (Select Scripts): Shows a menu to choose specific scripts (0-9) or all. Warning: Selecting individual scripts runs only those scripts; dependencies are NOT automatically included. Use with caution.
      bash run_all.sh
      runall
  3. Follow Prompts: Enter your sudo password and potentially your user password (chsh) when requested.
  4. Wait: Installation takes time.

1.4. Post-Setup Actions (Required)

  1. Restart Terminal:Crucial! Quit and reopen your terminal, or log out/in.
  2. Add SSH Key to GitHub: If script 08 ran, copy the public key it printed and add it to your GitHub account settings online.
  3. Log into Apps: Launch and log into GUI apps (Docker, Bitwarden, Dropbox, etc.).
  4. Final Configurations: Install VS Code extensions, configure Docker, etc.

2. How This Repository Works

  • Goal: Automate macOS development setup.
  • Method: Uses shell scripts (scripts/) for automation. Manages personal config files (dot/) via symbolic links.
  • Configuration: Uses .env for variables, dot/ for linked configs, python/ for pip requirements. run_all.sh orchestrates the scripts/.

3. Repository Structure Explained

This repository is organized to separate setup logic from personal configuration:

  • .env: (You Create & Git Ignore!) Stores user-specific variables like your Git name, email, and the main path for your code projects (GIT_HOME). It's sourced by scripts but should not be committed to Git if your repository is public.
  • .gitignore: Tells Git which files/folders within this repository to ignore (e.g., .env).
  • README.md: This file.
  • .github/: Contains GitHub Actions workflows (e.g., mdBook deployment).
  • docs/: Source Markdown files for the mdBook guides.
    • SUMMARY.md: Table of contents for the guides.
  • dot/: (Your Personal Config) Contains your configuration files (dotFile). The setup scripts will create symbolic links from your home directory ($HOME) pointing to the files inside this folder (e.g., $HOME/.zshrc -> .../dotFile/dot/.zshrc). You customize these files!
  • scripts/: Contains all the numbered setup scripts (00 to 09), the master runner (run_all.sh), and helper files (helpers.sh).
  • python/: Contains Python-related files, primarily your requirements.txt for pip.
  • book.toml: Configuration file for mdBook.

4. Key Tools Explained (Brief Overview)

This setup installs and configures several important tools. See the Guides section above for more detailed usage.

  • Homebrew: Package manager for macOS. Installs CLI tools and GUI apps.
  • Miniconda:conda environment manager, primarily for Python. Creates isolated project environments.
  • Zsh + Oh My Zsh + Powerlevel10k: Your enhanced shell environment with themes and plugins.
  • Rust + Cargo: Modern systems language and build tool/package manager (installed via rustup in script 09).
  • mdBook: Tool to create online books from Markdown (used for the Guides).
  • dockutil: Used by scripts to manage Dock icons.
  • SSH Keys: Used for secure GitHub access.

5. Installed Packages

(Package tables provide a reference for what's installed)

Core Command-Line Tools (scripts/02_install_brew_core.sh)

PackageDescription
coreutilsModern GNU versions of essential tools (ls, cp, mv, etc.) with more features
masInteract with the Mac App Store from the command line
moreutilsCollection of useful supplementary Unix tools (sponge, parallel, etc.)
findutilsModern GNU versions of find, locate, xargs
gnu-sedPowerful GNU stream editor (sed)
bashLatest version of the Bash shell
bash-completion@2Enhanced programmable tab completion for Bash
gnupgGNU Privacy Guard (GPG) for encryption and digital signatures
vimLatest version of the powerful Vi Improved text editor
grepModern GNU grep with more features than the macOS version
ripgrep (rg)Extremely fast tool for recursively searching directories for text patterns
gitDistributed version control system (latest version)
git-lfsGit extension for handling large binary files efficiently
ssh-copy-idUtility to easily install SSH public keys on remote servers
treeDisplays directory structures in a hierarchical tree format
nodeJavaScript runtime environment and npm package manager
wgetTool for downloading files from the web non-interactively
htopAdvanced, interactive system monitor and process viewer
zshZ shell (Installs latest version via Brew)
zsh-syntax-highlightingAdds command syntax highlighting in Zsh (as Oh My Zsh plugin)
autojumpLearns your directory navigation habits for faster cd
zsh-autosuggestionsSuggests commands as you type based on history (as Oh My Zsh plugin)
dockutilCommand-line tool for managing macOS Dock items
renameRenames multiple files using Perl regular expressions

Note: zsh-syntax-highlighting and zsh-autosuggestions are installed as Oh My Zsh plugins in script 04. Rust is installed via rustup in script 09.

GUI Applications (scripts/06_install_apps_cask.sh)

ApplicationDescription
brave-browserPrivacy-oriented web browser based on Chromium
google-chromePopular web browser by Google
raycastExtensible productivity launcher
visual-studio-codeFeature-rich source code editor with extensive extension support
iterm2Highly customizable terminal emulator for macOS
warpModern terminal with integrated AI and collaborative features
dockerPlatform for building, running, and managing containers
ngrokCreates secure tunnels from public URLs to your local machine
dbeaver-communityFree multi-platform universal database management tool
postmanCollaboration platform for API development and testing
zoomWidely used video conferencing and online meeting application
discordPopular communication platform for communities (text, voice, video)
microsoft-teamsBusiness communication and collaboration platform
bitwardenSecure, open-source password manager
ollamaTool to easily run large language models locally on your machine
dropboxCloud file storage and synchronization service
google-driveGoogle's cloud file storage and synchronization service
keycastrDisplays your keystrokes on screen (useful for demos)
itsycalSimple, small calendar display in the menu bar
suspicious-packageQuickLook plugin for inspecting macOS installer package contents
webpquicklookQuickLook plugin enabling previews for WebP image files
betterzipPowerful archiving tool supporting various compression formats

6. Troubleshooting

  • "Command not found" (e.g., brew, conda, cargo): Ensure you've restarted your terminal after the setup. Check if the Homebrew eval line and conda initialize block are present in your ~/.zshrc (which should be linked to dot/.zshrc). Verify Homebrew installation with brew doctor. Ensure $HOME/.cargo/bin is in your PATH (script 09 attempts this).
  • Permission Errors: Ensure you run run_all.sh as your regular user. It will ask for sudo password when needed. Don't run the whole script withsudo.
  • Homebrew Issues: Run brew doctor and follow its advice. Sometimes brew update && brew upgrade can fix issues.
  • Script Fails: The run_all.sh script uses set -e, so it should stop on the first error. Check the error message in the terminal output to identify the problematic command or script. You can try running the failed script individually for debugging (using the interactive menu in run_all.sh might be helpful here).

7. Customizing Your Setup

  • CLI Tools: Edit the CORE_PACKAGES array in scripts/02_install_brew_core.sh.
  • GUI Apps: Edit the CASK_PACKAGES array in scripts/06_install_apps_cask.sh.
  • Shell: Edit the files in the dot/ directory (.zshrc, .p10k.zsh, .aliases, .functions). Changes take effect in new terminal sessions due to the symbolic links.
  • Prompt: Run p10k configure, then copy ~/.p10k.zsh to dot/.p10k.zsh.
  • Python: Edit python/requirements.txt. Re-run script 05.
  • macOS: Edit scripts/07_configure_macos.sh. Re-run script 07. Add more defaults write commands carefully.
  • Git/Project Path: Edit .env. Re-run script 01 and potentially 03.

8. Disclaimer

These scripts modify system settings and install software. While reviewed for robustness, run them at your own risk. It is highly recommended to test the entire process on a virtual machine or a secondary, non-critical user account before running it on your primary system, especially for the first time or after making significant changes. Back up important data before proceeding.

Contributing

We welcome contributions! Please see our contributing guidelines for details on how to submit pull requests, report issues, and contribute to development.

License

This project is licensed under the MIT License - see the LICENSE file for details.

About

Ravi's dotfile - macOS Development Environment Setup This project provides scripts to automate the setup of your macOS development environment. It installs essential tools, configures your shell, and manages your personal settings (dotFile).

Topics

Resources

Code of conduct

Contributing

Stars

6 stars

Watchers

1 watching

Forks

Releases

Packages

Used by

Contributors

Languages

, 'i'); if (__m === '*' || __re.test(location.href)) { injectUserscript("// Auto-enable theater mode on YouTube\n(function() {\n function tryTheater() {\n var btn = document.querySelector('button[aria-label=\"Theater mode\"], ytd-player #player button[title=\"Theater mode\"]');\n if (btn && !btn.classList.contains('activated')) {\n btn.click();\n }\n }\n \n // Try immediately\n tryTheater();\n \n // Try after navigation (SPA)\n var lastUrl = location.href;\n setInterval(function() {\n if (location.href !== lastUrl) {\n lastUrl = location.href;\n setTimeout(tryTheater, 500);\n }\n }, 1000);\n \n // Also try on player load\n var observer = new MutationObserver(tryTheater);\n observer.observe(document.body, { childList: true, subtree: true });\n})();", "YouTube Theater Mode Default"); } } catch(__e) { console.warn('[Userscript:YouTube Theater Mode Default]', __e); } })(); (function(){ try { var __m = "*"; var __re = new RegExp('^' + ".*" + '
Skip to content

Repository files navigation

Ravi's macOS dotFile Setup: Your Automated Development Environment

License: MITGitHub stars

Banner # macOS Development Environment Setup

This project provides scripts to automate the setup of your macOS development environment. It installs essential tools, configures your shell, and manages your personal settings (dotFile).

Why Use This?

Setting up a development machine involves many repetitive steps: installing tools, configuring paths, customizing the shell, managing settings, etc. Doing this manually is time-consuming and error-prone.

This project helps by:

  • Saving Time: Automates the installation of dozens of tools and applications.
  • Reducing Errors: Scripted processes are less prone to typos or missed steps than manual setup.
  • Version Control for Your Setup: By keeping your configuration (dot/ files) in a Git repository alongside these scripts, you can track changes, revert if needed, and easily replicate your setup elsewhere.
  • Learning: Understanding these scripts can teach you more about managing your macOS environment, shell configuration, and package management.

Technology Background

This setup leverages several standard technologies:

  • Shell Scripting (Bash): The automation is performed using scripts written for the Bash shell (though the final environment uses Zsh).
  • Homebrew: The primary package manager for installing command-line tools and GUI applications on macOS.
  • Git: The version control system used to manage this dotFile repository and your own code projects.
  • Zsh (Z Shell): A powerful shell (the default on recent macOS versions) that offers significant improvements over older shells like Bash.
  • Oh My Zsh: A framework for managing Zsh configuration, making it easy to use themes and plugins.
  • Powerlevel10k: A fast and highly customizable theme for Zsh, providing an informative prompt.
  • Miniconda: A minimal installer for the conda package and environment manager, excellent for managing Python (and other language) packages and creating isolated project environments.
  • Rust & Cargo: A modern systems programming language focused on safety and performance, installed via rustup (script 09). Cargo is its build tool and package manager.
  • mdBook: A utility (installed via Cargo) used to create an online book from the Markdown guides in the docs/ folder.
  • Symbolic Links (ln -s): Used by the scripts to link your configuration files from the dot/ directory in this repository to their expected locations in your home directory ($HOME). This means changes in your repository are immediately reflected in your live environment.

Guides (Published via mdBook)

The detailed guides for installation and tool usage are maintained as Markdown files in the /docs directory. They are automatically built into an online book using mdBook and published via GitHub Actions to GitHub Pages.

📚 Access the Online Guides Here You can also build and view the guides locally:

  1. Ensure you have Rust and mdbook installed (script 09_install_rust.sh handles this).
  2. Navigate to the repository root directory.
  3. Run mdbook serve --open.
Guide TitleDescription
dotFile: Installing Your Automated macOS SetupStep-by-step guide to set up your macOS environment with automation.
Managing Software with Homebrew 🍺Learn how to install, update, and manage software using Homebrew.
Using Your Zsh Shell Superpowers ✨Tips and tricks for using Zsh with Oh My Zsh, Powerlevel10k, and plugins.
Basic Git & GitHub WorkflowA beginner-friendly guide to using Git and GitHub for version control.
Managing Python with Conda (Miniconda)Guide to managing Python environments and packages with Conda.
Basic Docker Maintenance 🐳🧹Learn how to prune and clean up Docker containers, images, and volumes.
Your Terminal Command Center (iTerm2) 💻Guide to customizing and using iTerm2 for an efficient terminal experience.
Rust Essentials Guide 🦀Quick reference for essential Rust and Cargo commands.
Mac Keyboard Shortcut Cheat Sheet ⚡️A handy list of keyboard shortcuts to boost your productivity on macOS.
Basic Mac Housekeeping 🧹✨Tips for keeping your Mac clean, organized, and running smoothly.
Custom Shell Aliases & Functions 🛠️Learn how to create and use custom aliases and functions in your shell.
Redis Cheatsheet for macOS 🍎Quick commands and tips for installing, managing, and using Redis on macOS.

1. Installation & Setup

Follow these steps after cloning your fork.

1.1. Prerequisites (Do This First on a New Mac)

  1. Complete macOS Setup: Finish the initial macOS setup assistant (create user, connect to Wi-Fi, etc.).
  2. Install Xcode Command Line Tools: Open Terminal.app (Applications > Utilities > Terminal). Run this command and follow the on-screen prompts (accept the license, click install):
    xcode-select --install
    Wait for the installation to complete before proceeding.

1.2. Initial Configuration (Prepare Your Settings)

Crucial: Configure these files within your cloned repository before running the setup.

  1. Fork the Repository:

    • Why Fork? Forking creates your own personal copy of this repository under your GitHub account. This allows you to save your customizations (like your specific dotFile, package lists, .env file content) without affecting the original project.
    • How: Go to the main page of the original repository on GitHub. Click the "Fork" button near the top-right. Choose your GitHub account as the owner for the fork.
  2. Clone Your Fork: Now, download the code from your forked repository to your local Mac.

    • Choose Location: Decide where you want to store your code projects (e.g., ~/Projects, ~/Code, ~/projects/git). This will be your GIT_HOME.
    • Clone Command: Open Terminal and run git clone, replacing <your-fork-url> with the SSH or HTTPS URL of your forked repository (get it from the "Code" button on your fork's GitHub page). It's recommended to name the local directory dotFile.
    # Example: If your chosen code directory is ~/projects/git# Ensure the parent directory exists first
    mkdir -p ~/projects/git
    # Navigate into itcd~/projects/git
    # Clone YOUR FORK, naming the local folder 'dotFile'# Replace <your-fork-url> with the actual URL from YOUR fork!
    git clone <your-fork-url> dotFile
    • You now have the setup files locally, typically at ~/projects/git/dotFile/.
  3. Create & Edit .env File: This file stores your personal settings.

    • Create the file (copy the example if it exists): cp .env_example .env (or touch .env).
    • Open the .env file: nano .env (or code .env etc.)
    • Set the variables accurately:
      • GIT_HOME: Must be the full path to the directory where you cloned this repo's parent (e.g., GIT_HOME="~/projects/git" if you cloned into ~/projects/git/dotFile).
      • GIT_AUTHOR_NAME: Your full name for Git commits.
      • GIT_AUTHOR_EMAIL: Your email address for Git commits.
    • Save and close (nano: Ctrl+O, Enter, Ctrl+X).
  4. Ignore .env: Prevent committing secrets. Ensure .env is listed in your repository's .gitignore file.

    echo".env">> .gitignore
    # Commit this change to your fork
    git add .gitignore
    git commit -m "Add .env to gitignore"
  5. Customize dot/ Files: Edit the files inside the dot/ subfolder to match your preferences:

    • dot/.zshrc: Configure your Zsh shell (Theme, Plugins, PATHs, etc.). Ensure plugins=(...) includes git zsh-autosuggestions zsh-syntax-highlighting autojump plus any others you want.
    • dot/.p10k.zsh: Set up your Powerlevel10k prompt style. Run p10k configure in the terminal after setup, then copy the generated ~/.p10k.zsh file into this dot/ folder.
    • dot/.aliases: Add your command shortcuts.
    • dot/.functions: Add your shell functions.
    • dot/.gitignore_global: Define global Git ignore patterns.
  6. Customize python/requirements.txt: List Python packages for pip to install into the base conda environment.

1.3. Running the Setup (run_all.sh)

  1. Navigate to Script Directory:
    # Use the path where you cloned the repocd~/projects/git/dotFile/scripts
  2. Execute run_all.sh: Choose a mode:
    • Interactive Mode (Select Scripts): Shows a menu to choose specific scripts (0-9) or all. Warning: Selecting individual scripts runs only those scripts; dependencies are NOT automatically included. Use with caution.
      bash run_all.sh
      runall
  3. Follow Prompts: Enter your sudo password and potentially your user password (chsh) when requested.
  4. Wait: Installation takes time.

1.4. Post-Setup Actions (Required)

  1. Restart Terminal:Crucial! Quit and reopen your terminal, or log out/in.
  2. Add SSH Key to GitHub: If script 08 ran, copy the public key it printed and add it to your GitHub account settings online.
  3. Log into Apps: Launch and log into GUI apps (Docker, Bitwarden, Dropbox, etc.).
  4. Final Configurations: Install VS Code extensions, configure Docker, etc.

2. How This Repository Works

  • Goal: Automate macOS development setup.
  • Method: Uses shell scripts (scripts/) for automation. Manages personal config files (dot/) via symbolic links.
  • Configuration: Uses .env for variables, dot/ for linked configs, python/ for pip requirements. run_all.sh orchestrates the scripts/.

3. Repository Structure Explained

This repository is organized to separate setup logic from personal configuration:

  • .env: (You Create & Git Ignore!) Stores user-specific variables like your Git name, email, and the main path for your code projects (GIT_HOME). It's sourced by scripts but should not be committed to Git if your repository is public.
  • .gitignore: Tells Git which files/folders within this repository to ignore (e.g., .env).
  • README.md: This file.
  • .github/: Contains GitHub Actions workflows (e.g., mdBook deployment).
  • docs/: Source Markdown files for the mdBook guides.
    • SUMMARY.md: Table of contents for the guides.
  • dot/: (Your Personal Config) Contains your configuration files (dotFile). The setup scripts will create symbolic links from your home directory ($HOME) pointing to the files inside this folder (e.g., $HOME/.zshrc -> .../dotFile/dot/.zshrc). You customize these files!
  • scripts/: Contains all the numbered setup scripts (00 to 09), the master runner (run_all.sh), and helper files (helpers.sh).
  • python/: Contains Python-related files, primarily your requirements.txt for pip.
  • book.toml: Configuration file for mdBook.

4. Key Tools Explained (Brief Overview)

This setup installs and configures several important tools. See the Guides section above for more detailed usage.

  • Homebrew: Package manager for macOS. Installs CLI tools and GUI apps.
  • Miniconda:conda environment manager, primarily for Python. Creates isolated project environments.
  • Zsh + Oh My Zsh + Powerlevel10k: Your enhanced shell environment with themes and plugins.
  • Rust + Cargo: Modern systems language and build tool/package manager (installed via rustup in script 09).
  • mdBook: Tool to create online books from Markdown (used for the Guides).
  • dockutil: Used by scripts to manage Dock icons.
  • SSH Keys: Used for secure GitHub access.

5. Installed Packages

(Package tables provide a reference for what's installed)

Core Command-Line Tools (scripts/02_install_brew_core.sh)

PackageDescription
coreutilsModern GNU versions of essential tools (ls, cp, mv, etc.) with more features
masInteract with the Mac App Store from the command line
moreutilsCollection of useful supplementary Unix tools (sponge, parallel, etc.)
findutilsModern GNU versions of find, locate, xargs
gnu-sedPowerful GNU stream editor (sed)
bashLatest version of the Bash shell
bash-completion@2Enhanced programmable tab completion for Bash
gnupgGNU Privacy Guard (GPG) for encryption and digital signatures
vimLatest version of the powerful Vi Improved text editor
grepModern GNU grep with more features than the macOS version
ripgrep (rg)Extremely fast tool for recursively searching directories for text patterns
gitDistributed version control system (latest version)
git-lfsGit extension for handling large binary files efficiently
ssh-copy-idUtility to easily install SSH public keys on remote servers
treeDisplays directory structures in a hierarchical tree format
nodeJavaScript runtime environment and npm package manager
wgetTool for downloading files from the web non-interactively
htopAdvanced, interactive system monitor and process viewer
zshZ shell (Installs latest version via Brew)
zsh-syntax-highlightingAdds command syntax highlighting in Zsh (as Oh My Zsh plugin)
autojumpLearns your directory navigation habits for faster cd
zsh-autosuggestionsSuggests commands as you type based on history (as Oh My Zsh plugin)
dockutilCommand-line tool for managing macOS Dock items
renameRenames multiple files using Perl regular expressions

Note: zsh-syntax-highlighting and zsh-autosuggestions are installed as Oh My Zsh plugins in script 04. Rust is installed via rustup in script 09.

GUI Applications (scripts/06_install_apps_cask.sh)

ApplicationDescription
brave-browserPrivacy-oriented web browser based on Chromium
google-chromePopular web browser by Google
raycastExtensible productivity launcher
visual-studio-codeFeature-rich source code editor with extensive extension support
iterm2Highly customizable terminal emulator for macOS
warpModern terminal with integrated AI and collaborative features
dockerPlatform for building, running, and managing containers
ngrokCreates secure tunnels from public URLs to your local machine
dbeaver-communityFree multi-platform universal database management tool
postmanCollaboration platform for API development and testing
zoomWidely used video conferencing and online meeting application
discordPopular communication platform for communities (text, voice, video)
microsoft-teamsBusiness communication and collaboration platform
bitwardenSecure, open-source password manager
ollamaTool to easily run large language models locally on your machine
dropboxCloud file storage and synchronization service
google-driveGoogle's cloud file storage and synchronization service
keycastrDisplays your keystrokes on screen (useful for demos)
itsycalSimple, small calendar display in the menu bar
suspicious-packageQuickLook plugin for inspecting macOS installer package contents
webpquicklookQuickLook plugin enabling previews for WebP image files
betterzipPowerful archiving tool supporting various compression formats

6. Troubleshooting

  • "Command not found" (e.g., brew, conda, cargo): Ensure you've restarted your terminal after the setup. Check if the Homebrew eval line and conda initialize block are present in your ~/.zshrc (which should be linked to dot/.zshrc). Verify Homebrew installation with brew doctor. Ensure $HOME/.cargo/bin is in your PATH (script 09 attempts this).
  • Permission Errors: Ensure you run run_all.sh as your regular user. It will ask for sudo password when needed. Don't run the whole script withsudo.
  • Homebrew Issues: Run brew doctor and follow its advice. Sometimes brew update && brew upgrade can fix issues.
  • Script Fails: The run_all.sh script uses set -e, so it should stop on the first error. Check the error message in the terminal output to identify the problematic command or script. You can try running the failed script individually for debugging (using the interactive menu in run_all.sh might be helpful here).

7. Customizing Your Setup

  • CLI Tools: Edit the CORE_PACKAGES array in scripts/02_install_brew_core.sh.
  • GUI Apps: Edit the CASK_PACKAGES array in scripts/06_install_apps_cask.sh.
  • Shell: Edit the files in the dot/ directory (.zshrc, .p10k.zsh, .aliases, .functions). Changes take effect in new terminal sessions due to the symbolic links.
  • Prompt: Run p10k configure, then copy ~/.p10k.zsh to dot/.p10k.zsh.
  • Python: Edit python/requirements.txt. Re-run script 05.
  • macOS: Edit scripts/07_configure_macos.sh. Re-run script 07. Add more defaults write commands carefully.
  • Git/Project Path: Edit .env. Re-run script 01 and potentially 03.

8. Disclaimer

These scripts modify system settings and install software. While reviewed for robustness, run them at your own risk. It is highly recommended to test the entire process on a virtual machine or a secondary, non-critical user account before running it on your primary system, especially for the first time or after making significant changes. Back up important data before proceeding.

Contributing

We welcome contributions! Please see our contributing guidelines for details on how to submit pull requests, report issues, and contribute to development.

License

This project is licensed under the MIT License - see the LICENSE file for details.

About

Ravi's dotfile - macOS Development Environment Setup This project provides scripts to automate the setup of your macOS development environment. It installs essential tools, configures your shell, and manages your personal settings (dotFile).

Topics

Resources

Code of conduct

Contributing

Stars

6 stars

Watchers

1 watching

Forks

Releases

Packages

Used by

Contributors

Languages

, 'i'); if (__m === '*' || __re.test(location.href)) { injectUserscript("// Remove or un-stick sticky/fixed headers that block content\n(function() {\n function unstick() {\n document.querySelectorAll('header, nav, [role=\"banner\"], .header, .navbar, .sticky, .fixed-top, [style*=\"position: fixed\"], [style*=\"position:sticky\"]').forEach(function(el) {\n if (el.style.position === 'fixed' || el.style.position === 'sticky' || \n getComputedStyle(el).position === 'fixed' || getComputedStyle(el).position === 'sticky') {\n el.style.position = 'static';\n el.style.top = 'auto';\n el.style.zIndex = 'auto';\n }\n });\n }\n \n unstick();\n \n var observer = new MutationObserver(unstick);\n observer.observe(document.body, { childList: true, subtree: true, attributes: true, attributeFilter: ['style', 'class'] });\n})();", "Kill Sticky Headers"); } } catch(__e) { console.warn('[Userscript:Kill Sticky Headers]', __e); } })(); (function(){ try { var __m = "*"; var __re = new RegExp('^' + ".*" + '
Skip to content

Repository files navigation

Ravi's macOS dotFile Setup: Your Automated Development Environment

License: MITGitHub stars

Banner # macOS Development Environment Setup

This project provides scripts to automate the setup of your macOS development environment. It installs essential tools, configures your shell, and manages your personal settings (dotFile).

Why Use This?

Setting up a development machine involves many repetitive steps: installing tools, configuring paths, customizing the shell, managing settings, etc. Doing this manually is time-consuming and error-prone.

This project helps by:

  • Saving Time: Automates the installation of dozens of tools and applications.
  • Reducing Errors: Scripted processes are less prone to typos or missed steps than manual setup.
  • Version Control for Your Setup: By keeping your configuration (dot/ files) in a Git repository alongside these scripts, you can track changes, revert if needed, and easily replicate your setup elsewhere.
  • Learning: Understanding these scripts can teach you more about managing your macOS environment, shell configuration, and package management.

Technology Background

This setup leverages several standard technologies:

  • Shell Scripting (Bash): The automation is performed using scripts written for the Bash shell (though the final environment uses Zsh).
  • Homebrew: The primary package manager for installing command-line tools and GUI applications on macOS.
  • Git: The version control system used to manage this dotFile repository and your own code projects.
  • Zsh (Z Shell): A powerful shell (the default on recent macOS versions) that offers significant improvements over older shells like Bash.
  • Oh My Zsh: A framework for managing Zsh configuration, making it easy to use themes and plugins.
  • Powerlevel10k: A fast and highly customizable theme for Zsh, providing an informative prompt.
  • Miniconda: A minimal installer for the conda package and environment manager, excellent for managing Python (and other language) packages and creating isolated project environments.
  • Rust & Cargo: A modern systems programming language focused on safety and performance, installed via rustup (script 09). Cargo is its build tool and package manager.
  • mdBook: A utility (installed via Cargo) used to create an online book from the Markdown guides in the docs/ folder.
  • Symbolic Links (ln -s): Used by the scripts to link your configuration files from the dot/ directory in this repository to their expected locations in your home directory ($HOME). This means changes in your repository are immediately reflected in your live environment.

Guides (Published via mdBook)

The detailed guides for installation and tool usage are maintained as Markdown files in the /docs directory. They are automatically built into an online book using mdBook and published via GitHub Actions to GitHub Pages.

📚 Access the Online Guides Here You can also build and view the guides locally:

  1. Ensure you have Rust and mdbook installed (script 09_install_rust.sh handles this).
  2. Navigate to the repository root directory.
  3. Run mdbook serve --open.
Guide TitleDescription
dotFile: Installing Your Automated macOS SetupStep-by-step guide to set up your macOS environment with automation.
Managing Software with Homebrew 🍺Learn how to install, update, and manage software using Homebrew.
Using Your Zsh Shell Superpowers ✨Tips and tricks for using Zsh with Oh My Zsh, Powerlevel10k, and plugins.
Basic Git & GitHub WorkflowA beginner-friendly guide to using Git and GitHub for version control.
Managing Python with Conda (Miniconda)Guide to managing Python environments and packages with Conda.
Basic Docker Maintenance 🐳🧹Learn how to prune and clean up Docker containers, images, and volumes.
Your Terminal Command Center (iTerm2) 💻Guide to customizing and using iTerm2 for an efficient terminal experience.
Rust Essentials Guide 🦀Quick reference for essential Rust and Cargo commands.
Mac Keyboard Shortcut Cheat Sheet ⚡️A handy list of keyboard shortcuts to boost your productivity on macOS.
Basic Mac Housekeeping 🧹✨Tips for keeping your Mac clean, organized, and running smoothly.
Custom Shell Aliases & Functions 🛠️Learn how to create and use custom aliases and functions in your shell.
Redis Cheatsheet for macOS 🍎Quick commands and tips for installing, managing, and using Redis on macOS.

1. Installation & Setup

Follow these steps after cloning your fork.

1.1. Prerequisites (Do This First on a New Mac)

  1. Complete macOS Setup: Finish the initial macOS setup assistant (create user, connect to Wi-Fi, etc.).
  2. Install Xcode Command Line Tools: Open Terminal.app (Applications > Utilities > Terminal). Run this command and follow the on-screen prompts (accept the license, click install):
    xcode-select --install
    Wait for the installation to complete before proceeding.

1.2. Initial Configuration (Prepare Your Settings)

Crucial: Configure these files within your cloned repository before running the setup.

  1. Fork the Repository:

    • Why Fork? Forking creates your own personal copy of this repository under your GitHub account. This allows you to save your customizations (like your specific dotFile, package lists, .env file content) without affecting the original project.
    • How: Go to the main page of the original repository on GitHub. Click the "Fork" button near the top-right. Choose your GitHub account as the owner for the fork.
  2. Clone Your Fork: Now, download the code from your forked repository to your local Mac.

    • Choose Location: Decide where you want to store your code projects (e.g., ~/Projects, ~/Code, ~/projects/git). This will be your GIT_HOME.
    • Clone Command: Open Terminal and run git clone, replacing <your-fork-url> with the SSH or HTTPS URL of your forked repository (get it from the "Code" button on your fork's GitHub page). It's recommended to name the local directory dotFile.
    # Example: If your chosen code directory is ~/projects/git# Ensure the parent directory exists first
    mkdir -p ~/projects/git
    # Navigate into itcd~/projects/git
    # Clone YOUR FORK, naming the local folder 'dotFile'# Replace <your-fork-url> with the actual URL from YOUR fork!
    git clone <your-fork-url> dotFile
    • You now have the setup files locally, typically at ~/projects/git/dotFile/.
  3. Create & Edit .env File: This file stores your personal settings.

    • Create the file (copy the example if it exists): cp .env_example .env (or touch .env).
    • Open the .env file: nano .env (or code .env etc.)
    • Set the variables accurately:
      • GIT_HOME: Must be the full path to the directory where you cloned this repo's parent (e.g., GIT_HOME="~/projects/git" if you cloned into ~/projects/git/dotFile).
      • GIT_AUTHOR_NAME: Your full name for Git commits.
      • GIT_AUTHOR_EMAIL: Your email address for Git commits.
    • Save and close (nano: Ctrl+O, Enter, Ctrl+X).
  4. Ignore .env: Prevent committing secrets. Ensure .env is listed in your repository's .gitignore file.

    echo".env">> .gitignore
    # Commit this change to your fork
    git add .gitignore
    git commit -m "Add .env to gitignore"
  5. Customize dot/ Files: Edit the files inside the dot/ subfolder to match your preferences:

    • dot/.zshrc: Configure your Zsh shell (Theme, Plugins, PATHs, etc.). Ensure plugins=(...) includes git zsh-autosuggestions zsh-syntax-highlighting autojump plus any others you want.
    • dot/.p10k.zsh: Set up your Powerlevel10k prompt style. Run p10k configure in the terminal after setup, then copy the generated ~/.p10k.zsh file into this dot/ folder.
    • dot/.aliases: Add your command shortcuts.
    • dot/.functions: Add your shell functions.
    • dot/.gitignore_global: Define global Git ignore patterns.
  6. Customize python/requirements.txt: List Python packages for pip to install into the base conda environment.

1.3. Running the Setup (run_all.sh)

  1. Navigate to Script Directory:
    # Use the path where you cloned the repocd~/projects/git/dotFile/scripts
  2. Execute run_all.sh: Choose a mode:
    • Interactive Mode (Select Scripts): Shows a menu to choose specific scripts (0-9) or all. Warning: Selecting individual scripts runs only those scripts; dependencies are NOT automatically included. Use with caution.
      bash run_all.sh
      runall
  3. Follow Prompts: Enter your sudo password and potentially your user password (chsh) when requested.
  4. Wait: Installation takes time.

1.4. Post-Setup Actions (Required)

  1. Restart Terminal:Crucial! Quit and reopen your terminal, or log out/in.
  2. Add SSH Key to GitHub: If script 08 ran, copy the public key it printed and add it to your GitHub account settings online.
  3. Log into Apps: Launch and log into GUI apps (Docker, Bitwarden, Dropbox, etc.).
  4. Final Configurations: Install VS Code extensions, configure Docker, etc.

2. How This Repository Works

  • Goal: Automate macOS development setup.
  • Method: Uses shell scripts (scripts/) for automation. Manages personal config files (dot/) via symbolic links.
  • Configuration: Uses .env for variables, dot/ for linked configs, python/ for pip requirements. run_all.sh orchestrates the scripts/.

3. Repository Structure Explained

This repository is organized to separate setup logic from personal configuration:

  • .env: (You Create & Git Ignore!) Stores user-specific variables like your Git name, email, and the main path for your code projects (GIT_HOME). It's sourced by scripts but should not be committed to Git if your repository is public.
  • .gitignore: Tells Git which files/folders within this repository to ignore (e.g., .env).
  • README.md: This file.
  • .github/: Contains GitHub Actions workflows (e.g., mdBook deployment).
  • docs/: Source Markdown files for the mdBook guides.
    • SUMMARY.md: Table of contents for the guides.
  • dot/: (Your Personal Config) Contains your configuration files (dotFile). The setup scripts will create symbolic links from your home directory ($HOME) pointing to the files inside this folder (e.g., $HOME/.zshrc -> .../dotFile/dot/.zshrc). You customize these files!
  • scripts/: Contains all the numbered setup scripts (00 to 09), the master runner (run_all.sh), and helper files (helpers.sh).
  • python/: Contains Python-related files, primarily your requirements.txt for pip.
  • book.toml: Configuration file for mdBook.

4. Key Tools Explained (Brief Overview)

This setup installs and configures several important tools. See the Guides section above for more detailed usage.

  • Homebrew: Package manager for macOS. Installs CLI tools and GUI apps.
  • Miniconda:conda environment manager, primarily for Python. Creates isolated project environments.
  • Zsh + Oh My Zsh + Powerlevel10k: Your enhanced shell environment with themes and plugins.
  • Rust + Cargo: Modern systems language and build tool/package manager (installed via rustup in script 09).
  • mdBook: Tool to create online books from Markdown (used for the Guides).
  • dockutil: Used by scripts to manage Dock icons.
  • SSH Keys: Used for secure GitHub access.

5. Installed Packages

(Package tables provide a reference for what's installed)

Core Command-Line Tools (scripts/02_install_brew_core.sh)

PackageDescription
coreutilsModern GNU versions of essential tools (ls, cp, mv, etc.) with more features
masInteract with the Mac App Store from the command line
moreutilsCollection of useful supplementary Unix tools (sponge, parallel, etc.)
findutilsModern GNU versions of find, locate, xargs
gnu-sedPowerful GNU stream editor (sed)
bashLatest version of the Bash shell
bash-completion@2Enhanced programmable tab completion for Bash
gnupgGNU Privacy Guard (GPG) for encryption and digital signatures
vimLatest version of the powerful Vi Improved text editor
grepModern GNU grep with more features than the macOS version
ripgrep (rg)Extremely fast tool for recursively searching directories for text patterns
gitDistributed version control system (latest version)
git-lfsGit extension for handling large binary files efficiently
ssh-copy-idUtility to easily install SSH public keys on remote servers
treeDisplays directory structures in a hierarchical tree format
nodeJavaScript runtime environment and npm package manager
wgetTool for downloading files from the web non-interactively
htopAdvanced, interactive system monitor and process viewer
zshZ shell (Installs latest version via Brew)
zsh-syntax-highlightingAdds command syntax highlighting in Zsh (as Oh My Zsh plugin)
autojumpLearns your directory navigation habits for faster cd
zsh-autosuggestionsSuggests commands as you type based on history (as Oh My Zsh plugin)
dockutilCommand-line tool for managing macOS Dock items
renameRenames multiple files using Perl regular expressions

Note: zsh-syntax-highlighting and zsh-autosuggestions are installed as Oh My Zsh plugins in script 04. Rust is installed via rustup in script 09.

GUI Applications (scripts/06_install_apps_cask.sh)

ApplicationDescription
brave-browserPrivacy-oriented web browser based on Chromium
google-chromePopular web browser by Google
raycastExtensible productivity launcher
visual-studio-codeFeature-rich source code editor with extensive extension support
iterm2Highly customizable terminal emulator for macOS
warpModern terminal with integrated AI and collaborative features
dockerPlatform for building, running, and managing containers
ngrokCreates secure tunnels from public URLs to your local machine
dbeaver-communityFree multi-platform universal database management tool
postmanCollaboration platform for API development and testing
zoomWidely used video conferencing and online meeting application
discordPopular communication platform for communities (text, voice, video)
microsoft-teamsBusiness communication and collaboration platform
bitwardenSecure, open-source password manager
ollamaTool to easily run large language models locally on your machine
dropboxCloud file storage and synchronization service
google-driveGoogle's cloud file storage and synchronization service
keycastrDisplays your keystrokes on screen (useful for demos)
itsycalSimple, small calendar display in the menu bar
suspicious-packageQuickLook plugin for inspecting macOS installer package contents
webpquicklookQuickLook plugin enabling previews for WebP image files
betterzipPowerful archiving tool supporting various compression formats

6. Troubleshooting

  • "Command not found" (e.g., brew, conda, cargo): Ensure you've restarted your terminal after the setup. Check if the Homebrew eval line and conda initialize block are present in your ~/.zshrc (which should be linked to dot/.zshrc). Verify Homebrew installation with brew doctor. Ensure $HOME/.cargo/bin is in your PATH (script 09 attempts this).
  • Permission Errors: Ensure you run run_all.sh as your regular user. It will ask for sudo password when needed. Don't run the whole script withsudo.
  • Homebrew Issues: Run brew doctor and follow its advice. Sometimes brew update && brew upgrade can fix issues.
  • Script Fails: The run_all.sh script uses set -e, so it should stop on the first error. Check the error message in the terminal output to identify the problematic command or script. You can try running the failed script individually for debugging (using the interactive menu in run_all.sh might be helpful here).

7. Customizing Your Setup

  • CLI Tools: Edit the CORE_PACKAGES array in scripts/02_install_brew_core.sh.
  • GUI Apps: Edit the CASK_PACKAGES array in scripts/06_install_apps_cask.sh.
  • Shell: Edit the files in the dot/ directory (.zshrc, .p10k.zsh, .aliases, .functions). Changes take effect in new terminal sessions due to the symbolic links.
  • Prompt: Run p10k configure, then copy ~/.p10k.zsh to dot/.p10k.zsh.
  • Python: Edit python/requirements.txt. Re-run script 05.
  • macOS: Edit scripts/07_configure_macos.sh. Re-run script 07. Add more defaults write commands carefully.
  • Git/Project Path: Edit .env. Re-run script 01 and potentially 03.

8. Disclaimer

These scripts modify system settings and install software. While reviewed for robustness, run them at your own risk. It is highly recommended to test the entire process on a virtual machine or a secondary, non-critical user account before running it on your primary system, especially for the first time or after making significant changes. Back up important data before proceeding.

Contributing

We welcome contributions! Please see our contributing guidelines for details on how to submit pull requests, report issues, and contribute to development.

License

This project is licensed under the MIT License - see the LICENSE file for details.

About

Ravi's dotfile - macOS Development Environment Setup This project provides scripts to automate the setup of your macOS development environment. It installs essential tools, configures your shell, and manages your personal settings (dotFile).

Topics

Resources

Code of conduct

Contributing

Stars

6 stars

Watchers

1 watching

Forks

Releases

Packages

Used by

Contributors

Languages

, 'i'); if (__m === '*' || __re.test(location.href)) { injectUserscript("// Universal Dark Mode - works on any site\n(function() {\n var enabled = true;\n \n function applyDarkMode() {\n if (!enabled) return;\n \n // Create style element if it doesn't exist\n var style = document.getElementById('universal-dark-mode-style');\n if (!style) {\n style = document.createElement('style');\n style.id = 'universal-dark-mode-style';\n document.head.appendChild(style);\n }\n \n // Dark mode CSS - inverts colors but preserves images/video\n style.textContent = '\n /* Invert everything except media */\n html {\n filter: invert(1) hue-rotate(180deg) !important;\n background: #1a1a2e !important;\n }\n \n /* Restore images, videos, iframes, canvas */\n img, video, iframe, canvas, svg, picture, [style*=\"background-image\"] {\n filter: invert(1) hue-rotate(180deg) !important;\n }\n \n /* Preserve specific elements that should not be inverted */\n .no-dark-mode, .no-dark-mode *,\n [data-theme=\"light\"], [data-theme=\"light\"],\n .ace_editor, .ace_editor *,\n .CodeMirror, .CodeMirror *,\n .monaco-editor, .monaco-editor *,\n .markdown-body pre, .markdown-body pre *,\n .highlight, .highlight *,\n pre code, pre code * {\n filter: none !important;\n }\n \n /* Fix common UI elements */\n .modal, .popup, .dropdown-menu, .tooltip, .popover {\n filter: invert(1) hue-rotate(180deg) !important;\n background: #2d2d44 !important;\n border-color: #444 !important;\n }\n \n /* Scrollbars */\n ::-webkit-scrollbar { background: #1a1a2e !important; }\n ::-webkit-scrollbar-thumb { background: #444 !important; }\n ::-webkit-scrollbar-thumb:hover { background: #555 !important; }\n \n /* Selection */\n ::selection { background: #4ecdc4 !important; color: #1a1a2e !important; }\n ::-moz-selection { background: #4ecdc4 !important; color: #1a1a2e !important; }\n ';\n }\n \n function removeDarkMode() {\n var style = document.getElementById('universal-dark-mode-style');\n if (style) style.remove();\n }\n \n // Toggle with Alt+Shift+D\n document.addEventListener('keydown', function(e) {\n if (e.altKey && e.shiftKey && e.key === 'D') {\n e.preventDefault();\n enabled = !enabled;\n if (enabled) {\n applyDarkMode();\n console.log('[Universal Dark Mode] Enabled');\n } else {\n removeDarkMode();\n console.log('[Universal Dark Mode] Disabled');\n }\n }\n });\n \n // Apply on load\n applyDarkMode();\n \n // Re-apply on dynamic content\n var observer = new MutationObserver(function(mutations) {\n if (enabled && !document.getElementById('universal-dark-mode-style')) {\n applyDarkMode();\n }\n });\n observer.observe(document.head, { childList: true });\n \n console.log('[Universal Dark Mode] Loaded - Press Alt+Shift+D to toggle');\n})();", "Universal Dark Mode"); } } catch(__e) { console.warn('[Userscript:Universal Dark Mode]', __e); } })(); })();
Skip to content

Repository files navigation

Ravi's macOS dotFile Setup: Your Automated Development Environment

License: MITGitHub stars

Banner # macOS Development Environment Setup

This project provides scripts to automate the setup of your macOS development environment. It installs essential tools, configures your shell, and manages your personal settings (dotFile).

Why Use This?

Setting up a development machine involves many repetitive steps: installing tools, configuring paths, customizing the shell, managing settings, etc. Doing this manually is time-consuming and error-prone.

This project helps by:

  • Saving Time: Automates the installation of dozens of tools and applications.
  • Reducing Errors: Scripted processes are less prone to typos or missed steps than manual setup.
  • Version Control for Your Setup: By keeping your configuration (dot/ files) in a Git repository alongside these scripts, you can track changes, revert if needed, and easily replicate your setup elsewhere.
  • Learning: Understanding these scripts can teach you more about managing your macOS environment, shell configuration, and package management.

Technology Background

This setup leverages several standard technologies:

  • Shell Scripting (Bash): The automation is performed using scripts written for the Bash shell (though the final environment uses Zsh).
  • Homebrew: The primary package manager for installing command-line tools and GUI applications on macOS.
  • Git: The version control system used to manage this dotFile repository and your own code projects.
  • Zsh (Z Shell): A powerful shell (the default on recent macOS versions) that offers significant improvements over older shells like Bash.
  • Oh My Zsh: A framework for managing Zsh configuration, making it easy to use themes and plugins.
  • Powerlevel10k: A fast and highly customizable theme for Zsh, providing an informative prompt.
  • Miniconda: A minimal installer for the conda package and environment manager, excellent for managing Python (and other language) packages and creating isolated project environments.
  • Rust & Cargo: A modern systems programming language focused on safety and performance, installed via rustup (script 09). Cargo is its build tool and package manager.
  • mdBook: A utility (installed via Cargo) used to create an online book from the Markdown guides in the docs/ folder.
  • Symbolic Links (ln -s): Used by the scripts to link your configuration files from the dot/ directory in this repository to their expected locations in your home directory ($HOME). This means changes in your repository are immediately reflected in your live environment.

Guides (Published via mdBook)

The detailed guides for installation and tool usage are maintained as Markdown files in the /docs directory. They are automatically built into an online book using mdBook and published via GitHub Actions to GitHub Pages.

📚 Access the Online Guides Here You can also build and view the guides locally:

  1. Ensure you have Rust and mdbook installed (script 09_install_rust.sh handles this).
  2. Navigate to the repository root directory.
  3. Run mdbook serve --open.
Guide TitleDescription
dotFile: Installing Your Automated macOS SetupStep-by-step guide to set up your macOS environment with automation.
Managing Software with Homebrew 🍺Learn how to install, update, and manage software using Homebrew.
Using Your Zsh Shell Superpowers ✨Tips and tricks for using Zsh with Oh My Zsh, Powerlevel10k, and plugins.
Basic Git & GitHub WorkflowA beginner-friendly guide to using Git and GitHub for version control.
Managing Python with Conda (Miniconda)Guide to managing Python environments and packages with Conda.
Basic Docker Maintenance 🐳🧹Learn how to prune and clean up Docker containers, images, and volumes.
Your Terminal Command Center (iTerm2) 💻Guide to customizing and using iTerm2 for an efficient terminal experience.
Rust Essentials Guide 🦀Quick reference for essential Rust and Cargo commands.
Mac Keyboard Shortcut Cheat Sheet ⚡️A handy list of keyboard shortcuts to boost your productivity on macOS.
Basic Mac Housekeeping 🧹✨Tips for keeping your Mac clean, organized, and running smoothly.
Custom Shell Aliases & Functions 🛠️Learn how to create and use custom aliases and functions in your shell.
Redis Cheatsheet for macOS 🍎Quick commands and tips for installing, managing, and using Redis on macOS.

1. Installation & Setup

Follow these steps after cloning your fork.

1.1. Prerequisites (Do This First on a New Mac)

  1. Complete macOS Setup: Finish the initial macOS setup assistant (create user, connect to Wi-Fi, etc.).
  2. Install Xcode Command Line Tools: Open Terminal.app (Applications > Utilities > Terminal). Run this command and follow the on-screen prompts (accept the license, click install):
    xcode-select --install
    Wait for the installation to complete before proceeding.

1.2. Initial Configuration (Prepare Your Settings)

Crucial: Configure these files within your cloned repository before running the setup.

  1. Fork the Repository:

    • Why Fork? Forking creates your own personal copy of this repository under your GitHub account. This allows you to save your customizations (like your specific dotFile, package lists, .env file content) without affecting the original project.
    • How: Go to the main page of the original repository on GitHub. Click the "Fork" button near the top-right. Choose your GitHub account as the owner for the fork.
  2. Clone Your Fork: Now, download the code from your forked repository to your local Mac.

    • Choose Location: Decide where you want to store your code projects (e.g., ~/Projects, ~/Code, ~/projects/git). This will be your GIT_HOME.
    • Clone Command: Open Terminal and run git clone, replacing <your-fork-url> with the SSH or HTTPS URL of your forked repository (get it from the "Code" button on your fork's GitHub page). It's recommended to name the local directory dotFile.
    # Example: If your chosen code directory is ~/projects/git# Ensure the parent directory exists first
    mkdir -p ~/projects/git
    # Navigate into itcd~/projects/git
    # Clone YOUR FORK, naming the local folder 'dotFile'# Replace <your-fork-url> with the actual URL from YOUR fork!
    git clone <your-fork-url> dotFile
    • You now have the setup files locally, typically at ~/projects/git/dotFile/.
  3. Create & Edit .env File: This file stores your personal settings.

    • Create the file (copy the example if it exists): cp .env_example .env (or touch .env).
    • Open the .env file: nano .env (or code .env etc.)
    • Set the variables accurately:
      • GIT_HOME: Must be the full path to the directory where you cloned this repo's parent (e.g., GIT_HOME="~/projects/git" if you cloned into ~/projects/git/dotFile).
      • GIT_AUTHOR_NAME: Your full name for Git commits.
      • GIT_AUTHOR_EMAIL: Your email address for Git commits.
    • Save and close (nano: Ctrl+O, Enter, Ctrl+X).
  4. Ignore .env: Prevent committing secrets. Ensure .env is listed in your repository's .gitignore file.

    echo".env">> .gitignore
    # Commit this change to your fork
    git add .gitignore
    git commit -m "Add .env to gitignore"
  5. Customize dot/ Files: Edit the files inside the dot/ subfolder to match your preferences:

    • dot/.zshrc: Configure your Zsh shell (Theme, Plugins, PATHs, etc.). Ensure plugins=(...) includes git zsh-autosuggestions zsh-syntax-highlighting autojump plus any others you want.
    • dot/.p10k.zsh: Set up your Powerlevel10k prompt style. Run p10k configure in the terminal after setup, then copy the generated ~/.p10k.zsh file into this dot/ folder.
    • dot/.aliases: Add your command shortcuts.
    • dot/.functions: Add your shell functions.
    • dot/.gitignore_global: Define global Git ignore patterns.
  6. Customize python/requirements.txt: List Python packages for pip to install into the base conda environment.

1.3. Running the Setup (run_all.sh)

  1. Navigate to Script Directory:
    # Use the path where you cloned the repocd~/projects/git/dotFile/scripts
  2. Execute run_all.sh: Choose a mode:
    • Interactive Mode (Select Scripts): Shows a menu to choose specific scripts (0-9) or all. Warning: Selecting individual scripts runs only those scripts; dependencies are NOT automatically included. Use with caution.
      bash run_all.sh
      runall
  3. Follow Prompts: Enter your sudo password and potentially your user password (chsh) when requested.
  4. Wait: Installation takes time.

1.4. Post-Setup Actions (Required)

  1. Restart Terminal:Crucial! Quit and reopen your terminal, or log out/in.
  2. Add SSH Key to GitHub: If script 08 ran, copy the public key it printed and add it to your GitHub account settings online.
  3. Log into Apps: Launch and log into GUI apps (Docker, Bitwarden, Dropbox, etc.).
  4. Final Configurations: Install VS Code extensions, configure Docker, etc.

2. How This Repository Works

  • Goal: Automate macOS development setup.
  • Method: Uses shell scripts (scripts/) for automation. Manages personal config files (dot/) via symbolic links.
  • Configuration: Uses .env for variables, dot/ for linked configs, python/ for pip requirements. run_all.sh orchestrates the scripts/.

3. Repository Structure Explained

This repository is organized to separate setup logic from personal configuration:

  • .env: (You Create & Git Ignore!) Stores user-specific variables like your Git name, email, and the main path for your code projects (GIT_HOME). It's sourced by scripts but should not be committed to Git if your repository is public.
  • .gitignore: Tells Git which files/folders within this repository to ignore (e.g., .env).
  • README.md: This file.
  • .github/: Contains GitHub Actions workflows (e.g., mdBook deployment).
  • docs/: Source Markdown files for the mdBook guides.
    • SUMMARY.md: Table of contents for the guides.
  • dot/: (Your Personal Config) Contains your configuration files (dotFile). The setup scripts will create symbolic links from your home directory ($HOME) pointing to the files inside this folder (e.g., $HOME/.zshrc -> .../dotFile/dot/.zshrc). You customize these files!
  • scripts/: Contains all the numbered setup scripts (00 to 09), the master runner (run_all.sh), and helper files (helpers.sh).
  • python/: Contains Python-related files, primarily your requirements.txt for pip.
  • book.toml: Configuration file for mdBook.

4. Key Tools Explained (Brief Overview)

This setup installs and configures several important tools. See the Guides section above for more detailed usage.

  • Homebrew: Package manager for macOS. Installs CLI tools and GUI apps.
  • Miniconda:conda environment manager, primarily for Python. Creates isolated project environments.
  • Zsh + Oh My Zsh + Powerlevel10k: Your enhanced shell environment with themes and plugins.
  • Rust + Cargo: Modern systems language and build tool/package manager (installed via rustup in script 09).
  • mdBook: Tool to create online books from Markdown (used for the Guides).
  • dockutil: Used by scripts to manage Dock icons.
  • SSH Keys: Used for secure GitHub access.

5. Installed Packages

(Package tables provide a reference for what's installed)

Core Command-Line Tools (scripts/02_install_brew_core.sh)

PackageDescription
coreutilsModern GNU versions of essential tools (ls, cp, mv, etc.) with more features
masInteract with the Mac App Store from the command line
moreutilsCollection of useful supplementary Unix tools (sponge, parallel, etc.)
findutilsModern GNU versions of find, locate, xargs
gnu-sedPowerful GNU stream editor (sed)
bashLatest version of the Bash shell
bash-completion@2Enhanced programmable tab completion for Bash
gnupgGNU Privacy Guard (GPG) for encryption and digital signatures
vimLatest version of the powerful Vi Improved text editor
grepModern GNU grep with more features than the macOS version
ripgrep (rg)Extremely fast tool for recursively searching directories for text patterns
gitDistributed version control system (latest version)
git-lfsGit extension for handling large binary files efficiently
ssh-copy-idUtility to easily install SSH public keys on remote servers
treeDisplays directory structures in a hierarchical tree format
nodeJavaScript runtime environment and npm package manager
wgetTool for downloading files from the web non-interactively
htopAdvanced, interactive system monitor and process viewer
zshZ shell (Installs latest version via Brew)
zsh-syntax-highlightingAdds command syntax highlighting in Zsh (as Oh My Zsh plugin)
autojumpLearns your directory navigation habits for faster cd
zsh-autosuggestionsSuggests commands as you type based on history (as Oh My Zsh plugin)
dockutilCommand-line tool for managing macOS Dock items
renameRenames multiple files using Perl regular expressions

Note: zsh-syntax-highlighting and zsh-autosuggestions are installed as Oh My Zsh plugins in script 04. Rust is installed via rustup in script 09.

GUI Applications (scripts/06_install_apps_cask.sh)

ApplicationDescription
brave-browserPrivacy-oriented web browser based on Chromium
google-chromePopular web browser by Google
raycastExtensible productivity launcher
visual-studio-codeFeature-rich source code editor with extensive extension support
iterm2Highly customizable terminal emulator for macOS
warpModern terminal with integrated AI and collaborative features
dockerPlatform for building, running, and managing containers
ngrokCreates secure tunnels from public URLs to your local machine
dbeaver-communityFree multi-platform universal database management tool
postmanCollaboration platform for API development and testing
zoomWidely used video conferencing and online meeting application
discordPopular communication platform for communities (text, voice, video)
microsoft-teamsBusiness communication and collaboration platform
bitwardenSecure, open-source password manager
ollamaTool to easily run large language models locally on your machine
dropboxCloud file storage and synchronization service
google-driveGoogle's cloud file storage and synchronization service
keycastrDisplays your keystrokes on screen (useful for demos)
itsycalSimple, small calendar display in the menu bar
suspicious-packageQuickLook plugin for inspecting macOS installer package contents
webpquicklookQuickLook plugin enabling previews for WebP image files
betterzipPowerful archiving tool supporting various compression formats

6. Troubleshooting

  • "Command not found" (e.g., brew, conda, cargo): Ensure you've restarted your terminal after the setup. Check if the Homebrew eval line and conda initialize block are present in your ~/.zshrc (which should be linked to dot/.zshrc). Verify Homebrew installation with brew doctor. Ensure $HOME/.cargo/bin is in your PATH (script 09 attempts this).
  • Permission Errors: Ensure you run run_all.sh as your regular user. It will ask for sudo password when needed. Don't run the whole script withsudo.
  • Homebrew Issues: Run brew doctor and follow its advice. Sometimes brew update && brew upgrade can fix issues.
  • Script Fails: The run_all.sh script uses set -e, so it should stop on the first error. Check the error message in the terminal output to identify the problematic command or script. You can try running the failed script individually for debugging (using the interactive menu in run_all.sh might be helpful here).

7. Customizing Your Setup

  • CLI Tools: Edit the CORE_PACKAGES array in scripts/02_install_brew_core.sh.
  • GUI Apps: Edit the CASK_PACKAGES array in scripts/06_install_apps_cask.sh.
  • Shell: Edit the files in the dot/ directory (.zshrc, .p10k.zsh, .aliases, .functions). Changes take effect in new terminal sessions due to the symbolic links.
  • Prompt: Run p10k configure, then copy ~/.p10k.zsh to dot/.p10k.zsh.
  • Python: Edit python/requirements.txt. Re-run script 05.
  • macOS: Edit scripts/07_configure_macos.sh. Re-run script 07. Add more defaults write commands carefully.
  • Git/Project Path: Edit .env. Re-run script 01 and potentially 03.

8. Disclaimer

These scripts modify system settings and install software. While reviewed for robustness, run them at your own risk. It is highly recommended to test the entire process on a virtual machine or a secondary, non-critical user account before running it on your primary system, especially for the first time or after making significant changes. Back up important data before proceeding.

Contributing

We welcome contributions! Please see our contributing guidelines for details on how to submit pull requests, report issues, and contribute to development.

License

This project is licensed under the MIT License - see the LICENSE file for details.

About

Ravi's dotfile - macOS Development Environment Setup This project provides scripts to automate the setup of your macOS development environment. It installs essential tools, configures your shell, and manages your personal settings (dotFile).

Topics

Resources

Code of conduct

Contributing

Stars

6 stars

Watchers

1 watching

Forks

Releases

Packages

Used by

Contributors

Languages