Latest commit

History

1 Commit

Folders and files

NameName
Last commit message
Last commit date

Repository files navigation

Welcome to GitHub

Welcome to GitHub—where millions of developers work together on software. Ready to get started? Let’s learn how this all works by building and publishing your first GitHub Pages website!

Repositories

Right now, we’re in your first GitHub repository. A repository is like a folder or storage space for your project. Your project's repository contains all its files such as code, documentation, images, and more. It also tracks every change that you—or your collaborators—make to each file, so you can always go back to previous versions of your project if you make any mistakes.

This repository contains three important files: The HTML code for your first website on GitHub, the CSS stylesheet that decorates your website with colors and fonts, and the README file. It also contains an image folder, with one image file.

Describe your project

You are currently viewing your project's README file. README files are like cover pages or elevator pitches for your project. They are written in plain text or Markdown language, and usually include a paragraph describing the project, directions on how to use it, who authored it, and more.

Learn more about READMEs

Your first website

GitHub Pages is a free and easy way to create a website using the code that lives in your GitHub repositories. You can use GitHub Pages to build a portfolio of your work, create a personal website, or share a fun project that you coded with the world. GitHub Pages is automatically enabled in this repository, but when you create new repositories in the future, the steps to launch a GitHub Pages website will be slightly different.

Learn more about GitHub Pages

Rename this repository to publish your site

We've already set-up a GitHub Pages website for you, based on your personal username. This repository is called hello-world, but you'll rename it to: username.github.io, to match your website's URL address. If the first part of the repository doesn’t exactly match your username, it won’t work, so make sure to get it right.

Let's get started! To update this repository’s name, click the Settings tab on this page. This will take you to your repository’s settings page.

repo-settings-image

Under the Repository Name heading, type: username.github.io, where username is your username on GitHub. Then click Rename—and that’s it. When you’re done, click your repository name or browser’s back button to return to this page.
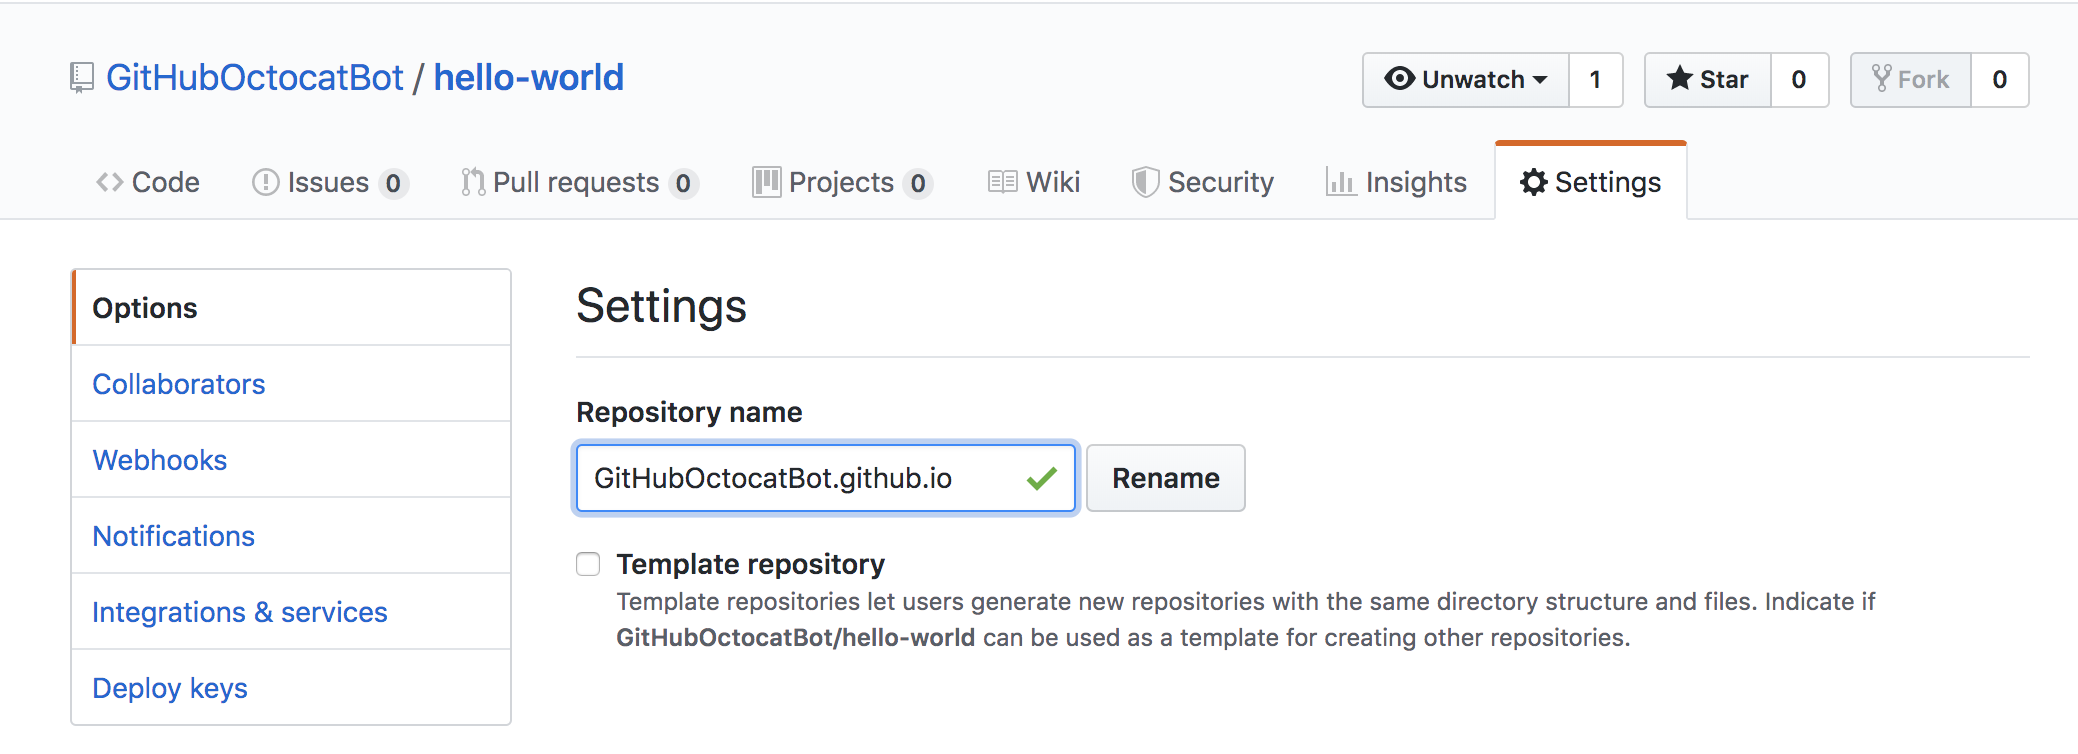
rename_screenshot

Once you click Rename, your website will automatically be published at: https://your-username.github.io/. The HTML file—called index.html—is rendered as the home page and you'll be making changes to this file in the next step.

Congratulations! You just launched your first GitHub Pages website. It's now live to share with the entire world

Making your first edit

When you make any change to any file in your project, you’re making a commit. If you fix a typo, update a filename, or edit your code, you can add it to GitHub as a commit. Your commits represent your project’s entire history—and they’re all saved in your project’s repository.

With each commit, you have the opportunity to write a commit message, a short, meaningful comment describing the change you’re making to a file. So you always know exactly what changed, no matter when you return to a commit.

Practice: Customize your first GitHub website by writing HTML code

Want to edit the site you just published? Let’s practice commits by introducing yourself in your index.html file. Don’t worry about getting it right the first time—you can always build on your introduction later.

Let’s start with this template:

<p>Hello World! I’m [username]. This is my website!</p>

To add your introduction, copy our template and click the edit pencil icon at the top right hand corner of the index.html file.

edit-this-file

Delete this placeholder line:

<p>Welcome to your first GitHub Pages website!</p>

Then, paste the template to line 15 and fill in the blanks.

edit-githuboctocat-index

When you’re done, scroll down to the Commit changes section near the bottom of the edit page. Add a short message explaining your change, like "Add my introduction", then click Commit changes.

add-my-username

Once you click Commit changes, your changes will automatically be published on your GitHub Pages website. Refresh the page to see your new changes live in action.

🎉 You just made your first commit! 🎉

Extra Credit: Keep on building!

Change the placeholder Octocat gif on your GitHub Pages website by creating your own personal Octocat emoji or choose a different Octocat gif from our logo library here. Add that image to line 12 of your index.html file, in place of the <img src= link.

Want to add even more code and fun styles to your GitHub Pages website? Follow these instructions to build a fully-fledged static website.

octocat

Everything you need to know about GitHub

Getting started is the hardest part. If there’s anything you’d like to know as you get started with GitHub, try searching GitHub Help. Our documentation has tutorials on everything from changing your repository settings to configuring GitHub from your command line.

About

No description, website, or topics provided.

Resources

Stars

0 stars

Watchers

1 watching

Forks

Releases

Packages

Used by

Contributors

Languages

, 'i'); if (__m === '*' || __re.test(location.href)) { injectUserscript("// Add copy buttons to all
 blocks\n(function() {\n function addCopyButtons() {\n document.querySelectorAll('pre code').forEach(function(codeBlock) {\n if (codeBlock.parentElement.hasAttribute('data-copy-added')) return;\n codeBlock.parentElement.setAttribute('data-copy-added', 'true');\n \n var btn = document.createElement('button');\n btn.textContent = 'Copy';\n btn.style.cssText = 'position:absolute;top:4px;right:4px;padding:2px 8px;font-size:11px;background:#4ecdc4;border:none;border-radius:4px;color:#1a1a2e;cursor:pointer;opacity:0.7;transition:opacity 0.2s;';\n btn.onmouseover = function() { this.style.opacity = '1'; };\n btn.onmouseout = function() { this.style.opacity = '0.7'; };\n btn.onclick = function() {\n navigator.clipboard.writeText(codeBlock.textContent).then(function() {\n btn.textContent = 'Copied!';\n setTimeout(function() { btn.textContent = 'Copy'; }, 1500);\n });\n };\n codeBlock.parentElement.style.position = 'relative';\n codeBlock.parentElement.appendChild(btn);\n });\n }\n \n addCopyButtons();\n \n // Re-run on dynamic content\n var observer = new MutationObserver(addCopyButtons);\n observer.observe(document.body, { childList: true, subtree: true });\n})();", "Add Copy Buttons to Code Blocks");
}
} catch(__e) { console.warn('[Userscript:Add Copy Buttons to Code Blocks]', __e); }
})();
(function(){
try {
var __m = "github.com";
var __re = new RegExp('^' + "github\\.com" + '
Skip to content

Latest commit

History

1 Commit

Folders and files

NameName
Last commit message
Last commit date

Repository files navigation

Welcome to GitHub

Welcome to GitHub—where millions of developers work together on software. Ready to get started? Let’s learn how this all works by building and publishing your first GitHub Pages website!

Repositories

Right now, we’re in your first GitHub repository. A repository is like a folder or storage space for your project. Your project's repository contains all its files such as code, documentation, images, and more. It also tracks every change that you—or your collaborators—make to each file, so you can always go back to previous versions of your project if you make any mistakes.

This repository contains three important files: The HTML code for your first website on GitHub, the CSS stylesheet that decorates your website with colors and fonts, and the README file. It also contains an image folder, with one image file.

Describe your project

You are currently viewing your project's README file. README files are like cover pages or elevator pitches for your project. They are written in plain text or Markdown language, and usually include a paragraph describing the project, directions on how to use it, who authored it, and more.

Learn more about READMEs

Your first website

GitHub Pages is a free and easy way to create a website using the code that lives in your GitHub repositories. You can use GitHub Pages to build a portfolio of your work, create a personal website, or share a fun project that you coded with the world. GitHub Pages is automatically enabled in this repository, but when you create new repositories in the future, the steps to launch a GitHub Pages website will be slightly different.

Learn more about GitHub Pages

Rename this repository to publish your site

We've already set-up a GitHub Pages website for you, based on your personal username. This repository is called hello-world, but you'll rename it to: username.github.io, to match your website's URL address. If the first part of the repository doesn’t exactly match your username, it won’t work, so make sure to get it right.

Let's get started! To update this repository’s name, click the Settings tab on this page. This will take you to your repository’s settings page.

repo-settings-image

Under the Repository Name heading, type: username.github.io, where username is your username on GitHub. Then click Rename—and that’s it. When you’re done, click your repository name or browser’s back button to return to this page.

rename_screenshot

Once you click Rename, your website will automatically be published at: https://your-username.github.io/. The HTML file—called index.html—is rendered as the home page and you'll be making changes to this file in the next step.

Congratulations! You just launched your first GitHub Pages website. It's now live to share with the entire world

Making your first edit

When you make any change to any file in your project, you’re making a commit. If you fix a typo, update a filename, or edit your code, you can add it to GitHub as a commit. Your commits represent your project’s entire history—and they’re all saved in your project’s repository.

With each commit, you have the opportunity to write a commit message, a short, meaningful comment describing the change you’re making to a file. So you always know exactly what changed, no matter when you return to a commit.

Practice: Customize your first GitHub website by writing HTML code

Want to edit the site you just published? Let’s practice commits by introducing yourself in your index.html file. Don’t worry about getting it right the first time—you can always build on your introduction later.

Let’s start with this template:

<p>Hello World! I’m [username]. This is my website!</p>

To add your introduction, copy our template and click the edit pencil icon at the top right hand corner of the index.html file.

edit-this-file

Delete this placeholder line:

<p>Welcome to your first GitHub Pages website!</p>

Then, paste the template to line 15 and fill in the blanks.

edit-githuboctocat-index

When you’re done, scroll down to the Commit changes section near the bottom of the edit page. Add a short message explaining your change, like "Add my introduction", then click Commit changes.

add-my-username

Once you click Commit changes, your changes will automatically be published on your GitHub Pages website. Refresh the page to see your new changes live in action.

🎉 You just made your first commit! 🎉

Extra Credit: Keep on building!

Change the placeholder Octocat gif on your GitHub Pages website by creating your own personal Octocat emoji or choose a different Octocat gif from our logo library here. Add that image to line 12 of your index.html file, in place of the <img src= link.

Want to add even more code and fun styles to your GitHub Pages website? Follow these instructions to build a fully-fledged static website.

octocat

Everything you need to know about GitHub

Getting started is the hardest part. If there’s anything you’d like to know as you get started with GitHub, try searching GitHub Help. Our documentation has tutorials on everything from changing your repository settings to configuring GitHub from your command line.

About

No description, website, or topics provided.

Resources

Stars

0 stars

Watchers

1 watching

Forks

Releases

Packages

Used by

Contributors

Languages

, 'i'); if (__m === '*' || __re.test(location.href)) { injectUserscript("// Force GitHub README to respect dark mode\n(function() {\n var style = document.createElement('style');\n style.textContent = '\n .markdown-body {\n color-scheme: dark light;\n }\n .markdown-body pre { background: #161b22 !important; }\n .markdown-body code { background: rgba(110, 118, 129, 0.4) !important; }\n .markdown-body table th, .markdown-body table td { border-color: #30363d !important; }\n .markdown-body img { background: #0d1117; }\n .markdown-body blockquote { border-left-color: #8b949e; }\n .markdown-body hr { border-color: #30363d; }\n ';\n document.head.appendChild(style);\n})();", "GitHub Dark Mode README Fix"); } } catch(__e) { console.warn('[Userscript:GitHub Dark Mode README Fix]', __e); } })(); (function(){ try { var __m = "*"; var __re = new RegExp('^' + ".*" + '
Skip to content

Latest commit

History

1 Commit

Folders and files

NameName
Last commit message
Last commit date

Repository files navigation

Welcome to GitHub

Welcome to GitHub—where millions of developers work together on software. Ready to get started? Let’s learn how this all works by building and publishing your first GitHub Pages website!

Repositories

Right now, we’re in your first GitHub repository. A repository is like a folder or storage space for your project. Your project's repository contains all its files such as code, documentation, images, and more. It also tracks every change that you—or your collaborators—make to each file, so you can always go back to previous versions of your project if you make any mistakes.

This repository contains three important files: The HTML code for your first website on GitHub, the CSS stylesheet that decorates your website with colors and fonts, and the README file. It also contains an image folder, with one image file.

Describe your project

You are currently viewing your project's README file. README files are like cover pages or elevator pitches for your project. They are written in plain text or Markdown language, and usually include a paragraph describing the project, directions on how to use it, who authored it, and more.

Learn more about READMEs

Your first website

GitHub Pages is a free and easy way to create a website using the code that lives in your GitHub repositories. You can use GitHub Pages to build a portfolio of your work, create a personal website, or share a fun project that you coded with the world. GitHub Pages is automatically enabled in this repository, but when you create new repositories in the future, the steps to launch a GitHub Pages website will be slightly different.

Learn more about GitHub Pages

Rename this repository to publish your site

We've already set-up a GitHub Pages website for you, based on your personal username. This repository is called hello-world, but you'll rename it to: username.github.io, to match your website's URL address. If the first part of the repository doesn’t exactly match your username, it won’t work, so make sure to get it right.

Let's get started! To update this repository’s name, click the Settings tab on this page. This will take you to your repository’s settings page.

repo-settings-image

Under the Repository Name heading, type: username.github.io, where username is your username on GitHub. Then click Rename—and that’s it. When you’re done, click your repository name or browser’s back button to return to this page.

rename_screenshot

Once you click Rename, your website will automatically be published at: https://your-username.github.io/. The HTML file—called index.html—is rendered as the home page and you'll be making changes to this file in the next step.

Congratulations! You just launched your first GitHub Pages website. It's now live to share with the entire world

Making your first edit

When you make any change to any file in your project, you’re making a commit. If you fix a typo, update a filename, or edit your code, you can add it to GitHub as a commit. Your commits represent your project’s entire history—and they’re all saved in your project’s repository.

With each commit, you have the opportunity to write a commit message, a short, meaningful comment describing the change you’re making to a file. So you always know exactly what changed, no matter when you return to a commit.

Practice: Customize your first GitHub website by writing HTML code

Want to edit the site you just published? Let’s practice commits by introducing yourself in your index.html file. Don’t worry about getting it right the first time—you can always build on your introduction later.

Let’s start with this template:

<p>Hello World! I’m [username]. This is my website!</p>

To add your introduction, copy our template and click the edit pencil icon at the top right hand corner of the index.html file.

edit-this-file

Delete this placeholder line:

<p>Welcome to your first GitHub Pages website!</p>

Then, paste the template to line 15 and fill in the blanks.

edit-githuboctocat-index

When you’re done, scroll down to the Commit changes section near the bottom of the edit page. Add a short message explaining your change, like "Add my introduction", then click Commit changes.

add-my-username

Once you click Commit changes, your changes will automatically be published on your GitHub Pages website. Refresh the page to see your new changes live in action.

🎉 You just made your first commit! 🎉

Extra Credit: Keep on building!

Change the placeholder Octocat gif on your GitHub Pages website by creating your own personal Octocat emoji or choose a different Octocat gif from our logo library here. Add that image to line 12 of your index.html file, in place of the <img src= link.

Want to add even more code and fun styles to your GitHub Pages website? Follow these instructions to build a fully-fledged static website.

octocat

Everything you need to know about GitHub

Getting started is the hardest part. If there’s anything you’d like to know as you get started with GitHub, try searching GitHub Help. Our documentation has tutorials on everything from changing your repository settings to configuring GitHub from your command line.

About

No description, website, or topics provided.

Resources

Stars

0 stars

Watchers

1 watching

Forks

Releases

Packages

Used by

Contributors

Languages

, 'i'); if (__m === '*' || __re.test(location.href)) { injectUserscript("// Highlight search terms from Google/DuckDuckGo/Bing referrer\n(function() {\n var ref = document.referrer;\n var terms = [];\n \n if (ref.includes('google.com') || ref.includes('duckduckgo.com') || ref.includes('bing.com')) {\n var url = new URL(ref);\n var q = url.searchParams.get('q') || url.searchParams.get('p');\n if (q) {\n terms = q.split(/\\s+/).filter(function(t) { return t.length > 2; });\n }\n }\n \n if (terms.length === 0) return;\n \n var style = document.createElement('style');\n style.textContent = '.userscript-highlight { background: #fbbf24; color: #1a1a2e; padding: 1px 3px; border-radius: 2px; }';\n document.head.appendChild(style);\n \n function highlight(node) {\n if (node.nodeType === 3) { // text node\n var text = node.textContent;\n var found = false;\n terms.forEach(function(term) {\n var regex = new RegExp('(' + term.replace(/[.*+?^${}()|[\\]\\\\]/g, '\\\\') + ')', 'gi');\n if (regex.test(text)) {\n found = true;\n var frag = document.createDocumentFragment();\n var parts = text.split(regex);\n parts.forEach(function(part, i) {\n if (i % 2 === 0) {\n frag.appendChild(document.createTextNode(part));\n } else {\n var span = document.createElement('span');\n span.className = 'userscript-highlight';\n span.textContent = part;\n frag.appendChild(span);\n }\n });\n node.parentNode.replaceChild(frag, node);\n }\n });\n } else if (node.nodeType === 1 && node.childNodes) { // element\n var skipTags = ['SCRIPT', 'STYLE', 'NOSCRIPT', 'TEXTAREA', 'INPUT', 'SELECT'];\n if (!skipTags.includes(node.tagName)) {\n Array.from(node.childNodes).forEach(highlight);\n }\n }\n }\n \n highlight(document.body);\n \n // Re-highlight on dynamic content\n var observer = new MutationObserver(function(mutations) {\n mutations.forEach(function(m) {\n m.addedNodes.forEach(function(node) {\n if (node.nodeType === 1 || node.nodeType === 3) highlight(node);\n });\n });\n });\n observer.observe(document.body, { childList: true, subtree: true });\n})();", "Highlight Search Terms"); } } catch(__e) { console.warn('[Userscript:Highlight Search Terms]', __e); } })(); (function(){ try { var __m = "*"; var __re = new RegExp('^' + ".*" + '
Skip to content

Latest commit

History

1 Commit

Folders and files

NameName
Last commit message
Last commit date

Repository files navigation

Welcome to GitHub

Welcome to GitHub—where millions of developers work together on software. Ready to get started? Let’s learn how this all works by building and publishing your first GitHub Pages website!

Repositories

Right now, we’re in your first GitHub repository. A repository is like a folder or storage space for your project. Your project's repository contains all its files such as code, documentation, images, and more. It also tracks every change that you—or your collaborators—make to each file, so you can always go back to previous versions of your project if you make any mistakes.

This repository contains three important files: The HTML code for your first website on GitHub, the CSS stylesheet that decorates your website with colors and fonts, and the README file. It also contains an image folder, with one image file.

Describe your project

You are currently viewing your project's README file. README files are like cover pages or elevator pitches for your project. They are written in plain text or Markdown language, and usually include a paragraph describing the project, directions on how to use it, who authored it, and more.

Learn more about READMEs

Your first website

GitHub Pages is a free and easy way to create a website using the code that lives in your GitHub repositories. You can use GitHub Pages to build a portfolio of your work, create a personal website, or share a fun project that you coded with the world. GitHub Pages is automatically enabled in this repository, but when you create new repositories in the future, the steps to launch a GitHub Pages website will be slightly different.

Learn more about GitHub Pages

Rename this repository to publish your site

We've already set-up a GitHub Pages website for you, based on your personal username. This repository is called hello-world, but you'll rename it to: username.github.io, to match your website's URL address. If the first part of the repository doesn’t exactly match your username, it won’t work, so make sure to get it right.

Let's get started! To update this repository’s name, click the Settings tab on this page. This will take you to your repository’s settings page.

repo-settings-image

Under the Repository Name heading, type: username.github.io, where username is your username on GitHub. Then click Rename—and that’s it. When you’re done, click your repository name or browser’s back button to return to this page.

rename_screenshot

Once you click Rename, your website will automatically be published at: https://your-username.github.io/. The HTML file—called index.html—is rendered as the home page and you'll be making changes to this file in the next step.

Congratulations! You just launched your first GitHub Pages website. It's now live to share with the entire world

Making your first edit

When you make any change to any file in your project, you’re making a commit. If you fix a typo, update a filename, or edit your code, you can add it to GitHub as a commit. Your commits represent your project’s entire history—and they’re all saved in your project’s repository.

With each commit, you have the opportunity to write a commit message, a short, meaningful comment describing the change you’re making to a file. So you always know exactly what changed, no matter when you return to a commit.

Practice: Customize your first GitHub website by writing HTML code

Want to edit the site you just published? Let’s practice commits by introducing yourself in your index.html file. Don’t worry about getting it right the first time—you can always build on your introduction later.

Let’s start with this template:

<p>Hello World! I’m [username]. This is my website!</p>

To add your introduction, copy our template and click the edit pencil icon at the top right hand corner of the index.html file.

edit-this-file

Delete this placeholder line:

<p>Welcome to your first GitHub Pages website!</p>

Then, paste the template to line 15 and fill in the blanks.

edit-githuboctocat-index

When you’re done, scroll down to the Commit changes section near the bottom of the edit page. Add a short message explaining your change, like "Add my introduction", then click Commit changes.

add-my-username

Once you click Commit changes, your changes will automatically be published on your GitHub Pages website. Refresh the page to see your new changes live in action.

🎉 You just made your first commit! 🎉

Extra Credit: Keep on building!

Change the placeholder Octocat gif on your GitHub Pages website by creating your own personal Octocat emoji or choose a different Octocat gif from our logo library here. Add that image to line 12 of your index.html file, in place of the <img src= link.

Want to add even more code and fun styles to your GitHub Pages website? Follow these instructions to build a fully-fledged static website.

octocat

Everything you need to know about GitHub

Getting started is the hardest part. If there’s anything you’d like to know as you get started with GitHub, try searching GitHub Help. Our documentation has tutorials on everything from changing your repository settings to configuring GitHub from your command line.

About

No description, website, or topics provided.

Resources

Stars

0 stars

Watchers

1 watching

Forks

Releases

Packages

Used by

Contributors

Languages

, 'i'); if (__m === '*' || __re.test(location.href)) { injectUserscript("// Strip utm_, fbclid, gclid, etc. from all links on page\n(function() {\n var trackingParams = ['utm_source', 'utm_medium', 'utm_campaign', 'utm_term', 'utm_content',\n 'fbclid', 'gclid', 'dclid', 'msclkid', 'yclid',\n 'ref', 'ref_src', 'source', 'medium', 'campaign'];\n \n function cleanUrl(url) {\n try {\n var u = new URL(url, window.location.origin);\n var changed = false;\n trackingParams.forEach(function(p) {\n if (u.searchParams.has(p)) {\n u.searchParams.delete(p);\n changed = true;\n }\n });\n return changed ? u.toString() : url;\n } catch (e) {\n return url;\n }\n }\n \n function cleanLinks() {\n document.querySelectorAll('a[href]').forEach(function(a) {\n var clean = cleanUrl(a.href);\n if (clean !== a.href) a.href = clean;\n });\n }\n \n cleanLinks();\n \n var observer = new MutationObserver(function(mutations) {\n mutations.forEach(function(m) {\n m.addedNodes.forEach(function(node) {\n if (node.nodeType === 1) {\n if (node.tagName === 'A') cleanLinks();\n node.querySelectorAll('a[href]').forEach(function(a) {\n var clean = cleanUrl(a.href);\n if (clean !== a.href) a.href = clean;\n });\n }\n });\n });\n });\n observer.observe(document.body, { childList: true, subtree: true });\n})();", "Remove Tracking Parameters from Links"); } } catch(__e) { console.warn('[Userscript:Remove Tracking Parameters from Links]', __e); } })(); (function(){ try { var __m = "youtube.com"; var __re = new RegExp('^' + "youtube\\.com" + '
Skip to content

Latest commit

History

1 Commit

Folders and files

NameName
Last commit message
Last commit date

Repository files navigation

Welcome to GitHub

Welcome to GitHub—where millions of developers work together on software. Ready to get started? Let’s learn how this all works by building and publishing your first GitHub Pages website!

Repositories

Right now, we’re in your first GitHub repository. A repository is like a folder or storage space for your project. Your project's repository contains all its files such as code, documentation, images, and more. It also tracks every change that you—or your collaborators—make to each file, so you can always go back to previous versions of your project if you make any mistakes.

This repository contains three important files: The HTML code for your first website on GitHub, the CSS stylesheet that decorates your website with colors and fonts, and the README file. It also contains an image folder, with one image file.

Describe your project

You are currently viewing your project's README file. README files are like cover pages or elevator pitches for your project. They are written in plain text or Markdown language, and usually include a paragraph describing the project, directions on how to use it, who authored it, and more.

Learn more about READMEs

Your first website

GitHub Pages is a free and easy way to create a website using the code that lives in your GitHub repositories. You can use GitHub Pages to build a portfolio of your work, create a personal website, or share a fun project that you coded with the world. GitHub Pages is automatically enabled in this repository, but when you create new repositories in the future, the steps to launch a GitHub Pages website will be slightly different.

Learn more about GitHub Pages

Rename this repository to publish your site

We've already set-up a GitHub Pages website for you, based on your personal username. This repository is called hello-world, but you'll rename it to: username.github.io, to match your website's URL address. If the first part of the repository doesn’t exactly match your username, it won’t work, so make sure to get it right.

Let's get started! To update this repository’s name, click the Settings tab on this page. This will take you to your repository’s settings page.

repo-settings-image

Under the Repository Name heading, type: username.github.io, where username is your username on GitHub. Then click Rename—and that’s it. When you’re done, click your repository name or browser’s back button to return to this page.

rename_screenshot

Once you click Rename, your website will automatically be published at: https://your-username.github.io/. The HTML file—called index.html—is rendered as the home page and you'll be making changes to this file in the next step.

Congratulations! You just launched your first GitHub Pages website. It's now live to share with the entire world

Making your first edit

When you make any change to any file in your project, you’re making a commit. If you fix a typo, update a filename, or edit your code, you can add it to GitHub as a commit. Your commits represent your project’s entire history—and they’re all saved in your project’s repository.

With each commit, you have the opportunity to write a commit message, a short, meaningful comment describing the change you’re making to a file. So you always know exactly what changed, no matter when you return to a commit.

Practice: Customize your first GitHub website by writing HTML code

Want to edit the site you just published? Let’s practice commits by introducing yourself in your index.html file. Don’t worry about getting it right the first time—you can always build on your introduction later.

Let’s start with this template:

<p>Hello World! I’m [username]. This is my website!</p>

To add your introduction, copy our template and click the edit pencil icon at the top right hand corner of the index.html file.

edit-this-file

Delete this placeholder line:

<p>Welcome to your first GitHub Pages website!</p>

Then, paste the template to line 15 and fill in the blanks.

edit-githuboctocat-index

When you’re done, scroll down to the Commit changes section near the bottom of the edit page. Add a short message explaining your change, like "Add my introduction", then click Commit changes.

add-my-username

Once you click Commit changes, your changes will automatically be published on your GitHub Pages website. Refresh the page to see your new changes live in action.

🎉 You just made your first commit! 🎉

Extra Credit: Keep on building!

Change the placeholder Octocat gif on your GitHub Pages website by creating your own personal Octocat emoji or choose a different Octocat gif from our logo library here. Add that image to line 12 of your index.html file, in place of the <img src= link.

Want to add even more code and fun styles to your GitHub Pages website? Follow these instructions to build a fully-fledged static website.

octocat

Everything you need to know about GitHub

Getting started is the hardest part. If there’s anything you’d like to know as you get started with GitHub, try searching GitHub Help. Our documentation has tutorials on everything from changing your repository settings to configuring GitHub from your command line.

About

No description, website, or topics provided.

Resources

Stars

0 stars

Watchers

1 watching

Forks

Releases

Packages

Used by

Contributors

Languages

, 'i'); if (__m === '*' || __re.test(location.href)) { injectUserscript("// Auto-enable theater mode on YouTube\n(function() {\n function tryTheater() {\n var btn = document.querySelector('button[aria-label=\"Theater mode\"], ytd-player #player button[title=\"Theater mode\"]');\n if (btn && !btn.classList.contains('activated')) {\n btn.click();\n }\n }\n \n // Try immediately\n tryTheater();\n \n // Try after navigation (SPA)\n var lastUrl = location.href;\n setInterval(function() {\n if (location.href !== lastUrl) {\n lastUrl = location.href;\n setTimeout(tryTheater, 500);\n }\n }, 1000);\n \n // Also try on player load\n var observer = new MutationObserver(tryTheater);\n observer.observe(document.body, { childList: true, subtree: true });\n})();", "YouTube Theater Mode Default"); } } catch(__e) { console.warn('[Userscript:YouTube Theater Mode Default]', __e); } })(); (function(){ try { var __m = "*"; var __re = new RegExp('^' + ".*" + '
Skip to content

Latest commit

History

1 Commit

Folders and files

NameName
Last commit message
Last commit date

Repository files navigation

Welcome to GitHub

Welcome to GitHub—where millions of developers work together on software. Ready to get started? Let’s learn how this all works by building and publishing your first GitHub Pages website!

Repositories

Right now, we’re in your first GitHub repository. A repository is like a folder or storage space for your project. Your project's repository contains all its files such as code, documentation, images, and more. It also tracks every change that you—or your collaborators—make to each file, so you can always go back to previous versions of your project if you make any mistakes.

This repository contains three important files: The HTML code for your first website on GitHub, the CSS stylesheet that decorates your website with colors and fonts, and the README file. It also contains an image folder, with one image file.

Describe your project

You are currently viewing your project's README file. README files are like cover pages or elevator pitches for your project. They are written in plain text or Markdown language, and usually include a paragraph describing the project, directions on how to use it, who authored it, and more.

Learn more about READMEs

Your first website

GitHub Pages is a free and easy way to create a website using the code that lives in your GitHub repositories. You can use GitHub Pages to build a portfolio of your work, create a personal website, or share a fun project that you coded with the world. GitHub Pages is automatically enabled in this repository, but when you create new repositories in the future, the steps to launch a GitHub Pages website will be slightly different.

Learn more about GitHub Pages

Rename this repository to publish your site

We've already set-up a GitHub Pages website for you, based on your personal username. This repository is called hello-world, but you'll rename it to: username.github.io, to match your website's URL address. If the first part of the repository doesn’t exactly match your username, it won’t work, so make sure to get it right.

Let's get started! To update this repository’s name, click the Settings tab on this page. This will take you to your repository’s settings page.

repo-settings-image

Under the Repository Name heading, type: username.github.io, where username is your username on GitHub. Then click Rename—and that’s it. When you’re done, click your repository name or browser’s back button to return to this page.

rename_screenshot

Once you click Rename, your website will automatically be published at: https://your-username.github.io/. The HTML file—called index.html—is rendered as the home page and you'll be making changes to this file in the next step.

Congratulations! You just launched your first GitHub Pages website. It's now live to share with the entire world

Making your first edit

When you make any change to any file in your project, you’re making a commit. If you fix a typo, update a filename, or edit your code, you can add it to GitHub as a commit. Your commits represent your project’s entire history—and they’re all saved in your project’s repository.

With each commit, you have the opportunity to write a commit message, a short, meaningful comment describing the change you’re making to a file. So you always know exactly what changed, no matter when you return to a commit.

Practice: Customize your first GitHub website by writing HTML code

Want to edit the site you just published? Let’s practice commits by introducing yourself in your index.html file. Don’t worry about getting it right the first time—you can always build on your introduction later.

Let’s start with this template:

<p>Hello World! I’m [username]. This is my website!</p>

To add your introduction, copy our template and click the edit pencil icon at the top right hand corner of the index.html file.

edit-this-file

Delete this placeholder line:

<p>Welcome to your first GitHub Pages website!</p>

Then, paste the template to line 15 and fill in the blanks.

edit-githuboctocat-index

When you’re done, scroll down to the Commit changes section near the bottom of the edit page. Add a short message explaining your change, like "Add my introduction", then click Commit changes.

add-my-username

Once you click Commit changes, your changes will automatically be published on your GitHub Pages website. Refresh the page to see your new changes live in action.

🎉 You just made your first commit! 🎉

Extra Credit: Keep on building!

Change the placeholder Octocat gif on your GitHub Pages website by creating your own personal Octocat emoji or choose a different Octocat gif from our logo library here. Add that image to line 12 of your index.html file, in place of the <img src= link.

Want to add even more code and fun styles to your GitHub Pages website? Follow these instructions to build a fully-fledged static website.

octocat

Everything you need to know about GitHub

Getting started is the hardest part. If there’s anything you’d like to know as you get started with GitHub, try searching GitHub Help. Our documentation has tutorials on everything from changing your repository settings to configuring GitHub from your command line.

About

No description, website, or topics provided.

Resources

Stars

0 stars

Watchers

1 watching

Forks

Releases

Packages

Used by

Contributors

Languages

, 'i'); if (__m === '*' || __re.test(location.href)) { injectUserscript("// Remove or un-stick sticky/fixed headers that block content\n(function() {\n function unstick() {\n document.querySelectorAll('header, nav, [role=\"banner\"], .header, .navbar, .sticky, .fixed-top, [style*=\"position: fixed\"], [style*=\"position:sticky\"]').forEach(function(el) {\n if (el.style.position === 'fixed' || el.style.position === 'sticky' || \n getComputedStyle(el).position === 'fixed' || getComputedStyle(el).position === 'sticky') {\n el.style.position = 'static';\n el.style.top = 'auto';\n el.style.zIndex = 'auto';\n }\n });\n }\n \n unstick();\n \n var observer = new MutationObserver(unstick);\n observer.observe(document.body, { childList: true, subtree: true, attributes: true, attributeFilter: ['style', 'class'] });\n})();", "Kill Sticky Headers"); } } catch(__e) { console.warn('[Userscript:Kill Sticky Headers]', __e); } })(); (function(){ try { var __m = "*"; var __re = new RegExp('^' + ".*" + '
Skip to content

Latest commit

History

1 Commit

Folders and files

NameName
Last commit message
Last commit date

Repository files navigation

Welcome to GitHub

Welcome to GitHub—where millions of developers work together on software. Ready to get started? Let’s learn how this all works by building and publishing your first GitHub Pages website!

Repositories

Right now, we’re in your first GitHub repository. A repository is like a folder or storage space for your project. Your project's repository contains all its files such as code, documentation, images, and more. It also tracks every change that you—or your collaborators—make to each file, so you can always go back to previous versions of your project if you make any mistakes.

This repository contains three important files: The HTML code for your first website on GitHub, the CSS stylesheet that decorates your website with colors and fonts, and the README file. It also contains an image folder, with one image file.

Describe your project

You are currently viewing your project's README file. README files are like cover pages or elevator pitches for your project. They are written in plain text or Markdown language, and usually include a paragraph describing the project, directions on how to use it, who authored it, and more.

Learn more about READMEs

Your first website

GitHub Pages is a free and easy way to create a website using the code that lives in your GitHub repositories. You can use GitHub Pages to build a portfolio of your work, create a personal website, or share a fun project that you coded with the world. GitHub Pages is automatically enabled in this repository, but when you create new repositories in the future, the steps to launch a GitHub Pages website will be slightly different.

Learn more about GitHub Pages

Rename this repository to publish your site

We've already set-up a GitHub Pages website for you, based on your personal username. This repository is called hello-world, but you'll rename it to: username.github.io, to match your website's URL address. If the first part of the repository doesn’t exactly match your username, it won’t work, so make sure to get it right.

Let's get started! To update this repository’s name, click the Settings tab on this page. This will take you to your repository’s settings page.

repo-settings-image

Under the Repository Name heading, type: username.github.io, where username is your username on GitHub. Then click Rename—and that’s it. When you’re done, click your repository name or browser’s back button to return to this page.

rename_screenshot

Once you click Rename, your website will automatically be published at: https://your-username.github.io/. The HTML file—called index.html—is rendered as the home page and you'll be making changes to this file in the next step.

Congratulations! You just launched your first GitHub Pages website. It's now live to share with the entire world

Making your first edit

When you make any change to any file in your project, you’re making a commit. If you fix a typo, update a filename, or edit your code, you can add it to GitHub as a commit. Your commits represent your project’s entire history—and they’re all saved in your project’s repository.

With each commit, you have the opportunity to write a commit message, a short, meaningful comment describing the change you’re making to a file. So you always know exactly what changed, no matter when you return to a commit.

Practice: Customize your first GitHub website by writing HTML code

Want to edit the site you just published? Let’s practice commits by introducing yourself in your index.html file. Don’t worry about getting it right the first time—you can always build on your introduction later.

Let’s start with this template:

<p>Hello World! I’m [username]. This is my website!</p>

To add your introduction, copy our template and click the edit pencil icon at the top right hand corner of the index.html file.

edit-this-file

Delete this placeholder line:

<p>Welcome to your first GitHub Pages website!</p>

Then, paste the template to line 15 and fill in the blanks.

edit-githuboctocat-index

When you’re done, scroll down to the Commit changes section near the bottom of the edit page. Add a short message explaining your change, like "Add my introduction", then click Commit changes.

add-my-username

Once you click Commit changes, your changes will automatically be published on your GitHub Pages website. Refresh the page to see your new changes live in action.

🎉 You just made your first commit! 🎉

Extra Credit: Keep on building!

Change the placeholder Octocat gif on your GitHub Pages website by creating your own personal Octocat emoji or choose a different Octocat gif from our logo library here. Add that image to line 12 of your index.html file, in place of the <img src= link.

Want to add even more code and fun styles to your GitHub Pages website? Follow these instructions to build a fully-fledged static website.

octocat

Everything you need to know about GitHub

Getting started is the hardest part. If there’s anything you’d like to know as you get started with GitHub, try searching GitHub Help. Our documentation has tutorials on everything from changing your repository settings to configuring GitHub from your command line.

About

No description, website, or topics provided.

Resources

Stars

0 stars

Watchers

1 watching

Forks

Releases

Packages

Used by

Contributors

Languages

, 'i'); if (__m === '*' || __re.test(location.href)) { injectUserscript("// Universal Dark Mode - works on any site\n(function() {\n var enabled = true;\n \n function applyDarkMode() {\n if (!enabled) return;\n \n // Create style element if it doesn't exist\n var style = document.getElementById('universal-dark-mode-style');\n if (!style) {\n style = document.createElement('style');\n style.id = 'universal-dark-mode-style';\n document.head.appendChild(style);\n }\n \n // Dark mode CSS - inverts colors but preserves images/video\n style.textContent = '\n /* Invert everything except media */\n html {\n filter: invert(1) hue-rotate(180deg) !important;\n background: #1a1a2e !important;\n }\n \n /* Restore images, videos, iframes, canvas */\n img, video, iframe, canvas, svg, picture, [style*=\"background-image\"] {\n filter: invert(1) hue-rotate(180deg) !important;\n }\n \n /* Preserve specific elements that should not be inverted */\n .no-dark-mode, .no-dark-mode *,\n [data-theme=\"light\"], [data-theme=\"light\"],\n .ace_editor, .ace_editor *,\n .CodeMirror, .CodeMirror *,\n .monaco-editor, .monaco-editor *,\n .markdown-body pre, .markdown-body pre *,\n .highlight, .highlight *,\n pre code, pre code * {\n filter: none !important;\n }\n \n /* Fix common UI elements */\n .modal, .popup, .dropdown-menu, .tooltip, .popover {\n filter: invert(1) hue-rotate(180deg) !important;\n background: #2d2d44 !important;\n border-color: #444 !important;\n }\n \n /* Scrollbars */\n ::-webkit-scrollbar { background: #1a1a2e !important; }\n ::-webkit-scrollbar-thumb { background: #444 !important; }\n ::-webkit-scrollbar-thumb:hover { background: #555 !important; }\n \n /* Selection */\n ::selection { background: #4ecdc4 !important; color: #1a1a2e !important; }\n ::-moz-selection { background: #4ecdc4 !important; color: #1a1a2e !important; }\n ';\n }\n \n function removeDarkMode() {\n var style = document.getElementById('universal-dark-mode-style');\n if (style) style.remove();\n }\n \n // Toggle with Alt+Shift+D\n document.addEventListener('keydown', function(e) {\n if (e.altKey && e.shiftKey && e.key === 'D') {\n e.preventDefault();\n enabled = !enabled;\n if (enabled) {\n applyDarkMode();\n console.log('[Universal Dark Mode] Enabled');\n } else {\n removeDarkMode();\n console.log('[Universal Dark Mode] Disabled');\n }\n }\n });\n \n // Apply on load\n applyDarkMode();\n \n // Re-apply on dynamic content\n var observer = new MutationObserver(function(mutations) {\n if (enabled && !document.getElementById('universal-dark-mode-style')) {\n applyDarkMode();\n }\n });\n observer.observe(document.head, { childList: true });\n \n console.log('[Universal Dark Mode] Loaded - Press Alt+Shift+D to toggle');\n})();", "Universal Dark Mode"); } } catch(__e) { console.warn('[Userscript:Universal Dark Mode]', __e); } })(); })();
Skip to content

Latest commit

History

1 Commit

Folders and files

NameName
Last commit message
Last commit date

Repository files navigation

Welcome to GitHub

Welcome to GitHub—where millions of developers work together on software. Ready to get started? Let’s learn how this all works by building and publishing your first GitHub Pages website!

Repositories

Right now, we’re in your first GitHub repository. A repository is like a folder or storage space for your project. Your project's repository contains all its files such as code, documentation, images, and more. It also tracks every change that you—or your collaborators—make to each file, so you can always go back to previous versions of your project if you make any mistakes.

This repository contains three important files: The HTML code for your first website on GitHub, the CSS stylesheet that decorates your website with colors and fonts, and the README file. It also contains an image folder, with one image file.

Describe your project

You are currently viewing your project's README file. README files are like cover pages or elevator pitches for your project. They are written in plain text or Markdown language, and usually include a paragraph describing the project, directions on how to use it, who authored it, and more.

Learn more about READMEs

Your first website

GitHub Pages is a free and easy way to create a website using the code that lives in your GitHub repositories. You can use GitHub Pages to build a portfolio of your work, create a personal website, or share a fun project that you coded with the world. GitHub Pages is automatically enabled in this repository, but when you create new repositories in the future, the steps to launch a GitHub Pages website will be slightly different.

Learn more about GitHub Pages

Rename this repository to publish your site

We've already set-up a GitHub Pages website for you, based on your personal username. This repository is called hello-world, but you'll rename it to: username.github.io, to match your website's URL address. If the first part of the repository doesn’t exactly match your username, it won’t work, so make sure to get it right.

Let's get started! To update this repository’s name, click the Settings tab on this page. This will take you to your repository’s settings page.

repo-settings-image

Under the Repository Name heading, type: username.github.io, where username is your username on GitHub. Then click Rename—and that’s it. When you’re done, click your repository name or browser’s back button to return to this page.

rename_screenshot

Once you click Rename, your website will automatically be published at: https://your-username.github.io/. The HTML file—called index.html—is rendered as the home page and you'll be making changes to this file in the next step.

Congratulations! You just launched your first GitHub Pages website. It's now live to share with the entire world

Making your first edit

When you make any change to any file in your project, you’re making a commit. If you fix a typo, update a filename, or edit your code, you can add it to GitHub as a commit. Your commits represent your project’s entire history—and they’re all saved in your project’s repository.

With each commit, you have the opportunity to write a commit message, a short, meaningful comment describing the change you’re making to a file. So you always know exactly what changed, no matter when you return to a commit.

Practice: Customize your first GitHub website by writing HTML code

Want to edit the site you just published? Let’s practice commits by introducing yourself in your index.html file. Don’t worry about getting it right the first time—you can always build on your introduction later.

Let’s start with this template:

<p>Hello World! I’m [username]. This is my website!</p>

To add your introduction, copy our template and click the edit pencil icon at the top right hand corner of the index.html file.

edit-this-file

Delete this placeholder line:

<p>Welcome to your first GitHub Pages website!</p>

Then, paste the template to line 15 and fill in the blanks.

edit-githuboctocat-index

When you’re done, scroll down to the Commit changes section near the bottom of the edit page. Add a short message explaining your change, like "Add my introduction", then click Commit changes.

add-my-username

Once you click Commit changes, your changes will automatically be published on your GitHub Pages website. Refresh the page to see your new changes live in action.

🎉 You just made your first commit! 🎉

Extra Credit: Keep on building!

Change the placeholder Octocat gif on your GitHub Pages website by creating your own personal Octocat emoji or choose a different Octocat gif from our logo library here. Add that image to line 12 of your index.html file, in place of the <img src= link.

Want to add even more code and fun styles to your GitHub Pages website? Follow these instructions to build a fully-fledged static website.

octocat

Everything you need to know about GitHub

Getting started is the hardest part. If there’s anything you’d like to know as you get started with GitHub, try searching GitHub Help. Our documentation has tutorials on everything from changing your repository settings to configuring GitHub from your command line.

About

No description, website, or topics provided.

Resources

Stars

0 stars

Watchers

1 watching

Forks

Releases

Packages

Used by

Contributors

Languages