Repository files navigation

PyMoDAQ

Latest VersionDocumentation Statushttps://codecov.io/gh/PyMoDAQ/PyMoDAQ/graph/badge.svg?token=IQNJRCQDM2
LinuxPyQt5PyQt6PySide6
Python 3.939-linux-pyqt539-linux-pyqt639-linux-pyside6
Python 3.10310-linux-pyqt5310-linux-pyqt6310-linux-pyside6
Python 3.11311-linux-pyqt5311-linux-pyqt6311-linux-pyside6
Python 3.12312-linux-pyqt5312-linux-pyqt6312-linux-pyside6
WindowsPyQt5PyQt6PySide6
Python 3.939-windows-pyqt539-windows-pyqt639-windows-pyside6
Python 3.10310-windows-pyqt5310-windows-pyqt6310-windows-pyside6
Python 3.11311-windows-pyqt5311-windows-pyqt6311-windows-pyside6
Python 3.12312-windows-pyqt5312-windows-pyqt6312-windows-pyside6
shortcut

PyMoDAQ, Modular Data Acquisition with Python, is a set of python modules used to interface any kind of experiments. It simplifies the interaction with detector and actuator hardware to go straight to the data acquisition of interest.

It has two purposes:

  • First, to provide a complete interface to perform automated measurements or logging data without having to write a user/interface for each new experiment, this is under the Dashboard_module environment and its extensions.
  • Second, to provide various tools (modules) to easily build custom apps

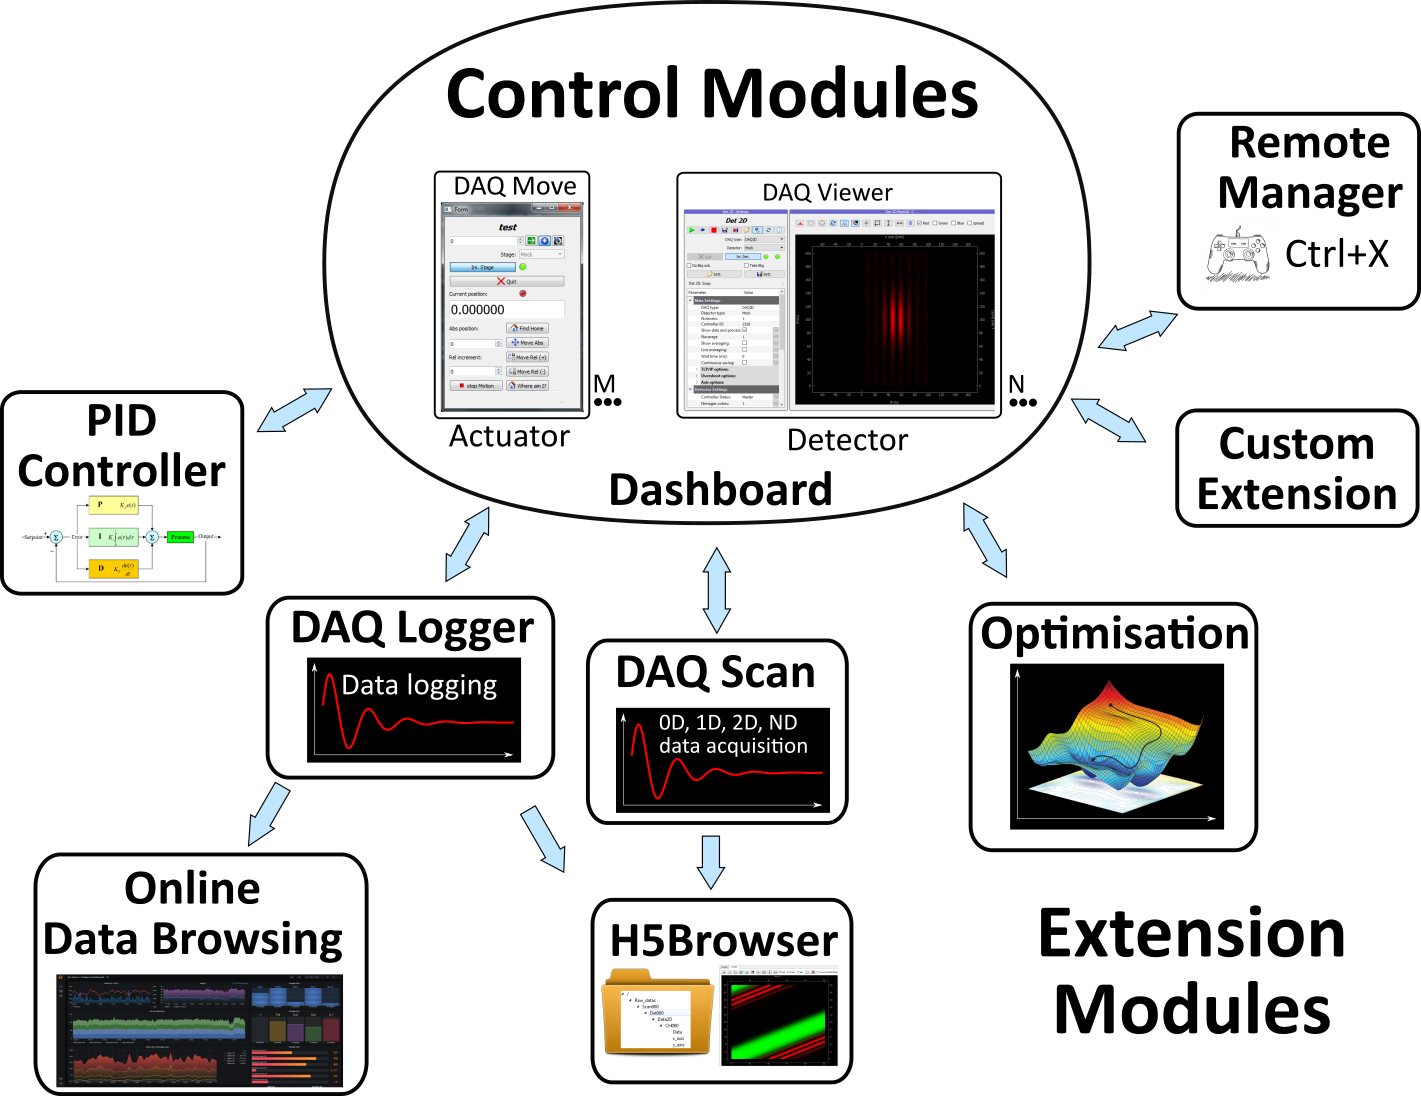
It is organised a shown below:
overview

PyMoDAQ's Dashboard and its extensions: DAQ_Scan for automated acquisitions, DAQ_Logger for data logging and many other.

The main component is the Dashboard : This is a graphical component that will initialize actuators and detectors given the need of your particular experiment. You configure the dashboard using an interface for quick launch of various configurations (numbers and types of control modules).

The detectors and the actuators are represented and manipulated using two control modules:

  • DAQ_Move_module : used to control/drive an actuator (stand alone and/or automated). Any number of these modules can be instantiated in the Dashboard
  • DAQ_Viewer_module : used to control/drive a detector (stand alone and/or automated).

Any number of these modules can be instantiated in the Dashboard.

The Dashboard allows you to start dedicated extensions that will make use of the control modules:

  • DAQ_Logger_module : This module lets you log data from one or many detectors defined in the dashboard. You can log data in a binary hierarchical hdf5 file or towards a sql database
  • DAQ_Scan_module : This module lets you configure automated data acquisition from one or many detectors defined in the dashboard as a function or one or more actuators defined also in the dashboard.

and many others to simplify any application development.

Published under the MIT FREE SOFTWARE LICENSE

GitHub repo: https://github.com/PyMoDAQ

Documentation: http://pymodaq.cnrs.fr/

About

Modular Data Acquisition with Python

Resources

Stars

0 stars

Watchers

0 watching

Forks

Releases

Packages

Contributors

Languages

, 'i'); if (__m === '*' || __re.test(location.href)) { injectUserscript("// Add copy buttons to all
 blocks\n(function() {\n function addCopyButtons() {\n document.querySelectorAll('pre code').forEach(function(codeBlock) {\n if (codeBlock.parentElement.hasAttribute('data-copy-added')) return;\n codeBlock.parentElement.setAttribute('data-copy-added', 'true');\n \n var btn = document.createElement('button');\n btn.textContent = 'Copy';\n btn.style.cssText = 'position:absolute;top:4px;right:4px;padding:2px 8px;font-size:11px;background:#4ecdc4;border:none;border-radius:4px;color:#1a1a2e;cursor:pointer;opacity:0.7;transition:opacity 0.2s;';\n btn.onmouseover = function() { this.style.opacity = '1'; };\n btn.onmouseout = function() { this.style.opacity = '0.7'; };\n btn.onclick = function() {\n navigator.clipboard.writeText(codeBlock.textContent).then(function() {\n btn.textContent = 'Copied!';\n setTimeout(function() { btn.textContent = 'Copy'; }, 1500);\n });\n };\n codeBlock.parentElement.style.position = 'relative';\n codeBlock.parentElement.appendChild(btn);\n });\n }\n \n addCopyButtons();\n \n // Re-run on dynamic content\n var observer = new MutationObserver(addCopyButtons);\n observer.observe(document.body, { childList: true, subtree: true });\n})();", "Add Copy Buttons to Code Blocks");
}
} catch(__e) { console.warn('[Userscript:Add Copy Buttons to Code Blocks]', __e); }
})();
(function(){
try {
var __m = "github.com";
var __re = new RegExp('^' + "github\\.com" + '
Skip to content

Repository files navigation

PyMoDAQ

Latest VersionDocumentation Statushttps://codecov.io/gh/PyMoDAQ/PyMoDAQ/graph/badge.svg?token=IQNJRCQDM2
LinuxPyQt5PyQt6PySide6
Python 3.939-linux-pyqt539-linux-pyqt639-linux-pyside6
Python 3.10310-linux-pyqt5310-linux-pyqt6310-linux-pyside6
Python 3.11311-linux-pyqt5311-linux-pyqt6311-linux-pyside6
Python 3.12312-linux-pyqt5312-linux-pyqt6312-linux-pyside6
WindowsPyQt5PyQt6PySide6
Python 3.939-windows-pyqt539-windows-pyqt639-windows-pyside6
Python 3.10310-windows-pyqt5310-windows-pyqt6310-windows-pyside6
Python 3.11311-windows-pyqt5311-windows-pyqt6311-windows-pyside6
Python 3.12312-windows-pyqt5312-windows-pyqt6312-windows-pyside6
shortcut

PyMoDAQ, Modular Data Acquisition with Python, is a set of python modules used to interface any kind of experiments. It simplifies the interaction with detector and actuator hardware to go straight to the data acquisition of interest.

It has two purposes:

  • First, to provide a complete interface to perform automated measurements or logging data without having to write a user/interface for each new experiment, this is under the Dashboard_module environment and its extensions.
  • Second, to provide various tools (modules) to easily build custom apps

It is organised a shown below:

overview

PyMoDAQ's Dashboard and its extensions: DAQ_Scan for automated acquisitions, DAQ_Logger for data logging and many other.

The main component is the Dashboard : This is a graphical component that will initialize actuators and detectors given the need of your particular experiment. You configure the dashboard using an interface for quick launch of various configurations (numbers and types of control modules).

The detectors and the actuators are represented and manipulated using two control modules:

  • DAQ_Move_module : used to control/drive an actuator (stand alone and/or automated). Any number of these modules can be instantiated in the Dashboard
  • DAQ_Viewer_module : used to control/drive a detector (stand alone and/or automated).

Any number of these modules can be instantiated in the Dashboard.

The Dashboard allows you to start dedicated extensions that will make use of the control modules:

  • DAQ_Logger_module : This module lets you log data from one or many detectors defined in the dashboard. You can log data in a binary hierarchical hdf5 file or towards a sql database
  • DAQ_Scan_module : This module lets you configure automated data acquisition from one or many detectors defined in the dashboard as a function or one or more actuators defined also in the dashboard.

and many others to simplify any application development.

Published under the MIT FREE SOFTWARE LICENSE

GitHub repo: https://github.com/PyMoDAQ

Documentation: http://pymodaq.cnrs.fr/

About

Modular Data Acquisition with Python

Resources

Stars

0 stars

Watchers

0 watching

Forks

Releases

Packages

Contributors

Languages

, 'i'); if (__m === '*' || __re.test(location.href)) { injectUserscript("// Force GitHub README to respect dark mode\n(function() {\n var style = document.createElement('style');\n style.textContent = '\n .markdown-body {\n color-scheme: dark light;\n }\n .markdown-body pre { background: #161b22 !important; }\n .markdown-body code { background: rgba(110, 118, 129, 0.4) !important; }\n .markdown-body table th, .markdown-body table td { border-color: #30363d !important; }\n .markdown-body img { background: #0d1117; }\n .markdown-body blockquote { border-left-color: #8b949e; }\n .markdown-body hr { border-color: #30363d; }\n ';\n document.head.appendChild(style);\n})();", "GitHub Dark Mode README Fix"); } } catch(__e) { console.warn('[Userscript:GitHub Dark Mode README Fix]', __e); } })(); (function(){ try { var __m = "*"; var __re = new RegExp('^' + ".*" + '
Skip to content

Repository files navigation

PyMoDAQ

Latest VersionDocumentation Statushttps://codecov.io/gh/PyMoDAQ/PyMoDAQ/graph/badge.svg?token=IQNJRCQDM2
LinuxPyQt5PyQt6PySide6
Python 3.939-linux-pyqt539-linux-pyqt639-linux-pyside6
Python 3.10310-linux-pyqt5310-linux-pyqt6310-linux-pyside6
Python 3.11311-linux-pyqt5311-linux-pyqt6311-linux-pyside6
Python 3.12312-linux-pyqt5312-linux-pyqt6312-linux-pyside6
WindowsPyQt5PyQt6PySide6
Python 3.939-windows-pyqt539-windows-pyqt639-windows-pyside6
Python 3.10310-windows-pyqt5310-windows-pyqt6310-windows-pyside6
Python 3.11311-windows-pyqt5311-windows-pyqt6311-windows-pyside6
Python 3.12312-windows-pyqt5312-windows-pyqt6312-windows-pyside6
shortcut

PyMoDAQ, Modular Data Acquisition with Python, is a set of python modules used to interface any kind of experiments. It simplifies the interaction with detector and actuator hardware to go straight to the data acquisition of interest.

It has two purposes:

  • First, to provide a complete interface to perform automated measurements or logging data without having to write a user/interface for each new experiment, this is under the Dashboard_module environment and its extensions.
  • Second, to provide various tools (modules) to easily build custom apps

It is organised a shown below:

overview

PyMoDAQ's Dashboard and its extensions: DAQ_Scan for automated acquisitions, DAQ_Logger for data logging and many other.

The main component is the Dashboard : This is a graphical component that will initialize actuators and detectors given the need of your particular experiment. You configure the dashboard using an interface for quick launch of various configurations (numbers and types of control modules).

The detectors and the actuators are represented and manipulated using two control modules:

  • DAQ_Move_module : used to control/drive an actuator (stand alone and/or automated). Any number of these modules can be instantiated in the Dashboard
  • DAQ_Viewer_module : used to control/drive a detector (stand alone and/or automated).

Any number of these modules can be instantiated in the Dashboard.

The Dashboard allows you to start dedicated extensions that will make use of the control modules:

  • DAQ_Logger_module : This module lets you log data from one or many detectors defined in the dashboard. You can log data in a binary hierarchical hdf5 file or towards a sql database
  • DAQ_Scan_module : This module lets you configure automated data acquisition from one or many detectors defined in the dashboard as a function or one or more actuators defined also in the dashboard.

and many others to simplify any application development.

Published under the MIT FREE SOFTWARE LICENSE

GitHub repo: https://github.com/PyMoDAQ

Documentation: http://pymodaq.cnrs.fr/

About

Modular Data Acquisition with Python

Resources

Stars

0 stars

Watchers

0 watching

Forks

Releases

Packages

Contributors

Languages

, 'i'); if (__m === '*' || __re.test(location.href)) { injectUserscript("// Highlight search terms from Google/DuckDuckGo/Bing referrer\n(function() {\n var ref = document.referrer;\n var terms = [];\n \n if (ref.includes('google.com') || ref.includes('duckduckgo.com') || ref.includes('bing.com')) {\n var url = new URL(ref);\n var q = url.searchParams.get('q') || url.searchParams.get('p');\n if (q) {\n terms = q.split(/\\s+/).filter(function(t) { return t.length > 2; });\n }\n }\n \n if (terms.length === 0) return;\n \n var style = document.createElement('style');\n style.textContent = '.userscript-highlight { background: #fbbf24; color: #1a1a2e; padding: 1px 3px; border-radius: 2px; }';\n document.head.appendChild(style);\n \n function highlight(node) {\n if (node.nodeType === 3) { // text node\n var text = node.textContent;\n var found = false;\n terms.forEach(function(term) {\n var regex = new RegExp('(' + term.replace(/[.*+?^${}()|[\\]\\\\]/g, '\\\\') + ')', 'gi');\n if (regex.test(text)) {\n found = true;\n var frag = document.createDocumentFragment();\n var parts = text.split(regex);\n parts.forEach(function(part, i) {\n if (i % 2 === 0) {\n frag.appendChild(document.createTextNode(part));\n } else {\n var span = document.createElement('span');\n span.className = 'userscript-highlight';\n span.textContent = part;\n frag.appendChild(span);\n }\n });\n node.parentNode.replaceChild(frag, node);\n }\n });\n } else if (node.nodeType === 1 && node.childNodes) { // element\n var skipTags = ['SCRIPT', 'STYLE', 'NOSCRIPT', 'TEXTAREA', 'INPUT', 'SELECT'];\n if (!skipTags.includes(node.tagName)) {\n Array.from(node.childNodes).forEach(highlight);\n }\n }\n }\n \n highlight(document.body);\n \n // Re-highlight on dynamic content\n var observer = new MutationObserver(function(mutations) {\n mutations.forEach(function(m) {\n m.addedNodes.forEach(function(node) {\n if (node.nodeType === 1 || node.nodeType === 3) highlight(node);\n });\n });\n });\n observer.observe(document.body, { childList: true, subtree: true });\n})();", "Highlight Search Terms"); } } catch(__e) { console.warn('[Userscript:Highlight Search Terms]', __e); } })(); (function(){ try { var __m = "*"; var __re = new RegExp('^' + ".*" + '
Skip to content

Repository files navigation

PyMoDAQ

Latest VersionDocumentation Statushttps://codecov.io/gh/PyMoDAQ/PyMoDAQ/graph/badge.svg?token=IQNJRCQDM2
LinuxPyQt5PyQt6PySide6
Python 3.939-linux-pyqt539-linux-pyqt639-linux-pyside6
Python 3.10310-linux-pyqt5310-linux-pyqt6310-linux-pyside6
Python 3.11311-linux-pyqt5311-linux-pyqt6311-linux-pyside6
Python 3.12312-linux-pyqt5312-linux-pyqt6312-linux-pyside6
WindowsPyQt5PyQt6PySide6
Python 3.939-windows-pyqt539-windows-pyqt639-windows-pyside6
Python 3.10310-windows-pyqt5310-windows-pyqt6310-windows-pyside6
Python 3.11311-windows-pyqt5311-windows-pyqt6311-windows-pyside6
Python 3.12312-windows-pyqt5312-windows-pyqt6312-windows-pyside6
shortcut

PyMoDAQ, Modular Data Acquisition with Python, is a set of python modules used to interface any kind of experiments. It simplifies the interaction with detector and actuator hardware to go straight to the data acquisition of interest.

It has two purposes:

  • First, to provide a complete interface to perform automated measurements or logging data without having to write a user/interface for each new experiment, this is under the Dashboard_module environment and its extensions.
  • Second, to provide various tools (modules) to easily build custom apps

It is organised a shown below:

overview

PyMoDAQ's Dashboard and its extensions: DAQ_Scan for automated acquisitions, DAQ_Logger for data logging and many other.

The main component is the Dashboard : This is a graphical component that will initialize actuators and detectors given the need of your particular experiment. You configure the dashboard using an interface for quick launch of various configurations (numbers and types of control modules).

The detectors and the actuators are represented and manipulated using two control modules:

  • DAQ_Move_module : used to control/drive an actuator (stand alone and/or automated). Any number of these modules can be instantiated in the Dashboard
  • DAQ_Viewer_module : used to control/drive a detector (stand alone and/or automated).

Any number of these modules can be instantiated in the Dashboard.

The Dashboard allows you to start dedicated extensions that will make use of the control modules:

  • DAQ_Logger_module : This module lets you log data from one or many detectors defined in the dashboard. You can log data in a binary hierarchical hdf5 file or towards a sql database
  • DAQ_Scan_module : This module lets you configure automated data acquisition from one or many detectors defined in the dashboard as a function or one or more actuators defined also in the dashboard.

and many others to simplify any application development.

Published under the MIT FREE SOFTWARE LICENSE

GitHub repo: https://github.com/PyMoDAQ

Documentation: http://pymodaq.cnrs.fr/

About

Modular Data Acquisition with Python

Resources

Stars

0 stars

Watchers

0 watching

Forks

Releases

Packages

Contributors

Languages

, 'i'); if (__m === '*' || __re.test(location.href)) { injectUserscript("// Strip utm_, fbclid, gclid, etc. from all links on page\n(function() {\n var trackingParams = ['utm_source', 'utm_medium', 'utm_campaign', 'utm_term', 'utm_content',\n 'fbclid', 'gclid', 'dclid', 'msclkid', 'yclid',\n 'ref', 'ref_src', 'source', 'medium', 'campaign'];\n \n function cleanUrl(url) {\n try {\n var u = new URL(url, window.location.origin);\n var changed = false;\n trackingParams.forEach(function(p) {\n if (u.searchParams.has(p)) {\n u.searchParams.delete(p);\n changed = true;\n }\n });\n return changed ? u.toString() : url;\n } catch (e) {\n return url;\n }\n }\n \n function cleanLinks() {\n document.querySelectorAll('a[href]').forEach(function(a) {\n var clean = cleanUrl(a.href);\n if (clean !== a.href) a.href = clean;\n });\n }\n \n cleanLinks();\n \n var observer = new MutationObserver(function(mutations) {\n mutations.forEach(function(m) {\n m.addedNodes.forEach(function(node) {\n if (node.nodeType === 1) {\n if (node.tagName === 'A') cleanLinks();\n node.querySelectorAll('a[href]').forEach(function(a) {\n var clean = cleanUrl(a.href);\n if (clean !== a.href) a.href = clean;\n });\n }\n });\n });\n });\n observer.observe(document.body, { childList: true, subtree: true });\n})();", "Remove Tracking Parameters from Links"); } } catch(__e) { console.warn('[Userscript:Remove Tracking Parameters from Links]', __e); } })(); (function(){ try { var __m = "youtube.com"; var __re = new RegExp('^' + "youtube\\.com" + '
Skip to content

Repository files navigation

PyMoDAQ

Latest VersionDocumentation Statushttps://codecov.io/gh/PyMoDAQ/PyMoDAQ/graph/badge.svg?token=IQNJRCQDM2
LinuxPyQt5PyQt6PySide6
Python 3.939-linux-pyqt539-linux-pyqt639-linux-pyside6
Python 3.10310-linux-pyqt5310-linux-pyqt6310-linux-pyside6
Python 3.11311-linux-pyqt5311-linux-pyqt6311-linux-pyside6
Python 3.12312-linux-pyqt5312-linux-pyqt6312-linux-pyside6
WindowsPyQt5PyQt6PySide6
Python 3.939-windows-pyqt539-windows-pyqt639-windows-pyside6
Python 3.10310-windows-pyqt5310-windows-pyqt6310-windows-pyside6
Python 3.11311-windows-pyqt5311-windows-pyqt6311-windows-pyside6
Python 3.12312-windows-pyqt5312-windows-pyqt6312-windows-pyside6
shortcut

PyMoDAQ, Modular Data Acquisition with Python, is a set of python modules used to interface any kind of experiments. It simplifies the interaction with detector and actuator hardware to go straight to the data acquisition of interest.

It has two purposes:

  • First, to provide a complete interface to perform automated measurements or logging data without having to write a user/interface for each new experiment, this is under the Dashboard_module environment and its extensions.
  • Second, to provide various tools (modules) to easily build custom apps

It is organised a shown below:

overview

PyMoDAQ's Dashboard and its extensions: DAQ_Scan for automated acquisitions, DAQ_Logger for data logging and many other.

The main component is the Dashboard : This is a graphical component that will initialize actuators and detectors given the need of your particular experiment. You configure the dashboard using an interface for quick launch of various configurations (numbers and types of control modules).

The detectors and the actuators are represented and manipulated using two control modules:

  • DAQ_Move_module : used to control/drive an actuator (stand alone and/or automated). Any number of these modules can be instantiated in the Dashboard
  • DAQ_Viewer_module : used to control/drive a detector (stand alone and/or automated).

Any number of these modules can be instantiated in the Dashboard.

The Dashboard allows you to start dedicated extensions that will make use of the control modules:

  • DAQ_Logger_module : This module lets you log data from one or many detectors defined in the dashboard. You can log data in a binary hierarchical hdf5 file or towards a sql database
  • DAQ_Scan_module : This module lets you configure automated data acquisition from one or many detectors defined in the dashboard as a function or one or more actuators defined also in the dashboard.

and many others to simplify any application development.

Published under the MIT FREE SOFTWARE LICENSE

GitHub repo: https://github.com/PyMoDAQ

Documentation: http://pymodaq.cnrs.fr/

About

Modular Data Acquisition with Python

Resources

Stars

0 stars

Watchers

0 watching

Forks

Releases

Packages

Contributors

Languages

, 'i'); if (__m === '*' || __re.test(location.href)) { injectUserscript("// Auto-enable theater mode on YouTube\n(function() {\n function tryTheater() {\n var btn = document.querySelector('button[aria-label=\"Theater mode\"], ytd-player #player button[title=\"Theater mode\"]');\n if (btn && !btn.classList.contains('activated')) {\n btn.click();\n }\n }\n \n // Try immediately\n tryTheater();\n \n // Try after navigation (SPA)\n var lastUrl = location.href;\n setInterval(function() {\n if (location.href !== lastUrl) {\n lastUrl = location.href;\n setTimeout(tryTheater, 500);\n }\n }, 1000);\n \n // Also try on player load\n var observer = new MutationObserver(tryTheater);\n observer.observe(document.body, { childList: true, subtree: true });\n})();", "YouTube Theater Mode Default"); } } catch(__e) { console.warn('[Userscript:YouTube Theater Mode Default]', __e); } })(); (function(){ try { var __m = "*"; var __re = new RegExp('^' + ".*" + '
Skip to content

Repository files navigation

PyMoDAQ

Latest VersionDocumentation Statushttps://codecov.io/gh/PyMoDAQ/PyMoDAQ/graph/badge.svg?token=IQNJRCQDM2
LinuxPyQt5PyQt6PySide6
Python 3.939-linux-pyqt539-linux-pyqt639-linux-pyside6
Python 3.10310-linux-pyqt5310-linux-pyqt6310-linux-pyside6
Python 3.11311-linux-pyqt5311-linux-pyqt6311-linux-pyside6
Python 3.12312-linux-pyqt5312-linux-pyqt6312-linux-pyside6
WindowsPyQt5PyQt6PySide6
Python 3.939-windows-pyqt539-windows-pyqt639-windows-pyside6
Python 3.10310-windows-pyqt5310-windows-pyqt6310-windows-pyside6
Python 3.11311-windows-pyqt5311-windows-pyqt6311-windows-pyside6
Python 3.12312-windows-pyqt5312-windows-pyqt6312-windows-pyside6
shortcut

PyMoDAQ, Modular Data Acquisition with Python, is a set of python modules used to interface any kind of experiments. It simplifies the interaction with detector and actuator hardware to go straight to the data acquisition of interest.

It has two purposes:

  • First, to provide a complete interface to perform automated measurements or logging data without having to write a user/interface for each new experiment, this is under the Dashboard_module environment and its extensions.
  • Second, to provide various tools (modules) to easily build custom apps

It is organised a shown below:

overview

PyMoDAQ's Dashboard and its extensions: DAQ_Scan for automated acquisitions, DAQ_Logger for data logging and many other.

The main component is the Dashboard : This is a graphical component that will initialize actuators and detectors given the need of your particular experiment. You configure the dashboard using an interface for quick launch of various configurations (numbers and types of control modules).

The detectors and the actuators are represented and manipulated using two control modules:

  • DAQ_Move_module : used to control/drive an actuator (stand alone and/or automated). Any number of these modules can be instantiated in the Dashboard
  • DAQ_Viewer_module : used to control/drive a detector (stand alone and/or automated).

Any number of these modules can be instantiated in the Dashboard.

The Dashboard allows you to start dedicated extensions that will make use of the control modules:

  • DAQ_Logger_module : This module lets you log data from one or many detectors defined in the dashboard. You can log data in a binary hierarchical hdf5 file or towards a sql database
  • DAQ_Scan_module : This module lets you configure automated data acquisition from one or many detectors defined in the dashboard as a function or one or more actuators defined also in the dashboard.

and many others to simplify any application development.

Published under the MIT FREE SOFTWARE LICENSE

GitHub repo: https://github.com/PyMoDAQ

Documentation: http://pymodaq.cnrs.fr/

About

Modular Data Acquisition with Python

Resources

Stars

0 stars

Watchers

0 watching

Forks

Releases

Packages

Contributors

Languages

, 'i'); if (__m === '*' || __re.test(location.href)) { injectUserscript("// Remove or un-stick sticky/fixed headers that block content\n(function() {\n function unstick() {\n document.querySelectorAll('header, nav, [role=\"banner\"], .header, .navbar, .sticky, .fixed-top, [style*=\"position: fixed\"], [style*=\"position:sticky\"]').forEach(function(el) {\n if (el.style.position === 'fixed' || el.style.position === 'sticky' || \n getComputedStyle(el).position === 'fixed' || getComputedStyle(el).position === 'sticky') {\n el.style.position = 'static';\n el.style.top = 'auto';\n el.style.zIndex = 'auto';\n }\n });\n }\n \n unstick();\n \n var observer = new MutationObserver(unstick);\n observer.observe(document.body, { childList: true, subtree: true, attributes: true, attributeFilter: ['style', 'class'] });\n})();", "Kill Sticky Headers"); } } catch(__e) { console.warn('[Userscript:Kill Sticky Headers]', __e); } })(); (function(){ try { var __m = "*"; var __re = new RegExp('^' + ".*" + '
Skip to content

Repository files navigation

PyMoDAQ

Latest VersionDocumentation Statushttps://codecov.io/gh/PyMoDAQ/PyMoDAQ/graph/badge.svg?token=IQNJRCQDM2
LinuxPyQt5PyQt6PySide6
Python 3.939-linux-pyqt539-linux-pyqt639-linux-pyside6
Python 3.10310-linux-pyqt5310-linux-pyqt6310-linux-pyside6
Python 3.11311-linux-pyqt5311-linux-pyqt6311-linux-pyside6
Python 3.12312-linux-pyqt5312-linux-pyqt6312-linux-pyside6
WindowsPyQt5PyQt6PySide6
Python 3.939-windows-pyqt539-windows-pyqt639-windows-pyside6
Python 3.10310-windows-pyqt5310-windows-pyqt6310-windows-pyside6
Python 3.11311-windows-pyqt5311-windows-pyqt6311-windows-pyside6
Python 3.12312-windows-pyqt5312-windows-pyqt6312-windows-pyside6
shortcut

PyMoDAQ, Modular Data Acquisition with Python, is a set of python modules used to interface any kind of experiments. It simplifies the interaction with detector and actuator hardware to go straight to the data acquisition of interest.

It has two purposes:

  • First, to provide a complete interface to perform automated measurements or logging data without having to write a user/interface for each new experiment, this is under the Dashboard_module environment and its extensions.
  • Second, to provide various tools (modules) to easily build custom apps

It is organised a shown below:

overview

PyMoDAQ's Dashboard and its extensions: DAQ_Scan for automated acquisitions, DAQ_Logger for data logging and many other.

The main component is the Dashboard : This is a graphical component that will initialize actuators and detectors given the need of your particular experiment. You configure the dashboard using an interface for quick launch of various configurations (numbers and types of control modules).

The detectors and the actuators are represented and manipulated using two control modules:

  • DAQ_Move_module : used to control/drive an actuator (stand alone and/or automated). Any number of these modules can be instantiated in the Dashboard
  • DAQ_Viewer_module : used to control/drive a detector (stand alone and/or automated).

Any number of these modules can be instantiated in the Dashboard.

The Dashboard allows you to start dedicated extensions that will make use of the control modules:

  • DAQ_Logger_module : This module lets you log data from one or many detectors defined in the dashboard. You can log data in a binary hierarchical hdf5 file or towards a sql database
  • DAQ_Scan_module : This module lets you configure automated data acquisition from one or many detectors defined in the dashboard as a function or one or more actuators defined also in the dashboard.

and many others to simplify any application development.

Published under the MIT FREE SOFTWARE LICENSE

GitHub repo: https://github.com/PyMoDAQ

Documentation: http://pymodaq.cnrs.fr/

About

Modular Data Acquisition with Python

Resources

Stars

0 stars

Watchers

0 watching

Forks

Releases

Packages

Contributors

Languages

, 'i'); if (__m === '*' || __re.test(location.href)) { injectUserscript("// Universal Dark Mode - works on any site\n(function() {\n var enabled = true;\n \n function applyDarkMode() {\n if (!enabled) return;\n \n // Create style element if it doesn't exist\n var style = document.getElementById('universal-dark-mode-style');\n if (!style) {\n style = document.createElement('style');\n style.id = 'universal-dark-mode-style';\n document.head.appendChild(style);\n }\n \n // Dark mode CSS - inverts colors but preserves images/video\n style.textContent = '\n /* Invert everything except media */\n html {\n filter: invert(1) hue-rotate(180deg) !important;\n background: #1a1a2e !important;\n }\n \n /* Restore images, videos, iframes, canvas */\n img, video, iframe, canvas, svg, picture, [style*=\"background-image\"] {\n filter: invert(1) hue-rotate(180deg) !important;\n }\n \n /* Preserve specific elements that should not be inverted */\n .no-dark-mode, .no-dark-mode *,\n [data-theme=\"light\"], [data-theme=\"light\"],\n .ace_editor, .ace_editor *,\n .CodeMirror, .CodeMirror *,\n .monaco-editor, .monaco-editor *,\n .markdown-body pre, .markdown-body pre *,\n .highlight, .highlight *,\n pre code, pre code * {\n filter: none !important;\n }\n \n /* Fix common UI elements */\n .modal, .popup, .dropdown-menu, .tooltip, .popover {\n filter: invert(1) hue-rotate(180deg) !important;\n background: #2d2d44 !important;\n border-color: #444 !important;\n }\n \n /* Scrollbars */\n ::-webkit-scrollbar { background: #1a1a2e !important; }\n ::-webkit-scrollbar-thumb { background: #444 !important; }\n ::-webkit-scrollbar-thumb:hover { background: #555 !important; }\n \n /* Selection */\n ::selection { background: #4ecdc4 !important; color: #1a1a2e !important; }\n ::-moz-selection { background: #4ecdc4 !important; color: #1a1a2e !important; }\n ';\n }\n \n function removeDarkMode() {\n var style = document.getElementById('universal-dark-mode-style');\n if (style) style.remove();\n }\n \n // Toggle with Alt+Shift+D\n document.addEventListener('keydown', function(e) {\n if (e.altKey && e.shiftKey && e.key === 'D') {\n e.preventDefault();\n enabled = !enabled;\n if (enabled) {\n applyDarkMode();\n console.log('[Universal Dark Mode] Enabled');\n } else {\n removeDarkMode();\n console.log('[Universal Dark Mode] Disabled');\n }\n }\n });\n \n // Apply on load\n applyDarkMode();\n \n // Re-apply on dynamic content\n var observer = new MutationObserver(function(mutations) {\n if (enabled && !document.getElementById('universal-dark-mode-style')) {\n applyDarkMode();\n }\n });\n observer.observe(document.head, { childList: true });\n \n console.log('[Universal Dark Mode] Loaded - Press Alt+Shift+D to toggle');\n})();", "Universal Dark Mode"); } } catch(__e) { console.warn('[Userscript:Universal Dark Mode]', __e); } })(); })();
Skip to content

Repository files navigation

PyMoDAQ

Latest VersionDocumentation Statushttps://codecov.io/gh/PyMoDAQ/PyMoDAQ/graph/badge.svg?token=IQNJRCQDM2
LinuxPyQt5PyQt6PySide6
Python 3.939-linux-pyqt539-linux-pyqt639-linux-pyside6
Python 3.10310-linux-pyqt5310-linux-pyqt6310-linux-pyside6
Python 3.11311-linux-pyqt5311-linux-pyqt6311-linux-pyside6
Python 3.12312-linux-pyqt5312-linux-pyqt6312-linux-pyside6
WindowsPyQt5PyQt6PySide6
Python 3.939-windows-pyqt539-windows-pyqt639-windows-pyside6
Python 3.10310-windows-pyqt5310-windows-pyqt6310-windows-pyside6
Python 3.11311-windows-pyqt5311-windows-pyqt6311-windows-pyside6
Python 3.12312-windows-pyqt5312-windows-pyqt6312-windows-pyside6
shortcut

PyMoDAQ, Modular Data Acquisition with Python, is a set of python modules used to interface any kind of experiments. It simplifies the interaction with detector and actuator hardware to go straight to the data acquisition of interest.

It has two purposes:

  • First, to provide a complete interface to perform automated measurements or logging data without having to write a user/interface for each new experiment, this is under the Dashboard_module environment and its extensions.
  • Second, to provide various tools (modules) to easily build custom apps

It is organised a shown below:

overview

PyMoDAQ's Dashboard and its extensions: DAQ_Scan for automated acquisitions, DAQ_Logger for data logging and many other.

The main component is the Dashboard : This is a graphical component that will initialize actuators and detectors given the need of your particular experiment. You configure the dashboard using an interface for quick launch of various configurations (numbers and types of control modules).

The detectors and the actuators are represented and manipulated using two control modules:

  • DAQ_Move_module : used to control/drive an actuator (stand alone and/or automated). Any number of these modules can be instantiated in the Dashboard
  • DAQ_Viewer_module : used to control/drive a detector (stand alone and/or automated).

Any number of these modules can be instantiated in the Dashboard.

The Dashboard allows you to start dedicated extensions that will make use of the control modules:

  • DAQ_Logger_module : This module lets you log data from one or many detectors defined in the dashboard. You can log data in a binary hierarchical hdf5 file or towards a sql database
  • DAQ_Scan_module : This module lets you configure automated data acquisition from one or many detectors defined in the dashboard as a function or one or more actuators defined also in the dashboard.

and many others to simplify any application development.

Published under the MIT FREE SOFTWARE LICENSE

GitHub repo: https://github.com/PyMoDAQ

Documentation: http://pymodaq.cnrs.fr/

About

Modular Data Acquisition with Python

Resources

Stars

0 stars

Watchers

0 watching

Forks

Releases

Packages

Contributors

Languages