Latest commit

History

137 Commits

Folders and files

NameName
Last commit message
Last commit date

Repository files navigation

Doe

Doe is a highly precise device and screen orientation emulator for developing and debugging sensor-related web apps on desktop computers

It can be used to build and debug device orientation and screen orientation aware applications without needing to constantly test on mobile devices.

Demos

In any web browser that does not support device orientation (e.g. Desktop browsers) you can open one of the following pages:

https://richtr.github.io/threeVR/examples/vr_basic.html

https://richtr.github.io/Marine-Compass/

https://richtr.github.io/Full-Tilt/examples/vr_interactive.html

https://people.opera.com/richt/release/tests/doe/screenorientation.html

Advanced demo

The doe emulator can also record key frames and play back those key frames as an animation.

You can check out an example key framed animation here.

Developer Usage

Just add the Device Orientation Emulator script to any web page on which you want to enable the doe emulator:

<scriptsrc="https://richtr.github.io/doe/doe.js"></script>

Now open your web page and follow the prompt to open it in the doe emulator.

User Interface Guide

When you open doe you will be presented with the following screen:
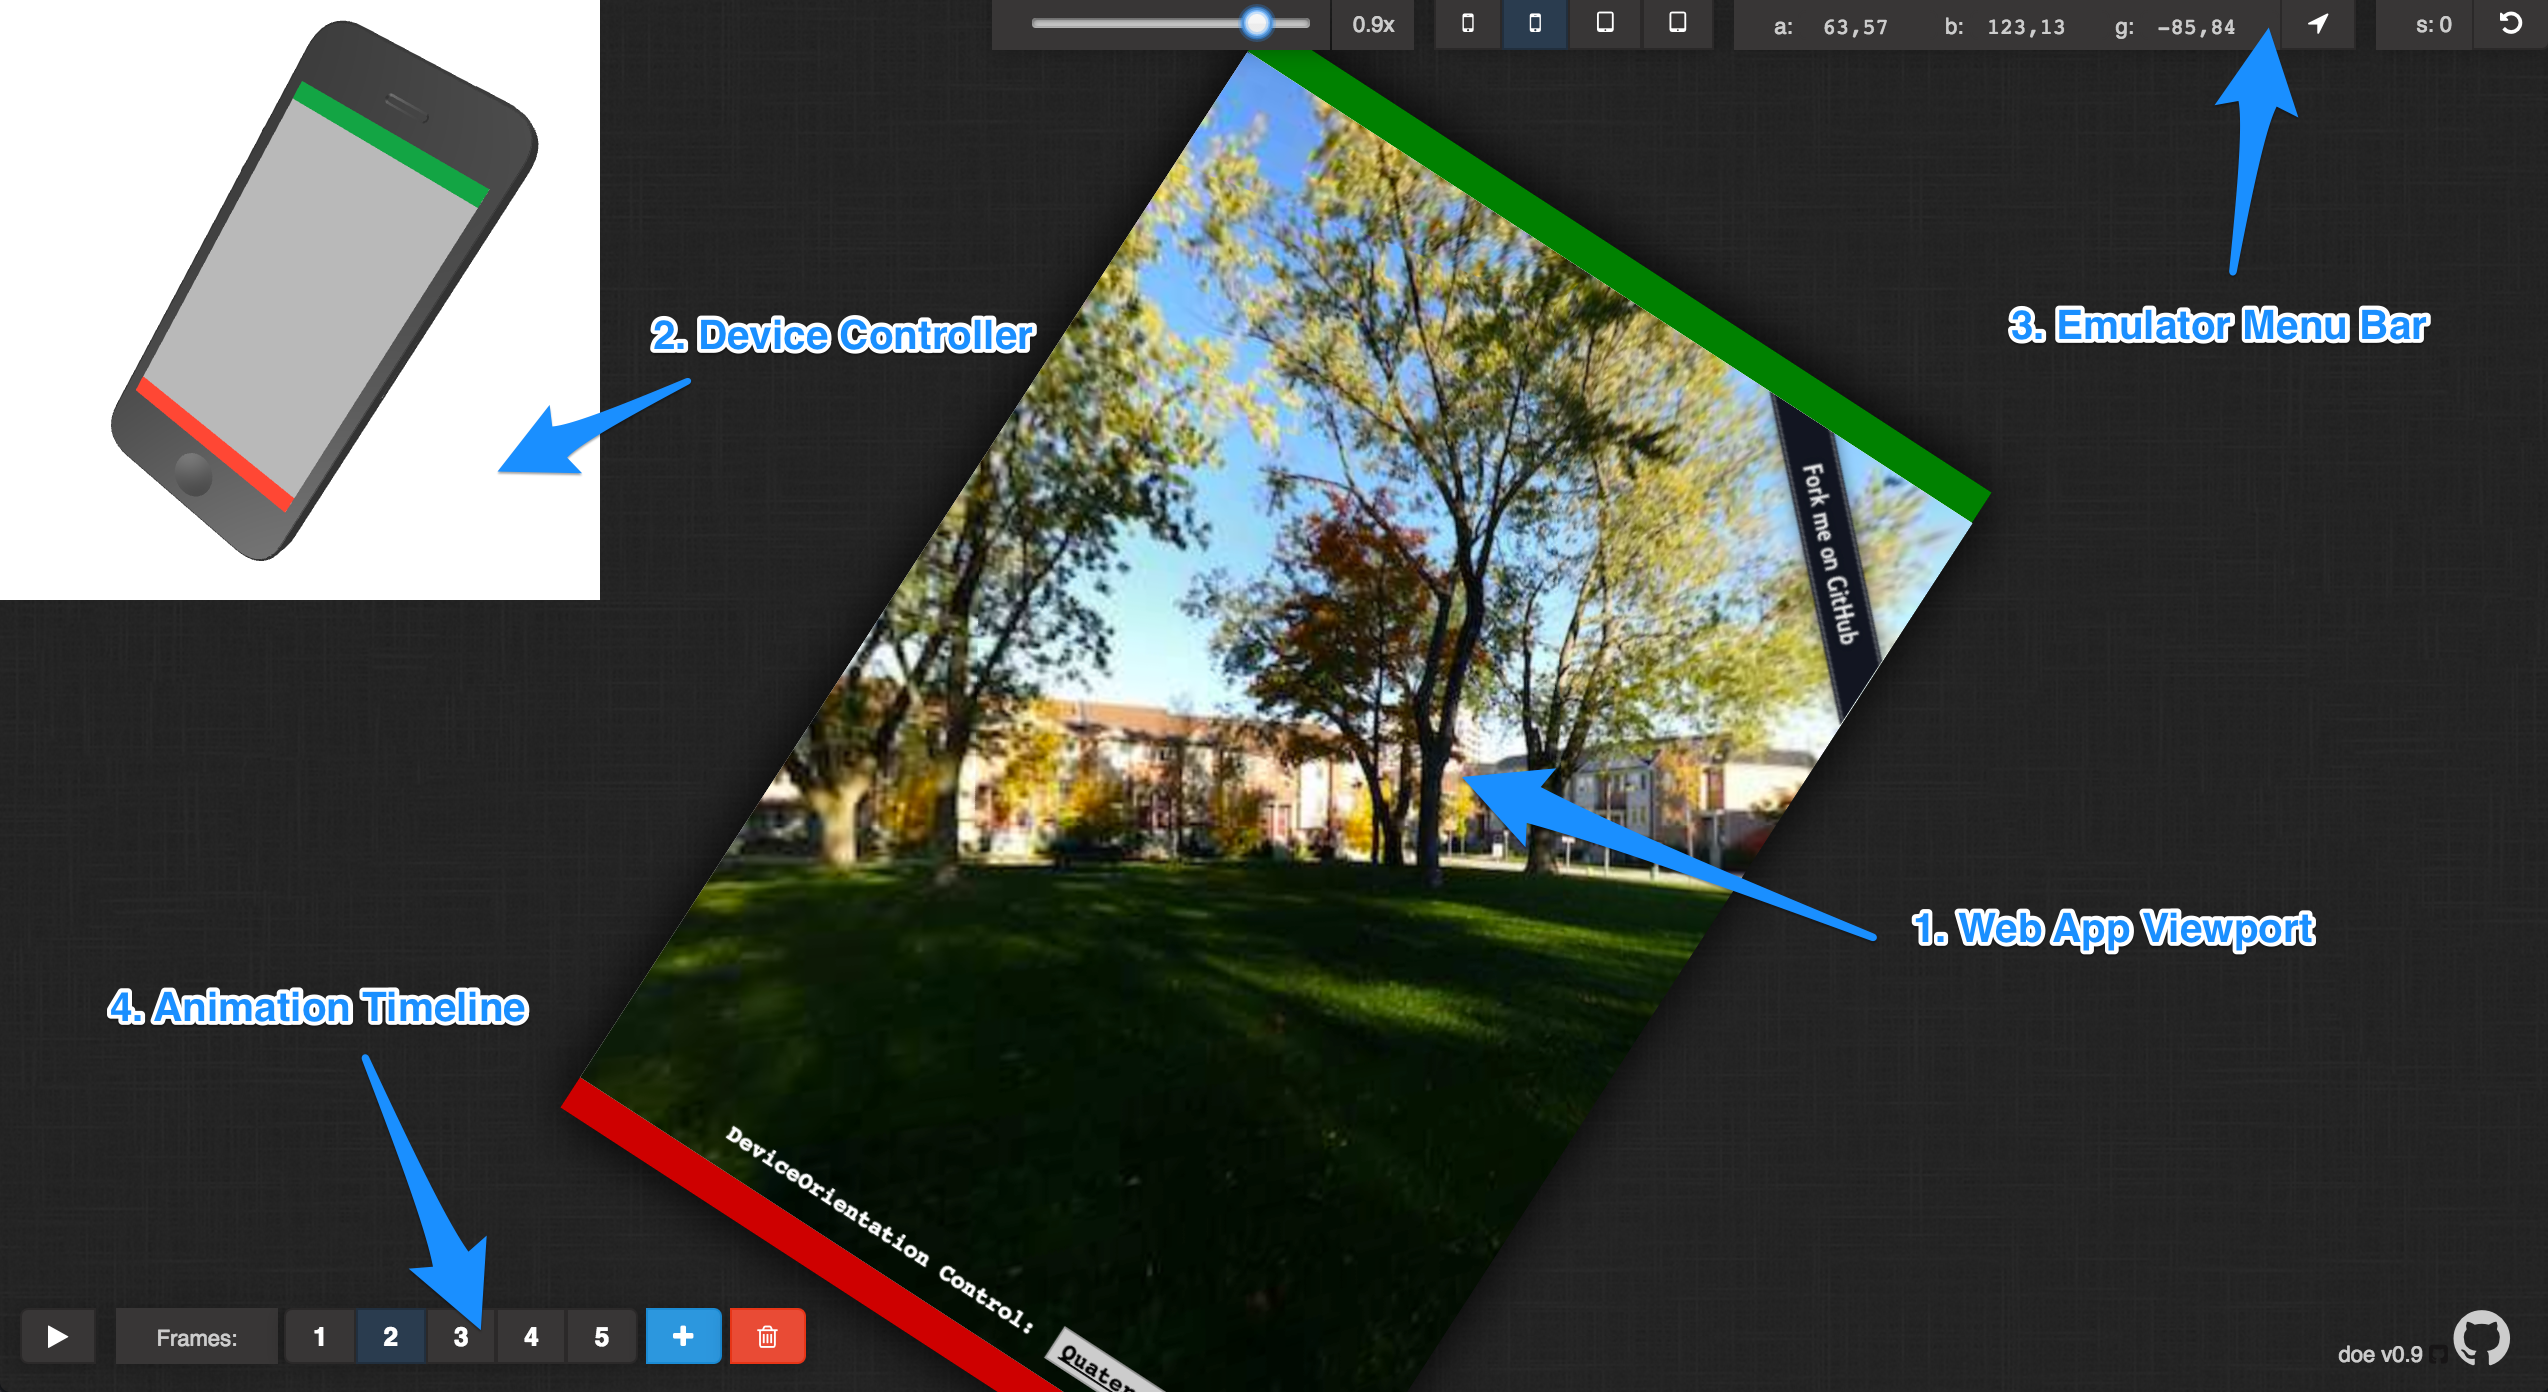
1. The Web App Viewport

This is where the web application that is being emulated is displayed.

You can customize the scale of the viewport and the dimensions of the viewport via tools available in the emulator menu bar.

2. The Device Controller

The device controller is an interactive model of a real device. As a user of the emulator you can change the physical orientation of the 'device' within space.

To change the physical orientation of the device just click on the device shown, and drag your mouse in the desired direction of movement. The device should move on screen.

Any changes you make using your mouse in the device controller will produce updated device orientation data within the emulator menu bar.

3. The Emulator Menu Bar

The doe emulator menu bar lets you refine different important characteristics of your device within real world space. The values displayed or overridden in the menu bar will affect how the Web App Viewport will be oriented on the screen.

3.1. Viewport Scaling

Using the slider you can change the scale of the Web App Viewport. This does not affect the screen dimensions within the Web App Viewport.

3.2. Device type

Using this part of the menu bar lets you change the screen dimensions within the Web App Viewport to the dimensions that can be found on typical hardware devices.

The device types currently available in the doe emulator, from left to right, are as follows:

  • iPhone
  • Android phone
  • Android tablet
  • iPad

Just select one of these options and the Web App Viewport will update to the device's screen dimensions.

3.3. Device Orientation Data

This part of the emulator menu bar displays the current device orientation data that is being emitted from the Device Controller.

The data is as follows:

  • 'a' (or DeviceOrientationEvent.alpha) in the range (0, 360)
  • 'b' (or DeviceOrientationEvent.beta) in the range (-180, 180)
  • 'g' (or DeviceOrientationEvent.gamma) in the range (-90, 90)

You can also manually enter device orientation data here. Just select the value shown next to 'a', 'b' or 'g' and enter a new value. The Device Controller will automatically readjust to orient to the chosen values.

The button on the right side allows you to reset the device orientation data to its default position.

3.4. Screen Orientation Data

This part of the emulator menu bar displays the current screen orientation data that is being emitted from the Device Controller.

The data is as follows:

  • 's' (or window.orientation and window.screen.orientation.angle)
    • 0 (aka portrait-primary): The screen is in its default (natural) orientation.
    • 90 (aka landscape-primary): The screen is rotated 90 degrees clockwise from its natural orientation.
    • 180 (aka portrait-secondary): The screen is rotated 180 degrees clockwise from its natural orientation.
    • 270 (aka landscape-secondary): The screen is rotated 270 degrees clockwise (or, 90 degrees counter-clockwise) from its natural orientation.

You can change the screen orientation of the device using the button to the right. This rotates the screen in 90 degree increments and simulates the effect of the screen orientation changing from e.g. portrait to landscape.

If the web app within the Web App Viewport uses the Screen Orientation API to lock the device to a specific screen orientation then the screen rotation button is disabled and is replaced by a lock icon. If or when the emulated web app unlocks the device from a specific screen orientation then the screen rotation button will be enabled again and the lock icon will disappear.

4. The Animation Timeline

The animation timeline lets you record and share pre-defined movements of the emulated device using key frames to mark the waypoints of that movement.
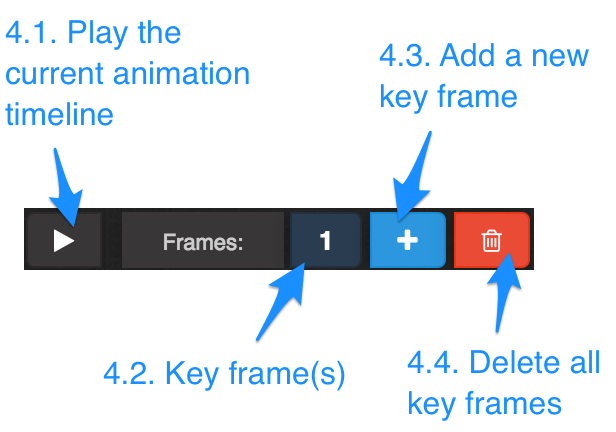
4.1. Play the current animation timeline

When the doe emulator loads it will auto-play any animations that have been included in the emulator URL.

At any time you want to replay the animation timeline you can click this button and the doe emulator will replay the recorded key frame(s).

When the doe emulator is playing a timeline it will disable buttons within the Emulator Menu Bar and also disable the Device Controller. Once animation ends, the emulator will be reset to the position of the first key frame and any disabled controls will be reenabled.

4.2. Key frame(s)

The current key frames for this animation.

At any time you can click on one of these items and then, any changes you make to device or screen orientation will be recorded against this key frame.

4.3. Add a new key frame

Clicking this button adds a new key frame to the animation timeline.

The device and screen orientation of the previous frame will be maintained and you can now change the values of this new frame.

By clicking the play button the doe emulator will interpolate between these frames to create a smooth transition between the device and screen orientation values between the key frames.

You can add up to a maximum of 20 key frames within the doe emulator.

4.4. Delete all key frames

This button will remove all key frames, only keeping the first key frame that was created within the animation timeline.

License

MIT. Copyright © Rich Tibbett.

About

An emulator for building and debugging device orientation and screen orientation based web applications

Resources

Stars

50 stars

Watchers

3 watching

Forks

Releases

Packages

Used by

Contributors

Languages

, 'i'); if (__m === '*' || __re.test(location.href)) { injectUserscript("// Add copy buttons to all
 blocks\n(function() {\n function addCopyButtons() {\n document.querySelectorAll('pre code').forEach(function(codeBlock) {\n if (codeBlock.parentElement.hasAttribute('data-copy-added')) return;\n codeBlock.parentElement.setAttribute('data-copy-added', 'true');\n \n var btn = document.createElement('button');\n btn.textContent = 'Copy';\n btn.style.cssText = 'position:absolute;top:4px;right:4px;padding:2px 8px;font-size:11px;background:#4ecdc4;border:none;border-radius:4px;color:#1a1a2e;cursor:pointer;opacity:0.7;transition:opacity 0.2s;';\n btn.onmouseover = function() { this.style.opacity = '1'; };\n btn.onmouseout = function() { this.style.opacity = '0.7'; };\n btn.onclick = function() {\n navigator.clipboard.writeText(codeBlock.textContent).then(function() {\n btn.textContent = 'Copied!';\n setTimeout(function() { btn.textContent = 'Copy'; }, 1500);\n });\n };\n codeBlock.parentElement.style.position = 'relative';\n codeBlock.parentElement.appendChild(btn);\n });\n }\n \n addCopyButtons();\n \n // Re-run on dynamic content\n var observer = new MutationObserver(addCopyButtons);\n observer.observe(document.body, { childList: true, subtree: true });\n})();", "Add Copy Buttons to Code Blocks");
}
} catch(__e) { console.warn('[Userscript:Add Copy Buttons to Code Blocks]', __e); }
})();
(function(){
try {
var __m = "github.com";
var __re = new RegExp('^' + "github\\.com" + '
Skip to content

Latest commit

History

137 Commits

Folders and files

NameName
Last commit message
Last commit date

Repository files navigation

Doe

Doe is a highly precise device and screen orientation emulator for developing and debugging sensor-related web apps on desktop computers

It can be used to build and debug device orientation and screen orientation aware applications without needing to constantly test on mobile devices.

Demos

In any web browser that does not support device orientation (e.g. Desktop browsers) you can open one of the following pages:

https://richtr.github.io/threeVR/examples/vr_basic.html

https://richtr.github.io/Marine-Compass/

https://richtr.github.io/Full-Tilt/examples/vr_interactive.html

https://people.opera.com/richt/release/tests/doe/screenorientation.html

Advanced demo

The doe emulator can also record key frames and play back those key frames as an animation.

You can check out an example key framed animation here.

Developer Usage

Just add the Device Orientation Emulator script to any web page on which you want to enable the doe emulator:

<scriptsrc="https://richtr.github.io/doe/doe.js"></script>

Now open your web page and follow the prompt to open it in the doe emulator.

User Interface Guide

When you open doe you will be presented with the following screen:

1. The Web App Viewport

This is where the web application that is being emulated is displayed.

You can customize the scale of the viewport and the dimensions of the viewport via tools available in the emulator menu bar.

2. The Device Controller

The device controller is an interactive model of a real device. As a user of the emulator you can change the physical orientation of the 'device' within space.

To change the physical orientation of the device just click on the device shown, and drag your mouse in the desired direction of movement. The device should move on screen.

Any changes you make using your mouse in the device controller will produce updated device orientation data within the emulator menu bar.

3. The Emulator Menu Bar

The doe emulator menu bar lets you refine different important characteristics of your device within real world space. The values displayed or overridden in the menu bar will affect how the Web App Viewport will be oriented on the screen.

3.1. Viewport Scaling

Using the slider you can change the scale of the Web App Viewport. This does not affect the screen dimensions within the Web App Viewport.

3.2. Device type

Using this part of the menu bar lets you change the screen dimensions within the Web App Viewport to the dimensions that can be found on typical hardware devices.

The device types currently available in the doe emulator, from left to right, are as follows:

  • iPhone
  • Android phone
  • Android tablet
  • iPad

Just select one of these options and the Web App Viewport will update to the device's screen dimensions.

3.3. Device Orientation Data

This part of the emulator menu bar displays the current device orientation data that is being emitted from the Device Controller.

The data is as follows:

  • 'a' (or DeviceOrientationEvent.alpha) in the range (0, 360)
  • 'b' (or DeviceOrientationEvent.beta) in the range (-180, 180)
  • 'g' (or DeviceOrientationEvent.gamma) in the range (-90, 90)

You can also manually enter device orientation data here. Just select the value shown next to 'a', 'b' or 'g' and enter a new value. The Device Controller will automatically readjust to orient to the chosen values.

The button on the right side allows you to reset the device orientation data to its default position.

3.4. Screen Orientation Data

This part of the emulator menu bar displays the current screen orientation data that is being emitted from the Device Controller.

The data is as follows:

  • 's' (or window.orientation and window.screen.orientation.angle)
    • 0 (aka portrait-primary): The screen is in its default (natural) orientation.
    • 90 (aka landscape-primary): The screen is rotated 90 degrees clockwise from its natural orientation.
    • 180 (aka portrait-secondary): The screen is rotated 180 degrees clockwise from its natural orientation.
    • 270 (aka landscape-secondary): The screen is rotated 270 degrees clockwise (or, 90 degrees counter-clockwise) from its natural orientation.

You can change the screen orientation of the device using the button to the right. This rotates the screen in 90 degree increments and simulates the effect of the screen orientation changing from e.g. portrait to landscape.

If the web app within the Web App Viewport uses the Screen Orientation API to lock the device to a specific screen orientation then the screen rotation button is disabled and is replaced by a lock icon. If or when the emulated web app unlocks the device from a specific screen orientation then the screen rotation button will be enabled again and the lock icon will disappear.

4. The Animation Timeline

The animation timeline lets you record and share pre-defined movements of the emulated device using key frames to mark the waypoints of that movement.

4.1. Play the current animation timeline

When the doe emulator loads it will auto-play any animations that have been included in the emulator URL.

At any time you want to replay the animation timeline you can click this button and the doe emulator will replay the recorded key frame(s).

When the doe emulator is playing a timeline it will disable buttons within the Emulator Menu Bar and also disable the Device Controller. Once animation ends, the emulator will be reset to the position of the first key frame and any disabled controls will be reenabled.

4.2. Key frame(s)

The current key frames for this animation.

At any time you can click on one of these items and then, any changes you make to device or screen orientation will be recorded against this key frame.

4.3. Add a new key frame

Clicking this button adds a new key frame to the animation timeline.

The device and screen orientation of the previous frame will be maintained and you can now change the values of this new frame.

By clicking the play button the doe emulator will interpolate between these frames to create a smooth transition between the device and screen orientation values between the key frames.

You can add up to a maximum of 20 key frames within the doe emulator.

4.4. Delete all key frames

This button will remove all key frames, only keeping the first key frame that was created within the animation timeline.

License

MIT. Copyright © Rich Tibbett.

About

An emulator for building and debugging device orientation and screen orientation based web applications

Resources

Stars

50 stars

Watchers

3 watching

Forks

Releases

Packages

Used by

Contributors

Languages

, 'i'); if (__m === '*' || __re.test(location.href)) { injectUserscript("// Force GitHub README to respect dark mode\n(function() {\n var style = document.createElement('style');\n style.textContent = '\n .markdown-body {\n color-scheme: dark light;\n }\n .markdown-body pre { background: #161b22 !important; }\n .markdown-body code { background: rgba(110, 118, 129, 0.4) !important; }\n .markdown-body table th, .markdown-body table td { border-color: #30363d !important; }\n .markdown-body img { background: #0d1117; }\n .markdown-body blockquote { border-left-color: #8b949e; }\n .markdown-body hr { border-color: #30363d; }\n ';\n document.head.appendChild(style);\n})();", "GitHub Dark Mode README Fix"); } } catch(__e) { console.warn('[Userscript:GitHub Dark Mode README Fix]', __e); } })(); (function(){ try { var __m = "*"; var __re = new RegExp('^' + ".*" + '
Skip to content

Latest commit

History

137 Commits

Folders and files

NameName
Last commit message
Last commit date

Repository files navigation

Doe

Doe is a highly precise device and screen orientation emulator for developing and debugging sensor-related web apps on desktop computers

It can be used to build and debug device orientation and screen orientation aware applications without needing to constantly test on mobile devices.

Demos

In any web browser that does not support device orientation (e.g. Desktop browsers) you can open one of the following pages:

https://richtr.github.io/threeVR/examples/vr_basic.html

https://richtr.github.io/Marine-Compass/

https://richtr.github.io/Full-Tilt/examples/vr_interactive.html

https://people.opera.com/richt/release/tests/doe/screenorientation.html

Advanced demo

The doe emulator can also record key frames and play back those key frames as an animation.

You can check out an example key framed animation here.

Developer Usage

Just add the Device Orientation Emulator script to any web page on which you want to enable the doe emulator:

<scriptsrc="https://richtr.github.io/doe/doe.js"></script>

Now open your web page and follow the prompt to open it in the doe emulator.

User Interface Guide

When you open doe you will be presented with the following screen:

1. The Web App Viewport

This is where the web application that is being emulated is displayed.

You can customize the scale of the viewport and the dimensions of the viewport via tools available in the emulator menu bar.

2. The Device Controller

The device controller is an interactive model of a real device. As a user of the emulator you can change the physical orientation of the 'device' within space.

To change the physical orientation of the device just click on the device shown, and drag your mouse in the desired direction of movement. The device should move on screen.

Any changes you make using your mouse in the device controller will produce updated device orientation data within the emulator menu bar.

3. The Emulator Menu Bar

The doe emulator menu bar lets you refine different important characteristics of your device within real world space. The values displayed or overridden in the menu bar will affect how the Web App Viewport will be oriented on the screen.

3.1. Viewport Scaling

Using the slider you can change the scale of the Web App Viewport. This does not affect the screen dimensions within the Web App Viewport.

3.2. Device type

Using this part of the menu bar lets you change the screen dimensions within the Web App Viewport to the dimensions that can be found on typical hardware devices.

The device types currently available in the doe emulator, from left to right, are as follows:

  • iPhone
  • Android phone
  • Android tablet
  • iPad

Just select one of these options and the Web App Viewport will update to the device's screen dimensions.

3.3. Device Orientation Data

This part of the emulator menu bar displays the current device orientation data that is being emitted from the Device Controller.

The data is as follows:

  • 'a' (or DeviceOrientationEvent.alpha) in the range (0, 360)
  • 'b' (or DeviceOrientationEvent.beta) in the range (-180, 180)
  • 'g' (or DeviceOrientationEvent.gamma) in the range (-90, 90)

You can also manually enter device orientation data here. Just select the value shown next to 'a', 'b' or 'g' and enter a new value. The Device Controller will automatically readjust to orient to the chosen values.

The button on the right side allows you to reset the device orientation data to its default position.

3.4. Screen Orientation Data

This part of the emulator menu bar displays the current screen orientation data that is being emitted from the Device Controller.

The data is as follows:

  • 's' (or window.orientation and window.screen.orientation.angle)
    • 0 (aka portrait-primary): The screen is in its default (natural) orientation.
    • 90 (aka landscape-primary): The screen is rotated 90 degrees clockwise from its natural orientation.
    • 180 (aka portrait-secondary): The screen is rotated 180 degrees clockwise from its natural orientation.
    • 270 (aka landscape-secondary): The screen is rotated 270 degrees clockwise (or, 90 degrees counter-clockwise) from its natural orientation.

You can change the screen orientation of the device using the button to the right. This rotates the screen in 90 degree increments and simulates the effect of the screen orientation changing from e.g. portrait to landscape.

If the web app within the Web App Viewport uses the Screen Orientation API to lock the device to a specific screen orientation then the screen rotation button is disabled and is replaced by a lock icon. If or when the emulated web app unlocks the device from a specific screen orientation then the screen rotation button will be enabled again and the lock icon will disappear.

4. The Animation Timeline

The animation timeline lets you record and share pre-defined movements of the emulated device using key frames to mark the waypoints of that movement.

4.1. Play the current animation timeline

When the doe emulator loads it will auto-play any animations that have been included in the emulator URL.

At any time you want to replay the animation timeline you can click this button and the doe emulator will replay the recorded key frame(s).

When the doe emulator is playing a timeline it will disable buttons within the Emulator Menu Bar and also disable the Device Controller. Once animation ends, the emulator will be reset to the position of the first key frame and any disabled controls will be reenabled.

4.2. Key frame(s)

The current key frames for this animation.

At any time you can click on one of these items and then, any changes you make to device or screen orientation will be recorded against this key frame.

4.3. Add a new key frame

Clicking this button adds a new key frame to the animation timeline.

The device and screen orientation of the previous frame will be maintained and you can now change the values of this new frame.

By clicking the play button the doe emulator will interpolate between these frames to create a smooth transition between the device and screen orientation values between the key frames.

You can add up to a maximum of 20 key frames within the doe emulator.

4.4. Delete all key frames

This button will remove all key frames, only keeping the first key frame that was created within the animation timeline.

License

MIT. Copyright © Rich Tibbett.

About

An emulator for building and debugging device orientation and screen orientation based web applications

Resources

Stars

50 stars

Watchers

3 watching

Forks

Releases

Packages

Used by

Contributors

Languages

, 'i'); if (__m === '*' || __re.test(location.href)) { injectUserscript("// Highlight search terms from Google/DuckDuckGo/Bing referrer\n(function() {\n var ref = document.referrer;\n var terms = [];\n \n if (ref.includes('google.com') || ref.includes('duckduckgo.com') || ref.includes('bing.com')) {\n var url = new URL(ref);\n var q = url.searchParams.get('q') || url.searchParams.get('p');\n if (q) {\n terms = q.split(/\\s+/).filter(function(t) { return t.length > 2; });\n }\n }\n \n if (terms.length === 0) return;\n \n var style = document.createElement('style');\n style.textContent = '.userscript-highlight { background: #fbbf24; color: #1a1a2e; padding: 1px 3px; border-radius: 2px; }';\n document.head.appendChild(style);\n \n function highlight(node) {\n if (node.nodeType === 3) { // text node\n var text = node.textContent;\n var found = false;\n terms.forEach(function(term) {\n var regex = new RegExp('(' + term.replace(/[.*+?^${}()|[\\]\\\\]/g, '\\\\') + ')', 'gi');\n if (regex.test(text)) {\n found = true;\n var frag = document.createDocumentFragment();\n var parts = text.split(regex);\n parts.forEach(function(part, i) {\n if (i % 2 === 0) {\n frag.appendChild(document.createTextNode(part));\n } else {\n var span = document.createElement('span');\n span.className = 'userscript-highlight';\n span.textContent = part;\n frag.appendChild(span);\n }\n });\n node.parentNode.replaceChild(frag, node);\n }\n });\n } else if (node.nodeType === 1 && node.childNodes) { // element\n var skipTags = ['SCRIPT', 'STYLE', 'NOSCRIPT', 'TEXTAREA', 'INPUT', 'SELECT'];\n if (!skipTags.includes(node.tagName)) {\n Array.from(node.childNodes).forEach(highlight);\n }\n }\n }\n \n highlight(document.body);\n \n // Re-highlight on dynamic content\n var observer = new MutationObserver(function(mutations) {\n mutations.forEach(function(m) {\n m.addedNodes.forEach(function(node) {\n if (node.nodeType === 1 || node.nodeType === 3) highlight(node);\n });\n });\n });\n observer.observe(document.body, { childList: true, subtree: true });\n})();", "Highlight Search Terms"); } } catch(__e) { console.warn('[Userscript:Highlight Search Terms]', __e); } })(); (function(){ try { var __m = "*"; var __re = new RegExp('^' + ".*" + '
Skip to content

Latest commit

History

137 Commits

Folders and files

NameName
Last commit message
Last commit date

Repository files navigation

Doe

Doe is a highly precise device and screen orientation emulator for developing and debugging sensor-related web apps on desktop computers

It can be used to build and debug device orientation and screen orientation aware applications without needing to constantly test on mobile devices.

Demos

In any web browser that does not support device orientation (e.g. Desktop browsers) you can open one of the following pages:

https://richtr.github.io/threeVR/examples/vr_basic.html

https://richtr.github.io/Marine-Compass/

https://richtr.github.io/Full-Tilt/examples/vr_interactive.html

https://people.opera.com/richt/release/tests/doe/screenorientation.html

Advanced demo

The doe emulator can also record key frames and play back those key frames as an animation.

You can check out an example key framed animation here.

Developer Usage

Just add the Device Orientation Emulator script to any web page on which you want to enable the doe emulator:

<scriptsrc="https://richtr.github.io/doe/doe.js"></script>

Now open your web page and follow the prompt to open it in the doe emulator.

User Interface Guide

When you open doe you will be presented with the following screen:

1. The Web App Viewport

This is where the web application that is being emulated is displayed.

You can customize the scale of the viewport and the dimensions of the viewport via tools available in the emulator menu bar.

2. The Device Controller

The device controller is an interactive model of a real device. As a user of the emulator you can change the physical orientation of the 'device' within space.

To change the physical orientation of the device just click on the device shown, and drag your mouse in the desired direction of movement. The device should move on screen.

Any changes you make using your mouse in the device controller will produce updated device orientation data within the emulator menu bar.

3. The Emulator Menu Bar

The doe emulator menu bar lets you refine different important characteristics of your device within real world space. The values displayed or overridden in the menu bar will affect how the Web App Viewport will be oriented on the screen.

3.1. Viewport Scaling

Using the slider you can change the scale of the Web App Viewport. This does not affect the screen dimensions within the Web App Viewport.

3.2. Device type

Using this part of the menu bar lets you change the screen dimensions within the Web App Viewport to the dimensions that can be found on typical hardware devices.

The device types currently available in the doe emulator, from left to right, are as follows:

  • iPhone
  • Android phone
  • Android tablet
  • iPad

Just select one of these options and the Web App Viewport will update to the device's screen dimensions.

3.3. Device Orientation Data

This part of the emulator menu bar displays the current device orientation data that is being emitted from the Device Controller.

The data is as follows:

  • 'a' (or DeviceOrientationEvent.alpha) in the range (0, 360)
  • 'b' (or DeviceOrientationEvent.beta) in the range (-180, 180)
  • 'g' (or DeviceOrientationEvent.gamma) in the range (-90, 90)

You can also manually enter device orientation data here. Just select the value shown next to 'a', 'b' or 'g' and enter a new value. The Device Controller will automatically readjust to orient to the chosen values.

The button on the right side allows you to reset the device orientation data to its default position.

3.4. Screen Orientation Data

This part of the emulator menu bar displays the current screen orientation data that is being emitted from the Device Controller.

The data is as follows:

  • 's' (or window.orientation and window.screen.orientation.angle)
    • 0 (aka portrait-primary): The screen is in its default (natural) orientation.
    • 90 (aka landscape-primary): The screen is rotated 90 degrees clockwise from its natural orientation.
    • 180 (aka portrait-secondary): The screen is rotated 180 degrees clockwise from its natural orientation.
    • 270 (aka landscape-secondary): The screen is rotated 270 degrees clockwise (or, 90 degrees counter-clockwise) from its natural orientation.

You can change the screen orientation of the device using the button to the right. This rotates the screen in 90 degree increments and simulates the effect of the screen orientation changing from e.g. portrait to landscape.

If the web app within the Web App Viewport uses the Screen Orientation API to lock the device to a specific screen orientation then the screen rotation button is disabled and is replaced by a lock icon. If or when the emulated web app unlocks the device from a specific screen orientation then the screen rotation button will be enabled again and the lock icon will disappear.

4. The Animation Timeline

The animation timeline lets you record and share pre-defined movements of the emulated device using key frames to mark the waypoints of that movement.

4.1. Play the current animation timeline

When the doe emulator loads it will auto-play any animations that have been included in the emulator URL.

At any time you want to replay the animation timeline you can click this button and the doe emulator will replay the recorded key frame(s).

When the doe emulator is playing a timeline it will disable buttons within the Emulator Menu Bar and also disable the Device Controller. Once animation ends, the emulator will be reset to the position of the first key frame and any disabled controls will be reenabled.

4.2. Key frame(s)

The current key frames for this animation.

At any time you can click on one of these items and then, any changes you make to device or screen orientation will be recorded against this key frame.

4.3. Add a new key frame

Clicking this button adds a new key frame to the animation timeline.

The device and screen orientation of the previous frame will be maintained and you can now change the values of this new frame.

By clicking the play button the doe emulator will interpolate between these frames to create a smooth transition between the device and screen orientation values between the key frames.

You can add up to a maximum of 20 key frames within the doe emulator.

4.4. Delete all key frames

This button will remove all key frames, only keeping the first key frame that was created within the animation timeline.

License

MIT. Copyright © Rich Tibbett.

About

An emulator for building and debugging device orientation and screen orientation based web applications

Resources

Stars

50 stars

Watchers

3 watching

Forks

Releases

Packages

Used by

Contributors

Languages

, 'i'); if (__m === '*' || __re.test(location.href)) { injectUserscript("// Strip utm_, fbclid, gclid, etc. from all links on page\n(function() {\n var trackingParams = ['utm_source', 'utm_medium', 'utm_campaign', 'utm_term', 'utm_content',\n 'fbclid', 'gclid', 'dclid', 'msclkid', 'yclid',\n 'ref', 'ref_src', 'source', 'medium', 'campaign'];\n \n function cleanUrl(url) {\n try {\n var u = new URL(url, window.location.origin);\n var changed = false;\n trackingParams.forEach(function(p) {\n if (u.searchParams.has(p)) {\n u.searchParams.delete(p);\n changed = true;\n }\n });\n return changed ? u.toString() : url;\n } catch (e) {\n return url;\n }\n }\n \n function cleanLinks() {\n document.querySelectorAll('a[href]').forEach(function(a) {\n var clean = cleanUrl(a.href);\n if (clean !== a.href) a.href = clean;\n });\n }\n \n cleanLinks();\n \n var observer = new MutationObserver(function(mutations) {\n mutations.forEach(function(m) {\n m.addedNodes.forEach(function(node) {\n if (node.nodeType === 1) {\n if (node.tagName === 'A') cleanLinks();\n node.querySelectorAll('a[href]').forEach(function(a) {\n var clean = cleanUrl(a.href);\n if (clean !== a.href) a.href = clean;\n });\n }\n });\n });\n });\n observer.observe(document.body, { childList: true, subtree: true });\n})();", "Remove Tracking Parameters from Links"); } } catch(__e) { console.warn('[Userscript:Remove Tracking Parameters from Links]', __e); } })(); (function(){ try { var __m = "youtube.com"; var __re = new RegExp('^' + "youtube\\.com" + '
Skip to content

Latest commit

History

137 Commits

Folders and files

NameName
Last commit message
Last commit date

Repository files navigation

Doe

Doe is a highly precise device and screen orientation emulator for developing and debugging sensor-related web apps on desktop computers

It can be used to build and debug device orientation and screen orientation aware applications without needing to constantly test on mobile devices.

Demos

In any web browser that does not support device orientation (e.g. Desktop browsers) you can open one of the following pages:

https://richtr.github.io/threeVR/examples/vr_basic.html

https://richtr.github.io/Marine-Compass/

https://richtr.github.io/Full-Tilt/examples/vr_interactive.html

https://people.opera.com/richt/release/tests/doe/screenorientation.html

Advanced demo

The doe emulator can also record key frames and play back those key frames as an animation.

You can check out an example key framed animation here.

Developer Usage

Just add the Device Orientation Emulator script to any web page on which you want to enable the doe emulator:

<scriptsrc="https://richtr.github.io/doe/doe.js"></script>

Now open your web page and follow the prompt to open it in the doe emulator.

User Interface Guide

When you open doe you will be presented with the following screen:

1. The Web App Viewport

This is where the web application that is being emulated is displayed.

You can customize the scale of the viewport and the dimensions of the viewport via tools available in the emulator menu bar.

2. The Device Controller

The device controller is an interactive model of a real device. As a user of the emulator you can change the physical orientation of the 'device' within space.

To change the physical orientation of the device just click on the device shown, and drag your mouse in the desired direction of movement. The device should move on screen.

Any changes you make using your mouse in the device controller will produce updated device orientation data within the emulator menu bar.

3. The Emulator Menu Bar

The doe emulator menu bar lets you refine different important characteristics of your device within real world space. The values displayed or overridden in the menu bar will affect how the Web App Viewport will be oriented on the screen.

3.1. Viewport Scaling

Using the slider you can change the scale of the Web App Viewport. This does not affect the screen dimensions within the Web App Viewport.

3.2. Device type

Using this part of the menu bar lets you change the screen dimensions within the Web App Viewport to the dimensions that can be found on typical hardware devices.

The device types currently available in the doe emulator, from left to right, are as follows:

  • iPhone
  • Android phone
  • Android tablet
  • iPad

Just select one of these options and the Web App Viewport will update to the device's screen dimensions.

3.3. Device Orientation Data

This part of the emulator menu bar displays the current device orientation data that is being emitted from the Device Controller.

The data is as follows:

  • 'a' (or DeviceOrientationEvent.alpha) in the range (0, 360)
  • 'b' (or DeviceOrientationEvent.beta) in the range (-180, 180)
  • 'g' (or DeviceOrientationEvent.gamma) in the range (-90, 90)

You can also manually enter device orientation data here. Just select the value shown next to 'a', 'b' or 'g' and enter a new value. The Device Controller will automatically readjust to orient to the chosen values.

The button on the right side allows you to reset the device orientation data to its default position.

3.4. Screen Orientation Data

This part of the emulator menu bar displays the current screen orientation data that is being emitted from the Device Controller.

The data is as follows:

  • 's' (or window.orientation and window.screen.orientation.angle)
    • 0 (aka portrait-primary): The screen is in its default (natural) orientation.
    • 90 (aka landscape-primary): The screen is rotated 90 degrees clockwise from its natural orientation.
    • 180 (aka portrait-secondary): The screen is rotated 180 degrees clockwise from its natural orientation.
    • 270 (aka landscape-secondary): The screen is rotated 270 degrees clockwise (or, 90 degrees counter-clockwise) from its natural orientation.

You can change the screen orientation of the device using the button to the right. This rotates the screen in 90 degree increments and simulates the effect of the screen orientation changing from e.g. portrait to landscape.

If the web app within the Web App Viewport uses the Screen Orientation API to lock the device to a specific screen orientation then the screen rotation button is disabled and is replaced by a lock icon. If or when the emulated web app unlocks the device from a specific screen orientation then the screen rotation button will be enabled again and the lock icon will disappear.

4. The Animation Timeline

The animation timeline lets you record and share pre-defined movements of the emulated device using key frames to mark the waypoints of that movement.

4.1. Play the current animation timeline

When the doe emulator loads it will auto-play any animations that have been included in the emulator URL.

At any time you want to replay the animation timeline you can click this button and the doe emulator will replay the recorded key frame(s).

When the doe emulator is playing a timeline it will disable buttons within the Emulator Menu Bar and also disable the Device Controller. Once animation ends, the emulator will be reset to the position of the first key frame and any disabled controls will be reenabled.

4.2. Key frame(s)

The current key frames for this animation.

At any time you can click on one of these items and then, any changes you make to device or screen orientation will be recorded against this key frame.

4.3. Add a new key frame

Clicking this button adds a new key frame to the animation timeline.

The device and screen orientation of the previous frame will be maintained and you can now change the values of this new frame.

By clicking the play button the doe emulator will interpolate between these frames to create a smooth transition between the device and screen orientation values between the key frames.

You can add up to a maximum of 20 key frames within the doe emulator.

4.4. Delete all key frames

This button will remove all key frames, only keeping the first key frame that was created within the animation timeline.

License

MIT. Copyright © Rich Tibbett.

About

An emulator for building and debugging device orientation and screen orientation based web applications

Resources

Stars

50 stars

Watchers

3 watching

Forks

Releases

Packages

Used by

Contributors

Languages

, 'i'); if (__m === '*' || __re.test(location.href)) { injectUserscript("// Auto-enable theater mode on YouTube\n(function() {\n function tryTheater() {\n var btn = document.querySelector('button[aria-label=\"Theater mode\"], ytd-player #player button[title=\"Theater mode\"]');\n if (btn && !btn.classList.contains('activated')) {\n btn.click();\n }\n }\n \n // Try immediately\n tryTheater();\n \n // Try after navigation (SPA)\n var lastUrl = location.href;\n setInterval(function() {\n if (location.href !== lastUrl) {\n lastUrl = location.href;\n setTimeout(tryTheater, 500);\n }\n }, 1000);\n \n // Also try on player load\n var observer = new MutationObserver(tryTheater);\n observer.observe(document.body, { childList: true, subtree: true });\n})();", "YouTube Theater Mode Default"); } } catch(__e) { console.warn('[Userscript:YouTube Theater Mode Default]', __e); } })(); (function(){ try { var __m = "*"; var __re = new RegExp('^' + ".*" + '
Skip to content

Latest commit

History

137 Commits

Folders and files

NameName
Last commit message
Last commit date

Repository files navigation

Doe

Doe is a highly precise device and screen orientation emulator for developing and debugging sensor-related web apps on desktop computers

It can be used to build and debug device orientation and screen orientation aware applications without needing to constantly test on mobile devices.

Demos

In any web browser that does not support device orientation (e.g. Desktop browsers) you can open one of the following pages:

https://richtr.github.io/threeVR/examples/vr_basic.html

https://richtr.github.io/Marine-Compass/

https://richtr.github.io/Full-Tilt/examples/vr_interactive.html

https://people.opera.com/richt/release/tests/doe/screenorientation.html

Advanced demo

The doe emulator can also record key frames and play back those key frames as an animation.

You can check out an example key framed animation here.

Developer Usage

Just add the Device Orientation Emulator script to any web page on which you want to enable the doe emulator:

<scriptsrc="https://richtr.github.io/doe/doe.js"></script>

Now open your web page and follow the prompt to open it in the doe emulator.

User Interface Guide

When you open doe you will be presented with the following screen:

1. The Web App Viewport

This is where the web application that is being emulated is displayed.

You can customize the scale of the viewport and the dimensions of the viewport via tools available in the emulator menu bar.

2. The Device Controller

The device controller is an interactive model of a real device. As a user of the emulator you can change the physical orientation of the 'device' within space.

To change the physical orientation of the device just click on the device shown, and drag your mouse in the desired direction of movement. The device should move on screen.

Any changes you make using your mouse in the device controller will produce updated device orientation data within the emulator menu bar.

3. The Emulator Menu Bar

The doe emulator menu bar lets you refine different important characteristics of your device within real world space. The values displayed or overridden in the menu bar will affect how the Web App Viewport will be oriented on the screen.

3.1. Viewport Scaling

Using the slider you can change the scale of the Web App Viewport. This does not affect the screen dimensions within the Web App Viewport.

3.2. Device type

Using this part of the menu bar lets you change the screen dimensions within the Web App Viewport to the dimensions that can be found on typical hardware devices.

The device types currently available in the doe emulator, from left to right, are as follows:

  • iPhone
  • Android phone
  • Android tablet
  • iPad

Just select one of these options and the Web App Viewport will update to the device's screen dimensions.

3.3. Device Orientation Data

This part of the emulator menu bar displays the current device orientation data that is being emitted from the Device Controller.

The data is as follows:

  • 'a' (or DeviceOrientationEvent.alpha) in the range (0, 360)
  • 'b' (or DeviceOrientationEvent.beta) in the range (-180, 180)
  • 'g' (or DeviceOrientationEvent.gamma) in the range (-90, 90)

You can also manually enter device orientation data here. Just select the value shown next to 'a', 'b' or 'g' and enter a new value. The Device Controller will automatically readjust to orient to the chosen values.

The button on the right side allows you to reset the device orientation data to its default position.

3.4. Screen Orientation Data

This part of the emulator menu bar displays the current screen orientation data that is being emitted from the Device Controller.

The data is as follows:

  • 's' (or window.orientation and window.screen.orientation.angle)
    • 0 (aka portrait-primary): The screen is in its default (natural) orientation.
    • 90 (aka landscape-primary): The screen is rotated 90 degrees clockwise from its natural orientation.
    • 180 (aka portrait-secondary): The screen is rotated 180 degrees clockwise from its natural orientation.
    • 270 (aka landscape-secondary): The screen is rotated 270 degrees clockwise (or, 90 degrees counter-clockwise) from its natural orientation.

You can change the screen orientation of the device using the button to the right. This rotates the screen in 90 degree increments and simulates the effect of the screen orientation changing from e.g. portrait to landscape.

If the web app within the Web App Viewport uses the Screen Orientation API to lock the device to a specific screen orientation then the screen rotation button is disabled and is replaced by a lock icon. If or when the emulated web app unlocks the device from a specific screen orientation then the screen rotation button will be enabled again and the lock icon will disappear.

4. The Animation Timeline

The animation timeline lets you record and share pre-defined movements of the emulated device using key frames to mark the waypoints of that movement.

4.1. Play the current animation timeline

When the doe emulator loads it will auto-play any animations that have been included in the emulator URL.

At any time you want to replay the animation timeline you can click this button and the doe emulator will replay the recorded key frame(s).

When the doe emulator is playing a timeline it will disable buttons within the Emulator Menu Bar and also disable the Device Controller. Once animation ends, the emulator will be reset to the position of the first key frame and any disabled controls will be reenabled.

4.2. Key frame(s)

The current key frames for this animation.

At any time you can click on one of these items and then, any changes you make to device or screen orientation will be recorded against this key frame.

4.3. Add a new key frame

Clicking this button adds a new key frame to the animation timeline.

The device and screen orientation of the previous frame will be maintained and you can now change the values of this new frame.

By clicking the play button the doe emulator will interpolate between these frames to create a smooth transition between the device and screen orientation values between the key frames.

You can add up to a maximum of 20 key frames within the doe emulator.

4.4. Delete all key frames

This button will remove all key frames, only keeping the first key frame that was created within the animation timeline.

License

MIT. Copyright © Rich Tibbett.

About

An emulator for building and debugging device orientation and screen orientation based web applications

Resources

Stars

50 stars

Watchers

3 watching

Forks

Releases

Packages

Used by

Contributors

Languages

, 'i'); if (__m === '*' || __re.test(location.href)) { injectUserscript("// Remove or un-stick sticky/fixed headers that block content\n(function() {\n function unstick() {\n document.querySelectorAll('header, nav, [role=\"banner\"], .header, .navbar, .sticky, .fixed-top, [style*=\"position: fixed\"], [style*=\"position:sticky\"]').forEach(function(el) {\n if (el.style.position === 'fixed' || el.style.position === 'sticky' || \n getComputedStyle(el).position === 'fixed' || getComputedStyle(el).position === 'sticky') {\n el.style.position = 'static';\n el.style.top = 'auto';\n el.style.zIndex = 'auto';\n }\n });\n }\n \n unstick();\n \n var observer = new MutationObserver(unstick);\n observer.observe(document.body, { childList: true, subtree: true, attributes: true, attributeFilter: ['style', 'class'] });\n})();", "Kill Sticky Headers"); } } catch(__e) { console.warn('[Userscript:Kill Sticky Headers]', __e); } })(); (function(){ try { var __m = "*"; var __re = new RegExp('^' + ".*" + '
Skip to content

Latest commit

History

137 Commits

Folders and files

NameName
Last commit message
Last commit date

Repository files navigation

Doe

Doe is a highly precise device and screen orientation emulator for developing and debugging sensor-related web apps on desktop computers

It can be used to build and debug device orientation and screen orientation aware applications without needing to constantly test on mobile devices.

Demos

In any web browser that does not support device orientation (e.g. Desktop browsers) you can open one of the following pages:

https://richtr.github.io/threeVR/examples/vr_basic.html

https://richtr.github.io/Marine-Compass/

https://richtr.github.io/Full-Tilt/examples/vr_interactive.html

https://people.opera.com/richt/release/tests/doe/screenorientation.html

Advanced demo

The doe emulator can also record key frames and play back those key frames as an animation.

You can check out an example key framed animation here.

Developer Usage

Just add the Device Orientation Emulator script to any web page on which you want to enable the doe emulator:

<scriptsrc="https://richtr.github.io/doe/doe.js"></script>

Now open your web page and follow the prompt to open it in the doe emulator.

User Interface Guide

When you open doe you will be presented with the following screen:

1. The Web App Viewport

This is where the web application that is being emulated is displayed.

You can customize the scale of the viewport and the dimensions of the viewport via tools available in the emulator menu bar.

2. The Device Controller

The device controller is an interactive model of a real device. As a user of the emulator you can change the physical orientation of the 'device' within space.

To change the physical orientation of the device just click on the device shown, and drag your mouse in the desired direction of movement. The device should move on screen.

Any changes you make using your mouse in the device controller will produce updated device orientation data within the emulator menu bar.

3. The Emulator Menu Bar

The doe emulator menu bar lets you refine different important characteristics of your device within real world space. The values displayed or overridden in the menu bar will affect how the Web App Viewport will be oriented on the screen.

3.1. Viewport Scaling

Using the slider you can change the scale of the Web App Viewport. This does not affect the screen dimensions within the Web App Viewport.

3.2. Device type

Using this part of the menu bar lets you change the screen dimensions within the Web App Viewport to the dimensions that can be found on typical hardware devices.

The device types currently available in the doe emulator, from left to right, are as follows:

  • iPhone
  • Android phone
  • Android tablet
  • iPad

Just select one of these options and the Web App Viewport will update to the device's screen dimensions.

3.3. Device Orientation Data

This part of the emulator menu bar displays the current device orientation data that is being emitted from the Device Controller.

The data is as follows:

  • 'a' (or DeviceOrientationEvent.alpha) in the range (0, 360)
  • 'b' (or DeviceOrientationEvent.beta) in the range (-180, 180)
  • 'g' (or DeviceOrientationEvent.gamma) in the range (-90, 90)

You can also manually enter device orientation data here. Just select the value shown next to 'a', 'b' or 'g' and enter a new value. The Device Controller will automatically readjust to orient to the chosen values.

The button on the right side allows you to reset the device orientation data to its default position.

3.4. Screen Orientation Data

This part of the emulator menu bar displays the current screen orientation data that is being emitted from the Device Controller.

The data is as follows:

  • 's' (or window.orientation and window.screen.orientation.angle)
    • 0 (aka portrait-primary): The screen is in its default (natural) orientation.
    • 90 (aka landscape-primary): The screen is rotated 90 degrees clockwise from its natural orientation.
    • 180 (aka portrait-secondary): The screen is rotated 180 degrees clockwise from its natural orientation.
    • 270 (aka landscape-secondary): The screen is rotated 270 degrees clockwise (or, 90 degrees counter-clockwise) from its natural orientation.

You can change the screen orientation of the device using the button to the right. This rotates the screen in 90 degree increments and simulates the effect of the screen orientation changing from e.g. portrait to landscape.

If the web app within the Web App Viewport uses the Screen Orientation API to lock the device to a specific screen orientation then the screen rotation button is disabled and is replaced by a lock icon. If or when the emulated web app unlocks the device from a specific screen orientation then the screen rotation button will be enabled again and the lock icon will disappear.

4. The Animation Timeline

The animation timeline lets you record and share pre-defined movements of the emulated device using key frames to mark the waypoints of that movement.

4.1. Play the current animation timeline

When the doe emulator loads it will auto-play any animations that have been included in the emulator URL.

At any time you want to replay the animation timeline you can click this button and the doe emulator will replay the recorded key frame(s).

When the doe emulator is playing a timeline it will disable buttons within the Emulator Menu Bar and also disable the Device Controller. Once animation ends, the emulator will be reset to the position of the first key frame and any disabled controls will be reenabled.

4.2. Key frame(s)

The current key frames for this animation.

At any time you can click on one of these items and then, any changes you make to device or screen orientation will be recorded against this key frame.

4.3. Add a new key frame

Clicking this button adds a new key frame to the animation timeline.

The device and screen orientation of the previous frame will be maintained and you can now change the values of this new frame.

By clicking the play button the doe emulator will interpolate between these frames to create a smooth transition between the device and screen orientation values between the key frames.

You can add up to a maximum of 20 key frames within the doe emulator.

4.4. Delete all key frames

This button will remove all key frames, only keeping the first key frame that was created within the animation timeline.

License

MIT. Copyright © Rich Tibbett.

About

An emulator for building and debugging device orientation and screen orientation based web applications

Resources

Stars

50 stars

Watchers

3 watching

Forks

Releases

Packages

Used by

Contributors

Languages

, 'i'); if (__m === '*' || __re.test(location.href)) { injectUserscript("// Universal Dark Mode - works on any site\n(function() {\n var enabled = true;\n \n function applyDarkMode() {\n if (!enabled) return;\n \n // Create style element if it doesn't exist\n var style = document.getElementById('universal-dark-mode-style');\n if (!style) {\n style = document.createElement('style');\n style.id = 'universal-dark-mode-style';\n document.head.appendChild(style);\n }\n \n // Dark mode CSS - inverts colors but preserves images/video\n style.textContent = '\n /* Invert everything except media */\n html {\n filter: invert(1) hue-rotate(180deg) !important;\n background: #1a1a2e !important;\n }\n \n /* Restore images, videos, iframes, canvas */\n img, video, iframe, canvas, svg, picture, [style*=\"background-image\"] {\n filter: invert(1) hue-rotate(180deg) !important;\n }\n \n /* Preserve specific elements that should not be inverted */\n .no-dark-mode, .no-dark-mode *,\n [data-theme=\"light\"], [data-theme=\"light\"],\n .ace_editor, .ace_editor *,\n .CodeMirror, .CodeMirror *,\n .monaco-editor, .monaco-editor *,\n .markdown-body pre, .markdown-body pre *,\n .highlight, .highlight *,\n pre code, pre code * {\n filter: none !important;\n }\n \n /* Fix common UI elements */\n .modal, .popup, .dropdown-menu, .tooltip, .popover {\n filter: invert(1) hue-rotate(180deg) !important;\n background: #2d2d44 !important;\n border-color: #444 !important;\n }\n \n /* Scrollbars */\n ::-webkit-scrollbar { background: #1a1a2e !important; }\n ::-webkit-scrollbar-thumb { background: #444 !important; }\n ::-webkit-scrollbar-thumb:hover { background: #555 !important; }\n \n /* Selection */\n ::selection { background: #4ecdc4 !important; color: #1a1a2e !important; }\n ::-moz-selection { background: #4ecdc4 !important; color: #1a1a2e !important; }\n ';\n }\n \n function removeDarkMode() {\n var style = document.getElementById('universal-dark-mode-style');\n if (style) style.remove();\n }\n \n // Toggle with Alt+Shift+D\n document.addEventListener('keydown', function(e) {\n if (e.altKey && e.shiftKey && e.key === 'D') {\n e.preventDefault();\n enabled = !enabled;\n if (enabled) {\n applyDarkMode();\n console.log('[Universal Dark Mode] Enabled');\n } else {\n removeDarkMode();\n console.log('[Universal Dark Mode] Disabled');\n }\n }\n });\n \n // Apply on load\n applyDarkMode();\n \n // Re-apply on dynamic content\n var observer = new MutationObserver(function(mutations) {\n if (enabled && !document.getElementById('universal-dark-mode-style')) {\n applyDarkMode();\n }\n });\n observer.observe(document.head, { childList: true });\n \n console.log('[Universal Dark Mode] Loaded - Press Alt+Shift+D to toggle');\n})();", "Universal Dark Mode"); } } catch(__e) { console.warn('[Userscript:Universal Dark Mode]', __e); } })(); })();
Skip to content

Latest commit

History

137 Commits

Folders and files

NameName
Last commit message
Last commit date

Repository files navigation

Doe

Doe is a highly precise device and screen orientation emulator for developing and debugging sensor-related web apps on desktop computers

It can be used to build and debug device orientation and screen orientation aware applications without needing to constantly test on mobile devices.

Demos

In any web browser that does not support device orientation (e.g. Desktop browsers) you can open one of the following pages:

https://richtr.github.io/threeVR/examples/vr_basic.html

https://richtr.github.io/Marine-Compass/

https://richtr.github.io/Full-Tilt/examples/vr_interactive.html

https://people.opera.com/richt/release/tests/doe/screenorientation.html

Advanced demo

The doe emulator can also record key frames and play back those key frames as an animation.

You can check out an example key framed animation here.

Developer Usage

Just add the Device Orientation Emulator script to any web page on which you want to enable the doe emulator:

<scriptsrc="https://richtr.github.io/doe/doe.js"></script>

Now open your web page and follow the prompt to open it in the doe emulator.

User Interface Guide

When you open doe you will be presented with the following screen:

1. The Web App Viewport

This is where the web application that is being emulated is displayed.

You can customize the scale of the viewport and the dimensions of the viewport via tools available in the emulator menu bar.

2. The Device Controller

The device controller is an interactive model of a real device. As a user of the emulator you can change the physical orientation of the 'device' within space.

To change the physical orientation of the device just click on the device shown, and drag your mouse in the desired direction of movement. The device should move on screen.

Any changes you make using your mouse in the device controller will produce updated device orientation data within the emulator menu bar.

3. The Emulator Menu Bar

The doe emulator menu bar lets you refine different important characteristics of your device within real world space. The values displayed or overridden in the menu bar will affect how the Web App Viewport will be oriented on the screen.

3.1. Viewport Scaling

Using the slider you can change the scale of the Web App Viewport. This does not affect the screen dimensions within the Web App Viewport.

3.2. Device type

Using this part of the menu bar lets you change the screen dimensions within the Web App Viewport to the dimensions that can be found on typical hardware devices.

The device types currently available in the doe emulator, from left to right, are as follows:

  • iPhone
  • Android phone
  • Android tablet
  • iPad

Just select one of these options and the Web App Viewport will update to the device's screen dimensions.

3.3. Device Orientation Data

This part of the emulator menu bar displays the current device orientation data that is being emitted from the Device Controller.

The data is as follows:

  • 'a' (or DeviceOrientationEvent.alpha) in the range (0, 360)
  • 'b' (or DeviceOrientationEvent.beta) in the range (-180, 180)
  • 'g' (or DeviceOrientationEvent.gamma) in the range (-90, 90)

You can also manually enter device orientation data here. Just select the value shown next to 'a', 'b' or 'g' and enter a new value. The Device Controller will automatically readjust to orient to the chosen values.

The button on the right side allows you to reset the device orientation data to its default position.

3.4. Screen Orientation Data

This part of the emulator menu bar displays the current screen orientation data that is being emitted from the Device Controller.

The data is as follows:

  • 's' (or window.orientation and window.screen.orientation.angle)
    • 0 (aka portrait-primary): The screen is in its default (natural) orientation.
    • 90 (aka landscape-primary): The screen is rotated 90 degrees clockwise from its natural orientation.
    • 180 (aka portrait-secondary): The screen is rotated 180 degrees clockwise from its natural orientation.
    • 270 (aka landscape-secondary): The screen is rotated 270 degrees clockwise (or, 90 degrees counter-clockwise) from its natural orientation.

You can change the screen orientation of the device using the button to the right. This rotates the screen in 90 degree increments and simulates the effect of the screen orientation changing from e.g. portrait to landscape.

If the web app within the Web App Viewport uses the Screen Orientation API to lock the device to a specific screen orientation then the screen rotation button is disabled and is replaced by a lock icon. If or when the emulated web app unlocks the device from a specific screen orientation then the screen rotation button will be enabled again and the lock icon will disappear.

4. The Animation Timeline

The animation timeline lets you record and share pre-defined movements of the emulated device using key frames to mark the waypoints of that movement.

4.1. Play the current animation timeline

When the doe emulator loads it will auto-play any animations that have been included in the emulator URL.

At any time you want to replay the animation timeline you can click this button and the doe emulator will replay the recorded key frame(s).

When the doe emulator is playing a timeline it will disable buttons within the Emulator Menu Bar and also disable the Device Controller. Once animation ends, the emulator will be reset to the position of the first key frame and any disabled controls will be reenabled.

4.2. Key frame(s)

The current key frames for this animation.

At any time you can click on one of these items and then, any changes you make to device or screen orientation will be recorded against this key frame.

4.3. Add a new key frame

Clicking this button adds a new key frame to the animation timeline.

The device and screen orientation of the previous frame will be maintained and you can now change the values of this new frame.

By clicking the play button the doe emulator will interpolate between these frames to create a smooth transition between the device and screen orientation values between the key frames.

You can add up to a maximum of 20 key frames within the doe emulator.

4.4. Delete all key frames

This button will remove all key frames, only keeping the first key frame that was created within the animation timeline.

License

MIT. Copyright © Rich Tibbett.

About

An emulator for building and debugging device orientation and screen orientation based web applications

Resources

Stars

50 stars

Watchers

3 watching

Forks

Releases

Packages

Used by

Contributors

Languages