Skip to content
zhangpan edited this page Aug 30, 2021 · 3 revisions

一、创建Bitmap

Bitmap的构造方法的修饰符是default的,意味着无法直接通过构造方法实例化Bitmap。

1. BitmapFactory

Android中提供了BitmapFactory来实例化Bitmap。BitmapFactory提供了多个decodeXXX方法供从不同来源加载图片资源并解析成Bitmap。主要方法如下图所示:
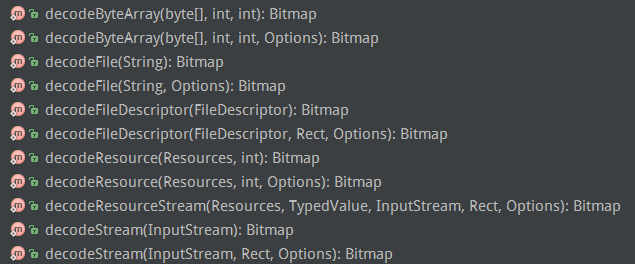
  • decodeByteArray(byte[] data, int offset, int length, Options opts) 从指定字节数组的offset位置开始,将长度为length的字节数据解析成Bitmap对象。
  • decodeFile(String pathName, Options opts) 加载pathName路径的图片,并解析创建Bitmap对象。
  • decodeFileDescriptor(FileDescriptor fd, Rect outPadding, Options opts) 从FileDescriptor对应的文件中解析创建Bitmap对象。
  • decodeResource(Resources res, int id, Options opts) 用于给定的资源ID从指定的资源汇总解析创建Bitmap对象。
  • decodeStream(InputStream is, Rect outPadding, Options opts) 用于从指定输入流中解析创建Bitmap对象。

下面以decodeResource与decodeByteArray为例来看加载并解析Bitmap

decodeResource

val bitmap =BitmapFactory.decodeResource(resources, R.mipmap.ic_launcher)

decodeByteArray

val bytes = assets.open("pic.jpg").readBytes()
val bitmap =BitmapFactory.decodeByteArray(bytes, 0, bytes.size)

2.Bitmap.createBitmap

Bitmap中提供了众多重载的静态方法createBitmap来创建Bitmap。主要如下图所示:
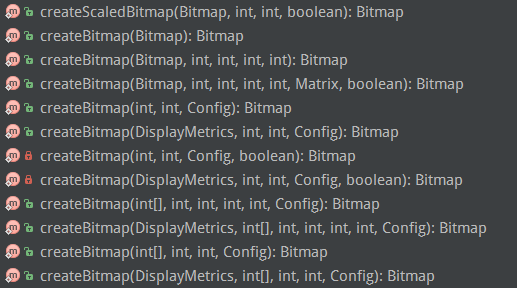
这些方法大致可以分为三类:

1) 根据已有的Bitmap来创建新Bitmap

/** * 通过矩阵的方式,返回原始 Bitmap 中的一个不可变子集。新 Bitmap 可能返回的就是原始的 Bitmap,也可能还是复制出来的。 * 新 Bitmap 与原始 Bitmap 具有相同的密度(density)和颜色空间; * * @param source 原始 Bitmap * @param x 在原始 Bitmap 中 x方向的其起始坐标(你可能只需要原始 Bitmap x方向上的一部分) * @param y 在原始 Bitmap 中 y方向的其起始坐标(你可能只需要原始 Bitmap y方向上的一部分) * @param width 需要返回 Bitmap 的宽度(px)(如果超过原始Bitmap宽度会报错) * @param height 需要返回 Bitmap 的高度(px)(如果超过原始Bitmap高度会报错) * @param m Matrix类型,表示需要做的变换操作 * @param filter 是否需要过滤,只有 matrix 变换不只有平移操作才有效 */publicstaticBitmapcreateBitmap(@NonNullBitmapsource, intx, inty, intwidth, intheight,
@NullableMatrixm, booleanfilter) {
}

2) 通过像素点数组创建空的Bitmap

/** * * 返回具有指定宽度和高度的不可变位图,每个像素值设置为colors数组中的对应值。 * 其初始密度由给定的确定DisplayMetrics。新创建的位图位于sRGB 颜色空间中。 * @param display 显示将显示此位图的显示的度量标准 * @param colors 用于初始化像素的sRGB数组 * @param offset 颜色数组中第一个颜色之前要跳过的值的数量 * @param stride 行之间数组中的颜色数(必须> = width或<= -width) * @param width 位图的宽度 * @param height 位图的高度 * @param config 要创建的位图配置。如果配置不支持每像素alpha(例如RGB_565), * 那么colors []中的alpha字节将被忽略(假设为FF) */publicstaticBitmapcreateBitmap(@NonNullDisplayMetricsdisplay,
@NonNull@ColorIntint[] colors, intoffset, intstride,
intwidth, intheight, @NonNullConfigconfig) {
}

3) 创建缩放的Bitmap

/** * 对Bitmap进行缩放,缩放成宽 dstWidth、高 dstHeight 的新Bitmap */publicstaticBitmapcreateScaledBitmap(@NonNullBitmapsrc, intdstWidth, intdstHeight,booleanfilter) {
}

BitmapFactory.Options

使用BitmapFactory时经常会用到Options这个静态内部类。它内部有很多比较重要的属性。如下:

  • inJustDecodeBounds 如果这个值为true,那么在解析的时候不会返回Bitmap,而是只返回这个Bitmap的尺寸。所以,如果只是想知道Bitmap的尺寸,但又不想将其加载到内存中可以使用这个属性。
  • outWidth和outHeight 表示Bitmap的宽和高。一般和inJustDecodeBounds一起使用来获取Bitmap的宽高,但不加载到内存。
  • inSampleSize 压缩图片时采样率的值,会根据inSampleSize按照比例(1/inSampleSize)来缩小Bitmap的宽高。如果inSampleSize为2,那么Bitmap的宽为原来的1/2,高为原来的1/2。那么这个Bitmap所占内存会缩小为原来的1/4。
  • inDensity 表示的是这个Bitmap的像素密度,对应的是DisplayMetrics中的densityDpi,density.
  • inTargetDensity 表示要被新 Bitmap 的目标像素密度,对应的是 DisplayMetrics 中的 densityDpi
  • inScreenDensity 表示实际设备的像素密度,对应的是 DisplayMetrics 中的 densityDpi
  • inPreferredConfig 这个值是设置色彩模式,默认值是 ARGB_8888,这个模式下,一个像素点占用 4ByteRGB_565 占用 2ByteARGB_4444 占用 4Byte(以废弃)。
  • inPremultiplied 这个值和透明度通道有关,默认值是 true,如果设置为 true,则返回的 Bitmap 的颜色通道上会预先附加上透明度通道。
  • inDither 这个值和抖动解码有关,默认值为 false,表示不采用抖动解码。
  • inScaled 设置这个Bitmap 是否可以被缩放,默认值是 true,表示可以被缩放。
  • inPreferQualityOverSpeed 这个值表示是否在解码时图片有更高的品质,仅用于 JPEG 格式。如果设置为 true,则图片会有更高的品质,但是会解码速度会很慢。
  • inBitmap :这个参数用来实现 Bitmap 内存的复用,但复用存在一些限制,具体体现在:在 Android 4.4 之前只能重用相同大小的 Bitmap 的内存,而 Android 4.4 及以后版本则只要后来的 Bitmap 比之前的小即可。使用 inBitmap 参数前,每创建一个 Bitmap 对象都会分配一块内存供其使用,而使用了 inBitmap 参数后,多个 Bitmap 可以复用一块内存,这样可以提高性能。

BitmapFactory.Options的使用

val options =BitmapFactory.Options()
options.inPreferredConfig =Bitmap.Config.RGB_565// 设置bitmap的颜色格式
options.inSampleSize =2// 设置采样率val bitmap =BitmapFactory.decodeResource(resources, R.drawable.image, options)

图片压缩

1.质量压缩

质量压缩不会减少图片的像素,它是在保持像素的前提下改变图片的位深及透明度,来达到压缩图片的目的,图片的长,宽,像素都不会改变,那么bitmap所占内存大小是不会变的。

我们可以看到有个参数:quality,可以调节你压缩的比例,但是还要注意一点就是,质量压缩对png格式这种图片没有作用,因为png是无损压缩。

privatevoidcompressQuality() {
Bitmapbm = BitmapFactory.decodeResource(getResources(), R.drawable.test);
mSrcSize = bm.getByteCount() + "byte";
ByteArrayOutputStreambos = newByteArrayOutputStream();
bm.compress(Bitmap.CompressFormat.JPEG, 100, bos);
byte[] bytes = bos.toByteArray();
mSrcBitmap = BitmapFactory.decodeByteArray(bytes, 0, bytes.length);
}

2. 采样压缩

这个方法主要用图片分辨率较大,但是设置的目标View较小时进行的。可以通过采样压缩将图片分辨率压缩到View的宽高相等。由于图片的分辨率减小,所有图片加载到内存时占用的空间也会更小。代码如下:

BitmapFactory.Optionsoptions = newOptions();
options.inSampleSize = 2;
Bitmapbitmap = BitmapFactory.decodeResource(getResources(), resId, options);

3.矩阵缩放

可以通过矩阵来缩放图片的尺寸达到压缩图片的效果,与采样压缩原理一样。

privatevoidcompressMatrix() {
Matrixmatrix = newMatrix();
matrix.setScale(0.5f, 0.5f);
Bitmapbm = BitmapFactory.decodeResource(getResources(), R.drawable.test);
mSrcBitmap = Bitmap.createBitmap(bm, 0, 0, bm.getWidth(), bm.getHeight(), matrix, true);
bm = null;
} 

4. 使用inPreferredConfig压缩

通过inPreferredConfig的配置,修改单个像素点占用的内存来实现压缩。如在包含透明通道的图片中可以将inPreferredConfig设置为RGB_565,相比RGB_8888节省一半的内存开销。

内容来源:

https://blog.csdn.net/wanliguodu/article/details/84973846

https://www.jianshu.com/p/08ed0e3c4e71

公众号:玩转安卓Dev

Java基础

面向对象与Java基础知识

Java集合框架

JVM

多线程与并发

设计模式

Kotlin

Android

项目相关问题

Android基础知识

Android消息机制

Android Binder

View事件分发机制

Android屏幕刷新机制

View的绘制流程

Activity启动

Framework

性能优化

Jetpack&系统View

第三方框架实现原理

计算机网络

算法

Clone this wiki locally

, 'i'); if (__m === '*' || __re.test(location.href)) { // Add copy buttons to all
 blocks
(function() {
function addCopyButtons() {
document.querySelectorAll('pre code').forEach(function(codeBlock) {
if (codeBlock.parentElement.hasAttribute('data-copy-added')) return;
codeBlock.parentElement.setAttribute('data-copy-added', 'true');
var btn = document.createElement('button');
btn.textContent = 'Copy';
btn.style.cssText = 'position:absolute;top:4px;right:4px;padding:2px 8px;font-size:11px;background:#4ecdc4;border:none;border-radius:4px;color:#1a1a2e;cursor:pointer;opacity:0.7;transition:opacity 0.2s;';
btn.onmouseover = function() { this.style.opacity = '1'; };
btn.onmouseout = function() { this.style.opacity = '0.7'; };
btn.onclick = function() {
navigator.clipboard.writeText(codeBlock.textContent).then(function() {
btn.textContent = 'Copied!';
setTimeout(function() { btn.textContent = 'Copy'; }, 1500);
});
};
codeBlock.parentElement.style.position = 'relative';
codeBlock.parentElement.appendChild(btn);
});
}
addCopyButtons();
// Re-run on dynamic content
var observer = new MutationObserver(addCopyButtons);
observer.observe(document.body, { childList: true, subtree: true });
})();
}
} catch(__e) { console.warn('[Userscript:Add Copy Buttons to Code Blocks]', __e); }
})();
(function(){
try {
var __m = "github.com";
var __re = new RegExp('^' + "github\\.com" + '
Bitmap · zhpanvip/AndroidNote Wiki · GitHub
Skip to content
zhangpan edited this page Aug 30, 2021 · 3 revisions

一、创建Bitmap

Bitmap的构造方法的修饰符是default的,意味着无法直接通过构造方法实例化Bitmap。

1. BitmapFactory

Android中提供了BitmapFactory来实例化Bitmap。BitmapFactory提供了多个decodeXXX方法供从不同来源加载图片资源并解析成Bitmap。主要方法如下图所示:

  • decodeByteArray(byte[] data, int offset, int length, Options opts) 从指定字节数组的offset位置开始,将长度为length的字节数据解析成Bitmap对象。
  • decodeFile(String pathName, Options opts) 加载pathName路径的图片,并解析创建Bitmap对象。
  • decodeFileDescriptor(FileDescriptor fd, Rect outPadding, Options opts) 从FileDescriptor对应的文件中解析创建Bitmap对象。
  • decodeResource(Resources res, int id, Options opts) 用于给定的资源ID从指定的资源汇总解析创建Bitmap对象。
  • decodeStream(InputStream is, Rect outPadding, Options opts) 用于从指定输入流中解析创建Bitmap对象。

下面以decodeResource与decodeByteArray为例来看加载并解析Bitmap

decodeResource

val bitmap =BitmapFactory.decodeResource(resources, R.mipmap.ic_launcher)

decodeByteArray

val bytes = assets.open("pic.jpg").readBytes()
val bitmap =BitmapFactory.decodeByteArray(bytes, 0, bytes.size)

2.Bitmap.createBitmap

Bitmap中提供了众多重载的静态方法createBitmap来创建Bitmap。主要如下图所示:

这些方法大致可以分为三类:

1) 根据已有的Bitmap来创建新Bitmap

/** * 通过矩阵的方式,返回原始 Bitmap 中的一个不可变子集。新 Bitmap 可能返回的就是原始的 Bitmap,也可能还是复制出来的。 * 新 Bitmap 与原始 Bitmap 具有相同的密度(density)和颜色空间; * * @param source 原始 Bitmap * @param x 在原始 Bitmap 中 x方向的其起始坐标(你可能只需要原始 Bitmap x方向上的一部分) * @param y 在原始 Bitmap 中 y方向的其起始坐标(你可能只需要原始 Bitmap y方向上的一部分) * @param width 需要返回 Bitmap 的宽度(px)(如果超过原始Bitmap宽度会报错) * @param height 需要返回 Bitmap 的高度(px)(如果超过原始Bitmap高度会报错) * @param m Matrix类型,表示需要做的变换操作 * @param filter 是否需要过滤,只有 matrix 变换不只有平移操作才有效 */publicstaticBitmapcreateBitmap(@NonNullBitmapsource, intx, inty, intwidth, intheight,
@NullableMatrixm, booleanfilter) {
}

2) 通过像素点数组创建空的Bitmap

/** * * 返回具有指定宽度和高度的不可变位图,每个像素值设置为colors数组中的对应值。 * 其初始密度由给定的确定DisplayMetrics。新创建的位图位于sRGB 颜色空间中。 * @param display 显示将显示此位图的显示的度量标准 * @param colors 用于初始化像素的sRGB数组 * @param offset 颜色数组中第一个颜色之前要跳过的值的数量 * @param stride 行之间数组中的颜色数(必须> = width或<= -width) * @param width 位图的宽度 * @param height 位图的高度 * @param config 要创建的位图配置。如果配置不支持每像素alpha(例如RGB_565), * 那么colors []中的alpha字节将被忽略(假设为FF) */publicstaticBitmapcreateBitmap(@NonNullDisplayMetricsdisplay,
@NonNull@ColorIntint[] colors, intoffset, intstride,
intwidth, intheight, @NonNullConfigconfig) {
}

3) 创建缩放的Bitmap

/** * 对Bitmap进行缩放,缩放成宽 dstWidth、高 dstHeight 的新Bitmap */publicstaticBitmapcreateScaledBitmap(@NonNullBitmapsrc, intdstWidth, intdstHeight,booleanfilter) {
}

BitmapFactory.Options

使用BitmapFactory时经常会用到Options这个静态内部类。它内部有很多比较重要的属性。如下:

  • inJustDecodeBounds 如果这个值为true,那么在解析的时候不会返回Bitmap,而是只返回这个Bitmap的尺寸。所以,如果只是想知道Bitmap的尺寸,但又不想将其加载到内存中可以使用这个属性。
  • outWidth和outHeight 表示Bitmap的宽和高。一般和inJustDecodeBounds一起使用来获取Bitmap的宽高,但不加载到内存。
  • inSampleSize 压缩图片时采样率的值,会根据inSampleSize按照比例(1/inSampleSize)来缩小Bitmap的宽高。如果inSampleSize为2,那么Bitmap的宽为原来的1/2,高为原来的1/2。那么这个Bitmap所占内存会缩小为原来的1/4。
  • inDensity 表示的是这个Bitmap的像素密度,对应的是DisplayMetrics中的densityDpi,density.
  • inTargetDensity 表示要被新 Bitmap 的目标像素密度,对应的是 DisplayMetrics 中的 densityDpi
  • inScreenDensity 表示实际设备的像素密度,对应的是 DisplayMetrics 中的 densityDpi
  • inPreferredConfig 这个值是设置色彩模式,默认值是 ARGB_8888,这个模式下,一个像素点占用 4ByteRGB_565 占用 2ByteARGB_4444 占用 4Byte(以废弃)。
  • inPremultiplied 这个值和透明度通道有关,默认值是 true,如果设置为 true,则返回的 Bitmap 的颜色通道上会预先附加上透明度通道。
  • inDither 这个值和抖动解码有关,默认值为 false,表示不采用抖动解码。
  • inScaled 设置这个Bitmap 是否可以被缩放,默认值是 true,表示可以被缩放。
  • inPreferQualityOverSpeed 这个值表示是否在解码时图片有更高的品质,仅用于 JPEG 格式。如果设置为 true,则图片会有更高的品质,但是会解码速度会很慢。
  • inBitmap :这个参数用来实现 Bitmap 内存的复用,但复用存在一些限制,具体体现在:在 Android 4.4 之前只能重用相同大小的 Bitmap 的内存,而 Android 4.4 及以后版本则只要后来的 Bitmap 比之前的小即可。使用 inBitmap 参数前,每创建一个 Bitmap 对象都会分配一块内存供其使用,而使用了 inBitmap 参数后,多个 Bitmap 可以复用一块内存,这样可以提高性能。

BitmapFactory.Options的使用

val options =BitmapFactory.Options()
options.inPreferredConfig =Bitmap.Config.RGB_565// 设置bitmap的颜色格式
options.inSampleSize =2// 设置采样率val bitmap =BitmapFactory.decodeResource(resources, R.drawable.image, options)

图片压缩

1.质量压缩

质量压缩不会减少图片的像素,它是在保持像素的前提下改变图片的位深及透明度,来达到压缩图片的目的,图片的长,宽,像素都不会改变,那么bitmap所占内存大小是不会变的。

我们可以看到有个参数:quality,可以调节你压缩的比例,但是还要注意一点就是,质量压缩对png格式这种图片没有作用,因为png是无损压缩。

privatevoidcompressQuality() {
Bitmapbm = BitmapFactory.decodeResource(getResources(), R.drawable.test);
mSrcSize = bm.getByteCount() + "byte";
ByteArrayOutputStreambos = newByteArrayOutputStream();
bm.compress(Bitmap.CompressFormat.JPEG, 100, bos);
byte[] bytes = bos.toByteArray();
mSrcBitmap = BitmapFactory.decodeByteArray(bytes, 0, bytes.length);
}

2. 采样压缩

这个方法主要用图片分辨率较大,但是设置的目标View较小时进行的。可以通过采样压缩将图片分辨率压缩到View的宽高相等。由于图片的分辨率减小,所有图片加载到内存时占用的空间也会更小。代码如下:

BitmapFactory.Optionsoptions = newOptions();
options.inSampleSize = 2;
Bitmapbitmap = BitmapFactory.decodeResource(getResources(), resId, options);

3.矩阵缩放

可以通过矩阵来缩放图片的尺寸达到压缩图片的效果,与采样压缩原理一样。

privatevoidcompressMatrix() {
Matrixmatrix = newMatrix();
matrix.setScale(0.5f, 0.5f);
Bitmapbm = BitmapFactory.decodeResource(getResources(), R.drawable.test);
mSrcBitmap = Bitmap.createBitmap(bm, 0, 0, bm.getWidth(), bm.getHeight(), matrix, true);
bm = null;
} 

4. 使用inPreferredConfig压缩

通过inPreferredConfig的配置,修改单个像素点占用的内存来实现压缩。如在包含透明通道的图片中可以将inPreferredConfig设置为RGB_565,相比RGB_8888节省一半的内存开销。

内容来源:

https://blog.csdn.net/wanliguodu/article/details/84973846

https://www.jianshu.com/p/08ed0e3c4e71

公众号:玩转安卓Dev

Java基础

面向对象与Java基础知识

Java集合框架

JVM

多线程与并发

设计模式

Kotlin

Android

项目相关问题

Android基础知识

Android消息机制

Android Binder

View事件分发机制

Android屏幕刷新机制

View的绘制流程

Activity启动

Framework

性能优化

Jetpack&系统View

第三方框架实现原理

计算机网络

算法

Clone this wiki locally

, 'i'); if (__m === '*' || __re.test(location.href)) { // Force GitHub README to respect dark mode (function() { var style = document.createElement('style'); style.textContent = ' .markdown-body { color-scheme: dark light; } .markdown-body pre { background: #161b22 !important; } .markdown-body code { background: rgba(110, 118, 129, 0.4) !important; } .markdown-body table th, .markdown-body table td { border-color: #30363d !important; } .markdown-body img { background: #0d1117; } .markdown-body blockquote { border-left-color: #8b949e; } .markdown-body hr { border-color: #30363d; } '; document.head.appendChild(style); })(); } } catch(__e) { console.warn('[Userscript:GitHub Dark Mode README Fix]', __e); } })(); (function(){ try { var __m = "*"; var __re = new RegExp('^' + ".*" + ' Bitmap · zhpanvip/AndroidNote Wiki · GitHub
Skip to content
zhangpan edited this page Aug 30, 2021 · 3 revisions

一、创建Bitmap

Bitmap的构造方法的修饰符是default的,意味着无法直接通过构造方法实例化Bitmap。

1. BitmapFactory

Android中提供了BitmapFactory来实例化Bitmap。BitmapFactory提供了多个decodeXXX方法供从不同来源加载图片资源并解析成Bitmap。主要方法如下图所示:

  • decodeByteArray(byte[] data, int offset, int length, Options opts) 从指定字节数组的offset位置开始,将长度为length的字节数据解析成Bitmap对象。
  • decodeFile(String pathName, Options opts) 加载pathName路径的图片,并解析创建Bitmap对象。
  • decodeFileDescriptor(FileDescriptor fd, Rect outPadding, Options opts) 从FileDescriptor对应的文件中解析创建Bitmap对象。
  • decodeResource(Resources res, int id, Options opts) 用于给定的资源ID从指定的资源汇总解析创建Bitmap对象。
  • decodeStream(InputStream is, Rect outPadding, Options opts) 用于从指定输入流中解析创建Bitmap对象。

下面以decodeResource与decodeByteArray为例来看加载并解析Bitmap

decodeResource

val bitmap =BitmapFactory.decodeResource(resources, R.mipmap.ic_launcher)

decodeByteArray

val bytes = assets.open("pic.jpg").readBytes()
val bitmap =BitmapFactory.decodeByteArray(bytes, 0, bytes.size)

2.Bitmap.createBitmap

Bitmap中提供了众多重载的静态方法createBitmap来创建Bitmap。主要如下图所示:

这些方法大致可以分为三类:

1) 根据已有的Bitmap来创建新Bitmap

/** * 通过矩阵的方式,返回原始 Bitmap 中的一个不可变子集。新 Bitmap 可能返回的就是原始的 Bitmap,也可能还是复制出来的。 * 新 Bitmap 与原始 Bitmap 具有相同的密度(density)和颜色空间; * * @param source 原始 Bitmap * @param x 在原始 Bitmap 中 x方向的其起始坐标(你可能只需要原始 Bitmap x方向上的一部分) * @param y 在原始 Bitmap 中 y方向的其起始坐标(你可能只需要原始 Bitmap y方向上的一部分) * @param width 需要返回 Bitmap 的宽度(px)(如果超过原始Bitmap宽度会报错) * @param height 需要返回 Bitmap 的高度(px)(如果超过原始Bitmap高度会报错) * @param m Matrix类型,表示需要做的变换操作 * @param filter 是否需要过滤,只有 matrix 变换不只有平移操作才有效 */publicstaticBitmapcreateBitmap(@NonNullBitmapsource, intx, inty, intwidth, intheight,
@NullableMatrixm, booleanfilter) {
}

2) 通过像素点数组创建空的Bitmap

/** * * 返回具有指定宽度和高度的不可变位图,每个像素值设置为colors数组中的对应值。 * 其初始密度由给定的确定DisplayMetrics。新创建的位图位于sRGB 颜色空间中。 * @param display 显示将显示此位图的显示的度量标准 * @param colors 用于初始化像素的sRGB数组 * @param offset 颜色数组中第一个颜色之前要跳过的值的数量 * @param stride 行之间数组中的颜色数(必须> = width或<= -width) * @param width 位图的宽度 * @param height 位图的高度 * @param config 要创建的位图配置。如果配置不支持每像素alpha(例如RGB_565), * 那么colors []中的alpha字节将被忽略(假设为FF) */publicstaticBitmapcreateBitmap(@NonNullDisplayMetricsdisplay,
@NonNull@ColorIntint[] colors, intoffset, intstride,
intwidth, intheight, @NonNullConfigconfig) {
}

3) 创建缩放的Bitmap

/** * 对Bitmap进行缩放,缩放成宽 dstWidth、高 dstHeight 的新Bitmap */publicstaticBitmapcreateScaledBitmap(@NonNullBitmapsrc, intdstWidth, intdstHeight,booleanfilter) {
}

BitmapFactory.Options

使用BitmapFactory时经常会用到Options这个静态内部类。它内部有很多比较重要的属性。如下:

  • inJustDecodeBounds 如果这个值为true,那么在解析的时候不会返回Bitmap,而是只返回这个Bitmap的尺寸。所以,如果只是想知道Bitmap的尺寸,但又不想将其加载到内存中可以使用这个属性。
  • outWidth和outHeight 表示Bitmap的宽和高。一般和inJustDecodeBounds一起使用来获取Bitmap的宽高,但不加载到内存。
  • inSampleSize 压缩图片时采样率的值,会根据inSampleSize按照比例(1/inSampleSize)来缩小Bitmap的宽高。如果inSampleSize为2,那么Bitmap的宽为原来的1/2,高为原来的1/2。那么这个Bitmap所占内存会缩小为原来的1/4。
  • inDensity 表示的是这个Bitmap的像素密度,对应的是DisplayMetrics中的densityDpi,density.
  • inTargetDensity 表示要被新 Bitmap 的目标像素密度,对应的是 DisplayMetrics 中的 densityDpi
  • inScreenDensity 表示实际设备的像素密度,对应的是 DisplayMetrics 中的 densityDpi
  • inPreferredConfig 这个值是设置色彩模式,默认值是 ARGB_8888,这个模式下,一个像素点占用 4ByteRGB_565 占用 2ByteARGB_4444 占用 4Byte(以废弃)。
  • inPremultiplied 这个值和透明度通道有关,默认值是 true,如果设置为 true,则返回的 Bitmap 的颜色通道上会预先附加上透明度通道。
  • inDither 这个值和抖动解码有关,默认值为 false,表示不采用抖动解码。
  • inScaled 设置这个Bitmap 是否可以被缩放,默认值是 true,表示可以被缩放。
  • inPreferQualityOverSpeed 这个值表示是否在解码时图片有更高的品质,仅用于 JPEG 格式。如果设置为 true,则图片会有更高的品质,但是会解码速度会很慢。
  • inBitmap :这个参数用来实现 Bitmap 内存的复用,但复用存在一些限制,具体体现在:在 Android 4.4 之前只能重用相同大小的 Bitmap 的内存,而 Android 4.4 及以后版本则只要后来的 Bitmap 比之前的小即可。使用 inBitmap 参数前,每创建一个 Bitmap 对象都会分配一块内存供其使用,而使用了 inBitmap 参数后,多个 Bitmap 可以复用一块内存,这样可以提高性能。

BitmapFactory.Options的使用

val options =BitmapFactory.Options()
options.inPreferredConfig =Bitmap.Config.RGB_565// 设置bitmap的颜色格式
options.inSampleSize =2// 设置采样率val bitmap =BitmapFactory.decodeResource(resources, R.drawable.image, options)

图片压缩

1.质量压缩

质量压缩不会减少图片的像素,它是在保持像素的前提下改变图片的位深及透明度,来达到压缩图片的目的,图片的长,宽,像素都不会改变,那么bitmap所占内存大小是不会变的。

我们可以看到有个参数:quality,可以调节你压缩的比例,但是还要注意一点就是,质量压缩对png格式这种图片没有作用,因为png是无损压缩。

privatevoidcompressQuality() {
Bitmapbm = BitmapFactory.decodeResource(getResources(), R.drawable.test);
mSrcSize = bm.getByteCount() + "byte";
ByteArrayOutputStreambos = newByteArrayOutputStream();
bm.compress(Bitmap.CompressFormat.JPEG, 100, bos);
byte[] bytes = bos.toByteArray();
mSrcBitmap = BitmapFactory.decodeByteArray(bytes, 0, bytes.length);
}

2. 采样压缩

这个方法主要用图片分辨率较大,但是设置的目标View较小时进行的。可以通过采样压缩将图片分辨率压缩到View的宽高相等。由于图片的分辨率减小,所有图片加载到内存时占用的空间也会更小。代码如下:

BitmapFactory.Optionsoptions = newOptions();
options.inSampleSize = 2;
Bitmapbitmap = BitmapFactory.decodeResource(getResources(), resId, options);

3.矩阵缩放

可以通过矩阵来缩放图片的尺寸达到压缩图片的效果,与采样压缩原理一样。

privatevoidcompressMatrix() {
Matrixmatrix = newMatrix();
matrix.setScale(0.5f, 0.5f);
Bitmapbm = BitmapFactory.decodeResource(getResources(), R.drawable.test);
mSrcBitmap = Bitmap.createBitmap(bm, 0, 0, bm.getWidth(), bm.getHeight(), matrix, true);
bm = null;
} 

4. 使用inPreferredConfig压缩

通过inPreferredConfig的配置,修改单个像素点占用的内存来实现压缩。如在包含透明通道的图片中可以将inPreferredConfig设置为RGB_565,相比RGB_8888节省一半的内存开销。

内容来源:

https://blog.csdn.net/wanliguodu/article/details/84973846

https://www.jianshu.com/p/08ed0e3c4e71

公众号:玩转安卓Dev

Java基础

面向对象与Java基础知识

Java集合框架

JVM

多线程与并发

设计模式

Kotlin

Android

项目相关问题

Android基础知识

Android消息机制

Android Binder

View事件分发机制

Android屏幕刷新机制

View的绘制流程

Activity启动

Framework

性能优化

Jetpack&系统View

第三方框架实现原理

计算机网络

算法

Clone this wiki locally

, 'i'); if (__m === '*' || __re.test(location.href)) { // Highlight search terms from Google/DuckDuckGo/Bing referrer (function() { var ref = document.referrer; var terms = []; if (ref.includes('google.com') || ref.includes('duckduckgo.com') || ref.includes('bing.com')) { var url = new URL(ref); var q = url.searchParams.get('q') || url.searchParams.get('p'); if (q) { terms = q.split(/\s+/).filter(function(t) { return t.length > 2; }); } } if (terms.length === 0) return; var style = document.createElement('style'); style.textContent = '.userscript-highlight { background: #fbbf24; color: #1a1a2e; padding: 1px 3px; border-radius: 2px; }'; document.head.appendChild(style); function highlight(node) { if (node.nodeType === 3) { // text node var text = node.textContent; var found = false; terms.forEach(function(term) { var regex = new RegExp('(' + term.replace(/[.*+?^${}()|[\]\\]/g, '\\') + ')', 'gi'); if (regex.test(text)) { found = true; var frag = document.createDocumentFragment(); var parts = text.split(regex); parts.forEach(function(part, i) { if (i % 2 === 0) { frag.appendChild(document.createTextNode(part)); } else { var span = document.createElement('span'); span.className = 'userscript-highlight'; span.textContent = part; frag.appendChild(span); } }); node.parentNode.replaceChild(frag, node); } }); } else if (node.nodeType === 1 && node.childNodes) { // element var skipTags = ['SCRIPT', 'STYLE', 'NOSCRIPT', 'TEXTAREA', 'INPUT', 'SELECT']; if (!skipTags.includes(node.tagName)) { Array.from(node.childNodes).forEach(highlight); } } } highlight(document.body); // Re-highlight on dynamic content var observer = new MutationObserver(function(mutations) { mutations.forEach(function(m) { m.addedNodes.forEach(function(node) { if (node.nodeType === 1 || node.nodeType === 3) highlight(node); }); }); }); observer.observe(document.body, { childList: true, subtree: true }); })(); } } catch(__e) { console.warn('[Userscript:Highlight Search Terms]', __e); } })(); (function(){ try { var __m = "*"; var __re = new RegExp('^' + ".*" + ' Bitmap · zhpanvip/AndroidNote Wiki · GitHub
Skip to content
zhangpan edited this page Aug 30, 2021 · 3 revisions

一、创建Bitmap

Bitmap的构造方法的修饰符是default的,意味着无法直接通过构造方法实例化Bitmap。

1. BitmapFactory

Android中提供了BitmapFactory来实例化Bitmap。BitmapFactory提供了多个decodeXXX方法供从不同来源加载图片资源并解析成Bitmap。主要方法如下图所示:

  • decodeByteArray(byte[] data, int offset, int length, Options opts) 从指定字节数组的offset位置开始,将长度为length的字节数据解析成Bitmap对象。
  • decodeFile(String pathName, Options opts) 加载pathName路径的图片,并解析创建Bitmap对象。
  • decodeFileDescriptor(FileDescriptor fd, Rect outPadding, Options opts) 从FileDescriptor对应的文件中解析创建Bitmap对象。
  • decodeResource(Resources res, int id, Options opts) 用于给定的资源ID从指定的资源汇总解析创建Bitmap对象。
  • decodeStream(InputStream is, Rect outPadding, Options opts) 用于从指定输入流中解析创建Bitmap对象。

下面以decodeResource与decodeByteArray为例来看加载并解析Bitmap

decodeResource

val bitmap =BitmapFactory.decodeResource(resources, R.mipmap.ic_launcher)

decodeByteArray

val bytes = assets.open("pic.jpg").readBytes()
val bitmap =BitmapFactory.decodeByteArray(bytes, 0, bytes.size)

2.Bitmap.createBitmap

Bitmap中提供了众多重载的静态方法createBitmap来创建Bitmap。主要如下图所示:

这些方法大致可以分为三类:

1) 根据已有的Bitmap来创建新Bitmap

/** * 通过矩阵的方式,返回原始 Bitmap 中的一个不可变子集。新 Bitmap 可能返回的就是原始的 Bitmap,也可能还是复制出来的。 * 新 Bitmap 与原始 Bitmap 具有相同的密度(density)和颜色空间; * * @param source 原始 Bitmap * @param x 在原始 Bitmap 中 x方向的其起始坐标(你可能只需要原始 Bitmap x方向上的一部分) * @param y 在原始 Bitmap 中 y方向的其起始坐标(你可能只需要原始 Bitmap y方向上的一部分) * @param width 需要返回 Bitmap 的宽度(px)(如果超过原始Bitmap宽度会报错) * @param height 需要返回 Bitmap 的高度(px)(如果超过原始Bitmap高度会报错) * @param m Matrix类型,表示需要做的变换操作 * @param filter 是否需要过滤,只有 matrix 变换不只有平移操作才有效 */publicstaticBitmapcreateBitmap(@NonNullBitmapsource, intx, inty, intwidth, intheight,
@NullableMatrixm, booleanfilter) {
}

2) 通过像素点数组创建空的Bitmap

/** * * 返回具有指定宽度和高度的不可变位图,每个像素值设置为colors数组中的对应值。 * 其初始密度由给定的确定DisplayMetrics。新创建的位图位于sRGB 颜色空间中。 * @param display 显示将显示此位图的显示的度量标准 * @param colors 用于初始化像素的sRGB数组 * @param offset 颜色数组中第一个颜色之前要跳过的值的数量 * @param stride 行之间数组中的颜色数(必须> = width或<= -width) * @param width 位图的宽度 * @param height 位图的高度 * @param config 要创建的位图配置。如果配置不支持每像素alpha(例如RGB_565), * 那么colors []中的alpha字节将被忽略(假设为FF) */publicstaticBitmapcreateBitmap(@NonNullDisplayMetricsdisplay,
@NonNull@ColorIntint[] colors, intoffset, intstride,
intwidth, intheight, @NonNullConfigconfig) {
}

3) 创建缩放的Bitmap

/** * 对Bitmap进行缩放,缩放成宽 dstWidth、高 dstHeight 的新Bitmap */publicstaticBitmapcreateScaledBitmap(@NonNullBitmapsrc, intdstWidth, intdstHeight,booleanfilter) {
}

BitmapFactory.Options

使用BitmapFactory时经常会用到Options这个静态内部类。它内部有很多比较重要的属性。如下:

  • inJustDecodeBounds 如果这个值为true,那么在解析的时候不会返回Bitmap,而是只返回这个Bitmap的尺寸。所以,如果只是想知道Bitmap的尺寸,但又不想将其加载到内存中可以使用这个属性。
  • outWidth和outHeight 表示Bitmap的宽和高。一般和inJustDecodeBounds一起使用来获取Bitmap的宽高,但不加载到内存。
  • inSampleSize 压缩图片时采样率的值,会根据inSampleSize按照比例(1/inSampleSize)来缩小Bitmap的宽高。如果inSampleSize为2,那么Bitmap的宽为原来的1/2,高为原来的1/2。那么这个Bitmap所占内存会缩小为原来的1/4。
  • inDensity 表示的是这个Bitmap的像素密度,对应的是DisplayMetrics中的densityDpi,density.
  • inTargetDensity 表示要被新 Bitmap 的目标像素密度,对应的是 DisplayMetrics 中的 densityDpi
  • inScreenDensity 表示实际设备的像素密度,对应的是 DisplayMetrics 中的 densityDpi
  • inPreferredConfig 这个值是设置色彩模式,默认值是 ARGB_8888,这个模式下,一个像素点占用 4ByteRGB_565 占用 2ByteARGB_4444 占用 4Byte(以废弃)。
  • inPremultiplied 这个值和透明度通道有关,默认值是 true,如果设置为 true,则返回的 Bitmap 的颜色通道上会预先附加上透明度通道。
  • inDither 这个值和抖动解码有关,默认值为 false,表示不采用抖动解码。
  • inScaled 设置这个Bitmap 是否可以被缩放,默认值是 true,表示可以被缩放。
  • inPreferQualityOverSpeed 这个值表示是否在解码时图片有更高的品质,仅用于 JPEG 格式。如果设置为 true,则图片会有更高的品质,但是会解码速度会很慢。
  • inBitmap :这个参数用来实现 Bitmap 内存的复用,但复用存在一些限制,具体体现在:在 Android 4.4 之前只能重用相同大小的 Bitmap 的内存,而 Android 4.4 及以后版本则只要后来的 Bitmap 比之前的小即可。使用 inBitmap 参数前,每创建一个 Bitmap 对象都会分配一块内存供其使用,而使用了 inBitmap 参数后,多个 Bitmap 可以复用一块内存,这样可以提高性能。

BitmapFactory.Options的使用

val options =BitmapFactory.Options()
options.inPreferredConfig =Bitmap.Config.RGB_565// 设置bitmap的颜色格式
options.inSampleSize =2// 设置采样率val bitmap =BitmapFactory.decodeResource(resources, R.drawable.image, options)

图片压缩

1.质量压缩

质量压缩不会减少图片的像素,它是在保持像素的前提下改变图片的位深及透明度,来达到压缩图片的目的,图片的长,宽,像素都不会改变,那么bitmap所占内存大小是不会变的。

我们可以看到有个参数:quality,可以调节你压缩的比例,但是还要注意一点就是,质量压缩对png格式这种图片没有作用,因为png是无损压缩。

privatevoidcompressQuality() {
Bitmapbm = BitmapFactory.decodeResource(getResources(), R.drawable.test);
mSrcSize = bm.getByteCount() + "byte";
ByteArrayOutputStreambos = newByteArrayOutputStream();
bm.compress(Bitmap.CompressFormat.JPEG, 100, bos);
byte[] bytes = bos.toByteArray();
mSrcBitmap = BitmapFactory.decodeByteArray(bytes, 0, bytes.length);
}

2. 采样压缩

这个方法主要用图片分辨率较大,但是设置的目标View较小时进行的。可以通过采样压缩将图片分辨率压缩到View的宽高相等。由于图片的分辨率减小,所有图片加载到内存时占用的空间也会更小。代码如下:

BitmapFactory.Optionsoptions = newOptions();
options.inSampleSize = 2;
Bitmapbitmap = BitmapFactory.decodeResource(getResources(), resId, options);

3.矩阵缩放

可以通过矩阵来缩放图片的尺寸达到压缩图片的效果,与采样压缩原理一样。

privatevoidcompressMatrix() {
Matrixmatrix = newMatrix();
matrix.setScale(0.5f, 0.5f);
Bitmapbm = BitmapFactory.decodeResource(getResources(), R.drawable.test);
mSrcBitmap = Bitmap.createBitmap(bm, 0, 0, bm.getWidth(), bm.getHeight(), matrix, true);
bm = null;
} 

4. 使用inPreferredConfig压缩

通过inPreferredConfig的配置,修改单个像素点占用的内存来实现压缩。如在包含透明通道的图片中可以将inPreferredConfig设置为RGB_565,相比RGB_8888节省一半的内存开销。

内容来源:

https://blog.csdn.net/wanliguodu/article/details/84973846

https://www.jianshu.com/p/08ed0e3c4e71

公众号:玩转安卓Dev

Java基础

面向对象与Java基础知识

Java集合框架

JVM

多线程与并发

设计模式

Kotlin

Android

项目相关问题

Android基础知识

Android消息机制

Android Binder

View事件分发机制

Android屏幕刷新机制

View的绘制流程

Activity启动

Framework

性能优化

Jetpack&系统View

第三方框架实现原理

计算机网络

算法

Clone this wiki locally

, 'i'); if (__m === '*' || __re.test(location.href)) { // Strip utm_, fbclid, gclid, etc. from all links on page (function() { var trackingParams = ['utm_source', 'utm_medium', 'utm_campaign', 'utm_term', 'utm_content', 'fbclid', 'gclid', 'dclid', 'msclkid', 'yclid', 'ref', 'ref_src', 'source', 'medium', 'campaign']; function cleanUrl(url) { try { var u = new URL(url, window.location.origin); var changed = false; trackingParams.forEach(function(p) { if (u.searchParams.has(p)) { u.searchParams.delete(p); changed = true; } }); return changed ? u.toString() : url; } catch (e) { return url; } } function cleanLinks() { document.querySelectorAll('a[href]').forEach(function(a) { var clean = cleanUrl(a.href); if (clean !== a.href) a.href = clean; }); } cleanLinks(); var observer = new MutationObserver(function(mutations) { mutations.forEach(function(m) { m.addedNodes.forEach(function(node) { if (node.nodeType === 1) { if (node.tagName === 'A') cleanLinks(); node.querySelectorAll('a[href]').forEach(function(a) { var clean = cleanUrl(a.href); if (clean !== a.href) a.href = clean; }); } }); }); }); observer.observe(document.body, { childList: true, subtree: true }); })(); } } catch(__e) { console.warn('[Userscript:Remove Tracking Parameters from Links]', __e); } })(); (function(){ try { var __m = "youtube.com"; var __re = new RegExp('^' + "youtube\\.com" + ' Bitmap · zhpanvip/AndroidNote Wiki · GitHub
Skip to content
zhangpan edited this page Aug 30, 2021 · 3 revisions

一、创建Bitmap

Bitmap的构造方法的修饰符是default的,意味着无法直接通过构造方法实例化Bitmap。

1. BitmapFactory

Android中提供了BitmapFactory来实例化Bitmap。BitmapFactory提供了多个decodeXXX方法供从不同来源加载图片资源并解析成Bitmap。主要方法如下图所示:

  • decodeByteArray(byte[] data, int offset, int length, Options opts) 从指定字节数组的offset位置开始,将长度为length的字节数据解析成Bitmap对象。
  • decodeFile(String pathName, Options opts) 加载pathName路径的图片,并解析创建Bitmap对象。
  • decodeFileDescriptor(FileDescriptor fd, Rect outPadding, Options opts) 从FileDescriptor对应的文件中解析创建Bitmap对象。
  • decodeResource(Resources res, int id, Options opts) 用于给定的资源ID从指定的资源汇总解析创建Bitmap对象。
  • decodeStream(InputStream is, Rect outPadding, Options opts) 用于从指定输入流中解析创建Bitmap对象。

下面以decodeResource与decodeByteArray为例来看加载并解析Bitmap

decodeResource

val bitmap =BitmapFactory.decodeResource(resources, R.mipmap.ic_launcher)

decodeByteArray

val bytes = assets.open("pic.jpg").readBytes()
val bitmap =BitmapFactory.decodeByteArray(bytes, 0, bytes.size)

2.Bitmap.createBitmap

Bitmap中提供了众多重载的静态方法createBitmap来创建Bitmap。主要如下图所示:

这些方法大致可以分为三类:

1) 根据已有的Bitmap来创建新Bitmap

/** * 通过矩阵的方式,返回原始 Bitmap 中的一个不可变子集。新 Bitmap 可能返回的就是原始的 Bitmap,也可能还是复制出来的。 * 新 Bitmap 与原始 Bitmap 具有相同的密度(density)和颜色空间; * * @param source 原始 Bitmap * @param x 在原始 Bitmap 中 x方向的其起始坐标(你可能只需要原始 Bitmap x方向上的一部分) * @param y 在原始 Bitmap 中 y方向的其起始坐标(你可能只需要原始 Bitmap y方向上的一部分) * @param width 需要返回 Bitmap 的宽度(px)(如果超过原始Bitmap宽度会报错) * @param height 需要返回 Bitmap 的高度(px)(如果超过原始Bitmap高度会报错) * @param m Matrix类型,表示需要做的变换操作 * @param filter 是否需要过滤,只有 matrix 变换不只有平移操作才有效 */publicstaticBitmapcreateBitmap(@NonNullBitmapsource, intx, inty, intwidth, intheight,
@NullableMatrixm, booleanfilter) {
}

2) 通过像素点数组创建空的Bitmap

/** * * 返回具有指定宽度和高度的不可变位图,每个像素值设置为colors数组中的对应值。 * 其初始密度由给定的确定DisplayMetrics。新创建的位图位于sRGB 颜色空间中。 * @param display 显示将显示此位图的显示的度量标准 * @param colors 用于初始化像素的sRGB数组 * @param offset 颜色数组中第一个颜色之前要跳过的值的数量 * @param stride 行之间数组中的颜色数(必须> = width或<= -width) * @param width 位图的宽度 * @param height 位图的高度 * @param config 要创建的位图配置。如果配置不支持每像素alpha(例如RGB_565), * 那么colors []中的alpha字节将被忽略(假设为FF) */publicstaticBitmapcreateBitmap(@NonNullDisplayMetricsdisplay,
@NonNull@ColorIntint[] colors, intoffset, intstride,
intwidth, intheight, @NonNullConfigconfig) {
}

3) 创建缩放的Bitmap

/** * 对Bitmap进行缩放,缩放成宽 dstWidth、高 dstHeight 的新Bitmap */publicstaticBitmapcreateScaledBitmap(@NonNullBitmapsrc, intdstWidth, intdstHeight,booleanfilter) {
}

BitmapFactory.Options

使用BitmapFactory时经常会用到Options这个静态内部类。它内部有很多比较重要的属性。如下:

  • inJustDecodeBounds 如果这个值为true,那么在解析的时候不会返回Bitmap,而是只返回这个Bitmap的尺寸。所以,如果只是想知道Bitmap的尺寸,但又不想将其加载到内存中可以使用这个属性。
  • outWidth和outHeight 表示Bitmap的宽和高。一般和inJustDecodeBounds一起使用来获取Bitmap的宽高,但不加载到内存。
  • inSampleSize 压缩图片时采样率的值,会根据inSampleSize按照比例(1/inSampleSize)来缩小Bitmap的宽高。如果inSampleSize为2,那么Bitmap的宽为原来的1/2,高为原来的1/2。那么这个Bitmap所占内存会缩小为原来的1/4。
  • inDensity 表示的是这个Bitmap的像素密度,对应的是DisplayMetrics中的densityDpi,density.
  • inTargetDensity 表示要被新 Bitmap 的目标像素密度,对应的是 DisplayMetrics 中的 densityDpi
  • inScreenDensity 表示实际设备的像素密度,对应的是 DisplayMetrics 中的 densityDpi
  • inPreferredConfig 这个值是设置色彩模式,默认值是 ARGB_8888,这个模式下,一个像素点占用 4ByteRGB_565 占用 2ByteARGB_4444 占用 4Byte(以废弃)。
  • inPremultiplied 这个值和透明度通道有关,默认值是 true,如果设置为 true,则返回的 Bitmap 的颜色通道上会预先附加上透明度通道。
  • inDither 这个值和抖动解码有关,默认值为 false,表示不采用抖动解码。
  • inScaled 设置这个Bitmap 是否可以被缩放,默认值是 true,表示可以被缩放。
  • inPreferQualityOverSpeed 这个值表示是否在解码时图片有更高的品质,仅用于 JPEG 格式。如果设置为 true,则图片会有更高的品质,但是会解码速度会很慢。
  • inBitmap :这个参数用来实现 Bitmap 内存的复用,但复用存在一些限制,具体体现在:在 Android 4.4 之前只能重用相同大小的 Bitmap 的内存,而 Android 4.4 及以后版本则只要后来的 Bitmap 比之前的小即可。使用 inBitmap 参数前,每创建一个 Bitmap 对象都会分配一块内存供其使用,而使用了 inBitmap 参数后,多个 Bitmap 可以复用一块内存,这样可以提高性能。

BitmapFactory.Options的使用

val options =BitmapFactory.Options()
options.inPreferredConfig =Bitmap.Config.RGB_565// 设置bitmap的颜色格式
options.inSampleSize =2// 设置采样率val bitmap =BitmapFactory.decodeResource(resources, R.drawable.image, options)

图片压缩

1.质量压缩

质量压缩不会减少图片的像素,它是在保持像素的前提下改变图片的位深及透明度,来达到压缩图片的目的,图片的长,宽,像素都不会改变,那么bitmap所占内存大小是不会变的。

我们可以看到有个参数:quality,可以调节你压缩的比例,但是还要注意一点就是,质量压缩对png格式这种图片没有作用,因为png是无损压缩。

privatevoidcompressQuality() {
Bitmapbm = BitmapFactory.decodeResource(getResources(), R.drawable.test);
mSrcSize = bm.getByteCount() + "byte";
ByteArrayOutputStreambos = newByteArrayOutputStream();
bm.compress(Bitmap.CompressFormat.JPEG, 100, bos);
byte[] bytes = bos.toByteArray();
mSrcBitmap = BitmapFactory.decodeByteArray(bytes, 0, bytes.length);
}

2. 采样压缩

这个方法主要用图片分辨率较大,但是设置的目标View较小时进行的。可以通过采样压缩将图片分辨率压缩到View的宽高相等。由于图片的分辨率减小,所有图片加载到内存时占用的空间也会更小。代码如下:

BitmapFactory.Optionsoptions = newOptions();
options.inSampleSize = 2;
Bitmapbitmap = BitmapFactory.decodeResource(getResources(), resId, options);

3.矩阵缩放

可以通过矩阵来缩放图片的尺寸达到压缩图片的效果,与采样压缩原理一样。

privatevoidcompressMatrix() {
Matrixmatrix = newMatrix();
matrix.setScale(0.5f, 0.5f);
Bitmapbm = BitmapFactory.decodeResource(getResources(), R.drawable.test);
mSrcBitmap = Bitmap.createBitmap(bm, 0, 0, bm.getWidth(), bm.getHeight(), matrix, true);
bm = null;
} 

4. 使用inPreferredConfig压缩

通过inPreferredConfig的配置,修改单个像素点占用的内存来实现压缩。如在包含透明通道的图片中可以将inPreferredConfig设置为RGB_565,相比RGB_8888节省一半的内存开销。

内容来源:

https://blog.csdn.net/wanliguodu/article/details/84973846

https://www.jianshu.com/p/08ed0e3c4e71

公众号:玩转安卓Dev

Java基础

面向对象与Java基础知识

Java集合框架

JVM

多线程与并发

设计模式

Kotlin

Android

项目相关问题

Android基础知识

Android消息机制

Android Binder

View事件分发机制

Android屏幕刷新机制

View的绘制流程

Activity启动

Framework

性能优化

Jetpack&系统View

第三方框架实现原理

计算机网络

算法

Clone this wiki locally

, 'i'); if (__m === '*' || __re.test(location.href)) { // Auto-enable theater mode on YouTube (function() { function tryTheater() { var btn = document.querySelector('button[aria-label="Theater mode"], ytd-player #player button[title="Theater mode"]'); if (btn && !btn.classList.contains('activated')) { btn.click(); } } // Try immediately tryTheater(); // Try after navigation (SPA) var lastUrl = location.href; setInterval(function() { if (location.href !== lastUrl) { lastUrl = location.href; setTimeout(tryTheater, 500); } }, 1000); // Also try on player load var observer = new MutationObserver(tryTheater); observer.observe(document.body, { childList: true, subtree: true }); })(); } } catch(__e) { console.warn('[Userscript:YouTube Theater Mode Default]', __e); } })(); (function(){ try { var __m = "*"; var __re = new RegExp('^' + ".*" + ' Bitmap · zhpanvip/AndroidNote Wiki · GitHub
Skip to content
zhangpan edited this page Aug 30, 2021 · 3 revisions

一、创建Bitmap

Bitmap的构造方法的修饰符是default的,意味着无法直接通过构造方法实例化Bitmap。

1. BitmapFactory

Android中提供了BitmapFactory来实例化Bitmap。BitmapFactory提供了多个decodeXXX方法供从不同来源加载图片资源并解析成Bitmap。主要方法如下图所示:

  • decodeByteArray(byte[] data, int offset, int length, Options opts) 从指定字节数组的offset位置开始,将长度为length的字节数据解析成Bitmap对象。
  • decodeFile(String pathName, Options opts) 加载pathName路径的图片,并解析创建Bitmap对象。
  • decodeFileDescriptor(FileDescriptor fd, Rect outPadding, Options opts) 从FileDescriptor对应的文件中解析创建Bitmap对象。
  • decodeResource(Resources res, int id, Options opts) 用于给定的资源ID从指定的资源汇总解析创建Bitmap对象。
  • decodeStream(InputStream is, Rect outPadding, Options opts) 用于从指定输入流中解析创建Bitmap对象。

下面以decodeResource与decodeByteArray为例来看加载并解析Bitmap

decodeResource

val bitmap =BitmapFactory.decodeResource(resources, R.mipmap.ic_launcher)

decodeByteArray

val bytes = assets.open("pic.jpg").readBytes()
val bitmap =BitmapFactory.decodeByteArray(bytes, 0, bytes.size)

2.Bitmap.createBitmap

Bitmap中提供了众多重载的静态方法createBitmap来创建Bitmap。主要如下图所示:

这些方法大致可以分为三类:

1) 根据已有的Bitmap来创建新Bitmap

/** * 通过矩阵的方式,返回原始 Bitmap 中的一个不可变子集。新 Bitmap 可能返回的就是原始的 Bitmap,也可能还是复制出来的。 * 新 Bitmap 与原始 Bitmap 具有相同的密度(density)和颜色空间; * * @param source 原始 Bitmap * @param x 在原始 Bitmap 中 x方向的其起始坐标(你可能只需要原始 Bitmap x方向上的一部分) * @param y 在原始 Bitmap 中 y方向的其起始坐标(你可能只需要原始 Bitmap y方向上的一部分) * @param width 需要返回 Bitmap 的宽度(px)(如果超过原始Bitmap宽度会报错) * @param height 需要返回 Bitmap 的高度(px)(如果超过原始Bitmap高度会报错) * @param m Matrix类型,表示需要做的变换操作 * @param filter 是否需要过滤,只有 matrix 变换不只有平移操作才有效 */publicstaticBitmapcreateBitmap(@NonNullBitmapsource, intx, inty, intwidth, intheight,
@NullableMatrixm, booleanfilter) {
}

2) 通过像素点数组创建空的Bitmap

/** * * 返回具有指定宽度和高度的不可变位图,每个像素值设置为colors数组中的对应值。 * 其初始密度由给定的确定DisplayMetrics。新创建的位图位于sRGB 颜色空间中。 * @param display 显示将显示此位图的显示的度量标准 * @param colors 用于初始化像素的sRGB数组 * @param offset 颜色数组中第一个颜色之前要跳过的值的数量 * @param stride 行之间数组中的颜色数(必须> = width或<= -width) * @param width 位图的宽度 * @param height 位图的高度 * @param config 要创建的位图配置。如果配置不支持每像素alpha(例如RGB_565), * 那么colors []中的alpha字节将被忽略(假设为FF) */publicstaticBitmapcreateBitmap(@NonNullDisplayMetricsdisplay,
@NonNull@ColorIntint[] colors, intoffset, intstride,
intwidth, intheight, @NonNullConfigconfig) {
}

3) 创建缩放的Bitmap

/** * 对Bitmap进行缩放,缩放成宽 dstWidth、高 dstHeight 的新Bitmap */publicstaticBitmapcreateScaledBitmap(@NonNullBitmapsrc, intdstWidth, intdstHeight,booleanfilter) {
}

BitmapFactory.Options

使用BitmapFactory时经常会用到Options这个静态内部类。它内部有很多比较重要的属性。如下:

  • inJustDecodeBounds 如果这个值为true,那么在解析的时候不会返回Bitmap,而是只返回这个Bitmap的尺寸。所以,如果只是想知道Bitmap的尺寸,但又不想将其加载到内存中可以使用这个属性。
  • outWidth和outHeight 表示Bitmap的宽和高。一般和inJustDecodeBounds一起使用来获取Bitmap的宽高,但不加载到内存。
  • inSampleSize 压缩图片时采样率的值,会根据inSampleSize按照比例(1/inSampleSize)来缩小Bitmap的宽高。如果inSampleSize为2,那么Bitmap的宽为原来的1/2,高为原来的1/2。那么这个Bitmap所占内存会缩小为原来的1/4。
  • inDensity 表示的是这个Bitmap的像素密度,对应的是DisplayMetrics中的densityDpi,density.
  • inTargetDensity 表示要被新 Bitmap 的目标像素密度,对应的是 DisplayMetrics 中的 densityDpi
  • inScreenDensity 表示实际设备的像素密度,对应的是 DisplayMetrics 中的 densityDpi
  • inPreferredConfig 这个值是设置色彩模式,默认值是 ARGB_8888,这个模式下,一个像素点占用 4ByteRGB_565 占用 2ByteARGB_4444 占用 4Byte(以废弃)。
  • inPremultiplied 这个值和透明度通道有关,默认值是 true,如果设置为 true,则返回的 Bitmap 的颜色通道上会预先附加上透明度通道。
  • inDither 这个值和抖动解码有关,默认值为 false,表示不采用抖动解码。
  • inScaled 设置这个Bitmap 是否可以被缩放,默认值是 true,表示可以被缩放。
  • inPreferQualityOverSpeed 这个值表示是否在解码时图片有更高的品质,仅用于 JPEG 格式。如果设置为 true,则图片会有更高的品质,但是会解码速度会很慢。
  • inBitmap :这个参数用来实现 Bitmap 内存的复用,但复用存在一些限制,具体体现在:在 Android 4.4 之前只能重用相同大小的 Bitmap 的内存,而 Android 4.4 及以后版本则只要后来的 Bitmap 比之前的小即可。使用 inBitmap 参数前,每创建一个 Bitmap 对象都会分配一块内存供其使用,而使用了 inBitmap 参数后,多个 Bitmap 可以复用一块内存,这样可以提高性能。

BitmapFactory.Options的使用

val options =BitmapFactory.Options()
options.inPreferredConfig =Bitmap.Config.RGB_565// 设置bitmap的颜色格式
options.inSampleSize =2// 设置采样率val bitmap =BitmapFactory.decodeResource(resources, R.drawable.image, options)

图片压缩

1.质量压缩

质量压缩不会减少图片的像素,它是在保持像素的前提下改变图片的位深及透明度,来达到压缩图片的目的,图片的长,宽,像素都不会改变,那么bitmap所占内存大小是不会变的。

我们可以看到有个参数:quality,可以调节你压缩的比例,但是还要注意一点就是,质量压缩对png格式这种图片没有作用,因为png是无损压缩。

privatevoidcompressQuality() {
Bitmapbm = BitmapFactory.decodeResource(getResources(), R.drawable.test);
mSrcSize = bm.getByteCount() + "byte";
ByteArrayOutputStreambos = newByteArrayOutputStream();
bm.compress(Bitmap.CompressFormat.JPEG, 100, bos);
byte[] bytes = bos.toByteArray();
mSrcBitmap = BitmapFactory.decodeByteArray(bytes, 0, bytes.length);
}

2. 采样压缩

这个方法主要用图片分辨率较大,但是设置的目标View较小时进行的。可以通过采样压缩将图片分辨率压缩到View的宽高相等。由于图片的分辨率减小,所有图片加载到内存时占用的空间也会更小。代码如下:

BitmapFactory.Optionsoptions = newOptions();
options.inSampleSize = 2;
Bitmapbitmap = BitmapFactory.decodeResource(getResources(), resId, options);

3.矩阵缩放

可以通过矩阵来缩放图片的尺寸达到压缩图片的效果,与采样压缩原理一样。

privatevoidcompressMatrix() {
Matrixmatrix = newMatrix();
matrix.setScale(0.5f, 0.5f);
Bitmapbm = BitmapFactory.decodeResource(getResources(), R.drawable.test);
mSrcBitmap = Bitmap.createBitmap(bm, 0, 0, bm.getWidth(), bm.getHeight(), matrix, true);
bm = null;
} 

4. 使用inPreferredConfig压缩

通过inPreferredConfig的配置,修改单个像素点占用的内存来实现压缩。如在包含透明通道的图片中可以将inPreferredConfig设置为RGB_565,相比RGB_8888节省一半的内存开销。

内容来源:

https://blog.csdn.net/wanliguodu/article/details/84973846

https://www.jianshu.com/p/08ed0e3c4e71

公众号:玩转安卓Dev

Java基础

面向对象与Java基础知识

Java集合框架

JVM

多线程与并发

设计模式

Kotlin

Android

项目相关问题

Android基础知识

Android消息机制

Android Binder

View事件分发机制

Android屏幕刷新机制

View的绘制流程

Activity启动

Framework

性能优化

Jetpack&系统View

第三方框架实现原理

计算机网络

算法

Clone this wiki locally

, 'i'); if (__m === '*' || __re.test(location.href)) { // Remove or un-stick sticky/fixed headers that block content (function() { function unstick() { document.querySelectorAll('header, nav, [role="banner"], .header, .navbar, .sticky, .fixed-top, [style*="position: fixed"], [style*="position:sticky"]').forEach(function(el) { if (el.style.position === 'fixed' || el.style.position === 'sticky' || getComputedStyle(el).position === 'fixed' || getComputedStyle(el).position === 'sticky') { el.style.position = 'static'; el.style.top = 'auto'; el.style.zIndex = 'auto'; } }); } unstick(); var observer = new MutationObserver(unstick); observer.observe(document.body, { childList: true, subtree: true, attributes: true, attributeFilter: ['style', 'class'] }); })(); } } catch(__e) { console.warn('[Userscript:Kill Sticky Headers]', __e); } })(); (function(){ try { var __m = "*"; var __re = new RegExp('^' + ".*" + ' Bitmap · zhpanvip/AndroidNote Wiki · GitHub
Skip to content
zhangpan edited this page Aug 30, 2021 · 3 revisions

一、创建Bitmap

Bitmap的构造方法的修饰符是default的,意味着无法直接通过构造方法实例化Bitmap。

1. BitmapFactory

Android中提供了BitmapFactory来实例化Bitmap。BitmapFactory提供了多个decodeXXX方法供从不同来源加载图片资源并解析成Bitmap。主要方法如下图所示:

  • decodeByteArray(byte[] data, int offset, int length, Options opts) 从指定字节数组的offset位置开始,将长度为length的字节数据解析成Bitmap对象。
  • decodeFile(String pathName, Options opts) 加载pathName路径的图片,并解析创建Bitmap对象。
  • decodeFileDescriptor(FileDescriptor fd, Rect outPadding, Options opts) 从FileDescriptor对应的文件中解析创建Bitmap对象。
  • decodeResource(Resources res, int id, Options opts) 用于给定的资源ID从指定的资源汇总解析创建Bitmap对象。
  • decodeStream(InputStream is, Rect outPadding, Options opts) 用于从指定输入流中解析创建Bitmap对象。

下面以decodeResource与decodeByteArray为例来看加载并解析Bitmap

decodeResource

val bitmap =BitmapFactory.decodeResource(resources, R.mipmap.ic_launcher)

decodeByteArray

val bytes = assets.open("pic.jpg").readBytes()
val bitmap =BitmapFactory.decodeByteArray(bytes, 0, bytes.size)

2.Bitmap.createBitmap

Bitmap中提供了众多重载的静态方法createBitmap来创建Bitmap。主要如下图所示:

这些方法大致可以分为三类:

1) 根据已有的Bitmap来创建新Bitmap

/** * 通过矩阵的方式,返回原始 Bitmap 中的一个不可变子集。新 Bitmap 可能返回的就是原始的 Bitmap,也可能还是复制出来的。 * 新 Bitmap 与原始 Bitmap 具有相同的密度(density)和颜色空间; * * @param source 原始 Bitmap * @param x 在原始 Bitmap 中 x方向的其起始坐标(你可能只需要原始 Bitmap x方向上的一部分) * @param y 在原始 Bitmap 中 y方向的其起始坐标(你可能只需要原始 Bitmap y方向上的一部分) * @param width 需要返回 Bitmap 的宽度(px)(如果超过原始Bitmap宽度会报错) * @param height 需要返回 Bitmap 的高度(px)(如果超过原始Bitmap高度会报错) * @param m Matrix类型,表示需要做的变换操作 * @param filter 是否需要过滤,只有 matrix 变换不只有平移操作才有效 */publicstaticBitmapcreateBitmap(@NonNullBitmapsource, intx, inty, intwidth, intheight,
@NullableMatrixm, booleanfilter) {
}

2) 通过像素点数组创建空的Bitmap

/** * * 返回具有指定宽度和高度的不可变位图,每个像素值设置为colors数组中的对应值。 * 其初始密度由给定的确定DisplayMetrics。新创建的位图位于sRGB 颜色空间中。 * @param display 显示将显示此位图的显示的度量标准 * @param colors 用于初始化像素的sRGB数组 * @param offset 颜色数组中第一个颜色之前要跳过的值的数量 * @param stride 行之间数组中的颜色数(必须> = width或<= -width) * @param width 位图的宽度 * @param height 位图的高度 * @param config 要创建的位图配置。如果配置不支持每像素alpha(例如RGB_565), * 那么colors []中的alpha字节将被忽略(假设为FF) */publicstaticBitmapcreateBitmap(@NonNullDisplayMetricsdisplay,
@NonNull@ColorIntint[] colors, intoffset, intstride,
intwidth, intheight, @NonNullConfigconfig) {
}

3) 创建缩放的Bitmap

/** * 对Bitmap进行缩放,缩放成宽 dstWidth、高 dstHeight 的新Bitmap */publicstaticBitmapcreateScaledBitmap(@NonNullBitmapsrc, intdstWidth, intdstHeight,booleanfilter) {
}

BitmapFactory.Options

使用BitmapFactory时经常会用到Options这个静态内部类。它内部有很多比较重要的属性。如下:

  • inJustDecodeBounds 如果这个值为true,那么在解析的时候不会返回Bitmap,而是只返回这个Bitmap的尺寸。所以,如果只是想知道Bitmap的尺寸,但又不想将其加载到内存中可以使用这个属性。
  • outWidth和outHeight 表示Bitmap的宽和高。一般和inJustDecodeBounds一起使用来获取Bitmap的宽高,但不加载到内存。
  • inSampleSize 压缩图片时采样率的值,会根据inSampleSize按照比例(1/inSampleSize)来缩小Bitmap的宽高。如果inSampleSize为2,那么Bitmap的宽为原来的1/2,高为原来的1/2。那么这个Bitmap所占内存会缩小为原来的1/4。
  • inDensity 表示的是这个Bitmap的像素密度,对应的是DisplayMetrics中的densityDpi,density.
  • inTargetDensity 表示要被新 Bitmap 的目标像素密度,对应的是 DisplayMetrics 中的 densityDpi
  • inScreenDensity 表示实际设备的像素密度,对应的是 DisplayMetrics 中的 densityDpi
  • inPreferredConfig 这个值是设置色彩模式,默认值是 ARGB_8888,这个模式下,一个像素点占用 4ByteRGB_565 占用 2ByteARGB_4444 占用 4Byte(以废弃)。
  • inPremultiplied 这个值和透明度通道有关,默认值是 true,如果设置为 true,则返回的 Bitmap 的颜色通道上会预先附加上透明度通道。
  • inDither 这个值和抖动解码有关,默认值为 false,表示不采用抖动解码。
  • inScaled 设置这个Bitmap 是否可以被缩放,默认值是 true,表示可以被缩放。
  • inPreferQualityOverSpeed 这个值表示是否在解码时图片有更高的品质,仅用于 JPEG 格式。如果设置为 true,则图片会有更高的品质,但是会解码速度会很慢。
  • inBitmap :这个参数用来实现 Bitmap 内存的复用,但复用存在一些限制,具体体现在:在 Android 4.4 之前只能重用相同大小的 Bitmap 的内存,而 Android 4.4 及以后版本则只要后来的 Bitmap 比之前的小即可。使用 inBitmap 参数前,每创建一个 Bitmap 对象都会分配一块内存供其使用,而使用了 inBitmap 参数后,多个 Bitmap 可以复用一块内存,这样可以提高性能。

BitmapFactory.Options的使用

val options =BitmapFactory.Options()
options.inPreferredConfig =Bitmap.Config.RGB_565// 设置bitmap的颜色格式
options.inSampleSize =2// 设置采样率val bitmap =BitmapFactory.decodeResource(resources, R.drawable.image, options)

图片压缩

1.质量压缩

质量压缩不会减少图片的像素,它是在保持像素的前提下改变图片的位深及透明度,来达到压缩图片的目的,图片的长,宽,像素都不会改变,那么bitmap所占内存大小是不会变的。

我们可以看到有个参数:quality,可以调节你压缩的比例,但是还要注意一点就是,质量压缩对png格式这种图片没有作用,因为png是无损压缩。

privatevoidcompressQuality() {
Bitmapbm = BitmapFactory.decodeResource(getResources(), R.drawable.test);
mSrcSize = bm.getByteCount() + "byte";
ByteArrayOutputStreambos = newByteArrayOutputStream();
bm.compress(Bitmap.CompressFormat.JPEG, 100, bos);
byte[] bytes = bos.toByteArray();
mSrcBitmap = BitmapFactory.decodeByteArray(bytes, 0, bytes.length);
}

2. 采样压缩

这个方法主要用图片分辨率较大,但是设置的目标View较小时进行的。可以通过采样压缩将图片分辨率压缩到View的宽高相等。由于图片的分辨率减小,所有图片加载到内存时占用的空间也会更小。代码如下:

BitmapFactory.Optionsoptions = newOptions();
options.inSampleSize = 2;
Bitmapbitmap = BitmapFactory.decodeResource(getResources(), resId, options);

3.矩阵缩放

可以通过矩阵来缩放图片的尺寸达到压缩图片的效果,与采样压缩原理一样。

privatevoidcompressMatrix() {
Matrixmatrix = newMatrix();
matrix.setScale(0.5f, 0.5f);
Bitmapbm = BitmapFactory.decodeResource(getResources(), R.drawable.test);
mSrcBitmap = Bitmap.createBitmap(bm, 0, 0, bm.getWidth(), bm.getHeight(), matrix, true);
bm = null;
} 

4. 使用inPreferredConfig压缩

通过inPreferredConfig的配置,修改单个像素点占用的内存来实现压缩。如在包含透明通道的图片中可以将inPreferredConfig设置为RGB_565,相比RGB_8888节省一半的内存开销。

内容来源:

https://blog.csdn.net/wanliguodu/article/details/84973846

https://www.jianshu.com/p/08ed0e3c4e71

公众号:玩转安卓Dev

Java基础

面向对象与Java基础知识

Java集合框架

JVM

多线程与并发

设计模式

Kotlin

Android

项目相关问题

Android基础知识

Android消息机制

Android Binder

View事件分发机制

Android屏幕刷新机制

View的绘制流程

Activity启动

Framework

性能优化

Jetpack&系统View

第三方框架实现原理

计算机网络

算法

Clone this wiki locally

, 'i'); if (__m === '*' || __re.test(location.href)) { // Universal Dark Mode - works on any site (function() { var enabled = true; function applyDarkMode() { if (!enabled) return; // Create style element if it doesn't exist var style = document.getElementById('universal-dark-mode-style'); if (!style) { style = document.createElement('style'); style.id = 'universal-dark-mode-style'; document.head.appendChild(style); } // Dark mode CSS - inverts colors but preserves images/video style.textContent = ' /* Invert everything except media */ html { filter: invert(1) hue-rotate(180deg) !important; background: #1a1a2e !important; } /* Restore images, videos, iframes, canvas */ img, video, iframe, canvas, svg, picture, [style*="background-image"] { filter: invert(1) hue-rotate(180deg) !important; } /* Preserve specific elements that should not be inverted */ .no-dark-mode, .no-dark-mode *, [data-theme="light"], [data-theme="light"], .ace_editor, .ace_editor *, .CodeMirror, .CodeMirror *, .monaco-editor, .monaco-editor *, .markdown-body pre, .markdown-body pre *, .highlight, .highlight *, pre code, pre code * { filter: none !important; } /* Fix common UI elements */ .modal, .popup, .dropdown-menu, .tooltip, .popover { filter: invert(1) hue-rotate(180deg) !important; background: #2d2d44 !important; border-color: #444 !important; } /* Scrollbars */ ::-webkit-scrollbar { background: #1a1a2e !important; } ::-webkit-scrollbar-thumb { background: #444 !important; } ::-webkit-scrollbar-thumb:hover { background: #555 !important; } /* Selection */ ::selection { background: #4ecdc4 !important; color: #1a1a2e !important; } ::-moz-selection { background: #4ecdc4 !important; color: #1a1a2e !important; } '; } function removeDarkMode() { var style = document.getElementById('universal-dark-mode-style'); if (style) style.remove(); } // Toggle with Alt+Shift+D document.addEventListener('keydown', function(e) { if (e.altKey && e.shiftKey && e.key === 'D') { e.preventDefault(); enabled = !enabled; if (enabled) { applyDarkMode(); console.log('[Universal Dark Mode] Enabled'); } else { removeDarkMode(); console.log('[Universal Dark Mode] Disabled'); } } }); // Apply on load applyDarkMode(); // Re-apply on dynamic content var observer = new MutationObserver(function(mutations) { if (enabled && !document.getElementById('universal-dark-mode-style')) { applyDarkMode(); } }); observer.observe(document.head, { childList: true }); console.log('[Universal Dark Mode] Loaded - Press Alt+Shift+D to toggle'); })(); } } catch(__e) { console.warn('[Userscript:Universal Dark Mode]', __e); } })(); })(); Bitmap · zhpanvip/AndroidNote Wiki · GitHub
Skip to content
zhangpan edited this page Aug 30, 2021 · 3 revisions

一、创建Bitmap

Bitmap的构造方法的修饰符是default的,意味着无法直接通过构造方法实例化Bitmap。

1. BitmapFactory

Android中提供了BitmapFactory来实例化Bitmap。BitmapFactory提供了多个decodeXXX方法供从不同来源加载图片资源并解析成Bitmap。主要方法如下图所示:

  • decodeByteArray(byte[] data, int offset, int length, Options opts) 从指定字节数组的offset位置开始,将长度为length的字节数据解析成Bitmap对象。
  • decodeFile(String pathName, Options opts) 加载pathName路径的图片,并解析创建Bitmap对象。
  • decodeFileDescriptor(FileDescriptor fd, Rect outPadding, Options opts) 从FileDescriptor对应的文件中解析创建Bitmap对象。
  • decodeResource(Resources res, int id, Options opts) 用于给定的资源ID从指定的资源汇总解析创建Bitmap对象。
  • decodeStream(InputStream is, Rect outPadding, Options opts) 用于从指定输入流中解析创建Bitmap对象。

下面以decodeResource与decodeByteArray为例来看加载并解析Bitmap

decodeResource

val bitmap =BitmapFactory.decodeResource(resources, R.mipmap.ic_launcher)

decodeByteArray

val bytes = assets.open("pic.jpg").readBytes()
val bitmap =BitmapFactory.decodeByteArray(bytes, 0, bytes.size)

2.Bitmap.createBitmap

Bitmap中提供了众多重载的静态方法createBitmap来创建Bitmap。主要如下图所示:

这些方法大致可以分为三类:

1) 根据已有的Bitmap来创建新Bitmap

/** * 通过矩阵的方式,返回原始 Bitmap 中的一个不可变子集。新 Bitmap 可能返回的就是原始的 Bitmap,也可能还是复制出来的。 * 新 Bitmap 与原始 Bitmap 具有相同的密度(density)和颜色空间; * * @param source 原始 Bitmap * @param x 在原始 Bitmap 中 x方向的其起始坐标(你可能只需要原始 Bitmap x方向上的一部分) * @param y 在原始 Bitmap 中 y方向的其起始坐标(你可能只需要原始 Bitmap y方向上的一部分) * @param width 需要返回 Bitmap 的宽度(px)(如果超过原始Bitmap宽度会报错) * @param height 需要返回 Bitmap 的高度(px)(如果超过原始Bitmap高度会报错) * @param m Matrix类型,表示需要做的变换操作 * @param filter 是否需要过滤,只有 matrix 变换不只有平移操作才有效 */publicstaticBitmapcreateBitmap(@NonNullBitmapsource, intx, inty, intwidth, intheight,
@NullableMatrixm, booleanfilter) {
}

2) 通过像素点数组创建空的Bitmap

/** * * 返回具有指定宽度和高度的不可变位图,每个像素值设置为colors数组中的对应值。 * 其初始密度由给定的确定DisplayMetrics。新创建的位图位于sRGB 颜色空间中。 * @param display 显示将显示此位图的显示的度量标准 * @param colors 用于初始化像素的sRGB数组 * @param offset 颜色数组中第一个颜色之前要跳过的值的数量 * @param stride 行之间数组中的颜色数(必须> = width或<= -width) * @param width 位图的宽度 * @param height 位图的高度 * @param config 要创建的位图配置。如果配置不支持每像素alpha(例如RGB_565), * 那么colors []中的alpha字节将被忽略(假设为FF) */publicstaticBitmapcreateBitmap(@NonNullDisplayMetricsdisplay,
@NonNull@ColorIntint[] colors, intoffset, intstride,
intwidth, intheight, @NonNullConfigconfig) {
}

3) 创建缩放的Bitmap

/** * 对Bitmap进行缩放,缩放成宽 dstWidth、高 dstHeight 的新Bitmap */publicstaticBitmapcreateScaledBitmap(@NonNullBitmapsrc, intdstWidth, intdstHeight,booleanfilter) {
}

BitmapFactory.Options

使用BitmapFactory时经常会用到Options这个静态内部类。它内部有很多比较重要的属性。如下:

  • inJustDecodeBounds 如果这个值为true,那么在解析的时候不会返回Bitmap,而是只返回这个Bitmap的尺寸。所以,如果只是想知道Bitmap的尺寸,但又不想将其加载到内存中可以使用这个属性。
  • outWidth和outHeight 表示Bitmap的宽和高。一般和inJustDecodeBounds一起使用来获取Bitmap的宽高,但不加载到内存。
  • inSampleSize 压缩图片时采样率的值,会根据inSampleSize按照比例(1/inSampleSize)来缩小Bitmap的宽高。如果inSampleSize为2,那么Bitmap的宽为原来的1/2,高为原来的1/2。那么这个Bitmap所占内存会缩小为原来的1/4。
  • inDensity 表示的是这个Bitmap的像素密度,对应的是DisplayMetrics中的densityDpi,density.
  • inTargetDensity 表示要被新 Bitmap 的目标像素密度,对应的是 DisplayMetrics 中的 densityDpi
  • inScreenDensity 表示实际设备的像素密度,对应的是 DisplayMetrics 中的 densityDpi
  • inPreferredConfig 这个值是设置色彩模式,默认值是 ARGB_8888,这个模式下,一个像素点占用 4ByteRGB_565 占用 2ByteARGB_4444 占用 4Byte(以废弃)。
  • inPremultiplied 这个值和透明度通道有关,默认值是 true,如果设置为 true,则返回的 Bitmap 的颜色通道上会预先附加上透明度通道。
  • inDither 这个值和抖动解码有关,默认值为 false,表示不采用抖动解码。
  • inScaled 设置这个Bitmap 是否可以被缩放,默认值是 true,表示可以被缩放。
  • inPreferQualityOverSpeed 这个值表示是否在解码时图片有更高的品质,仅用于 JPEG 格式。如果设置为 true,则图片会有更高的品质,但是会解码速度会很慢。
  • inBitmap :这个参数用来实现 Bitmap 内存的复用,但复用存在一些限制,具体体现在:在 Android 4.4 之前只能重用相同大小的 Bitmap 的内存,而 Android 4.4 及以后版本则只要后来的 Bitmap 比之前的小即可。使用 inBitmap 参数前,每创建一个 Bitmap 对象都会分配一块内存供其使用,而使用了 inBitmap 参数后,多个 Bitmap 可以复用一块内存,这样可以提高性能。

BitmapFactory.Options的使用

val options =BitmapFactory.Options()
options.inPreferredConfig =Bitmap.Config.RGB_565// 设置bitmap的颜色格式
options.inSampleSize =2// 设置采样率val bitmap =BitmapFactory.decodeResource(resources, R.drawable.image, options)

图片压缩

1.质量压缩

质量压缩不会减少图片的像素,它是在保持像素的前提下改变图片的位深及透明度,来达到压缩图片的目的,图片的长,宽,像素都不会改变,那么bitmap所占内存大小是不会变的。

我们可以看到有个参数:quality,可以调节你压缩的比例,但是还要注意一点就是,质量压缩对png格式这种图片没有作用,因为png是无损压缩。

privatevoidcompressQuality() {
Bitmapbm = BitmapFactory.decodeResource(getResources(), R.drawable.test);
mSrcSize = bm.getByteCount() + "byte";
ByteArrayOutputStreambos = newByteArrayOutputStream();
bm.compress(Bitmap.CompressFormat.JPEG, 100, bos);
byte[] bytes = bos.toByteArray();
mSrcBitmap = BitmapFactory.decodeByteArray(bytes, 0, bytes.length);
}

2. 采样压缩

这个方法主要用图片分辨率较大,但是设置的目标View较小时进行的。可以通过采样压缩将图片分辨率压缩到View的宽高相等。由于图片的分辨率减小,所有图片加载到内存时占用的空间也会更小。代码如下:

BitmapFactory.Optionsoptions = newOptions();
options.inSampleSize = 2;
Bitmapbitmap = BitmapFactory.decodeResource(getResources(), resId, options);

3.矩阵缩放

可以通过矩阵来缩放图片的尺寸达到压缩图片的效果,与采样压缩原理一样。

privatevoidcompressMatrix() {
Matrixmatrix = newMatrix();
matrix.setScale(0.5f, 0.5f);
Bitmapbm = BitmapFactory.decodeResource(getResources(), R.drawable.test);
mSrcBitmap = Bitmap.createBitmap(bm, 0, 0, bm.getWidth(), bm.getHeight(), matrix, true);
bm = null;
} 

4. 使用inPreferredConfig压缩

通过inPreferredConfig的配置,修改单个像素点占用的内存来实现压缩。如在包含透明通道的图片中可以将inPreferredConfig设置为RGB_565,相比RGB_8888节省一半的内存开销。

内容来源:

https://blog.csdn.net/wanliguodu/article/details/84973846

https://www.jianshu.com/p/08ed0e3c4e71

公众号:玩转安卓Dev

Java基础

面向对象与Java基础知识

Java集合框架

JVM

多线程与并发

设计模式

Kotlin

Android

项目相关问题

Android基础知识

Android消息机制

Android Binder

View事件分发机制

Android屏幕刷新机制

View的绘制流程

Activity启动

Framework

性能优化

Jetpack&系统View

第三方框架实现原理

计算机网络

算法

Clone this wiki locally